Opitec 106.061 User manual

1
E106061#1
106.061
Weather vane with
wind turbine
Parts list
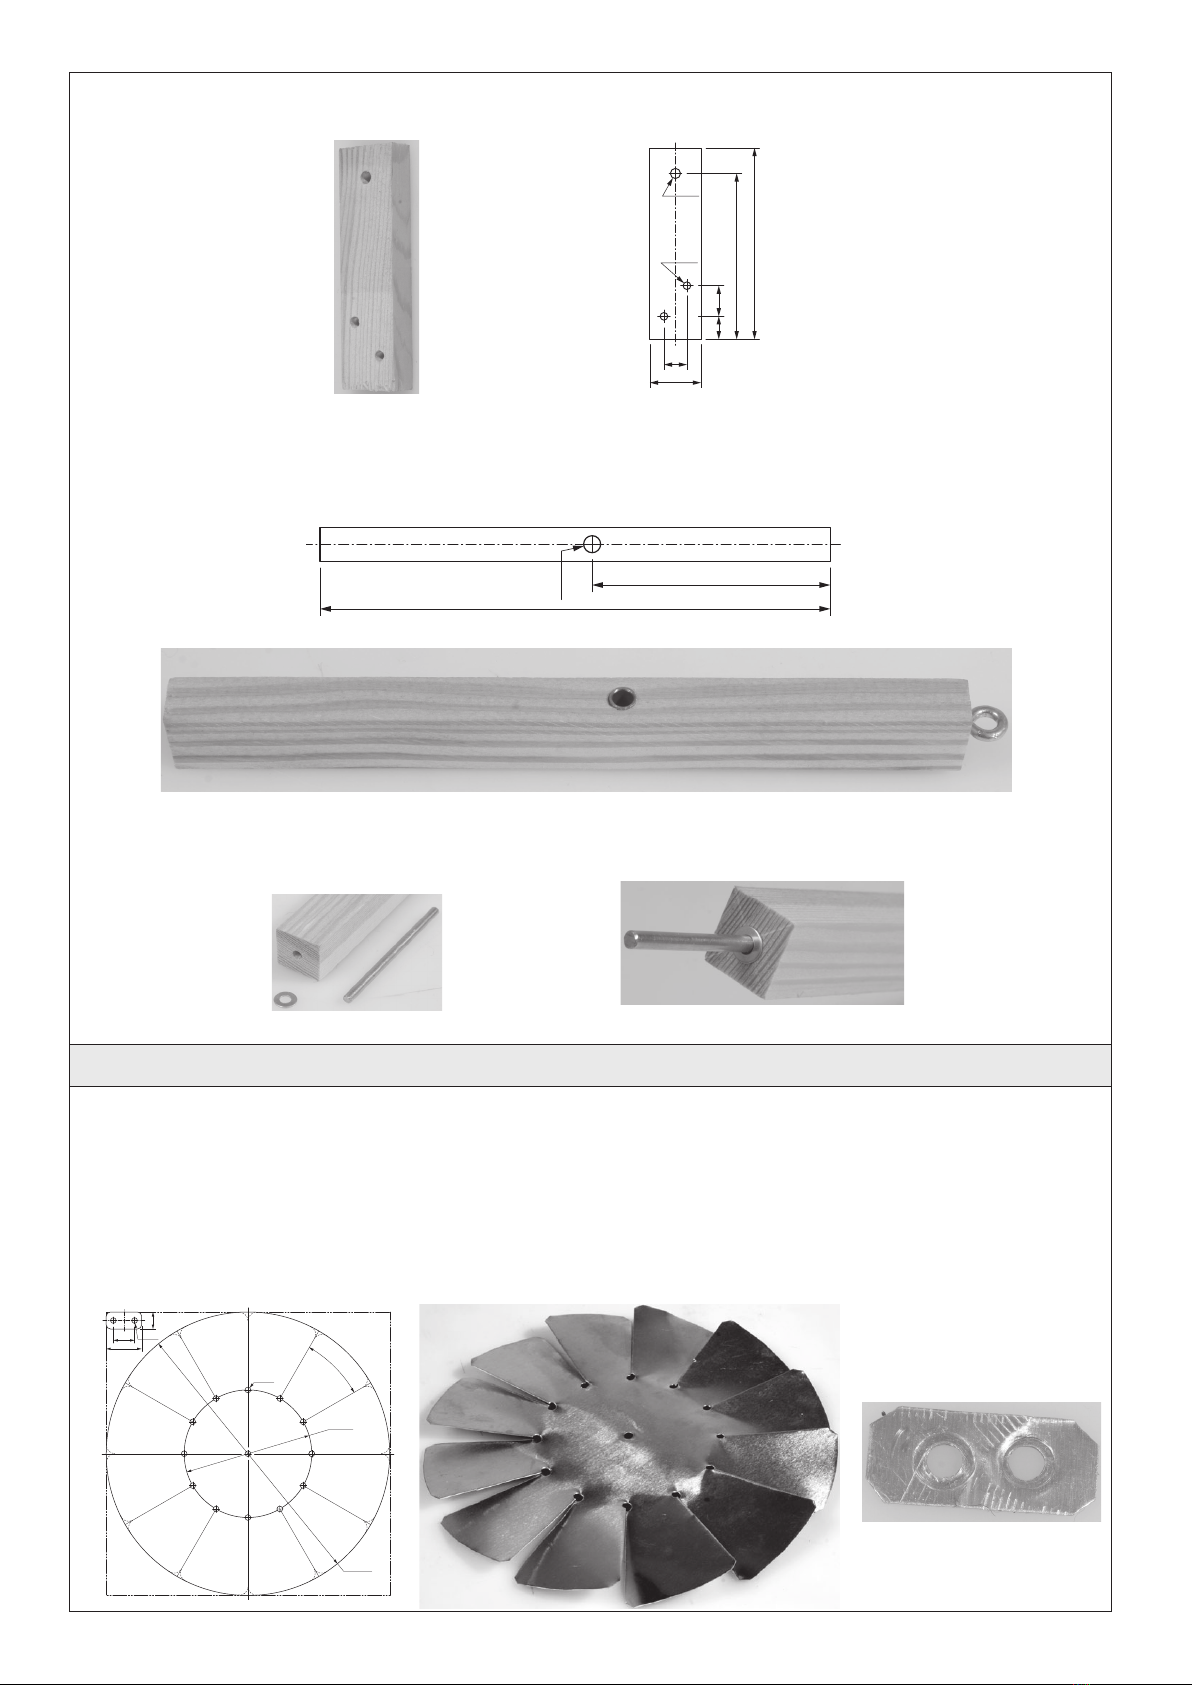
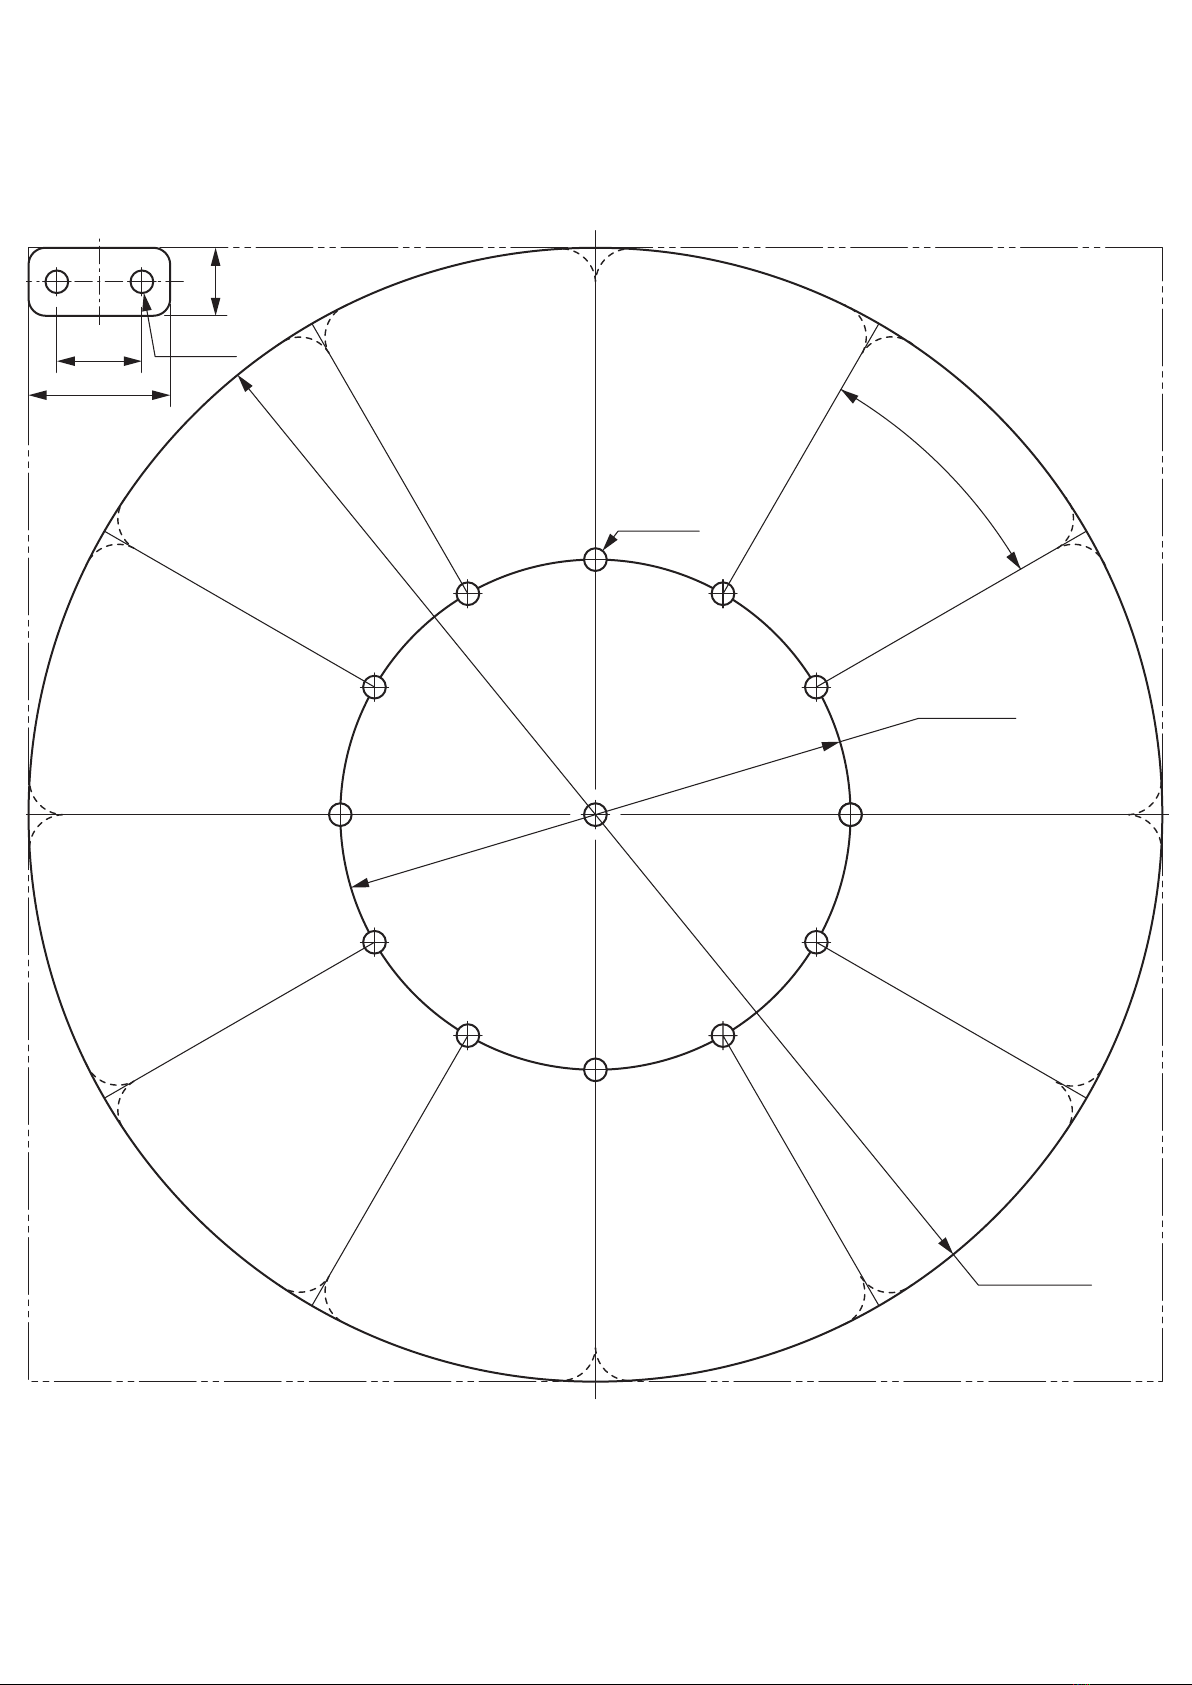
2 x Alu sheet 0,3 x 200 x 200 mm Wind turbine
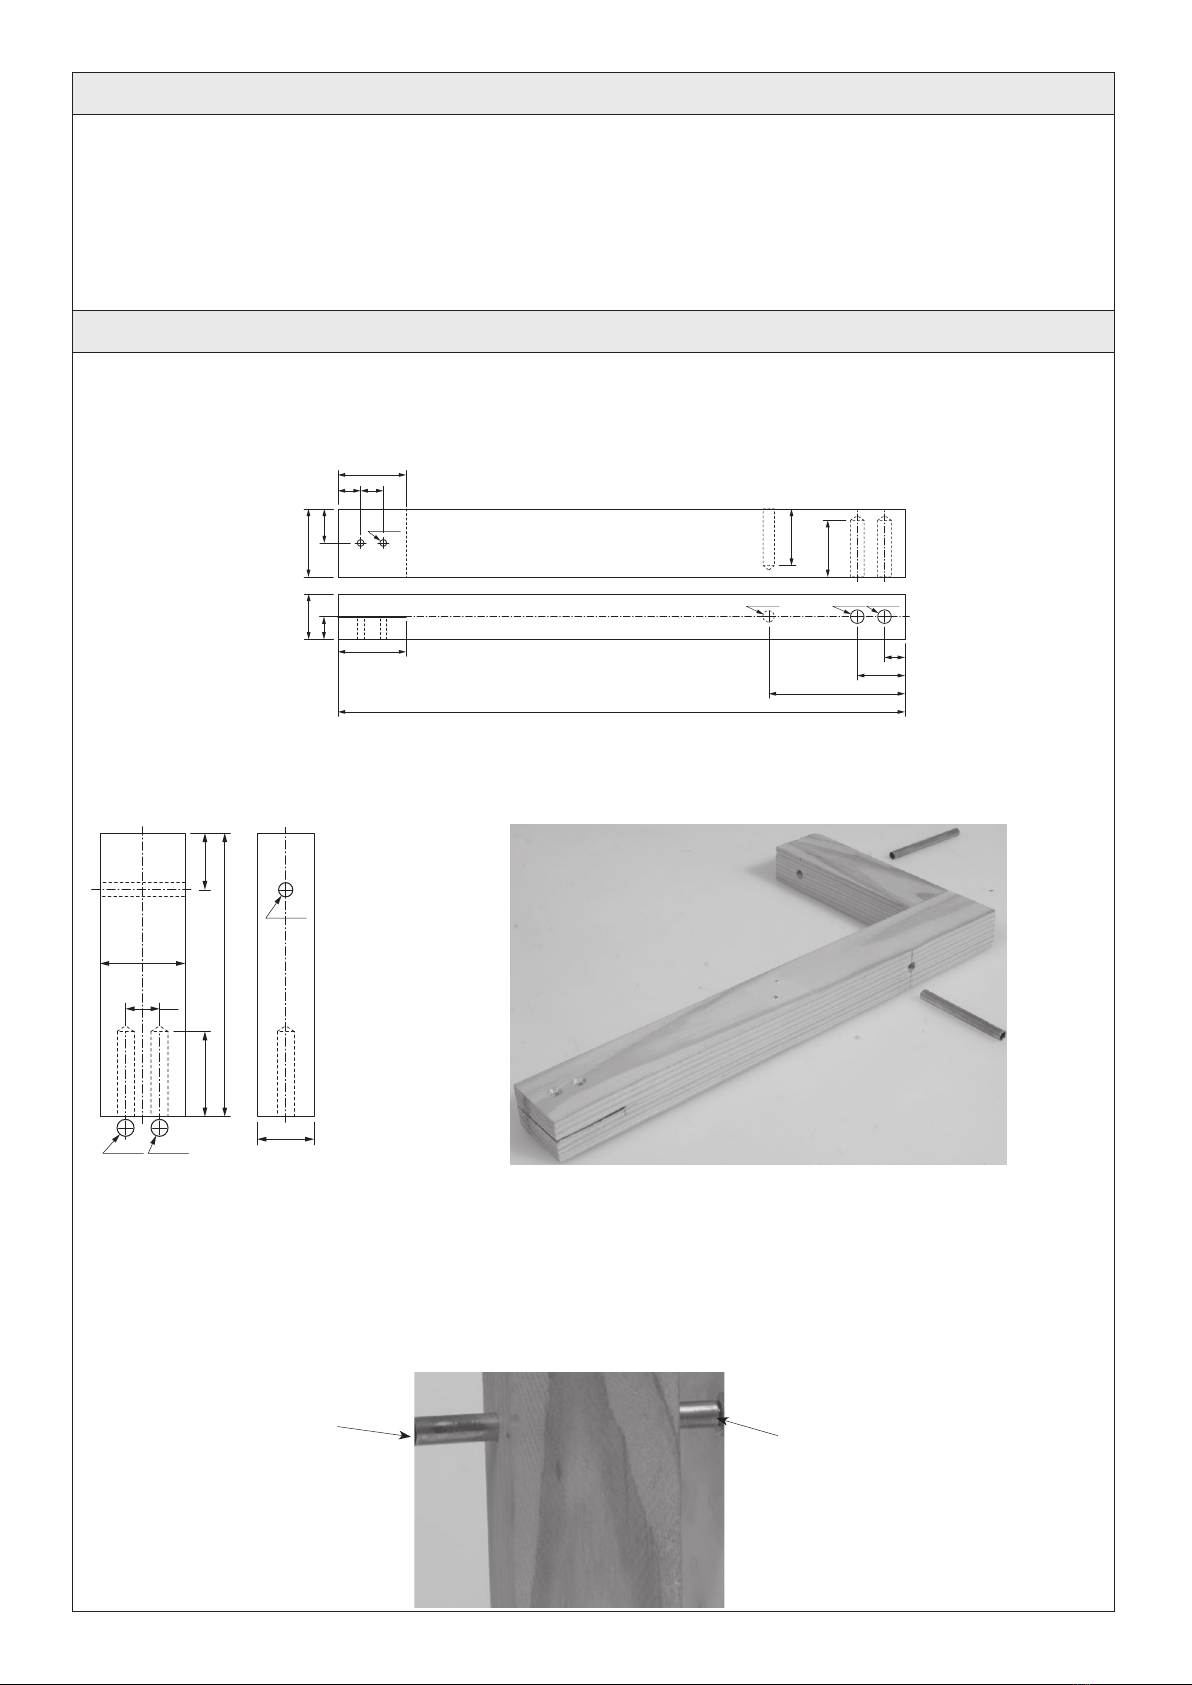
1 x Pine strip 20 x 20 x 350mm Bearing
1 x Pine strip 10 x 20 x 150mm Bearing block
1 x Pine strip 10 x 15 x 150mm Base
1 x Pine strip 20 x 30 x 250mm Frame
1 x Pine strip 20 x 30x 100mm Frame
1 x Brass tube 5dia/0,5 x 245mm Bush
10 x Nuts M4
10 x Washers M4
1 x Screw eye 12mm
2 x Pine dowel dia 6 x 50mm Dowel
1 x Brass rod dia 4 x 68mm Bearing
1 x Welding rod dia 2 x 100mm Rod
1 x Machine screw M4 x 70mm
1 x Machine screw M4 x 50mm
1 x Machine screw M4 x 20mm
2 x Grub screws 2,9 x 9,5mm
6 x Wood screws 3 x 20mm
Necessary tools and equipment
Ruler, compass, pencil
Sandpaper
Metal shears
Spanner (M4)
Screwdrivers slot and cross
Drills 3mm dia + 4 + 5mm
Hacksaw
File
Paint & brush
Please Note
The OPITEC range of projects is not intended as play
toys for young children.They are teaching aids for
young people learning the skills of Craft, Design and
Technolo- gy.These projects should only be underta-
ken and tested with the guidance of a fully qualified
adult. The finished projects are not suitable to give to
children under 3 years old. Some parts can be swallo-
wed. Dan- ger of suffocation!

2E106061#1
5.Instructions
5.1 Making the frame and bearing block
5.2 Making the turbine, cockerel, tail and mechanism
5.3 Mounting the single parts
5 .4 Function control
5.1 Making the frame and bearing block
5.1.1 Mark out & drill the blind holes 6 & 5mm diameter as in the drawing (See page 6 ) each 25mm deep in the
pine strip 20x 30x 250mm. At the other end saw a 30mm deep slot for the tail vane.
Finally drill 2 holes 3mm dia as shown in the drawing (See page 6). Sand to finish.
5.1.2 Mark out & drill the 6mm diameter blind hole ( See page 6) in the pine strip 20 x 30 x 100mm. At the other
end drill the 5mm diameter hole for the bearing- sand to finish.
.
5.1.3 Join the two together with the 6dia x 50mm dowel.
Use a cramp to press them together.
5.1.4 Saw from the brass tube 5dia x 245 a 55mm and a 4mm long piece. File the ends clean
Finally place the 45mm long piece as bearing in the long pine strip. Then the 55mm long piece as a bearing
in the shorter piece so that ca 15mm protrudes to the front.
( See photo)
25
25
9
21
60
250
30
30
Ø 3
10 10
30
15
10
Ø 5 Ø 6Ø 6
20
30 20
100
Ø 6 Ø 6
Ø 5
12
30
20
ca. 15 mm ca. 10 mm

3
E106061#1
5.1.5 Saw the wood strip 10 x 20 x 150 in half. Then mark out and drill the holes 3dia & 4mm as shown ( See page 6)
5.1.6 Mark out and drill the 5mm hole in the side of the pine strip 10 x 15 x 150mm
Saw 17mm from the remaining brass tube. Remove burr ( File ) from the ends of the tube . Now inset the
tube in the 5mm hole. Insert a ring screw in the end nearest the hole. (See photo )
5.1.7 Drill the bearing block 20 x 20 x 350mm at one end, 4mm dia x 20mm deep
Insert the 4dia x 68mm brass rod in the hole and then add a washer ( So that the turbine will turn easier )
5.2 Making the Turbine, Cockerel, Tail and mechanism
5.21 Trace the drawings ( See page 7) for the turbine & joiner on to the aluminium sheet.
Centre punch all the holes and drill them 4mm dia around and in the middle of the turbine fan. Cut out the
shape with metal shears. Cut out the vanes and round off the corners
- Remove any sharp burr ! Twist the vanes at angle 25-30 degrees
Note: Be careful of any sharp metal edges !!
Cut out the joiner and file smooth
65
75
9 12
20
Ø 3
Ø 4
9
ca.
70
150
Ø 5
Ø 4
25
12
15
Ø 90
Ø 200
30°
Ø 4

4E106061#1
5.2.2 Trace the shape of the cockerel and the tail ( See page 9 ) on the second aluminium sheet. Centre punch all
the middle points. Now cut out the shapes with shears. Remove any burr.
Note! The cockerel is only and idea –you can of course design your own motif
Drill the holes for the screws making sure that they are horizontal
5.2.3 Bend the connecting rod from the welding rod as shown in the plan
5.3 Mounting the single parts
5.3.1 Place the machine screw 4 x70mm through the turbine and tighten it with a nut
Insert the screw through the bearing on the frame ( Shorter piece) now add two lock nuts and contra tighten
them so that the turbine turns easily then add on the joiner , Tighten with a nut
Machine screw 4 x 20 mm in the free hole of the joiner 2 nuts
Add the connecting rod . Ensure that the mechanism turns easily
6
Ø 3
4
3
30
30
20
Ø 3
10 10
120

5
E106061#1
5.3.2 Fix the cockerel with two screws 2,9 x 9,5mm
5.3.3 Secure the two bearing blocks on either side of the seesaw mechanism
About 120mm in. Use 3 x 20m screws
Note Make sure the bearing holes are in line with each other!
Arrange the bearing blocks so that the screws are not in line with each other
5.3.4 Use the 4 x 50mm to hold the see-saw mechanism between the bearing blocks
Lock with 2 nuts so that it will move easily up and down
5.3.5 Open the free end of the connecting rod and connect it to the screw eye in the end of the seesaw.
5.3.6 Paint the finished model to your own taste. The wood parts can be protected with
linseed oil or clear varnish
5.4 Function control
Check – that the windmill turns easily !
- that the mechanism between the turbine and the see –saw works freely.
- that the whole model will turn easily on its stand.
When everything has been checked it can be placed outside in an open space so that the wind can drive it.

6D106061#1
25
25
9
21
60
250
30
30
Ø 3
10 10
30
15 10
Ø 5
Ø 6
Ø 6
20
30 20
100
Ø 6 Ø 6
Ø 5
12
30
20
65
75
9 12
20
Ø 3
Ø 4
9
70
150
Ø 5
Frame,long strip Frame , shorter strip
Seesaw Mounting
Side view
Side view Front view
Front view

7
D106061#1
Ø 4
25
12
15
Ø 90
Ø 200
30°
Ø 4
Pattern
Turbine vane and joiner
Scale 1:1

8D106061#1

9
D106061#1
6
Ø 3
4
3
30
30
20
Ø 3
10 10
120
pattern
Cockerel and tail vane
Scale 1 : 1
Table of contents
Popular Wind Turbine manuals by other brands

SkyWind Energy
SkyWind Energy NG owner's manual

Natural Power
Natural Power ZephIR Operation & maintenance manual

Valen
Valen Hyland 920 owner's manual

Nature's Generator
Nature's Generator Powerhouse Wind Turbine user manual

Marlec
Marlec Rutland 1200 Installation and operation

GRAUPNER
GRAUPNER G-BOOSTER 160 manual