Nemo Shootpower NEMO500 User manual

Instruction Manual
NEMO500
Marine Grade Wind Generator
Please read and understand this manual completely before operating the machine.
Serial number:
Version1.1
TM

This manual contains installation and safety information for the Nemo500 Wind turbine.
The information in this manual is believed to be accurate and reliable; however,
The Distributor assumes no responsibility for inaccuracies or omissions. Our company
reserves the right to make changes to this product specification, or its manual, without prior
notice. Therefore, check the Shoot Power Website for updates as necessary.
The wind turbine, like other sources of electrical power, must be installed following the
guidelines established by state and local regulations. Consult a local electrician or local
planning and zoning offices for detailed information about your area.
For your ease write the serial number of your wind turbine on the front of this manual. Store
your manual and receipt together. You will need this information in the event of a warranty
claim.
1. Introduction:
CONGRATULATIONS!
You will find your new wind turbine easy to install. However, it is important that you read
this manual thoroughly prior to installation to assure proper performance and safety.
If you have any questions after reading the manual, please contact the Distributor.
2

TABLE OF CONTENTS
3. WIRING AND INSTALLATION PROCEDURES
3.1 System wiring diagrams
4.LOCATION SELECTION
5. TOWER
6.1 SINGLE WIND GENERATOR
6.2CONTROLLER WIRING
6.3 INSTALLATION OPERATION
6.4 ATTACHING TO POLE
6.5 STEP-BY-STEP INSTRUCTION
7. WARRANTY POLICY
7.1 ELEVATION
8. SPECIFICATIONS
4
4
4
4
5
6
6
7
8
9
10
11
11
12
15
15
16

The wind turbine has been designed with your safety in mind. However,
there are inherent dangers involved with any electrical and/or mechanical
equipment. Safety must be your primary concern as you plan the location,
installation and operation of the turbine. At all times be aware of electrical,
mechanical and rotor blade hazards.
1.1 MECHANICAL HAZARD
Rotating blades present the most serious hazard. The rotor blades are made of very
strong thermoplastic. At the tip, the blades may be moving at velocities over 275 miles
per hour (440 km/hr). At this speed, the tip of a blade is nearly invisible and can cause
serious injury. Under no circumstances should you install the turbine where a person
could come in contact with moving rotor blades. DO NOT INSTALL THE TURBINE
WHERE ANYONE CAN APPROACH THE PATH OF THE BLADES.
1.2 ELECTRICAL HAZARDS
*Observe all manufacturers' safety procedures when working around batteries and
other electrical equipment.
The wind turbine is equipped with sophisticated electronics designed to provide protection
from high surge electrical dangers. The internal electronics of the wind turbine prevents
open circuit voltages from rising above 20 volts for 12-volt systems. Please note that the
inherent personal dangers from electrical current still exist, therefore caution should
always be used when connecting this and other electrical devices.
Heat in wiring systems is often a result of too much current flowing through an
undersized wire or through a bad connection.
Batteries can deliver a dangerous amount of current. If a short occurs in the wiring
from the batteries, a fire can result. In order to avoid this threat, a properly sized fuse
or circuit breaker is required in the lines connecting to the battery.
1.3 INSTALLATION PRECAUTIONS:
1. PRECAUTIONS
Installation procedures should be performed at ground level.
Make sure that all batteries are disconnected throughout the installation process.
Never install the AWS Wind Turbine upside down.
Choose a day when the wind is calm.
Connect the 2 wires coming from the Wind Turbine to the control switch panel.
Then, connect control panel output wires to the battery bank.
From Wind turbine and swtich panel has two wires(Black = Negative (-)
Red = positive (+)) ensuring they do not made a mistake.
1.4 OPERATION PRECAUTIONS

Check support structures, blades, and electrical systems regularly. The rotor blades
are very strong; however, if they come in contact with a solid object, they can break.
When performing periodic inspections, or if you must approach the path of the blades,
disconnect the power leads from the battery and tie the wind turbine output leads
together to stop /slow down the blades from rotating.
Note: There is a short break-in period with new wind turbines. The bearings in both the
turbine yaw and the turbine rotor will require approximately 60-100 hours of operation
in normal wind speeds (approximately 18 – 20 mph, 8 – 9 m/s) before they are running
at peak efficiency. During this break-in period, the turbine operation might appear
sluggish.
2. PACKAGE CONTENTS
ROTOR BLADES ARE SHARP. PLEASE HANDLE WITH CARE.
USE CHART BELOW TO COMPARE PARTS.
5
11
14
123
4
56
78
910
13
x3
x6
x3
x3
12
Figure 1
1. Nose Cone
2. Screw Socket Head
3. Nut-Jam-SAE 5/8-18
4. Blade
5. HUB
6. Nut-Nylock-SAE 6-32
7. Screw Socket head 10-24 x 1-1/2”
8. Face Assembly
9. Stator
10. Rotor
11. O-Ring
12. Body Assembly
13. Snap Ring- 32 MM External
14. Yaw Shaft Assembly
15
15. Internal MPPT Controller
16. Power Meter box
16

6
3. WIRING AND INSTALLATION PROCEDURES
Your Wind Turbine is shipped partially assembled. Please completely read
all procedures before beginning installation. NOTE: Do not install the blade/hub
until the turbine is mounted on the tower
4mm hex key wrench (included)
5mm hex key wrench (included)
8mm hex key wrench (included)
Power cables (not included):
#12 AWG (American Wire Gage) stranded.
Batteries (not included)
Steel Pipe: 1 1/2", Schedule 40 steel pipe (Actual OD 1.875 inches, 48mm) (not
included)
Torque wrench with 4mm, 5mm, and 8mm hex drives (not included)
Soldering iron or propane torch (not included)
Rosin core solder (not included)
Electrical tape or 1/4” (6-7mm) heat shrink (not included)
Wire strippers (not included)
Wire crimpers (not included)
NOTE: Do not connect to the battery.
Precheck
Spin rotor shaft slowly with your fingers
while at the same time connecting and
disconnecting the DC OUTPUT's positive
and negative wires. With the wires
connected, the rotor shaft should become
more difficult to rotate. With the wires
disconnected, it should spin freely.
Every time connect the DC
OUTPUT's wires (RED= Positive,
BLACK = Negative)
directly to the set of posts of the
Power Meter box, the controller LED will
lighten to indicate that the
controller is running properly.
CAUTION: DO NOT CONNECT WIND
GENERATOR POSITIVE TO BATTERY
NEGATIVE AND POWER METER BOX
NEGATIVE TO BATTERY POSITIVE FOR
EVEN A SECOND, OR ELSE WILL DAMAGE THE WIND GENERATOR'S
CONTROLLER AND VOID YOUR WARRANTY.
Red wire
Red wire
black wire
Black wire
Power Met er Box

4. LOCATION SELECTION
To ensure good performance from the Wind Generator, it is important that
care is taken in the site of the machine. Buildings, trees and rocky outcrops
etc. disrupt the smooth flow of wind creating a “Wind Shear” with the wind
velocity nearer the ground being slower than that higher up. Turbulence is
also created by these obstructions. Turbulence is detrimental as the swirling
air causes the Wind Generator to yaw continually thus stressing the mechanical
parts and greatly increasing wear and tear.
Sharp edges
Create turbulence
Smooth, laminar airflow
2H
20H
Turbulent airflow
2H
H
Turbulent airflow created by obstructions (Ad. P. Gipe, 93)
Therefore, as a general rule the Wind Generator should be mounted twice
as high as any such obstructions. The power obtained from the wind is
proportional the cube of the wind speed, and the wind speed increases with
height from the ground. A 26% increase in wind speed from a higher tower
will yield a 100% increase in power from the wind generator. A little more
money spent on a higher tower will harvest the same power as 2 machines!
Preference should be given to the prevailing wind direction, but it should be
noted that tall features behind the Wind Generator can also slow down the
wind flow through the Wind Generator.
7

The Wind Generator should be mounted on a tower a minimum of 25'
(8 meters) above any surrounding objects within a 500' (150m) radius.
If this is not possible, then place it as high as you can. If this is a roof
top installation, it is important there are no objects around the structure
that may block the wind.
5. TOWER
Great care should be taken in the selection and preparation of the wind
generator's tower, as this is the most difficult and crucial aspect of the
entire installation. If you select a tower from another source or build your
own, you are responsible for assuring the tower is suitable. As with all
towers, you must first evaluate your site to determine the appropriate
tower height, available space and reasonable cost.
Usually, the higher tower is erected, the greater the output, but also the
greater cost and effort of the installation. If purchasing a taller tower will
provide significantly more power it might offset the additional cost and
effort. It's very important to mount the wind generator in the best winds
while being balanced by the cost and effort of the installation.
This Wind Generator is designed to use steel pipe 1.875 inch (48mm)
outside diameter, equivalent to 1 ½ inch SCH 40 pipe, which can be used
in some tower applications. If larger pipe is used for your tower, make
sure that the 1.875 inch pipe is at least 22 inch long or will damage the
blades. Refer to SPHERE OF OPERATION (Minimum Safe Pole Length
Above Obstructions).
CAUTION: SAFETY, ENGINEERING AND LOCAL CODES MUST BE
ADDRESSED BEFORE ATTEMPTING ANY INSTALLATION.
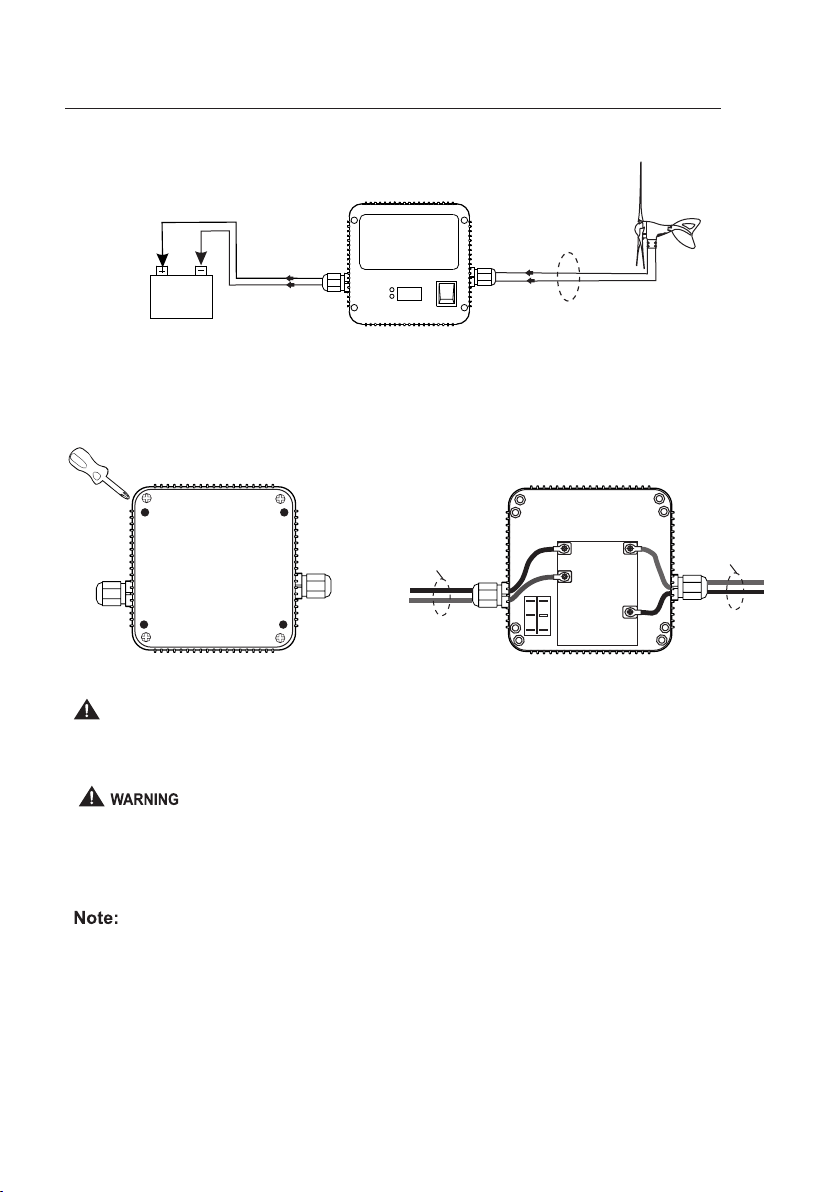
NOTE: The yaw wires can support loads up to a total of 155 lbs. (70kg).
If the wire weight is higher, you must install a strain relief to minimize
the stress put on the hanging wires.
NOTE: Towers must be capable of withstanding 155 lb. (70kg) of load
in the horizontal direction at the Wind Generator.
The following list considerations must be consulted:
Number of Wind Generators
Budget
Type: guyed, freestanding or rooftop
Site: hills, trees, buildings
Ease of use
Note: Guyed And Freestanding Towers Are The Most Common Way To Install A
Wind Generator. These Towers Are Available In All Shapes, Sizes And Costs.
Caution: Do Not Install The Wind Generator Where The Path Of The
Blades Can Be Reached During Normal Operation! Never Approach
The Wind Generator During Operation!
8

99
6.1. Single wind generator
See Diagram below for further wiring information
Wind T urbine Generator
The controller Indicator Lamp
red
Black
Mode Lamp Status Cause
Normal mode
Stop mode
Solid Green
Flashing red
Charging wind speed
3.13m/s to 9m/s
Rotor rotating at low
spin or stop
Rotor rotating at low
spin or stop
Flashing red and
green light
alternatively
The alternator
temperature
exceeded 90C or
temperature sensor
damage
Rotor rotating at
0-1000rpm
Normal mode Flashing green Charging wind
speed to 9m/s to 16m/s
Rotor rotating at
1000rpm to 1500rpm
System returns to
normal mode if the
battery voltage
drops below 13.1V,
24V system 26.2V
Normal Mode
Battery fully charged
(voltage exceeds 14.1V)
or 24V system 28.2V
Normally
Normally
Operation
System returns to
normal mode if the
control
temperature drops
below 60C
Power Meter Box
Stop mode Solid red Rotor rotating at low
spin or stop
The output is reach peak
power. It will stop 30mins
and restart again

10
6.2 CONTROLLER WIRING
+
-
Do not make a wrong positive and negative connections to the power meter box or the battery
bank.
The wrong positive and negative connection or positive and negative in short circuit condition will
damage the power meter box or wind turbine controller, the warranty will not cover.
Red is for positive.
Black is for negative.
When the green light is on or flashing, it is normal charging.
Please connect with power meter box in any time, without power meter box
positive and negative direct short circuit easily damaged internal controller in
wind condition, the warranty will not covered.
The power meter box main function is display and break the wind turbine, the
MPPT controller in the wind turbine body.
Power Meter box
+
-Red is for positive.
Black is for negative.
Wind+
Wind-
B-
B+
B”+” is battery”+”
B”-” is battery”-”
Wind”+” is Wind turbine”+” ;
Wind”-” is Wind turbine”-” ;
Important
Use bolt driver to remove the 4pcs screws on the backside of the meter box and open it, then install the cables from
the wind turbine and battery to the power meter box board as the following photo:
From wind turbine To battery

For more information about some very economical tower kits for the
wind generator, please refer or purchase them from your dealer or
distributor.
Choose a calm day and have someone available to help during the
installation process.
NOTE: THE BLADE EDGES ARE SHARP. PLEASE HANDLE IT CAREFULLY.
NOTE: DO NOT install the blade assembly until the body is mounted on
the tower.
CAUTION: ALL BATTERIES MUST DISCONNECTED THROUGHOUT
THE INSTALLATION PROCESS!
CAUTION: DO NOT INSTALL THE WIND GENERATOR WHERE THE
PATH OF THE BLADES CAN BE REACHED DURING NORMAL
OPERATION! NEVER APPROACH THE WIND GENERATOR DURING
OPERATION!
USE COMMON SENSE AND PLEASE BE CAREFUL!
Figure 3 Proper Blade-to-Tower Clearances
Right Right Wrong
11
6.4 Attaching to pole
6.3 INSTALLATION OPERATION

1).Ensure the voltage systems of the wind generator and the battery bank are
the same. Prepare the appropriate wires.
2).Run the wire through the pipe and drag the wires near to the batteries
(Do not connect to the battery), strip the insulation back from each set of wires.
battery
5) Prepare a grounding cable from yaw shaft screw, secure the grounding
cable against the pipe with insulation tape for grounding the wind
generator by the pipe.
3).Connect the Wind Generator to the wires and insulate the connections
using either heat shrink tubing or a quality electrical tape.
4).Once the yaw shaft is on the tower, firmly tighten the yaw clamp screws with
the 4mm hex key to 3-5 foot pounds(4.0-6.5Nm). Be sure that it is securely
attached to the mounts.
Slide the yaw shaft all the way down over the end of pole being careful not to
pinch the yaw wires. Be sure to leave enough slack in the wires so that if
necessary, the Wind Generator can be removed.
12
6.5 Step-by-step instructions
outline of the Marine grade Nemo500 wind turbine installation process. This
consolidated reference should only be used as an outline during installation.
Refer to the appropriate sections for further details.

6).Place one of the blades on the hub socket and insert one of the M6-15
socket head cap screws. Place a plastic disk on the end of the screw, then
place self-locking nut (M6) and tighten it with the 5mm hex key to 8-10
foot lbs. (10.5-13.5 N.m). Repeat this procedure on all three blades.
M6-16 Screw ( 6 )
M6 Nut ( 6 )
7). Remove the M16 nut from the rotor shaft. Slide the blades assembly onto
the rotor shaft and place the nut on the shaft. DO NOT press the rotor shaft
into the body.
Caution: over-torque will damage the
blades and wind generator.
M16 NUT
8).Insert the 8mm hex key into the rotor shaft and thread the nut on by spinning
the blades assembly. Holding the blades assembly and tightening the M16
nut lightly with the 8mm hex key. Finally, spin the blades slowly to be sure they
turn freely.
8mm Hex Key
CAUTION: DO NOT SCREW M16 NUT TOO TIGHTLY, OTHERWISE THE FACE
BEARING WILL BE STUCK AND THE BLADES ROTATE DIFFICULTLY!
13

9) Place the nose cone over the center line of the blades assembly and snap the
nose cone into place. Carefully check it is secure by firmly pulling on and be
sure all three edges are catch. Don't worry if the nose cone missing, it will not
affect the performance of the wind generator.
Nose Cone
14
9)Before attaching the wiring to the battery, make sure that:
a.All wires connect to the control box and battery ok.
b.The stop switch is in the "Stop"position.
Note: Grounding
For long-term operation and protecting the electronics, properly grounding
is very important. Grounding procedures must be followed along with any
local electrical codes.
The negative wire of your system should be connected to a ground. This is
usually done by connecting a wire from the negative battery terminal to a
nearby ground rod. Wires with the same ratings as the positive and
negative wires must connect all system grounds.
A ground electrode can be made for systems without an existing system
ground from an 8 ft. (2.4 m) section of 3/4" (19 mm) galvanized pipe or
conduit, or an 8 ft. (2.4 m) section of 5/8" (16 mm) iron or steel rod. This
ground electrode must be buried completely beneath the soil, at no more
than 45 degrees from vertical, or horizontally at least 2 1/2 ft. (75 cm)
beneath the surface. It is recommended that the ground electrode be
installed as close as possible to the batteries for maximum lightning
protection. The base of the tower is also a good location for an
appropriate surge arrestor.
Caution: Improper Grounding Will Damage Your Wind Generator
And Void Your Warranty.

10)Carefully raise the tower and secure base and/or guy cables.
15
Caution: Ensure That The Tower Is Vertical So That The Wind
Generator Can Yaw (turn Into The Wind) Properly.
CONGRATULATIONS! You have completed the installation process now.
FEET
1-500ft
METER
0-150m
OUTPUT POWER
100%
500-1,000ft
1,000-2,000ft
2,000-3,000ft
3,000-4,000ft
4,000-5,000ft
5,000-6,000ft
6,000-7,000ft
7,000-8,000ft
8,000-9,000ft
9,000-10,000ft
150-300m
300-600m
600-900m
900-1,200m
1,200-1,500m
1,500-1,800m
1,800-2,100m
2,100-2,400m
2,400-2,700m
2,700-3,000m
97%
94%
91%
88%
85%
82%
79%
76%
73%
70%
7.1 ELEVATION
An important fact to keep in mind is elevation. The higher a Wind Generator
is from sea level, the lower the air density. Air density is directly
proportional to the output of your Wind Generator. Here are some
general numbers to keep in mind when determine the maximum output
that can be expected from a Wind Generator.
7. Warranty policy proof of purchase is required(Receipt)
Our company wind turbine
our company
other obligations in connection to our company and it products. Any implied
Our company

8. SPECIFICATIONS
Marine grade 500 Watt Wind turbine
DC12V and DC24V dual voltages
Nemo500
16Lbs
500W at 31mph/14m/s wind speed
Smart MPPT internal controller
Body Permanent mold cast aluminum
839290007316
TM
Shoot Power Equipment Co., Ltd
www.shootpower.com
Made In China
Table of contents
Other Nemo Wind Turbine manuals
Popular Wind Turbine manuals by other brands

Chinook
Chinook 200 Installation & operation guide

Ampair
Ampair 300 Operation & maintenance manual

Leading Edge
Leading Edge LE-v50 Installation & operation guide

Sunshine Solar
Sunshine Solar 914 installation instructions

Futurenergy
Futurenergy AirForce1 Installation and training manual

Automaxx
Automaxx 400 Watt Turbine user manual