Opove X Master User manual

X Master
RECHARGEABLE HAIR CLIPPER
USER MANUAL

Table of Content
1
1.Product Parts 2
2.Product Specifications 3
3.Recharging 3
4.Features 4
5.Installation and Detachment 5
6.Cleanning & Maintain 6
7.Product List 6
8.Caution 7
9.Battery Removal 7
10.Warranty Card 8

2
Power On / Off
LCD Screen
1.Product Parts
Blade
Micro Length Regulator
Rotary Speed Control
Accessories
Trim Comb
3mm
Power Base
Trim Comb
6mm
Trim Comb
9mm
Trim Comb
12mm
Cleaning Brush
1
6
2
1
3
4
5
7
8
9
10
11
Oil Refill Reminder
Load Condition Display
Spinning Motor
Rotary Motor
Remaining Time
Current Micro Length
Power Adapter
12
Trim Comb
15mm
Trim Comb
18mm
Trim Comb
21mm
Trim Comb
25mm
6
7
8
9
10
11
12
X Master
2
3
4
5
3

3
3.Recharging
• The product will still maintain 80% of the battery capacity after 400 times
battery cycle.
2.Product Specifications
Product name
Model
Power Adapter
Battery Type
Recharge Time
OPOVE Professional Hair Clipper
X Master
Lithium battery
Around 3 hours
Battery 3.7V 2600mAh
Power 7W
Battery Time 190-250 Minutes (Depends on Rotary Speed)
• Please charge the clipper at least 3 hours before using it for the first time.
After 3 to 4 times, the battery capacity will reach its best conditions.
• The best temperature to operate the hair clipper is between room temperature
5°C to 40°C.
Recharging Instructions
•The hair clipper can be operated with the cable when it is out of battery.
• The clipper can directly charge with the power base.
• LCD screen light will be blink to indicate that it
is charging.(The hair clipper will activate
recharging protection after fully charged. Turn
off charging power, and protect the battery lifetime).
• Ensure the power is “off” and place the clipper
on the power base and make “didi” sound.
• Connect the power adapter to the power base.
• Connect the power base into the circuit.
Note
Input: 100 – 240V ~ 50/60Hz Output: 5V 1000mA

Reminder Lubricant Oil Refill Features
Chart for Micro Length regulator
Adjust
button
Length
I
1.0 mm
II
1.3 mm
III
1.6 mm
IV
1.9 mm
When the hair clipping operates accumulate over 120
minutes, the “oil” ( ) symbol will blink and beep
to remind you to clean the blade and refill lubricant oil.
4
Burden Condition
When the burden is shown as above picture, it is normal.
4.Features
When the burden is shown as above picture, reminding
the loading condition is higher, and need to refill lubricant
oil on the blade.
When the burden is shown as above picture, the hair clipper
will be beeping and warning the burden condition very higher
than normal. Need to remove blade for cleaning and refill
lubricant oil immediately.

5
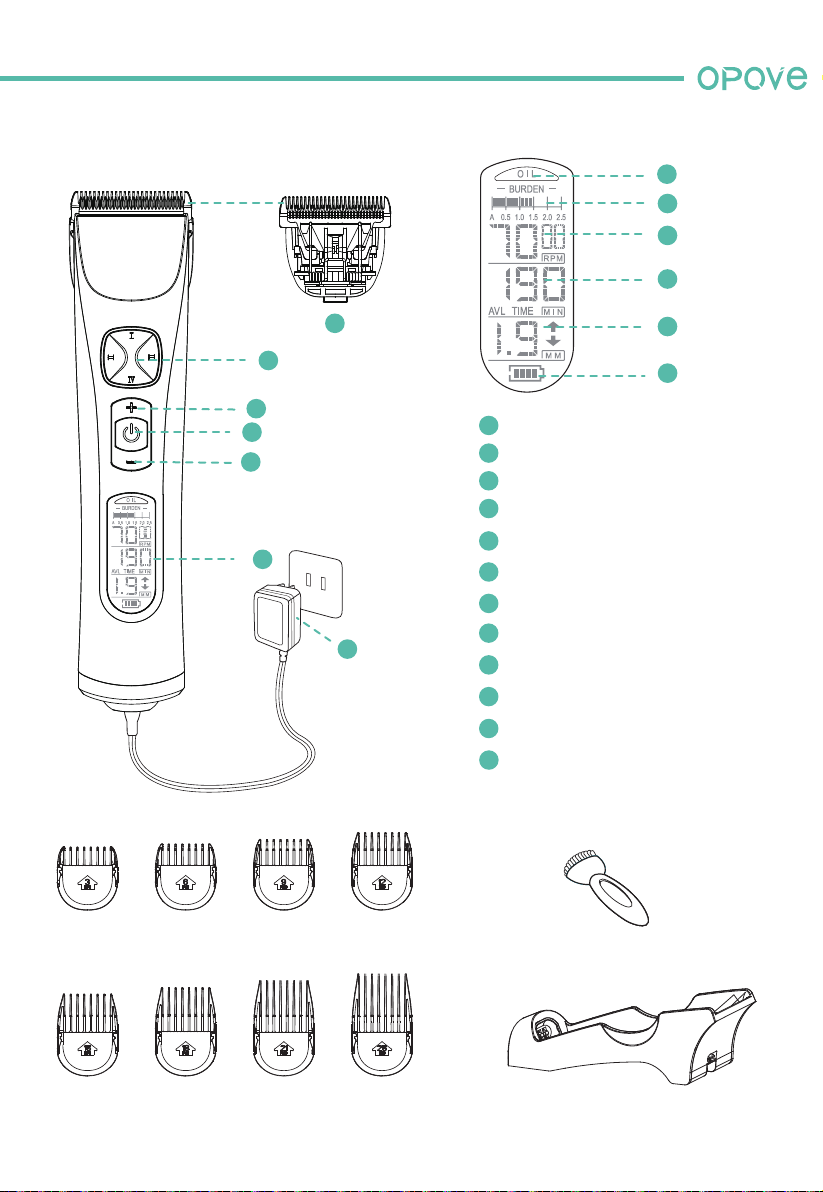
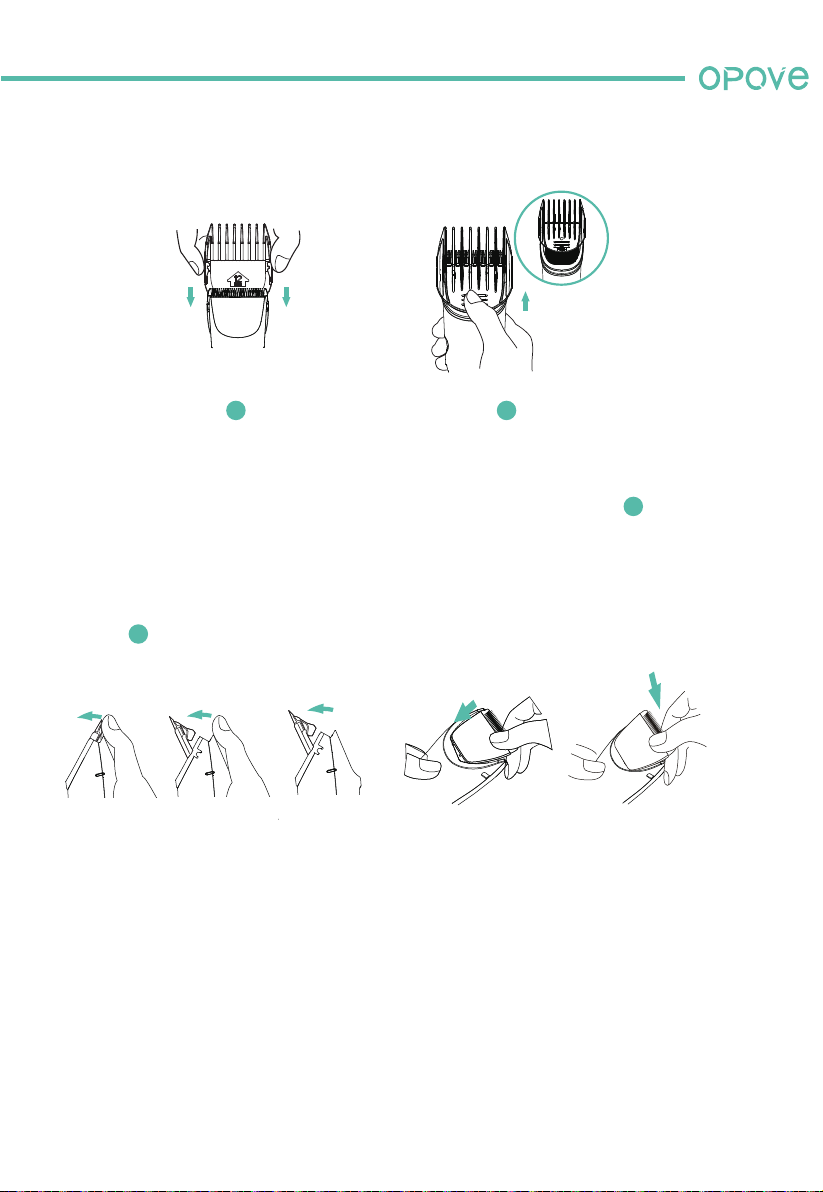
Micro cutting Length Setting
Setting for 4 micro cutting length: 1.0mm, 1.3mm, 1.6mm,
1.9mm.
Charging Reminder
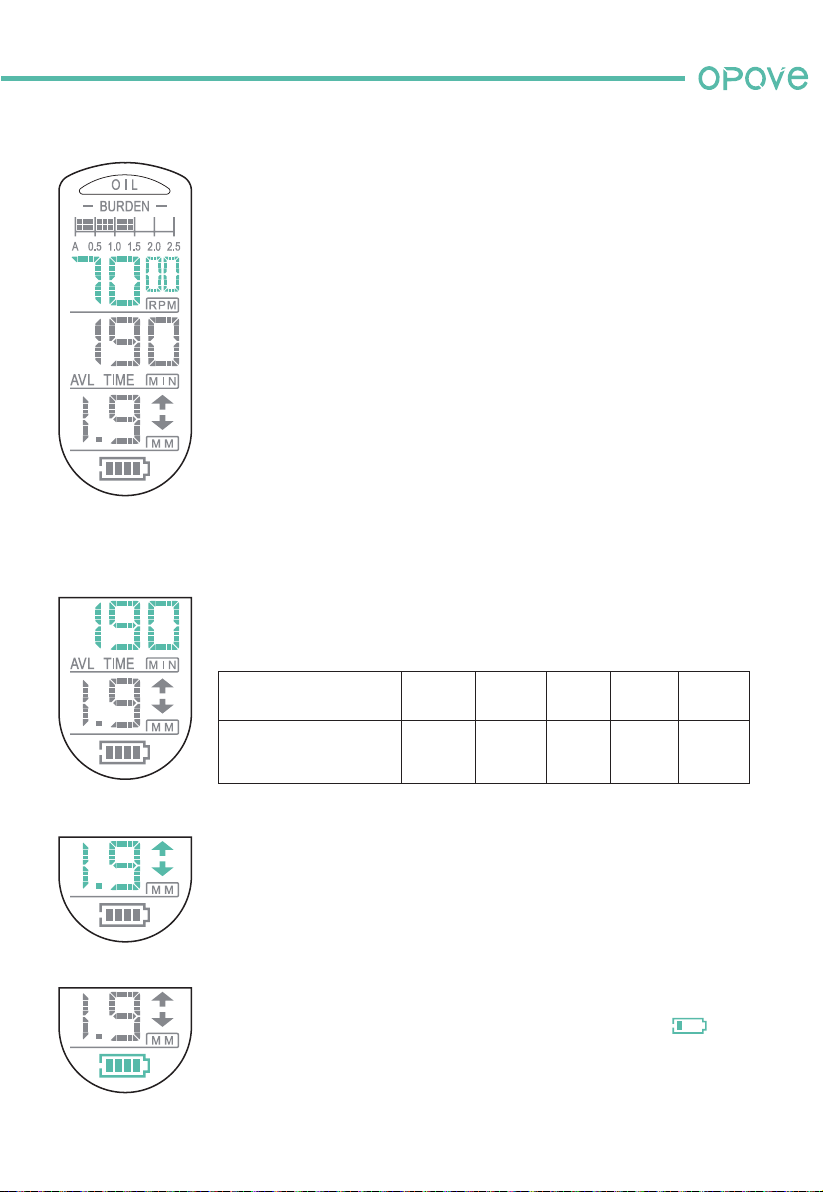
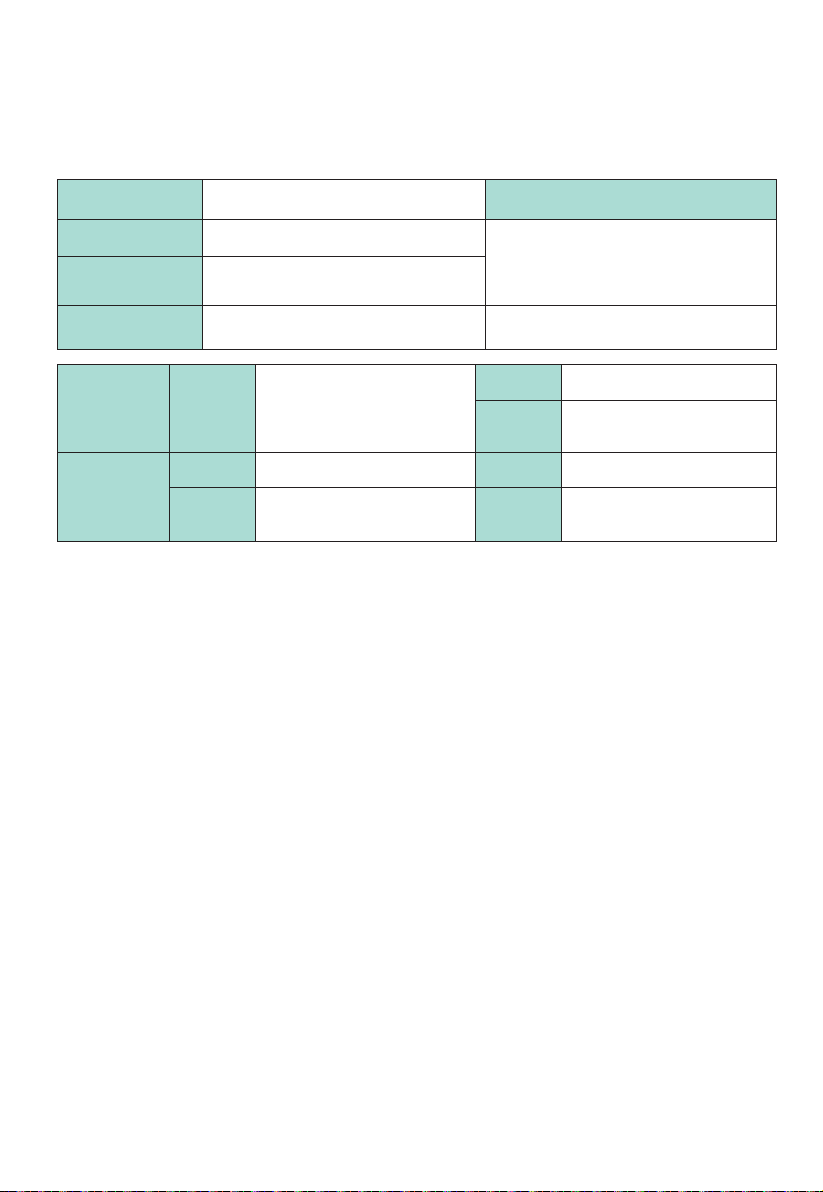
Current Remaining Time Display
Display the current battery remaining time, the below times
based on when battery is full charged.
Rotary speed(RPM)
Current battery
lifetime
5000
250
min
5500
235
min
6000
220
min
6500
205
min
7000
190
min
When the battery remains 20 minutes, the battery( )
symbol will start blinking, and making “didi” sound to remind
you to recharge the clipper.
•The highlight of this product is the rotary speed will not
effect when cutting a lot of hairs or thicker hair during
operation. It will remain the same speed of rotary; increase
the cutting process and cutting result.
•Hair clipper will remain the same speed as setting.
Smart Rotary Features
•
The number displays rotary times of hair clipper in each minute.
Rotary Control Features
•Rotary setting: Press “-” or “+” to adjust rotary regulator to
specific spin, and each adjustment is 500 spins apart.
•Rotary frequency: 5000 – 7000 times in every minute.

6
5.Installation and Detachment
Trim comb installation
Press and pulls the trim comb into the clipper shown as picture .
(Caution: locks clipper into place prevent any movement or fall off)
Trim comb detachment
Pull in opposite direction of the installation and detach the trim comb shown as
picture .
21
1
2
Blade detachment
Press and use thumb slide off the blade.
Blade installation
Press the blade and locked into its place until hearing “click”

7
6.Cleanning & Maintain
• Drop 1-2 lubricant oil on the blade (shown as picture) after cleaning, and reinstall
the blade back to the clipper.
• Blade could be rinsed with water after detached, please keep it dry before refilling
lubricant or installation .
• Use brush to clean the hair between inner cutter and the clipper. (Do not remove
the blade spring, which may cause damage).
7.Product List
Hair Clipper x1
Power Base x1
Power Adapter x1
Cleaning Brush x1
Trim Comb x8
Product list contains:
Trim Comb
3mm
Power Base
Trim Comb
6mm
Trim Comb
9mm
Trim Comb
12mm
Cleaning Brush
Trim Comb
15mm
Trim Comb
18mm
Trim Comb
21mm
Trim Comb
25mm
X Master

8
It is normal that the product will during recharging or operation.
• Do not disassemble the product without the seller’s permission.
• Do not keep the clipper in a humid place or wash it directly with water.
• Product can only be wiped with wet cloth or with soap water for cleaning.
• Do not recharge the product when the room temperature is above 40°C or
below 0°C.
8.Caution
gasoline alcoholBanana
oil
9.Battery Removal
• Operate the item until out of battery.
• Unscrew the clipper (shown as picture) and remove the battery.
• Disconnect the clipper from the power adapter.
2
1
34
5
The internal battery is a lithium battery. Please take out the battery before dispose
the item. Use recovery and disposal of waste electrical guideline in order to
protect the environment.
• Be careful the battery cannot be used after removal, the positive and negative
pole may cause short-circuit.
Note
Note

9
Product Warranty:
Warning: This product cannot be used to cut animal’s hair. The company will not
be responsible for any damage of the hair clipper or provide any compensation
if the animal gets hurt from using the hair clipper.
Address
Store
name
Consumer
Retailer
Address
Name
Phone
number
Name
Phone
number
• The product was made under strict quality control and inspection.
• 30-day Unconditional Money back!1 year warranty covers failures due to defects
in materials or workmanship that occur during normal use.(Blade needs buy)
• Possible charges under warranty:
(a)Any defects under improper usage.
(b)Any damage due to improper repair or modify the clipper in any way.
(c)Failures that result from natural accident.
(d)Failures of misuse damage or modification.
(e)Failures of line power surge.
(f)Any damage caused by not following the instruction manual.
Note
10.Warranty Card
Manufacturer
number
One year from purchase date
Expire on Month Date YearPurchase Date Month Date Year
Product Name OPOVE Professional Hair Clipper Warranty Period
Model X Master

www.opove.com
Designed by opove
Table of contents