Optelec Alva BC640 User manual


User Manual
Version 1.0
UDC-02133A
© 2014 Optelec, the Netherlands
All rights reserved
Optelec
2993 LT Barendrecht
The Netherlands
+31 (0)88 6783 444
www.optelec.com


Optelec ALVA BC6
English Page 4
Contents
1. Introduction ........................................................................................................5
1.1. About this manual...........................................................................................6
1.2. ALVA Braille Controller package contents......................................................6
2. Getting to know your ALVA Braille Controller.................................................7
2.1. ALVA BC640 Base Unit..................................................................................7
2.1.1.Surface and front panel lay-out.................................................................. 7
2.1.2.Right side lay-out....................................................................................... 8
2.1.3.Left side lay-out ......................................................................................... 8
2.1.4.Front panel keys........................................................................................ 8
2.2. ALVA BC680 Unit ...........................................................................................9
2.3.1 Surface and front panel lay-out................................................................... 9
2.3.2 Back panel lay-out................................................................................... 10
2.3.3 Right side lay-out..................................................................................... 10
2.3.4. Left side lay-out....................................................................................... 10
2.3.5. Front panel keys...................................................................................... 10
3. Installation ........................................................................................................12
3.1. Setting up the ALVA Braille Controller..........................................................12
3.1.1.Setting up the USB connection................................................................ 12
3.1.2.Setting up the USB keyboard connection of the ALVA BC680................ 12
3.2. Installing ALVA BC6-series screen reader drivers ..........................................12
3.3 Bluetooth® connection.....................................................................................13
4. The ALVA BC6-series menu...............................................................................14
4.1 Local Menu ......................................................................................................14
4.1.1. Activating the Local Menu ....................................................................... 14
4.1.2. Changing settings in the Local Menu....................................................... 15
5. Power Sources.....................................................................................................23
5.1. USB power......................................................................................................23
5.2 Internal battery.................................................................................................23
5.3 External power adapter....................................................................................23
Appendix: Safety and regulatory notices..............................................................24
Optelec offices worldwide ......................................................................................28

Optelec ALVA BC6
Page 5 English
1. Introduction
Congratulations on choosing the ALVA Braille Controller. The ALVA Braille Controller 6-
series merges classic Braille display access with advanced functionality. The high
quality and reliability of the ALVA BC6-series gives you optimal flexibility and
productivity in an ultra compact design.
Each ALVA Braille Controller features future proof hardware standards as wireless
Bluetooth® connection and USB ports. The ergonomic design with its high quality
Braille cells and optimal navigation possibilities allows you to be in full control of your
computer, tablet or smartphone. Used in combination with screen reading software,
the ALVA Braille Controller can be installed for a wide range of operating systems to
provide a tactile and audible user interface.
The ALVA Braille Controller offers an enhanced ergonomic design that extends the
navigation and operation possibilities of the screen reading software. The ergonomics
are designed for optimal efficiency when working with a computer, tablet or
smartphone.
The ALVA Braille Controller was designed to adhere to the Open Standard
philosophy using mainstream technology. This enables compatibility with most
screen reading software and operating systems. The available and supported
functionality of the ALVA Braille Controller depends on the Braille display options of
your screen reader, your mainstream computing hardware and operating system.
Contact your distributor or Optelec for updated information about screen readers that
fully support the device.
If you have any questions or suggestions concerning the use of this Braille display,
please contact your distributor or Optelec’s head office using the contact information at
the last page of this manual. Your feedback is highly appreciated. We hope you enjoy
working with your ALVA Braille Controller.

Optelec ALVA BC6
English Page 6
1.1. About this manual
This manual will familiarize you with the features and basic operation of your ALVA
Braille Controller. Please read this manual carefully before using your device. Please
note that this manual is about the ALVA Braille Controller and does not contain
information about screen readers, screen reader commands, screen reader
installation procedures, screen reader Braille display selection or screen reader key
assignments. Refer to your screen reader documentation to find out more on these
topics.
1.2. ALVA Braille Controller package contents
The ALVA BC640 package contains the following:
–A protective sleeve
–The ALVA BC640 Base Unit
–Power adapter 110/240V
–Long and short USB cables
–The ALVA BC driver software for Windows 7 and higher and
documentation on CD-ROM
The ALVA BC680 package contains the following:
–A protective sleeve
–The ALVA BC680 unit
–Power adapter 110/240V
–Long and short USB cables
–The ALVA BC driver software for Windows 7 and higher and
documentation on CD-ROM
If any of these items are missing from your package, please contact your distributor.

Optelec ALVA BC6
Page 7 English
2. Getting to know your ALVA Braille Controller
The ALVA Braille Controller consists of a 40 cell or 80 cell Braille line with advanced
navigation possibilities. This chapter will give a detailed overview of the lay-out of the
ALVA BC640 Base Unit and the ALVA BC680 unit.
2.1. ALVA BC640 Base Unit
The ALVA BC640 Base Unit is placed correctly in front of you when the Braille cells
are located at the back of the flat surface and the thumb keys are facing towards you.
The ALVA BC640 contains:
1. 40-cell Braille display
2. Two eTouch keys (left of the Braille line) for panning left and right or other
screen reading functions
3. Two eTouch keys (right of the Braille line) for panning left and right or other
screen reading functions
4. Smartpad with 5-way navigation key and 4 function keys
5. Five thumb keys for panning, left, right, up and down and returning to the
cursor position
6. 40 Cursor Routing Keys
7. Power supply and mini USB connector
8. On/off switch
2.1.1. Surface and front panel lay-out
The ALVA BC640 is designed with a row of 40 Braille cells at the back of the flat
surface. In front of the Braille cells one row of small buttons can be found, known as
Cursor Routing Keys. Each Braille cell has a corresponding Cursor Routing Key that
can be used for multiple functions. On the left and right side of the Braille line you will
find two groups of two keys. These so-called eTouch keys can be used for Braille
panning left and right as well as various other screen reader functions.

Optelec ALVA BC6
English Page 8
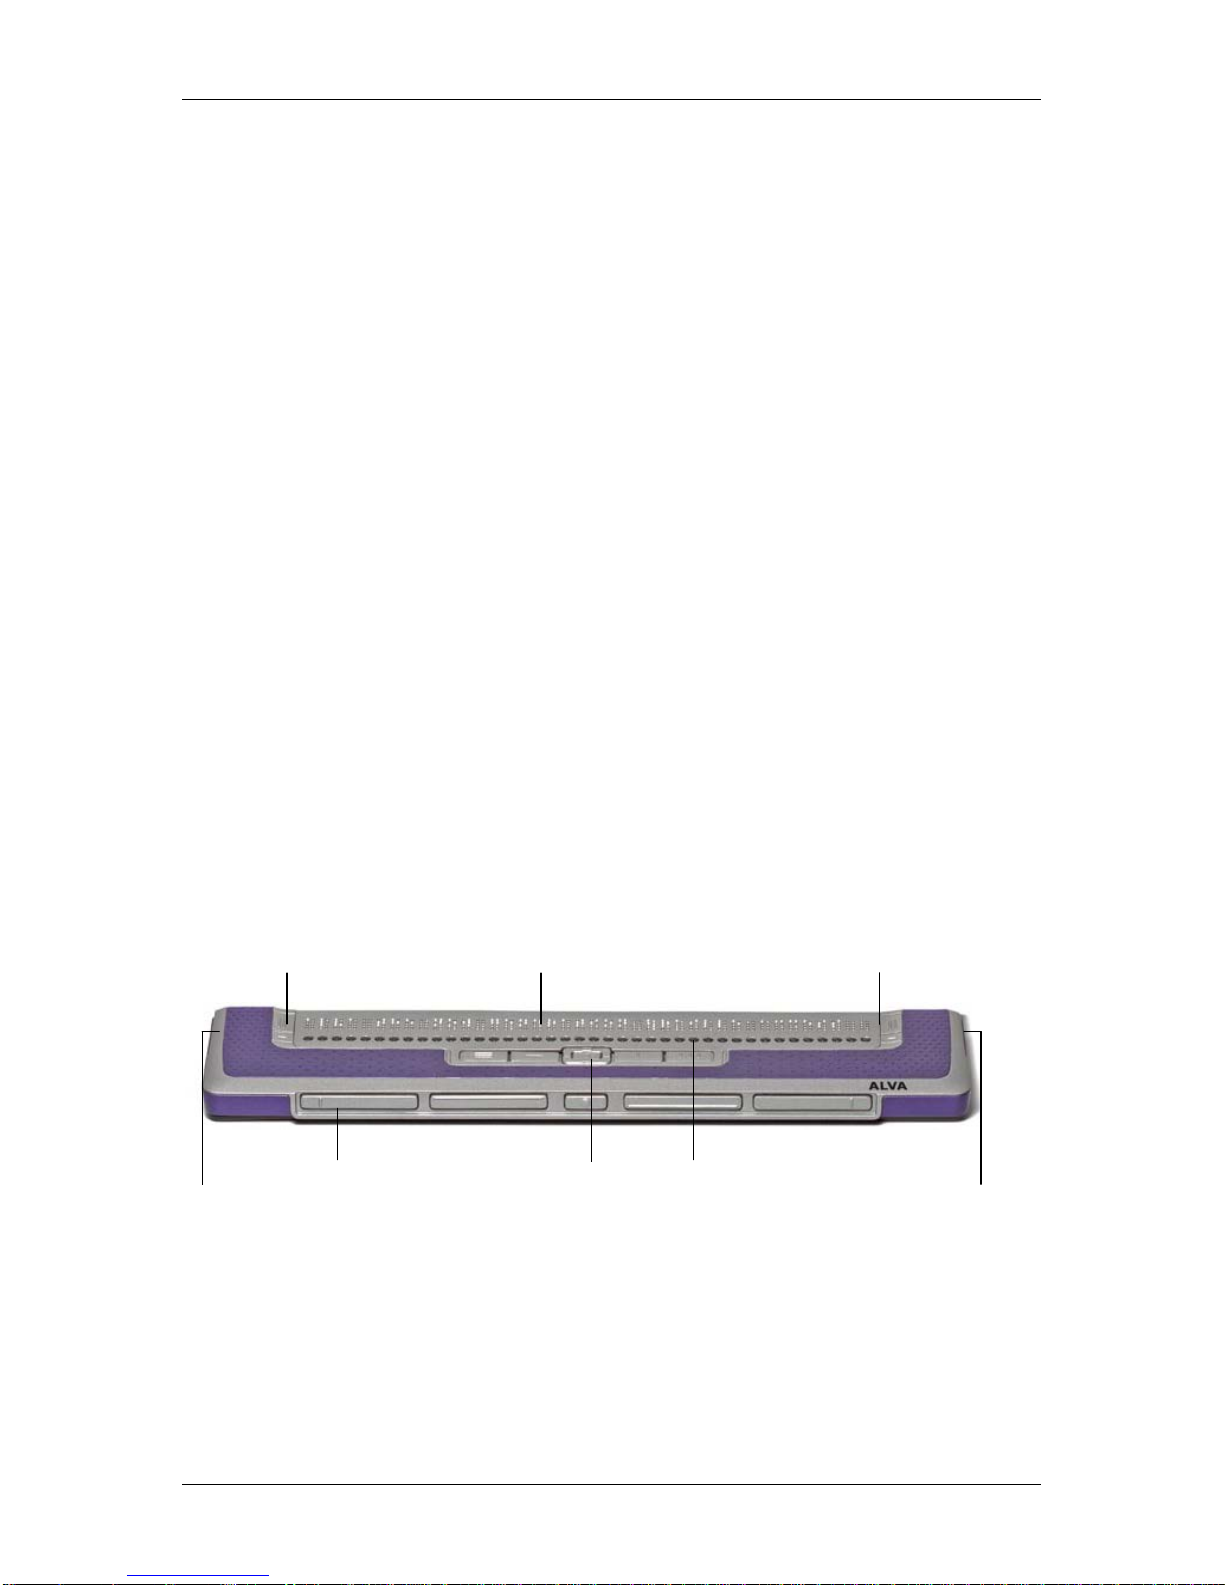
In the middle, just in front of the Cursor Routing Keys, you will find a group of 9 keys.
This group is called Smartpad and consists of 4 function keys and a 5-way navigation
key.
2.1.2. Right side lay-out
The power switch is located at the right side of the Braille Controller. The Braille
Controller is switched on when the rectangular push button is pressed. Switching the
Braille Controller on will generate an audio signal.
2.1.3. Left side lay-out
The left side of the Braille Controller contains three connectors. From front to back:
power connector, mini USB connector and a feature connector. The feature
connector has no function with the release of this manual.
2.1.4. Front panel keys
The names of the ALVA BC640 keys listed in this section will be used in all
documentation, including your screen reader documentation. This section describes
the name of the key(s) and its main function, which is supported by the screen
reader. The exact functionality is defined by the screen reader. Please refer to your
screen reader documentation for detailed functionality of the ALVA BC640.
Smartpad
The integrated Smartpad allows for navigation through menu’s and dialog boxes.
From left to right, the Smartpad keys are:
Smartpad key 1 First rectangular key at the left marked with 3 horizontal lines
Smartpad key 2 Second rectangular key at the left marked with 1 horizontal line
LEFT Left key on the 5-way navigation key
UP Top key on the 5-way navigation key
DOWN Bottom key on the 5-way navigation key
RIGHT Right key on the 5-way navigation key
MIDDLE Middle key marked with a round dot of the 5-way navigation key
Smartpad key 3 Second rectangular key from the right marked with 1 vertical line
Smartpad key 4 Most right rectangular key marked with 3 vertical lines
eTouch keys
The two keys on each side of the Braille line are called the eTouch keys. They are
used for panning left and right as well as various other Braille functions.
eTouch 1 Top left key marked with two vertical lines
eTouch 2 Bottom left key marked with one horizontal line
eTouch 3 Top right key marked with two vertical lines
eTouch 4 Bottom right key marked with one horizontal line
Cursor Routing Keys
The cursor routing keys correspond to the particular Braille cell immediately above
each button. Typically, they are used for routing the cursor or caret to the
corresponding Braille cell, generating a left or right mouse click at that point, or for
obtaining additional information about the contents of the Braille cell.

Optelec ALVA BC6
Page 9 English
Thumb Keys
At the front of the Braille Controller five front panel keys are placed, the so called
thumb keys. Four bigger keys are symmetrically aligned along the front of the ALVA
BC640. One smaller button is located in the middle of the front. Pressing one of the
four bigger thumb keys will navigate left, right, up or down. By pressing the middle
key you will return to the cursor position
2.2. ALVA BC680 Unit
The ALVA BC680 is placed correctly in front of you when the Braille input keys are
located at the back of the flat surface and the thumb keys of the ALVA BC680 Unit
are facing towards you.
The ALVA BC680 contains:
1. 80-cell Braille display
2. Two eTouch keys (left of the Braille line) for panning left and right or other
screen reading functions
3. Two eTouch keys (right of the Braille line) for panning left and right or other
screen reading functions
4. Smartpad (left) with 5-way navigation key and 4 function keys
5. Smartpad (right) with 5-way navigation key and 4 function keys
6. Ten thumb keys for panning left, right, up and down and returning to the
cursor position
7. 80 Cursor Routing Keys
8. Power supply and USB keyboard connectors
9. USB ports (USB port 1 and USB port 2)
10.On/off switch
2.3.1 Surface and front panel lay-out
The ALVA BC680 is designed with a row of 80 Braille cells at the back of the flat
surface. In front of the Braille cells one row of small buttons can be found, known as
Cursor Routing Keys. Each Braille cell has a corresponding Cursor Routing Key that
can be used for multiple functions. On the left and right side of the Braille line you will

Optelec ALVA BC6
English Page 10
find two groups of two keys. These so-called eTouch keys can be used for Braille
panning left and right as well as various other screen reader functions.
In front of the Cursor Routing Keys, you will find two groups of 9 keys. These groups
are called Smartpad. The ALVA BC680 contains a Smartpad Left (below cell 11 to
cell 30) and a Smartpad Right (below cell 51 to cell 70). Each Smartpad consists of 4
function keys and a 5-way navigation key.
2.3.2 Back panel lay-out
At the back of the Braille Controller, two USB ports can be found. The left USB port
(marked with one dot) can be used for charging the integrated batteries over USB
and for connecting the optional built-in screen reader with your PC. The right USB
port has been marked with two dots. This port cannot be used for charging the
integrated batteries over USB and for connecting the optional built-in screen reader
with your PC.
2.3.3 Right side lay-out
The power switch is located at the right side of the Braille Controller. The Braille
Controller is switched on when the rectangular push button is pressed. Switching the
Braille Controller on will generate an audio signal.
2.3.4. Left side lay-out
The left side of the ALVA BC680 contains two connectors. From front to back: a USB
keyboard connector and a power connector.
2.3.5. Front panel keys
The names of the ALVA BC680 keys listed in this section will be used in all
documentation, including your screen reader documentation. This section describes
the name of the key(s) and its main function, which is supported by the screen
reader. The exact functionality is defined by the screen reader. Please refer to your
screen reader documentation for detailed functionality of the ALVA BC680
Smartpad
The integrated Smartpad allows for navigation through menus and dialog boxes. The
ALVA BC680 contains two Smartpads. The left Smartpad is located on the left side of
the Braille Controller, in front of Braille cells 11 to 30. The right Smartpad is located
on the right side of the Braille Controller, in front of cells 51 to 70. From left to right,
the Smartpad keys are:
Smartpad key 1 First rectangular key at the left marked with 3 horizontal lines
Smartpad key 2 Second rectangular key at the left marked with 1 horizontal line
LEFT Left key on the 5-way navigation key
UP Top key on the 5-way navigation key
DOWN Bottom key on the 5-way navigation key
RIGHT Right key on the 5-way navigation key
MIDDLE Middle key marked with a round dot of the 5-way navigation key
Smartpad key 3 Second rectangular key from the right marked with 1 vertical line
Smartpad key 4 Most right rectangular key marked with 3 vertical lines

Optelec ALVA BC6
Page 11 English
eTouch keys
The two keys on each side of the Braille line are called the eTouch keys. They are
used for panning left and right as well as various other Braille functions.
eTouch key 1 Top left key marked with two vertical lines
eTouch key 2 Bottom left key marked with one horizontal line
eTouch key 3 Top right key marked with two vertical lines
eTouch key 4 Bottom right key marked with one horizontal line
Cursor Routing Keys
The cursor routing keys correspond to the particular Braille cell immediately above
each button. Typically, they are used for routing the cursor or caret to the
corresponding Braille cell, generating a left or right mouse click at that point, or for
obtaining additional information about the contents of the Braille cell.
Thumb keys
At the front of the Braille Controller ten front panel keys are placed, the so-called
thumb keys. Eight bigger keys are symmetrically aligned along the front of the ALVA
BC680. Two smaller buttons are located at the far left and right side of the front.
Pressing one of the eight bigger thumb keys will navigate left, right, up or down. By
pressing one of the smaller keys, you will return to the cursor position.

Optelec ALVA BC6
English Page 12
3. Installation
In this section, a general description of the installation procedure is described for the
JAWS, Window-Eyes and Dolphin Supernova screen readers for Windows 7 and
higher and Bluetooth® installation.
The ALVA Braille Controller is compatible with most modern operating systems,
including Windows 7, Windows 8, Linux, Apple OS X, Apple iOS, Google Chrome OS
and Android. Please refer to the screen reader documentation for instructions on how
to setup and configure the Braille display for your screen reader of choice and
operating system.
3.1. Setting up the ALVA Braille Controller
3.1.1. Setting up the USB connection
The ALVA Braille Controller does not need any special USB drivers. Windows 7 (or
higher and most other operating systems) will automatically detect the ALVA Braille
Controller and install the necessary USB drivers.
1. Attach the USB cable to the ALVA Braille Controller and computer.
2. A removable drive will appear on the screen. This drive contains the ALVA
BC6-series screen reader drivers for JAWS, Window-Eyes and Dolphin
Supernova.
3. Switch on the ALVA Braille Controller. Windows will automatically install
the necessary drivers. This process will take approximately 1 minute.
Please do not turn off the ALVA or cancel the installation during this
process. Generally this does not require any further user input. When the
connection is established the ALVA Braille Controller will issue an audible
signal and displays the message “USB connected”.
3.1.2. Setting up the USB keyboard connection of the ALVA BC680
The USB keyboard connection is only available on the ALVA BC680. To connect
your PC keyboard to the ALVA BC680, locate the USB keyboard connector on the
left side of the ALVA BC680. Make sure your ALVA BC680 is connected to the PC
and insert the USB plug of your keyboard. Windows will automatically detect your
keyboard without having to install drivers.
3.2. Installing ALVA BC6-series screen reader drivers
Drivers for the majority of the screen readers are included in the products
themselves. Therefore, you do not need to install the screen reader drivers from the
ALVA BC6-series CD-ROM or removable drive within the ALVA. Please refer to your
screen reader documentation for more information on the setup of, and selection of a
Braille display to select and configure the ALVA Braille Controller in your screen
reader.
Only if the drivers on the CD-Rom are newer than the drivers included with the
screen reader, we recommend to install the screen reader drivers from the CD-ROM
or ALVA internal removable drive:

Optelec ALVA BC6
Page 13 English
1. Insert the ALVA BC6-series software CD-ROM that came with the package
in your computer’s disk drive.
2. The program will automatically run if the autostart feature of your CD-ROM
drive is enabled.
a. If the autostart feature is not enabled, press the Windows key and
type d:\setup.exe (assuming d: is the letter assigned to your CD-ROM
drive) and press Enter.
b. Or, locate the ALVA folder on the ALVA BC6-series removable drive
and run the “ALVA BC6 Setup.exe”.
3. Select “Install screen reader drivers”
4. The setup program will guide you through the installation.
5. The setup program will automatically search your system for installations of
JAWS, Window-Eyes and Dolphin screen readers and will install all
necessary drivers, manuals and the ALVA BC6 Bluetooth® pairing utility.
3.3 Bluetooth® connection
To create the Bluetooth® connection with your ALVA, the device will need to be
paired with the PC using the ALVA Bluetooth Utility included with the ALVA screen
reader drivers.
Important:
Please use the ALVA Bluetooth Utility to establish the Bluetooth connection. Do not
use the standard Windows Bluetooth pairing control panel applet. The ALVA
Bluetooth Utility will register the ALVA with the screenreader.
Pairing the ALVA BC640 or BC680 using the ALVA BC6 Bluetooth®Utility
1. Launch the ALVA BC6 Bluetooth® Utility located on your desktop or by
going to Start, All Programs, ALVA BC6, ALVA BC6 Bluetooth® Utility;
2. Press the Search button.
3. Select the ALVA BC6 from the list by checking the checkbox;
4. Click on “OK” if you did not change the default PIN code “0000”. Otherwise,
please enter your PIN code and click on “OK”.
Connecting the Bluetooth ALVA BC680 USB keyboard:
1. In the ALVA Bluetooth® Utility, select the ALVA BC680 you just paired from
the list and right click or press shift-F10;
2. Select “Connect keyboard” from the context menu.
3. A new window will open. In this window, select your ALVA (other device) and
right click or press shift-F10;
4. In the context menu, select “Properties”;

Optelec ALVA BC6
English Page 14
5. On the “Services” tab, check the checkboxes to enable the available
services.
Unpairing an ALVA:
1. In the ALVA Bluetooth® Utility, select the ALVA BC6 from the list and right
click or press shift-F10;
2. Select “Unpair” from the context menu and press enter.
Please note:
A. You will have to restart your screen reader to establish the Bluetooth®
connection.
B. Most screenreaders use the first found ALVA. Therefore, make sure that the
ALVA you would like to use is at the top of the list. Use the “Up” button in the
ALVA Bluetooth® Utility to move an ALVA up the list.
C. Unchecking the checkbox in the list of paired ALVA’s in the ALVA Bluetooth
Utility will not unpair the ALVA. By unchecking the checkbox the screenreader
will no longer use this particular ALVA and wil remove it from the list of
available ALVA’s for the screenreader.
D. If there are multiple Bluetooth® stacks installed on your system, make sure
you select the Bluetooth® stack you would like to use with your ALVA in the
ALVA Bluetooth® Utility before proceeding with pairing the unit.
4. The ALVA BC6-series menu
This chapter describes the menus of the ALVA BC6-series. Standard there is one so-
called Local Menu on the ALVA BC640 and ALVA BC680. The Local Menu enables
you to change several built-in settings of the Braille display.
When the ALVA BC640 or ALVA BC680 is switched on, the following message is
displayed:
“ALVA BC640 ready” followed by the date and time.
“ALVA BC680 ready” followed by the date and time.
This message will automatically disappear when the screen reader is loaded and a
successful connection with the ALVA BC640 or ALVA BC680 is established.
4.1 Local Menu
Some menu items in the Local Menu are only available when using an ALVA BC680.
These menu items are marked as ‘*ALVA BC680*’.
4.1.1. Activating the Local Menu
To enter the Local Menu press the keys Smartpad key 2 + Smartpad key 3 + arrow
down key simultaneously.

Optelec ALVA BC6
Page 15 English
To exit the Local Menu:
1. Press Smartpad key 1. The Smartpad keys are located on top of the ALVA
BC640. If you are using an ALVA BC680, please use the left Smartpad,
located in front of Braille cell 11 to 30. The arrow keys and Enter key are
located in the centre of the Smartpad. The four remaining keys are labeled
from left to right Smartpad key 1 to 4. Refer to chapter 2 for a detailed
description of the ALVA Braille Controller keys.
2. Or, press eTouch key 1. eTouch key 1 is the top key marked with the 2 vertical
lines, located left of the Braille line.
Note: Depending on the used screenreader, you may need to close your
screenreader first in order to access the local menu
4.1.2. Changing settings in the Local Menu
The Local Menu allows you to configure the ALVA Braille Controller or review
information about the current status of the ALVA BC6-series.
To navigate in the menu use the following keys:
Local menu Key Combination
Next menu item Thumbkey 4 or Smartpad arrow down key
Previous menu item Thumbkey 2 or Smartpad arrow up key
Select menu item Thumbkey 3 or Smartpad Enter key
Next field in menu item Thumbkey 5 or Smartpad arrow right key
Previous field in menu item Thumbkey 1 or Smartpad arrow left key
Change value in menu field item Thumbkey 2 and 4 or Smartpad arrow up /
down keys
Confirm and leave field Thumbkey 3 or Smartpad Enter key
Exit menu without saving changes eTouch key 1 or Smartpad key 1
To indicate that a menu item is activated, it will be underlined with dot 7 and 8.
The Local menu has the following items:
Battery: 45%, charging
Battery presents the status of the battery and informs you if the battery is charging.
In case the USB connection is used, the ALVA BC640 or ALVA BC680 will charge via
USB automatically.
Date/Time: 01/01/2014 01:00:00
Date and time. This menu item shows the current date and time. To set the date and
time and to change the date and time format, please refer to the set date, set time
and date and time format menu options.

Optelec ALVA BC6
English Page 16
Bluetooth®status: connected
Bluetooth® status displays if the ALVA BC640 or ALVA BC680 Bluetooth® is
connected or disconnected.
Set Bluetooth® pairable
Set Bluetooth® pairable. Activating this menu item will disconnect the current
Bluetooth® connection and make the ALVA Braille Controller visible to other
Bluetooth® devices. Alternatively, switching the ALVA BC640 or ALVA BC680 off
and on will disconnect the current Bluetooth® connection and switches the
Bluetooth® module into the pairable state as well.
Bluetooth: on
Bluetooth® on / off.The ALVA Braille Controller Bluetooth® module can be
switched on or off using this menu item.
Bluetooth® pin: 0000
Bluetooth® PIN. The ALVA Braille Controller is protected by a Personal
Identification Number (PIN) to prevent other people from setting up a wireless
connection with your Braille display. This setting allows you to enter your own PIN
code. By default the PIN code is set to 0000. This number is required when setting up
a wireless connection with your PC or other Bluetooth® device. Use this menu item
to change the Bluetooth® PIN.
Bluetooth® name: ALVA BC640
Bluetooth® name: ALVA BC680
Bluetooth® Name. Specify the Bluetooth® name for the ALVA BC640 or ALVA
BC680. This allows you to uniquely identify the ALVA Braille Controller if you are
setting up a wireless Bluetooth® connection with your PC or other Bluetooth® device.
By default the Bluetooth® name is ALVA BC640 when using an ALVA BC640, or
ALVA BC680 when using an ALVA BC680. To be able to use your ALVA with Apple
and Android devices, please do not change the default name. Apple and Android
require the Bluetooth® name to start with ALVA BC640 or ALVA BC680.
Sleep: 30
Sleep. By default the sleep time function is set to 30 minutes. Set a time of 5, 10, 15
or 30 minutes, indicating the time after which the Braille display puts itself into sleep
mode if there is no activity. To disable the sleep function, select never. Consequently,
the ALVA BC640 and BC680 consume virtually no energy when the Braille display is
in sleep mode.

Optelec ALVA BC6
Page 17 English
Dot pressure: 5
Dot pressure. Select the Braille reading comfort by setting the dot pressure. If you
prefer hard and stiff Braille dots set the value to 5. If you prefer soft and weak Braille
dots, set the value to 1. The default setting is 5.
Number status cells: 0
Number status cells. By default the number of status cells is 0. To enable status
cells, select a value of 1 to 20 status cells when using an ALVA BC640 or a value of
1 to 40 when using an ALVA BC680. If the status cells are set to 0, the status cells
will be disabled and all 40 or 80 Braille cells are used for displaying text and data.
Status cells provide useful information about the text on the screen, Windows
controls and screen reader mode.
Please note that some screenreaders, such as JAWS, ignore this setting. To set the
number of status cells in JAWS, plese refer to the JAWS help documentation.
Status cells: Left
Status cells. The default position of the status cells is on the left. Select the position
of the status cells either on the left or right side on the Braille display.
Please note that some screenreaders, such as JAWS, ignore this setting. To set the
number of status cells in JAWS, plese refer to the JAWS help documentation.
Split point configuration menu
When split point is enabled, the Braille display will be divided into two segments.
This enables you to read and interact with two devices simultaneously. For example,
the Bluetooth® screen reader output of a mobile phone can be displayed on the first
segment of the Braille display while the second segment can be used to read the PC
screen reader output via the USB connection. The cell between the two segments will
have all 8 dots raised to indicate where the first segment ends and the second
segment starts. By default the first segment will display the information sent via the
Bluetooth® connection. The second segment will display the information sent via the
USB connection. If you own an ALVA BC680 you can connect e.g. two PCs using the
two USB ports on the back side of the ALVA BC680. To be able to use the split point
feature, please make sure your screen reader supports this function. To find out if
your screen reader supports the ALVA BC6 split point functionality, please refer to
your screen reader documentation.
Split point configuration menu : Split point active: off
Split point active. The first item in the Split point Configuration menu is the option to
enable or disable the split point feature.

Optelec ALVA BC6
English Page 18
Split point configuration menu: Split point: 5
Split point. Adjust the number of cells used for the split point function by selecting
the number of cells.
Split point configuration menu: Display layout: BT-USB
Display layout. This option selects which connection is linked to a Braille display
segment. By default the Bluetooth® connection is linked to the first segment and the
USB connection to the second segment. The hotkey on the ALVA BC680 to change
the display layout is Right Smartpad 2 + Right Smartpad 3 + Smartpad up or down.
Split point configuration menu: *ALVA BC680* Split keys: off
Split keys.This menu item is only available when using the ALVA BC680. The ALVA
BC680 offers the feature to split the keys in 2 groups of ALVA BC640 keys. If this
option is enabled, the left group of keys will be assigned to the left Split point
segment and the right group of keys to the right Split point segment. This option can
be enabled and disabled using the hotkey Right Smartpad 2 + Right Smartpad 3 +
Right Smartpad Enter.
Split point configuration menu: Keys to: left segment
Keys to. When selecting the keys to the left or right segment, the ALVA BC640 keys
will be directed to the selected segment and connection. The hotkey to switch the
keys on the ALVA BC640 to the left or right segment is Smartpad 2 + Smartpad 3 +
cursor routing key 1 for the left segment, and cursor routing key 40 for the right
segment.
On the ALVA BC680 this option configures if the connected USB keyboard input is
sent to the left or right segment. If the ALVA BC680 Split keys feature is switched off,
selecting the Keys to segment will also direct the ALVA BC680 keys to the selected
segment. The ALVA BC680 hotkey to switch the keys to the left segment is Right
Smartpad 2 + Right Smartpad 3 + Right Smartpad left. To switch the keys to the right
segment press Right Smartpad 2 + Right Smartpad 3 + Right Smartpad right.
Repeat keys: on
Repeat keys. The repeat function of the thumb keys can be enabled or disabled.
When holding down a thumb key with the repeat function switched on, the thumb
keys will start repeating after half a second. This enables you to quickly scroll the
display by keeping the thumb key pressed.

Optelec ALVA BC6
Page 19 English
2nd cursor routing row: on
2nd cursor routing row. The ALVA BC640 and ALVA BC680 are equipped with one
row of cursor routing keys. However, by keeping the cursor routing key pressed the
ALVA Braille Controller is able to emulate a second row of cursor routing keys. This
will give you the possibility to perform a left and a right mouse click with one row of
cursor routing keys. When enabled, the ALVA Braille Controller will differentiate
between a short and a long cursor routing key press. A short press will be treated as
a press of a key of the first row of cursor routing keys, while a long press will be seen
as a press of a key of the second row of cursor routing keys. The length of a “long
press” can be set by adjusting the delay time. The default time is half a second. The
assignment of the first and second row of cursor key actions depends on the used
screen reader. Refer to your screen reader documentation for the assignment of the
first and second cursor routing key actions.
2nd cursor routing delay: 500 ms
2nd cursor routing delay. The length of the delay before the second cursor routing
key is activated can be set by adjusting the delay time. By default the delay is set to
500 ms or half a second.
Sounds: off
Sounds can be switched on or off. When switched on, a short beep is being
generated on each key press. If you prefer no sounds to be generated, select “off”.
For each group of keys the beeps can be switched on or off individually.
Cursor routing sound: on
Cursor routing sound can be switched on or off. When switched on, a short beep is
generated on each cursor routing key press. If you prefer no sounds to be generated
when a cursor routing key is pressed, select off.
eTouch key sound: on
eTouch key sound can be switched on or off. When switched on, a short beep is
generated on each eTouch key press. If you prefer no sounds to be generated when
an eTouch key is pressed, select off.
Thumb key sound: on
Thumb key sound can be switched on or off. When switched on, a short beep is
generated on each thumbkey press. If you prefer no sounds to be generated when a
Thumb key is pressed, select off.
Other manuals for Alva BC640
2
This manual suits for next models
1
Table of contents