Aram API100 User manual

-100
User Manual

Contents
1 Contents
A. Components 2
3
4
6
7
8
11
12
14
25
15
16
17
18
19
20
21
22
23
24
B. H/W Parts
E. Application
ⅰ.Both Sides
ⅱ.Settings
ⅰ
.
Download & Install
ⅱ
.
How to connect with the program
ⅲ
.
Wi-Fi Combo
ⅰ. Start Analysis
ⅱ. Full Analysis
ⅰ. Device Certification
ⅲ
.
View Mode
CRM
Moisture
Sebum
Pore
Melanin
Clearness of Pore (COP)
Wrinkle
Sensitivity
Summary
※Notes on use
·
·
The information contained inthis manual and future improvements are subject to
change without
notice.
· The latest version of the manual will be updated at the below link.
http://www.aramhuvis.com/downloads
C. System Settings
D. Program Settings
F. Warranty

API 100
ChargerBattery
USB cable
Cradle
Sebum paper 1 box
Main body with skin lens
Cleaning cloth
Components
2A. Components

Battery cover
LED light & lens
Mode up Mode down
Capture
Start, Analysis, Result
External adaptor connection
Power on & o
H/W Parts
3 B. H/W Parts - Both Sides
Both Sides

Insert the battery
Open the battery cover by pushing it down with finger.
Insert the battery and gently press the battery into place.
Close the cover.
1
2
To turn on the power
Press and hold “power” button.
"Indicate LED" starts twinkling in blue light.
When it stops, the device is ready to use.
1
2
To turn o the power
Press and hold "power" button.
"Indicate LED" will be turned o.
1
2
3
1
1
2
3
2
H/W Parts
B. H/W Parts - Settings 4
Settings

Then 220V European type is disassembled
and you can see the 110V-220V
American type inside of the charger.
Charger can be used for Amercian type & European type.
The default is European type .
Push the plug up.
1
2
3
Choose the one you want to use and connect USB cable in adaptor.
1
2
3
H/W Parts
5 B. H/W Parts - Settings
Settings

PC User
Go to link on the browser as below.
http://www.aramhuvis.com/downloads
1
2
1
Install the program.
2
Tablet device or Smartphone user
iOS : Go to "App Store" and search "Solutionist" to download the program.
Android : Go to "Google Play Store" and download it.
System Settings
C. System Settings - Download & Install 6
Download & Install

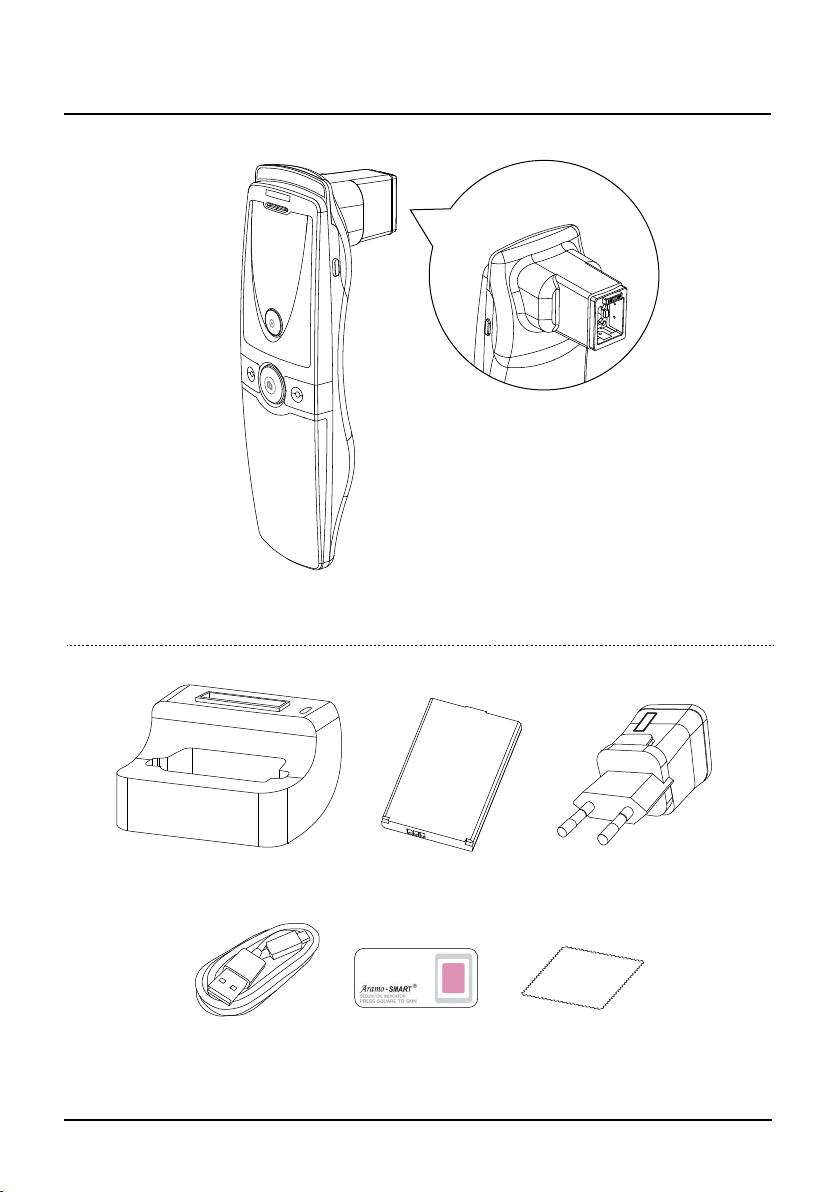
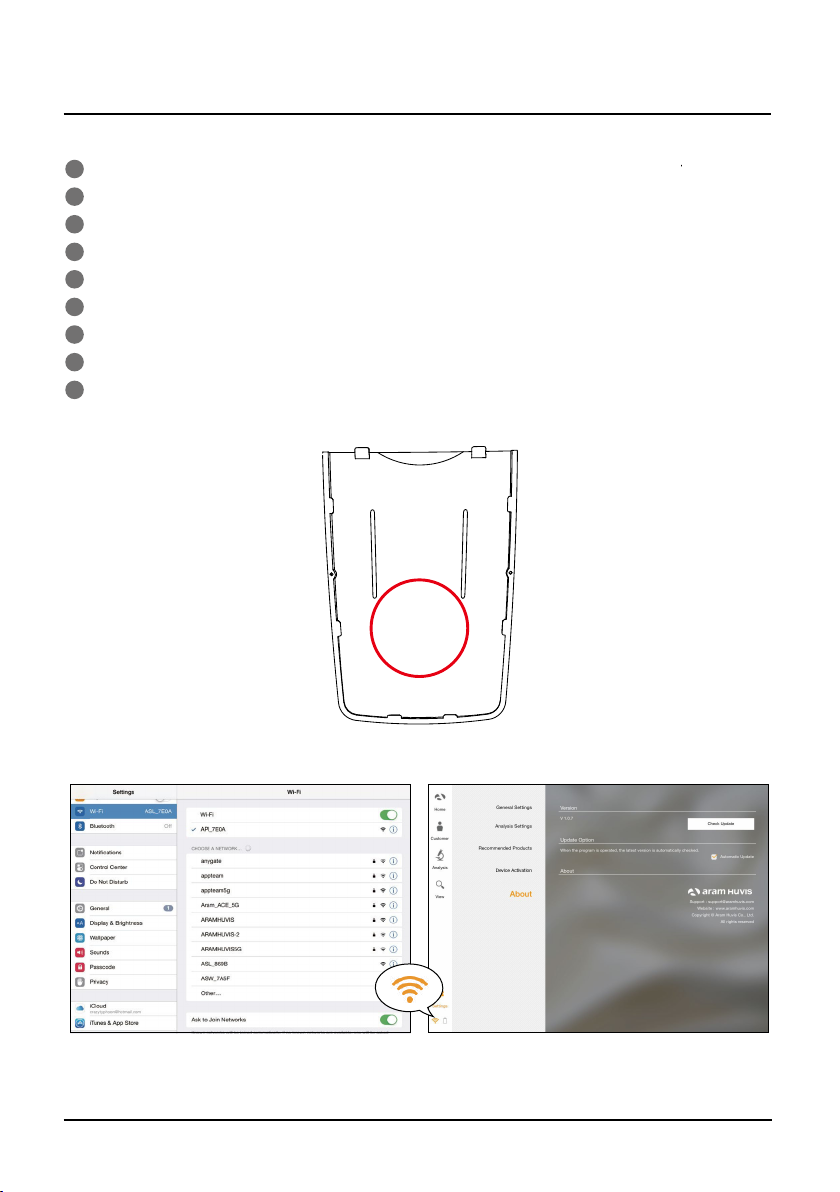
First of all, check the Wi-Fi name and password which is described at back side of battery cover.
Wi-Fi name & password must be same and the format is "API_XXXX".
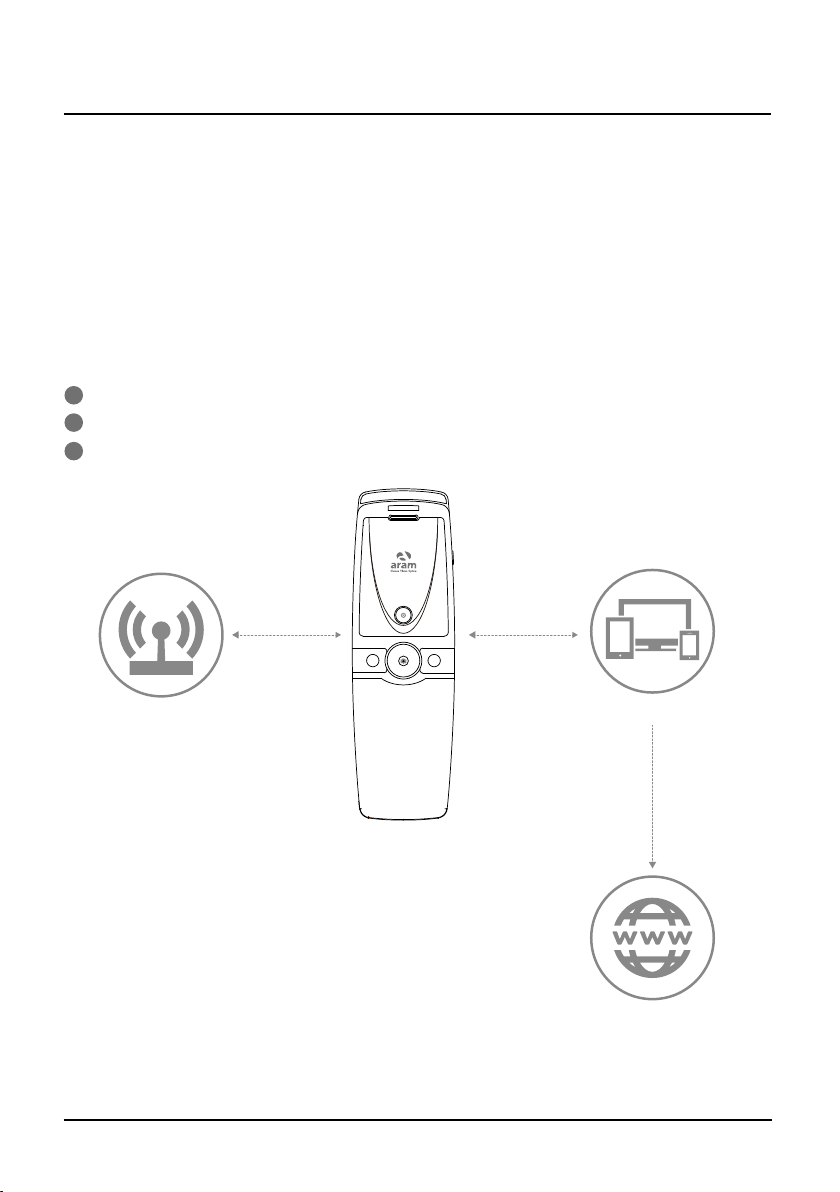
Turn on the device.
While turning on the device, prepare PC, Tablet, Smartphone to run the S/W.
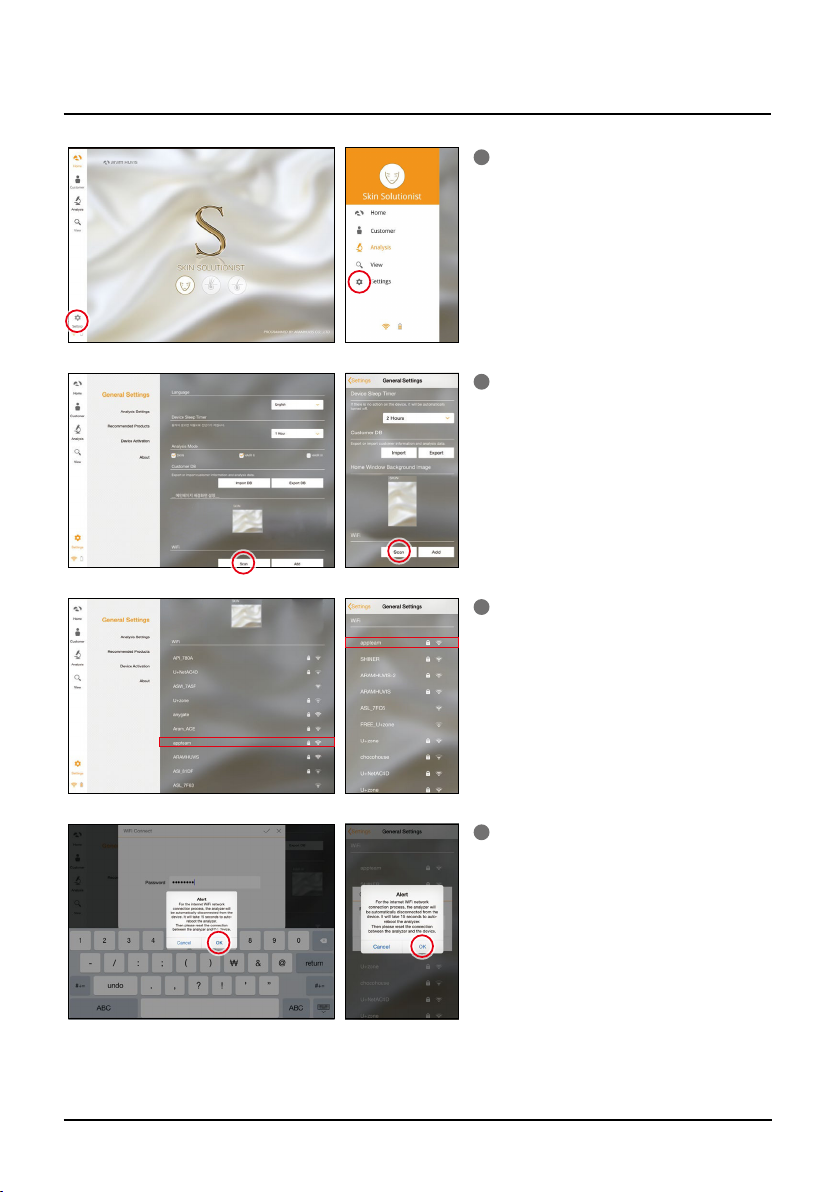
Once “API” device is turned on, please go to network setting to set up the Wi-Fi connection.
Among Wi-Fi lists, find “API_XXXX” and select it.
When above code is connected, run the program “Solutionist".
To check working properly, please check the program and see the le below side.
If it is correctly set up, you can see the orange light of Wi-Fi singal.
1
2
3
4
5
6
7
8
9
SSID: API_XXXX
PW: XXXXXXXX
System Settings
7 C. System Settings - How to connect with program
How to connect with program

Wi-Fi Combo
- It means user could use device and internet at the same time.
- With this function, user can send an email aer analysis immediately.
1
2
3
How to use?
The device has AP(API_XXXX) to be connected with the program “Solutionist” by Wi-Fi.
First of all, connect the device to AP to use it with “Solutionist”.
Run “Solutionist”.
PC/Phone/Tablet
Wireless LAN
Internet
Analyzer
System Settings
C. System Settings - Wi-Fi Combo 8
Wi-Fi Combo

System Settings
9 C. System Settings - Wi-Fi Combo
Wi-Fi Combo
1
2
3
4
Touch Settings.
In “General Settings”, go to “Wi-Fi” and
touch “Scan” button.
The available Wi-FI lists appear.
Among them, please choose the best
signal Wi-Fi to connect it.
During connect it, you can see the message
saying that API devicewill beautomatically
disconnectedand reboot.
Please touch “OK” button.

System Settings
C. System Settings - Wi-Fi Combo 10
Wi-Fi Combo
When Wi-Fi is connected, please go to
“Settings” page to set up the Wi-Fi
connection.
You can see now the Wi-Fi is connected.
Please turn it o and connect with device
AP code. (API_XXXX).
The analyzer is connected with AP code.
Then, run “Solutionist” program.
Then go to the settings again.
The selected AP will be checked as le.
The Wi-Fi combo is done.
1
2
3
4

Program Settings
11 D. Program Settings
General Settings
Change the language, analysis mode and
etc.
Analysis Settings
Set up the skin type and analysis
parameter.
Recommended Products
Available for each analysis result.
About
Check the current version and update is
available in Wi-Fi connection.
1
2
3
4

Program Settings
12D. Program Settings - Device Certification
Device Certification
Solutionist program includes three
programs.
But whenyou start “Solutionist” program with
API-100deviceyou can see the pop
message saying that the program is
compatible with only “SKIN” device.
Touch “OK” button.
Then you will see now only “SKIN”
program is activated.
On main menu, touch “Settings”.
Among the menu, please select “Device
Activation”.
There is a device model name with serial
code.
Please touch “Get Certification” to
register the device in program.
1
2
3
4

Program Settings
13 D. Program Settings - Device Certification
Device Certification
Device certification is complete.
Please touch “OK” button.
When it is done, you could touch
“Product Download”
button to load in server.
If you have the recommended product
data in server, the product will be
downloaded by clicking “Product
download”.
If you do not have the recommended
product data, you can see the message as
le image.
5
6
7

Touch “Analysis” to start.
Remote Control(Only Tablet)
During analysis, you can control the device in "Solutionist" program.
In screen, touch "Control Menu On" to activate "Remote".
You can make use of this function in all analysis pages.
Application
14E. Application - Start Analysis
Start Analysis
1
1
2
3

Application
CRM
15 E. Application - CRM
Input the information.
- full name, email address, gender and
age group
Take picture of customer's face with
built-in camera or use the picture you
already have in device.
Among the customer lists, select the
client to check or start analysis.
Check the customer information and
analysis result list.
1
2
3
4

Moisture sensor
Application
Moisture
16
Press "capture" button and when you hear
"beep" sound, please put the sensor onto
your skin and wait until you hear "beep"
sound again.
The result will appear.
To analyze the next step, touch the below
button.
or
E. Application - Moisture
1
2

Application
Sebum
17 E. Application - Sebum
Put the sebum paper onto the U-zone on
the cheek then press it for 2~3 seconds.
Place camera on the pink area and take
picture. (U-zone)
Put the sebum paper onto the T-zone
on face, then press it for 2~3 seconds.
Place camera on the pink area and take
picture. (T-zone)
The result will appear.
To analyze the next step, touch the below
button.
U-zone
or
1
2
3
4

4
Application
Pore
E. Application - Pore
Touch button to activate camera
mode.
Put the camera onto the skin and touch
button to capture the image.
Then touch button to analyze it.
The result will appear.
Touch "Compare" button to check the
sample images as .
To analyze the next step, touch the below
button.
Compare your image with 3sample
images.
-Good
- Normal
- Bad
or
or
or
18
1
2
3
4

19
Application
Melanin
E. Application - Melanin
4
Touch button to activate camera
mode.
Put the camera onto the skin and touch
button to capture the image.
Then touch button to analyze it.
The result will appear.
Touch "Compare" button to check the
sample images as .
To analyze the next step, touch the below
button.
Compare your image with 3sample
images.
-Good
- Normal
- Bad
or
or
or
1
2
3
4
Other manuals for API100
2
Table of contents
Other Aram Personal Care Product manuals