Optimum THERMOCOOK PRO M 2.0 User manual

QUALITY YOU CAN TRUST
USER’S MANUAL
THERMOCOOK PRO M 2.0

WELCOME TO YOUR NEW KITCHEN ASSISTANT! 1
IMPORTANT 2
GETTING TO KNOW YOUR THERMOCOOK PRO M 2.0 4
HOW TO INSTALL 9
BUTTON FUNCTION INTRODUCTION 14
HOW TO USE 14
FAULT CODES 16
PROCESSING GUIDE 16
WARRANTY TERMS AND CONDITIONS CONTACTING US 18
CONTENTS

1
Congratulations for investing in a professional quality Optimum ThermoCook Pro M 2.0. Your new
Optimum ThermoCook Pro M 2.0 is suitable for use in the domestic environment and you’ll very
quickly see why we describe it as “your new kitchenassistant”.
From the first time you use your Optimum ThermoCook Pro M 2.0, it will become your “secret
ally”, helping you to cook like a five-star chef. Its many diverse functions will help you to prepare
healthy, nutritionally balanced meals in half the time you’d expect. Use it to create an amazing range
of fresh, tasty, nutrient-rich foods, including:
• Smoothies
• Purées
• Fruit and vegetable juices
• 100% fruit ice-creams
• Preservative-free nut butters
• Spreads
• Dips
• Delicious hot soups
FOR BEST RESULTS, AND TO ENSURE YOUR SAFETY, PLEASE READ THE
INSTRUCTIONS IN THIS MANUAL CAREFULLY.
FOR ADDITIONAL INSPIRATIONAL IDEAS FOR DELICIOUS RECIPES,
PLEASE REFER TO THE OPTIMUM THERMOCOOK PRO M 2.0 RECIPE
BOOK.
WELCOME TO YOUR NEW KITCHEN ASSISTANT!

2
IMPORTANT:
1. Your Optimum ThermoCook Multi-Function Appliance is designed for household use, but can also
be used in other similar environments, such as:
• sta kitchen areas in shops, oces and other working environments
• hotel and motel guestrooms
• bed and breakfast type environments
• other residential type environments
2. Keep these instructions for use for future reference.
3. Check if the voltage indicated on the appliance corresponds to the local mains voltage before
you connect the appliance.
4. Appliances can be dangerous if they are used incorrectly. Please ensure that anyone who uses
your Optimum ThermoCook clearly understands how to operate it safely to avoid potential hazards.
5. Your Optimum ThermoCook is not a toy. Do not allow children to use it; and keep it and the cord
that comes with it out of their reach.
6. The cutting blades on your Optimum ThermoCook are extremely sharp, and can injure you. Take
care when you handle them, e.g. when
you empty the bowl or clean it. Do not touch the edge of blades, and be careful to only hold the
top part of the blade assembly when
you place or remove it.
7. Switch o your Optimum ThermoCook and disconnect it from any power supply before you
change the accessories or handle any moving parts.
8. Always disconnect your Optimum ThermoCook from the power supply if you need to leave it
unattended; and before you assemble, disassemble or clean it.
9. Please disconnect your Optimum ThermoCook from the power supply when you clean the
appliance or put it away for longterm storage.
10. If the supply cord is damaged, it must be replaced by the manufacturer, its service agent or
similarly qualified persons in order to avoid a hazard.
11. Accessories, other than those supplied with the appliance, should not be used when operation
the Optimum ThermoCook. Misuse may damage your appliance and void your warranty.
12. Do not remove the lid while your Optimum ThermoCook is boiling water.
13. Do not immerse your Optimum ThermoCook in water.
14. Thoroughly clean the parts that will come into contact with food before you use the appliance for
the first time.
15 Always put the main appliance on a flat, dry and clean surface.
16. Don't touch the blade especially while they are running.. They are very sharp. Only hold the upper
part of the blade while removing or re-inserting it.
17. Don’t use your attachment and/or appliance if it has been damaged. You should contact an
approved service centre.
18. Dropping your Optimum ThermoCook or allowing it to fall can seriously damage it. Please place it
BEFORE USING YOUR OPTIMUM THERMOCOOK PRO
M 2.0, PLEASE READ THESE SAFETY INSTRUCTIONS
CAREFULLY.

3
on stable, flat, heat-resistant surface (e.g. a bench or table); and ensure that it is at a safe distance
from the edge to avoid falling. Please be aware that when you use the unit to knead dough or cut
food, vibration may cause it to move; so do not leave it operating unsupervised.
19. Any damage to components – including the main body, jar, and steamer – can make your
Optimum ThermoCook less safe to use.
Regularly check all components for damage, and if you find something wrong, please stop using
the appliance and contact our After Sales Service centre.
20.
If your Optimum ThermoCook stops unexpectedly or appears to malfunction, switch o the power
supply, unplug it from the mains, and stop using it immediately. Seek professional advice from the
manufacturer, its service agent, or a similarly qualified person to identify the fault and make any repairs.
21.
The measuring cup is the only part that can be safely used to cover the round hole in the jar lid. Please
do not use a cloth or anything similar to cover this hole, and ensure the measuring cup is placed
correctly to cover it when you process food. Pay attention to the capacity mark on the blender jar.
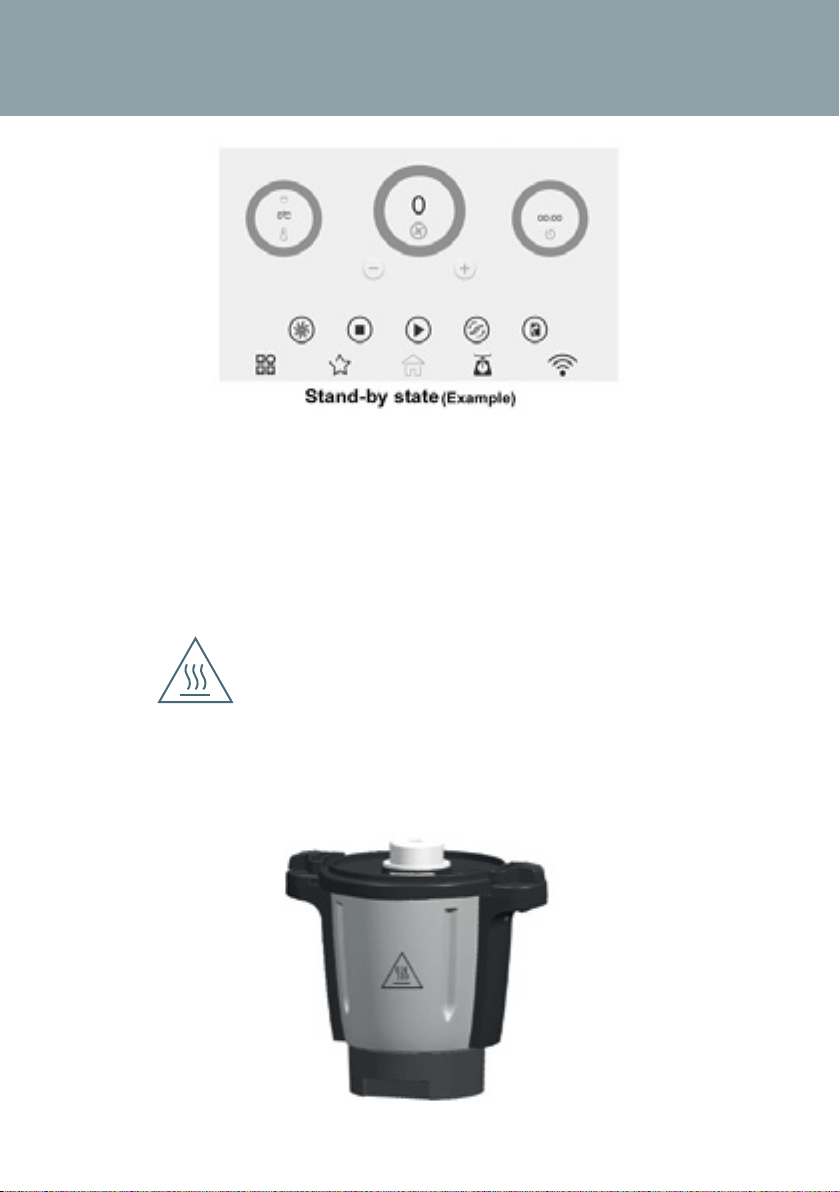
22.When processing hot food (for temperature above 60 degrees Celsius) , don’ t touch the
measuring cup. WARNING, the lid can become super hot.
23.When you use the steamer, make sure that it is connected properly to the jar, and that the
steamer lid is in place. Be careful of any vapour that flows out through the top or sides of the
cover, as this may scald you. Regularly check that the vent hole on the steamer lid is clear to
prevent the vapour from escaping elsewhere.
24.When the steamer is operating, the handles are the only safe place to touch it. Touching it
anywhere else may result in injury.
25.After using your Optimum ThermoCook, please keep it and any of its parts that are still hot well
out of children’s reach.
26.Food leakage can damage your Optimum ThermoCook. To avoid this, make sure that you place
the blade sealing ring correctly, and use the fixing bracket to ax the blade assembly to the bottom.
27. Poor ventilation can also damage your Optimum ThermoCook. To avoid this, ensure that the vents
on the back of the main body are clear of any blockages.
28.The appliance is not intended for use by persons (including children) with reduced physical,
sensory or mental capabilities, or lack of experience and knowledge, unless they have been
given supervision or instruction concerning us of the appliance by a person responsible for their
safety11. Never let the appliance run unattended.
29.
The Spatula is only used for moving the food out of the bowl. Don’t use it while the blade is running.
30.Be careful if hot liquid is poured into the food processor as it can be ejected out of the appliance
due to a sudden steaming.
31. When the current temperature of the bowl is at or above 60C), you will find:
1) The working speed will be limited at speed 1-4.
2) The appliance will automatically switch the working speed to speed 4; Even through the
current working speed is set at speed 5-10.
IMPORTANT: FAILURE TO FOLLOW THESE SAFETY INSTRUCTIONS AND
WARNINGS COULD RESULT IN SERIOUS INJURY. ADDITIONALLY,
MISUSING YOUR OPTIMUM THERMOCOOK PRO M 2.0 MAY DAMAGE
IT AND VOID YOUR WARRANTY.

4
GETTING TO KNOW YOUR THERMOCOOK PRO
M2.0
This section introduces you to the key components of your new Optimum ThermoCook Pro M 2.0.
1: Denotes the blade running in the forward direction (Speed: 1-10).
Tips: You may click “+”/”-” or slide the circle to set the speed you need.
2: Denotes the temperature. (Temperature range: 30-120. From 30-120, temperature increases
by 5.)
Tips:
1) You may click “+”/”-” or slide the circle to set the temperature you need.
2) It will show real-time temperature if the bowl is installed, and will show 0 if the bowl is
removed.
A. Measuring cup (Max. 100ml)
B. Bowl lid
C. Inner lid with air-proof ring
D. Blade
E. Air-proof ring
F. Bowl (Max.2L )
G. Nut
H. Stirring attachment (Butterfly)
I. Main appliance
J. LCD
K. “On/O” button
L. ”Start/stop” button
M. lid
N. Food steamer (Tray)
O. Steamer
P. Spatula
Q. Inner basket
PARTS NAME:
LCD:

5
3: “Start/stop”. Click it to start or stop the appliance.
4: Clear key. Click it to clear all the previous settings and go back to “stand-by state”.
5: “Pulse” key. When selected, the appliance instantly starts to run at the highest speed of 10. If
you don’t touch the key, the appliance will recover to the previous working speed.
Tips: When the temperature of the bowl is at or above 60 , or the blade is running in the reversal
direction, or at “stop” state, it can’t be used.
6: Recipe. Click it to select the recipes you need.
7: Favourites. You may collect your favourite recipes here.
8: DIY.
Tips: When the working temperature is set between 105 and 120, to avoid the dangerous
situation of spilling food, we recommend that the maximum quantity of the food processed is
no more than 1.5L.
9: Denotes the time. (Time range: 0second-99minutes)
0-60 seconds: From “-” to “+”, the time increases by 1 second.
1-10 minutes: From “-” to “+”, the time increases by 30 seconds.
10 minutes - 99 minutes: From “-” to “+”, the time increases by 1 minute.
Tips:
1) You may click “+”/”-” or slide the circle to set the time you need.
2) If you don’t set the working time, the longest work time of the appliance is 99 minutes at each
time!
10: denotes the blade running in the reversal direction (Speed: 1 -3).
11: Shortcut menu. Menu options include “JAM”,” STEAMING”, ”SOUP”, “KNEADING 1” and
“KNEADING 2”.
1) “JAM”
The recommended recipe is:
Fruit: 500g
Sugar: 500g
Default setting:
Step 1: working time is 15 seconds, speed is 6. Once this step start, you may increase the working
time during the operation.
Step 2: pause for 2 seconds.
Step 3: working time is 10 minutes, speed is 1 and target temperature is 100. Once this step start,
you may reset the time and temperature.
Tips: 5 seconds left to the programme and will continue beeping until the programme ends. At
last, the appliance goes back to stand-by state.

6
2) ”STEAMING”
The recommended recipe is:
Broth or water: 500-600ml
Default setting:
Working speed is 1, time is 17 minutes and target temperature is 120.
Tips:
(1) You may reset the time before the operation and during the operation.
(2)Sound “Beep” will be heard when there is 5 seconds left to the programme and will continue
beeping until the programme ends. At last, the appliance goes back to stand-by state.
3) “SOUP”
The recommended recipe is:
Soup: 1L (400g Vegetable and 500ml water).
Default setting:
Step1: The blade runs in the reversal direction at speed 1, working time is 20 minutes and target
temperature is 100 .
Step 2: pause for 2 seconds.
Step 3: working time is 2 minutes, speed is 4 and target temperature is 100.
Step 4: pause for 2 seconds.
Step 5: working time is 8 minutes, speed is 4 and target temperature is 100.
Tips: Sound “Beep” will be heard when there is 5 seconds left to the programme and will
continue beeping until the programme ends. At last, the appliance goes back to stand-by state.
4) “KEADING 1”
The recommended recipe is:
Flour: 250g, water: 140g, sugar: 5g, butter: 5g, salt: 5g, dry yeast: 7g.
Default setting:
Step 1: working time is 30 seconds, speed is 4.
Step 2: pause for 3 seconds.
Step 3: The blade runs in the reversal direction at speed 3, working time is 25 seconds.
Step 4: pause for 3 seconds.
Step 5: working time is 30 seconds, speed is 4.
Step 6: pause for 4 seconds.
Step 7: The blade runs in the reversal direction at speed 2, working time is 25 seconds.
Tips: Sound “Beep” will be heard when there is 5 seconds left to the programme and will
continue beeping until the programme ends. At last, the appliance goes back to stand-by state.
5) “KEADING 2”
The recommended recipe is:
Flour: 500g, water: 285g, sugar: 10g, butter: 10g, salt: 10g, dry yeast: 15g.
Default setting:
Step 1: working time is 45 seconds, speed is 4.
Step 2: pause for 3 seconds.
Step 3: The blade runs in the reversal direction at speed 3, working time is 40 seconds.

7
Step 4: pause for 3 seconds.
Step 5: working time is 45 seconds, speed is 4.
Step 6: pause for 4 seconds.
Step 7: The blade runs in the reversal direction at speed 2, working time is 40 seconds.
Tips: Sound “Beep” will be heard while the working time is left 2 seconds. At last, the appliance
goes back to stand-by state.
12: “WIFI” key.
You may follow the steps to use it:
1) Install APP on your mobile phone.
2) Click “WIFI” touch key to pop up account and password.
3) Open APP on your mobile, and then input the account and password. If “WIFI” logo changes
colour, which means WIFI is well connected. Now you may operate the appliance via your
mobile phone.
Tips:
1. The appliance is only allowed to connect one mobile phone at each time.
2. Frequency range: 2.4-2.5GHz.
3. Software version: V1.0
4. Hardware version: V1.0
5. Maximum RF output power of the product: 12.5dbm
13: “Weigh” key. (Weighing range: 0-5000g)
You may follow the steps to use it:
1. Click “weigh” key.
2. When LCD shows “0000”, put the food in bowl.
3. Read the number shows on the LCD. That is the net weight (Unit: g) of the food added.
4. Click “ ” on pop-up dialog, the read number is cleared. And you may continue weighing the
food to be added.
14: Stand-by state.
Plug in and press “On/O button (K)” to start
the appliance, and the appliance goes into
stand-by state.
The appliance goes into stand-by mode
when inactive for 5 minutes. The appliance
will go into “sleep mode (black screen)”.
You may press “Start/Stop” button (L) to
resume use.

8
15. “Start/Stop” button (L).
Press this button to start/stop the appliance, or recover the appliance back to its stand-by state.
If you hold this button down for longer than 3 seconds at any time, the appliance will exit any current
working condition instantly and go back to stand-by state. This will clear all settings.
THE SCALE OF THE BOWL
The Maximum capacity of the bowl is 2 litres. Don’t process the food more than 2 litres.
Caution:
“Hot surface” logo marked on the bowl
To indicate that the marked item can be hot and should not be touched without taking care!
•

9
HOW TO INSTALL THE AIR-PROOF RING
Please install “air-proof ring” according to the above figure.
HOW TO INSTALL/REMOVE THE BLADE
1. Put the air-proof ring (E) on the blade. Push the blade through the opening at the bottom of
the bowl. (See above figure)
2. Rotate the nut clockwise to install it tightly on the blade.
3. Rotate the nut anti-clockwise slightly to remove the blade from the bowl:
HOW TO INSTALL

10
When removing the blade from the bowl, you need hold the upper part of the blade with one hand,
and release the nut with the other hand.
Caution:
1. The blade is very sharp. Handle it with care. Only hold the upper part of the blade.
2. The air-proof ring must to be fitted on the blade. If there is no air-proof ring, the food to be
chopped or cooked may leak out and damage the appliance.
HOW TO INSTALL/REMOVE THE BOWL
To install the bowl:
1. Put the bowl lid on the bowl. And rotate the bowl lid clockwise to lock it on the bowl. (See above figure)
2. Insert the bowl onto the bowl socket. Be sure to make place Z1 point to place Z2. Press the bowl lid slightly to
ensure the bowl is well fitted.
3. Insert the measuring cup.

11
To remove the bowl:
Please follow the steps:
1. Press the button “Z3” of each handle.
2. Draw the bowl out of the main appliance.
HOW TO INSTALL THE INNER BASKET
The inner basket is suitable for cooking small quantity food, such as rice, fish and meat. Please follow
the steps:

12
1. Install the blade into the bowl.
2. Add water into the bowl.
3. Insert the inner basket and place ingredients in the basket.
4. Then cover the bowl lid.
5. Turn the bowl lid until it is locked in position. Place measuring cup on the bowl lid.
Caution:
1. The maximum amount of water added into the bowl should be 800ml and should not
immerse the steamer basket.
2. Danger of scalding by hot steam and hot condensed water.
3. Hot steam is dangerous and cause burns. Please take precaution in ensuring that steam
does not come in contact with your skin.
4. Don’t touch the metal part of the bowl while it is hot. Only hold the handle of the bowl to
move it.
HOW TO INSTALL THE STEAMER
The steamer is perfectly suited for preparing food such as vegetables with meat, sausages, steamed
bread, steamed fish etc.
You can use the steamers in either of the following two combinations:
Combination 1: Lid (M) + steamer (Tray) (N) + Steamer (O)
Use this combination for cooking dierent foods.
Combination 2: Lid (M) + Steamer (O)
Use this combination for larger amount of the same food, e.g. vegetables, potatoes or large pieces of
meat or sausages.
Please follow the steps:
1. Install the blade, and then fasten the bowl on the main appliance.
2. Add the water (0.5L≤water≤2L) into the bowl. (Caution: The water in the bowl should be
more than 500ml which can be used for 30 minutes of steaming.
3. Put the air-proof ring on the bowl lid, and then attach bowl lid.

13
4. Turn the bowl lid until it is locked in position.
5. Place the steamers on the bowl lid.
6. Place food on the steamer, and then cover the lid.
Caution:
1. Danger of scalding by hot steam - never use the steamer without its lid.
2. If the lid is not fitted properly, the steam will escape and ingredients may not cook properly
3. Never leave the measuring cup on the bowl lid when using the Hot steam is dangerous
and cause burns. Please take precaution in ensuring that steam does not come in contact with your
skin.
4. 30 minutes of steam cooking requires 0.5 litre (500ml) of water, you need add around
250ml of water for each additional 15 minutes.
HOW TO INSTALL THE BUTTERFLY
The butterfly will help you to achieve the best results while whisking cream, beating mayonnaise or
egg whites.
1. Hold the ball-shaped end of the butterfly.
2. Insert the butterfly on the upper part of the blade, until you hear a “click”. That means
the butterfly is well installed on the blade. (See the above figure)
3.
If you want to remove the butterfly from the blade, just hold the ball-shaped end and pull it out with
rotations in both directions.
Caution:
1. Only switch machine on after the butterfly has been positioned into place.
2. Don’t add ingredients that might damage or block the butterfly when the blade is in motion
and the butterfly is fitted.

14
HOW TO USE THE BASIC FUNCTION
You may set the working time, speed and temperature according to your requirements. Please follow
the steps:
1. Set the working speed (1-10), the time (0-99minutes) and the temperature (30-120).
NOTES:
1) If you set the working speed and time, or only set the working speed, the appliance will only mix
ingredients without heating it.
2) If you set the working speed, time and temperature, the appliance will mix AND heat the
ingredients.
2. Click “Start/Stop” button, and the appliance will start mixing while the timer counts down.
(Note: If you don’t set the working time, the timer of appliance will be count up.)
3. 5 seconds left to the programme and will continue beeping until the programme ends.
After the countdown ends, the machine enters stand-by state.
4. After use, turn the main appliance o. Remove the bowl from the main appliance, and take
o the bowl lid.
5. Take out all ingredients from the bowl.
Caution:
1. Don’t touch the metal part of the bowl while it is hot.
2. Only hold the handle of the bowl to move the bowl.
3. Never heat up the bowl when it is empty.
4. You change the working time between 0-99minutes), speed (between 1-10) and
temperature (between 30-120) at any time.
BUTTON FUNCTION INTRODUCTION:
From Top Left to Right:
• Temperature Control (Tap to adjust temperature up or down 30deg - 120deg)
• Speed Control (Tap to adjust blade speed 1-10)
• Time Control (Tap to adjust time 1 sec - 90 minutes)
Middle Row Left to Right:
• Language choice (English or Spanish)
• Pulse function (touch and hold to pulse, release to stop)
• Stop button
• Start button
• Reverse Blade function (used for gentle mixing, replaces the need for a blade cover)
• Menu function for automated settings
•
Bottom Row Left to Right:
• Recipe Book (easy tap and select)
• Favourites option
• Home Button

15
• Built in Scales (touch the scales to weigh, to bring back to zero tap the screen to reset, touch
the scales to close)
• WiFi function (when turned on allows recipes to be updated automatically once a month)
• Large Button below LCD screen for start/stop/pause.
Built in Scales
Automated Function Settings
Recipe Book
Automated Function Settings
Jam
Steaming
Soup
Kneading 800g
Kneading 500g

16
FAULT CODES:
Code Status Solution
E1
E2
E3
E4
The appliance needs to be sent to the
approved service centre for repair.
“E1” was shown on LCD, meanwhile
the light colour of “Start/Stop” button
(L) changes from green to red.
“E2” was shown on LCD, meanwhile
the light colour of “Start/Stop” button
(L) chang-es from green to red.
“E3” was shown on LCD, meanwhile
the light colour of “Start/Stop” button
(L) chang-es from green to red.
“E4” was shown on LCD, meanwhile
the light colour of “Start/Stop” button
(L) chang-es from green to red.
Take out the bowl and reinstall it according to
the operating instruc-tion. It needs to be sent
to the ap-proved service centre if it still doesn’t
work.
Take out the bowl, and reinstall it according to
the operating instruc-tion. It needs to be sent
to the ap-proved service centre if it still doesn’t
work.
Firstly power o, and then restart the appliance
after 1 hour. It needs to be sent to the approved
service centre if it still doesn’t work.
PROCESSING GUIDE
Flour
5
Speeds
Accessory
Butterfly (H)
Blade (D)
Food
Egg Whites
Maximum Operation time
500g
3 eggs
300g
3 minutes
2 minutes 3
Water
CLEANING:
1. Before you clean the appliance, switch the appliance o and remove the plug from the socket.
2. Unscrew the screw ring and remove all parts of the attachment.
3. All the accessories can be cleaned in the dishwasher.
4. While using the appliance, always keep the contact pins at the bottom of the bowl clean and dry!
Wipe the contact pins at the bottom of the bowl with a dry cloth!
5. Never use pointed or sharp objects for cleaning as this may damage functional parts or aect the
safety of the appliance.
6. The blade is very sharp, please ensure to handle it with care.
7. Wash all parts in hot soapy water. Clean them immediately after use. Rinse them with clear hot
water and dry them immediately.

17
8. We advise you to lubricate the blade with some vegetable oil.
9. Only wipe the main appliance with a damp soft cloth.
10. If the bowl and blade is hard to clean. You may add some hot soapy water in the bowl and run the
appliance at speed 1 for few seconds.
The device complies with the European Directives
2014/35/EU, 2014/30/EU and 2009/125/EC
At the end of its service life, this product may not be disposed
of in the normal household waste, but rather must be disposed
of at a collection point for recycling electrical and electronic
devices. The materials are recyclable according to their
labelling. You make an important contribution to protecting our
environment by reusing, recycling or utilizing old devices in
other ways. Please ask the municipal administration where the
appropriate disposal facility is located.
Model : TCPROM2
Voltage : 220-240V
Frequency : 50/60Hz
Rated Power (Motor) : 700W
1700W
TCPROM2WHI20110001
Rated Power (Heating) :
Serial Number :
Made in PRC,
loved by the world
Optimum ThermoCook Pro M 2.0

18
The warranty outlined below only covers distributors of the Optimum range of appliances. Please contact your
distributor for a full product warranty.
Eective as of 1st January 2014
1. Optimum® (“we”) warrants this appliance to be free from defects in materials and workmanship. As long as you
use it according to this instruction book, Optimum® warrants that it will perform satisfactorily in household use
for a period of 1 year.
2. Any warranties beyond this standard period are oered as extended terms by the selling distributor. This
means you can only claim them though that provider.
3. We will repair/replace your appliance if any defects occur under normal use and care within this manufacturers’
warranty period at our discretion, and only if the selling distributor cannot do so. This is done solely at our
option with no charge for parts. This warranty does not extend to any accessories, whether included or
purchased separately.
If your distributor determines that your appliance has a major fault, they may oer a replacement at their own
discretion.
4. The blade assembly and drive socket will only deteriorate through abuse and misuse. They are therefore are
only covered by this warranty for up to 30 days after purchase date.
5. If your appliance needs repair while it is under warranty, and your distributor cannot provide the repairs, you
are responsible for the cost of returning it to us (or an approved service provider), and also for the cost of
returning it back to you.
6. Whilst your appliance is in transit, you assume all risk for it. The warranty does not cover any further damage
during transportation.
7. You must ensure that you properly package your appliance when you return it to avoid any damage to it during
transit.
8. To enable us to process your warranty claim, ensure you include an explanation of any problem. We will not
look for faults for you, and will only repair described faults as covered under warranty.
9. This full warranty is void if your appliance has been subjected to abuse, negligence, accident, alteration, failure
to follow operating instructions, or exposed to abnormal or extreme conditions.
9. Cosmetic changes that do not aect performance will not be considered defects or fall under this warranty.
These changes include discolouration of any parts of your appliance, or the eects of using abrasive cleaners.
The warranty does not cover cleaning or removing any food products from your appliance, or repairing any
damage caused by allowing them to build up.
10. This warranty does not cover normal wear and tear on your appliance or its parts.
11. This warranty does not cover any defect caused by an accident, misuse, abuse, improper installation or
operation, lack of reasonable care, unauthorised medication, loss of parts, tampering or attempted repair by
anyone we have not authorised to make repairs.
12. The warranty will not apply if the damage, malfunction or failure results from alterations, accident, misuse,
abuse, fire, liquid spillage, maladjustment of customer controls, use on an incorrect voltage, power surges and
dips, thunderstorm activity, acts of God, voltage supply problems, tampering or unauthorised repairs by any
persons, use of defective or incompatible , exposure to abnormally corrosive conditions or entry by any insect,
vermin or foreign object in the product.
13. The warranty does not cover damage from using your machine with an alternate power source (e.g. solar,
inverter, generator, etc.). We do not recommend using these devices to power your appliance.
14. You must keep your purchase docket/receipt as both proof of purchase, and proof of the date on which you made
the purchase. You will need to present your purchase docket or receipt when making a claim under thiswarranty.
15. If you do not present your receipt of purchase, this warranty is invalid. Consumer Law allows us to request
reasonable proof of purchase to service a warranty claim.
16. This warranty does not imply, intend to or detract from any consumer rights listed in, and able to be enforced
from, Regulated Consumer Law. If any condition is found to be in breach of the Consumer Law, only that single
condition shall be void; and all other conditions will remain in place.
WARRANTY TERMS & CONDITIONS
Table of contents