Optimus MR-8Z User manual

MR-8Z v1.0 Page 1 of 27
MR-8Z
8 ZONES AUDIO SERVER AUDIO SERVER
SAFETY INSTRUCTIONS:
IMPORTANT:
Read carefully the safety instructions.
Keep this manual for future references.
Unplug the equipment during lightning storms or if it won’t be used for a long time.
Always use certified wires to prevent electric shock or fire. In case of doubt, consult a qualified
installer.
Do not use the unit in humid places or near liquids. Do not install it near heat sources. Do not
block ventilation openings.
When it is necessary, remove dust with a dry cloth. Do not use solvents such as alcohol. Keep
the unit clean and dust free.
Maintenance operations require qualified personnel.
Note: The information provided in this manual does not include neither details of design
production or variations in equipment, nor possible risks during installation, operation or
maintenance. If you need special assistance beyond the manual, please contact our
customer service.
MR-8Z v1.0 Page 2 of 27
MR-8Z
8 ZONES AUDIO SERVER AUDIO SERVER
ÍNDICE
1.GENERAL INFORMATION..........................................................................................3
2.CONNECT THE SYSTEM............................................................................................3
3.CONFIGURE THE SYSTEM........................................................................................4
3.1How to create a zone............................................................................................4
3.2How to create a new player...................................................................................5
3.3How to change player mode .................................................................................6
3.4How to manage all players/zones simultaneously.................................................7
3.5How to make microphone announcements over individual players.......................8
3.6How to setup Spotify music service.......................................................................9
3.7How to play internet radio station........................................................................11
3.8How to stream music from your iPhone, iPod or iPad wirelessly with Airplay.....13
3.9How to create scheduler task..............................................................................15
3.10How to create Jingles..........................................................................................17
3.11How to play a jingle in the selected zone............................................................19
3.12How to schedule Jingles .....................................................................................21
3.13How to generate playlist with periodic ads or announcements............................21
3.14How to prevent unauthorized accesses to the software......................................22
3.15How to control the software remotely via web browser.......................................24
4.SUPPORTED AUDIO FORMATS..............................................................................26
5.TECHNICAL SPECIFICATIONS................................................................................26
6.GUARANTEE CERTIFICATE ....................................................................................27

MR-8Z v1.0 Page 3 of 27
MR-8Z
8 ZONES AUDIO SERVER AUDIO SERVER
1. GENERAL INFORMATION
The audio server MR-8Z permits to send audio and control up to 8 independent zones. In
combination with public address system, it presents the perfect solution for music distribution
systems in Hotels and Shopping Centers.
The system is composed by the server itself and an 8 audio output module.
2. CONNECT THE SYSTEM
Connect the Server to the audio output module using USB cable.
Connect the audio output module to the amplifiers using RCA outputs.
If you want to play audio from an external music source or microphone, connect it to the server
audio input using 3.5” mini jack.
MR-8Z v1.0 Page 4 of 27
MR-8Z
8 ZONES AUDIO SERVER AUDIO SERVER
3. CONFIGURE THE SYSTEM
The first step is to install the drivers of the output module and the software.
Once the software is installed you can proceed to create the zones, one for each output, and the
players. After this operations the system is ready to use.
3.1 How to create a zone
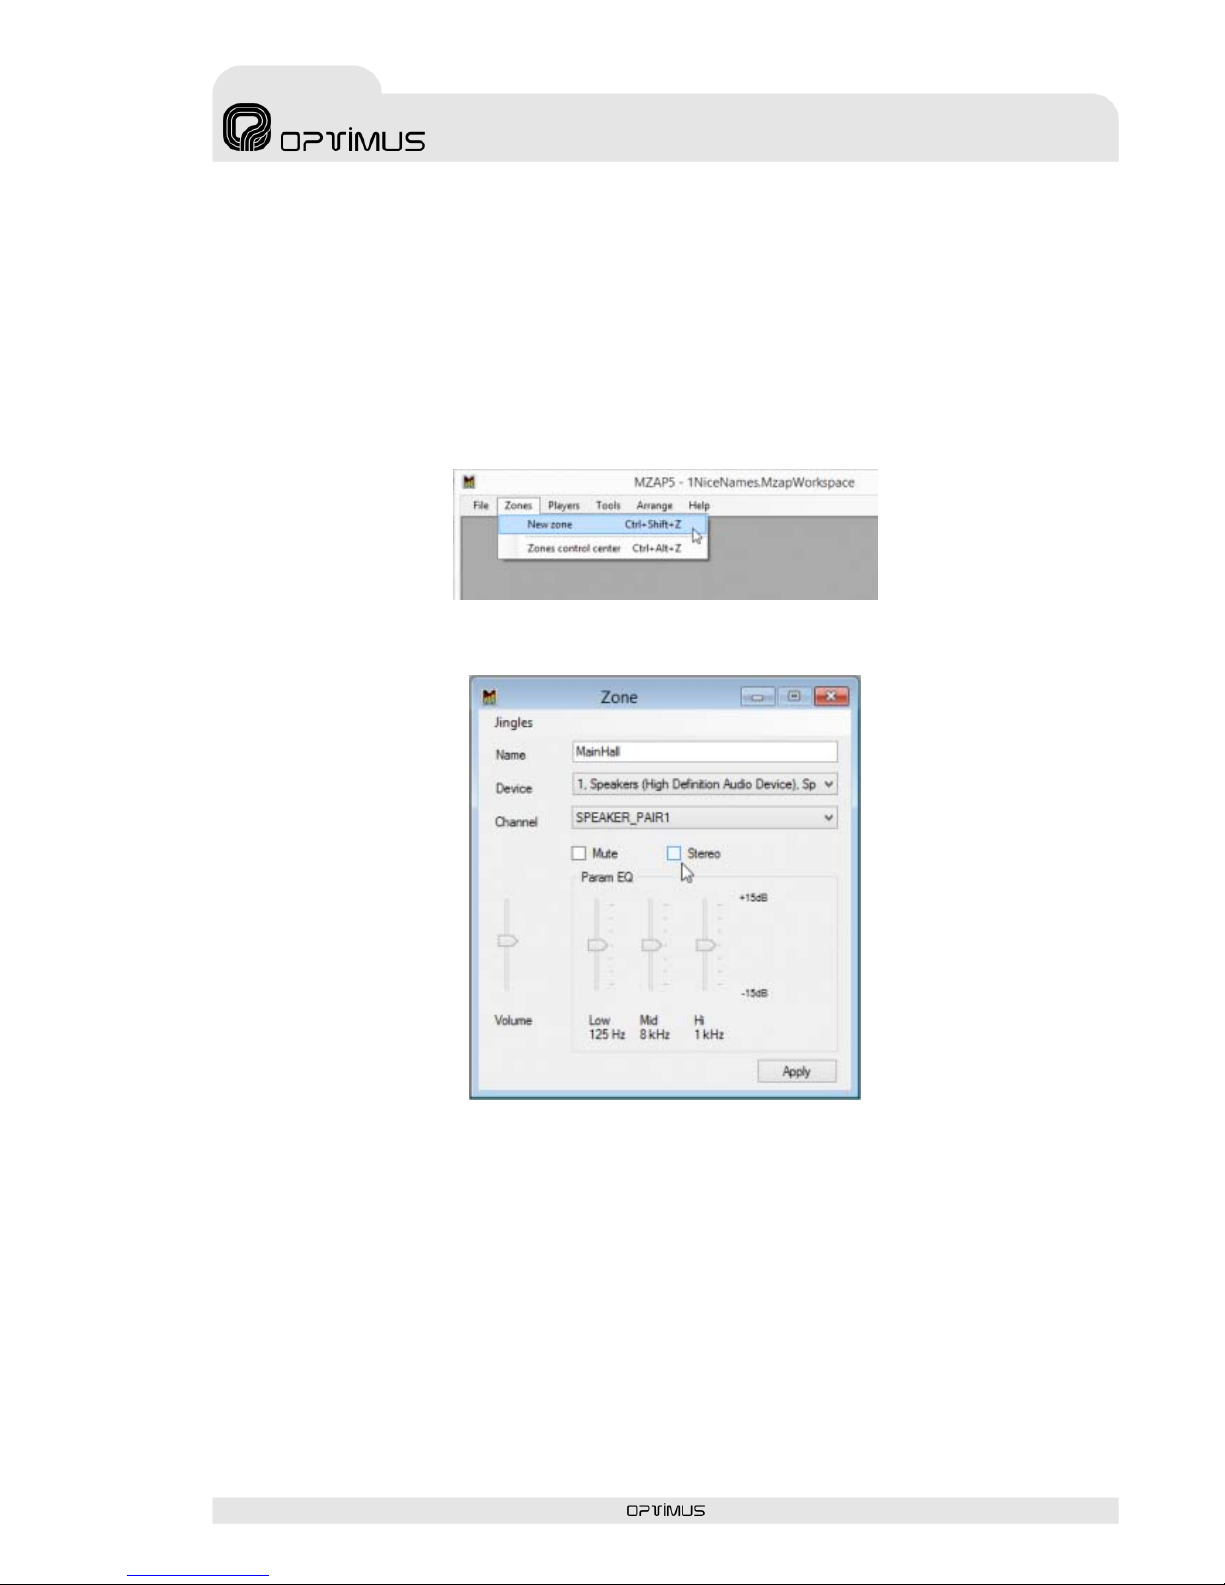
To create a new zone, first go to Zones menu and click New zone or press Ctrl-Shift-Z hot key.
New zone is created and Zone window appears.
Please rename your new zone and select the audio device from the list. Each audio device can
operate in mono or stereo mode. 8 zone output module will appear as 4 stereo outputs. Select the
channels independently (Left and Right) to get the 8 ones.
Button Mute allows you to temporarily mute Zone. If necessary, set the volume and desired
equalizer levels. Click Apply button. Your new zone is ready, it will automatically appear in all
players

MR-8Z v1.0 Page 5 of 27
MR-8Z
8 ZONES AUDIO SERVER AUDIO SERVER
3.2 How to create a new player
Go to the main menu Players. You can create three types of players.
For audio files or Internet radio streams select New Player (or press Ctrl-N hot key). If you want to
manage your external sources (for example line-in inputs or microphones), click New external
player. If you want to play your Spotify playlists, please select Spotify player.
Regular players can play a lot of popular audio formats, music playlists or Internet radio streams.
An external player, helps you to manage audio line-in inputs or microphones. Creating a new
Spotify player you will have access to your playlists and can use Spotify search. Remember that
you can create any number of regular and external players, but only one Spotify player.
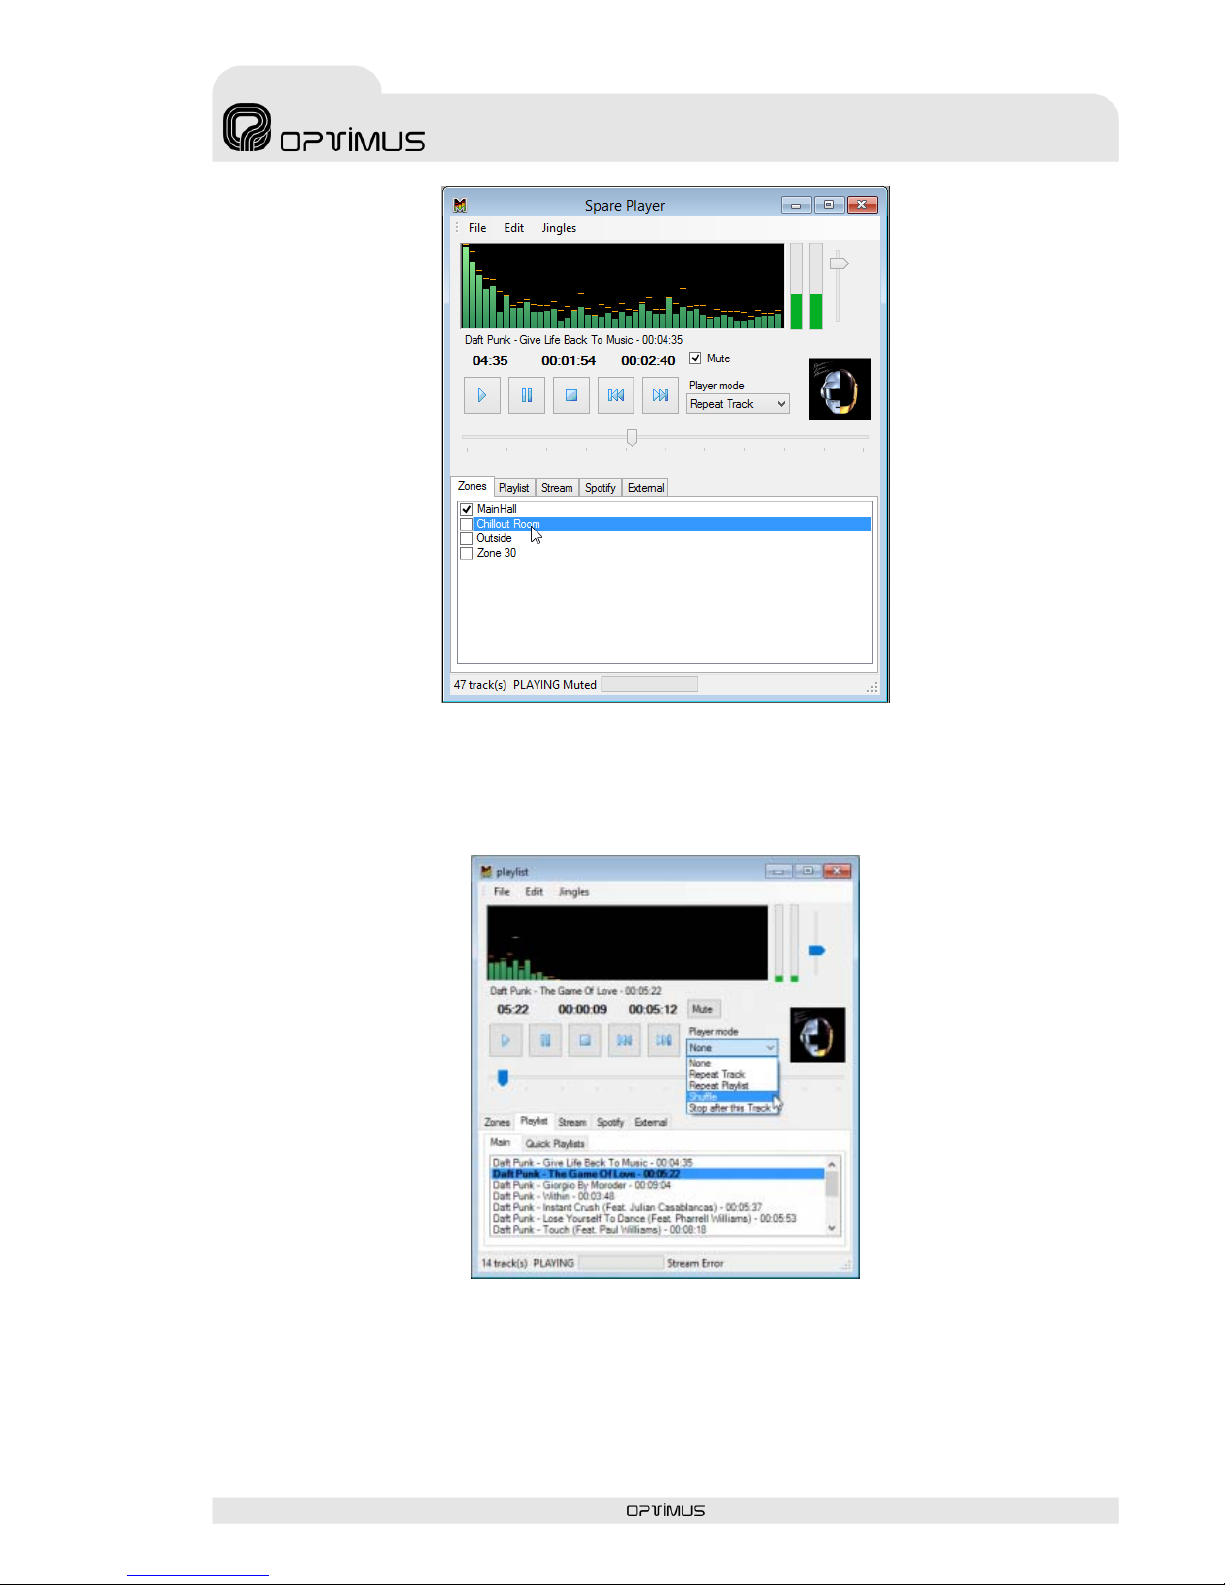
On the Zones tab, select zones to play music, then use player’s File menu to add files, folders or
playlists and press Play button.
MR-8Z v1.0 Page 6 of 27
MR-8Z
8 ZONES AUDIO SERVER AUDIO SERVER
3.3 How to change player mode
There are five player modes. Tracks that you play appear in the Playlist pane. You can change the
order in which the items play by selecting one of these modes.
By default, player starts in None mode. This mode will play your Playlist and stop after last track.
When you turn on Repeat Playlist mode, all tracks in the main Playlist pane will play once and
then begin playing again. Repeat Playlist mode will play your Playlist and return to the beginning to
cycle through again when it reaches the end. To play only one audio track repeatedly, please
select Repeat Track mode. Select this mode to repeat the audio track that is currently playing.
MR-8Z v1.0 Page 7 of 27
MR-8Z
8 ZONES AUDIO SERVER AUDIO SERVER
With Shuffle mode you can listen to your tracks over and over again, but in a different order each
time. Shuffle mode will randomize the playback of your Playlist. And last one is Stop after this
track mode. The name speaks for itself. It is useful if you need to stop playing after the current
track.
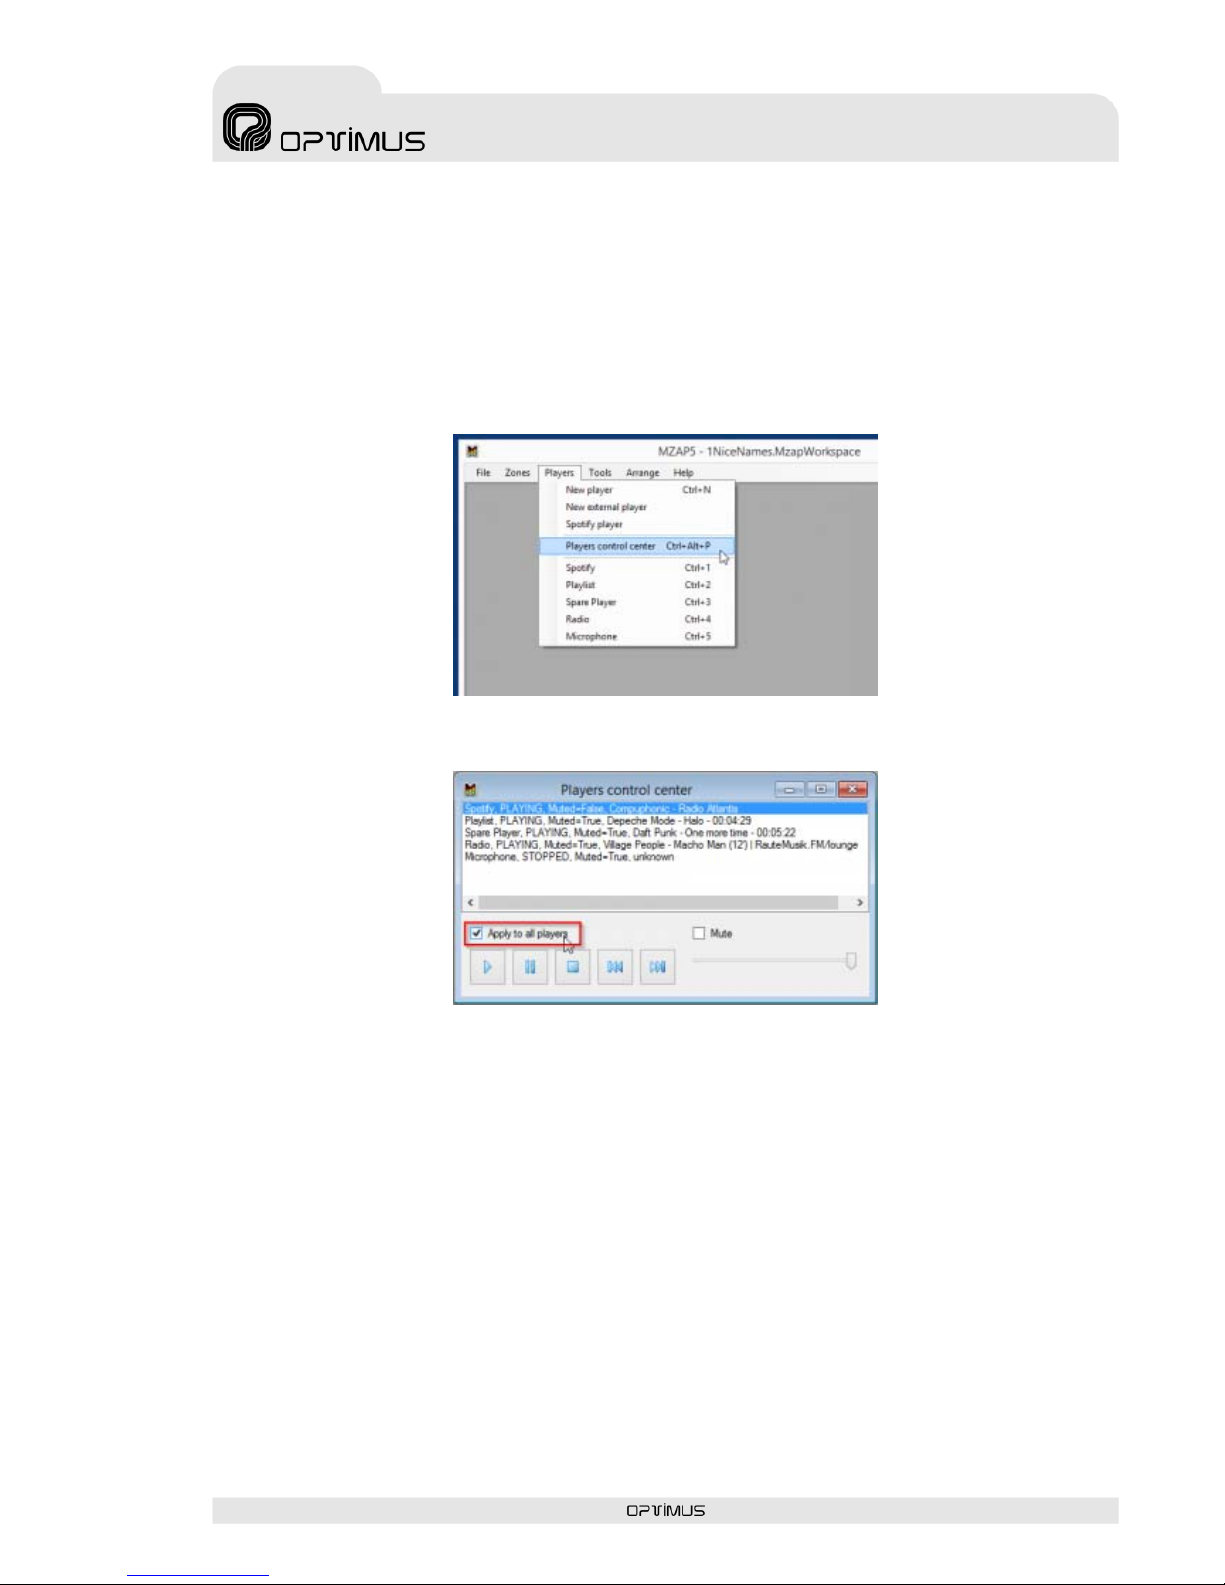
3.4 How to manage all players/zones simultaneously
If you want to start or stop all players at once, please open Players Control Center window from
Players menu or use Ctrl+Alt+P hot key.
Check “Apply to all players” check-box.
Then you can use all available on this window controls to manage all players simultaneously. You
can start, stop, pause and mute all players at the same time by one click.
You can manage all zones in the same way with Zones Control Center.

MR-8Z v1.0 Page 8 of 27
MR-8Z
8 ZONES AUDIO SERVER AUDIO SERVER
3.5 How to make microphone announcements over individual players
At first, please connect your mic to server microphone input and then create new External player.
Now you need to select your audio source, please choose your microphone from dropdown box.
Go to Zones tab and select zones to play your voice announcements.
Only Play and Stop buttons are available for External player, so please press Play and start
speaking to your microphone. You can hear your voice in the selected Zones. You can change
Zones on the fly, but please keep at least any one always selected, otherwise you have to click
Play button again. Please press Stop button to turn off your microphone. If you need to tune the

MR-8Z v1.0 Page 9 of 27
MR-8Z
8 ZONES AUDIO SERVER AUDIO SERVER
microphone level, please use horizontal fader below source box. If you enable “Automatic reduce
the volume of other players” checkbox, the volume of other players playing to same zones will be
reduced automatically.
3.6 How to setup Spotify music service
At first you need sign up to Spotify Premium account and get an application key. If you have
regular Spotify account, please upgrade it to Premium.
This software uses libspotify SDK. To use the Libspotify SDK you will need to get an application
key. Only Premium Spotify users will be able to log in and play music with this library. Please go to
Spotify Developer account and create an application key. Please use this link
Click on the Binary link and download your key as a binary file (by default: spotify_appkey.key)
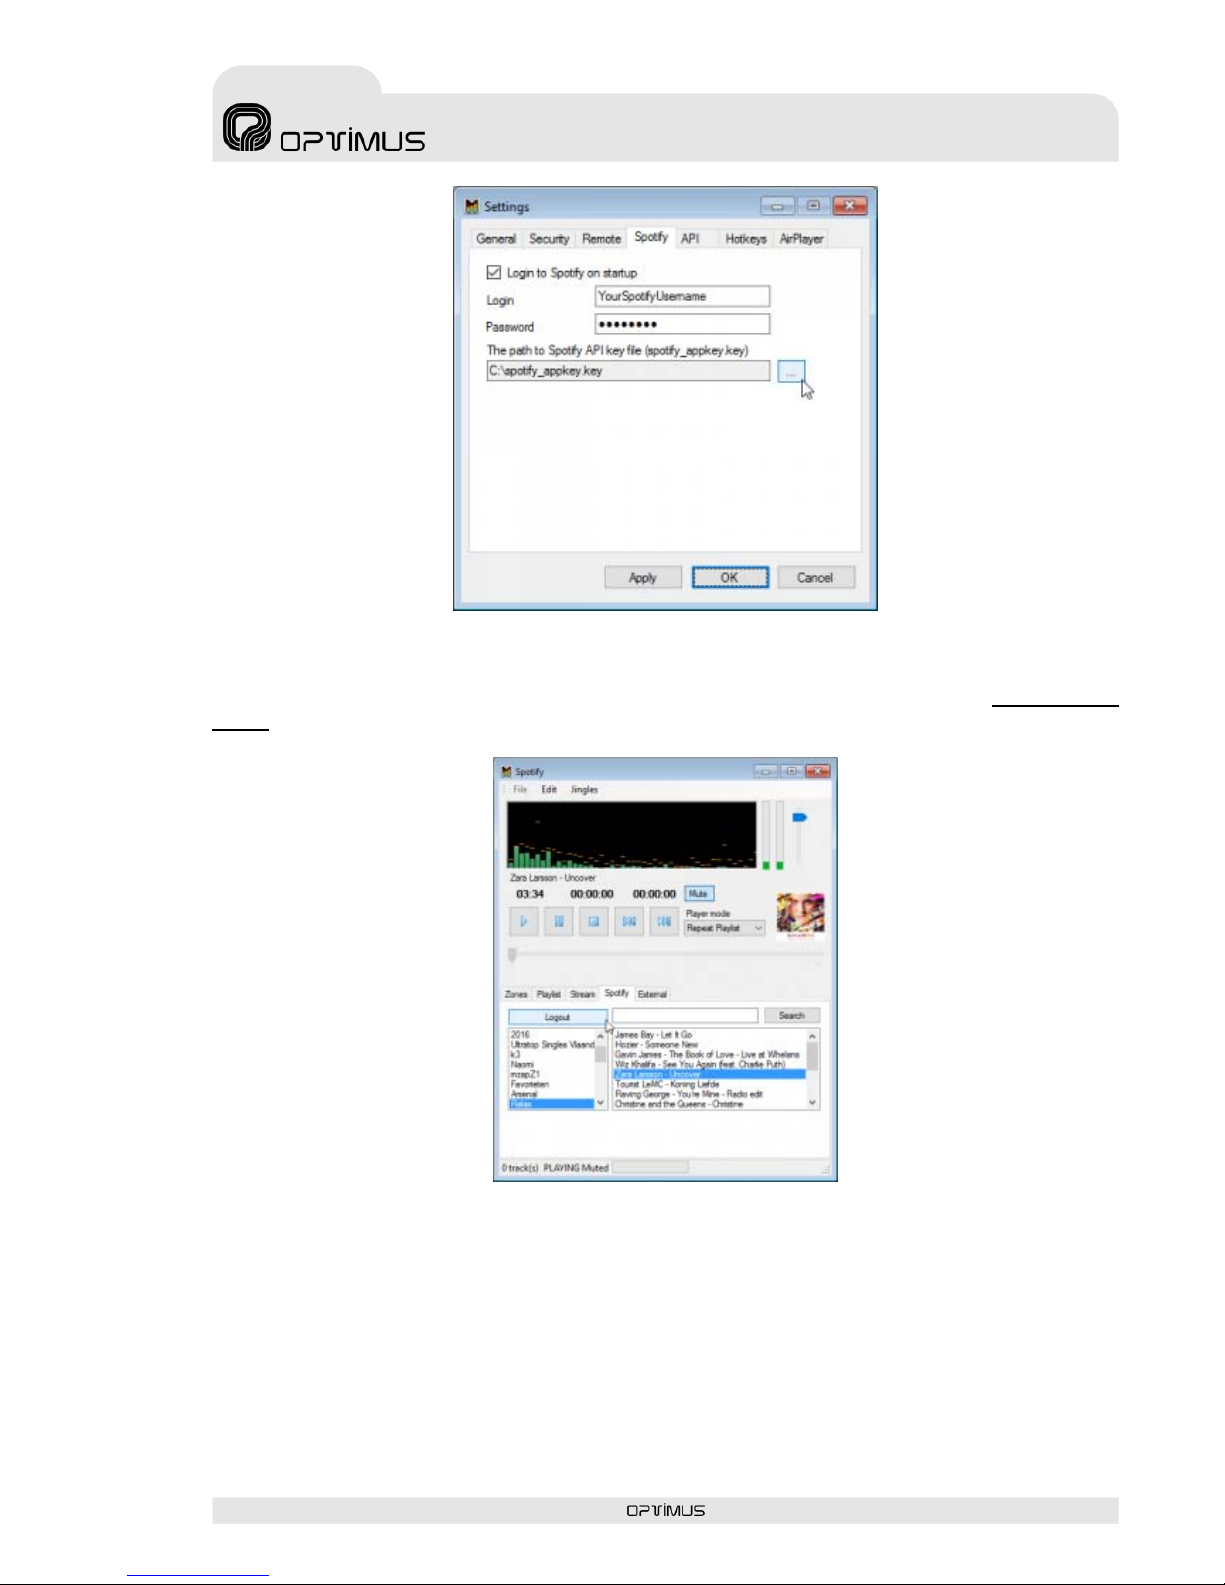
Note: to get the application key you will need to have a Spotify Premium account. Go to Tools-
Settings and open Spotify tab.
MR-8Z v1.0 Page 10 of 27
MR-8Z
8 ZONES AUDIO SERVER AUDIO SERVER
Please enter your Spotify username, password and path to saved application key. If you want to
login to Spotify automatically on startup, please enable corresponding check box. Press OK to
save settings. Your password will be encrypted and stored locally only. Now you can create Spotify
player.
On the Spotify player press Login button and you will see all saved playlists in the list box below.
Please choose desired playlist using mouse. You can select any playlist’s track from the right list
box by double click. And of course use Search text box to find any song or band on Spotify music
service.
Table of contents
Other Optimus Server manuals


