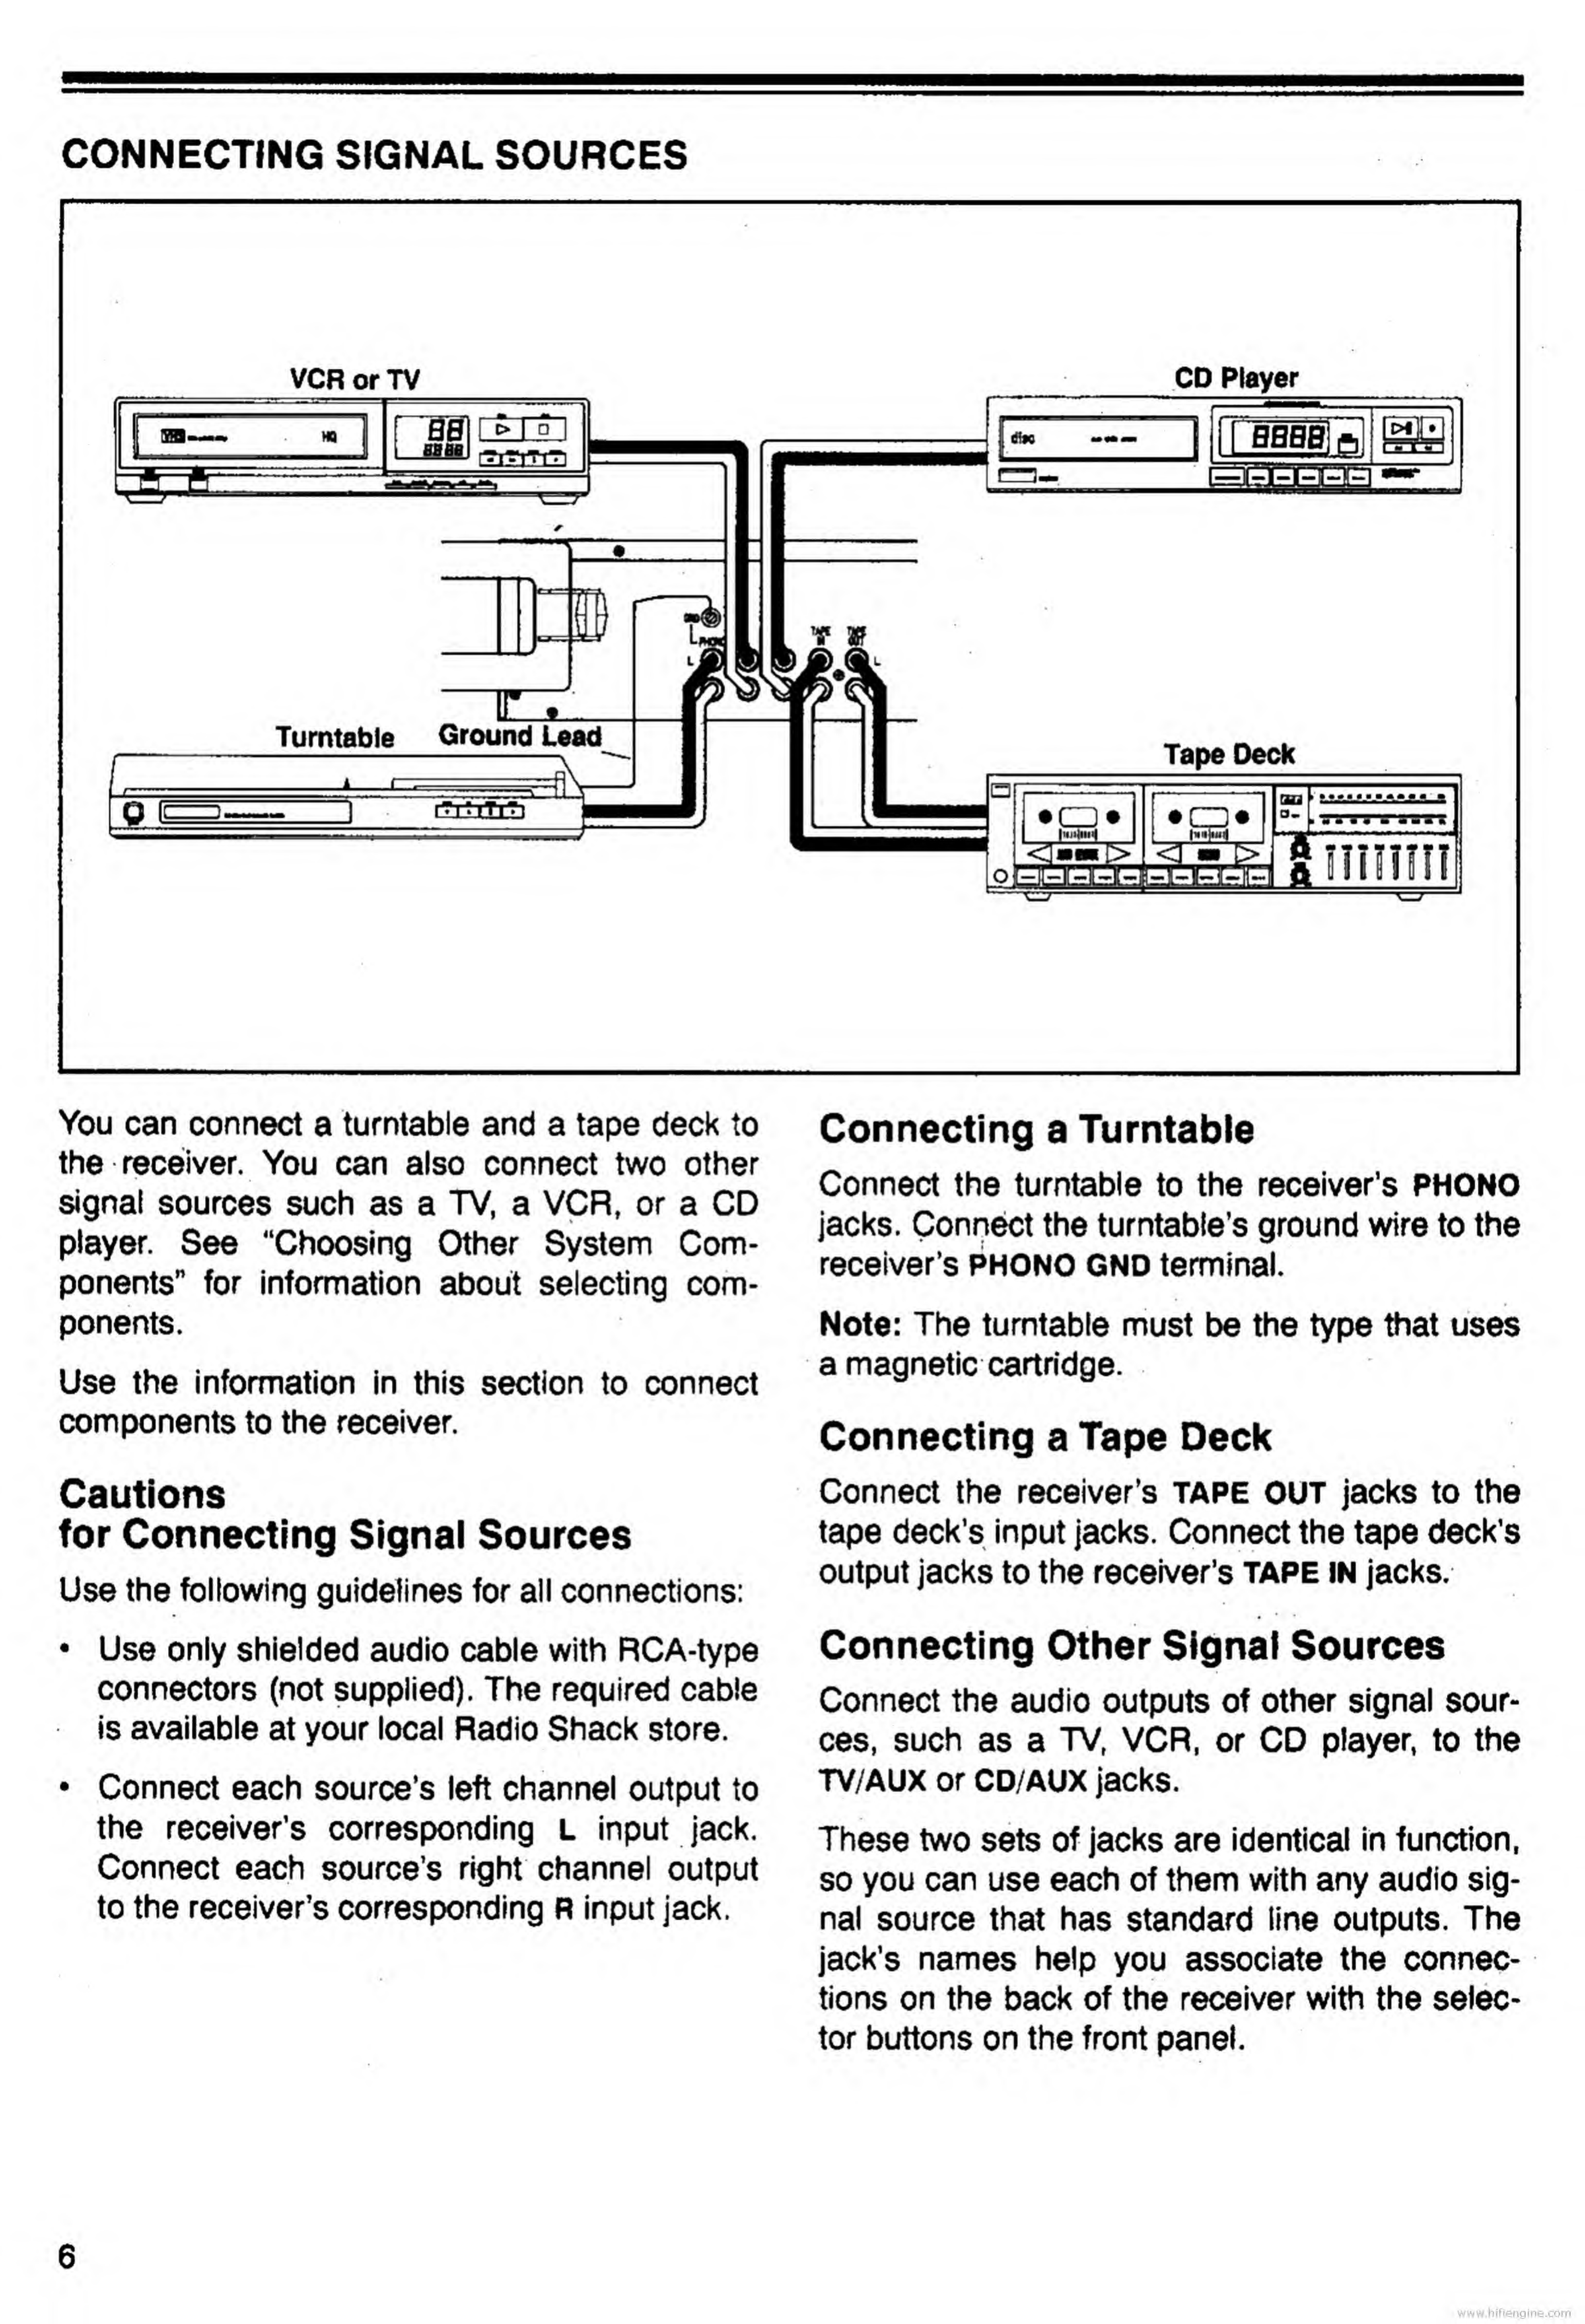
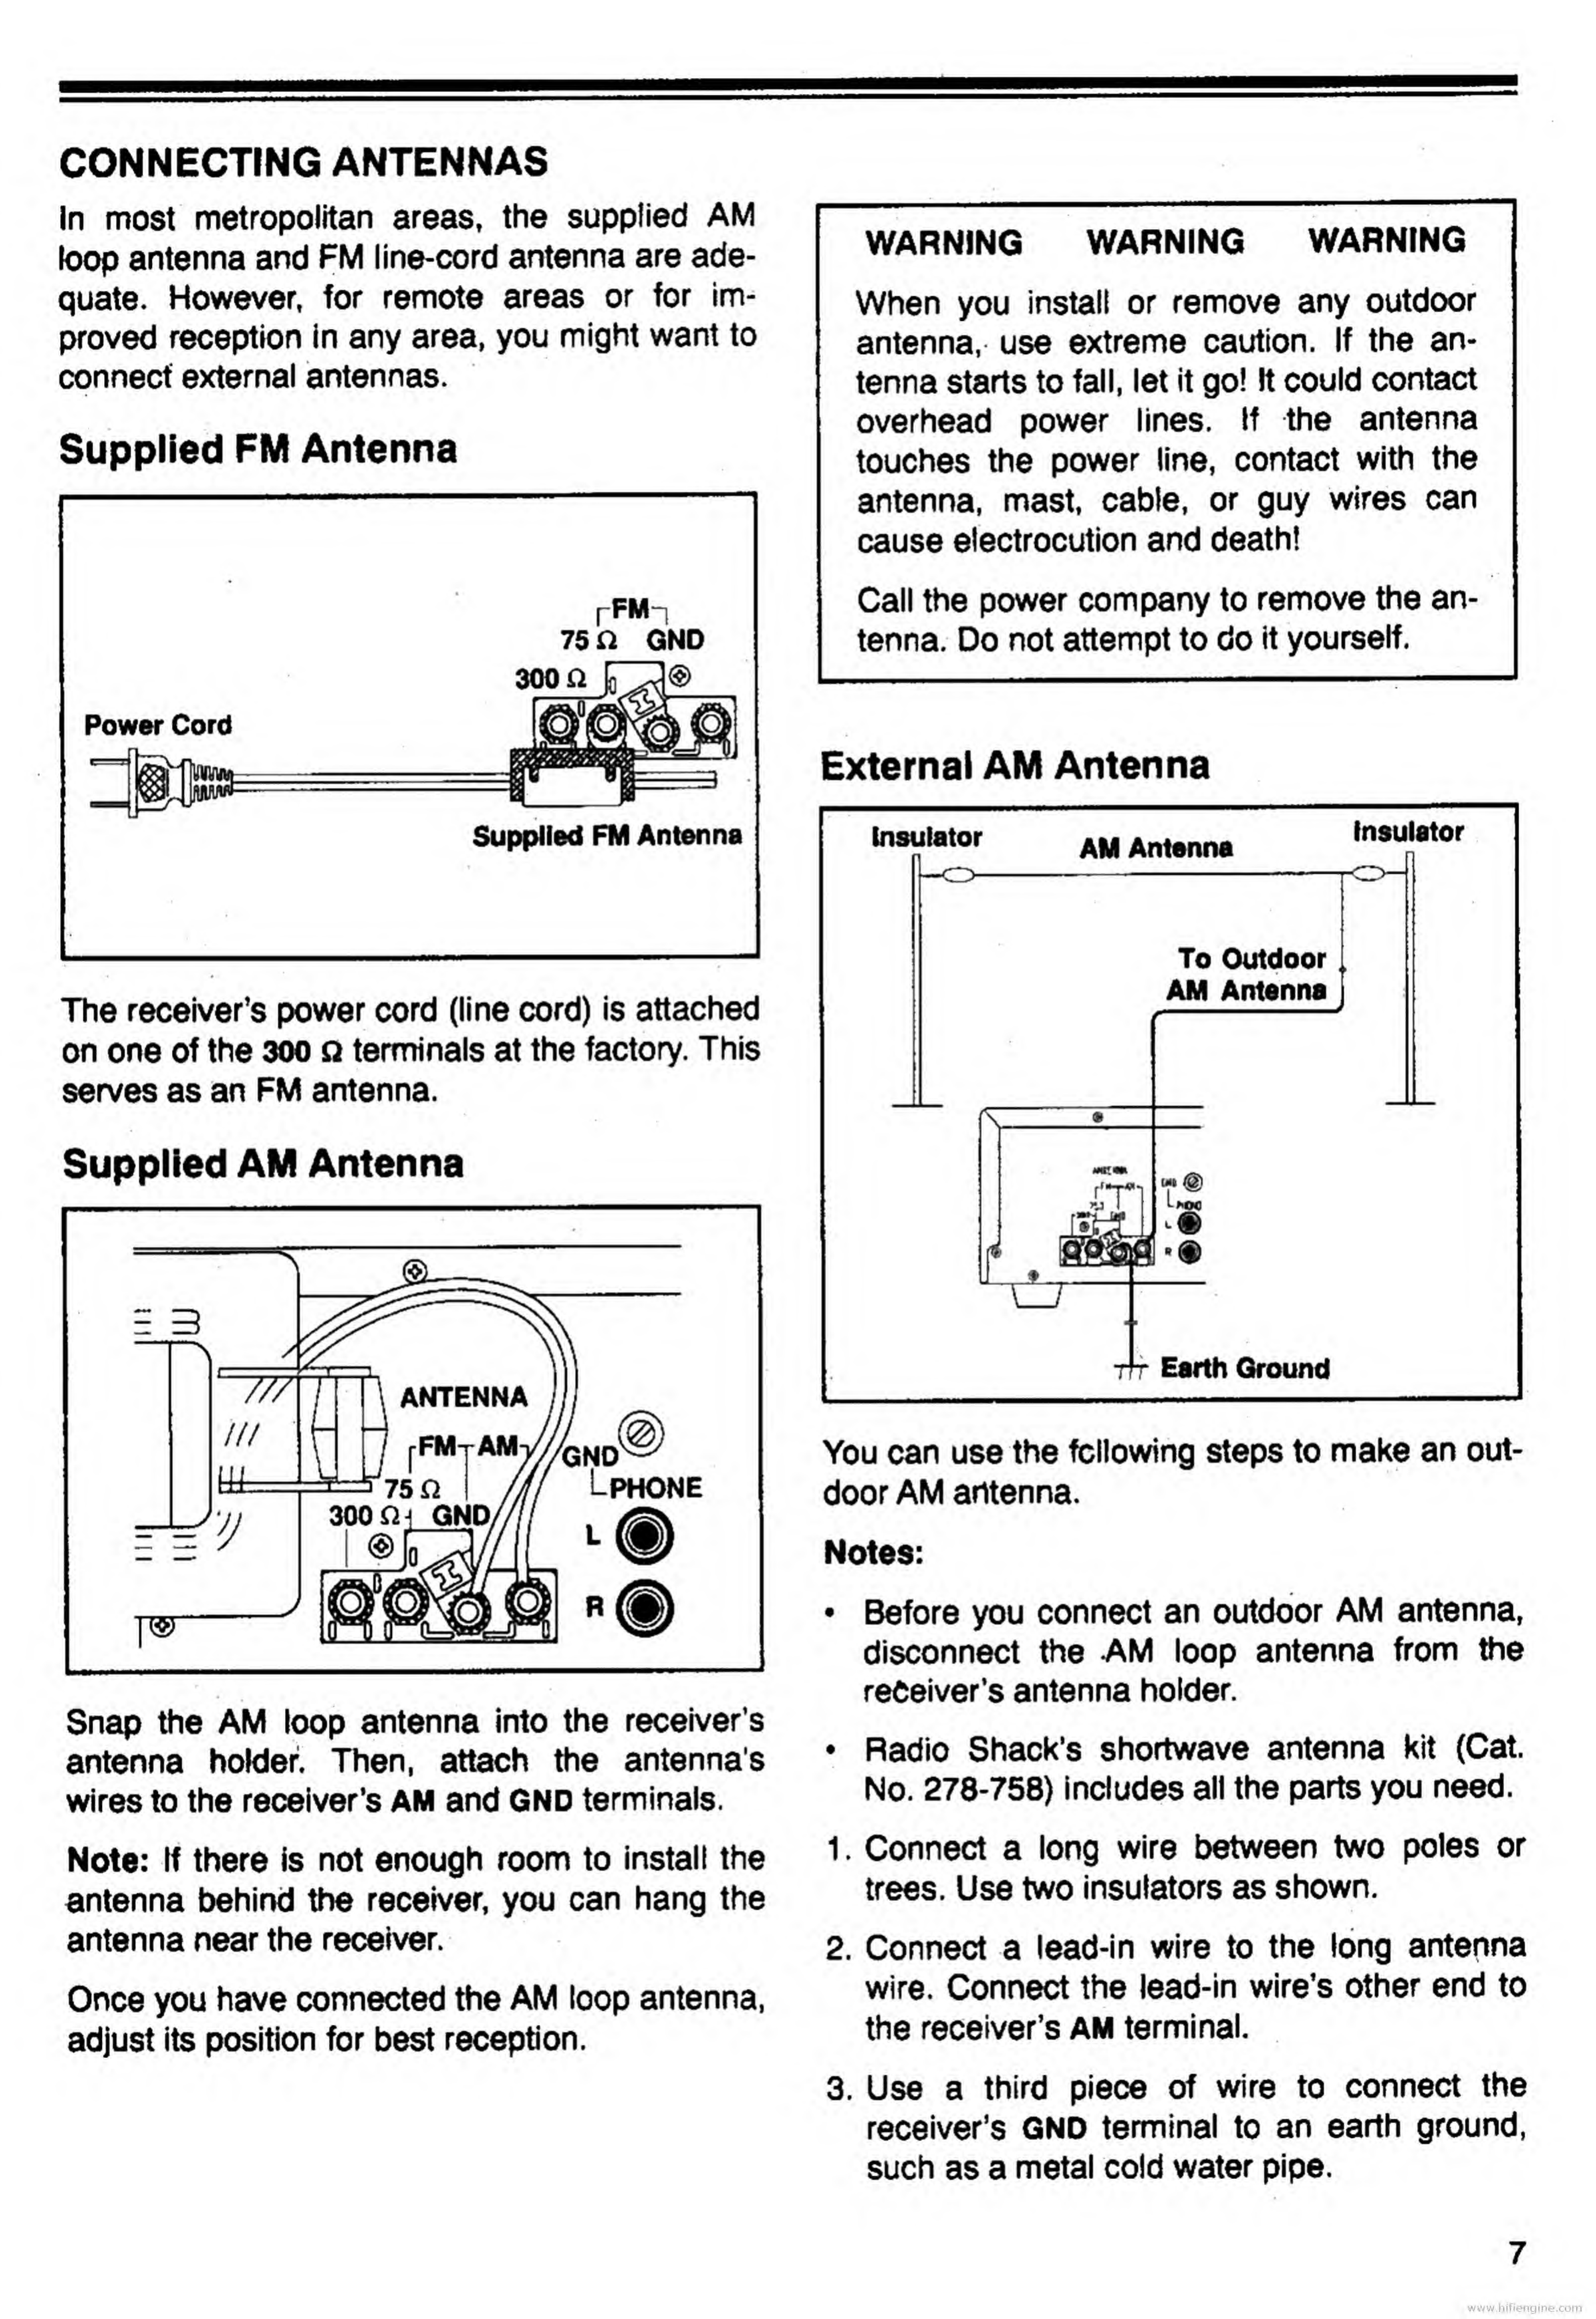
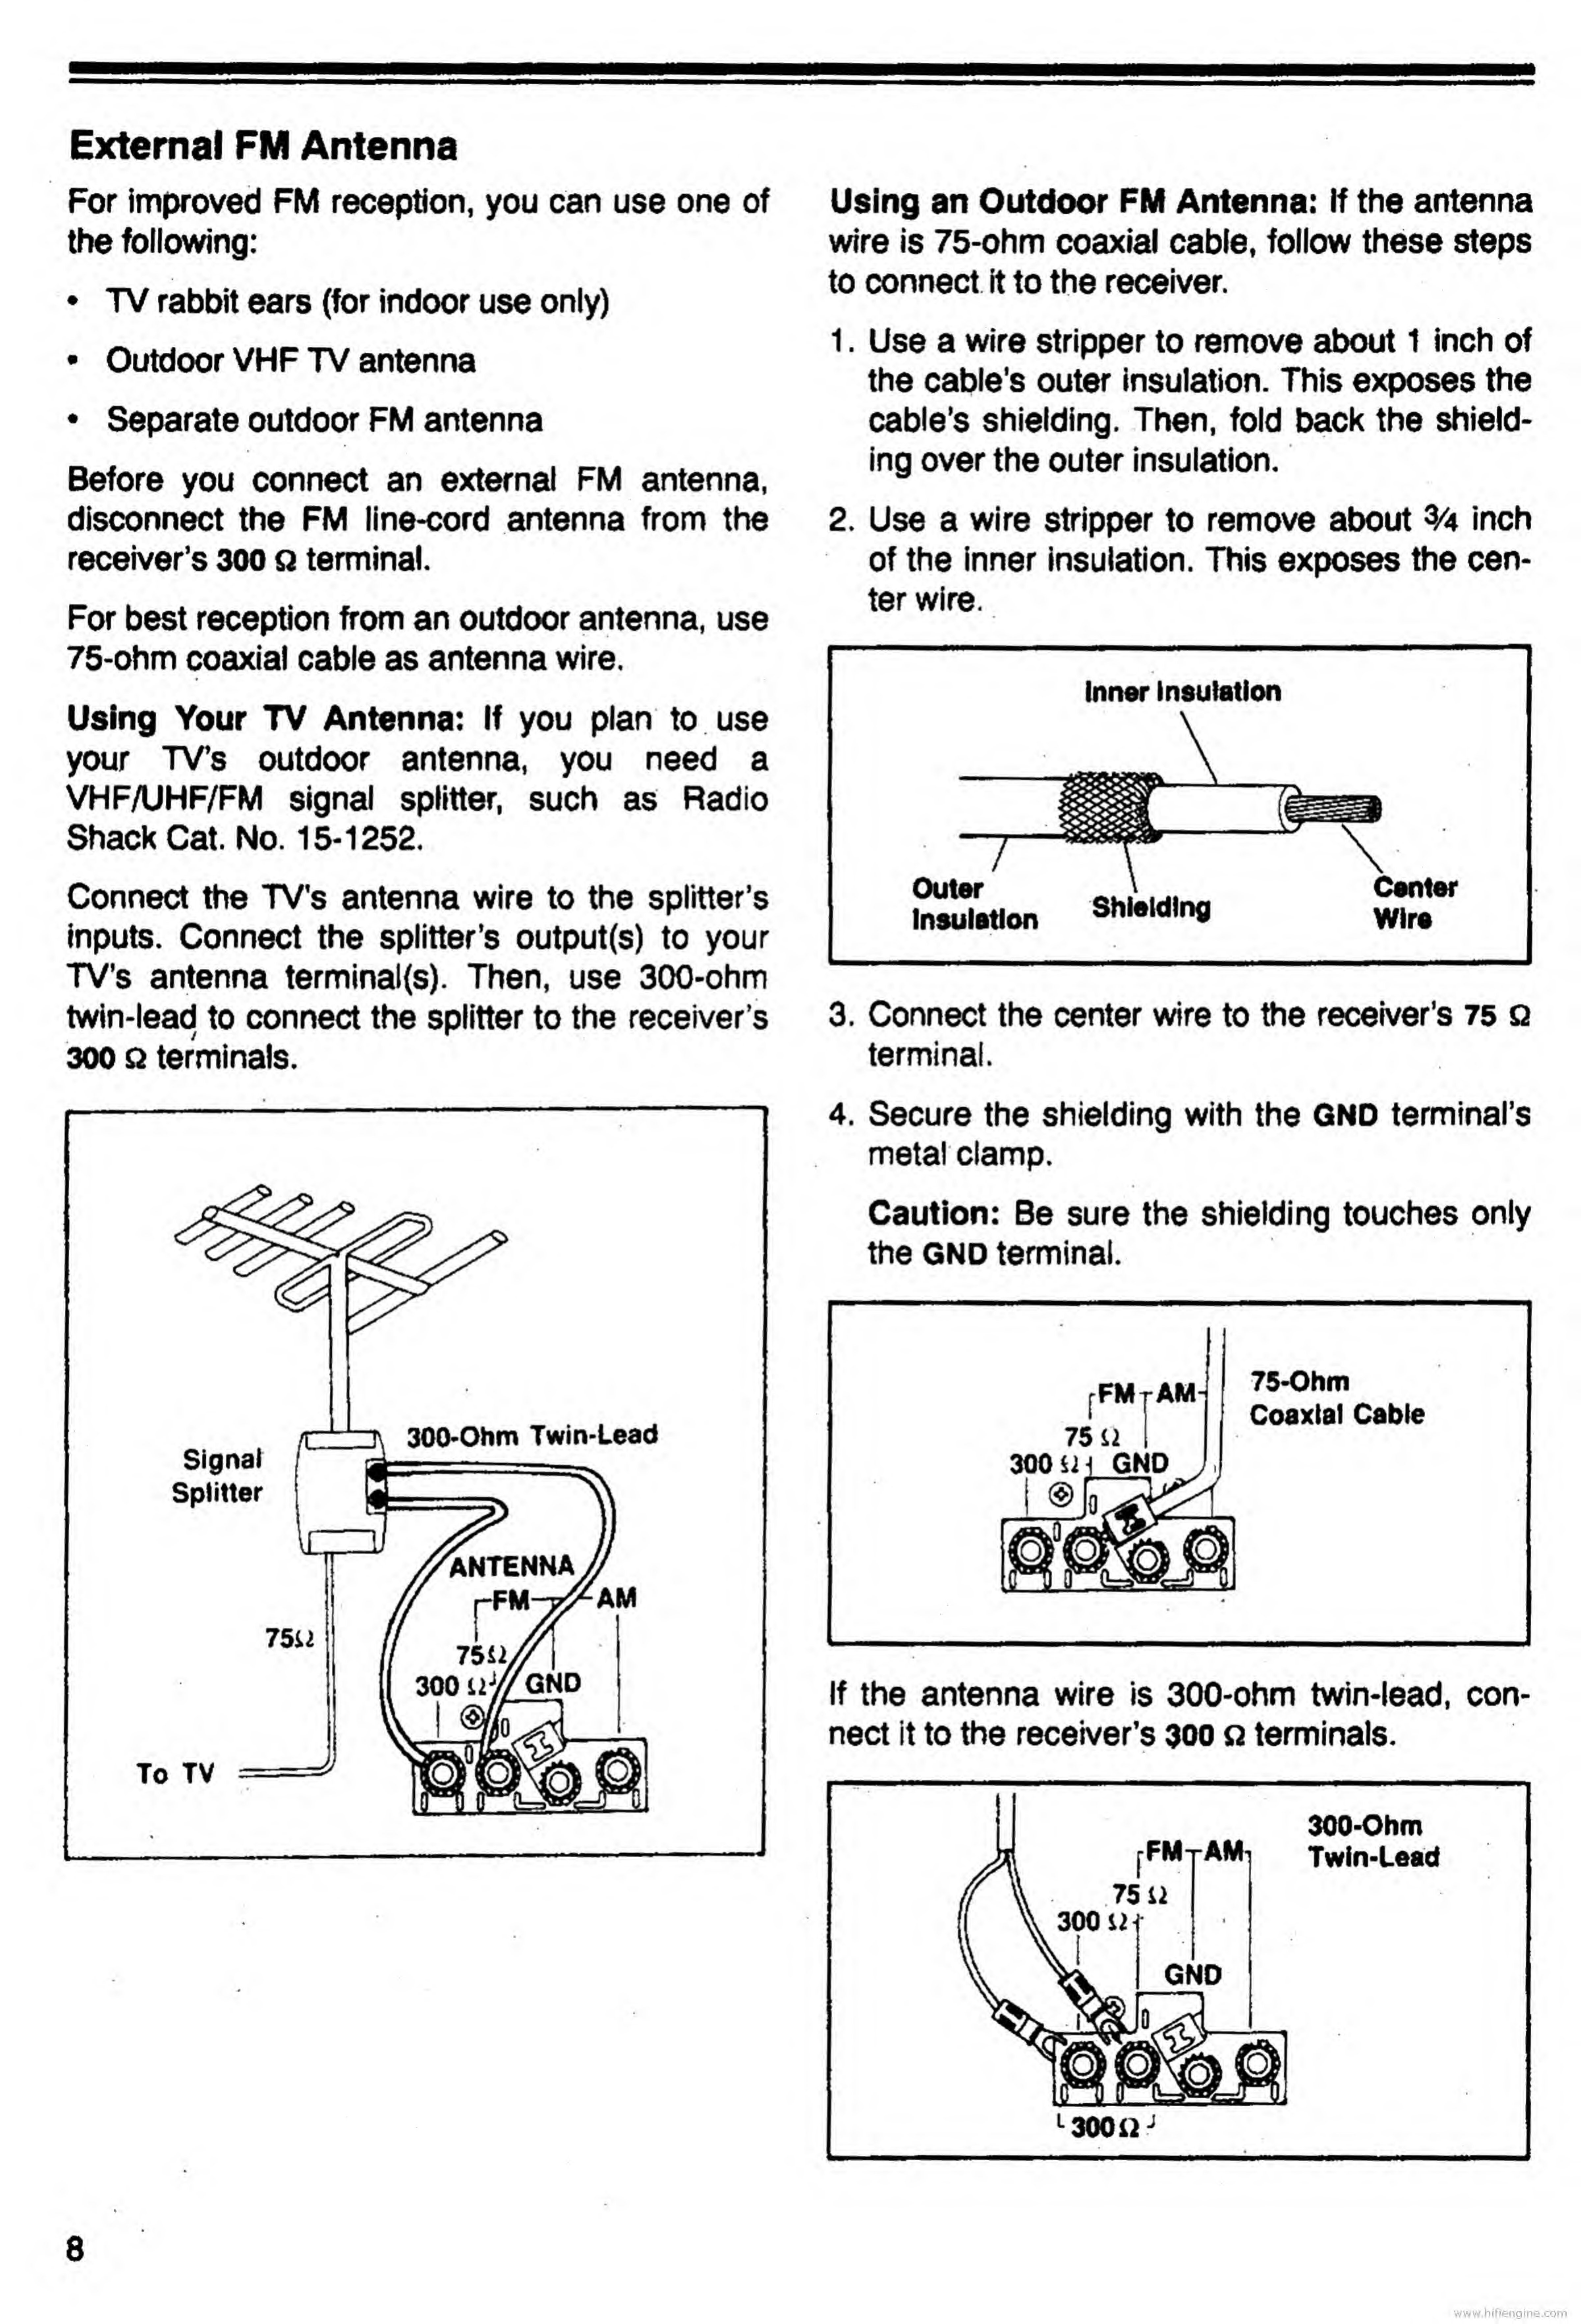
Optimus STA-795 User manual

STA-795
Digital
Synthesized
OWNER'S
MANUAL
AM/FM
Stereo
Receiver
Please
read
before
using
this
equipment.
Cat
No.
31-2101

Your
Optimus
STA-795
Digital
Synthesized
AM/FM
Stereo
Receiver
combines
50
watts
per
channel
of
power
with
efficient
state-of-the-art
circuitry.
The
STA-795
is
the
perfect
control
center
for
your
audio/video
system.
It
provides
connec¬
tions
for
a
tape
deck,
a
turntable,
and
two
other
signal
sources,
such
as
a
CD
player,
TV
monitor,
or
VCR.
The
CMOS
LSI
frequency-synthesized
tuner
and
the
large
digital
frequency
display
make
radio
tuning
precise
and
simple.
Additional
features
include
the
following:
Flat
Frequency
Response
—
ensures
accurate
sound
reproduction
from
20
to
30,000
Hertz.
Low
Distortion
—
lets
you
use
the
full
rated
power
of
the
receiver’s
amplifier
without
com¬
promising
the
sound
quality.
FM
Mute
—
eliminates
noise
when
you
tune
from
one
FM
station
to
another.
A/B
Speaker
Terminals
—
let
you
connect
two
pairs
of
stereo
speakers.
External
Antenna
Terminals
—
let
you
connect
external
AM
and
FM
antennas
for
"optimum
radio
reception.
However,
the
supplied
AM
loop
an¬
tenna
and
the
FM
line-cord
antenna
provide
adequate
reception
in
most
metropolitan
areas.
TWo
Tone
Controls
—
allow
independent
ad¬
justment
of
bass
and
treble
frequencies.
Search
Tuning
—
lets
you
scan
for
the
next
available
station
in
a
band.
Memory
Tuning
—
lets
you
program
6
AM
and
12
FM
stations
for
one-button
selection.
Headphone
Jack
—
lets
you
connect
head¬
phones
for
private
listening
and
enhanced
stereo
effect.
•
0
•
•
Tape
Monitoring
—
lets
you
listen
to
the
actual
recording
as
you
record
if
your
tape
deck
has
a
tape
monitoring
feature.
~
•
%*
»
•
Protection
Circuits
—
help
prevent
damage
from
over-heating
or
over-driving
of
the
receiver’s
amplifier.
Additional
protection
circuits
guard
against
power
surges
and
short
circuits.
Warning:
The
receiver’s
power
cord
has
a
polarized
plug.
To
prevent
electric
shock,
do
not
use
an
extension
cord
or
other
receptacle
un¬
less
the
plug’s
blades
can
be
fully
and
easily
in¬
serted.
Note
to
CATV
System
Installer:
This
reminder
is
provided
to
call
the
CATV
system
installer’s
attention
to
Article
820-22
of
the
NEC
that
provides
guidelines
for
proper
grounding
and,
in
particular,
specifies
that
the
cable
ground
shall
be
connected
to
the
grounding
system
of
the
building,
as
close
to
the
point
of
cable
entry
as
practical.
For
your
permanent
records,
we
recommend
you
record
the
receiver’s
serial
number
in
the
space
provided.
The
serial
number
is
listed
on
the
receiver’s
back
panel.
Serial
Number:
1992
Tandy
Corporation.
All
Rights
Reserved.
Optimus
and
Radio
Shack
are
registered
trademarks
used
by
Tandy
Corporation.
www.hifiengine.com

CONTENTS
Preparation
.
Connecting
Speakers
.
Connecting
Signal
Sources
.
Connecting
Antennas
.
Connecting
the
Receiver
to
Power
..
Using
the
Receiver's
AC
Power
Outlet
Operation
.
Basic
Operation
..
Hearing
Comfort
and
Your
Health
...
Tuning
to
a
Radio
Station
.
Adjusting
the
Sound
..
Recording
a
Tape
.
Using
Headphones
.
Output
Power
Meter
.
Built-In
Protection
Circuits
.
Choosing
Other
System
Components
.
Speakers
.
Turntables...
CD
Players
.
Tape
Decks
.
TVs/VCRs
.
Headphones
.
Problem-Solving
.
Maintenance
.
Care
.
The
FCC
Wants
You
to
Know
.
Specifications
.
General
.
Amplifier
.
FM
Tuner
..
AM
Tuner
.
WARNING:
To
reduce
the
risk
of
fire
or
electric
not
expose
this
appliance
to
rain
01
CAUTION
meKOPeLBcmc
•HOCK
DO
NOT
OPEN
CAUTION:
TO
REDUCE
THE
RISK
OF
ELECTRIC
SHOCK
DO
NOT
REMOVE
COVER
(OR
BACK).
NO
USER-
SERVICEABLE
PAHTS
INSIDE.
REFER
SERVICING
TO
QUALIFIED
SERVICE
PERSOftJEL
The
lightning
flash
with
arrowhead
symbol
with!
n
an
equilateral
triangle
is
intended
to
alert
the
user
to
the
presence
of
uninsulated
"dangerous
voltage"
within
the
product's
enclosure
that
may
be
of
sufficient
magnitude
to
oonstitute
a
risk
of
electric
shock
to
persons.
A
The
exclamation
point
within
an
equilateral
tri-
/l\
angle
Is
Intended
to
alert
the
usertotne
presence
/
.|
\
of
Important
operating
and
maintenance
(servic-
/
•
\
Ing)
Instructions
In
the
literature
accompanying
L
-*
the
appliance.
www.hifiengine.com

PREPARATION
Caution:
Do
not
plug
in
or
turn
on
the
receiver
speakers,
signal
sources,
and
antennas.
CONNECTING
SPEAKERS
You
can
connect
two
pairs
of
speakers
to
the
receiver.
This
lets
you
set
up
one
pair
of
speakers
in
your
main
listening
area
and
a
second
pair
of
speakers
in
a
second
listening
area.
See
"Speakers”
under
“Choosing
Other
System
Components”
for
information
about
selecting
speakers.
Use
the
information
in
this
Section
to
connect
speakers
to
the
receiver.
Cautions
for
Connecting
Speakers
Use
the
following
guidelines
when
connecting
speakers:
%
•
Use
only
speakers
with
an
impedance
of
8
to
16
ohms.
•
Connect
no
more
than
two
pairs
of
speakers
to
the
receiver.
•
Use
18-gauge
speaker
wire
if
your
speakers
are
within
50
feet
of
the
receiver.
Use
16-
gauge
speaker
wire
for
distances
greater
than
50
feet.
•
Use
only
the
length
of
wire
necessary
to
con¬
nect
the
speakers.
f
•
Be
sure
that
stray
wire
strands
from
one
speaker
terminal
do
not
touch
another
speaker
terminal.
until
you
have
completed
all
connections
for
the
Speaker
Placement
Use
the
following
information
to
help
you
deter¬
mine
the
best
location
for
your
speakers.
Maximizing
Stereo
Effect:
To
achieve
maxi¬
mum
stereo
effect,
place
each
pair
of
speakers
so
that
the
distance
between
the
speakers
is
about
the
same
as
the
distance
between
the
normal
listening
area
and
the
point
halfway
be¬
tween
the
speakers.
If
the
distance
between
the
speakers
is
greater,
you
can
improve
the
sound
by
angling
the
speakers
toward
you.
Adjusting
the
Bass:
The
amount
of
bass
you
hear
is
highly
dependent
on
speaker
location.
To
increase
the
bass,
do
one
or
both
of
the
fol¬
lowing:
•
Place
the
speakers
in
the
corner
of
the
room.
•
Place
the
speakers
directly
on
the
floor.
To
decrease
the
bass,
do
any
combination
of
the
following:
•
Move
the
speakers
slightly
away
from
the
corner.
•
Increase
the
distance
between
the
speakers
and
the
wall.
•
Raise
the
speakers
6
to
8
inches
off
the
floor.
Speaker
stands
are
available
at
your
local
Radio
Shack
store.
www.hifiengine.com

Speaker
Connections
Follow
these
steps
to
connect
the
speakers.
%
1.
S
elect
the
location
for
each
speaker.
See
“Speaker
Placement.’’
Then,
cut
the
length
of
speaker
wire
needed
to
connect
each
speaker
to
the
receiver.
2.
P
repare
the
ends
of
the
speaker
wire
by
doing
the
following:
a.
S
eparate
the
two
conductors
for
a
length
of
about
4
inches.
b.
Using
a
wire
stripper,
remove
about
Va
inch
of
insulation
from
the
end
bf
each
conductor.
c.
Twist
the
ends
of
each
conductor.
Be
sure
that
the
wire
strands
of
one
conductor
do
not
touch
any
other
conductor’s
wire
strands.
3.
C
onnect
the
correct
speaker
wire
to
the
ter¬
minals
on
the
back
of
each
speaker.
Connect
one
conductor
to
each
speaker
terminal.
If
your
speakers
have
spring-loaded
terminals,
press
the
terminal’s
tab,
insert
the
conductor,
and
release
the
tab.
If
your
speakers
have
another
type
of
connector,
see
your
speakers’
owner’s
manual
for
instruc¬
tions
for
connecting
the
speaker
wire.
4.
C
onnect
the
speaker
wires
to
the
SPEAKERS
terminals
on
the
back
of
the
receiver.
To
connect
a
conductor
to
a
terminal,
press
the
terminal’s
tab,
insert
the
conductor,
and
release
the
tab.
If
you
are
connecting
two
pairs
of
speakers,
connect
one
pair
to
the
SPEAKERS
A
ter¬
minals
and
one
pair
to
the
SPEAKERS
B
ter¬
minals.
If
you
are
connecting
only
one
pair
of
speakers,
you
can
use
either
set
of
terminals.
For
each
pair
of
speakers,
connect
the
left
speaker
to
the
L
terminals
and
the
right
speaker
to
the
R
terminals.
When
connecting
a
speaker
wire,
Use
the
wire’s
color-coding
or
marking
to
help
you
correctly
connect
the
conductors.
For
ex¬
ample,
be
sure
the
conductor
that
is
con¬
nected
to
the
speaker’s
negative
terminal
is
connected
to
the
receiver’s
negative
(-)
ter¬
minal.
This
greatly
affects
the
bass.
Note:
Some
speakers
are
marked
with
plus
(+)
and
minus
(-)
signs.
Others
have
a
mark
or
dot
next
to
the
positive
terminal
and
no
mark
for
the
negative
terminal.
www.hifiengine.com

CONNECTING
SIGNAL
SOURCES
VCR
or
TV
CD
Player
You
can
connect
a
turntable
and
a
tape
deck
to
the
receiver.
You
can
also
connect
two
other
signal
sources
such
as
a
TV,
a
VCR,
or
a
CD
player.
See
“Choosing
Other
System
Com¬
ponents"
for
information
about
selecting
com¬
ponents.
Use
the
information
in
this
section
to
connect
components
to
the
receiver.
Cautions
for
Connecting
Signal
Sources
Use
the
following
guidelines
for
all
connections:
•
Use
only
shielded
audio
cable
with
RCA-type
connectors
(not
supplied).
The
required
cable
is
available
at
your
local
Radio
Shack
store.
•
Connect
each
source’s
left
channel
output
to
the
receiver’s
corresponding
L
input
jack.
Connect
each
source’s
right
channel
output
to
the
receiver’s
corresponding
R
input
jack.
Connecting
a
Turntable
Connect
the
turntable
to
the
receiver’s
PHONO
jacks.
Connect
the
turntable’s
ground
wire
to
the
receiver’s
PHONO
GND
terminal.
Note:
The
turntable
must
be
the
type
that
uses
a
magnetic
cartridge.
Connecting
a
Tape
Deck
Connect
the
receiver’s
tape
OUT
jacks
to
the
tape
deck’s
input
jacks.
Connect
the
tape
deck’s
output
jacks
to
the
receiver’s
tape
in
jacks.
Connecting
Other
Signal
Sources
Connect
the
audio
outputs
of
other
signal
sour¬
ces,
such
as
a
TV,
VCR,
or
CD
player,
to
the
TV/AUX
or
cd/aux
jacks.
These
two
sets
of
jacks
are
identical
in
function,
so
you
can
use
each
of
them
with
any
audio
sig¬
nal
source
that
has
standard
line
outputs.
The
jack’s
names
help
you
associate
the
connec¬
tions
on
the
back
of
the
receiver
with
the
selec¬
tor
buttons
on
the
front
panel.
www.hifiengine.

CONNECTING
ANTENNAS
In
most
metropolitan
areas,
the
supplied
AM
loop
antenna
and
FM
line-cord
antenna
are
ade¬
quate.
However,
for
remote
areas
or
for
im¬
proved
reception
in
any
area,
you
might
want
to
connect
external
antennas.
Supplied
FM
Antenna
r
FM
“i
75
GND
Supplied
FM
Antenna
The
receiver’s
power
cord
(line
cord)
is
attached
on
one
of
the
300
n
terminals
at
the
factory.
This
serves
as
an
FM
antenna.
Supplied
AM
Antenna
Snap
the
AM
loop
antenna
into
the
receiver’s
antenna
holder.
Then,
attach
the
antenna's
wires
to
the
receiver’s
AM
and
GND
terminals.
Note:
If
there
is
not
enough
room
to
install
the
antenna
behind
the
receiver,
you
can
hang
the
antenna
near
the
receiver.
Once
you
have
connected
the
AM
loop
antenna,
adjust
its
position
for
best
reception.
WARNING
WARNING
WARNING
When
you
install
or
remove
any
outdoor
antenna,
use
extreme
caution.
If
the
an¬
tenna
starts
to
fall,
let
it
go!
It
could
contact
overhead
power
lines.
If
the
antenna
touches
the
power
line,
contact
with
the
antenna,
mast,
cable,
or
guy
wires
can
cause
electrocution
and
death!
Call
the
power
company
to
remove
the
an¬
tenna.
Do
not
attempt
to
do
it
yourself.
External
AM
Antenna
You
can
use
the
following
steps
to
make
an
out¬
door
AM
antenna.
Notes:
Before
you
connect
an
o
disconnect
the
AM
loop
antonna
hnlHar
•
Radio
Shack’s
shortwave
antenna
kit
(Cat.
No.
278-758)
includes
all
the
parts
you
need.
1.
C
onnect
a
long
wire
between
two
poles
or
trees.
Use
two
insulators
as
shown.
2.
C
onnect
a
lead-in
wire
to
the
long
antenna
wire.
Connect
the
lead-in
wire’s
other
end
to
the
receiver’s
AM
terminal.
3.
U
s
e
a
third
piece
of
wire
to
connect
the
receiver’s
GND
terminal
to
an
earth
ground,
such
as
a
metal
cold
water
pipe.
www.hifiengine.com

External
FM
Antenna
For
improved
FM
reception,
you
can
use
one
of
the
following:
•
TV
rabbit
ears
(for
indoor
use
only)
•
Outdoor
VHF
TV
antenna
•
Separate
outdoor
FM
antenna
Before
you
connect
an
external
FM
antenna,
disconnect
the
FM
line-cord
antenna
from
the
receiver’s
300
Q
terminal.
For
best
reception
from
an
outdoor
antenna,
use
75-ohm
coaxial
cable
as
antenna
wire.
Using
Your
TV
Antenna:
If
you
plan
to
use
your
TV’s
outdoor
antenna,
you
need
a
VHF/UHF/FM
signal
splitter,
such
as
Radio
Shack
Cat.
No.
15-1252.
Connect
the
TV’s
antenna
wire
to
the
splitter’s
inputs.
Connect
the
splitter’s
output(s)
to
your
TV’s
antenna
terminal(s).
Then,
use
300-ohm
twin-lead
to
connect
the
splitter
to
the
receiver’s
300
Q
terminals.
Using
an
Outdoor
FM
Antenna:
if
the
antenna
wire
is
75-ohm
coaxial
cable,
follow
these
steps
to
connect
it
to
the
receiver.
1.
U
se
a
wire
stripper
to
remove
about
1
inch
of
the
cable's
outer
insulation.
This
exposes
the
cable’s
shielding.
Then,
fold
back
the
shield¬
ing
over
the
outer
insulation.
2.
U
se
a
wire
stripper
to
remove
about
3
A
inch
of
the
inner
insulation.
This
exposes
the
cen¬
ter
wire.
3.
C
onnect
the
center
wire
to
the
receiver’s
75
a
terminal.
4.
S
ecure
the
shielding
with
the
GND
terminal’s
metal
clamp.
Caution:
Be
sure
the
shielding
touches
only
the
GND
terminal.
r
FM
r
75
U
300
UH
GND
AM
75-Ohm
Coaxial
Cable
If
the
antenna
wire
is
300-ohm
twin-lead,
con¬
nect
it
to
the
receiver’s
300
Q
terminals.
300-Ohm
Twin-Lead
www.hifiengine.com

CONNECTING
THE
RECEIVER
TO
POWER
Carefully
check
all
connections.
Then,
plug
the
receiver’s
power
cord
into
an
AC
outlet.
The
power
cord’s
plug
is
polarized
and
fits
only
one
way.
Warning:
To
prevent
electric
shock,
do
not
use
an
extension
cord
or
other
receptacle
unless
the
plug’s
blades
can
be
fully
and
easily
inserted.
USING
THE
RECEIVER’S
AC
POWER
OUTLET
The
receiver’s
unswitched
AC
power
outlet
provides
power
even
when
the
receiver
is
turned
off.
This
lets
you
use
the
outlet
for
an
ap¬
pliance
that
needs
continuous
power,
such
as
a
VCR
or
clock.
This
outlet
provides
a
maximum
output
of
100
watts.
www.hifiengine.com

OPERATION
BASIC
OPERATION
Warning:
To
prevent
possible
ear
injury
and
hearing
loss,
turn
VOLUME
to
0
before
you
turn
or
receiver
or
change
the
signal
source.
After
you
turn
on
the
receiver
or
change
the
signal
source
just
volume
to
a
comfortable
listening
level.
Follow
these
steps
to
use
the
receiver.
1.
P
ress
POWER
to
turn
on
the
receivers
power.
One
of
the
signal
source
indicators
comes
on.
i
2.
P
ress
speakers
A
or
B
(or
both)
to
select
the
speakers.
For
example,
to
select
the
speakers
connected
to
the
speakers
a
terminals,
press
in
A.
To
turn
off
a
pair
of
speakers,
press
the
cor¬
responding
button
to
release
it.
Note:
If
you
connect
only
one
pair
of
speakers,
press
only
the
corresponding
SPEAKERS
button.
Otherwise,
you
mute
the
sound
from
the
connected
speakers.
3.
S
elect
the
signal
source
as
follows:
To
listen
to
a
source
other
than
a
tape
deck,
be
sure
the
TAPE
MON
indicator
is
off.
If
necessary,
press
TAPE
MON
so
that
the
in¬
dicator
goes
off.
Then,
press
AM,
FM,
phono,
TV/AUX,
or
CD/AUX
to
select
the
signal
source.
The
corresponding
indicator
comes
on.
P&Ub
TV/AUX
CO/AUX
TAPC
MOW
AM
1
ru
PHONO
TV/AUX
CO/AUX
TAPP
MON
t
To
listen
to
a
tape,
press
tape
mon
so
that
the
tape
MON
indicator
comes
on.
Am
phono
TV/AUX
CO/AUX
]
PWCNO
TV/AUX
CO/AUX
1
TAP*
To
tune
to
a
radio
station,
press
TUNING
UP
or
TUNING
down
to
tune
up
or
down
the
selected
band.
Or,
press
SEARCH
and
then
press
TUNING
UP
Or
TUNING
DOWN
to
search
up
or
down
for
an
available
station.
See
“Tuning
to
a
Radio
Station"
for
details
and
for
information
about
memory
tuning.
<1
10
www.hifiengine.com

4.
Adjust
VOLUME,
BASS,
TREBLE,
and
BALANCE
to
suit
your
listening
preferences.
To
boost
the
bass
and
treble
when
listening
at
low
volumes,
press
in
LOUDNESS.
See
“Adjusting
the
Sound”
for
more
infor¬
mation.
5.
Press
POWER
to
turn
off
the
receiver.
All
in¬
dicators
go
off.
HEARING
COMFORT
AND
YOUR
HEALTH
Do
not
listen
to
your
receiver
at
extremely
high
volume
levels,
especially
when
listening
through
headphones.
Extended
high-volume
listening
can
cause
permanent
hearing
loss.

TUNING
TO
A
RADIO
STATION
You
can
use
manual,
search,
or
memory
tuning
to
select
a
radio
station.
Notes:
•
stereo
appears
on
the
display
when
the
sig¬
nal
is
stereo.
•
To
improve
the
reception
of
weak
FM
sta¬
tions,
press
FM
MONO
so
that
the
FM
MONO
indicator
comes
on.
For
more
information,
see
“Adjusting
the
Sound.”
Manual
Tuning
The
search
mode
tunes
to
only
strong
stations,
so
you
might
need
to
use
manual
tuning
for
weak
or
distant
stations.
Follow
these
steps
to
manually
tune
to
a
radio
station.
1.
Be
sure
the
search
mode
is
not
selected.
If
search
appears
on
the
display,
press
SEARCH
to
cancel
the
search
mode.
2.
Press
am
or
FM
to
select
the
band.
The
dis¬
play
shows
the
selected
band,
(fm
1
or
fm
2
appears
for
the
FM
band.)
3.
Press
TUNING
UP
or
TUNING
DOWN
to
tune
up
or
down
the
band.
The
display
shows
the
selected
frequency.
To
quickly
move
up
or
down
the
band,
press
and
hold
down
tuning
up
or
tuning
down.
Search
Tuning
Follow
these
steps
to
search
for
stations.
1.
Press
AM
or
FM
to
select
the
band.
The
dis¬
play
shows
the
selected
band,
(fm
l
or
fm
2
appears
for
the
FM
band.)
2.
Press
SEARCH
so
that
search
appears
on
the
display.
3.
Press
TUNING
UP
or
TUNING
DOWN.
The
receiver
searches
up
or
down
the
band
and
tunes
to
the
first
strong
station
it
finds.
Press
tuning
UP
or
TUNING
DOWN
to
search
for
another
station.
4.
To
return
to
manual
tuning,
press
SEARCH
so
that
search
no
longer
appears
on
the
dis¬
play.
Memory
Tuning
You
can
store
up
to
6
AM
and
12
FM
stations
in
memory.
Each
memory
group
(AM,
FM
1,
and
FM
2)
can
contain
up
to
6
stations.
Once
you
store
a
station
in
memory,
you
can
easily
tune
to
it
by
selecting
the
desired
memory
group
and
pressing
the
correct
memory
location
%
button.
Note:
If
the
receiver
is
without
power
for
more
than
3
days,
you
will
need
to
enter
the
stations
into
memory
again.
www.hifiengine.

Follow
these
steps
to
store
a
station
in
memory.
1.
P
ress
AM
or
fm
to
select
the
band.
2.
I
f
you
are
storing
FM
stations,
press
FM
1/2
to
select
the
memory
group,
fm
1
or
fm
2
appears
on
the
display.
fm
i/s
3.
U
se
manual
or
search
tuning
to
tune
to
the
first
station
you
want
to
store
in
the
memory
group.
4.
Press
MEMORY
SET.
ch
flashes
on
the
dis¬
play.
□
OWN
TUIMKMQ
UP
MEMORY
SET
t
5.
While
ch
flashes
on
the
display,
press
the
desired
memory
location
button.
For
ex¬
ample,
press
to
store
the
station
in
memory
location
1.
EIQHTBEN
MCMQRV
P^CSErTfl
t
6.
Repeat
Steps
3-5
to
store
additional
sta¬
tions
in
the
selected
memory
group.
Then,
repeat
Steps
1-5
to
store
stations
in
the
•
*
remaining
memory
groups.
Follow
these
steps
to
select
a
stored
station:
1.
Press
AM
or
FM
to
select
the
band.
For
FM
stations,
press
FM
1/2
to
select
the
memory
group.
2.
Press
the
desired
memory
location
button.
Last-Station
Tuning
Each
time
you
select
a
memory
group
(AM,
FM
1,
or
FM
2),
the
receiver
automatically
tunes
to
the
last
station
you
listened
to
in
that
memory
group.
13
www.hifiengine.com

ADJUSTING
THE
SOUND
Use
the
following
information
to
adjust
the
sound
to
suit
your
listening
preferences.
Balance
The
BALANCE
control
lets
you
adjust
the
balance
between
the
left
and
right
speakers.
This
control
affects
both
pairs
of
speakers
(A
and
B).
If
your
speakers
are
properly
positioned
and
your
listening
area
is
centered
between
the
speakers,
the
balance
control’s
center
setting
is
usually
best.
For
unusual
speaker
placements,
’adjust
the
balance
as
follows:
1.
Tune
to
an
FM
station.
2.
Press
FM
MONO
so
that
the
FM
MONO
in¬
dicator
comes
on.
3.
Adjust
BALANCE
until
the
sound
seems
to
be
coming
from
the
point
halfway
between
the
two
speakers.
4.
Press
FM
MONO
so
that
the
FM
MONO
in¬
dicator
goes
off
to
return
to
normal
FM
recep-
S
tion.
Loudness
At
low
volume
levels,
your
ears
are
less
sensi¬
tive
to
bass
and
treble
sounds.
When
you
listen
at
low
volume
levels,
boost
the
bass
and
treble
sounds
by
pressing
in
the
LOUDNESS
button.
FM
Mute/FM
Mono
l
fs/lONO
The
FM
mute
feature
reduces
the
noise
you
hear
when
you
tune
from
one
FM
station
to
another.
To
use
the
FM
mute
feature,
be
sure
the
FM
MONO
indicator
is
off.
To
tune
to
and
improve
the
reception
of
weak
FM
stations,
press
FM
MONO.
The
FM
MONO
in¬
dicator
comes
on,
the
FM
mute
feature
turns
off,
and
the
signal
becomes
monaural
(mono).
To
turn
on
the
FM
mute
feature
and
return
to
nor¬
mal
FM
reception,
press
FM
MONO
so
that
the
indicator
goes
off.
Bass
and
Treble
Adjust
the
BASS
control
to
increase
or
decrease
low
sounds
such
as
those
from
a
bass
drum
or
bass
guitar.
Adjust
the
TREBLE
control
to
increase
of
decrease
high
sounds
such
as
those
from
a
violin,
piccolo,
or
cymbals.
www.hifiengine.com

RECORDING
A
TAPE
If
you
connect
a
tape
deck
to
the
receiver
as
described
in
“Connecting
Signal
Sources,"
you
can
record
from
one
of
the
other
signal
sources.
Press
AM,
FM,
PHONO,
TV/AUX,
Or
CD/AUX
to
select
the
signal
source
you
want
to
record
from.
Then,
begin
recording.
To
ensure
that
the
tape
deck
is
receiving
the
signal,
press
tape
mon
so
that
the
tape
mon
indicator
is
on.
If
your
tape
deck
has
a
tape
monitoring
function,
you
can
hear
the
actual
recording
as
it
is
made.
If
you
want
to
listen
directly
to
the
signal
source
as
you
record,
press
TAPE
mon
so
that
the
TAPE
MON
indicator
is
off.
USING
HEADPHONES
Warnings:
•
To
prevent
possible
ear
injury
and
hearing
loss,
turn
VOLUME
to
0
before
you
put
on
the
headphones
and
before
you
change
the
sig¬
nal
source.
After
you
put
on
the
headphones
or
change
the
signal
source,
adjust
volume
to
a
comfortable
listening
level.
•
Do
not
listen
to
your
receiver
at
extremely
high
volume
levels,
especially
when
listening
through
headphones.
Extended
high-volume
listening
can
cause
permanent
hearing
loss.
To
listen
through
headphones,
insert
the
V4-inch
plug
of
a
pair
of
low-impedance
stereo
head¬
phones
into
the
receiver’s
PHONES
jack.
For
private
listening,
turn
off
the
speakers
by
pressing
both
speakers
buttons
to
release
them.
OUTPUT
POWER
METER
The
output
power
meter
shows
the
relative
amount
of
power
being
drawn
from
the
re¬
ceiver’s
amplifier.
BUILT-IN
PROTECTION
CIRCUITS
#
The
receiver
has
two
special
protection
circuits:
•
The
thermal
overload
protection
circuit
auto¬
matically
turns
off
the
receiver’s
amplifier
if
it
overheats.
•
The
overdrive
protection
circuit
automatically
turns
off
the
amplifier
if
too
much
power
is
being
drawn
from
it.
If
a
protection
circuit
turns
off
the
amplifier,
the
receiver
stops
producing
sounds
and
the
output
power
meter
indicators
go
off.
However,
the
receiver
continues
to
receive
power,
so
the
other
indicators
remain
on.
If
this
happens,
press
power
to
turn
off
the
receiver’s
power.
Then,
check
for
proper
ventila¬
tion
and
proper
speaker
connections,
and
be
sure
the
speakers
have
an
impedance
of
8
to
16
ohms.
The
protection
circuits
usually
reset
in
only
a
few
minutes,
so
you
can
turn
on
and
use
the
receiver
again.
The
circuits
seldom
take
longer
than
30
minutes
to
reset.
www.hifiengine.com

CHOOSING
OTHER
SYSTEM
COMPONENTS
Use
the
information
in
this
section
to
help
you
create
a
complete
audio/video
system.
Your
local
Radio
Shack
store
has
a
wide
selection
of
audio/video
components
to
suit
almost
every
application
and
budget.
See
“Connecting
Signal
Sources”
for
instruc¬
tions
for
connecting
components
to
the
receiver.
SPEAKERS
Your
stereo
system
can
sound
only
as
good
as
your
speakers
allow,
so
choose
the
best
speaker
possible.
that
of
a
live
performance.
With
proper
handling,
compact
discs
last
indefinitely.
Features
such
as
search,
program,
and
repeat
play
make
it
easy
to
listen
to
your
favorite
tunes.
M
Many
CD
players
give
you
the
added
con¬
venience
of
remote
operation.
TAPE
DECKS
Today's
high-performance
tape
decks
are
equipped
with
special
tape
bias
settings
and
noise-reduction
circuitry.
Some
decks
also
offer
advanced
recording
and
dubbing
capabilities.
For
the
best
performance
from
your
receiver,
use
Radio
Shack’s
Mach
Two
or
Optimus
speakers.
The
more
economical
Minimus
speakers
provide
superb
performance
as
auxiliary
speakers
or
as
main
speakers
when
used
in
smaller
rooms.
If
you
consistently
listen
to
music
at
a
high
volume
level,
we
recommend
speakers
with
a
higher
power
rating.
Note:
Your
speakers
must
have
an
impedance
of
8
to
16
ohms.
TURNTABLES
Use
a
turntable
with
a
magnetic
cartridge.
For
better
sound
and
less
wear
on
your
records,
we
recommend
a
cartridge
with
an
elliptical
stylus.
CD
PLAYERS
CD
players
are
free
from
audible
noise
and
dis¬
tortion,
and
provide
a
dynamic
range
close
to
TVS/VCRS
4
If
your
TV
has
audio/video
output
jacks,
you
can
connect
your
TV
or
VCR
to
your
receiver.
You
can
then
enjoy
the
rich,
powerful
sound
of
your
system’s
speakers
when
you
watch
TV
programs
and
video
cassettes.
For
best
audio
performance,
we
recommend
a
VHS
Hi-Fi
VCR.
HEADPHONES
%
A
good
pair
of
stereo
headphones
is
a
valuable
addition
to
a
home
stereo
system.
They
provide
convenient
private
listening
and
an
enhanced
stereo
effect.
Your
receiver’s
front
panel
PHONES
jack
accepts
any
low-impedance
stereo
headphones
with
a
VMnch
plug.
Before
buying
your
headphones,
wear
them
long
enough
to
be
sure
they
are
comfortable.
www.hifiengine.com
16

PROBLEM-SOLVING
If
the
receiver
is
not
working
as
it
should,
the
following
suggestions
might
help
you.
If
you
follow
the
suggestions
in
this
chart
and
the
receiver
still
does
not
work
properly,
contact
your
local
Radio
Shack
store
where
our
personnel
will
assist
you.
Problem
No
power
(All
indicators
are
off.)
No
sound
Cause/Remedy
Press
POWER.
Be
sure
the
power
cord
is
plugged
in.
Try
a
different
AC
outlet.
If
you
are
listening
to
a
signal
source
other
than
the
tape
deck,
be
sure
the
TAPE
MON
indicator
is
off.
If
necessary,
press
TAPE
MON
so
that
the
indicator
goes
off.
Check
the
SPEAKERS
buttons.
If
you
con¬
nect
only
one
pair
of
speakers,
press
only
the
corresponding
SPEAKERS
button.
Check
the
signal
source
connections.
Be
sure
you
have
selected
the
correct
signal
source.
Check
the
speaker
connections.
An
overload
protection
circuit
might
have
turned
off
the
amplifier.
Press
POWER
to
turn
off
the
receiver.
Then,
check
the
follow¬
ing:
Be
sure
the
speakers
are
correctly
con¬
nected.
Be
sure
there
are
no
stray
wire
strands
touching
other
wire
strands
or
metal
objects.
Be
sure
the
receiver
is
adequately
venti¬
lated.
Be
sure
the
speakers
have
an
im¬
pedance
of
8
to
16
ohms.
17
www.hifiengine.com

MAINTENANCE
CARE
Your
Optimus
STA-795
Digital
Synthesized
AM/FM
Stereo
Receiver
is
an
example
of
supe¬
rior
design
and
craftsmanship.
The
following
suggestions
will
help
you
care
for
your
receiver
so
that
you
can
enjoy
it
for
years.
Keep
the
receiver
dry.
If
it
does
get
wet,
wipe
it
dry
immediately.
Liquids
can
contain
minerals
that
can
corrode
the
electronic
circuits.
Use
and
store
the
receiver
only
in
normal
temperature
environ¬
ments.
Temperature
extremes
can
shorten
the
life
of
electronic
devices
and
distort
or
melt
plastic
parts.
Handle
the
receiver
gently
and
carefully.
Dropping
it
can
damage
circuit
boards
and
cases
and
can
cause
the
receiver
to
work
im¬
properly.
Keep
the
receiver
away
from
dust
and
dirt,
which
can
cause
prema¬
ture
wear
of
parts.
Wipe
the
receiver
with
a
dam¬
pened
cloth
occasionally
to
keep
it
looking
new.
Do
not
use
harsh
chemicals,
cleaning
solvents,
or
strong
detergents
to
clean
your
receiver.
Modifying
or
tampering
with
the
receiver’s
inter¬
nal
components
can
cause
a
malfunction
and
might
invalidate
its
warranty
and
void
your
FCC
authorization
to
operate
the
receiver.
If
your
receiver
is
not
performing
as
it
should,
take
it
to
your
local
Radio
Shack
store.
Our
personnel
can
assist
you
and
arrange
for
service
if
needed.
THE
FCC
WANTS
YOU
TO
KNOW
Your
receiver
might
cause
interference
on
other
radio/TV
devices
even
when
it
is
operating
properly.
To
determine
whether
your
receiver
is
causing
the
interference,
turn
off
your
receiver.
If
the
interference
goes
away,
your
receiver
is
causing
the
interference.
Try
to
eliminate
the
in¬
terference
by:
•
Moving
your
receiver
away
from
the
other
device
•
Connecting
your
receiver
to
an
outlet
that
is
on
a
different
electrical
circuit
from
the
other
device
•
Contacting
your
local
Radio
Shack
store
for
help
If
you
cannot
eliminate
the
interference,
the
FCC
requires
that
you
stop
using
your
receiver.
www.hifiengine.com

SPECIFICATIONS
50
watts
per
channel,
minimum
RMS
into
8
ohms
from
40
-
20,000
Hz,
with
no
more
than
0.5
%
total
harmonic
distortion
GENERAL
Power
Source
.
120V
AC,
60
Hz
Power
Consumption
.
350
Watts
Max
Dimension
.
3
^/isx
17
V&
x
9
11
/i6
Inches
(100
x430
x245
mm)
Temperature
Range:
Operating
.32
-
110
°F
(0
-
43
°C)
Storing
.-40
-
150
°F
(-40
-
66
#
C)
Weight
.12
lbs
2
oz
(5.5
kg)
AMPLIFIER
Frequency
Response
(Aux
1W,
8-ohm
load)
IM
Distortion
(50
watts)
.
Signal-to-Noise
Ratio
.
Input
Sensitivity:
PHONO
.
CD/AUX,
TV/AUX
and
TAPE
IN
.
Phono
Equalization
.
Tone
Control
Action:
Bass
.
Treble
.
Total
Harmonic
Distortion
(50
watts,
1
kHz)
Loudness
Compensation:
10
kHz
.
100
Hz
.
....
40
-
20,000
Hz
+/-
1
dB
..0.5
%
68
dB
(PHONO),
76
dB
(AUX)
.
2.6
mV
.150
mV
.New
RIAA
+/-
3
dB
.+/-10
dB@
100
Hz
.+/-10dB@
10
kHz
.0.3
%
+4.5
dB
+6
dB
FM
TUNER
Tuning
Range
.
IHF
Sensitivity
(3
%
THD)
.
Limiting
Sensitivity
(-3
dB)
.
Signal-to-Noise
Ratio
.
Capture
Ratio
.
Total
Harmonic
Distortion
(1
mV):
Mono.
Stereo
.
Image
Rejection
.
IF
Rejection.
Stereo
Separation
@
1
kHz
.
AM
TUNER
Tuning
Range
.
Sensitivity
(for
20
dB
S/N,
radiated)
Image
Rejection
..
IF
Rejection
.
AGC
Figure-of-Merit
.
Total
Harmonic
Distortion
(5
mV/m)
Signal-to-Noise
Ratio
(5
mv/m)
...
RF
Interference
Rejection
.
.
.
87.5-107.9
MHz
2.5
nV,
IHF
(13.2
dBf)
.1.7
nV
(9.8
dBf)
.
65
dB
.2.0
dB
.0.35
%
.0.4%
.
35
dB
.
77dB
.
38
dB
520
-
1720
kHz
...
.
400
fiV/m
.
33
dB
.
50
dB
.
55
dB
.
1
.
0
%
.
40
dB
Rated
Excellent
www.hifiengine.com

RADIO
SHACK
LIMITED
WARRANTY
This
product
is
warranted
against
defects
for
2
years
from
date
of
purchase
from
Radio
Shack
company-owned
stores
and
authorized
Radio
Shack
franchisees
and
dealers.
Within
this
period,
we
will
repair
it
without
charge
for
parts
and
labor.
Simply
bring
your
Radio
Shack
talas
slip
as
proof
of
purchase
date
to
any
Radio
Shack
store.
Warranty
does
not
cover
transportation
costs.
Nor
does
it
cover
a
product
subjected
to
misuse
or
accidental
damage.
EXCEPT
AS
PROVIDED
HEREIN,
RADIO
SHACK
MAKES
NO
WARRANTIES,
EXPRESS
OR
IMPLIED,
INCLUDING
WARRANTIES
OP
MERCHANTABILITY
AND
FITNESS
FOR
A
PARTICULAR
PURPOSE.
Some-states
do
not
permit
limitation
or
exclusion
of
implied
warranties;
therefore,
the
aforesaid
limitation(s)
or
exclusion(s)
may
not'apply
to
the
purchaser.
This
warranty
gives
you
specific
legal
rights
and
you
may
also
have
other
rights
which
vary
from
slate
to
state.
We
Service
What
We
Sell
6A6
RADIO
SHACK
0
A
Division
of
Tandy
Corporation
Fort
Worth,
Texas
76102
81102261OC
Printed
in
Hong
Kong
www.hifiengine.com
Other manuals for STA-795
1
Table of contents
Other Optimus Stereo Receiver manuals