Orange Pi PC2 User manual

Orange Pi Manual Copy right by Shenzhen Xunlong Software Co., Ltd
www.orangepi.org www.xunlong.tv
I
Orange Pi PC2
User Manual

Orange Pi Manual Copy right by Shenzhen Xunlong Software Co., Ltd
www.orangepi.org www.xunlong.tv
II
Contents
I. Orange Pi Introduction........................................................................................................................... 1
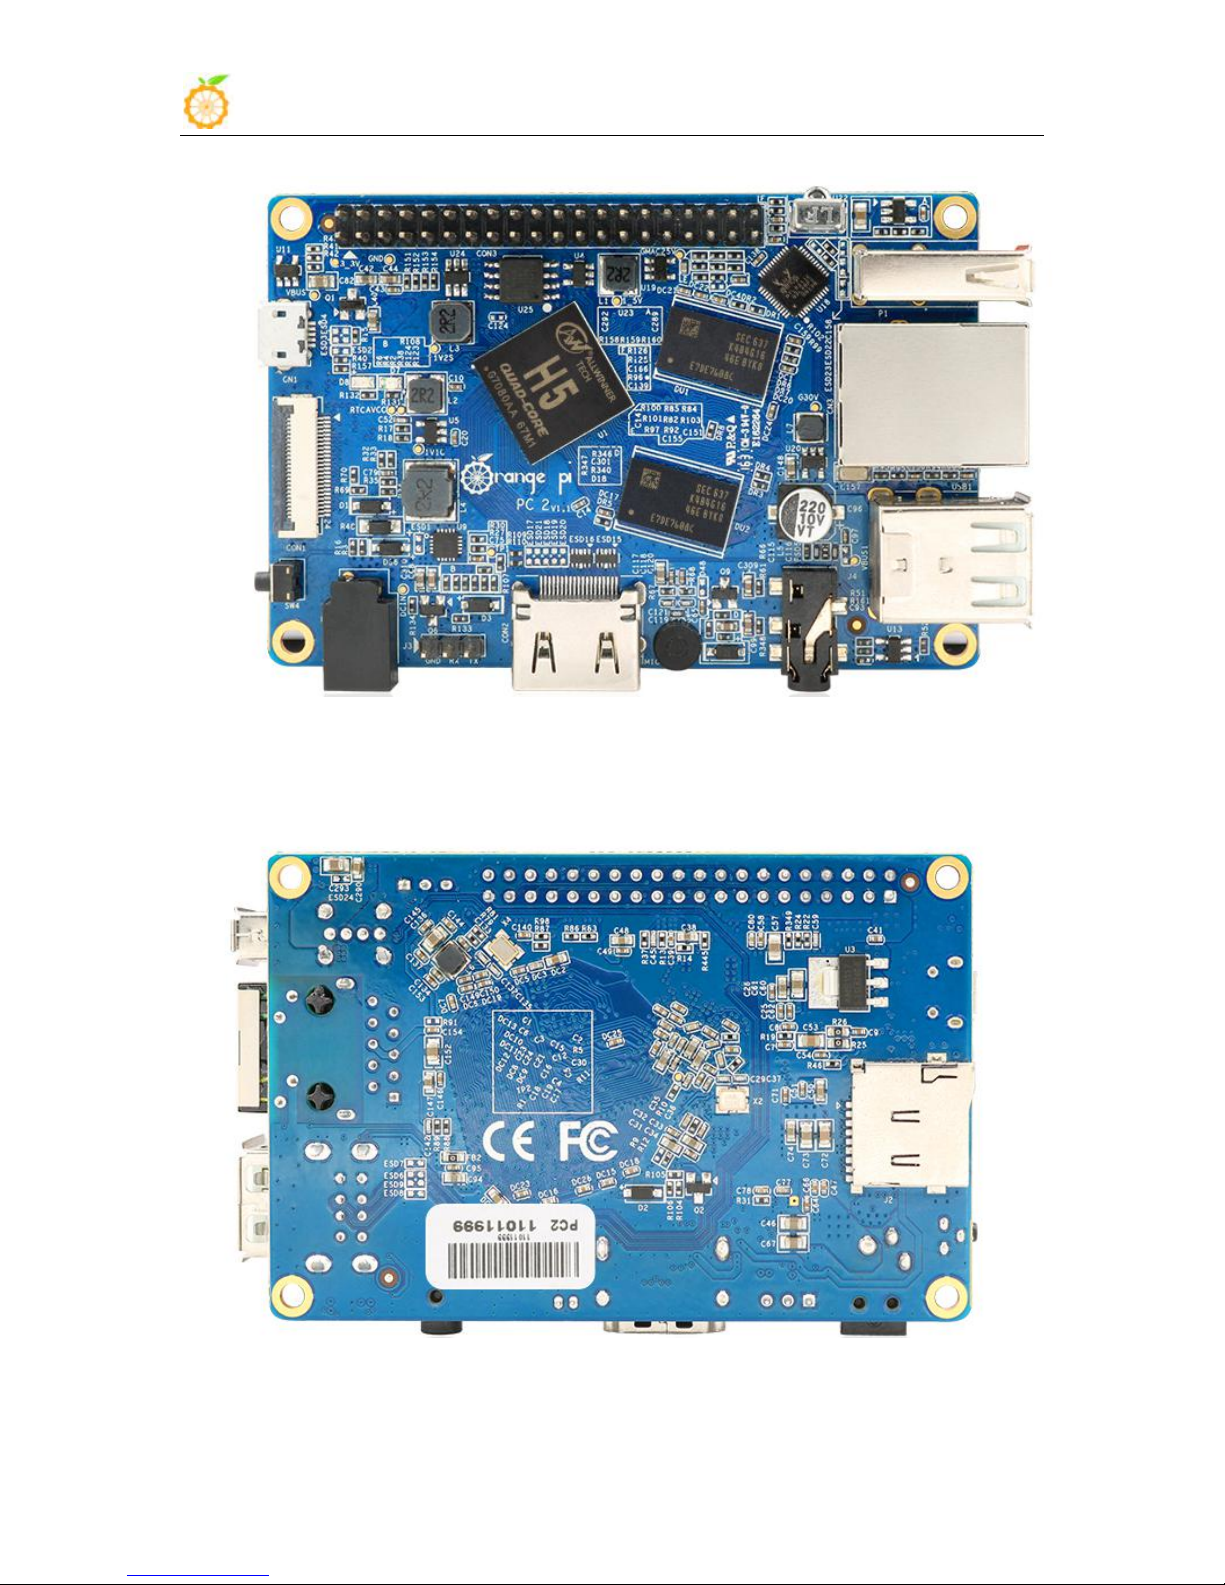
1. What is Orange Pi PC2?........................................................................................................ 1
2. What can I do with Orange Pi PC2?......................................................................................1
3. Whom is it for?...................................................................................................................... 1
4. Hardware specification of Orange Pi PC2............................................................................ 1
5. GPIO Specifications.............................................................................................................. 4
6. Specification of CSI Camera Connector............................................................................... 6
II. Using Method Introduction...................................................................................................................7
1. Step 1: Prepare Accessories Needed..................................................................................... 7
2. Step 2: Prepare a TF Card for Booting..................................................................................8
3. Step 3: Start your Orange Pi................................................................................................14
4. Step 4: Turn off your Orange Pi correctly...........................................................................17
5. Other configuration............................................................................................................. 17
6. Universal software configurationr.......................................................................................19
III. Linux Kernel Source Code Compilation...........................................................................................32
1. Download Linux Source Code............................................................................................ 32
2. Compile Project Source Code............................................................................................. 33
3. Update the Kernal Image File and Replace Library........................................................... 35
IV. Android Kernel Source Code Compilation.......................................................................................38
1. Install JDK...........................................................................................................................38
2. Install Platform Supported Software................................................................................... 39
3. Download Android Source Package....................................................................................39
4. Install Compiler Tool Chain................................................................................................ 40
5. Compile Lichee source Code.............................................................................................. 40
6. Compile Command of Android Code..................................................................................40
V. Use Project Configuration Files..........................................................................................................44
1. sys_config.fex Introduction.................................................................................................44
2. Examples..............................................................................................................................44
VI. OrangePi Driver development...........................................................................................................47
1. Device Driver and Application Programming.....................................................................47
2. Compile device driver......................................................................................................... 50
3. Corss-complile or compiled Application code....................................................................53
4. Running driver and application........................................................................................... 55
VII. Using Debug tools on OrangePi...................................................................................................... 56
1. Operation Steps on Windows.............................................................................................. 56
2. Operation steps on Linux.....................................................................................................60

Orange Pi Manual Copy right by Shenzhen Xunlong Software Co., Ltd
www.orangepi.org www.xunlong.tv
1
I. Orange Pi Introduction
1. What is Orange Pi PC2?
It’s an open-source single-board computer. It can run Android 5.1,
Ubuntu, Debian, Raspberry Pi Image. It uses the All-winner H5 Soc, and has
1GB DDR3 SDRAM.
2. What can I do with Orange Pi PC2?
You can use it to build…
A computer
A wireless server
Games
Music and sounds
HD video
A speaker
Android
Scratch
......
Pretty much anything else, because Orange Pi PC2 is open source
3. Whom is it for?
Orange Pi PC2 is for anyone who wants to create with technology– not
just consuming. It's a simple, fun, useful tool and you can use it to take
control of the world around you.
4. Hardware specification of Orange Pi PC2
Hardware specification
CPU
H5 High Performance Quad-core 64-bit Cortex-A53
GPU
• High Performance Hexa-core Mali450
• OpenGL ES 2.0/1.1/1.0, OpenVG 1.1, EGL
• 40 GFlops, Pixel fill rate greater than 2.7GPixel/s

Orange Pi Manual Copy right by Shenzhen Xunlong Software Co., Ltd
www.orangepi.org www.xunlong.tv
2
Memory (SDRAM)
1GB DDR3 (shared with GPU)
On-board Storage
TF card (Max. 32GB) /Emmc slot/NOR flash(2MB)
On-board Network
10/100/1000M Ethernet RJ45
Video Input
A CSI input connector Camera:
Supports 8-bit YUV422 CMOS sensor interface
Supports CCIR656 protocol for NTSC and PAL
Supports SM pixel camera sensor
Supports video capture solution up to 1080p@30fps
Audio Input
MIC
Video Outputs
Supports HDMI output with HDCP
Supports HDMI CEC
Supports HDMI 30 function
Integrated CVBS
Supports simultaneous output of HDMI and CVBS
Audio Output
3.5 mm Jack and HDMI
Power Source
DC input, USB OTG input don't supply power
USB 2.0 Ports
Three USB 2.0 HOST, one USB 2.0 OTG
Button
Power Button(SW4)
Low-level
peripherals
40 Pins Header,compatible with Raspberry Pi B+
GPIO(1x3) pin
UART, ground.
LED
Power led & Status led
Key
Power, IR input
Supported OS
Android Lubuntu, Debian, Raspberry Pi Image
Interface definition
Product size
85mm × 56mm
Weight
63g
Orange Pi™ is a trademark of the Shenzhen Xunlong Software CO., Limited

Orange Pi Manual Copy right by Shenzhen Xunlong Software Co., Ltd
www.orangepi.org www.xunlong.tv
3
Top view
Bottom view

Orange Pi Manual Copy right by Shenzhen Xunlong Software Co., Ltd
www.orangepi.org www.xunlong.tv
4
Interface instructions
5. GPIO Specifications
A 40-pin GPIO interface on the Orange Pi PC2 is the same as Model A
and Model B of Raspberry Pi. The picture below is GPIO pin define of
Orange Pi PC2.

Orange Pi Manual Copy right by Shenzhen Xunlong Software Co., Ltd
www.orangepi.org www.xunlong.tv
5
OrangePi(H5)
CON3-P01
VCC-3V3
CON3-P02
VCC-5V
CON3-P03
TWI0-SDA
PA12
CON3-P04
VCC-5V
CON3-P05
TWI0-SCK
PA11
CON3-P06
GND
CON3-P07
PWM1
PA6
CON3-P08
UART3_TX
PA13
CON3-P09
GND
CON3-P10
UART3_RX
PA14
CON3-P11
UART2_RX
PA1
CON3-P12
PD14
PD14
CON3-P13
UART2_TX
PA2
CON3-P14
GND
CON3-P15
UART2_CTS
PA3
CON3-P16
PC4
PC4
CON3-P17
VCC-3V3
CON3-P18
CAN_RX
PC7
CON3-P19
SPI0_MOSI
PC0
CON3-P20
GND
CON3-P21
SPI0_MISO
PC1
CON3-P22
UART2_RTS
PA2
CON3-P23
SPI0_CLK
PC2
CON3-P24
SPI0_CS0
PC3
CON3-P25
GND
CON3-P26
PA21
PA21
CON3-P27
TWI1-SDA
PA19
CON3-P28
TWI1-SCK
PA18
CON3-P29
PA7
PA7
CON3-P30
GND
CON3-P31
PA8
PA8
CON3-P32
UART1_RTS
PG8
CON3-P33
PA9
PA9
CON3-P34
GND
CON3-P35
PA10
PA10
CON3-P36
UART1_CTS
PG9
CON3-P37
PA20
PA20
CON3-P38
UART1_TX
PG6
CON3-P39
GND
CON3-P40
UART1_RX
PG7

Orange Pi Manual Copy right by Shenzhen Xunlong Software Co., Ltd
www.orangepi.org www.xunlong.tv
6
6. Specification of CSI Camera Connector
The CSI Camera Connector is a 24-pin FPC connector which can
connect external camera module with proper signal pin mappings. The pin of
CIS connector can be defined as follows. The connector marked with "CON
1" on the Orange Pi PC2 is camera connector.
Orange Pi PC2-CSI
CON1-P01
NC
CON1-P02
GND
CON1-P03
TWI2-SDA
PE13
CON1-P04
VCC-CSI
CON1-P05
TWI2-SCK
PE12
CON1-P06
CSI-RESET#
PE15
CON1-P07
CSI-VSYNC
PE3
CON1-P08
CSI-STBY-EN
PE15
CON1-P09
CSI-HSYNC
PE2
CON1-P10
VDD1V8-CSI
CON1-P11
VCC-CSI
CON1-P12
CSI-D7
PE11
CON1-P13
CSI-MCLK
PE1
CON1-P14
CSI-D6
PE10
CON1-P15
GND
CON1-P16
CSI-D5
PE9
CON1-P17
CSI-PCLK
PE0
CON1-P18
CSI-D4
PE8
CON1-P19
CSI-D0
PE4
CON1-P20
CSI-D3
PE7
CON1-P21
CSI-D1
PE5
CON1-P22
CSI-D2
PE6
CON1-P23
GND
CON1-P24
AFVCC-CSI

Orange Pi Manual Copy right by Shenzhen Xunlong Software Co., Ltd
www.orangepi.org www.xunlong.tv
7
II. Using Method Introduction
Follow these steps, you can configure and run your Orange Pi in a very
short period of time. Boot your Orange Pi need to complete the following
steps.
1. Step 1: Prepare Accessories Needed
You need at least some accessories like the following if it is your first
time to use the Orange Pi.
No.
Items
Requirements and Instructions
1
TF card
8GB min.; class 10. Branded TF cards would
be reference which are much more reliable.
2
HDMI to HDMI
cable or HDMI to
DVI cable
HDMI to HDMI cable is used to connect HD
TV or HD monitor
3
AV video cable
A standard AV video cable can be used to
connect stimulated monitor if a HDMI monitor
is unavailable.
4
Keyboard and
mouse
Any keyboard and mouse with USB port is
applicable; Keyboard and mouse are
high-power, so a USB concentrator is required.
5
Ethernet cable/USB
WiFi(Optional)
Network is optional, It makes more convenient
to mount and upgrade software in your Orange
Pi PC.
6
DC power adapter
5V/2V min. high qualified power adapter, OTG
can not used a power supply.
7
Audio cable
(Optional)
You can select an audio cable with 3.5mm jack
to feel stereo audio.
HDMI to HDMI cable HDMI to DVI cable AV video cable

Orange Pi Manual Copy right by Shenzhen Xunlong Software Co., Ltd
www.orangepi.org www.xunlong.tv
8
TF card DC power adapter
2. Step 2: Prepare a TF Card for Booting
In order to use Orange Pi normally, you must install the operating system
into TF card first.
1) Write Linux into TF Card Based on Windows Platform
a. Inserting the TF card into the computer, the capacity of the card must be
bigger than the operating system, usually requires 8GB or bigger.
b. Formatting the TF card.
iDownload tools for formatting TF card, such as TF Formatter, it
could be downloaded from:
https://www.sdcard.org/downloads/formatter_4/eula_windows/
ii Unzip the downloaded files, and run setup.exe
iii In the options settings select the "format" button for quick
formatting. "Format size adjustment" select "(ON)"

Orange Pi Manual Copy right by Shenzhen Xunlong Software Co., Ltd
www.orangepi.org www.xunlong.tv
9
iv Make sure the inserted TF card disk are in accordance with the
chosen disk.
v Click the "Format" button.
c. Download the operating system image file from the download page, the
page address is as following:
http://www.orangepi.org/downloadresources
d. Unzip the downloaded file (in addition to the Android system, this
method can be used to burn to write, the Android system need another
burn, the following will introduce)
e. Right click to download the file, select "Unzip file" to write image to TF
card
iDownload tools to write image,such as Win32 Diskimager, here is the
download page:
http://sourceforge.net/projects/win32diskimager/files/Archive/
ii Select the image file path that has been unzipped.
iii Click "Write" button and wait for the image to write.
iv After the image is written, click "Exit" button.

Orange Pi Manual Copy right by Shenzhen Xunlong Software Co., Ltd
www.orangepi.org www.xunlong.tv
10
2) Write Linux into TF card based on Linux platform?
a. Inserting the TF card into the computer, the capacity of the card must be
larger than the operating system image, usually requires 4GB or greater
capacity.
b. Formatting the TF card.
i Run fdisk –l order to make sure TF disk.
ii Run umount /dev/sdxx to uninstall all partitions of TF Card.
iii Run sudo fdisk /dev/sdxorder. Use ocommand to delete all
partitions of TF Card, and then us norder to add a new partition, finally use
wcommand to save and exit.
iv Run sudo mkfs.vfat /dev/sdx1command to format the TF card
partition set up last step to FAT32 form(according to your TF card disk to
replacex). Or you could skip this step since command in Linux will format
TF card automatic.
c. Download the OS image from download page
http://www.orangepi.org/`downloadresources
d. Unzip and right click the downloaded file, select " Unzip file"
e. Write image to TF card
iRun sudo fdisk –l order to make sure the TF card disk
ii make sure the image file hash key is the same as download page
mention(optional). It will output sha1sum [path]/[imagename],which
should be same as the image paye "SHA-1"
iii Run umount /dev/sdxx order to uninstall all partitions in TF Card
iv Run sudo dd bs=4M if=[path]/[imagename] of=/dev/sdxto write
down image file. Wait for the image to write. If it cannot work at 4M, then
replace a 1M which takes more time. You can run sudo pkill –USR1 –n –x
dd order to monitoring procedure.
3) Use PhoenixCard tool to write Android image into TF card
It is impossible for Android image to be written into TF card by using
dd command under Linux or using Win32 Diskimager under Windows. Here

Orange Pi Manual Copy right by Shenzhen Xunlong Software Co., Ltd
www.orangepi.org www.xunlong.tv
11
PhoenixCard tool is applicable for Android image writing.
a. Download the Android OS image and PhoenixCard tool.
Download PhoenixCard from here:
https://drive.google.com/file/d/0B_VynIqhAcB7NTg2UkRDdHRWX2s/
edit?usp=sharing
Download Android OS image from here:
http://www.orangepi.org/downloadresources/
b. Format the TF card
c. Please make sure the inserted TF card is in accordance with the chosen
TF card, click "restore" button for TF card formatting.
d. Click "OK" button after successfully formatted the TF card to normal.

Orange Pi Manual Copy right by Shenzhen Xunlong Software Co., Ltd
www.orangepi.org www.xunlong.tv
12
e. Burn the Android OS image into your TF card. Please pay attention to
the following with red marks.
f. Click "Burn" button for writing to TF card and wait for it finish
g. Click "Exit" button after burn Android image to TF card successfully.
4) Write Armbian Image into TF Card
a. Insert TF card into computer, please note that the TF card capacity must
bigger than the operating system image, usually need to be 8GB or
bigger.
b. Download the OS image file from the download page:
http://www.armbian.com/download/
c. Write the image into TF card.

Orange Pi Manual Copy right by Shenzhen Xunlong Software Co., Ltd
www.orangepi.org www.xunlong.tv
13
iDownload image writing tool such as Rufus, the download page:
https://rufus.akeo.ie/
ii Select the image file path that has been unzipped
iii Click "start" button and wait for the image to write.

Orange Pi Manual Copy right by Shenzhen Xunlong Software Co., Ltd
www.orangepi.org www.xunlong.tv
14
iv After the image is written, click "close" button
3. Step 3: Boot your Orange Pi
1) Hardware Connection Sketch Map
Orange Pi PC2 runs on Android 4.4 system

Orange Pi Manual Copy right by Shenzhen Xunlong Software Co., Ltd
www.orangepi.org www.xunlong.tv
15
Orange Pi PC2 runs on Debian system
Orange Pi PC2 runs on Ubuntu system

Orange Pi Manual Copy right by Shenzhen Xunlong Software Co., Ltd
www.orangepi.org www.xunlong.tv
16
2) Details of Booting Steps
a. Insert the TF card with written image in to the TF card slot.
b. It is HDMI interface on the bottom edge of the board. You could use
HDMI cable to connect your Orange Pi to HDMI TV or monitor.
You could also use AV interface and audio interface to connect output
video and audio to analog TV or display.
c. Insert USB keyboard and mouse into the USB interface.
d. It is the network port in the middle of 3USB interfaces, which you
can access Orange Pi to the wired network.
e. It is the power input interface on the right side for connecting a
power adapter up to or bigger than 5V/2A. Avoid using smaller
power GSM mobile phone charger, it is not able to output 2A even if
it marked "5V/2A ".
Note: Micro-USB
(OTG)
cannot use as power input which may cause the fail
boot of the OrangePi. Only the power interface could input power.

Orange Pi Manual Copy right by Shenzhen Xunlong Software Co., Ltd
www.orangepi.org www.xunlong.tv
17
The Orange Pi will boot in a few minutes If the above steps are
successful. There will be graphical interface in he monitor. It may take a
long time to start the first time, please wait patiently. The next time will boot
very fast.
4. Step 4: Turn off your Orange Pi Correctly
You can use the shutdown button on the interface to safety close the
Orange Pi.
You can also close the system by entering commands in the shell:
sudo halt
or
sudo shutdown –h
It will be safety to turn off the Orange Pi. If directly use the power
button to shut down the system may damage the file system on TF Card.
After the system is closed, the power can be cut off by more than 5 seconds’
press.
5. Other configuration
1) Connect to the wired network
If the Orange Pi has connect to wire cable, then the system would obtain
the IP address automatically. If there is no wire cable connecting, then the
system would fail at obtaining IP address which could cause the booting
delay.
After connecting to wired network, it should be green LED lighting and
yellow LED flashing. You need to make sure the image you wrote is
correspondent since some boards are 100M Ethernet but some are 1000M
Ethernet.
100M Ethernet is using internal phy, configuration just like the
following:
2indicates internal phy
1000M Ethernet is using external phy

Orange Pi Manual Copy right by Shenzhen Xunlong Software Co., Ltd
www.orangepi.org www.xunlong.tv
18
1 indicates external phy
The above configuration has been configured, you could refer to it when
using.
2) Login via vnc and ssh
If there is no condition for connecting HDMI, you could enter the system via
vnc or ssh remote login.
Login via serial port and install ssh
apt-get install ssh
Modify ssh configuration file /etc/ssh/sshd_config
Check the IP with ifconfig, login via ssh of root user
Table of contents
Other Orange Pi Motherboard manuals