Orbic Airsurf WI-FI User manual

1
USER
MANUAL

2
Table of Contents
Overview . . . . . . . . . . . . . . . . . . . . . . 4
Package Content . . . . . . . . . . . . . . . . .5
Getting Started - Device Overview . . . . 6
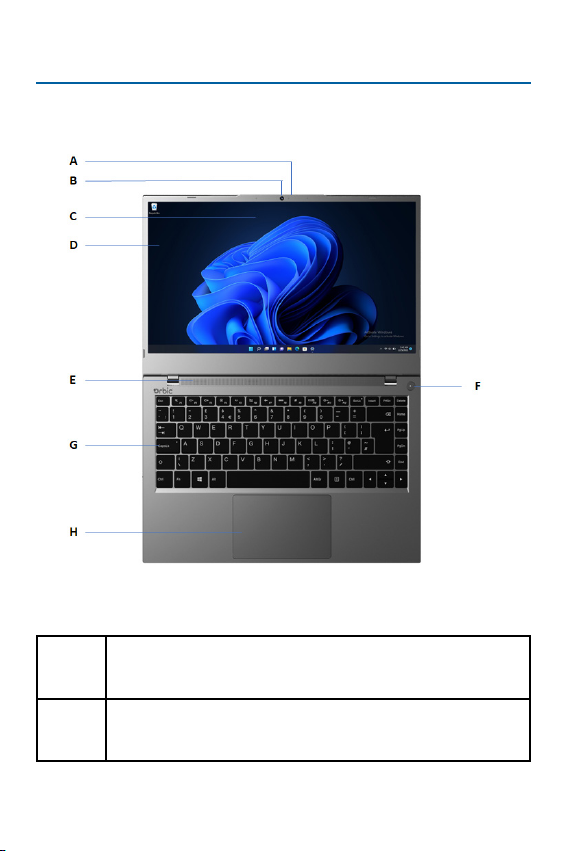
Front View. . . . . . . . . . . . . . . . . . . . . . . . 6
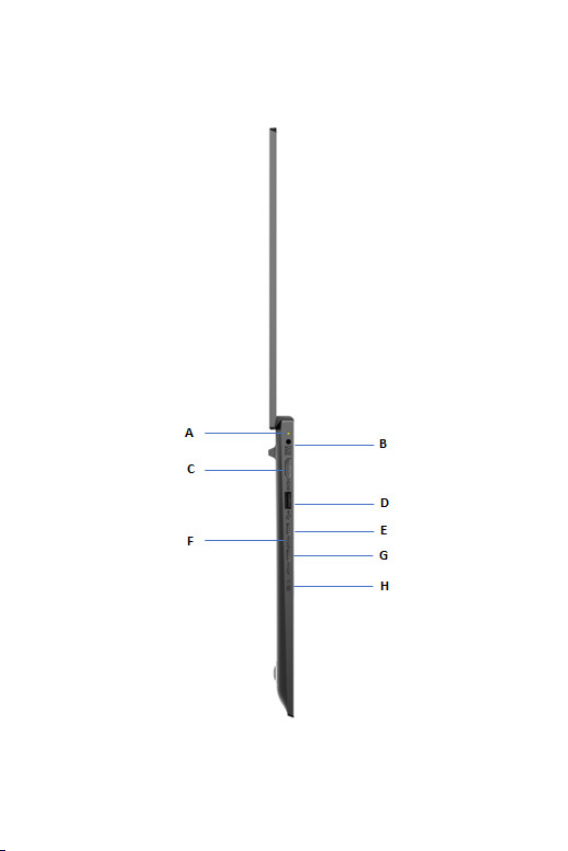
Left View . . . . . . . . . . . . . . . . . . . . . . . . 8
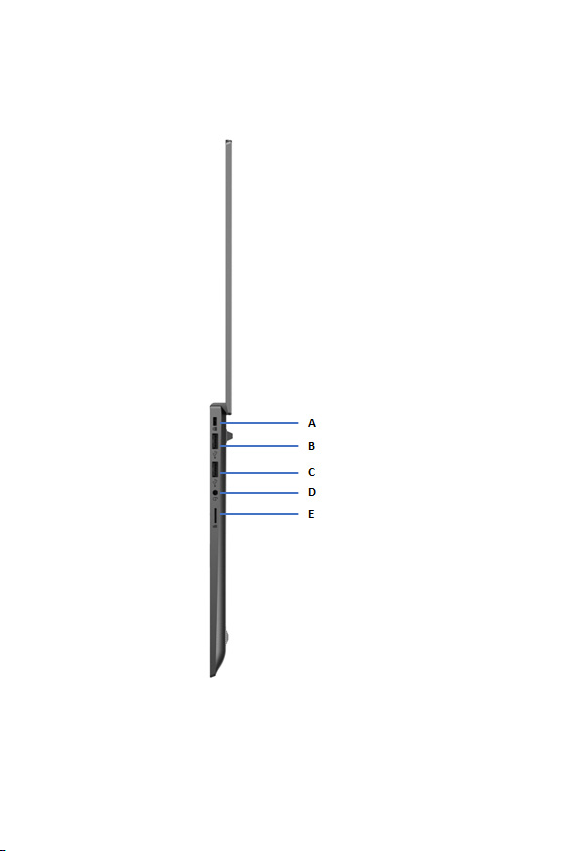
Right View . . . . . . . . . . . . . . . . . . . . . . .10
Bottom View . . . . . . . . . . . . . . . . . . . . . .12
Keyboard View . . . . . . . . . . . . . . . . . . . .13
Using the Touchpad . . . . . . . . . . . . . .14
Touchpad Gestures . . . . . . . . . . . . . . . . .15
Set up your Device . . . . . . . . . . . . . . . 16
Charging the Battery . . . . . . . . . . . . . . . .16
Turning the Device ON . . . . . . . . . . . . . . . 17
Connect to a Network . . . . . . . . . . . . .18
Connecting to a Wireless LAN. . . . . . . . . .18
Bluetooth Wireless Connection. . . . . . . . 20
Send/Receive les via Bluetooth . . . . . . . 25
Update Management . . . . . . . . . . . . .27
Start . . . . . . . . . . . . . . . . . . . . . . . . . . . 27
Power OFF / Reboot. . . . . . . . . . . . . . . . 27
Lock the Screen. . . . . . . . . . . . . . . . . . . 27
Wi-Fi Connection. . . . . . . . . . . . . . . . . . 27
Bluetooth 5.1 . . . . . . . . . . . . . . . . . . . . . 27
Select your Language Settings . . . . . . . . 27

4
Overview
Thank you for purchasing the Orbic AirSurf Wi-Fi.
This manual provides information about the hardware and soft-
ware features of your AirSurf Wi-Fi.
We recommend you read the Product Safety and Warranty Infor-
mation booklet that you have received along with your device for
additional safety information.

5
Package Content
Verify that the following items are included in the package:
•1X Orbic AirSurf Wi-Fi PC
•1X Power Adapter
•1X Quick Start Guide
•1X Product Safety and Warranty Information booklet
If any of the items are missing or damaged, please contact the
manufacturer immediately and save the entire package for trans-
port.

6
Getting Started - Device Overview
Front View
ACamera Status LED
The indicator will turn blue when the camera is active.
BCamera
High-denition infrared camera.

7
CDigital Microphones
Dual built-in microphones.
DLCD Screen
Internal display/panel.
ESpeakers
Stereo audio output.
FPower Button
Press once to turn the laptop ON when it is powered
OFF or asleep.
•The indicator will turn ON. Press once to notify
the operating system to power OFF the laptop or
enter sleep mode.
•The indicator will turn OFF if powered off or blink
for sleep mode.
GKeyboard
This keyboard supports white backlighting by pressing
Fn+Spacebar simultaneously.
HTouchpad/Clickpad
Touch-sensitive pointing device which functions like a
mouse.

8
Left View

9
AStatus Indicator
Indicates the device's status.
BDC Charger Port
Connect the AC adapter to this connector.
CHDMI Port
Supports high-denition digital video connections.
DUSB 3.0 Gen1 Ports
Connect any USB devices to these ports, such as a USB
ash drive, keyboard, or mouse.
EUSB Type-C
Connect any USB device to this port, such as a ash
drive, keyboard, or mouse. This port can also be used as
a charging port.
FLED Indicator
Indicates if the device's camera is ON/OFF.
GUSB Type-C
Connect any USB devices to these ports, such as a
ash drive, keyboard, or mouse.
HCamera/MIC Switch
Turn the camera and MIC audio ON/OFF.

10
Right View

11
AKensington Lock
Anti-theft key lock hole.
BUSB 3.0 Gen 1 Ports
Connect any USB devices to these ports, such as a USB
ash drive, keyboard, or mouse.
CUSB 2.0 Gen 2 Ports
Connect any USB devices to these ports, such as a USB
ash drive, keyboard, or mouse.
DHeadphone Jack
Connect amplied speakers or headphones into this
3.5mm jack.
EExternal Storage
Supports 512 GB of MicroSD memory cards.

12
Bottom View
A
Speakers
Stereo audio output.
B
Back Cover Screws
You can remove all the back cover screws to install
or remove the SO-DIMMs and M.2 SSD cards.
Modication of any other parts or components
aside from the SO-DIMMs or M.2 SSD cards will void
your warranty.

13
Keyboard View
The following denes the row of function keys, which also contain
secondary hotkeys/shortcuts, which can be accessed by pressing
and holding the Function Key (Fn) while simultaneously pressing
the desired hotkey/shortcut.

14
Using the Touchpad
Touchpads help move the cursor around or select items. A touch-
pad has left and right buttons similar to those of a mouse.
Press the left and right corners on the bottom edge of the touch-
pad/clickpad to make selections and run functions. These two
buttons are similar to a mouse's left and right buttons. Tapping on
the touchpad/clickpad produces identical results.
NOTE: Use the touchpad only with ngers. The touchpad will not
recognize the actions of other objects.

15
Touchpad Gestures
Single-nger slide
Slide a nger across the touchpad to move the
cursor.
Single-nger press or tap
Press the touchpad down, or lightly tap the
touchpad with your nger, to perform a click,
which will select or start an item. Quickly repeat
the tap to perform a double tap or double click.
Two-nger press
Lightly tap the touchpad with two ngers to
perform a right click. In the Start screen, this will
toggle the app commands. Most apps will open a
context menu related to the selected item.
Two-nger slide
Swiftly scroll through web pages, documents
and playlists by placing two ngers on the touch-
pad and moving both in any direction.
Two-nger pinch
Zoom in and out of photos, maps, and docu-
ments with a simple nger-and-thumb gesture.

16
Set up your Device
The display panel can be opened to a wide range of angles for
optimal viewing.
Attempting to force the lid open beyond 180 degrees will cause
damage to the hinges and/or the display.
Charging the Battery
Charge the battery completely before using it for the rst time.
Use the AC adapter to charge the battery.
Warning! Use only approved AC adapters, batteries, and cables.
Unapproved adapters or cables can cause the battery to explode
or damage the device.
1. Connect the AC adapter to the USB Type-C port of the
AirSurf.
2. Plug the AC adapter into an electrical socket.
3. Unplug the adapter from the electric socket when the bat-
tery is fully charged.

17
Turning the Device ON
•Press the Power button to turn ON your notebook computer.

18
Connect to a Network
Connecting to a Wireless LAN
A wireless LAN (or WLAN) is a local area network that can link
two or more computers without using wires. Once connected to
WLAN, you can access the internet.
To connect to a wireless network,
1. Click the wireless network icon in the system tray.
2. Select the Wi-Fi icon to see the options.

19
3. Select the network you want to connect to from the list and
click Connect to build the connection.
4. Enter the password and click Next.

20
After establishing a connection, you can see the wireless
network icon in the system tray.
Bluetooth Wireless Connection
Bluetooth enables you to transfer data wirelessly over short
distances between many different types of devices. Bluetooth-en-
abled devices include computers, cell phones, tablets, wireless
headsets, and keyboards.
To use Bluetooth, you must ensure the following:
1. Bluetooth is enabled on both devices.
2. Your devices are paired and connected.
Enable Bluetooth and Add a Device
You must pair every new device with your laptop's Bluetooth
adapter. Therefore, it rst needs to be authenticated to be secure.
When both devices are turned ON, the Bluetooth adapter will
connect them; you only need to pair them once.
Table of contents
Other Orbic Laptop manuals