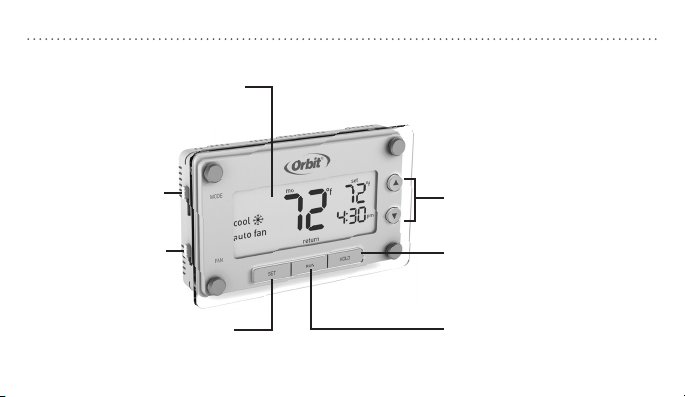
Orbit Clear Comfort Pro 83521 User manual

Clear Comfort™Pro
7-day Programmable
Thermostat
User Guide
Model 83521

i
Thank you for purchasing the Clear Comfort™ Pro thermostat from OrbitTM.
We are excited to provide you a long-lasting thermostat that blends style with function.
Features
• Easily program 7 individual days or copy one programmed day to another
• Pre-programmed and ready to go with Energy Star®seings
• Large backlit display is easy to read
• Early start ensures the desired temperature is reached at the scheduled time
• Precision control keeps the temperature within 1°F of set level
• Override the schedule temporarily or permanently

1
TABLEOFCONTENTS
Quick Reference
Easy 1-2-3 Operation ..................................................................... 2
Thermostat Controls .................................................................... 3
Display Screen.................................................................................4
Before You Begin............................................................................ 5
Installation
Installing Your Thermostat.......................................................... 7
Temperature Format....................................................................15
Reset Buon....................................................................................15
Advanced System Setup ............................................................16
Operation
Set Time and Day ........................................................................ 20
Select Mode and Fan Seings.................................................21
Programmed Schedules.............................................................22
Energy Star®Programmed Schedule ....................................23
Modifying the Programmed Schedule .................................24
Using the Copy Feature.............................................................25
Overriding Schedules Temporarily........................................26
Overriding Schedules Permanently......................................27
Turning Off Schedules ...............................................................28
Compressor Protection.............................................................29
Early Start....................................................................................... 30
Appendices
Replacing the Baeries...............................................................31
Troubleshooting ............................................................................32
Customer Assistance..................................................................38
Warranty ..........................................................................................39

2
1. Set the time and day ........................................................................................................................See page 20
2. Select whether to heat or cool .................................................................................................... See page 21
3. Select fan seing ............................................................................................................................... See page 21
Your thermostat is now ready to use, simply press RUN. If you do not wish to use
the preprogrammed Energy Star®thermostat seings you can:
Modify the programmed schedule...................................................................................................See page 24
Temporarily override the programmed schedule....................................................................... See page 26
Permanently override the programmed schedule ..................................................................... See page 27
EASYOPERATION

3
MODE Switch:
Select between
Heat/Off/Cool
p/qBuons: Press to
adjust temperature or use to
navigate during set up
HOLD Press to override
programmed schedule
RUNPress to resume
programmed schedule
FAN Switch:
Select between
Auto Fan/Fan On
SETPress to set
schedule, time, and day
Backlit Screen:
Press any buon to activate
THERMOSTATCONTROLS

4
Heating system is on
Fan seing
Fan is activated
Room temperature
Reminder to
change baeries
Desired
temperature
seing
Schedule period
Current day of the
week
Current time
Indicate which
mode the
system is in
Cooling system is on
DISPLAYSCREEN

5
This thermostat is compatible with
the following systems:
• Gas, oil or electric furnace
• Central air conditioner
• 2 wire hot water system with or without pump
• Millivolt system
• Central heating and cooling system
• Heat pump without auxiliary/backup heat
Tools Required For Installation
• Phillips screwdriver
• Wire cuers/strippers
• Drill with 3/16" (4.8 mm) drill bit
• Level
BEFOREYOUBEGIN
This thermostat is not compatible with
base board heaters (or other line voltage
heating), multi-stage heating or cooling
systems, or 3-wire hydronic systems.

6
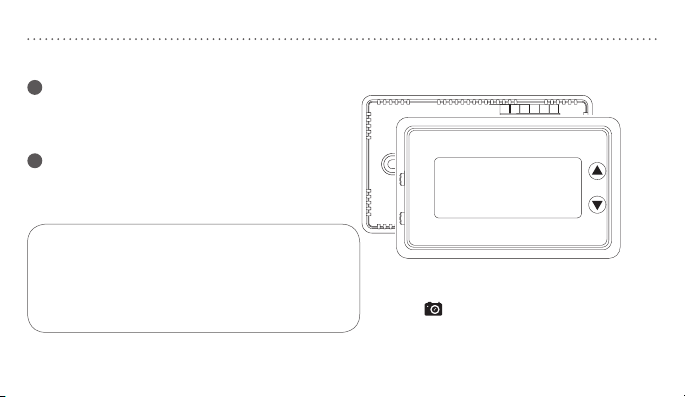
When replacing an existing thermostat,
position your new Clear Comfort™ Pro
thermostat in the same location as your
old one, unless the conditions that follow
suggest otherwise. For a new installation,
follow these guidelines for placement:
• Place the thermostat in a room or hallway that
is used oen; position on an inside wall about 5'
(1.52 m) from the floor.
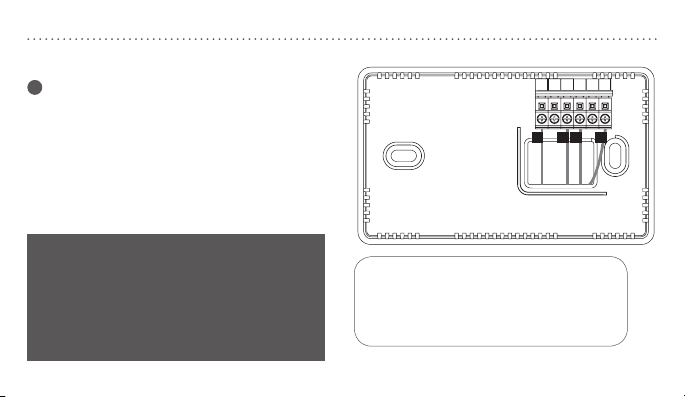
• Avoid installing the thermostat in overly warm
areas (e.g., near a television, lamp, radiator, or
fireplace), in direct sunlight, or
on a wall that has hot water pipes or that is
opposite a stove.
TIPSFORINSTALLATION
• Avoid installing the thermostat in
overly chilled areas, such as in a dray area (e.g.,
stairwell, door, or window),
on a wall separating an unheated room,
or where air circulation is poor
(e.g., in a corner or behind a door).
• Avoid installing the thermostat in damp areas, as
this can lead to corrosion.
• Do not install the thermostat until construction
work is complete, the area is dust free, and
painting is completed.
• If the thermostat housing is cold, wait for it to
reach room temperature before installing.

7
Take a picture or make note of
the current wiring for reference.
Mercury Notice: If your old thermostat
contains mercury contact your local
waste management authority for
information on how to safely dispose of it.
Switch Off Power
Turn off the power to the heating
and cooling equipment.
Remove Cover
Remove the front cover from the
old thermostat.
INSTALLINGYOURTHERMOSTAT
Y W
G0/B Y W RC R
GR

8
INSTALLINGYOURTHERMOSTAT
Label Wires
Use the supplied wire labels to identify the
wire by its terminal leer and not the color.
Once the wires are labeled, disconnect the
wires and remove the base.
While labeling and removing the
individual wires DO NOT let the wire
fall back inside the wall.
B B
G G
R R
V/VR V/VR
X X
Y2 Y2
H H
RC RC
W W
X1 X1
C C
L L
RH RH
W1
X2 X2
W1
E E
O O
T T
W2
Y Y
W2
F F
P P
U U
W3
Y1 Y1
W3
AUX
AUX
Y W
G0/B Y W RC R
GR

9
INSTALLINGYOURTHERMOSTAT
Mount New Base
a. Remove the thermostat body from
the base by gently pulling them apart.
b. Place the base flat against the wall by
feeding the wires through the opening
below the wiring terminal.
c. Level the base and mark the holes for
the mounting screws with a pencil.
d. Remove the base and drill holes at
marked positions. Insert the provided
wall anchors.
e. Feed wires back through the opening
and aach the base to the wall with
the screws provided.
G O/B Y W RC R

10
CAUTION: Stripping too much insulation from the end of a wire creates the
potential for shorting between wires and could prevent proper function of the thermostat.
GO/B Y W RC R
INSTALLINGYOURTHERMOSTAT
Wire Installation
for Conventional Systems
a. Loosen the screws on each terminal.
Note: Remove jumper wire if you have both
R and RC wires.
b. Insert each labeled wire into the matching
terminal and tighten the screws.
c. Wrap exposed areas of any unused wire
with electrical tape.
d. Continue to page 12.
screw
jump wire
labeled
wire

11
GO/B YW RC R
INSTALLINGYOURTHERMOSTAT
Wire Installation for Heat Pump Systems
a. Loosen the screws on each terminal.
b. Insert jumper wire into the Y and W
terminals.
c. Insert each labeled wire into the matching
terminal and tighten the screws.
d. Wrap exposed areas of any unused wire
with electrical tape.
screw
labeled
wire
/"
9.5 mm
Note: Expose 3/8" of each wire for proper installation.
jump wire

12
INSTALLINGYOURTHERMOSTAT
O B
Electric
Heat
Gas/Oil
Cool
Heat Cool
(B) (O)
Electric
Heat
Gas/Oil
Cool
Heat Cool
(B) (O)
Set Heat Pump Jumper
The following instructions are necessary
to check the J3 jumper placement if you
have a heat pump system.
OLeave the jumper in the Cool (O)
factory-set position if you connected an
O wire to the O/B terminal.
BMove the jumper to the Heat (B)
position if you connected a B wire to the
O/B terminal.

13
Electric
Heat
Gas/Oil
Heat
Heat Heat
(B) (O)
INSTALLINGYOURTHERMOSTAT
Electric
Heat
Gas/Oil
Heat
Heat Heat
(B) (O)
Set Fan Control Jumper
Correct placement of this J2 jumper
optimizes energy use and comfort levels for
the connected system type.
Gas/Oil Heat
For gas or oil systems leave the jumper in the
Gas/Oil Heat factory-set position.
Electric Heat
For electric and heat pump systems move
the jumper to the Electric Heat position.

14
INSTALLINGYOURTHERMOSTAT
G O/B Y W RC R
MODE
FAN
SET RUN HOLD
Completing an installation
a. Insert three Energizer® or Duracell® AAA
alkaline baeries.
b. Install the thermostat body by gently
pushing it onto the base until it “clicks” into
place. Verify that there are no gaps in the
side housing.
c. Turn the power back on to the heating and
cooling equipment.

15
RESETBUTTONTEMPERATUREFORMAT
Switching Between
Fahrenheit (°F) and Celsius (°C)
1. Slide the MODE switch to the
off position.
2. While holding ppress SET.
3. Release both buons.
4. Repeat steps 2 and 3 to toggle
between °F and °C.
RESET
THERMOSTATFIGMINIMUMOFFTIMEMU
Off
Arrow down
Arrow up
To access the RESET buon, remove the
thermostat body from its base by gently
pulling them apart.
• Press and hold for five seconds to reset all
system seings and temperature gauges back to
factory defaults.
Note: Be careful not to
touch the black surface
on which the reset button
is mounted, and do not
clean it if dusty.

16
The following four features are done in a
flow-through setup. The system will walk you
through each feature. To access only one
feature, follow these steps then press SET
until you come to the feature you would like
to adjust.
1. Slide the MODE switch to the off
position.
2. While holding the RESET buon press
SET, “offset” will appear on the display.
Note: Do not hold the reset button for more
than five seconds.
3. Release both buons.
Note: The system will automatically exit if no
buon is pressed within 12 seconds.
Offset the temperature display to read +/- 9°
F (+/- 4.5° C). This thermostat has a highly
accurate temperature sensor; if you desire
to match the display with other devices this
offset feature can be used.
Note: Using this feature does not change the actual
temperature.
1. Press por qto change the offset
amount.
2. Press SET to advance to the next step.
To exit, press SET four times.
TEMPERATUREOFFSETADVANCEDSYSTEMSETUP

17
EARLYSTART SYSTEMTYPE
Your thermostat comes preprogrammed
with early start functionality turned off. This
function allows the heating or cooling system
to turn on before the programmed start time
so that the room temperature matches the
set temperature at the start time.
1. Press por qto toggle between OFF
and ON.
2. Press SET to advance to the next step.
To exit, press SET three times.
Your thermostat is set at the factory to
operate a standard fossil fuel furnace
heating system.
1. Press por qto toggle between the
heat systems being used.
• If using a Heat Pump select HP.
• If using a Furnace select F.
2. Press SET to advance to the next step.
To exit, press SET two times.

18
MINIMUMCYCLEPERIOD
The cycle period is the minimum time in
minutes between each heating or cooling
cycle.
As a default, your thermostat’s minimum
cycle period is set to optimize energy use
and comfort levels. The default can be
changed if
you want it to turn on more or less
frequently.
1. Press por qto select the desired
cycle period.
2. Press SET to accept the cycle period
and exit.
• If Heat Pump (HP) has been selected,
it will toggle between 60, 30, 20, 15,
and 12.
• If Furnace (F) has been selected, it will
toggle between 60, 30, 20, 15, 12, 10,
8, and 6.
Table of contents
Other Orbit Thermostat manuals