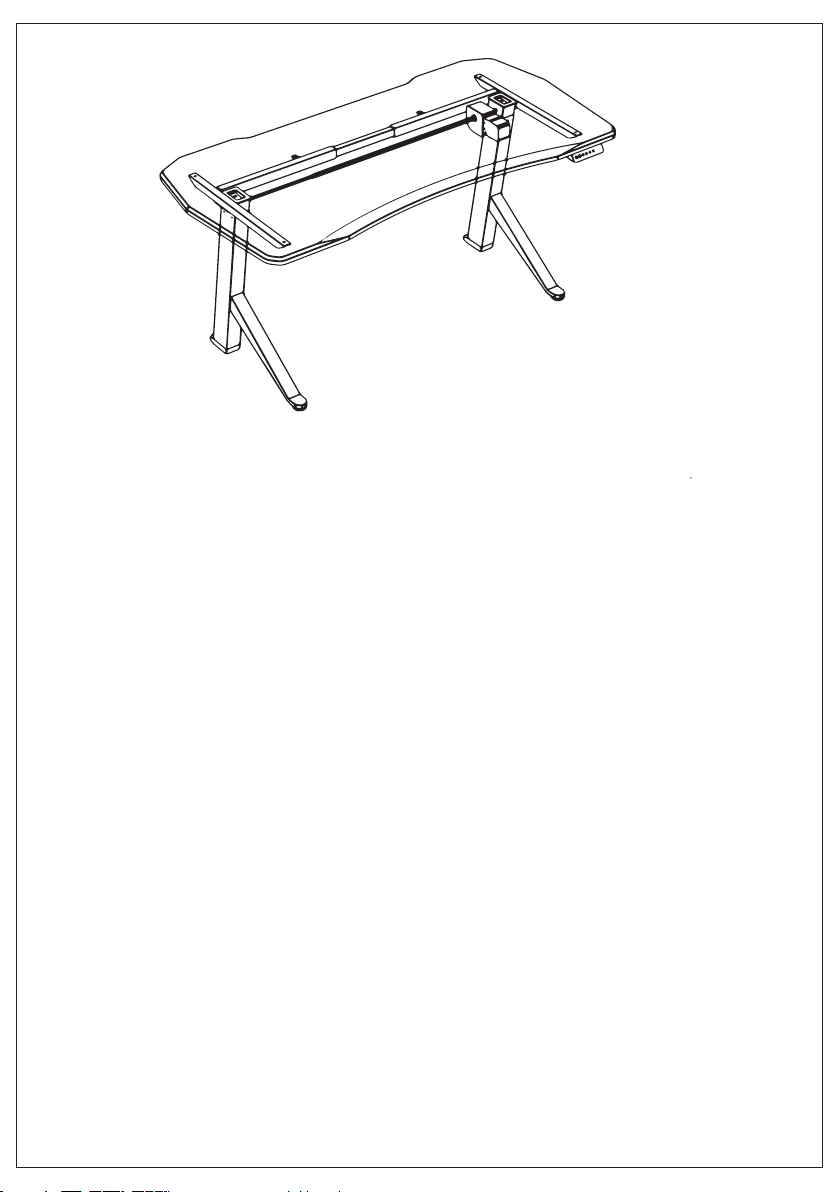
OriginLiving Ultimate Setup Gaming Desk User manual

Ultimate Gaming Tisch Aufbauanleitung
Ultimate Gaming Desk manual
Sehr geehrte Kundin, sehr geehrter Kunde,
wir freuen uns, dass du dich für unser Produkt
entschieden hast. Du hast einen modernen
Gaming Tisch ausgewählt, bei dem es uns
gelungen ist, die ergonomischen Vorteile eines
Sitz-Steh-Tisches mit den Vorlieben eines jeden
Gamers zu kombinieren. Der Gaming Tisch
wurde in Deutschland designed und konzipiert.
Dabei haben wir größten Wert auf die Qualität
jeder Komponente im Lieferumfang gelegt.
Wie du den Ultimate Setup Gaming Tisch richtig
montieren, nutzen und warten kannst, erfährst
du auf den folgenden Seiten der Bedienungs-
und Montageanleitung. Bitte lies dir die
Montageanleitung sorgfältig durch und halte
dich bei der Montage und der Benutzung
deines Ultimate Setup Gaming Tisches
unbedingt an die Anleitung. Änderungen am
Tischgestell, der Austausch von Komponenten
oder ein unsachgemäßer Gebrauch können sich
auf die Sicherheit, Funktionalität und
Lebensdauer auswirken.
Solltest du ein Problem oder Fragen bezüglich
des Ultimate Setup Gaming Tischs haben, sind
wir jederzeit für dich da.
Ihr Ultimate Setup Team
Dear Customer,
we are pleased that you have chosen our
product. You have picked a modern gaming
table where we have succeeded in combining
the ergonomic advantages of a sit-stand table
with the preferences of every gamer.
The gaming table was concepted and
designed Germany. The quality of materials
and manufacturing as well as functionality
and useability of the product were the most
important matters for us.
You can nd out how to properly assemble,
use and maintain the Ultimate Setup gaming
table on the following pages.
Please carefully read the assembly
instructions and stick to the assembly and use
of your Ultimate Setup Gaming Table
necessarily follow the instructions.
Changes to Table frame, the replacement of
components or an improper use can aect
the safety, functionality and lifespan of the
product.
If you have any problem or question
regarding your Ultimate Setup Gaming table,
we are always there for you.
Your Ultimate Setup team 1
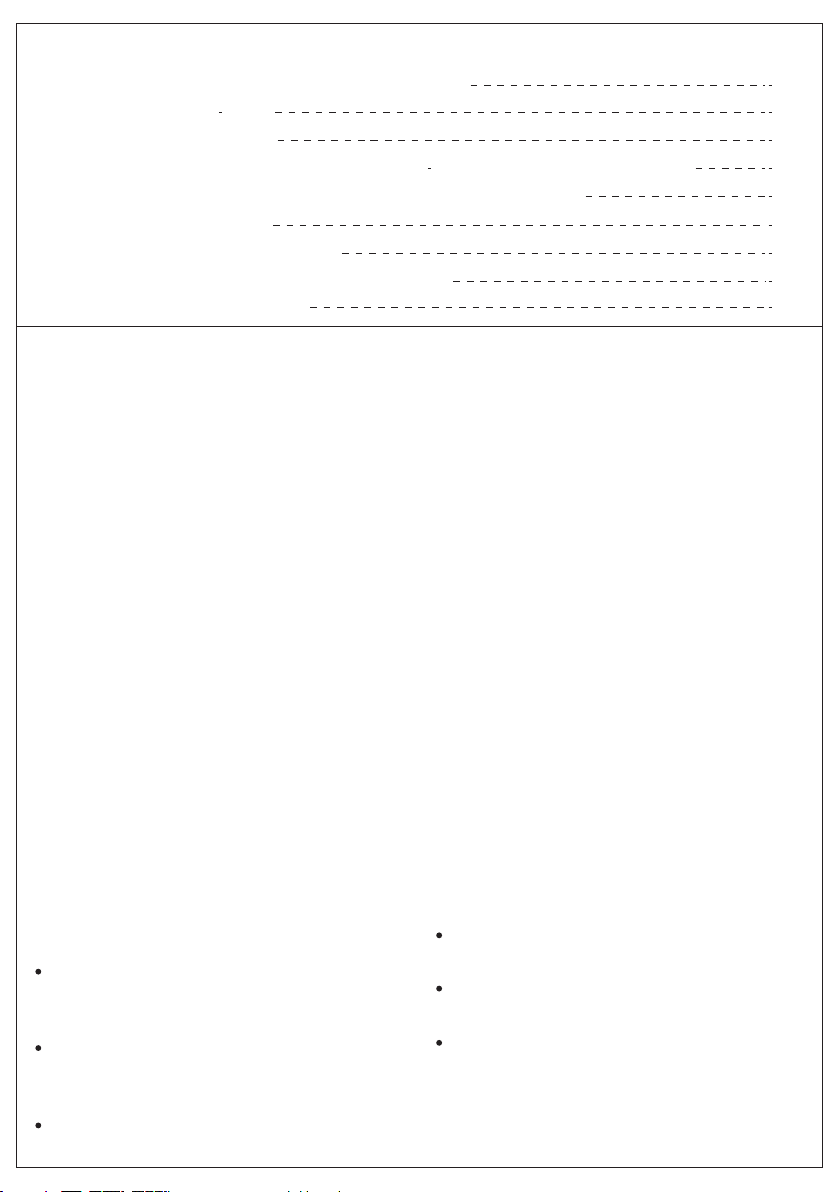
INHALT | CONTENT
Wichtige Benutzerinformation | Important user information
Lieferumfang | Scope of delivery
Aufbau Gestell | Assembly frame
Montage bei einer Ultimate Setup Tischplatte | Assembly with an Ultimate Setup table top
Montage bei einer anderen Tischplatte | Assembly with a dierent table top
Montage Tisch | Assembly table
Handset Einstellungen | Handset settings
EG-Konformitätserklärung | EC- declaration of conformity
Kontaktdaten | Contact informations
Allgemeines:
Die störungsfreie und sicherheitsgerechte
Benutzung des Tisches setzt voraus, dass Sie die
Sicherheitshinweise, Vorschriften sowie die
Aufbauanleitung gelesen haben.
Jede Person, die beim Aufbau behilich ist und
den Tisch nutzt, muss diese Sicherheitshinweise
beachten.
Der vorliegende elektromotorisch
höhenverstellbare Sitz-/Stehtisch dient
ausschließlich dem Zweck, im Stehen sowie im
Sitzen am Computer oder der Konsole zu
spielen oder Bürotätigkeiten nachzugehen. Für
andere Verwendungszwecke haftet der
Hersteller nicht. Insbesondere Kinder dürfen
nicht unbeaufsichtigt an den Tisch gelassen
werden, da Sie die vom Tisch ausgehenden
Gefahren nicht einschätzen können. Für hieraus
entstehende Schäden haftet der Hersteller
ebenfalls nicht.
Zur bestimmungsgemäßen Verwendung des
Tischgestells gehört, neben der Beachtung und
Anwendung aller Hinweise, auch das Verbot
jeglicher Art von Umbauten am Tischgestell
oder der Tischplatte.
Sachwidrige Verwendung:
Der Tisch darf niemals zum Heben von
Personen oder gewisser Lasten verwendet
werden!
Der Tisch darf nur bis zur maximalen Last
von insgesamt 80 kg (inkl. Tischplatte)
verwendet werden.
Der Tisch darf nicht im Freien, außerhalb des
Hauses verwendet werden.
General:
Trouble-free and safe use of the table
requires that you have read the safety
instructions, regulations and the assembly
instructions.
Every person who helps set up and uses the
table must observe these safety
instructions.
This electronic, height-adjustable sitting /
standing table is used exclusively for playing
or working while standing or sitting on the
computer or console. The manufacturer is
not liable for any other purposes. Children in
particular must not be left at the table
unsupervised as they cannot assess the
dangers posed by the table. The
manufacturer is also not liable for any
resulting damage out of this.
The intended use of the table frame
includes, in addition to observing and
applying all instructions, the prohibition of
any kind of modications to the table frame
or the table top.
Improper use:
The table must never be used to lift people
or certain loads!
The table may only be used up to a
maximum load of 80 kg (incl. Table top).
The table must not be used outdoors.
2
2-6
7
8-9
10-11
11-13
13-16
17-18
19
20

3
Richtlinien, Normen:
• Maschinenrichtlinie 2006/42/EG
• Niederspannungsrichtline 2014/35/EU
• Richtlinie über elektromagnetische
Verträglichkeit 2004/30/EU
ACHTUNG: Jegliche nicht ausdrücklich durch
den Hersteller erlaubte Veränderungen führen
zum Erlöschen der Garantie und sowohl das
Gestell als auch die Tischplatte dürfen nicht
mehr benutzt werden. Das Gleiche gilt bei einer
Montage des Tisches, die von der in dieser
Aufbauanleitung beschriebenen und
visualisierten Montage abweicht.
Sicherheitshinweise:
Die vorliegende Aufbauanleitung benutzt die
folgenden Symbole:
Directive standards:
• Machinery directive 2006/42 / EG
• Low voltage directive 2014/35 / EU
• Electromagnetic compatibility directive
2004/30 / EU
ATTENTION: Any changes not expressly
permitted by the manufacturer will void the
guarantee. Furthermore, it is possible that not
allowed changes can damage the function of
the desk frame as well as the table top. The
same applies to an assembly of the table that
deviates from the assembly described and
visualized in these assembly instructions.
Safety instructions:
These assembly instructions use the following
symbols:
Dieses Symbol weist auf einen wichtigen Hinweis hin. Das Nichtbeachten des Hinweises kann
Schäden am Tisch und/oder an der eigenen Gesundheit verursachen.
This symbol indicates an important note. Failure to observe the advice can damage the table
and / or your own health.
Belasten Sie den Tisch nicht mit mehr als 80 kg. Eine Überlastung kann zum Zusammenbruch
und Fehlfunktion des Tisches führen - schwere Verletzungen können ebenfalls die Folge sein.
Do not load the table with more than 80 kg. Overloading can lead to the collapse and
dysfunction of the table - serious injuries can also result.
Max
80 KG
Aufgrund der Schräge des Tischgestells entfernen Sie bitte das Tischgestell mit einem
angemessenen Sicherheitsabstand (15 cm) von dahinter/davor bendlichen Gegenständen.
Due to the inclination of the table frame, remove the table frame with an appropriate safety
distance (15 cm) from objects behind / in front of it.
Entfernen Sie Gegenstände unter dem Tisch bzw. der Tischplatte, die höher als 70 cm sind und
halten Sie kein Körperteil unter/auf den Tisch beim Hoch-/Runterfahren des Tisches. Das
Nichtbeachten dieses Hinweises kann den Tisch schwer beschädigen und Ihnen
gesundheitlich schwere Schäden zufügen.
Remove objects under the table or the table top that are higher than 70 cm and do not hold
any part of the body under / on the table when moving the table up / down. Failure to observe
this advice can seriously damage the table and cause serious damage to your health.
Dieses Symbol weist auf eine drohende Gefahr für das Leben und die Gesundheit hin. Das
Ignorieren dieses Symbols kann schwerwiegende Folgen für die Gesundheit haben.
This symbol indicates an imminent danger to life and health. Ignoring this symbol can have
serious health consequences.

4
Organisatorische Maßnahme:
Montieren Sie den Tisch am besten zu Zweit.
Insbesondere das Umdrehen des Gestellsmit
der montierten Tischplatte muss mit zwei
Personen erfolgen.
Empfohlene Sicherheitsmaßnahmen:
Bewahren Sie die Montageanleitung immer
in der Nähe des Tisches auf.
Hinweise zur Montage:
Der Aufbau des Tisches sowie das Spielen oder
Arbeiten an dem Tisch ist erst ab einem Alter von
16 Jahren gestattet.
Die Monteure müssen die Montageanleitung
sorgfältig gelesen und verstanden haben. Sollten
jedoch Unklarheiten vorhanden sein, müssen die
Monteure den Hersteller unter der angegeben
Telefonnummer kontaktieren (siehe
Konformitätserklärung).
Transport und Montage:
Der Tisch darf nur mit mindestens zwei Personen
und in niedrigster Tischhöhe (72 cm) transportiert
werden.
Der Tisch darf nur im spannungslosen Zustand
transportiert werden, d.h. der Netzstecker ist von der
Steckdose getrennt.
Damit der Tisch unversehrt bleibt, schieben oder
ziehen Sie den Tisch nicht über den Boden.
Zur Montage des Tisches benötigen Sie keine
weiteren Schrauben als die, die im Lieferumfang
enthalten sind.
Montieren Sie den Tisch mit dem beigefügten
Inbusschlüssel. Sollten Sie einen
Akkubohrer benutzen, achten Sie auf die
Drehgeschwindigkeit, so dass sich keine Schraube
durchdreht.
Die Löcher in der Ultimate Setup Tischplatte sind
vorgebohrt, benutzen Sie ausschließlich die
vorgebohrten Löcher in der Tischplatte zum
Befestigen der Tischplatte an das Tischgestell.
Befolgen Sie die Reihenfolge, wie sie in dieser
Aufbauanleitung vorgegeben ist.
Organizational measure:
It is best to have two people assemble the table. In
particular, turning the frame with the mounted
table top must be done by two people.
Recommended security measures:
Always keep the assembly instructions close to
the table.
Notes on assembly:
Setting up the table and playing or working at the
table is only permitted from the age of 16.
The tters must have carefully read and
understood the assembly instructions. However, if
anything is unclear, the tters must contact the
manufacturer on the telephone number given
(see declaration of conformity).
Transport and assembly:
The table may only be transported with at least
two people and at the lowest table height (72 cm).
The table may only be transported when it is
de-energized, i.e. the power plug is disconnected
from the socket.
To keep the table intact, do not push or pull the
table across the oor.
You do not need any screws other than those
included in the scope of delivery to assemble the
table.
Assemble the table with the enclosed Allen key.
If you use a cordless drill, pay attention to the
rotation speed so that no screw turns.
The holes in the Ultimate Setup table top are
pre-drilled, use only the pre-drilled holes in the
table top to attach the table top to the table
frame.
Follow the order given in these assembly
instructions.

5
Sicherheits- und Vorsichtsmaßnahmen:
Beim Ausfall des Motors bzw. der
Höhenverstellbarkeit kontaktieren Sie den Hersteller.
Beachten Sie jedoch, dass eine Fehlfunktion der
Höhenverstellbarkeit auch im Zusammenhang mit
einer falschen Bedienung oder Montage entstehen
kann. Daher ist das sorgfältige Lesen dieser
Montageanleitung zwingend notwendig.
Gefahren durch Elektrizität:
Der Tisch darf erst nach vollständiger Installation
an das Stromnetz angebunden werden.
Sollten Kabel beschädigt sein z.B. durch eine
beschädigte Isolierung, tauschen Sie diese
umgehend bei einem Fachbetrieb in Ihrer Nähe aus.
Verlegen Sie keine Kabel in der Nähe von
Wärmequellen. Durch die Wärmeeinwirkung kann
das Kabel beschädigt werden und es besteht die
Gefahr eines Brandes.
Der Tisch muss regelmäßig auf die Vorgaben der
nationalen Vorschriften hin geprüft werden. In
Deutschland sind dies die Unfallverhütungsvorschriften.
Bei längerer Abwesenheit oder Nichtbenutzung des
Tisches trennen Sie diesen von der Stromversorgung.
Benutzung des Tisches:
Der Tisch darf nur innerhalb des Eigenheimes
genutzt werden bzw. in Räumlichkeiten,die zur
privaten Nutzung dienen.
Lassen Sie Kinder den Tisch nicht unbeaufsichtigt
betätigen. Kinder können dieGefahren des Tisches
nicht richtig einschätzen und können gewisse
Einstellungen/Änderungen vornehmen, die die
Funktion des Tisches beeinträchtigen könnten.
Die Nutzung des Tisches muss auf ebenem Boden
erfolgen.
Nutzen Sie die Höhenverstellbarkeit des Tisches
nicht im Dauerbetrieb. Nach jeder Höhenverstellung
(max. 1 min. Hoch-/Runterfahren am Stück) müssen
Sie eine Pausevon mindestens 10 Minuten vornehmen.
Der Tisch darf nur mit dem maximal zulässigen
Gewicht von 80 kg belastet werden.
Besondere Gefahrenstellen:
Bei der Höhenverstellung des Tisches achten Sie
darauf, dass sich keine Personen in der Nähe des
Tisches benden. Es kann Verletzungsgefahr
bestehen.
Bei der Installation des Tisches und der Einrichtung
des Tisches achten Sie auf Kollisionsfreiheit (z.B.
Rollcontainer, Dachschräge etc.)
Safety and precautionary measures:
If the motor or the height adjustability fails, contact
the manufacturer. Please note, however, that a
dysfunction of the height adjustability can also
arise in connection with incorrect operation. It is
therefore imperative to read these assembly
instructions carefully.
Electricity Hazards:
The table may only be connected to the power
supply after it has been fully installed.
If cables are damaged e.g. If the insulation is
damaged, have it replaced immediately at a
specialist company in your area.
Do not lay cables near heat sources. The heat can
damage the cable and there is a risk of re.
The table must be checked regularly for the
requirements of the national regulations. In Germany
these are the accident prevention regulations.
If the table is absent or not used for a long time,
disconnect it from the power supply.
Use of the table:
The table may only be used within the home or in
rooms that are for private use.
Do not allow children to operate the table
unattended. Children cannot correctly assess the
dangers of the table and can make certain settings /
changes that could impair the function of the table.
The table must be used on at ground.
Do not use the height adjustability of the table in
continuous operation. After each height
adjustment (max. 1 min up / down at a time) you
must take a break of at least 10 minutes.
The table may only be loaded with the maximum
permissible weight of 80 kg.
Particular danger spots:
When adjusting the height of the table, make sure
that no one is near the table. There may be a risk
of injury.
When installing the table and setting up the table,
make sure that there are no collisions (e.g. roll
containers, sloping roof, etc.) Maintain a safety
distance of 10 cm from objects behind the table
and a safety distance of at least 2.5 cm to the side.

6
Hinweise für den Notfall:
Sollte der Tisch sich unbeabsichtigt in Bewegung
setzen, entfernen Sie sich unmittelbar aus der Nähe
des Tisches. Lassen Sie den Tisch von einem
Fachbetrieb reparieren.
Sollten ungewöhnliche Vorkommnisse an dem Tisch
auftreten wie bspw. Geräusche, Qualm, Rauch etc.
nehmen Sie den Tisch sofort außer Betrieb und
lassen Sie den Tisch von einem Fachbetrieb
reparieren.
Wartung und Instandhaltung:
Führen Sie keine Reparaturen eigenständig durch.
Tauschen Sie defekte Komponenten nur gegen neue
Originalteile des Herstellers aus.
Reinigung:
Beseitigen Sie größere Verunreinigungen am Tisch.
Putzen Sie das Tischgestell nur mit einem trockenen
Lappen ab.
Die Tischplatte können Sie mit einem leicht
feuchtem Tuch abwischen.
Lesen Sie die Gebrauchsanweisung sorgfältig und
befolgen Sie die Hinweise und einzelnen Schritte.
Restrisiken:
Der Tisch ist nach dem aktuellen Stand der Technik
und den anerkannten sicherheitstechnischen Regeln
gebaut und getestet worden. Es können dennoch bei
der Verwendung Gefahren für Leib und Leben des
Benutzers oder Dritter bzw. Beeinträchtigungen am
Tisch oder an anderen Sachwerten entstehen. Der
Tisch ist nur zur bestimmungsgemäßen Verwendung
und unter Berücksichtigung aller
Hinweise/Vorschriften in dieser Anleitung zu
benutzen.
Notes for emergencies:
If the table moves unintentionally, move away from
the table immediately and plug out the electricity.
Let the table be repaired by a specialist company.
Should unusual occurrences occur on the table,
such as noises, smoke, etc., take the table out of
operation immediately and have the table repaired
by a specialist company.
Cleaning:
Eliminate major debris on the table.
Only clean the table frame with a dry cloth.
You can wipe the table top with a slightly damp cloth.
Residual risks / persistent risks:
The table has been built and tested according to the
current state of the art and recognized safety rules.
Nevertheless, when using it, there may be dangers
to the life and limb of the user or third parties or
damage to the table or other property. The table is
only to be used for its intended purpose and taking
into account all information / regulations in these
instructions.
Read the instructions for use carefully and follow the
instructions and individual steps.
7
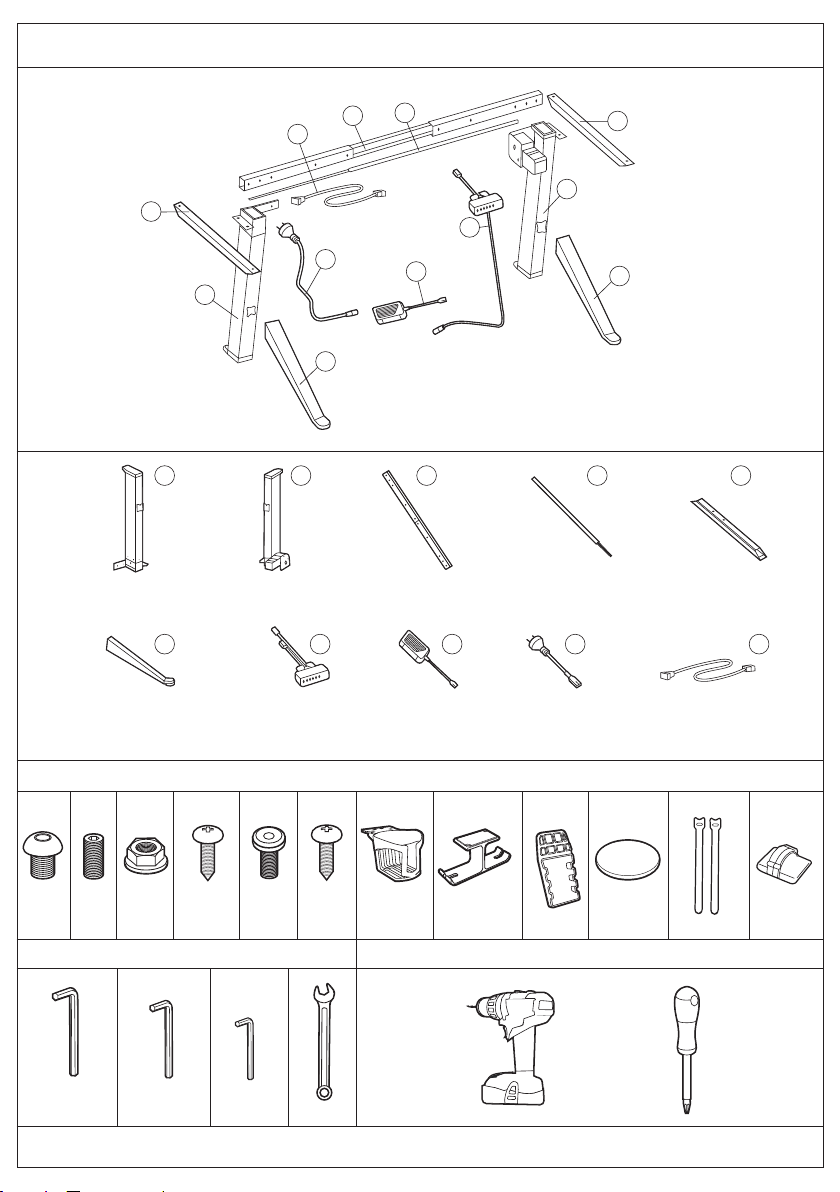
ENTHALTENE KOMPONENTEN | CONTENTS
LIEFERUMFANG | SCOPE OF DELIVERY
ENTHALTENE WERKZEUGE | INCLUDED TOOLS BENÖTIGTEWERKZEUGE | REQUIRED TOOLS
10x 2x 2x 2x 6x 14x 1x 1x 2x 2x 7x 10x
M5 x 16M8x10
M5 M4 M2.5
M8x20
Left leg 1pcs Right leg 1pcs Long tube 1pcs Hex bar 1pcs
Base 2pcs Power supply 1pcs Handset extra cable 1pcs
Beinstütze Netzteil Extra Kable
Linkes Bein Rechtes Bein Querstange Sechskantstange
M8
Mutter
ST4.2x16 M6 x 16
7
Side frame 2pcs
Seitenleisten
1
6
5
3
10
45
6
8
2
9
1
6
Power cord 1pcs
Stecker
98
Handset 1pcs
Handset
710
2 3 4 5
Kabelbinder Kabel Clips
or

8

9
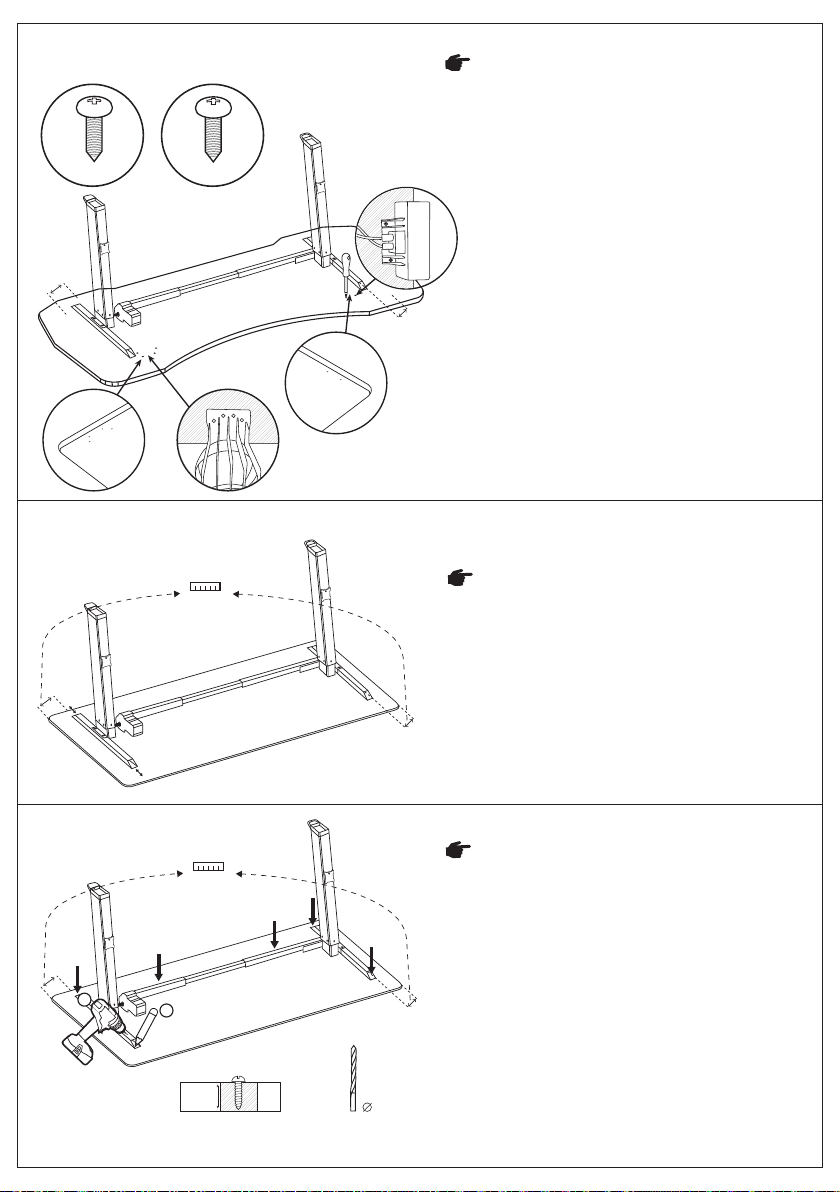
SCHRITT 1 / STEP 1
SCHRITT 2 / STEP 2
SCHRITT 3 / STEP 3 Hinweis: Stelle sicher, dass der Untergrund eben
ist. Ggf. musst du den am Boden bendlichen Teil
des Beins leicht nach oben anwinkeln, damit die
Schrauben eingedreht werden können.
Drehe die Schrauben fest ein.
Attention: Make sure the surface is at. You may
have to bend the part of the leg on the oor
slightly upwards so that the screws can be
screwed.
Screw in the screws tightly.
1
3
2
4x
M8x10 M5
M5
6x
M8x10
M5
M5
Long tube/
Querstange

10
Sorge für einen weichen Untergrund und leg
die Tischplatte auf den Rücken. Die Ultimate
Setup Tischplatte ist bereits mit eingesetzten
Gewinden versehen, die die perfekte
Positionierung desTischgestells auf der
Tischplatte ermöglichen.
Make sure the surface is soft and lay the
tabletop on its back on the surface.
The Ultimate Setup table top is already
provided with inserted threads, which ensure
the perfect positioning of the table frame on
table top.
MONTAGE BEI EINER ULTIMATE SETUP TISCHPLATTE
Stelle das Gestell so auf die Tischplatte, dass
die Löcher des Gestells mit den Gewinden
der Tischplatte übereinstimmen. Drehe nun
die M6*12 Schrauben ein.
WICHTIG: Wenn du einen Akkubohrer nutzt,
achte darauf, dass die Schrauben nicht
durchdrehen!
Place the frame on the table top so that the
holes in the frame line up with the threads
on the table top. Now screw in the M6 * 12
screws.
IMPORTANT: If you use a cordless drill,
make sure that the screws do not spin!
6x
M6 x 12 M4
SCHRITT 4.1 / STEP 4.1
SCHRITT 4.2 / STEP 4.2
11
Die Vorbohrungen für das Handset und den
Cupholder sind bei der Ultimate Setup
Tischplatte schon vorgebohrt.
Schraube das Handset mit ST 4.2x16 fest.
Schraube den Cupholder mit M5x16 fest.
The pre-drilled holes for the handset and the
cup holder are already pre-drilled in the
Ultimate Setup table top.
Tighten the handset with ST 4.2x16.
Tighten the cup holder with M5x16.
Stelle sicher, dass der Abstand zum Rand der
Tischplatte links und rechts Ca. 8-12 cm beträgt.
Das Tischgestell muss vorne und hinten mittig
stehen.
Make sure that the distance to the edge of the
table top is around 8-12 cm on the left and
right. The table frame must be centered at the
front and back.
Markiere mit einem Stift, die Stellen für die
Vorbohrungen, um sicherzustellen, dass das
Gestell während des Vorbohrens an der selben
Stelle bleibt.
Bohre mit einem 4mm Bohraufsatz an den
vorgesehenen Stellen vor.
Achtung: Nicht zu tief bohren.
Use a pen to mark the locations for the pilot
holes to ensure that the frame stays in place
while the holes are being pre-drilled.
Pre-drill in the designated places with a 4mm
drill bit.
Attention: Do not drill to deep.
8-12 cm
8-12 cm
4 mm
18 mm
Die Tischplatte sollte mindestens 1,8 cm dick sein. Holzbohraufsatz
The table top should be at least 1.8 cm thick. Wood drill
MONTAGE BEI EINER ANDEREN TISCHPLATTE
2
1
ST4.2x16
Handset
M5 x 16
Cupholder
4x 2x
SCHRITT 4.3 / STEP 4.3
SCHRITT 5.1 / STEP 5.1
SCHRITT 5.2 / STEP 5.2

Schraube nun die M6 x 16 Schrauben in die
vorgebohrten Löcher ein.
Now screw the M6 x 16 screws into the
pre-drilled holes.
Finde die optimale Position for das Handset.
Achte darauf, dass die Oberkante des Handsets
mit dem Rand deiner Tischplatte übereinstimmt.
Markiere die Stellen für die Vorbohrungen mit
einem Stift durch die vorgesehnen Löcher im
Handset. Bohre anschließend mit 3 mm vor.
Du kannst das Handset links oder rechts
anbringen. Achte darauf, dass du noch Platz für
deinen Cupholder und Headsethalter lässt, falls
diese vorhanden sind.
Schraub anschließend das Handset mit den
ST.4.2 * 16 Schrauben an.
Find the optimal position for the handset. Make
sure that the top edge of the handset is aligned
with the edge of your table top.
Mark the locations for the pilot holes with a pen
through the holes provided in the handset.Then
pre-drill with 3 mm. You can attach the handset
to the left or right. Make sure that you leave
space for your cup holder and headset holder, if
they are available.
Then screw on the handset with the ST.4.2 * 16
screws.
12
8-12 cm
10-15 cm
3 mm
Holzbohraufsatz
Wood drill
1
3
2
M6 x 16
6x
Handset
2x
SCHRITT 5.4 / STEP 5.4
SCHRITT 5.3 / STEP 5.3
ST4.2x16
1 2 3

Das selbe Prinzip wie beim Handset. Halte
den Cupholder an den Rand der Tischplatte.
Markiere die Stellen für die Vorbohrungen
mit einem Stift durch die Löcher des
Cupholder. Bohre nun mit 3 mm vor.
Schraub anschließend den Cupholder mit
den M5* 16 Schrauben an.
The same principle as with the Handset.
Hold the cup holder against the edge of the
tabletop. Use a pen to mark the locations for
the pilot holes through the holes in the cup
holder. Now pre-drill with 3 mm.
Then screw on the cup holder with the
M5 * 16 screws.
Achte darauf, dass die innere Stange der
Querstange mittig steht.
Nun die vier Schrauben an der Querstange
wieder fest schrauben.
Make sure that the inner bar of the crossbar
(long tube) is in the middle.
Now tighten the four screws on the crossbar
again.
1
2
13
NACHDEM DIE PLATTE BEFESTIGT IST
AFTER THE TABLE TOP IS ATTACHED
M5
SCHRITT 5.5 / STEP 5.5
SCHRITT 6 / STEP 6
3
1 2 3
M5 x 16
Cupholder
4x

Kraftübertragung des Motors:
Drehe die Schrauben in der Sechskantstange auf.
Führe die Sechskantstange in die vom Motor
herausstehende Sechskantstange.
Wichtig: Stelle sicher, dass die Stange maximal
eingeführt wurde. Schraube die zwei kleinen
Schrauben, die sich an diesem Ende der Stange
beÿnden, fest. Nun ziehe den innerenTeil der
Sechskantstange bis zum anderen Bein raus und
führe dieses in das Bein ein. Ggf. musst du hier den
Spielraum der Sechskantstange nutzen, um die
Stange in das Bein einzuführen. Die zwei mittleren
Schrauben (mit mehr Abstand) kannst du nun auch
leicht eindrehen
Power transmission of the engine:
Unscrew the screws in the hexagonal bar.
Guide the hex bar into the hexagonal bar
protruding from the motor.
Important: Make sure the bar is inserted as far as
possible. Tighten the two small screws that are on
this end of the rod. Now pull the inner part of the
hexagonal bar out to the other leg and insert it into
the leg. You may have to use the latitude of the
hexagonal bar to insert the bar into the leg. You can
now screw in the two middle screws (with more
space).
ACHTUNG: Die M8x20 Schraube nur per
Hand eindrehen. Sobald die Schraube fest
eingedreht ist, nicht zusätzlich nachdrehen.
ATTENTION: Only screw in the M8x20 screw
by hand power. As soon as the screw is
screwed in rmly, do not retighten it .
14
M8x20
2x
M 2.5
SCHRITT 7 / STEP 7
SCHRITT 8 / STEP 8

Führe die Schraube durch das obere Loch der
Beinstütze. Lege die Mutter drauf und drehe sie
fest. Hierfür kannst du auch den
Schraubenschlüssel verwenden. Auch hier nur so
lange eindrehen, bis die Mutter mit normalem
Druck nicht mehr eindrehbar ist!
Insert the screw through the top hole on the
base (small leg). Put the nut on top and tighten
it. You can also use the wrench for this. Again,
only screw in until the nut can no longer be
screwed in with normal pressure!
Befestige die Anti-Rutsch Fußmatte.
Es gibt zwei längliche und zwei kreisförmige.
Attach the anti-slip doormat.
There are two oblong and two circular.
15
2x
M8
Mutter
SCHRITT 9 / STEP 9
SCHRITT 10 / STEP 10
SCHRITT 11 / STEP 11 Wenn du eine Kabelwanne von Ultimate Setup
gekauft hast, sind die Stellen dafür vorgebohrt.
Du musst nur die Support-Parts der Kabelwanne
an den Vorbohrungen anbringen. Jetzt wo der
Tisch umgedreht ist, ist der beste Zeitpunkt
dafür.
If you bought a cable tray from Ultimate Setup,
the places for it are pre-drilled. You only have to
attach the support parts of the cable tray to the
pilot holes. Now that the table has been turned
is the best time to do so.

Drehe den Tisch mit Hilfe einer weiteren Person
nun um. Stecke die Kabel dann ineinander.
Now turn the table over with the help of another
person. Plug the cables into each other.
16
Fertig, dein Ultimate Setup Gaming
Tisch ist einsatzbereit, viel Spaß mit deinem
neuen Gadget!
Finally your Ultimate Setup gaming
desk is ready for use ! Much fun with
your new gadget!
SCHRITT 12 / STEP 12
SCHRITT 13 / STEP 13
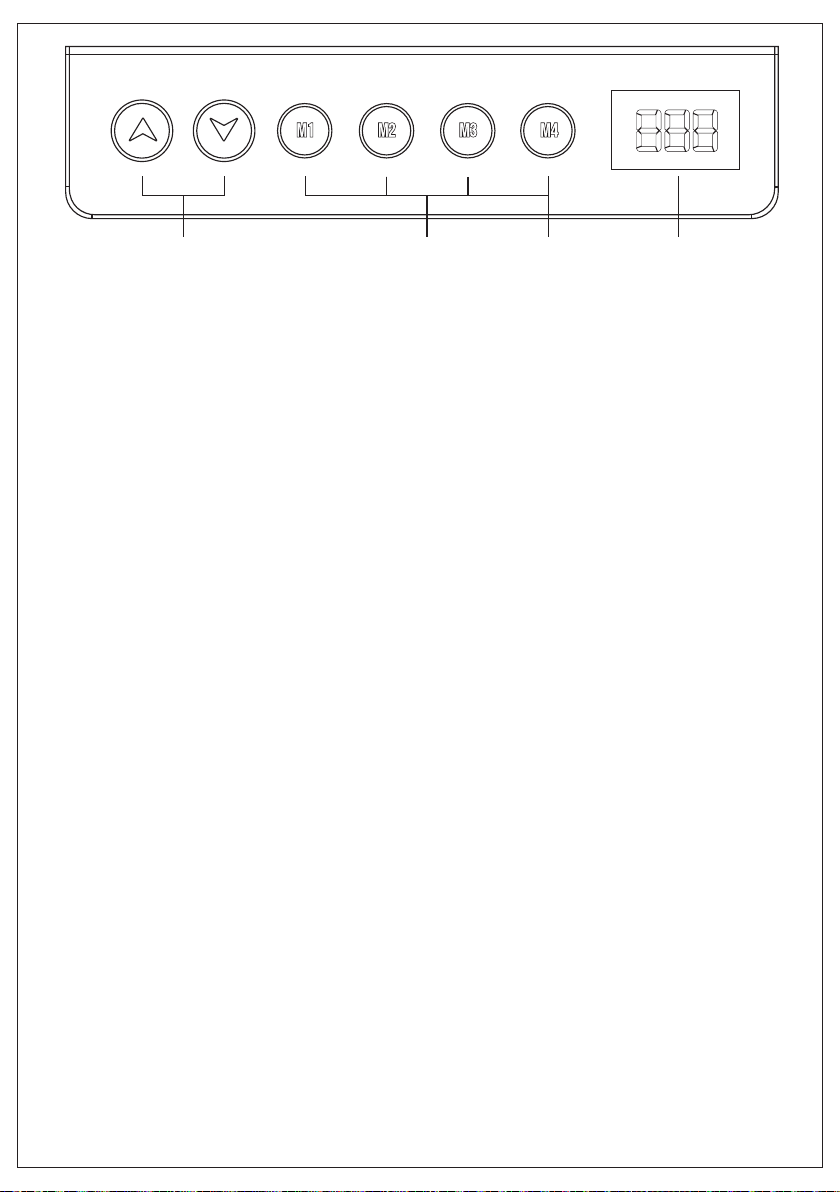
Speicher M1/M2/M3/M4
Halte bei deiner gewünschten Höhe eine der
“M”Tasten für ca. 5 sec. gedrückt. Diese Höhe ist
nun auf der jeweiligen“M”Taste gespeichert.
Menüeinstellungen M4
Halte M4 für 10 sec. gedrückt, um in das Menü
zu gelangen
Initialisierung
Wenn“RST” auf dem Bildschirm angezeigt wird,
drücke den“Runter”Button bis das Tischgestell
den niedrigsten Punkt erreicht hat. Halte den
“Runter” Button anschließend nochmal für ca. 5
sec. bis du den“di” Sound hörst. Die
Initialisierung ist abgeschlossen.
Werkseinstellungen
Drücke den“Hoch”und“Runter”Button
gleichzeitig ca. 10 sec. bis du zwei“di”Sounds
gehört hast. Anschließend führe die
Initialisierung wie oben beschrieben durch.
Sperrung
Halte den“Hoch”Button und den“M4”Button
gleichzeitig für 5 sec. gedrückt. Die
Höhenverstellbarkeit und alle anderen
Funktionen sind nun gesperrt.
Halte den“Runter”Button und den “M4”Button
gleichzeitig für 5 sec. gedrückt. Die
Höhenverstellbarkeit und alle anderen
Funktionen sind nun wieder verfügbar.
Memory M1 / M2 / M3 / M4
Hold down one of the“M”buttons for about 5
seconds at your desired height. This height is
now saved on the respective“M”key.
Menu settings M4
Hold M4 for 10 seconds to get into the menu
initialization
When“RST”is displayed on the screen, press
the“Down”button until the desk frame is at
its lowest point. Then hold the “Down”button
again for about 5 seconds until you hear the
“di”sound. The initialization is complete.
Factory settings
Press the“Up”and“Down”buttons
simultaneously for approx. 10 seconds until
you have heard two“di” sounds. Then carry
out the initialization as described above.
Blocking
Hold the“Up”button and the“M4”button at
the same time for 5 seconds. The height
adjustability and all other functions are now
blocked.
Hold down the“Down”button and the“M4”
button at the same time for 5 seconds. The
height adjustability and all other functions are
now available again.
17
DisplayMenueMemoryUp & down
Hoch & Runter Button Speicher Menü Anzeige

Error Code
E01,E06,E07
E04
E05
E08
E11,E21,E40,E41
E12,E22,E42,E43
E18, E28
HOT
(*) Wenn keine Gegenstände der Höhenverstellbarkeit im Weg stehen und der Fehler trotzdem
erscheint, kontaktiere bitte unseren Kundenservice. Die Kontaktdaten stehen auf der letzten Seite. Wir
helfen dir weiter.
E14 ~ E17, E24 ~ E27
Ursache / Fault cause
Stromausfall / Power fault
Touchpad-Fehler /Handset fault
Antikollisions-Fehler / Anticollision fault
Tisch-Neigung / Desktop sloping
Kabel Verbindungsproblem/ Connection
cable failure
Controller Fehler / Controller fault
Motor Fehler / Motor fault
Überladen / Overloading
Heiß gelaufen / Overtime operation
Lösung / Solution
Wechsel den Stromstecker /
Change the power
Löse und verbinde das
Handsetkabel / Unplug and replug
the cable of handset
Das Antikollisionssystem reagiert,
entferne Gegenstände, die dem
Tisch im Weg stehen. /
The anti-collision system reacts
remove objects that are in the way
of the table.(*)
Stelle den Tisch gerade hin /
Stand up the table straight
Stelle sicher, dass die Kabel fest
verbunden sind / Make sure the
cable are securely connected.
Kontaktiere den Kundenservice /
Contact the customer service
Kontaktiere den Kundenservice /
Contact the customer service
Reduziere das Gewicht auf dem Tisch
/ reduce the weight on the table.
Warte 20 min. dann kannst du den
Tisch wieder wie gewohnt nutzen /
Wait 20 min. then you can use the
desk as usual.
18
DisplayMenueMemoryUp & down
Hoch & Runter Button Speicher Menü Anzeige

Allgemeines:
Die störungsfreie und sicherheitsgerechte
Benutzung des Tisches setzt voraus, dass Sie die
Sicherheitshinweise, Vorschriften sowie die
Aufbauanleitung gelesen haben.
Jede Person, die beim Aufbau behilich ist und
den Tisch nutzt, muss diese Sicherheitshinweise
beachten.
Der vorliegende elektromotorisch
höhenverstellbare Sitz-/Stehtisch dient
ausschließlich dem Zweck, im Stehen sowie im
Sitzen am Computer oder der Konsole zu
spielen oder Bürotätigkeiten nachzugehen. Für
andere Verwendungszwecke haftet der
Hersteller nicht. Insbesondere Kinder dürfen
nicht unbeaufsichtigt an den Tisch gelassen
werden, da Sie die vom Tisch ausgehenden
Gefahren nicht einschätzen können. Für hieraus
entstehende Schäden haftet der Hersteller
ebenfalls nicht.
Zur bestimmungsgemäßen Verwendung des
Tischgestells gehört, neben der Beachtung und
Anwendung aller Hinweise, auch das Verbot
jeglicher Art von Umbauten am Tischgestell
oder der Tischplatte.
Sachwidrige Verwendung:
Der Tisch darf niemals zum Heben von
Personen oder gewisser Lasten verwendet
werden!
Der Tisch darf nur bis zur maximalen Last
von insgesamt 80 kg (inkl. Tischplatte)
verwendet werden.
Der Tisch darf nicht im Freien, außerhalb des
Hauses verwendet werden.
Lösung / Solution
EU | REP:
OriginLiving GmbH
Schenkendorfstraße 10
34119 Kassel
Deutschland
Telefon: +49 (0) 1635242040
E-Mail: info@ultimatesetup.de
Hiermit erklären wir, dass das Produkt allen Anforderungen in den einzelnen Richtlinien und
Normen der Europäischen Gemeinschaft (EC) entspricht, die für das Produkt gelten.
We hereby declare that the product conforms with all requirements in the directives and
standards in the European Community (EC) which applies to the product.
Machinery Directive / Maschinen Richtlinie 2006/42/EC
ISO 13849-1:2015
EN ISO 12100:2010
EN 60204-1:2018
RoHS
Directive 2011/65/EU and amendments, Restriction of the use of certain hazardous
Substances in electrical and electronic equipment
Directive 2011/65/EU and it’s amend regulation 2015/863/EU, Restriction of the use of certain
hazardous substances (RoHS) (DBP,BBP,DEHP,DIBP)
EMC Directive / EMV Richtlinie 2014/30/EC
EN 55014-1:2017
EN 61000-3-2:2014
EN 61000-3-3:2013
EN 55014-2:2015
LowVoltage Directive / Niederspannungs Richtlinie 2014/35/EU
EN 60335-1:2012 + A11:2014 + A13:2017 + A1: 2019 + A14: 2019 + A2: 2019
EN 62233: 2008 + AC:2008
Maziyar Khosrawikatoli & Daniel Aßmann
Business Owner / Geschäftsführer
EG-Konformitätserklärung
EC-declaration of conformity
19
This manual suits for next models
1
Table of contents
Popular Indoor Furnishing manuals by other brands

Regency
Regency LWMS3015 Assembly instructions

Furniture of America
Furniture of America CM7751C Assembly instructions

Safavieh Furniture
Safavieh Furniture Estella CNS5731 manual

PLACES OF STYLE
PLACES OF STYLE Ovalfuss Assembly instruction

Trasman
Trasman 1138 Bo1 Assembly manual

Costway
Costway JV10856 manual


