ORIGO 6000 User manual

for ORIGO Alcohol Range model 6000, 6100 and 6200.
OPERATOR'S MANUAL
SAFETY INSTRUCTIONS
WARNING!
WATER OR A CLASS A FIRE EXTINGUISHER WILL PUT OUT AN ALCOHOL FIRE.
SPECIAL SAFETY
SECTION
Carefully read and understand these instructions
before operating your ORIGO range. Save these
instructions and review them periodically.
Fuel Safety.
1. Use only denatured alcohol. Never use gasoline, kerosene,
methanol, propane, charcoal lighter, diesel or other flammable
substances or fuels. Uncontrollable operation and flare-ups can
result and cause serious burns or personal injury.
2. Store fuel in an approved container away from the range,
the engine or other heat source.
Installation and Maintenance
Safety.
3. Eliminate all sources of sparks or flames in the area where
fuel is poured or stored.
4. Do not smoke while working with fuel.
5. Wipe up immediately any spilled fuel.
1. Place range in a well-ventilated area away from all
combustible material. Excessive draft must be avoided.
Filling and Lighting Safety. 2. Do not hang or place towels, papers, curtains or other
combustibles near an installed range.
1. Do not attempt to fill fuel tanks while they are still in
range. Overfilling, spillage, or hot surfaces can cause serious
burns and fires.
3. Keep all surfaces and interior parts free of grease, alcohol or
other flammable substances.
4. To be sure of safe function of your ORIGO stove, do not use
an oversize pot. Max. recommended pot diameter: 9”(230mm)
2. Never pour fuel through burner openings in top of range.
(Picture 1) 5. Make sure the appliance is securely in position when in
operation as well as when not in use.
3. Remove fuel tanks from range by carefully following
instructions.
4. Move fuel tanks to a safe area away from all sparks, flames,
or other heat sources before filling with fuel. General Safety.
5. Make sure tanks are cool enough to be held in your bare
hand before filling with fuel. WARNING!
6. Fuel may burn with almost invisible flame. Make sure that
flame and heat-glow are extinguished before filling the tanks.
Flame or heat-glow can cause alcohol fire, resulting in serious
burns and personal injury.
BE EXTREMELY SAFETY CONSCIOUS AS WITH
ANY APPLIANCE THAT OPERATES WITH AN
OPEN FLAME. INSTRUCTIONS MUST BE
FOLLOWED CLOSELY TO AVOID SEVERE
BURNS OR CREATING A FIRE HAZARD.
7. Do not overfill tanks. Filling instructions must be followed
closely. Check the fuel by tilting the tank vertically (Picture5).
In this position, maximum fuel level occurs when fuel just
begins to show in the recess inside the tank opening. Alcohol
expands when heated. If the tank is overfilled, the surplus will
overflow into the stove cavity and can cause uncontrollable
burning.
1. Make sure the range is installed correctly. Installation
instructions are included with the product. Repairs must be
made by qualified service personnel. Ask your dealer to
recommend qualified personnel.
8. Wipe tanks to remove any excess fuel before replacing tanks
in the range. 2. Wear proper clothing when operating the range. Never wear
loose fitting or hanging garments as such can catch on fire.
9. Light burners by holding a lit match or long lighter at the
tank opening through the burner opening. As soon as the
burner ignites, quickly remove hand to avoid burning your
fingers.
3. Use ORIGO potholders to clamp pots to grate on the stove if
there is any risk of motion while the stove is in use. Unsecured
pots can shift or fall resulting in dangerous spills, which can
cause serious burns. (Picture 2)
An ORIGO lighter is recommended.
1

INSTRUCTIONS
This model of ORIGO range is equipped with non-pressurized
alcohol burners.
Alcohol is absorbed into the tanks in a non-flammable material.
This unit is not equipped with valves, which can develop leaks,
or with other components requiring regular service, making
safer and easier to maintain units.
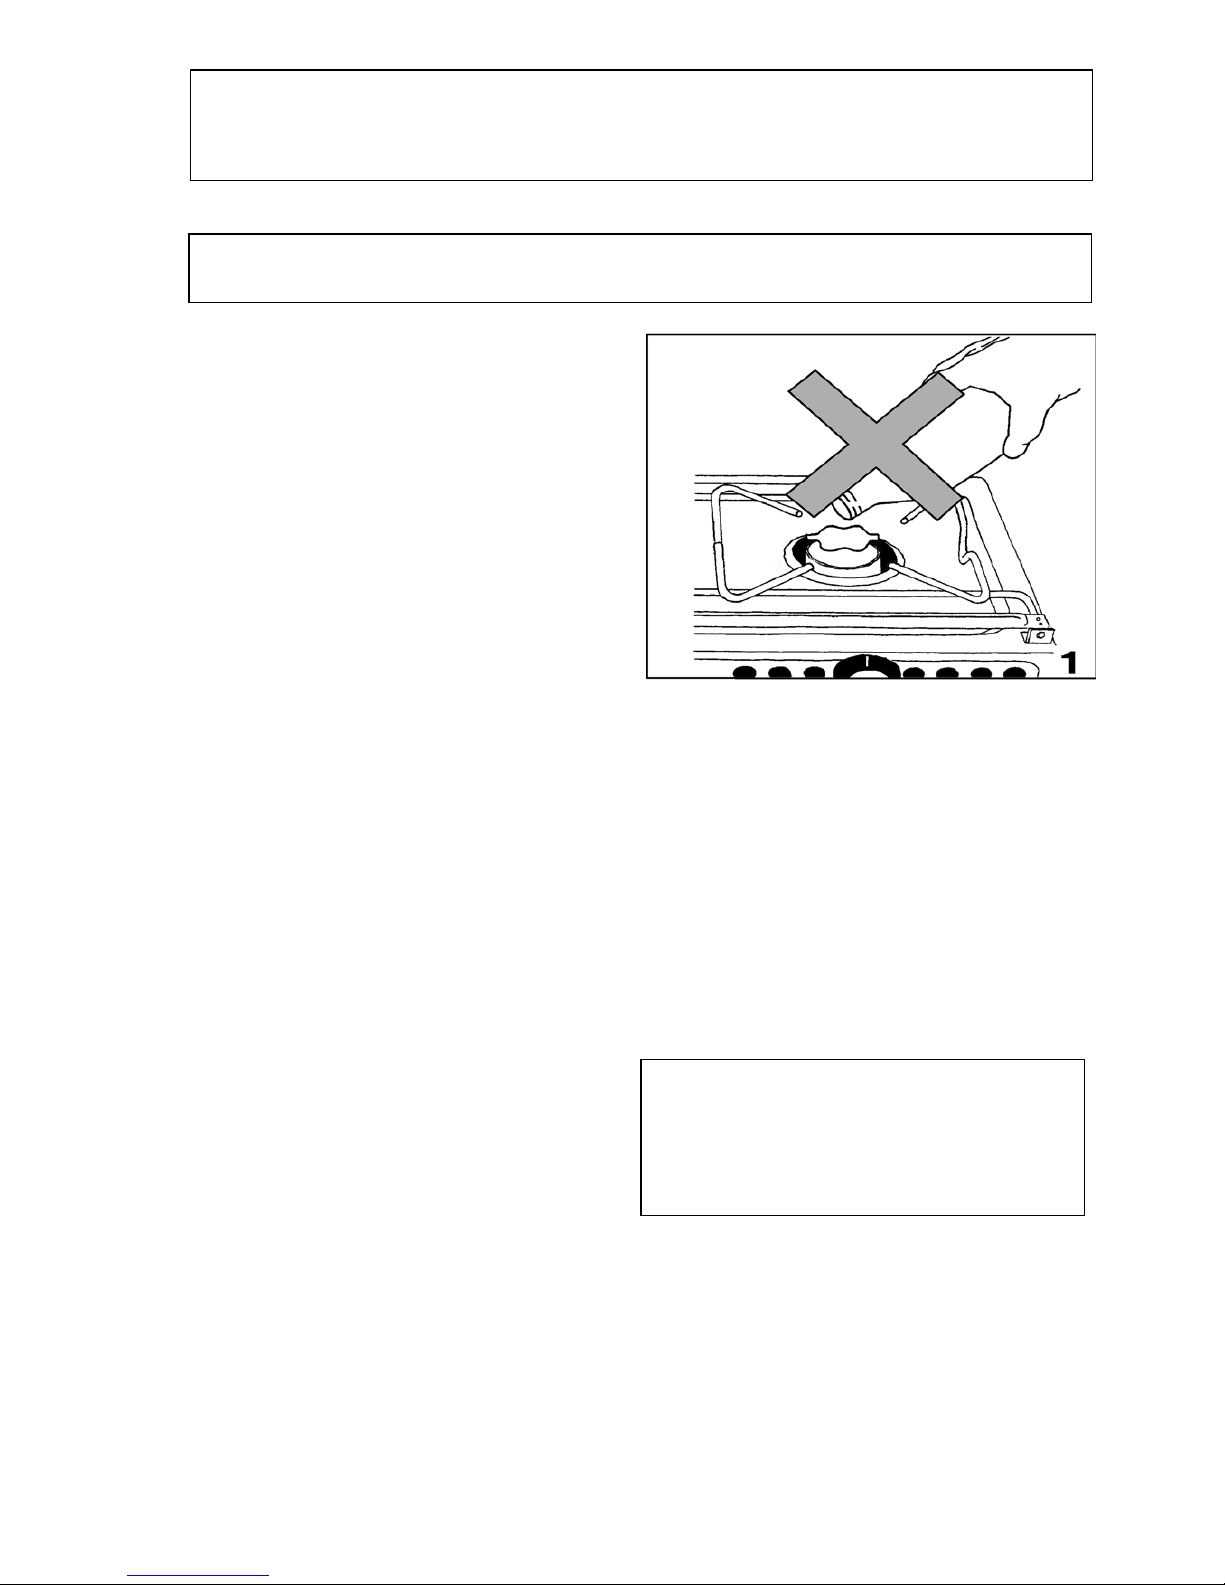
WARNING!
SAFETY PRECAUTIONS ARE REQUIRED AS
ALWAYS WHEN WORKING WITH AN EXPOSED
FLAME. CAREFULLY READ AND UNDER-
STAND ALL INSTRUCTIONS BEFORE USING
YOUR NEW ORIGO RANGE.
4. Allow all stove parts to cool to room temperature before
touching or removing from the stove. When the burners are
turned off, parts are still hot enough to cause serious burns for
some time.
Location of your ORIGO Range.
5. Know which knob controls which burner. Always turn to the
full open position when igniting the burners. Then adjust the
flame so it does not extend beyond the edge of the pot. Turn
burner to ”0” before removing the pot.
Your range must be located in a well-ventilated space.
Avoid excessive draft.•
•
•
•
•
•
•
6. Never allow pot handles to extend beyond the edge of the
stove. Turn pot handles inward, but not extending over other
burners or so they are tilted when the stove moves, if gimbals
are used. These precautions will help minimize the possibility
of spillage, ignition of flammable materials, and/or serious
burns.
Locate so that maximum protection against wind is
obtained if the range is to be used in an open cockpit or
other open area.
6000 and 6200: Mount the range as far away from
combustible materials as possible, but min. 100 mm from
back wall.
7. Watch closely when heating fat or grease. Fat or grease will
catch on fire if allowed to become too hot. 6100: Cut-out measurements (W x H x D) 490x530x400
mm.
8. Avoid grease fires by cleaning after each use to keep all
parts free of grease, particularly the area around the burners.
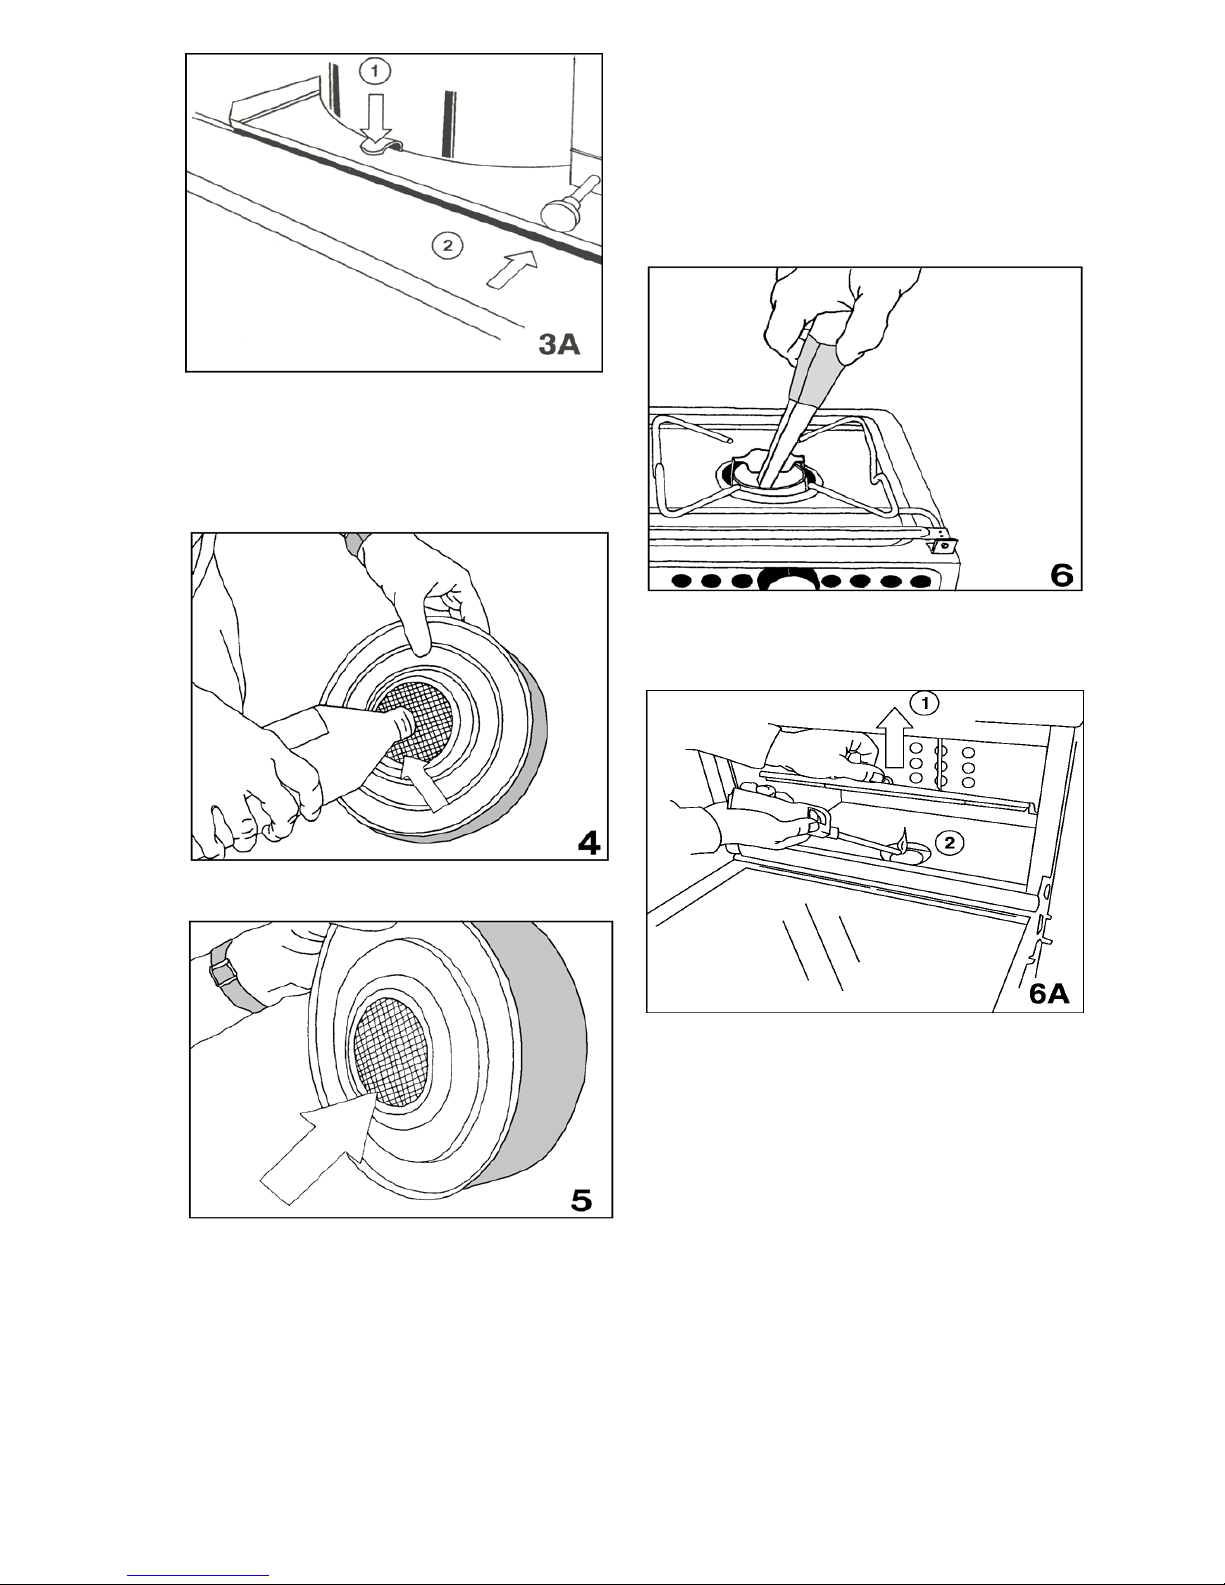
Filling the Fuel Tanks.
9. Never leave children alone or unattended in the area where
the range is in use. Never allow a child to sit or stand on or
play with any part of the range. As children grow, teach them
proper, safe use of all appliances.
The fuel tanks must be lifted out of the stove/oven and
moved away from open flames or hot objects before filling
with fuel.
10. Do not store items of interest to children in cabinets above
or to the side of a range. Children climbing on or around the
range to reach such items can be seriously injured.
Make sure all burners are turned off.
Allow the range to cool to room temperature.
11. Never use the range to heat or warm the cabin.
Open stove this way: Pull the forward lower edge of the
stovetop slightly forward, while simultaneously pressing
the catch. (Picture 3)
12. Use dry potholders only when handling a pot. Wet or damp
potholders used on hot surfaces can result in steam burns. Do
not allow the potholder to tough heating areas. A towel or
bulky cloth used instead of a potholder can catch on fire.
13. Never leave the stove unattended while the burners are in
operation. Boilovers can cause excessive smoke; greasy
spillovers can cause fires; and a pan that has boiled dry can
melt or crack.
14. Do not allow clothing or other flammable materials to
come close to areas near the burners, or to the interior surfaces
of the oven until they have had sufficient time to cool.
15. Do not place plastic items such as salt and peppershakers,
spoon holders, wrappings or other utensils on top of the stove
when it is in use as these can melt or ignite. Potholders, towels,
or wooden spoons will catch on fire if allowed to come too
close to a flame.
16. Do not store flammable materials in the oven or near the
burners. Keep the range free of all flammable materials.
17. Never modify or alter the construction of the range
including removal of panels, wire covers, or any other
permanent part of the product.
WARNING!
OPEN FLAME COOKING APPLIANCES
CONSUME OXYGEN, THIS CAN CAUSE
ASPHYXIATION OR DEATH.
Open oven this way: Open burners lid, push the knob (2),
while pressing the catch (1). (Picture 3A)
•
• Make sure that flames are completely extinguished and that
there is no heat-glow on top of the tanks, and then lift out
fuel tanks.
MAINTAIN OPEN VENTILATION.
2

NOTE: It is not necessary to fill tank completely to operate.
Range will operate with less than maximum capacity of
fuel.
To Light the Alcohol Burner.
•
•
•
•
•
•
•
An ORIGO lighter is recommended for lighting purposes.
Stove: Turn knob to the maximum position to open the
burner. Place a long match or long butane lighter at tank
opening. (Picture 6)
Hold each tank (one at a time) as shown (Picture 4) with
the recess pointing down, then pour alcohol directly into
the opening covered by wire mesh. Maximum capacity
from empty to full is 1 quart.
Check fuel level by tilting the tank on its side vertically as
shown. (Picture 5)
Oven: Turn knob to the maximum position to open the
burner. Open the oven door; lift the bottom lid (1) and light
at tank opening (2). (Picture 6A)
•
Hold in this position a few moments. When fuel is visible
in recess, tank is filled to maximum recommended level.
NOTE: If stove/oven is warm from previous use, burner
may ignite, then immediately go out. In this event, blow
down into the burner opening to dissipate vapor and relight
as above.
To Extinguish the Alcohol Burner.
Turn knob all the way to ”0”.•
•
•
•
•
Wait a moment, then turn burner back towards ”Max” to
make sure flame is out.
Do not overfill. Turn knob to ”0” again.
Wipe tank dry and replace tank in stove making sure it is
fitted properly in the mounting. Gaskets.
Closing stove: Knobs in 0 position, otherwise top will not
fold! Fold down the stove top, the catch will lock. (Make
certain that the regulating plates cover the burner openings
so that stovetop is level.)
The stove is equipped with a rubber gasket for each fuel tank.
Gaskets are to be installed when the stove will not be operated
for a period of time and will protect against alcohol
evaporation.
When reinserting the tank into oven compartment, check
that it is in the right position and that the catch (1) has
engaged. (Picture 3A) To install:
Open stovetop and make sure all parts are cool.
Place the gaskets over the tank openings. The rubber
gasket is not used with the oven burner.
3

4
• Fold down the stovetop to horizontal position and open the
burners to lock the top in closed position.
Cleaning.
Remove the grate for easy cleaning. (Picture 7)•
INSTALLATION.
WARNING!
PLACE UNIT IN A WELL-VENTILATED AREA
AWAY FROM ALL COMBUSTIBLE MATERIALS.
INSTALL A CLASS B-1 FIRE EXTINGUISHER
IMMEDIATELY AT HAND.
Fitting of the Range.
Your range should be located in a well-ventilated space. Avoid
excessive draft. If you fit in an open cockpit, or other open
area, wind protection must be provided.
The range shall be installed in accordance with national
regulations. In USA it is advisable to follow the ABYC
recommendations.
Model 6100 built-in oven is installed according to the cut-out
measurements (WxHxD) 490 x 530 x 400 mm.
Models 6000 and 6200 are delivered with gimbals. First
determine the best position for the pivot points. This can be
done by placing the range in the desired position, open the
stove top and mark through the holes in the gimbal sideplates.
Remove the range; fasten the pivot arms with fibre washers and
screws removed. Fit one fibre washer with round hole on each
pivot and lift the range from below up between the pivots so
that the gimbal side plates will spring into place on the pivots.
With open stovetop fit the fibre washers with oblong holes,
make certain they fit properly on the pivots so they can't rotate.
Fit steel washers, screws and tighten. Adjust the tension of the
screws to desired friction.
At the back of the range there is an outlet for hot air. A
clearance of 4 inches to the fittings behind is required. Be sure
you have ample room to swing the gimbaled range.
Description.
1. Stove top burner opening
2. Stove top regulator knob
3. Catch stove top
4. Swing locking device
5. Oven burner regulator knob
6. Oven thermometer
Technical Data.
Height: approx. 21 1/2” (545mm) excl. cooking grid
Width: approx. 18 1/4” (464mm)
approx. 20 1/16" (510 mm) incl. gimbals
Depth: approx. 13 3/16” (335mm)
Tank volumes: approx. 2,5 pints each (1,2 L)
Fuel: Denatured alcohol, Methylated spirit
Optional extras
Potholders
DOMETIC AB
Internet www.dometic.com
Phone +46 35 165700
Fax +46 35 165710
Olofsdalsvägen 15
SE-302 41 Halmstad, Sweden
Dometic Environmental Corporation
2000 N. Andrews Avenue Ext.
Pompano Beach, FL 33069, USA
Phone: (954)973-2477
Fax: (954)979-4414
This manual suits for next models
2
Table of contents
Other ORIGO Range manuals
Popular Range manuals by other brands

Wolf
Wolf DF366 Specifications

Frigidaire
Frigidaire LGGF3032KWC use & care

Bosch
Bosch HGB330E.0Q instruction manual

Fisher & Paykel
Fisher & Paykel RGV3-488 installation guide

Frigidaire
Frigidaire FGES3065KF - 30' Electric Slide-In Lery SS... Product specifications

GE
GE RGB740 Owner's Manual & Installation Instructions