Osculati 29.530.02 User manual

1
OWNER’S MANUAL
Code 29.530.02
Please read the instruction carefully before operating the unit

Installation
2
ATTENTIONS OF INSTALLATION
1.This player should be installed by professional technician.
2. please read the instruction and operation of equipment carefully before
installing.
3. Make sure to connect other wires before power connection.
4. To avoid short circuit. Please make sure all the exposed wire are insulating.
5. please fix all the wires after installation.
6. please make connection to the player accordingly to this instruction manual.
Wrong connection may cause damage.
7. This player only fit for 12V DC device and please make sure your car
belongs to this kind of cathode grounding electrical system.
8. Please connect the wires rightly. Wrong connection will cause malfunction or
damage the electrical system.
Wiring connection
3
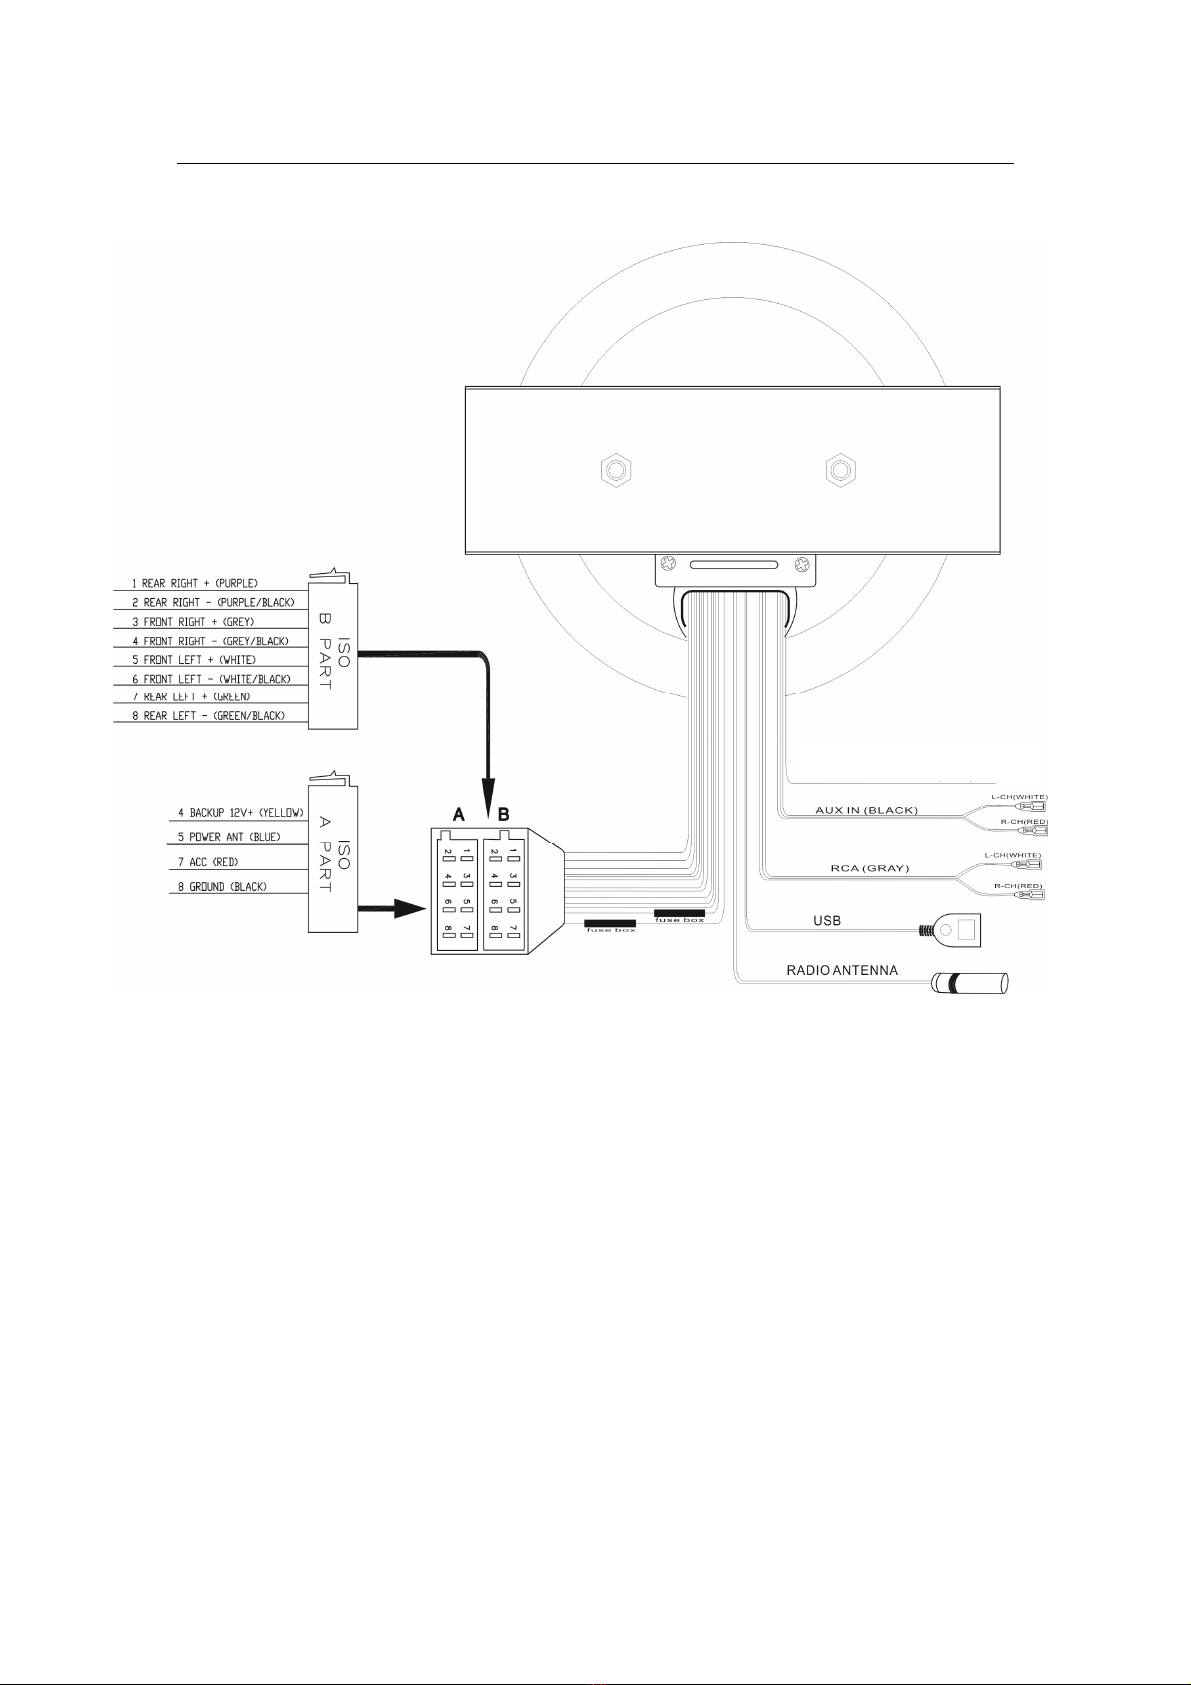
WIRING CONNECTION
1. This player can only be used by the 12V DC cathode grounding electrical system.
2. Don’t connect the terminals of the battery until the player is absolutely with well erection
joint.
3. Please make sure to connect the yellow wire to the positive of the battery(+).
4. When change the fuse. Please make sure the specifications are same.
5. Using good quality speaker with 4-8 ohm can result in the best effect of the equipment.
DAB antenna
Location of keys
4
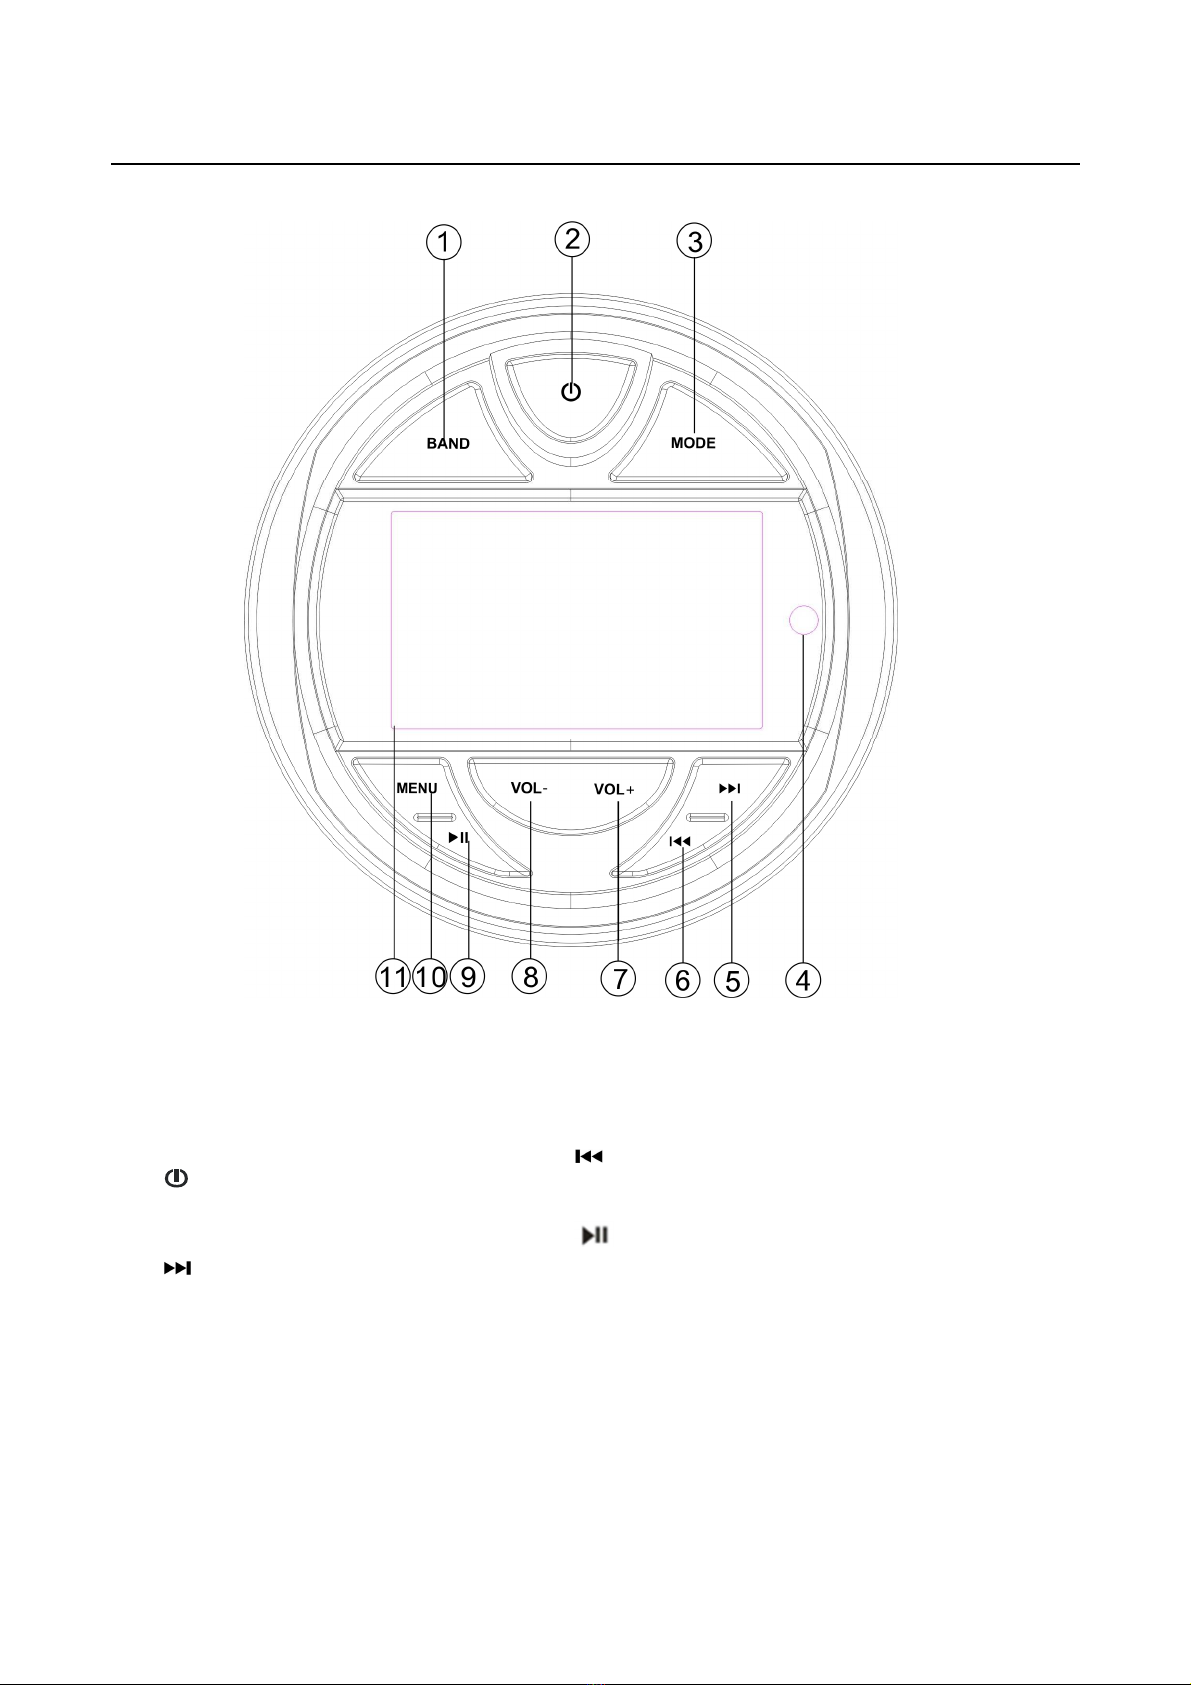
LOCATION OF KEYS
1. BAND
2. Power
3. MODE
4. IR SENSOR
5. Seek up button
6. Seek down button
7. VOL +
8. VOL –
9. Play/pause button
10. MENU
11. TFT

Key functions
5
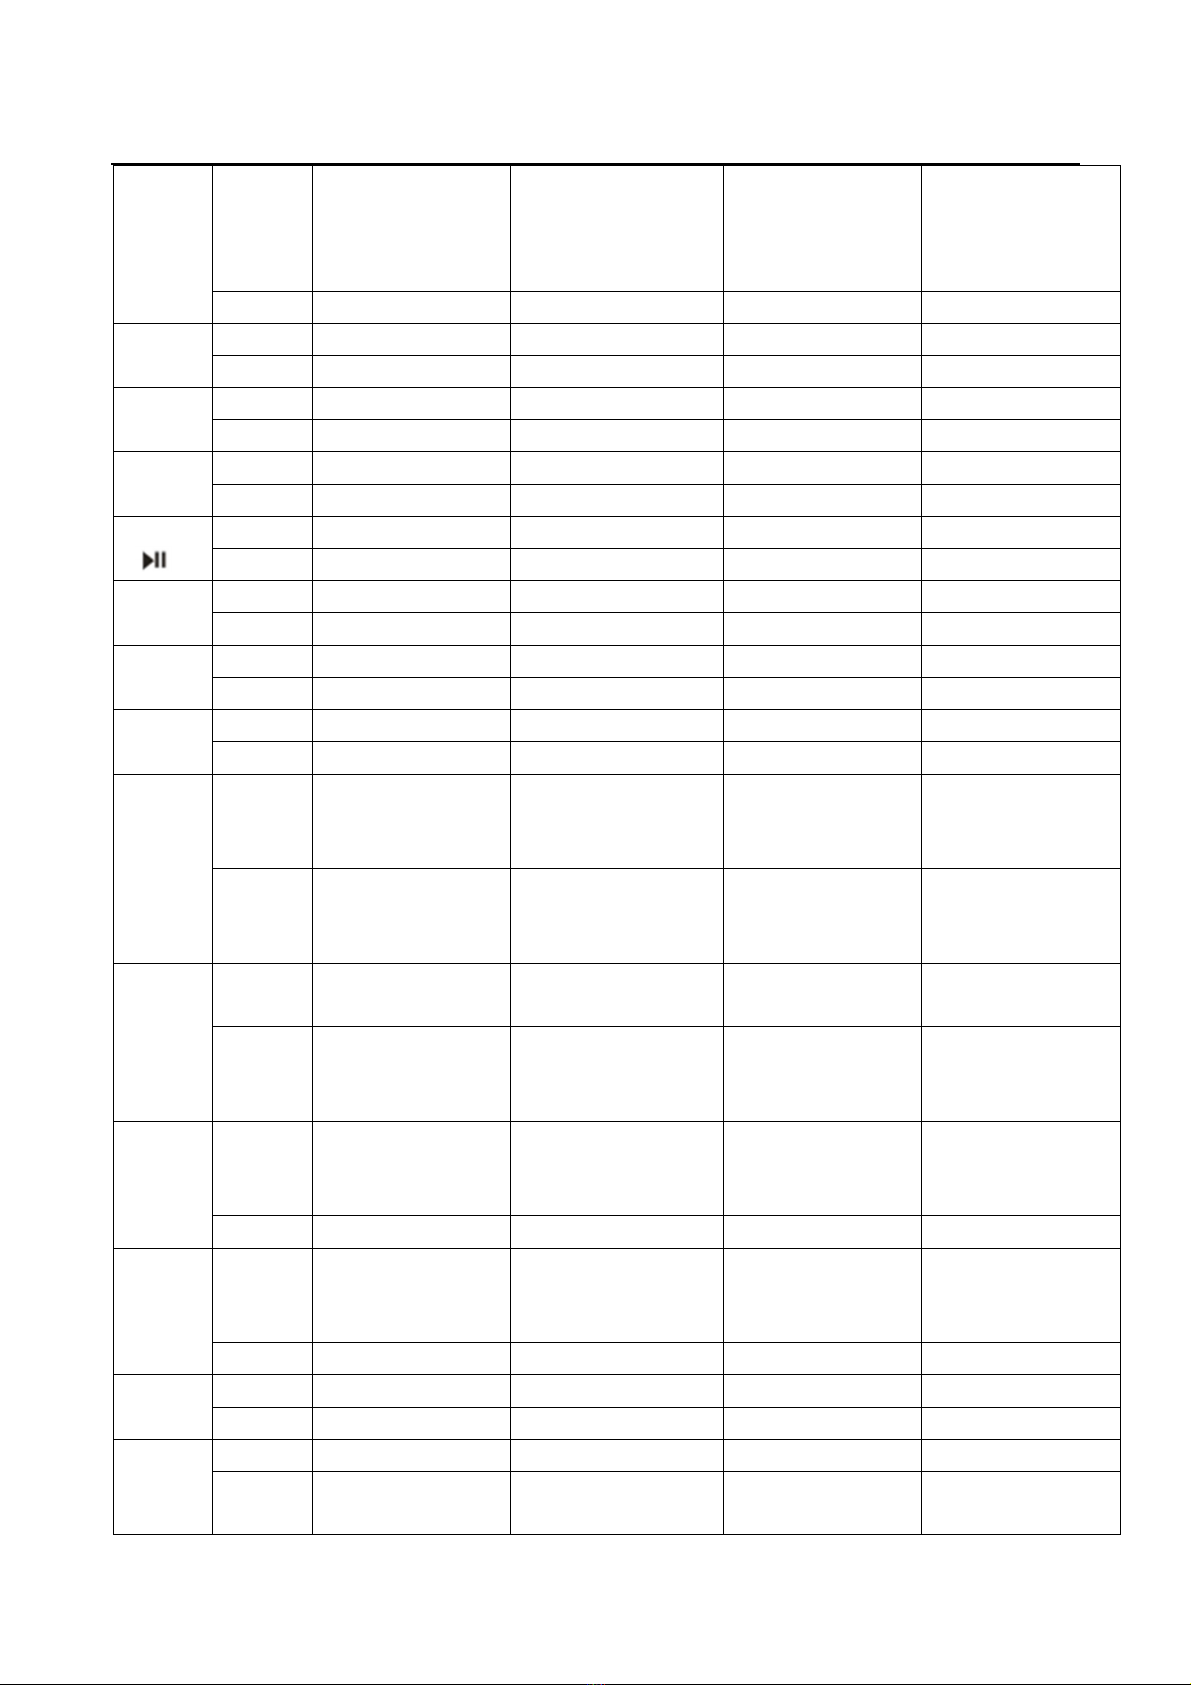
Key functions
KEYS
ACTION
RADIO/DAB USB AUX BT
Short power on/Mute on/off power on /
Mute on/off power on /
Mute on/off power on /
Mute on/off
Long power off power off power off power off
MODE Short source change source change source change source change
Long BT off/link BT off/link BT off/link BT off/link
BAND
Short band change Song search / /
Long FM: Auto store
DAB:DAB Search Video/Photo/Music
change / /
Short Preset up Play/Pause / Play/Pause
Long Manual save station / /
MENU
Short
FM: AF/TA/PTY
DAB: TA/PTY/S.S.* AF/TA AF/TA AF/TA
Long BAS/TRE/BAL/FAD/EQ/
LOUD/BEEP/CLOCK/C
LK SET/ST/LOC
BAS/TRE/BAL/FAD
/EQ/LOUD/BEEP/C
LOCK/CLK SET
BAS/TRE/BAL/F
AD/EQ/LOUD/BE
EP/CLOCK/CLK
SET
BAS/TRE/BAL
/FAD/EQ/LOU
D/BEEP/CLO
CK/CLK SET
>>I
Short FM: Seek up
DAB: Next station next file / next file
Long FM:Manual turn up
DAB: / FF Reset(5 seconds) /
I<<
Short FM: Seek down
DAB: Next station previous file / previous file
Long
FM:Manual turn down
DAB: / FR Show software
version /
VOL-
Short Volume down Volume down Volume down Volume down
Long Volume down fast Volume down fast Volume down fast
Volume down
fast
VOL+ Short Volume up Volume up Volume up Volume up
Long Volume up fast Volume up fast Volume up fast Volume up fast
*: S.S.: Slide Show.

Operation
6
Turn on/off the unit
Press button to turn on the unit. When the unit is on. Press and hold it for 2 seconds to
turn off the unit.
Mute on/off
When the unit is on. Press button to mute the sound. Press it again to resume the
sound.
Settings
In settings menu, You can setting below items:
BASS/TREBLE/BALANCE/EQ/LOUD/BEEP/CLOCK(12/24)/CLK SET/DX(LOCAL)/
STEREO(MONO)
In each item press VOL+/- button to set them.
Reset the unit
In AUX mode press and hold button for 5 seconds to reset the unit. It is activated for
the following reasons:
a) Some buttons do not operate.
b) Error symbol shows on the display.
Note: if the RESET function is activated, All the memory will be lost.
Radio Operation
Receive a radio station
Press MODE button to select radio mode. Then press BAND button to select desired band.
Shortly press / button to receive the desired radio station. Press and hold /
button for manual tuning the frequency.
Auto Store:
Press BAND button for 2 seconds to auto store stations to band 1~3.
Manually store station & recall preset station
Receiving a desired station. Press and hold the button. It shows “SAVE CH1”. Press
VOL+/- button to select channel then press MENU button. The station will be saved.
Listening to the preset station.
Pressing the button to scroll through the presets.
RDS operation
Alternative Frequency (AF)
In AF item (press menu button) .You can setting the AF to on/off.
AF on: Symbol “AF” appears on the display. Program name is displayed on receiving a
RDS station. “AF” symbol starts blinking if the broadcasting signal getting worse. It will start
to search the stronger station which in AF list and switch to the good station. If it doesn’t
find a stronger station in AF list. It will active the PI SEEK mode to search station which as
same PI.

Operation
7
AF off: switch off the AF mode.
Traffic Announcement (TA)
In TA item (press menu button) . You can setting the TA to on/off.
TAon: When received a TAstation it will switch temporarily to radio mode to listen to the TA
station whatever in RADIO/USB/AUX/BT mode. If the volume level was under the TA
volume it will be raised to the TA volume automatically.
TA stop (TA interruption function):
It allow you temporarily back to previous mode till next TA station was received.
TA off: Turn off the TA function.
PTY operation
In PTY item (press menu button) . Press VOL+/-button to select the PTY kinds. When
shown the PTY kind you want. Press MENU knob to search.
DAB Operation
Press MODE button switch to DAB mode.
Band selection
press BAND button shortly to select DAB1-> DAB2 -> DAB3.
Search DAB stations
In first time switch to DAB mode. It will search DAB stations automatically. Press and hold
BAND button it will search DAB stations again.
Selecting station
Press / button to select up/down station.
Manually store station and recall
preset station
Press / button to select a desired station. Then press and hold button for 2
seconds. “SAVE CH1”. Press VOL+/- button to select channel then press MENU button.
The station will be saved. Shortly press the button to to scroll through the presets.
USB Operation
When an USB driver inserted to the unit, the unit will play the MP3/WMA file automatically.
If an USB drive is already inserted in the unit. Keep pressing MODE button shortly until the
USB mode display appears.
Select file
Press
/
button to skip to next/previous file. Hold / button to fast
forward or fast reverse.
Play/Pause
Press button to pause/playing the file.
INT function
Press INT button (on remote) to play the first 10 seconds each file. Press it again to cancel
this function.

Operation
8
RPT function
Press RPT button (on remote) to select repeat mode: RPT ONE / RPTALL (default).
Random function
Press RDM button
(on remote), all files will be played randomly. Press it again to cancel this
function
Search song
Press BAND button. It will list all the songs on the display. Using VOL+/-button or cursor
(on remote) to select the desired song then press MENU (or ENTER) button to play.
Video/Photo/Music playing change
When there are video/photo/music files in the USB. Press and hold BAND button to change
video/photo/music playing.
AUX IN operation
Connecting the signal to the R/L IN connecter behind the unit. Then pressing MODE button
to switch to AUX IN mode.
Bluetooth Operation
Pairing
On mobile phone, select the Bluetooth item searching the Bluetooth device. “CAR KIT”
should appear in the list, select “CAR KIT” and then input password “0000” If it needs a
password. When successful paired, the BT mark will be shown on the display.
Bluetooth Audio
Press MODE button to switch to BT mode. It will play a song of your mobile phone
automatically. Press key to pause/play the song. Press /
button to select
next/previous song.
Disconnect the Bluetooth
When the mobile phone paired with the unit. If you want to disconnect the Bluetooth. Press
and hold MODE button for 2 seconds to disconnect/re-connect the Bluetooth.
Other operation please reference the Key functions table above.

Remote control
9
Remote control
PTY
TA

Remote control
10
Key functions
KEYS ACTION RADIO/DAB USB AUX BT
Short Power on/off Power on/off Power on/off Power on/off
Long / / / /
MODE Short source change source change source change source change
Long BT off/link BT off/link BT off/link BT off/link
AMS Short FM:Preset Scan
DAB:DAB Search Song search / /
Long Auto Store / / /
MUTE Short Mute on/off Mute on/off Mute on/off Mute on/off
Long / / / /
BAND Short Band change / / /
Long FM: Auto Store
DAB :DAB search Video/Photo/Music
change / /
VOL+ Short Volume up Volume up Volume up Volume up
Long Volume up fast Volume up fast Volume up fast Volume up fast
VOL- Short Volume down Volume down Volume down Volume down
Long Volume down fast Volume down fast Volume down fast Volume down fast
∧
Short
Cursor up Cursor up / /
Long
/ / / /
∨
Short
Cursor down Cursor down / /
Long
/ / / /
<
Short
Cursor left Cursor left / /
Long
/ / / /
>
Short
Cursor right Cursor right / /
Long
/ / / /
ENTER
SETUP
Short
Confirm Confirm / /
Long
Previous folder Previous folder /
Previous folder
AF Short FM: AF on/off
DAB: Slide Show
on/off
AF on/off AF on/off AF on/off
Long
/ / / /
TA Short FM: TA on/off
DAB: DAB TA
on/off TA on/off TA on/off TA on/off
Long
/ / / /
PTY Short PTY Select
/ / /
Long
/ / / /
EQ Short EQ change EQ change EQ change EQ change
Long LOUD on/off LOUD on/off LOUD on/off LOUD on/off
Remote control
11
SEL Short
BAS/TRE/BAL/FAD
/EQ/LOUD/BEEP/
CLOCK/CLK
SET/ST/LOC
BAS/TRE/BAL/FAD/
EQ/LOUD/BEEP/
CLOCK/CLK SET
BAS/TRE/BAL/FAD
/EQ/LOUD/BEEP/
CLOCK/CLK SET
BAS/TRE/BAL/FAD
/EQ/LOUD/BEEP/
CLOCK/CLK SET
Long
/ / / /
□
Short
/
Stop
/ /
Long Main menu Main menu Main menu Main menu
10- Short
/
-10 skip
/ /
Long
/ / / /
10+ Short
/
+10 skip
/ /
Long
/ / / /
Short
/
Play/Pause
/
Play/Pause
Long
/ / / /
INT Short
/
INT on/off
/ /
Long
/ / / /
RPT Short
/
RPT on/off
/ /
Long
/ / / /
RDM Short
/
RDM on/off
/ /
Long
/ / / /
I<<
Short FM: Seek down
DAB: Previous
station Previous file
/
Previous file
Long
FM:Manual Turn
down
DAB: /
/ / /
>>I
Short FM: Seek up
DAB: Next station Next file
/
Next file
Long FM: Manual Turn
up
DAB: /
/ / /
<< Short
FM: Manual Turn
down
DAB: / FR
/ /
Long
/ / / /
>> Short FM: Manual Turn
up
DAB: / FF
/ /
Long
/ / / /
1 Short Preset 1 recall Search: digit 1
/ /
Long Save station to P1
/ / /
2 Short Preset 2 recall Search: digit 2
/ /
Long Save station to P2
/ / /

Remote control
12
3 Short Preset 3 recall Search: digit 3
/ /
Long Save station to P3
/ / /
4 Short Preset 4 recall Search: digit 4
/ /
Long Save station to P4
/ / /
5 Short Preset 5 recall Search: digit 5
/ /
Long Save station to P5
/ / /
6 Short Preset 6 recall Search: digit 6
/ /
Long Save station to P6
/ / /
7 Short
/
Search: digit 7
/ /
Long
/ / / /
8 Short
/
Search: digit 8
/ /
Long
/ / / /
9 Short
/
Search: digit 9
/ /
Long
/ / / /
0 Short
/
Search: digit 0
/ /
Long
/ / / /
SCAN Short Scan up
/ / /
Long
/ / / /
OSD Short
/
Language Change
/ /
Long
/ / / /
Specification
GENERAL
Power Supply Requirements : DC 12 Volts, Negative Ground
Chassis Dimensions : 100(W) x 100 (D) x 70(H)
Tone Controls
- Bass (at 100 Hz) : ±10 dB
- Treble (at 10 kHz) : ±10 dB
Maximum Output Power : 4 x 40 watts
Current Drain : 10 Ampere (max.)
RADIO FM
Frequency Coverage 87.5 to 108 MHz
IF 10.7 MHz
Sensitivity 4µV(S/N=30dB)
Stereo Separation >25dB
DAB
Frequency Coverage 174.928~239.200 MHz
Sensitivity (S/N=20dB) ≥-100dBuV
Preset stations 18

Trouble shooting
13
TROUBLE SHOOTING
Before going through the checklist, check wiring connection. If any of the problems persist
after checklist has been made, consult your nearest service dealer.
Symptom Cause Solution
No power. The car ignition switch is
not on. If the power supply is
connected to the car accessory
circuits, but the engine is not
moving, switch the ignition key
to “ACC”.
The fuse is blown. Replace the fuse.
No sound. Volume is in minimum Adjust volume to a desired level.
Wiring is not properly
connected. Check wiring connection.
The operation
keys do not
work.
The built-in microcomputer
is not operating properly
due to noise.
Press the reset button.
The radio does
not Work. The
radio station
automatic
selection does
not work.
The antenna cable is not
connected. Insert the antenna cable firmly.
The signals are too weak. Select a station manually.
Table of contents
Popular Radio manuals by other brands

Federal Signal Corporation
Federal Signal Corporation PA300-012MSC Installation and operating manual

Audiovox
Audiovox Sirius SIR-PNP3 user guide

Armour Home Electronics
Armour Home Electronics Q2 quick start guide

Motorola
Motorola CM160 Service information

Raymarine
Raymarine RAY50 troubleshooting guide

iSimple
iSimple ISFM22 instruction manual


