Oserix EXERTUS VOX 100 User manual

1
PM/GSA/LOG – 005.01.009.001
Operation Manual
Isotope Projector
For Industrial Radiography
EXERTUS
VOX 100
Operation Manual Revision 1
PM/GSA/LOG – 005.01.009.001

2
PM/GSA/LOG – 005.01.009.001
List of content
1. Introduction 3
2. Technical Descriptions 4
2.1 Technical Specifications 4
2.2 Contents of complete Industrial Radiography package 5
2.3 Equipment description 6
3. Operation 9
4. Operating Instructions 11
5. Source Changing 16
6. Inspection 19
7. Maintenance 21
8. Emergencies 21
9. Problem Solving 22
10. Disposal of Radioactive Material & Contact Details 25
11. Appendix 25

3
PM/GSA/LOG – 005.01.009.001
1. INTRODUCTION
The VOX 100 Isotope Projector was designed to be used for Industrial Radiography to
determine the internal soundness of materials and structures, without destroying
the product’s usefulness, thereby assuring the satisfactory performance for which
the product was intended.
Non-Destructive Testing (NDT) is used in many different spheres of industry,
including but not limited to: Oil and Gas, Ship Building, Aviation, Power Generation
and General Construction. With Industrial Radiography it is possible to detect defects
and determine the integrity of steel in the thickness range 30mm to 150mm and
aluminum in the thickness range 200mm to 300mm .
The VOX 100 meets most of the international requirements for Radiographic
Equipment. It can accommodate a Co-60 isotope with a maximum capacity of 100Ci .
The reliability and safe operation of this Isotope Projector depends strongly on your
knowledge as a qualified Radiographer. It is the responsibility of the owner to ensure
that all personnel using this equipment are appropriately trained by a licensed
Institution.
Please ensure that the operator has read and fully understood this Operation Manual
before using this equipment.
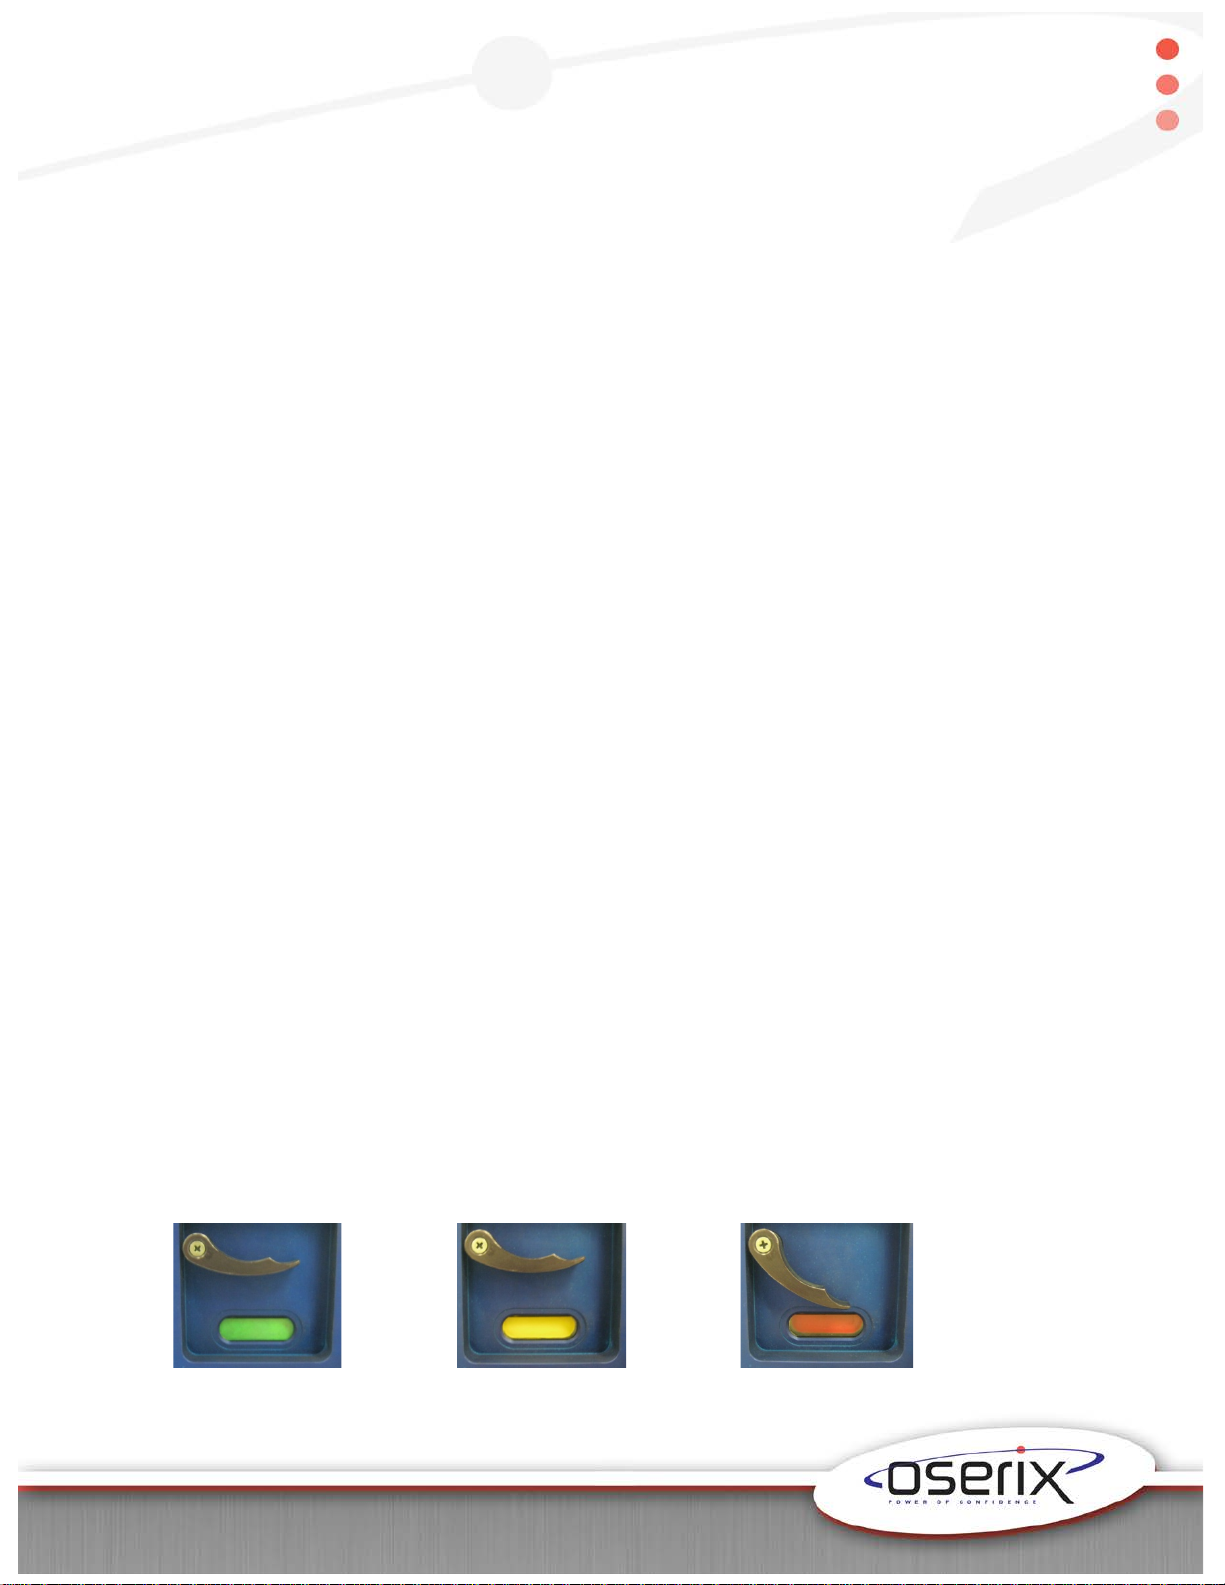
As with most National and International Legal Regulations it is required to use
radiation monitoring and/or dosimetric devices capable of measuring in the range
2mR/hr to 1000mR/hr. The Radiographer and his/her assistants must also wear a Film
Badge, TLD or personal Dosimeter at all times while performing Industrial
Radiography. Please note that this dosimetric equipment also needs to be calibrated
by an accredited service provider within the required intervals set out by your relevant
Authority.
The Radiation Shielding Unit of this Projector is made from Depleted Uranium and
therefore all National and International Regulations with regard to Transport and
Storage of Radioactive material must be adhered to at all times, even if the Projector
is not loaded with a Sealed Radioactive Source.

4
PM/GSA/LOG – 005.01.009.001
Whenever this Projector and accompanying equipment are used it is strongly advised
that all requirements are followed and applied as laid out in this Operating Manual.
All regulations regarding Radiation Safety must also be adhered to at all times!
2. TECHNICAL DESCRIPTION
2.1 Technical Specifications
Authorized contents: Co-60
Maximum activity: 100Ci (3.7TBq)
Maximum Surface dose rate: 200mR/hr (2mSv/hr)
Dimensions of Projector: 450mm(L)x315mm(W)x 320mm(H)
Weight of Projector: 185kg
Weight of Depleted Uranium shielding: 125kg
Shielding material: Depleted Uranium, Tungsten
encased in Stainless Steel housing.
Temperature range: -40 °C up to +45 °C with relative
ambient air humidity of 95% at a
temperature of +35 °C.
Winding Mechanism length: 15m standard. (Automatic Winding
Mechanism optional)
Guide Tube length: 3m standard, (Specials made to
order)
Material thickness range: 30mm – 150mm (Steel)
200mm – 300mm (Aluminum)

5
PM/GSA/LOG – 005.01.009.001
Transportation of the Exertus VOX 100 loaded with a radioactive source can be
carried out by any source of transportation following the rules of safety for
transportation of radioactive goods class 7, on transport category “III-yellow”,
observing norms of safety stated in “Rules of security during transport of radioactive
materials (NP-053-04). Potency of equivalent dose in any point outside the surface of
the Exertus VOX 100 should not exceed 2mSv/hr (200mR/hr). Transport Index (TI)
shouldn’t exceed 10. Transport of the Exertus VOX 100 without a radioactive source
is provided according to transport category “II-yellow”. Total TI of a number of
packages placed in one source of transportation shouldn’t exceed 50. During
transportation provided by civil plane the total TI shouldn’t be more than 50. During
transportation provided by cargo aircraft shouldn’t be more than 200. Level of
radiation in any point of external surface of transportation source should not exceed
2mSv/hr (200mR/hr) and at 2m distance – 0.1mSv/hr (10mR/hr).
2.2 Contents of complete Industrial Radiography package.
2.2.1 The complete Industrial Radiography package consists of the following:
•The VOX 100 Isotope Projector including Source Assembly (Fig 4)
•Oserix Winding Mechanism (Fig 5)
•Oserix Guide tube
•Collimator
•Guide Tube Coupling
•Source terminal
•Wrench
•Go/No-Go gauge (Fig. 14)
•Emergency Shipping Plug
•Operation Manual
2.2.2 The Projector package consists of the following:
•The VOX 100 Isotope Projector including Source Assembly (Fig. 4)
•Guide Tube Coupling
•Go/No-Go gauge (Fig. 14)
•Emergency Shipping Plug
•Operation Manual

6
PM/GSA/LOG – 005.01.009.001
Note: The Projector package doesn't include the Sealed Radioactive Source. The
Sealed Radioactive Source is supplied according to individual order following the
Sealed Radioactive Source Order procedure set out by the relevant Authorities.
2.3 Description
VOX 100 Isotope Projector
The digits in brackets refer to Figure 4 on page 7.
The Projector consists of the following basic parts: The Radiation Shielding Unit (1&
7), made of Depleted Uranium and Tungsten encased in a stainless steel housing,
side Flanges (3), two Foot Pieces, Source Assembly Securing unit (4), Guide Tube
Securing Mechanism (6) and front and rear Dust Covers (5).
The operating principle of the Projector is based on the exposure of a Radioactive
Isotope, by means of a Winding Mechanism, out of the Projector through the Guide
Tube to the point of exposure and back into the Projector into its secured position.
The Projector can only be operated when both the Winding Mechanism and Guide
Tube are properly connected.
The Projector is designed with an automatic Source Assembly Locking Mechanism,
incorporating a Three Colour Signal Indicator system, ensuring that the operator has
a visual indication of the position of the Source Assembly at all times.
Green Signal -Source Assembly is secured and the Projector is locked (Fig. 1).
Yellow Signal - Projector is unlocked and Source Assembly Locking Mechanism is
ready to be released (Fig. 2).
Red Signal - Source Assembly Locking Mechanism is released and ready to
expose (Fig. 3).
Figure 1 Figure 2 Figure 3

7
PM/GSA/LOG – 005.01.009.001
Figure 4
VOX 100 Isotope Projector
The Projector nameplate contains the following information:
•Radiation hazard sign according to "Nuclear material transportation
regulation" IAEA. Vienna 1996
•Word "RADIOACTIVE" with letter height not less than 10 mm
•Model of the Isotope Projector (EXERTUS VOX 100)
•The types Radioactive Sources used
•Nominal activities of the sources
•Shielding material and its weight
•Word "Type B(U) "
•Number of the international standard with year of edition (national
standard)
•Identification sign established by authorized body
•Factory number and date of manufacturing
•Weight of complete Projector

8
PM/GSA/LOG – 005.01.009.001
Guide Tube
The Guide Tube is used to guide the Source Assembly to the radiographic focal point
where the Source Terminal and/or collimator are securely attached. The Guide Tube
consists of the following basic parts: Guide Tube Coupling, Guide Tube and Source
Terminal.
Upon connecting the Guide Tube to the Projector, the Guide Tube Coupling releases
one of the Source Assembly securing mechanisms.
The Guide Tube must always be attached to the Projector prior to connecting the
Winding Mechanism.
Winding Mechanism
The Winding Mechanism is used to convey, from a safe distance, the Source
Assembly out of the Projector through the Guide Tube, into the Source Terminal
and/or Collimator and back into the Projector after exposure. The Winding
Mechanism consists of the following parts: Pistol Grip or Reel, Gearbox, Flexible Drive
Hoses (x2), Coupling and Drive Cable with Ballpoint Connector.
The Gearbox consists of the following basic parts: Crank Handle, Lid, Sealed Bearings
(x2), Drive Gear, Liner, Gearbox Housing and Guide Nipples (x2).
Figure 5

9
PM/GSA/LOG – 005.01.009.001
Upon connecting the Winding Mechanism to the Projector, the Winding Mechanism
Coupling releases one of the Source Securing Mechanisms.
Source Assembly Securing Mechanism
The Source Assembly Securing Mechanism is designed in such a way that it requires
three independent safety devices to be activated / connected before the Projector
can be operated and the Source Assembly moved out of its secured position to the
point of exposure.
The following connections need to be properly secured before any radiography can
take place:
1. Guide Tube to the Isotope Projector.
2. Drive Cable Ballpoint to the Source Assembly.
3. Winding Mechanism Coupling to the Projector.
IMPORTANT:
These three connections should always be done in this sequence when connecting
and in reverse for disconnecting.
3. Operation
Before operating this equipment it is of utmost importance to take note of the
following safety precautions.
Personal Safety and Dosimetry
The radiographer and all assistants are required to wear a TLD, pocket dosimeter or
suitable monitoring device with a range of 0 – 200mR/hr (0– 2mSv/hr) while work is
performed. A Radiation Survey Meter, capable of measuring in the range 2mR/hr –
1000mR/hr (0.02mSv/hr – 10mSv/hr) must also be used at all times. Some local
authorities may also require you to wear a direct reading dosimeter or EPD (Electronic
Personal Dosimeter).

10
PM/GSA/LOG – 005.01.009.001
Work Site or Location
Always ensure that Industrial Radiography only takes place in a properly secured and
restricted area with all appropriate barriers and warning signs required by local
regulations in place.
Distance
As the radioactive source emits high levels of radiation once it is out of its secured
position, it is very important to keep the distance between the radiographers and the
point of exposure as far as possible. This can be achieved by the correct layout of the
Winding Mechanism with regard to the Isotope Projector.
Equipment
Utmost care should be taken to prevent the accidental dropping or mishandling of the
Isotope Projector. Upon set-up of the radiographic system care should be taken to
safely secure all of the components, including the Guide Tube and Collimator. Special
attention should be paid to this when working overhead or in elevated positions.
Functionality Testing of Equipment
It is the responsibility of the operator to perform the following daily functionality tests
prior to any work being done.
Isotope Projector
1. The Isotope Projector cannot be unlocked without the appropriate key.
2. The Source Assembly Securing Mechanism cannot be released without the
Guide Tube being properly connected.
3. The Source Assembly Securing Mechanism cannot be released without the
Winding Mechanism being properly connected.
4. All Protective caps are in place and in good working condition.
5. The Source Assembly Female Connector passes the Go/No-Go test described in
chapter 6.
6. All required identification labels and warning signs are attached to the Projector
as required by the relevant local authority.

11
PM/GSA/LOG – 005.01.009.001
Guide Tube
1. The Coupling is not damaged or severely worn, is properly attached to the
Guide Tube and can be connected to the Projector safely.
2. The Source Terminal is not damaged or worn in any way, including the threads
on both the Source Terminal as well as its mating female thread on the Guide
Tube.
3. There are no dents, cracks or kinks or damage to the Guide Tube.
Winding Mechanism
1. The ballpoint passes a Go/No-Go test as described in chapter 6, and is still
properly crimped to the Drive Cable.
2. There is no damage or excessive wear to the Drive Cable or Ballpoint
whatsoever.
3. The Winding Mechanism Coupling is not damaged or severely worn and can be
properly attached to the Isotope Projector after connecting the Ballpoint to the
Source Assembly Female Connector.
4. The Drive Hoses have no permanent bends, cuts, dents or damage.
5. The Drive Cable does not slip over the Gear.
6. The Drive Cable moves freely through the Drive Hoses when winding.
Important Notice
This equipment must not be used under any circumstances if all of the above criteria
are not met. It must be taken out of service and sent back to the manufacturer or
authorized service agent for the necessary maintenance / repairs to be done. It is
prohibited to use defective equipment which could lead to an accident, incident or
loss.
4. Operating Instructions
It is important that the following steps are performed accordingly, and in the exact
sequence as set out below.

12
PM/GSA/LOG – 005.01.009.001
Step 1 -Positioning of Isotope Projector
Step 2 -Connecting of the Guide Tube
Step 3 -Connecting the Winding Mechanism
Step 4 -Exposing and retracting the Source Assembly
Step 5 -Confirmation Survey and locking of the Projector
Step 6 -Dismantling of equipment
Step 1 – Positioning of the Isotope Projector
Where possible always place the Isotope Projector on a level surface. In the event
where this is not possible or in the case of overhead or elevated work, secure the
Isotope Projector with suitable clamps, straps or similar to prevent it from falling.
Step 2 – Connecting of the Guide Tube
Ensure that the Guide Tube to be used has been inspected and meets all criteria set
out in the daily inspection section in chapter 3. Secure the Guide Tube Source
Terminal, with the Collimator correctly attached (if used), to the point of radiographic
exposure by means of a Magnetic Base Stand or similar device.
Lay out the Guide Tube, with no bend with a radius less than 0.3m, to ensure the
Source Assembly can move freely through the Guide Tube without any restrictions. To
prevent the Guide Tube being damaged whilst in use, ensure that it is not laid out in
walkways, driveways or where there is a danger of falling objects. Also avoid contact
with heated surfaces at all times.
Important Notice
As there are various lengths of Guide Tube available always ensure that the selected
Guide Tube is shorter than the length of the Winding Mechanism Hose to prevent
the Drive Cable running off the Gear.
Ensure that the Guide Tube Coupling is tightly secured to the Guide Tube and proceed
as follows:

13
PM/GSA/LOG – 005.01.009.001
Press the Locking Pin on the front of the Projector in order to remove the Front
Protective Cap (Fig. 6). Now pull the Front Protective Cap out by hand and insert it into
its storage hole as shown below (Fig. 7).
Figure 6 Figure 7
Press down on the Locking Pin and insert the Guide Tube Coupling into the exposure
port of the Projector (Fig. 8). Once completely in, release the Locking Pin and confirm
manually that the Guide Tube is properly secured. (Fig. 9)
Figure 8 Figure 9
Step 3 – Connecting of the Winding Mechanism
Ensure that the Winding Mechanism to be used has been inspected and meets all
criteria set out in the daily inspection section in chapter 3.

14
PM/GSA/LOG – 005.01.009.001
Remove Rear Protective cap and secure it by inserting it into its holder. Lay out the
Winding Mechanism Hoses as straight as possible ensuring maximum distance
between the Projector and operator.
To prevent the Winding Mechanism Hoses being damaged whilst in use, ensure that
they are not laid out in walkways, driveways or where there is a danger of falling
objects. Also avoid contact with heated surfaces at all times.
Expose approximately 200mm of the Drive Cable by turning the Winding Mechanism
Handle in a clockwise direction. Insert the Ballpoint Connector into the Source
Assembly Female Connector from a vertical position, keeping the Drive Cable straight
at all times. In this position, move the Ballpoint Connector towards the back of the
Female Connector and swivel it downwards (90˚) to a horizontal position. See Fig. 10
below.
Figure 10
Retract the Drive Cable by turning the Winding Mechanism Handle in an anti-
clockwise direction until the Winding Mechanism Coupling is against the Projector.
Now, pull back the outer sleeve of the Coupling (Fig. 11) and insert the Coupling over
the Projector Fitting. Once the outer sleeve is released, the Coupling will connect
automatically (Fig. 12). Check manually if this is connected properly. If not, check that
the Ballpoint Connector is properly connected to the Source Assembly Female
Connector.

15
PM/GSA/LOG – 005.01.009.001
Figure 11 Figure 12
Step 4 – Exposing and retracting of the Source Assembly
Before exposing, ensure that the following is in place: radiation control area barriers,
no person/s is inside these barriers and all legislative requirements are in place and
met.
Insert the key into the Lock and unlock the projector. The Source Assembly Indicator
shifts from Green to Yellow. Now, press down on the Release Lever Assembly until the
Locking Slide is automatically sustained in the open position. The Source Assembly
Indicator shifts from Yellow to Red. The Projector is now ready for operation.
Rapidly turn the Winding Mechanism Crank Handle in a clockwise (OUT) direction in
order to move the Source Assembly to point of radiography. Ensure not to use
excessive force and to slow down prior to reaching the Source Terminal.
When the Source Assembly is ejected from the Projector it will be observed that the
Survey meter reading increases dramatically from a Background Radiation level to a
High Radiation level. This should decrease sharply once the Source Assembly enters
the Collimator (if used) and should remain constant throughout the exposure. The
same principle will apply in reverse when the Source Assembly is retracted.
Once the desired exposure time is reached the Source Assembly is retracted by rapidly
turning the Winding Mechanism Crank Handle in an anti-clockwise (IN) direction.
Ensure not to use excessive force and to slow down as the Source Assembly enters the
Projector.

16
PM/GSA/LOG – 005.01.009.001
The Source Assembly Locking Mechanism will automatically lock the Source Assembly
in the secured position. The Source Assembly Indicator now shifts from Red to Yellow.
Step 5 - Confirmation survey and locking of the Projector
Approach the Isotope Projector cautiously while observing the Survey Meter. Ensure
that the Source Indicator is yellow when approaching the Projector. Measure the Dose
Rate at the surface of the Projector, the reading obtained should be the same as the
reading observed prior to the exposure. If this is not the case treat the situation as an
emergency and follow the emergency instructions according to chapter 7. If the
reading is satisfactory press the Corbin Lock in until it locks in place.
The Source Indicator will now change from yellow to green. Remove the key and store
it in a safe place.
Step 6 – Dismantling of equipment
The dismantling of equipment must always take place in reverse sequence to the
connecting procedure.
Remove the Winding Mechanism Coupling by pulling back on the outer sleeve. Expose
approximately 200mm of the Drive Cable. Now, follow the Ballpoint connection
procedure in reverse sequence. Retract the exposed Drive Cable back into the Hose
ensuring that there is approximately 50mm of Drive Cable left exposed. This will
automatically retract as the Winding Mechanism Hoses are rolled up, with no radius
less than 300mm, for transport purposes. Replace the rear Protective Cap of the
Projector.
Remove the Guide Tube Coupling by pressing down on the Locking Pin. Now, pull the
Guide Tube Coupling out of the Projector. Again press down the Locking Pin and plug
in the Front Protective Cap.
Important Notice
Although it is highly unlikely for the Sealed Source to be contaminated, the Winding
Mechanism and Guide Tube must always be monitored for excessive radiation after
use.

17
PM/GSA/LOG – 005.01.009.001
Important Notice
Always ensure that the Projector is locked prior to transporting or moving. Never
leave the Winding Mechanism coupled when transporting or moving the Projector.
This could cause damage to the Projector and/or a malfunction, possibly
compromising the safety system of the unit. This could lead to a Radiation
Emergency.
5. Source Changing
The Source Assembly, loaded with the sealed radioactive source, can be
interchanged either on-site in a controlled environment, or at Oserix’s or it’s
distributor’s facilities to ensure that the Projector is loaded with the required isotope
for the application. The new Source Assembly may be transported in a multi-channel
Transport Container which will always have an empty channel, into which the old
Source Assembly can be transferred, in order to load the Projector with the new
Source Assembly. The lifecycle of a Source Assembly (not the actual Radioactive
Source) is 2 years or 25000 cycles, whichever comes first, and should be replaced
accordingly.
The old Source Assembly will then be shipped back to Oserix or it’s local distributor
for disposal of the decayed radioactive source and for inspection and re-certification
of the Source Assembly. After certification the Source Assembly is ready to be
re-loaded.
Important Notice
The Source Change procedure may only be carried out by properly trained and
authorized persons under constant dosimetric control.
Unloading and Loading of the Projector
1. Align the Projector and Transport container adjacent to one another.
2. Connect the Transfer Tube, accompanying the Transport Container, to the
Projector.
3. Connect the Winding Mechanism to the Projector as described in Chapter 4.
4. Prepare the Transport Container as described in the container’s operating
instructions.

18
PM/GSA/LOG – 005.01.009.001
5. Connect the other end of the Transfer Tube to the Transport Container as
described in the container’s operating instructions.
6. Once the Transport Container is ready, proceed to eject the Source Assembly as
described in Chapter 4, Step 4.
7. Use a survey meter to confirm that the Source Assembly is secured inside the
Transport Container.
8. Lock the Source Assembly as described in the container’s operating instructions
and disconnect the Drive Cable from the Source Assembly.
10. If the Projector is not to be re-loaded with another Source Assembly, it is
necessary to connect a “Dummy Source Assembly” to the Drive Cable in order to
disconnect the Winding Mechanism and lock the Projector.
11. If the Projector is to be re-loaded proceed with step 12. If not, continue with
step 14.
12. Connect the Drive Cable to the required Source Assembly, currently still secured
inside the Transport Container.
13. Connect the Transfer Tube to the Transport Container as described in step 5.
14. Retract the Source Assembly as described in Chapter 4, step 4.
15. Lock and disengage the equipment as described in Chapter 4, step 6.
The complete Source Assembly consists of the following components:
1. Sealed Radioactive Source
2. Tungsten links
3. Spring Pins
4. Stainless Steel Links
Figure 13.

19
PM/GSA/LOG – 005.01.009.001
6. Inspection
Please pay special attention to this chapter. It is of utmost importance that all
inspection procedures are followed and adhered to in full. Failing to do so could
result in premature equipment failure, thus compromising safety and
productivity.
Important Notice
In addition to the inspections described below and where specified by National
Regulations, the owner of this equipment is required to send the equipment for
Regularity Certification Inspection at the specified intervals.
Daily Inspection
A daily Inspection of the complete Industrial Radiography package is important in
order to detect possible defects and/or equipment damage prior to each workday /
shift.
Even when it was recorded at the end of the previous shift that all equipment was
in good working order, there is always the possibility of damage occurring during
transport, storage etc.
The findings of each daily inspection must be recorded on the “Daily Inspection
Checklist” documents, provided in the Appendix section of this Operation Manual,
immediately after the inspection is done. If any equipment fails to comply with all
the criteria in the checklists, the equipment is no longer fit for field use. The
equipment should be taken out of service immediately, labeled accordingly and
returned to the manufacturer or authorized service centre for the necessary repairs
and maintenance.
Cleaning of Equipment
The Projector, Winding Mechanism and Guide Tube needs regular cleaning. The
intervals between cleaning will depend on the environmental conditions that the
equipment operates in. When the equipment is used in areas where dust, sand,
mud or moisture is present more frequent cleaning will be required.
Before every use it is important to ensure that both the working ends of the
Projector are entirely free of dirt. Also check that the Guide Tube and Winding

20
PM/GSA/LOG – 005.01.009.001
Mechanism are clean. Only use cloths that are lint free, wetted with alcohol, to
clean your equipment.
Important Notice
Under no circumstances should any of the equipment be cleaned with solvents,
degreasing fluids or any other liquid. Do not lubricate the equipment with oil as
dirt will stick to the oil and get transferred into the Winding Mechanism and
Projector.
Clean the projector using a soft bristle brush and alcohol (or non oil-based paint
thinners) and allow to dry thoroughly. If the Drive Cable needs to be cleaned, it will
have to be completely wound out of the Drive Hoses and then washed with alcohol
(or non oil-based paint thinners) and allowed to dry. The Guide Tube can be rinsed
out with alcohol (or non oil-based paint thinners).
If the Projector needs to be partly dismantled in order to eliminate all dirt it must be
sent back to the manufacturer or authorized service centre.
Female Connector and Ballpoint
The safe working of the Projector relies heavily on the soundness of the connection
between the Female Connector and the Ballpoint. Therefore it is very important to
monitor these two components for damage and wear and tear. Permissible
tolerances can be checked using the supplied “Go/No-Go” Gauge as follows:
Figure 14 - “Go/No-Go” Gauge
The Gauge has two parts, one side is marked Go and the other side is marked No-
Go. Use the above diagram to test the various elements of these components by
using their corresponding numbers on the Gauge.
•The neck (1) of the Ballpoint must not fit into the slit.
•The ball (2) of the Ballpoint must not pass through the hole.
•The Female Connector (3) must pass through the hole.
Table of contents