Oster OS-WD1800 User manual

MODELO/
MODEL OS-WD1800

Español-1
ÍNDICE
INSTRUCCIONES DE SEGURIDAD…………………………………………......................P2
INTRODUCCIÓN DE LAS FUNCIONES…….………….………………………..................P2
PARTES Y DESCRIPCIÓN DEL APARATO………….....................................…………...P3
INSTRUCCIÓN DE LA OPERACIÓN…………………………..............................………..P4
PRECAUCIONES IMPORTANTES………………............................................……….....P4
SOLUCIÓN DE PROBLEMAS…………………..............................………………………...P6
LIMPIEZA………………………………………………….............………………P7
INSTALACIÓN DE LA MÁQUINA………………..............................……………………..P8

INSTRUCCIONES DE SEGURIDAD
INTRODUCCIÓN DE LAS FUNCIONES
Español-2
1. Este aparato puede ser utilizado por niños de 8 años o más y personas con
capacidades físicas, sensoriales o mentales reducidas o con experiencia y conocimiento
si se les ha dado supervisión o instrucción sobre el uso del aparato de forma segura y
comprenden los peligros involucrados. Los niños no deben jugar con el aparato.
La limpieza y el mantenimiento por parte del usuario no deberán hacerse sin
supervisión.
2. Este aparato está destinado a ser utilizado por usuarios expertos o entrenados en la
industria y en las granjas, o para uso comercial.
3. Si el cable de alimentación está dañado, debe ser reemplazado por el agente de
servicio o personas calificadas para evitar un peligro.
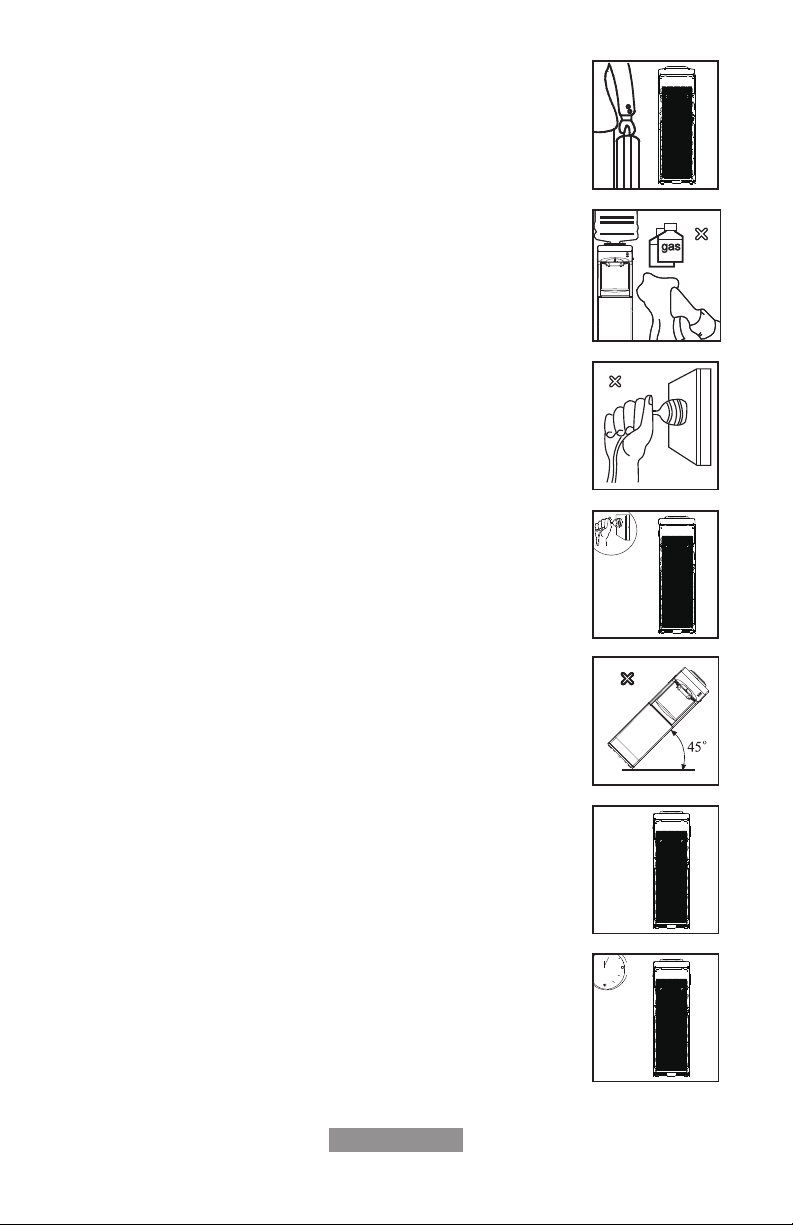
4. El aparato no debe limpiarse con un chorro de agua.
5. El aparato es adecuado sólo para uso en interiores.
6. ADVERTENCIA: Mantenga las aberturas de ventilación, en el gabinete del
estructura incorporada, libre de la obstrucción.
7. ADVERTENCIA: No use dispositivos mecánicos u otros medios para acelerar el
proceso de descongelación, distintos de los recomendados por el fabricante.
8. ADVERTENCIA: No utilice electrodomésticos dentro del almacén de alimentos,
Compartimentos del aparato, a menos que sean del tipo recomendado por el fabricante.
1. Esta máquina es confiable para su seguridad y durabilidad.
2. Esta máquina puede satisfacer la necesidad del té y del café. Debe ser utilizado sólo
en interiores.Con la adopción de la tecnología distintiva de aislamiento térmico, esta
máquina puede minimizar el intercambio térmico entre agua caliente y fría.
3. Advertencia: No dañar el circuito de refrigerante.
4. No almacene sustancias explosivas tales como latas de aerosol con
propulsor en este aparato.

Español-2Español-3
PARTES Y DESCRIPCIÓN DEL APARATO
NOMBRE DE LA PARTE
Soporte del botellón
Cubierta superior
Botón para agua fría
Botón para agua ambiente
Botón para agua caliente
Luz indicadora de energía
Luz indicadora de enfriamiento
Luz indicadora de calentamiento
No.
1
2
3
4
5
6
7
8
No.
9
10
11
12
13
14
15
NOMBRE DE LA PARTE
Grifo para agua
Recolector de agua
Interruptor para caliente
Interruptor para frío
Cable de alimentación eléctrica
Salida de drenaje
Condensador
NOTA: Esta máquina es sugerida para un botellón de 3 a 5 galones.
5
6
7
8
9
10
11
14
12
13
15
(FRONTAL) (TRASERA)

INSTRUCCIONES DE LA OPERACIÓN
Español-4
PRECAUCIONES IMPORTANTES
1. Retirar la etiqueta de la botella.
2. Insertar verticalmente el botellón dentro del soporte del bote frontal
de la maquina, no conecte el cable de alimentación ni presione el
interruptor rojo hasta que el agua corra por el grifo de agua caliente.
3. Inserte el enchufe en la corriente, luego encienda el interruptor de
energía, la luz indicadora se encenderá de acuerdo a como trabaje la
maquina.
4. Retirar verticalmente el botellón con las dos manos cuando esté vacío, y reemplazar
por otro que esté lleno con agua.
5. Este aparato es ideal para climas con temperaturas entre 10 y 43 Grados
centígrados.
6. Este aparato no es adecuado para la instalación en un área donde, se pueda usar un
chorro de agua.
1. Mantener esta máquina en un lugar seco y evitar la exposición
directa al sol. La parte trasera de la maquina debe estar al menos a
25cm de la pared. Nunca poner la máquina en papel o lugares suaves
ya que puede crear inestabilidad y nunca poner nada inflamable al
lado de la maquina.
2. Para evitar daños a la máquina. No poner el enchufe de energía o
encender el interruptor de calentamiento hasta que el agua corra por
el grifo de agua caliente.
3. En caso que no se necesite agua caliente o helada por mucho
tiempo, favor de apagar el interruptor para ahorro de energía.

Español-5
4. En caso de que no se utilice esta máquina por mucho tiempo,
apagar los interruptores, desconectar el enchufe y drenar el agua
restante a través de la salida de drenaje.
5. Nunca use líquidos orgánicos para limpiar esta máquina.
Estrictamente prohibido dejar salpicaduras de agua en la unidad.
6. Nunca encienda la máquina enchufando el enchufe a la toma
corriente. Nunca jale ni aumente la longitud del cable de alimentación
para evitar riesgo de incendios.
7. Si el cable de alimentación de energía está dañado, debe ser
reemplazado por el fabricante o agente de servicio o cualquier
persona calificada para evitar un peligro.
8. Nunca encienda la máquina al revés ni en forma inclinada a la
de 45 grados.
9. Cuando la máquina está sobre un punto de hielo o bloqueada
por hielo, el interruptor de frío debe estar cerrado por 4 horas antes
de volver a iniciar y continuar su operación.
10. La máquina no debe encenderse hasta los 3 minutos más tarde
después de apagar el interruptor de alimentación.

SOLUCIÓN DE PROBLEMAS
Español-6
Por favor revise los siguientes consejos antes de iniciar con la reparación de su
máquina.
PROBLEMAS
No hela ni calienta
agua
El agua no sale por
los grifos
Goteos en el soporte
del botellón
Operación ruidosa
1- Mucho consumo de
agua helada o caliente
en poco tiempo.
2- Sin energía.
1- Botellón vacío.
2- Soporte de entrada
de agua bloqueada por
sello del botellón.
Botellón roto.
Instalación incorrecta.
Reemplazar por un
botellón nuevo.
1- Espere un momento,
luego el agua helada y
caliente estarán disponibles
de nuevo.
2- Conecte el enchufe a la
toma de corriente y encienda
los interruptores de agua
helada o caliente.
1- Reemplazar por uno lleno.
2- Retirar el papel y sello del
botellón e instalar de nuevo
el botellón.
Poner la máquina en una
superficie plácida y
sólida.
POSIBLES CAUSAS POSIBLES SOLUCIONES

LIMPIEZA
Español-7
Para evitar accidentes, corte la fuente de energía y siga las siguientes instrucciones de
limpieza:
1. La máquina ya ha sido desinfectada antes de salir de la fábrica, limpiar el
dispensador antes de instalar una botella llena de agua por primera vez.
2. Instrucciones de limpieza y drenaje:
-1. Antes de limpiar, asegurarse que la luz indicadora de energía este apagada y
desconecte el dispensador de agua.
-2. Insertar verticalmente el botellón dentro del soporte frontal de la máquina.
-3. Abrir el grifo y dejar salir al menos un litro de agua en un recipiente.
-4. Saque la botella de agua del dispensador.
-5. Coloque un recipiente grande debajo de la salida de drenaje, retire la tapa de
drenaje y permita el drenaje de agua.
-6. Después del drenaje, volver a poner la tapa de drenaje y ya puede usar la
máquina
Precaución: el dispensador calienta agua a una temperatura aproximada de 85
grados centígrados, que pueden ocasionar quemaduras severas, favor úselo con
cuidado.
3. Desinfectantes:
La maquina debe ser limpiada con un desinféctate especial comprado en una farmacia o
tienda de conveniencia, desinfecte de acuerdo a las instrucciones del manual y luego
límpielo con agua. Por lo general esto se debe hacer cada tres meses.
4. Remover depósitos minerales:
Combinar 4 litros de agua con 200g de cristales de ácido cítrico, insertar dentro de la
máquina y asegurarse de que el agua pueda salir por el grifo de agua caliente.
Encender el interruptor y deje calentar por alrededor de 10 minutos, 30 minutos después
escurrir el líquido y limpiar con agua dos o tres veces. Generalmente esto debe hacerse
cada 6 meses.
Nunca desensamble esta máquina por usted mismo para evitar cualquier peligro de
daño a la máquina.

INSTALACIÓN DE LA MÁQUINA
Español-8
1-2. Afloje el tornillo del ángulo inferior izquierdo o derecho
del dispensador de agua así como lo muestra la foto.
3. Utilice el tornillo para fijar el soporte en el ángulo inferior
izquierdo o derecho del dispensador de agua.
4. Haga un hoyo en el piso o superficie de escritorio donde
el dispensador será instalado.
5. Fijar el soporte en el suelo con el tornillo firmemente.
6. Apriete los tornillos
Precaución: para evitar daños debido a la instalación del artefacto, debe ser fijado
de acuerdo con las instrucciones.
Dispensador de agua
Soporte
Hoyo para apretar
los tornillos

English-1
INDEX
SAFETY INSTRUCTION...................…………………………………………......................P2
FUNCTION INTRODUCTION.................…….………….………………………..................P2
PART NAME.................................................………….....................................…………...P3
OPERATION INSTRUCTION.............…………………………..............................………..P4
CAUTION..................…………………............................................……….....P4
TROUBLE SHOOTING...........…………………..............................………………………...P6
CLEANING...………………………………………………….............………………P7
MACHINE INSTALLATION.............………………..............................……………………..P8

SAFETY INSTRUCTION
FUNCTION INTRODUCTION
1. This appliance can be used by children aged from 8 years and above and persons
with reduced physical, sensory or mental capabilities or lack of experience and
knowledge if they have been given supervision or instruction concerning use of the
involved. Children shall not play with the appliance. Cleaning and user maintenance
shall not be made by children without supervision.
2. This appliance is intended to be used by expert or trained users in shops, in light
industry and on farms, or for commercial use by lay persons.
3. If the supply cord is damaged, it must be replaced by the manufacturer, its service
agent or similarly qualified persons in order to avoid a hazard.
4. The appliance must not be cleaned by a water jet.
5. The appliance is suitable for indoor use only.
6. WARNING: Keep ventilation openings, in the appliance enclosure or in the built-in
structure, clear of obstruction.
7. WARNING: Do not use mechanical devices or other means to accelerate the
defrosting process, other than those recommended by the manufacturer.
8. WARNING: Do not use electrical appliances inside the food storage compartments
of the appliance, unless they are of the type recommended by the manufacturer.
1. This machine is reliable for its safety & durability
2. This machine can satisfy the need of tea & coffee. It must be used indoor only. With
adoption of distinctive thermal isolation technology, this machine can minimize thermal
exchange between hot & cold water.
3. Warning: Do not damage the refrigerant circuit.
4. Do not store explosive substances such as aerosol cans with a flammable propellant
in this appliance.
English-2

Español-2English-3
PARTS NAME
No.
1
2
3
4
5
6
7
8
No.
9
10
11
12
13
14
15
PART NAME
Bottle supporter
Top cover
Cold water control
Room temp. water control
Hot water control
Power indicator light
Heating indicator light
Cooling indicator light
PART NAME
Water faucet
Drip tray
Heating switch
Cooling switch
Power supply cord
Drain outlet
Condenser
5
6
7
8
9
10
11
14
12
13
15
(FRONT) (BACK)

OPERATION INSTRUCTION
English-4
CAUTION
1. Tear the lable from the bottle.
2. Vertically insert the bottle into the bottle supporter on top of the
machine. Dont’t plug the power cord or push the red switch until
water runs out from the tap of hot water.
3. Insert the plug to socket, then turn on the power switch. Indicators
light up accordingly once the machine works.
4. Vertically pull out the bottle by two hands when the bottle is empty,
then replace it with another bottle of water.
5. This appliance should work under environment of temp from 10℃~43℃.
6. This appliance is not suitable for installation in an area where a water jet could be
used.
1. Keep this machine in place of dry and avoid direct sunshine. Rear
of the machine should be at least 25 cm far from the wall. Never put
the machine on paper or foam, which may cause unstable condition.
Never put anything flammable beside this machine.
2. To avoid damage to the machine, don´t plug the power cord or turn
on the heating switch until water runs out from the tap of hot water.
3. In case hot (or cold) water is not needed for a long time, turn off
the switch accordingly to save power.

English-5
4. In case not to use this machine for a long time, turn off the
switches, then pull the plug out from socket and drain the remaining
water through draining outlet.
5. Never use organic liquid to clean the machine. Srictly prohibit
splashing water to the unit.
6. Never turn on (off) the machine by plugging the plug to (pulling
the plug out from) the socket. Never increase the length of the
power supply cord to avoid fire.
7. If the supply cord is damaged, it must be replaced by the
manufacturer, its serviceagent or similarly qualified persons in order
to avoid a hazard.
8. Never turn machine upside down or tilt it more than 45°.
9. When the machine is under the ice point and blocked by ice,
the cooling switch must be closed for 4 hours before turning if on
again to continue its operation.
10. This machine should not be turned on until 3 minutes later after
turning off the power switch.

TROUBLE SHOOTING
English-6
Please check the followings before having the machine repaired.
PROBLEMS
No hot or cold
water
No water runnings
outfrom taps
Leakage from
bottle supporter
Noisy operation
1- Over consumption of
hot or cold water in
short time.
2- No power supply.
1- Empty bottle.
2- Inlet of bottle
supporter blocked by
bottle seal.
Broken bottle.
Not placid installation.
Replace it with a new bottle.
1- Just wait a moment, then
hot or cold water is available
again.
2- Connect plug to socket,
turn on heating or cooling
switch.
1- Replace it with another
one.
2- Clean out wasted paper &
bottle seal install bottle again.
Place the machine on placid
& solid surface.
POSSIBLES CAUSES ELIMINATION

CLEANING
English-7
To avoid accident, cut off the power supply before operation according to the following
instruction:
1. The machine had been disinfected before departed from factory. Cleaning the
dispenser prior to installing a full bottle of water for the firs time.
2. Cleaning and draining instruction:
-1. Before cleaning, make sure the power switch in the O (off) position and unplug the
water dispenser.
-2. Vertically insert the bottle into the supporter on top of the machine.
-3. Open the taps, let about 1 liter water flows into a container.
-4. Removed the water bottle from the dispenser.
-5. Place a large bucket beneath the drain outlet. Removed the drain cover an allow
water to drain.
-6. After draining, replace the drain cover and you can use the machine.
Attention: The dispenser heats water to a temperature of approximately 85°C. It
can cause severe scalded. Please operation it carefully.
3. Sanitizing:
The machine should be disinfected with the disinfectant separately bought from
drugstore or marketplace according to the instruction manual of the disinfectant and then
clean it with water (see cleaning and draining instruction). Generally this should be done
every three months.
4. To remove mineral deposits:
Mix 4 liters water with 200g citric acid crystals inject into the machine and make sure the
water can flow out of the hot water tap.Switch on the power and heat it about 10
minutes, 30 minutes later, drain off the liquor and clean it with water for two or tree times.
Generally this should be done every six months.
Never disassemble this machine by yourself to avoid danger from damaged machine.

MACHINE INSTALLATION
English-8
1-2. Loosen the screw of the left or right bottom angle just as
the picture shown.
3. Use the screw to fix the bracket on the left or right bottom
angle of the water dispenser.
4. Make a hole on the floor´s or the desk´s surface where the
water dispenser will be installed.
5. Fix the bracket on the floor by screw tightly.
6. Tighten the screw.
Warning: To avoid a hazard due to stability of the appliance, it must be fixed in
accordance with the instructions.

Impreso en China Printed in China
HPG-19122016
© 2021 Sunbeam Products, Inc. Todos los derechos reservados. El logotipo Oster™ es una marca comercial de
Sunbeam Products, Inc. utilizada bajo licencia. Fabricado, distribuido o vendido por Household Solutions, S.A.,
licenciatario oficial de este producto. Garantía limitada de un año.
Hecho en China.
© 2021 Sunbeam Products, Inc. All rights reserved. The Oster™ logo is a trademark of Sunbeam Products, Inc.
used under license. Manufactured, distributed or sold by Household Solutions, S.A., official licensee for this
product. One-year limited warranty.
Made in China.
Table of contents
Languages:
Other Oster Water Dispenser manuals
Popular Water Dispenser manuals by other brands

GE
GE SmartWater GXCF05D owner's manual

DS Services of America
DS Services of America Pure Water Dispenser 300m Series Quick setup guide

Elkay
Elkay LVRC8-BAC Series Installation, care & use manual

Watts
Watts PWS15 Series Installation, operation and maintenance manual

Follett
Follett 50Hz Specifications

vitapur
vitapur Classic VWD5276W Use & care guide

Everpure
Everpure EV9613-46S-104 Specifications

Intewa
Intewa AQUALOOP Installation and operating instructions

Fetco
Fetco HWB-2102 series user guide

Elkay
Elkay EZ Series Installation, care & use manual

Watex
Watex WATEX CMS-8 Installation and operation manual

Elkay
Elkay EZO Series Installation, care & use manual