oticon miniRITE R User manual
Instructions for use SmartCharger
miniRITE R
miniBTE R
Oticon Real™
Oticon More™
Oticon Zircon
Oticon Play PX
Oticon CROS PX

Introduction to this booklet
This booklet guides you on how to use and maintain your new charger.
Ensure you read this booklet carefully, including the Warnings section.
This will help you get the most benefit from your charger.
If you have additional questions about the use of your charger, contact
your hearing care professional.
For your convenience, this booklet contains a navigation bar to help
you navigate through the different sections.
About Getting started Daily use Warnings More info

Intended use
Intended use The charger is intended to recharge the hearing aids and
CROS transmitter that contain rechargeable batteries.
The product is intended to be used together with the given
hearing solution.
Indications for
use
There are no indications for use (diagnoses) for the charger
itself.
Intended user Person with hearing loss using a hearing aid and their
caregivers. Hearing care professional responsible for
adjusting the accessory.
Intended user
group
Adults and children older than 36months.
Use environment Indoor and outdoor.
Contraindications No contraindications.
Clinical benefits See clinical benefits of the hearing aid.
IMPORTANT NOTICE
For details on the functionality of your specific hearing aid solution, refer to
your hearing aid’s instructions for use.

Table of contents
About
Package contents 6
Charger 8
Temperature conditions 9
Getting started
Prepare charger 10
Charge the hearing aids 12
Daily use
Charging time 14
Charging the charger 16
Power bank function 18
Power and charge using other sources 19
Drying your hearing aids 20
Caring for your charger 21

Warnings
General warnings 22
More info
Troubleshooting 26
Conditions of use 30
Australia only 37
Warranty 38

Instructions for use SmartCharger
miniRITE R
miniBTE R
Oticon Real™
Oticon More™
Oticon Zircon
Oticon Play PX
Oticon CROS PX
6About Getting started Daily use Warnings More info
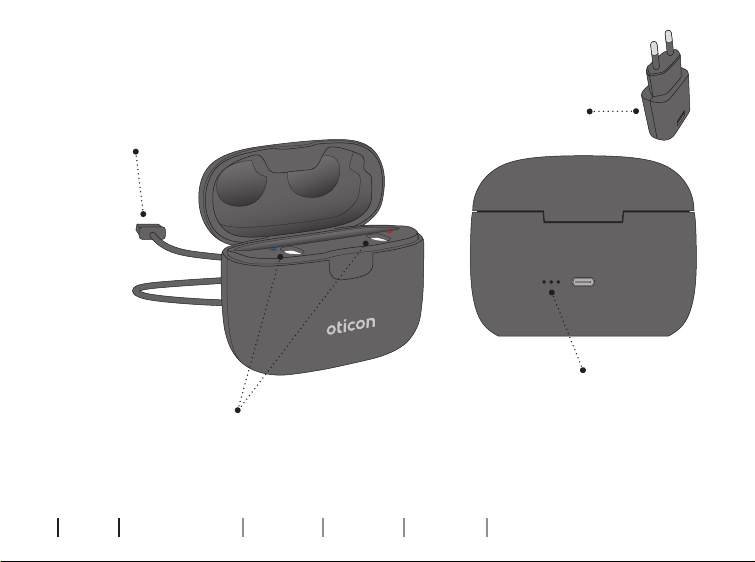
Package contents
The packaging box contains the following elements:
This booklet
Power plug
(varies from
country to country)
Charger
Cable
About

8About Getting started Daily use Warnings More info
Charger
What it is and does
Charging ports
For hearing aids when charging
Battery indicator
Displays charging status
of the power bank/power
bank battery levels
Power plug
For power point
USB cable
Insert in power plug

9
IMPORTANT NOTICE
Do not expose the charger to temperatures below -20°C(-4°F) or above
+60°C(140°F).
Temperature conditions
Temperature Charging condition
Below +5°C
(+41°F)
No charging due to low temperature.
+10°C to +35°C
(+50°F to +95°F)
Best charging condition. The charging of hearing aids can
take up to 3.5hours.
+5°C to +10°C and
+35°C to +38°C
(+41°F to 50°F and
+95°F to +100°F)
Extended charging. The charging of hearing aids can take up
to 5 hours.
Above +38°C
(+100°F)
No charging due to high temperature.

Step 1 Step 2 Step 3
10 About Getting started Daily use Warnings More info
Prepare charger
Insert the USB plug
into the power plug.
Insert the other end of
the USB cable into the
back of the charger.
Insert the power plug
into a power point.
The charger turns
ON automatically and
begins charging the
built-in power bank
battery.
Connect to power source
Getting started
11
When the charger is connected to
power, the charger’s power bank
charging status is shown.
First use - Charge the power bank’s
battery
When you use your charger for the
first time, it is important that you fully
charge the charger’s built-in battery.
Charger is turned ON
12 About Getting started Daily use Warnings More info
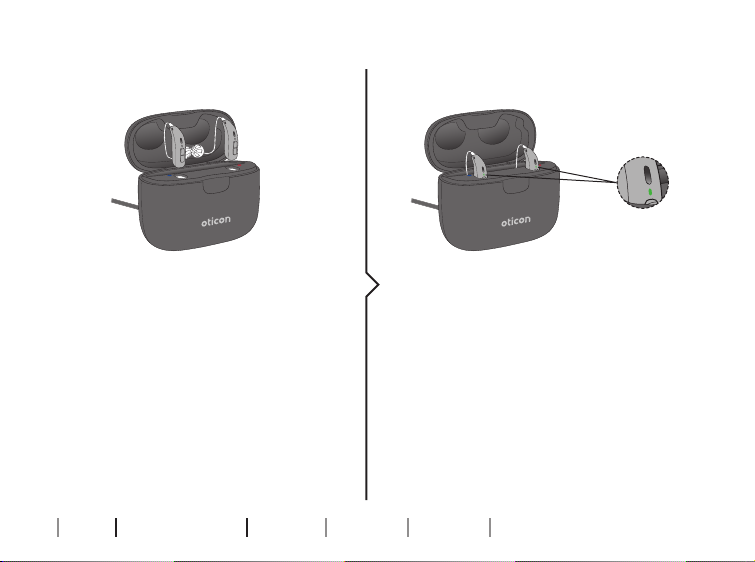
Charge the hearing aids
Place the hearing aids in the
charging ports as shown in the
picture and close the lid. Make
sure that your hearing aids match
the right and left colour indicators
on the charger’s charging ports.
The RED indicator is for the right
side hearing aid. The BLUE indicator
is for the left side hearing aid.
The hearing aid LED lights turn ON
when the hearing aids are correctly
placed in the charger.
Hearing aid LED light charging
status:
ORANGE = Charging
GREEN = Fully charged
Place hearing aids in charger Charging status


14 About Getting started Daily use Warnings More info
Charging time
Ensure you fully charge your hearing aids before first use and charge
them every night. That ensures that you start your day with fully
charged hearing aids.
If your hearing aid’s battery is completely drained, the normal charging
time is:
miniRITE R Fully charged 50% charged 25% charged
3 hours 1 hour 0.5 hours
miniBTE R Fully charged 40% charged 20% charged
3.5 hours 1 hour 0.5 hours
When the battery in your hearing aids is fully charged, the charging
process stops automatically.
Charging time may vary depending on the remaining capacity of the
battery and between the left/right-hand side hearing aid.
Daily use

15
The charger’s lid serves as protection and storage for your hearing aids.
During charging, when you open the lid, the LEDs in your hearing aids
light up to indicate their charging status.
Note
If you have not used your hearing aid in a long time and you then try to recharge it, it may take up to 30seconds
before the hearing aid begins charging. For more information, see your hearing aid’s instructions for use.
IMPORTANT NOTICE
Ensure that your charger is powered or that the charger’s built-in battery is
charged when the hearing aid or transmitter is seated in the charging port.
Otherwise your hearing aids or transmitter will remain turned ON and continue
using battery power.
16 About Getting started Daily use Warnings More info
Charging the charger
Your charger contains a built-in lithium-ion rechargeable battery that
doubles as a power bank. This lets you fully charge a pair of hearing aids
a minimum of three times on a fully-charged power bank while you are
on-the-go.
When the charger is plugged into a power source
• Your hearing aids and the charger’s built-in battery are being charged.
When the charger is unplugged from a power source
• The charger enters Power bank mode, letting you charge your hearing
aids when you do not have access to a power point.
Charging times
Power bank battery Power bank + hearing aids
Up to 4 hours depending on charge level Up to 8 hours depending on charge level
Note
It is recommended that you keep the lid closed at all times while you charge your hearing aids.
17
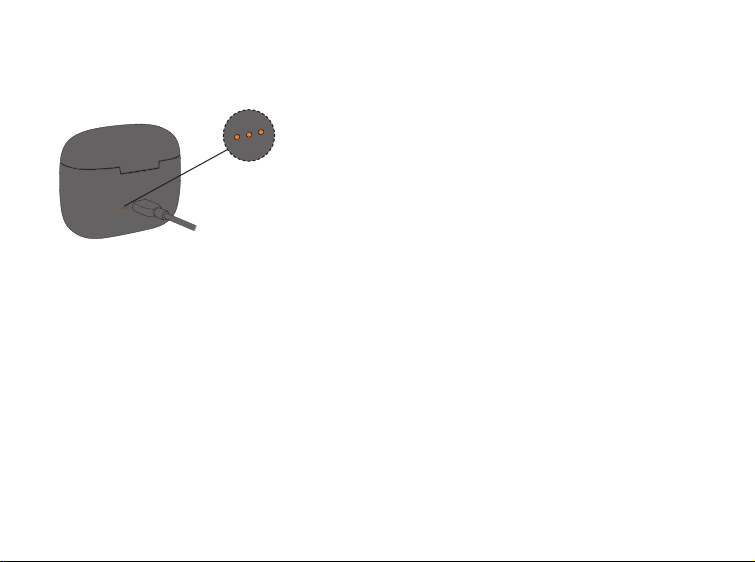
IMPORTANT NOTICE
When charging, the charging indicators on your charger should be lit as
described in this booklet. If the charging indicators are not lit as described,
disconnect the charger and consult your hearing care professional.
When the charger is connected to a power source, the LEDs on your
charger indicate the charging status of the power bank.
The LEDs turn OFF shortly after the power bank battery is fully charged.
Charging (Battery too low to recharge the hearing aids)
Charging
Fully charged
ORANGE blink ORANGE GREEN

18 About Getting started Daily use Warnings More info
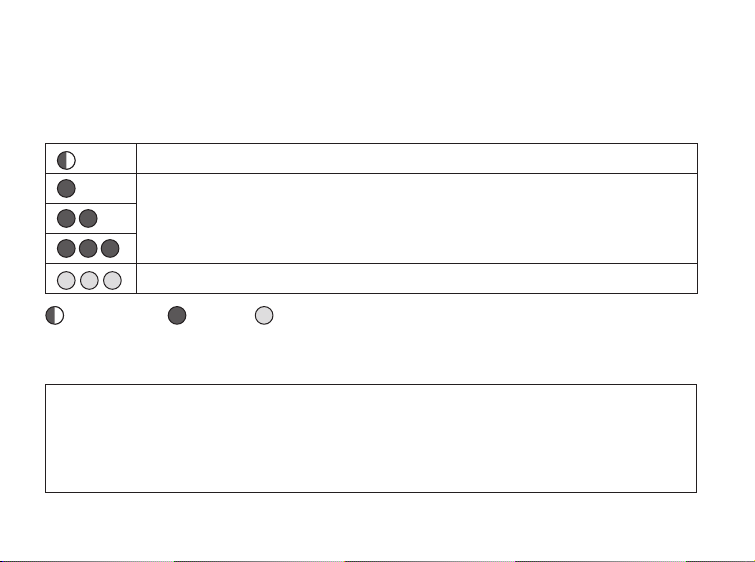
Power bank function
When the charger is disconnected from power, the LEDs on your charger
indicate the charger’s power bank battery level. You can check the
remaining battery level by opening the charger’s lid.
Three full charging cycles of two hearing aids
Two full charging cycles of two hearing aids
One full charging cycle of two hearing aids
Battery too low for a full charging cycle
ORANGE blink GREEN
Long-term storage
Before you put away or store the charger for a prolonged period of time
(more than 14days), ensure you first fully charge the charger’s power
bank battery. This way the battery can be charged again.
Note
To protect the rechargeable battery, it is necessary that you fully charge the charger’s power bank battery every
12 months, otherwise the rechargeable battery may need to be replaced.

19
Power and charge using other sources
You can power and charge the charger’s battery from other sources than
a power socket. This can be done by using the charger’s USB cable.
Ensure that the power source is USB 2.0 compliant, with a minimum of
500mA output.
Examples of power sources:
• Computer
• Car
IMPORTANT NOTICE
When using a power point, use the supplied original power supply (5.0V/1A)
for the charger.

20 About Getting started Daily use Warnings More info
Drying your hearing aids
Your charger uses heat from inductive charging to dry your hearing aids
when you place them in the charger ports.
The drying of your hearing aids is activated when you place the hearing
aids in the charger ports and charging begins.
IMPORTANT NOTICE
Ensure you remove the USB cable when you transport the charger.
Other manuals for miniRITE R
5
This manual suits for next models
6
Table of contents
Other oticon Batteries Charger manuals


Popular Batteries Charger manuals by other brands

Fresh 'N Rebel
Fresh 'N Rebel NOTEBOOK CHARGER 65Watt manual

Stiga
Stiga BT 20 Li 2.0 S Operator's manual

ROBBE
ROBBE Profi-Home-Charger 8194 operating instructions

VOLTCRAFT
VOLTCRAFT CQCP-2400 operating instructions

Hama
Hama Dual charging station operating instructions

Digimaksas
Digimaksas BC-450 instruction manual


