Outbound 076-5560-6 User manual

P-S-004749
P-S-004749/14x21cm/11812/11813/11816-18/18N-OEM-567/JS-YF-2017-B-00958
GUIDE D’UTILISATION
INSTRUCTION MANUAL
076-5560-6
TWIN AIRBED / MATELAS PNEUMATIQUE À UNE PLACE
076-5561-4
DOUBLE AIRBED / MATELAS PNEUMATIQUE À DEUX PLACES
076-5562-2
QUEEN AIRBED / GRAND MATELAS PNEUMATIQUE À DEUX PLACES
TM
MC

P-S-004749/14x21cm/11812/11813/11816-18/18N-OEM-567/JS-YF-2017-B-00958/英
INSTRUCTIONS TO INFLATE
AIRBED
PREPARATION:
Please read instructions carefully before using this airbed.
INFLATION:
DEFLATION:
1. First ensure the valve is fully secured on the
inlet at the end of the mattress (FIG. 1).
2. Locate the built-in manual pump and remove
the plastic screw cap and white rubber plug
from the suction port. You can use either your
hands using a "CPR method" (FIG. 2a) or your
foot (FIG. 2b) to inflate the mattress.
3. Depress the pump area to inflate the bed. Be
sure to depress the pump straight down. You
should completely cover the suction port while
depressing the pump, this will keep the air
from escaping the inflation chamber back
through the suction port.
4. Lift your hand/foot completely off of the hole in
order to have the suction port refill the
chamber. Continue until the bed reaches a
firm but not over-inflated pressure.
5. Insert the white rubber plug back into the
suction port and screw on the plastic cover.
The airbed is ready for use.
• Open the valve to deflate (FIG. 4).
Using air pump (sold separately)
Using the built-in manual pump:
Approximate inflation time using
built-in pump is 5 to 7 minutes.
Unroll the bed onto a flat area free from objects and debris.
The flocked side should be facing up and the smooth PVC side should be on the ground.
2
P-S-004749
NOTE:
FIG. 1
FIG. 2a FIG. 2b
FIG. 3
FIG. 4
•
Open the valve at the end of the mattress; inflate
the bed with an air pump and close the valve
once inflated (FIG. 3).
Note: Air pump is not included.
After use airbed may require additional air
to increase firmness, add air according to
your desired firmness.
NOTE:
• It is normal that air beds will stretch and decrease
in air pressure after the first several uses. Your air
bed is not leaking. Simply add air to your desired
firmness and the air pressure will stabilize over
several uses.
• Manufacturer’s Defects: Cuts, tears and punctures
are not considered a manufacturer defect and are
not covered under warranty.
• Refund Policy: For sanitary and hygienic reasons,
this product must be returned in its unopened
original packaging by the original purchaser, with
proof of purchase for a full refund.

P-S-004749/14x21cm/11812/11813/11816-18/18N-OEM-567/JS-YF-2017-B-00958/英
1. If the airbed is dirty, use a clean, damp cloth and gently wipe down the surface. Be sure to dry the
airbed before storing.
Note: Do not use harsh detergents as they may damage the airbed.
2. Once deflated, carefully fold the airbed and store in a cool, dry location away from chemicals and
heavy or sharp objects.
If the airbed surface is damaged, use the provided repair patch.
To repair: 1. Completely deflate the airbed.
2. Clean and dry the damaged area.
3. Apply a repair patch and smooth out any air bubbles.
Note:
Never use other types of liquid glue or adhesive fabric, only use a repair patch like the provided one.
CLEANING AND STORAGE:
REPAIRING:
MADE IN CHINA
IMPORTED BY
TRILEAF DISTRIBUTION TRIFEUIL
TORONTO, CANADA M4S 2B8
WARNING!
RISK OF SUFFOCATION.
• NOT INTENDED FOR INFANTS UNDER THE AGE OF 4 YEARS OLD.
• INFANTS HAVE SUFFOCATED ON INFLATABLE MATTRESSES.
• INFANTS CAN SUFFOCATE IN SOFT BEDDING MATERIALS, SUCH AS PILLOWS OR
COMFORTERS.
• ALWAYS KEEP MATTRESS FULLY INFLATED WHEN IN USE.
• INFANTS CAN BECOME TRAPPED BETWEEN OBJECTS SUCH AS THE SLEEPING SURFACE,
THE BODY OF THE PARENT OR CAREGIVER, THE WALL AND OTHER OBJECTS.
• INFANTS SLEEPING ON AN ELEVATED SURFACE CAN FALL AND BE SERIOUSLY INJURED.
• NEVER LEAVE YOUNG CHILDREN UNATTENDED.
• USE ONLY UNDER COMPETENT SUPERVISION.
• KEEP AWAY FROM FIRE AND FLAME.
• DO NOT USE IN WATER.
• DO NOT USE A HIGH-PRESSURE PUMP SUCH AS AN AIR COMPRESSOR.
• DO NOT OVER-INFLATE.
• DO NOT PLACE ON STONES, STICKS OR ANY SHARP OBJECTS THAT MAY PUNCTURE THE
PRODUCT.
• AFTER USE, AIRBEDS MAY REQUIRE ADDITIONAL AIR TO INCREASE FIRMNESS. THIS DOES
NOT NECESSARILY INDICATE A LEAK OR DEFECT. ADD AIR TO DESIRED FIRMNESS.
INSTRUCTIONS TO INFLATE
AIRBED
3
P-S-004749
Heavy-duty repair patch included. DO NOT THROW OUT. Keep in a safe place.

REMARQUE :
INSTRUCTIONS POUR GONFLER LE
MATELAS PNEUMATIQUE
PRÉPARATION :
Lisez attentivement ces instructions avant d'utiliser ce matelas pneumatique.
GONFLAGE :
Déroulez le matelas sur une surface plane, libre d'objets et de détritus.
Le côté floqué doit être orienté vers le haut et le côté lisse en PVC doit reposer sur le sol.
P-S-004749/14x21cm/11812/11813/11816-18/18N-OEM-567/JS-YF-2017-B-00958/法
P-S-004749
4
FIG. 1
FIG. 3
FIG. 4
DÉGONFLAGE :
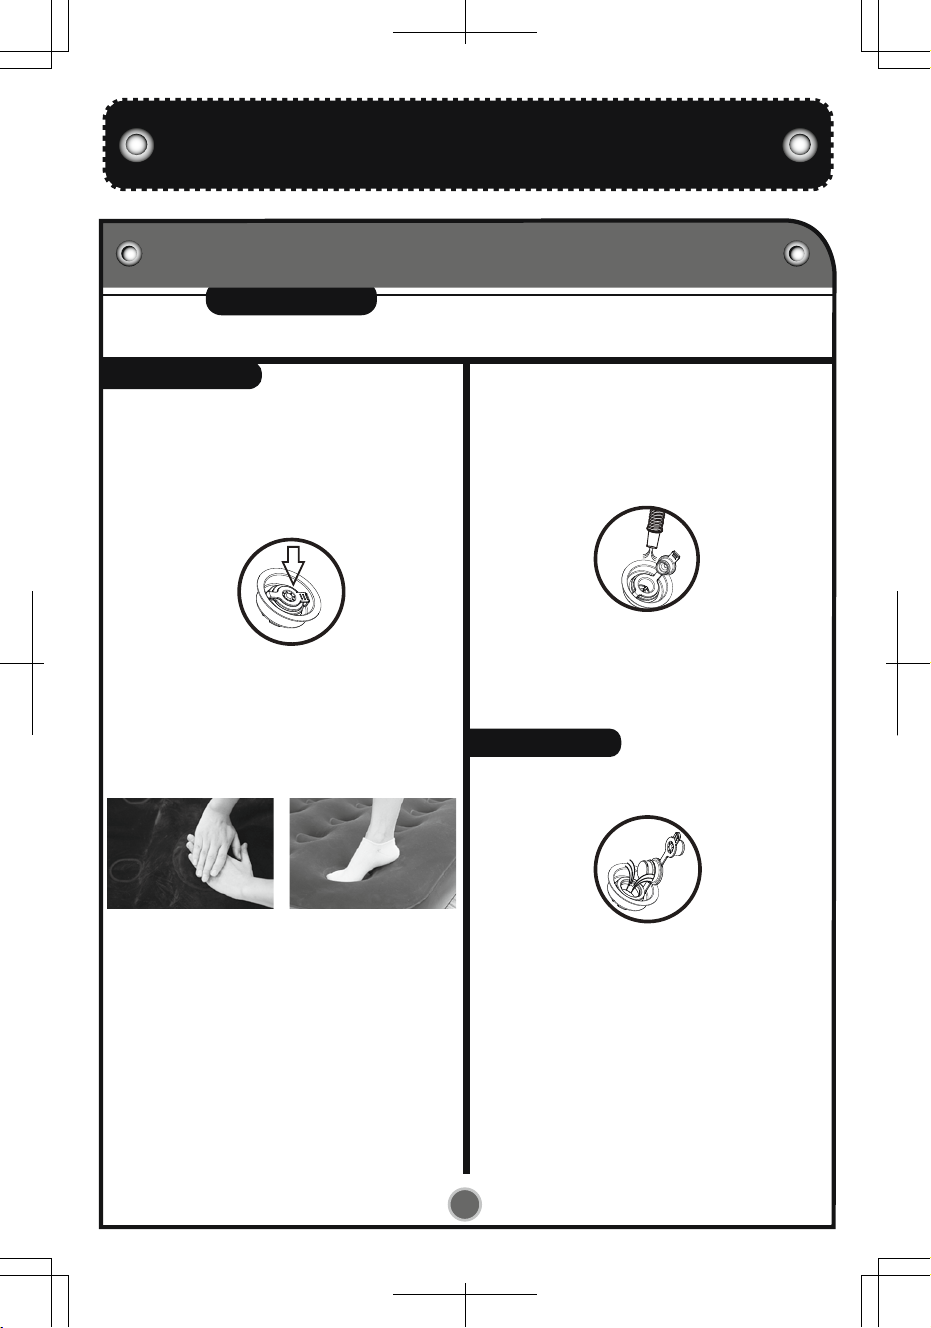
1. Assurez-vous d'abord que la vanne est bien fixée
sur l'entrée à l’extrémité du matelas (FIG. 1).
2. Trouvez la pompe à pied et ôtez le couvercle
en plastique et le bouchon blanc en
caoutchouc de l'orifice d'aspiration. Vous
pouvez utiliser vos mains en utilisant la
« méthode RCR » (FIG. 2a) ou votre pied
(FIG. 2b) pour gonfler le matelas.
3. Appuyez sur la zone de la pompe à pied pour
gonfler le matelas. Faites bien attention d’appuyer
verticalement sur la pompe. Votre main/pied doit
complètement couvrir l’orifice d’aspiration quand
vous appuyez sur la pompe à pied, cela
empêchera l’air de s’échapper par l’orifice
d’aspiration.
4. Soulevez complètement votre main/pied de
l’ouverture pour permettre à l’orifice d’aspiration de
remplir la chambre. Continuez jusqu’à ce que le
matelas devienne dur, mais ne le gonflez pas trop.
5. Remettez le bouchon blanc en caoutchouc dans
l’orifice d’aspiration et revissez le couvercle en
plastique. Le matelas pneumatique est prêt à
l’emploi.
• Ouvrez le couvercle intérieur de la vanne à vis
pour dégonfler. (FIG. 4)
Utilisation du gonfleur
(vendu séparément)
Utilisation de la pompe à pied incorporée
Le temps de gonflage approximatif en utilisant
la pompe à pied incorporée est de 5 à 7
minutes.
FIG. 2a FIG. 2b
• Ouvrez la vanne à l’extrémité du matelas. Gonflez
le matelas avec un gonfleur et refermez la
soupape quand il est gonflé (FIG. 3).
Remarque : Le gonfleur n'est pas inclus.
Après l’utilisation, le matelas pneumatique
pourrait avoir besoin d’un peu d’air pour
augmenter sa rigidité. Ajoutez de l’air selon
la rigidité que vous souhaitez.
REMARQUE :
• Il est normal que les matelas pneumatiques se détendent
et que la pression de l'air diminue après les premières
utilisations. Cela ne signifie pas qu'il y a une fuite d'air. Il
suffit d'ajouter de l'air jusqu'à obtenir la fermeté souhaitée
et cette pression se stabilisera au bout de plusieurs
utilisations.
• Défauts de fabrication : les coupures, les déchirures et les
crevaisons ne sont pas considérées comme un défaut de
fabrication et ne sont donc pas couvertes par la garantie.
• Politique de remboursement : pour des raisons sanitaires
et d'hygiène, ce produit doit être retourné dans son
emballage original non ouvert par l'acheteur d'origine,
avec une preuve d'achat afin d'obtenir un remboursement
intégral.

FABRIQUE EN CHINE
IMPORTÉ PAR
TRILEAF DISTRIBUTION TRIFEUIL
TORONTO, CANADA M4S 2B8
5
1. Si le matelas pneumatique est sale, utilisez un chiffon propre et frottez délicatement la surface.
Faites bien attention que le matelas pneumatique soit sec avant de le ranger.
Remarque : N’utilisez pas de détergents forts qui pourraient endommager le matelas
pneumatique.
2. Une fois dégonflé, pliez soigneusement le matelas pneumatique et rangez-le dans un endroit
frais et sec, loin de produits chimiques et d’objets lourds ou pointus.
Pièce de réparation robuste incluse. NE PAS JETER. Garder dans un endroit sûr.
Si le matelas pneumatique est endommagé, veuillez utiliser la pièce de réparation incluse.
Pour réparer : 1. Dégonflez complètement le matelas pneumatique.
2. Nettoyez et séchez la zone endommagée.
3. Appliquez une pièce de réparation et éliminez toutes les bulles.
Remarque : N’utilisez jamais d’autres rubans adhésifs ni de la colle liquide. Utilisez uniquement les
pièces de réparation fournies.
NETTOYAGE ET RANGEMENT :
RÉPARATION :
AVERTISSEMENT!
RISQUE DE SUFFOCATION.
• NON CONÇU POUR LES JEUNES ENFANTS DE MOINS DE 4 ANS.
• IL EST DÉJÀ ARRIVÉ QUE DES ENFANTS SUFFOQUENT SUR DES MATELAS GONFLABLES.
• LES ENFANTS PEUVENT SUFFOQUER DANS LES ARTICLES DE LITERIE MOUS, COMME UN
OREILLER OU UN ÉDREDON.
• LE MATELAS DOIT TOUJOURS ÊTRE COMPLÈTEMENT GONFLÉ PENDANT SON UTILISATION.
• LES ENFANTS PEUVENT RESTER COINCÉS ENTRE CERTAINS OBJETS, COMME LA SURFACE
DE SOMMEIL, LE CORPS D'UN ADULTE, LE MUR ET D’AUTRES OBJETS.
• LES ENFANTS QUI DORMENT SUR UNE SURFACE ÉLEVÉE RISQUENT DE CHUTER ET DE SE
BLESSER GRAVEMENT.
• NE LAISSEZ JAMAIS LES JEUNES ENFANTS SANS SURVEILLANCE.
• ASSUREZ TOUJOURS UNE SUPERVISION COMPÉTENTE LORS DE L’UTILISATION DE CET
ARTICLE.
• TENEZ CET ARTICLE À L’ÉCART DU FEU ET DES FLAMMES.
• N’UTILISEZ PAS CE PRODUIT DANS L’EAU.
• N’UTILISEZ JAMAIS UNE POMPE À HAUTE PRESSION COMME UN COMPRESSEUR D’AIR.
• NE SURGONFLEZ PAS LE PRODUIT.
• NE POSEZ PAS L’ARTICLE SUR DES PIERRES, DES BÂTONS OU TOUT AUTRE OBJET POINTU
POUVANT ENTRAÎNER UNE CREVAISON.
• À LA SUITE DE LEUR UTILISATION, IL FAUDRA PEUT-ÊTRE GONFLER LÉGÈREMENT LES
MATELAS GONFLABLES DE NOUVEAU AFIN DE LES RENDRE PLUS FERMES. CELA NE
SIGNIFIE PAS NÉCESSAIREMENT QUE LE MATELAS EST DÉFECTUEUX OU QU’UNE FUITE EST
PRÉSENTE. POMPEZ DE L’AIR JUSQU'À ATTEINDRE LA FERMETÉ SOUHAITÉE.
INSTRUCTIONS POUR GONFLER LE
MATELAS PNEUMATIQUE
P-S-004749/14x21cm/11812/11813/11816-18/18N-OEM-567/JS-YF-2017-B-00958/法
P-S-004749

P-S-004749
P-S-004749/14x21cm/11812/11813/11816-18/18N-OEM-567/JS-YF-2017-B-00958
TM
MC
This manual suits for next models
2
Table of contents
Languages:
Other Outbound Indoor Furnishing manuals
Popular Indoor Furnishing manuals by other brands

Wenger
Wenger Diva owner's manual

SMITH SYSTEM
SMITH SYSTEM Acrobat 26550 Assembly instructions

J.Burrows
J.Burrows STILFORD 2M RECEPTION COUNTER 3CN Assembly instructions

Furniture of America
Furniture of America Rianna FOA-BT8343 Assembly instructions

Tech Craft
Tech Craft MD73 Assembly instructions

Office Star
Office Star Space Seating 13-37N1P3 operating instructions