Outlaw Audio
2
Please Read First
CAUTION: To reduce the risk of electric shock, do not remove the cover.
WARNING:
appliance to rain or moisture.
WARNING: Important Safeguards
Servicing Do not attempt to service the unit yourself as opening or
removing covers may expose you to dangerous voltage or other hazards.
Refer all servicing to Transformative Engineering.
Damage Requiring Service Unplug the unit from the wall outlet
conditions:
»When the power-supply cord or plug is damaged,
»If liquid has been spilled, or objects have fallen into the unit,
»If the unit has been exposed to rain or water,
»If the unit does not operate normally by following the operating in-
structions. Adjust only those controls that are covered by the operating
instructions as an improper adjustment of other controls may result in
to restore the unit to its normal operation,
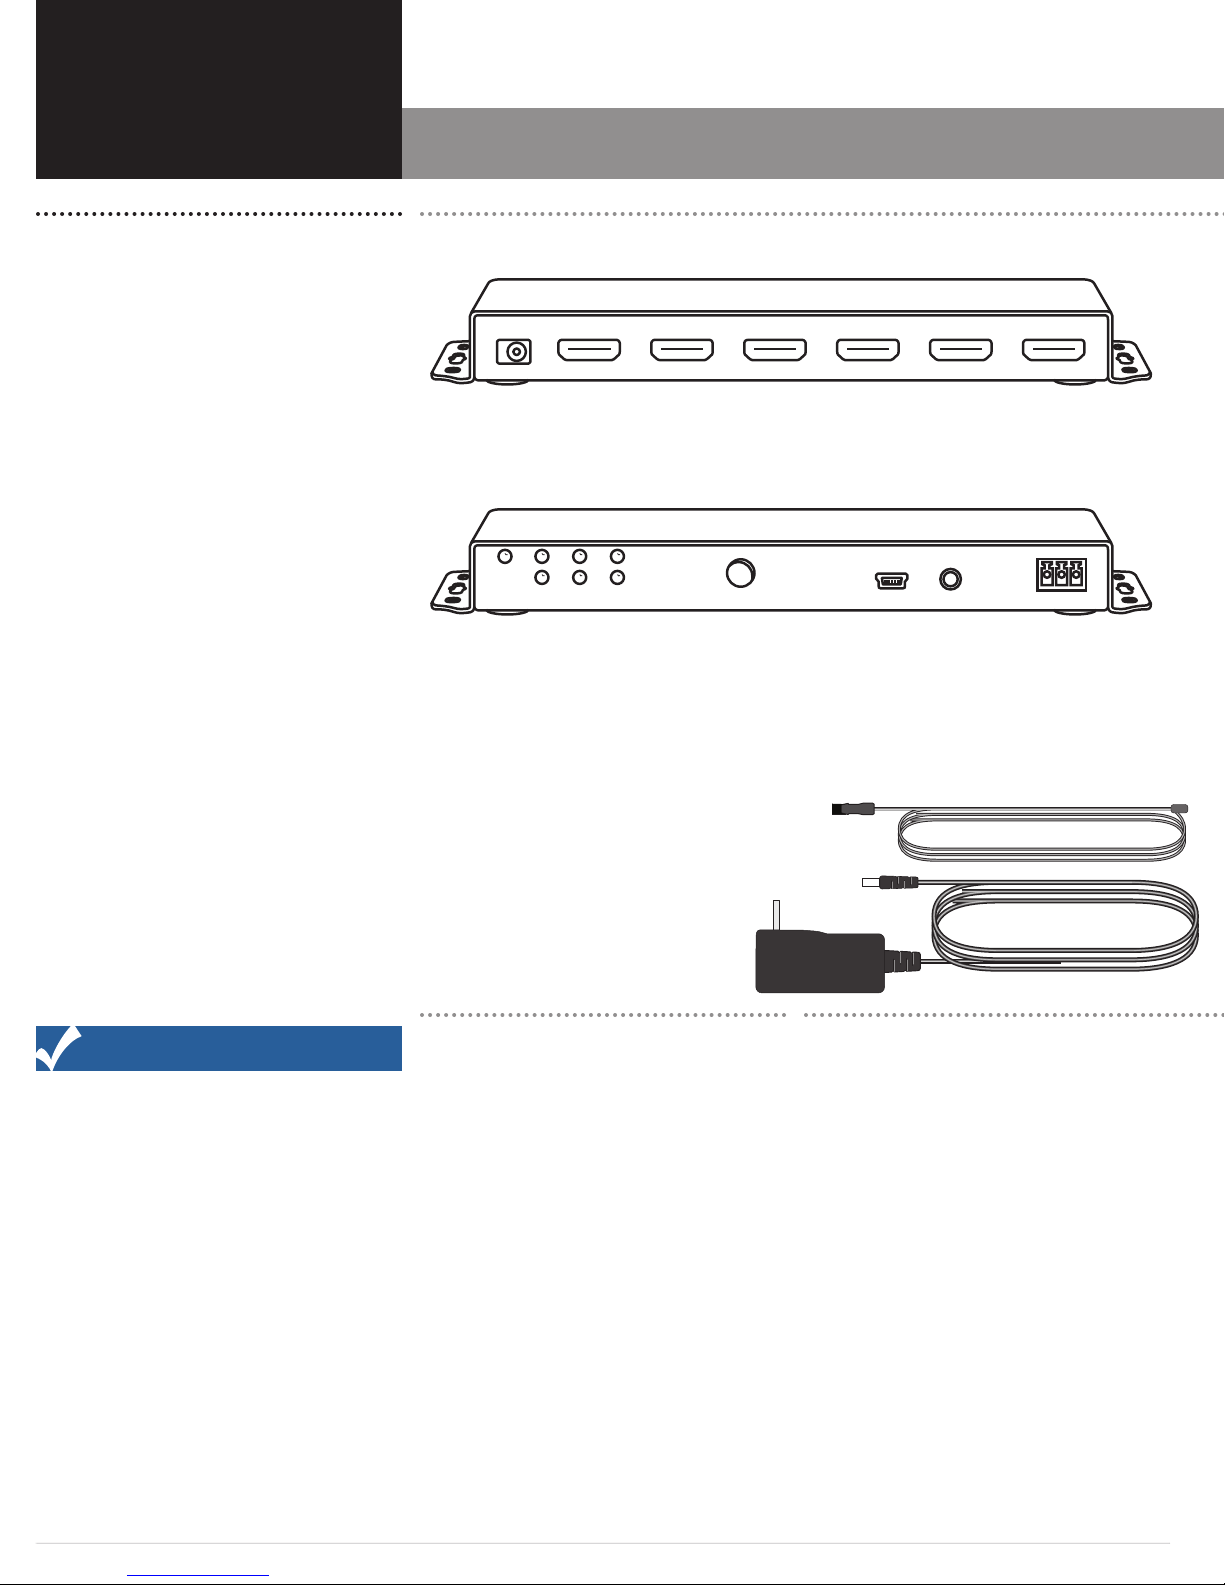
»If the HDS-42AVR has been dropped or damaged in any way, the unit
»When the unit exhibits a distinct change in performance–this indicates
a need for service.
Wall or Ceiling Mounting The unit should be mounted to a wall or
ceiling only as recommended by the manufacturer.
Heat The unit should be situated away from heat sources such as
produce heat.
IMPORTANT SAFETY NOTE Before connecting a new component
such as the HDS-42AVR to your audio or home theater system it is always
unplugged from their AC power source. Many modern electronics products feature
automatic turn-on circuits that may be activated during an installation, causing
the potential for damage to electronic components and/or speakers. Such damage
Read InstructionsAll the safety and operating instructions should be
read before the unit is operated.
Retain InstructionsThe safety and operating instructions should be
retained for future reference.
Heed Warnings All warnings on the unit and in the operating instruc-
tions should be adhered to.
Follow InstructionsAll operating and use instructions should be
followed.
Cleaning Unplug the unit from the wall outlet before cleaning. The unit
should be cleaned only as recommended by the manufacturer.
Attachments Do not use attachments not recommended by the unit
manufacturer as they may cause hazards.
Water and Moisture Do not use the unit near water–for example, near
a bath tub, wash bowl, kitchen sink, or laundry tub; in a wet basement; or
near a swimming pool.
Accessories Do not place the unit on an unstable cart, stand, tripod,
bracket, or table. The unit may fall, causing serious injury to a child or adult,
and serious damage to the unit. Any mounting of the unit should follow
the manufacturer’s instructions, and should use a mounting accessory
recommended by the manufacturer.
Power Sources The unit should be operated only from the type of
power source indicated on the marking label. If you are not sure of the type
of power supplied to your home, consult your unit dealer or local power
company.
Grounding or Polarization The unit may be equipped with a
polarized alternating current line plug (a plug having one blade wider
is a safety feature. If you are unable to insert the plug fully into the outlet,
electrician to replace your obsolete outlet. Do not defeat the safety purpose
of the polarized plug.
Power-Cord Protection Power-supply cords should be routed so that
they are not likely to be walked on or pinched by items placed upon or
against them, paying particular attention to cords where they enter a plug,
or a convenience receptacle, and the point where they exit from the unit.
Lightning For added protection for the unit during a lightning storm, or
when it is left unattended and unused for long periods of time, unplug it
from the wall outlet and disconnect the antenna or cable system. This will
prevent damage to the unit due to lightning and power-line surges.
Power Lines An outside antenna system should not be located in the
vicinity of overhead power lines or other electric light or power circuits, or
where it can fall into such power lines or circuits. When installing an out-
side antenna system, extreme care should be taken to keep from touching
such power lines or circuits as contact with them might be fatal.
Overloading Do not overload wall outlets, extension cords, or integral
Object and Liquid Entry Never push objects of any kind into the unit
through openings as they may touch dangerous voltage points or short-out
kind on the unit.
is not covered by product warranties; both Outlaw Audio and Transformative
Engineering specically disclaim responsibility for any such damage.
Verify The Line Voltage
lines. Connecting the unit to a line voltage other than that for which it is
or about the line voltage in your area, contact Transformative before plugging
the unit into a wall outlet.
It is always a good idea to avoid using any audio or video equipment on
the same AC circuit as equipment with motors, such as air conditioners or
refrigerators. This will lessen the possibility of power variation and electrical
Power Cord
designed to be used with this product. DO NOT use any other power cord, as
that may reduce the unit’s performance and possibly create a safety hazard.
Should the power cord require replacement, use an identical type or cont-
act Transformative Engineering for service.
Handle the AC Power Cord Gently
When disconnecting the power cord from an AC outlet, always pull the plug,
never pull the cord. If you do not intend to use the HDS-42AVR for any consider
able length of time, disconnect the plug from the AC outlet. If the power cord is
replaced, make certain that it is of similar gauge. As with all electrical devices,
do not run power cords under rugs or carpets or place heavy objects on them.
Damaged power cords should be replaced immediately with cords meeting
Wiring
Cables that are run inside of walls should have the appropriate markings to in
dicate compliance with, and listing by the UL , CSA or other standards required
by the UL, CSA, NEC or your local building code. Questions about cables inside
cian or low-voltage contractor.
Installation Location
To assure proper operation and to avoid the potential for safety hazards, place
placing the unit on a shelf, be certain that the shelf and any mounting hardware
can support the weight of the unit and any additional items in the equipment
rack, or on the shelf.
DO NOT place CDs, DVDs, videotapes, owner’s manuals, or other paper on top of,
or beneath, the unit, or in-between multiple ampliers in a stack. This will block
Do not place the unit directly on a carpeted surface, as this will
Avoid installation in humid locations, in extremely hot or cold locations, or in
areas that are exposed to direct sunlight or space heating equipment.
Do Not Open The Enclosure
There are no user serviceable components inside this product. Opening the
void your guarantee. If water or any metal object, such as a paper clip, coin or a
staple, accidentally falls inside the unit, disconnect it from the AC power source
immediately, and contact Transformative Engineering for further instructions.
Recording Copyright
Recording of copyrighted material for other than personal use is illegal without
permission of the copyright holder.
Your new HDS-42AVR has been factory congured for 120-240 volt AC
The removal power cord that is shipped with the HDS-42AVR is specically
airow, causing heat build-up, degraded performance, and may create a poss-
ble re hazard.
intended can create a safety and re hazard, and may damage the HDS-42. If