Outlaw PB User manual

OPERATION MANUAL
OUTLAW PB – BATTERY DRY VACUUM
IMPORTANT SAFETY INSTRUCTIONS
WARNING: Failure to observe these instructions can cause
personal injury to machine, operator, or bystanders.
WARNING: Shock or electrocution hazard.
ALWAYS disconnect batteries before
performing any maintenance or service.
WARNING: Shock or electrocution hazard.
NEVER connect this machine to any
batteries other than genuine NSS batteries.
WARNING: Burn/Fire hazard.
ALWAYS handle batteries with care.
WARNING: Fire or explosion hazard.
NEVER use to pick up flammable or
combustible liquids, or any thing that is
burning or smoking, such as cigarettes,
matches or hot ashes.
NEVER operate this machine in an
explosive atmosphere (grain dust,
flammable liquids or fumes, etc.)
WARNING: This product contains a chemical known to the state of California to cause
cancer and birth defects or other reproductive harm.
INTENDED USE
NSS vacuum cleaners are intended for commercial
use, vacuuming floors, furniture, and draperies in an
indoor environment. This machine is intended for
Dry pickup only. NSS does not recommend using
these machines for any other purpose.
FOR SAFETY
•ALWAYS read and understand all instructions before
operating or servicing machine.
•ALWAYS use this machine ONLY as described in this
manual.
•ALWAYS remove all jewelry when handling the
batteries.
•NEVER attempt to operate this machine unless you
have been trained in its operation.
•NEVER allow an untrained person to operate this
machine.
•NEVER attempt to operate this machine if it is not
working properly or has been damaged in any manner.
•NEVER disconnect or modify any switches or safety
devices.
•NEVER drop or insert any object into any machine
opening.
•NEVER operate this machine with any air opening
blocked. Keep all air openings free of dust, lint, hair,
etc.
•NEVER pull or carry the charger by its electrical
supply cord(s), use the cord(s) as a handle, close a
door on the cord(s), pull the cord(s) around sharp
edges or corners, expose to heated surfaces, run
machines over cord(s), or set heavy or sharp objects
on the cord(s).
•NEVER allow this machine to be used as a toy. Close
attention is necessary when used near children.
•ALWAYS keep face, fingers, hair or any other body part
or loose clothing away from any machine opening or
moving part.
•NEVER use this machine on wet surfaces or for wet
pickup.
•ALWAYS use extreme care when cleaning on stairs or
when machine is placed on stairs.
•NEVER operate machine without all filters in place.
•NEVER use any attachments other than the
manufacturers recommended attachments.
•NEVER spray this machine with water or any liquids.
•NEVER operate the machine outdoors.
•NEVER expose the machine to rain, snow, or extreme
temperatures.
•ALWAYS store this machine indoors in a dry, cool area.
BATTERY CHARGING
•NEVER charge batteries with any charger other than the
approved NSS charger for the Outlaw PB.
•NEVER use the NSS charger to charge batteries other
than genuine NSS batteries for the Outlaw PB.
•NEVER block the ventilation fan on the charger.
•ALWAYS keep flammable materials away from the
charger.
•NEVER disassemble or modify the charger in any way.
•NEVER touch the un-insulated portion of the output
connector or un-insulated battery terminal.
•NEVER operate charger if the AC supply cord is damaged
or if the charger has received a sharp blow, been
dropped, or otherwise damaged in any way.
SAVE THESE INSTRUCTIONS
ALL REPAIR SERVICE MUST BE PERFORMED BY AN NSS AUTHORIZED DISTRIBUTOR /
SERVICE STATION USING ONLY NSS ORIGINAL EQUIPMENT PARTS.

IMPORTANT SAFETY INSTRUCTIONS
GROUNDING OF ELECTRICAL EQUIPMENT-BATTERY CHARGER
WARNING: Improper connection of the equipment–grounding
conductor can result in a risk of electric shock. Check with a qualified
electrician or service person if you are in doubt as to whether the outlet is
properly grounded. Do not modify the plug provided with the charger. If
outlet is not suitable for safe use; have a properly grounded outlet
installed by a qualified electrician.
Always use a properly grounded 3-wire extension cord, which has
male and female plugs.
GROUNDING INSTRUCTIONS
This charger shall be grounded while in use to protect the operator from electric shock. The charger is
provided with a three-conductor cord and a three-contact grounding type attachment plug. The plug must be
plugged into an appropriate outlet that is properly installed and grounded in accordance with all local codes
and ordinances. The green conductor in the cord is the ground wire. Never connect this wire to other than
the grounding pin of the attachment plug.
Check nameplate on the charger to be sure voltage and cycle stated is the same as the electrical outlet. For
input voltages in the 90-132 VAC range, make sure the switch on the back of the charger is in the 110V
position. For input voltages in the 180-265 VAC range (single phase only), make sure the switch on the back
of the charger is in the 220V position. If the cord provided with the charger has an attachment plug as shown
in Figure A. below, it is intended for use on a nominal 120-volt circuit. If a properly grounded receptacle as
shown in Figure A is not available, an adapter may be installed as shown in Figure B if the outlet box that
houses the receptacle is grounded. Be sure to fasten the grounding tab (the green colored rigid ear, lug or
the like extending from the adapter) with a metal faceplate screw.
If the battery charger is intended to be operated on 180-265 VAC service, an appropriate cord with EMI
Suppressor NSS #6991271 (as supplied on the 90-132 VAC cord included with machine) must be used.
ALL REPAIR SERVICE MUST BE PERFORMED BY AN NSS AUTHORIZED DISTRIBUTOR/
SERVICE STATION USING ONLY NSS ORIGINAL EQUIPMENT PARTS.
SAVE THESE INSTRUCTIONS
NOTE: In Canada, the use of a temporary adaptor may not be permitted by Canadian electrical code.
NOISE
GENERAL INFORMATION
•Now that the machine is unpacked remember to
recycle all packing materials.
•Inspect the machine for damage or missing
components. If damage is found, contact the local
freight company to file a freight claim.
•!WARNING! HANDLE THE BATTERIES WITH
CARE. DAMAGE RESULTING FROM
DROPPING BATTERIES MAY CAUSE AN
UNSAFE CONDITION.
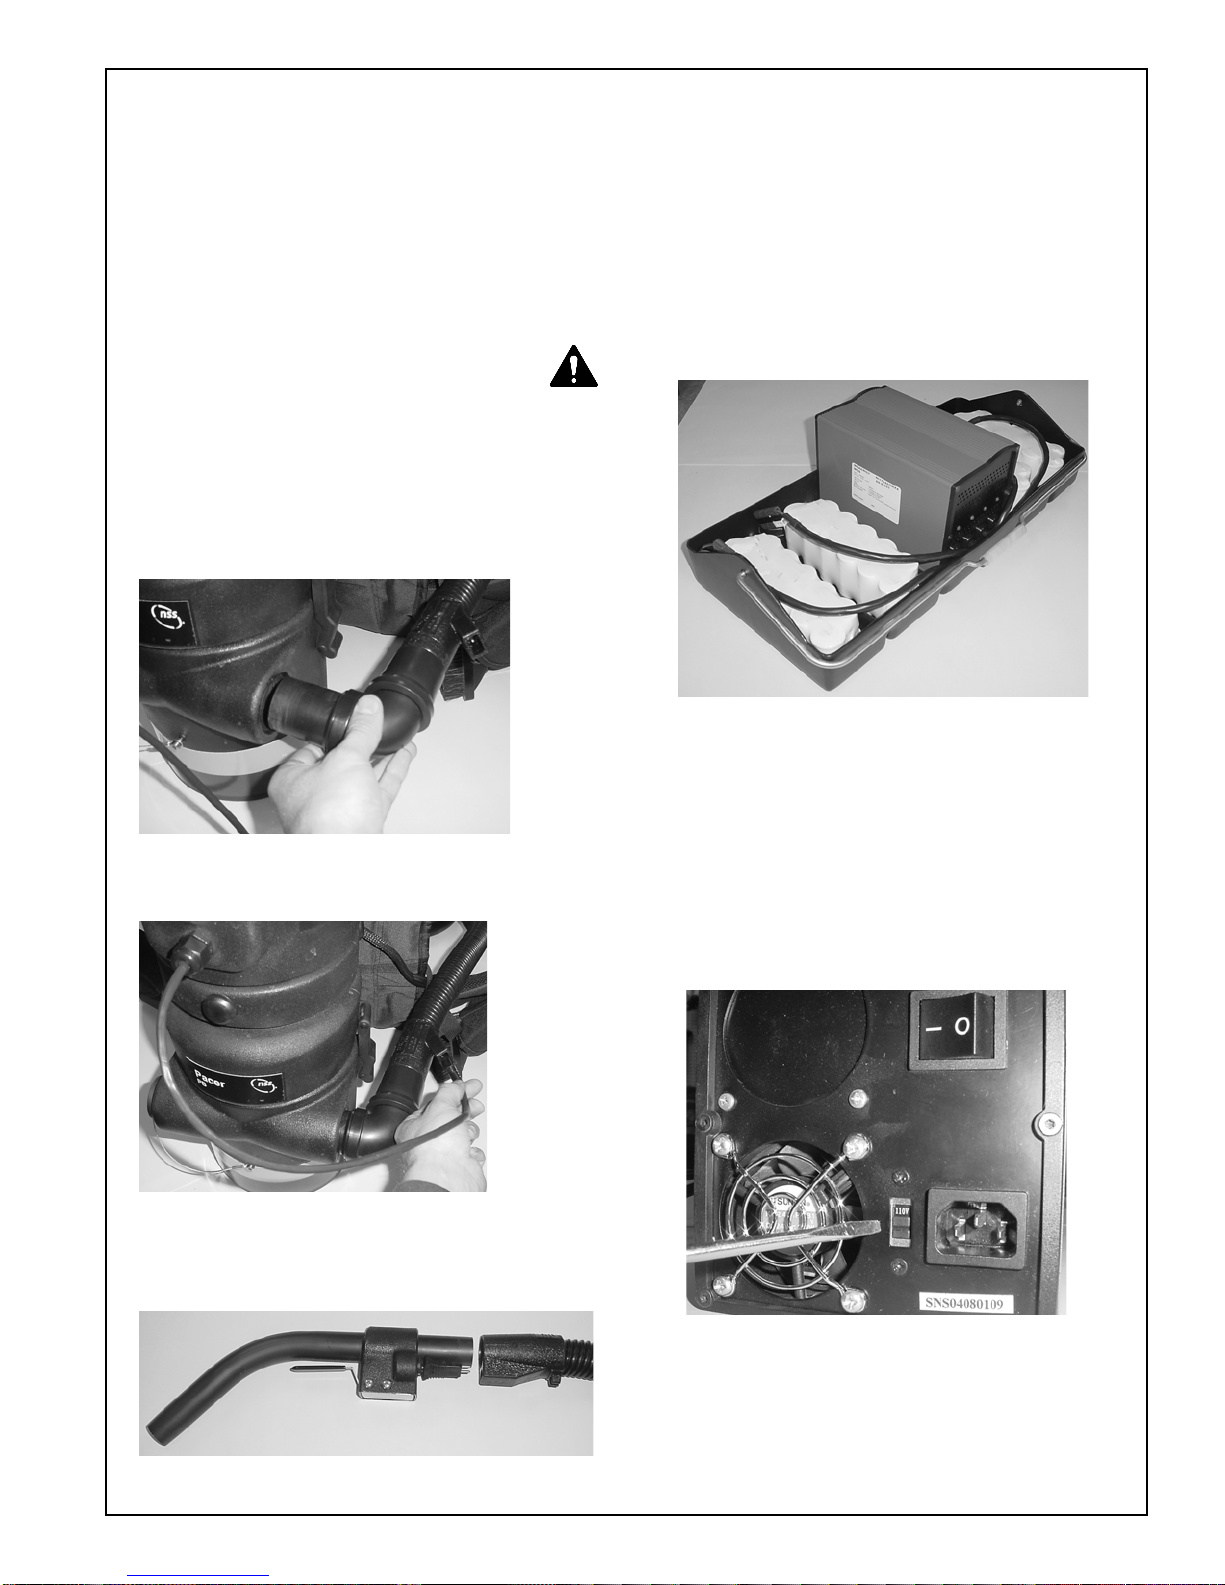
ASSEMBLY
•The Outlaw PB requires minimal assembly. The
hose must be plugged into the canister inlet - right
hand or left hand (photo 1). Be sure to insert the
provided plug into the unused inlet.
•The cord on the back of the vacuum must be
plugged into the hose receptacle (photo 2).
•The trigger assembly must be plugged into the hose,
being sure to properly engage the electrical
connector (photo 3).
•The batteries must be charged for 3 hours
minimum before first use in order to achieve full
runtime.
•The batteries require 5-10 charge/discharge cycles
for “break in” before full runtime will be achieved.
•After the first charge/discharge cycle, the batteries
may be used even if they are not fully charged.
Full runtime will not be provided, but these
batteries do not suffer from “memory” problems like
some other battery types. Full runtime will be
provided next time the batteries are fully charged.
•The batteries and charger may be kept in the
carrying tray (if so equipped) (photo 4).
•Before plugging the charger into the wall outlet, be
sure the switch on the back of the charger is in the
proper position (110 Volt position for 90 - 132 Volt
outlets, and 220 Volt position for 180 - 265 Volt
outlets) (photo 5).
!!!CAUTION!!!! Failure to set voltage
switch before plugging in cord will
damage the charger, and will VOID THE
WARRANTEE!
NOTE: All batteries must be charged within 6
months of date of manufacture. Check the date code
on the label on each battery, and be sure to charge
the battery prior to 6 months after this date. The date
code is wk/yr: 04/05 = 4th week of 2005.
Sound pressure level at
Operator position. 65 dB(A)
Photo 5
Photo 4
Photo 3
Photo 1
Photo 2
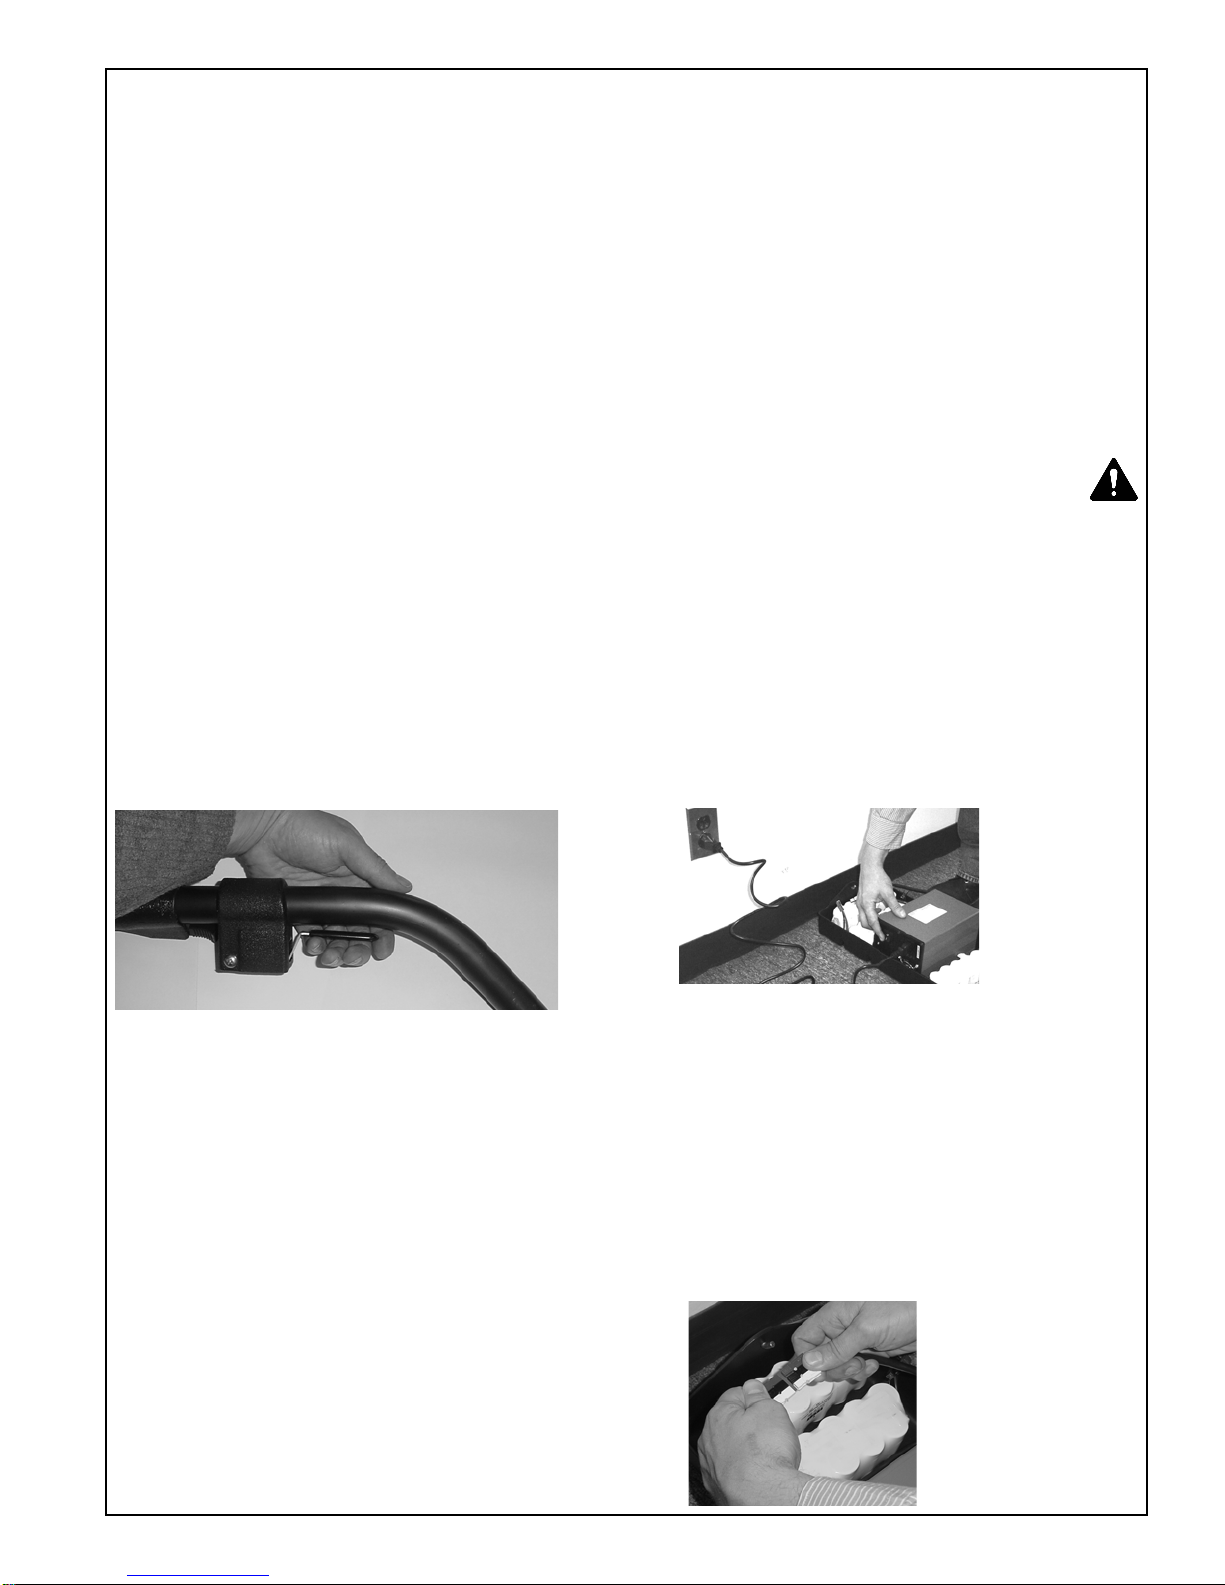
Photo 7
MACHINE COMPONENTS
Debris Canister
The Outlaw PB is a bag-less vacuum. The dirt and
debris is captured in the canister. The canister
capacity is 1.6 gallons (6.1l).
Filters
•The pre-filter cup is installed over the end of the
primary filter, and prevents large debris from entering
the pleats of the primary filter.
•The primary pleated filter sits within the top of the
canister, and mates with the motor / fan housing.
•A secondary foam filter is located at the top of the
vacuum, under the filter cap.
Filter Cap
The filter cap is located at the top of the vacuum, and
is retained by 3 clamps. The cap can only be installed
one way, with the exhaust pointing away from the
operator.
Harness
The harness is designed to provide a comfortable
means to carry the vacuum.
Trigger
The Outlaw PB is equipped with a “hold to run” trigger
to turn the vacuum on squeeze the lever against the
handle (photo 6). The trigger operates with very low
effort to eliminate operator fatigue. Releasing the
trigger to turn the vacuum off at every opportunity will
greatly increase the runtime provided by the batteries.
Batteries
Two batteries are required to operate the machine.
The batteries are equipped with color coded
connectors, and each battery plugs into a separate
battery cord on the vacuum.
Battery Cords
The vacuum is equipped with two battery cords with
color - coded connector, one cord for each battery.
Battery Charger
The battery charger provides automatic charging and
charge maintenance for the NSS batteries.
Optional HEPA Filter
•HEPA filters (High Efficiency Particulate Air) are
available for picking up non-hazardous materials;
they keep the finest contaminants from being
exhausted back into the air. This filter can be
purchased and installed into any unit at any time. It
is used in place of the secondary foam filter.
MACHINE OPERATION
Battery Performance and Use
The batteries that power the Outlaw PB vacuum are
an NSS exclusive proprietary design, and with proper
care will provide for long life and consistent pickup
during use.
•The Outlaw PB vacuum will automatically monitor
the charge on the batteries, and when the batteries
are fully depleted, the vacuum will automatically
shut off.
•The batteries provide for 30-35 minutes of constant
running – enough to cover over 5100 sq ft.
•Spot vacuuming can be performed for over 1 hour
on one set of batteries. Even longer times are
possible with judicious use of the trigger.
•!WARNING! HANDLE THE BATTERIES WITH
CARE. DAMAGE RESULTING FROM
DROPPING BATTERIES MAY CAUSE AN
UNSAFE CONDITION.
•ALWAYS CARRY THE BATTERIES BY THE
SUPPLIED CARRYING HANDLE.
•NEVER EXPOSE THE BATTERIES TO WATER
OR OTHER FLUIDS.
Charging the Batteries
The battery charger provides proper charging and
charge maintenance of the special batteries used by
the Outlaw PB.
•Plug the charger into the 110 Volt wall outlet, and
turn the charger on using the on / off switch located
on the end of the charger (photo 7).
CAUTION: make sure switch on end of charger is in
correct position for your wall outlet voltage. See
photo 5
•For wall outlet voltages higher than 132VAC,
contact NSS for alternate power cord.
•The LED’s will illuminate GREEN for approximately
4 seconds during self-diagnosis.
•The LED’s will flash RED every 15 seconds if no
battery is detected on that cord.
•Plug the battery into one of the cords coming from
the charger (photo 8).
Photo 8
Photo 6

The LED light next to that cord will display the status
of that battery.
•RED = charging
•GREEN = charge complete.
•ORANGE = charge pending.
•BLINKING YELLOW = Charge failed, unplug the
battery then plug back in. If still blinks yellow, call
for repair.
•BLINKING RED = cool down period, charging will
resume.
This information is also on the charger’s label.
•Up to 4 batteries may be plugged into the charger at
once. The charger will charge 2 batteries at a time.
As these batteries reach full charge, the other two
batteries will begin charging. This function is fully
automatic.
•If all four batteries are plugged into the charger at the
same time, the charging priority is channels 1 and 2,
then 3 and 4. Otherwise the batteries are charged in
the order they are plugged in (the first two connected
get charged first, regardless of which channel they
are plugged in to).
•The batteries may be left plugged into the charger
indefinitely. The charger will maintain the proper
charge on the batteries.
•Full recharge requires 2-2.5 hrs.
•60% recharge requires approximately 60 minutes.
•90% recharge requires approximately 90 minutes.
Harness
Proper adjustment of the harness will ensure
comfortable operation for extended periods. The
harness assembly is composed of several adjustable
straps including the following: lower shoulder straps,
Hip belt, chest strap, upper shoulder straps, and
battery pouches.
Harness Adjustment
The goal of adjusting the harness is to have all of the
weight of the machine carried on one’s hips.
•Loosen the lower shoulder straps (Photo9).
•Sling the vacuum onto your shoulders.
•Bend over at the waist, and position the vacuum up
onto your back.
•Tighten the hip belt (photo 10) very securely. The
hip belt is tight enough when you can stand up and
the vacuum does not slip down.
TIP: The bottom of the harness should be near your
tailbone.
•Tighten the lower shoulder strap adjustment to
prevent the vacuum from swinging / moving around
(see prior photo 9).
•Secure the chest strap (photo 11), and tighten to
suit.
•Tighten the upper shoulder strap (photo 12)
adjustments to suit.
To accommodate bodies of differing torso lengths,
the entire shoulder strap assembly can be adjusted
up and down as shown in photo 13.
Photo 9
Photo 10
Photo 11
Photo 12
Photo 13
Table of contents


