Ovation Systems SoundByte User manual

Issue: 2.86 Ovation Systems Ltd Page 1 of 32
www.ovation.co.uk
User Guide
Ovation Systems Ltd.
Springfield Barn
London Road
Milton Common
Oxfordshire
OX9 2JY
UK
Tel: +44 1844 279 638
Fax: +44 1844 279 071
Web: www.ovation.co.uk
SoundByte
2 & 4 Channel Audio Recorder
User Guide

Issue: 2.86 Ovation Systems Ltd Page 2 of 32
www.ovation.co.uk
User Guide
Contents
1Introduction.....................................................................................................................3
1.1 Support, Latest Updates and Information.................................................................................3
1.2 IMPORTANT: Internal Clock Battery Life..................................................................................3
2Quick Start Guide ...........................................................................................................4
2.1 Initial Setup................................................................................................................................4
2.2 Making a Recording ..................................................................................................................5
2.3 Playing Back a Recording.........................................................................................................6
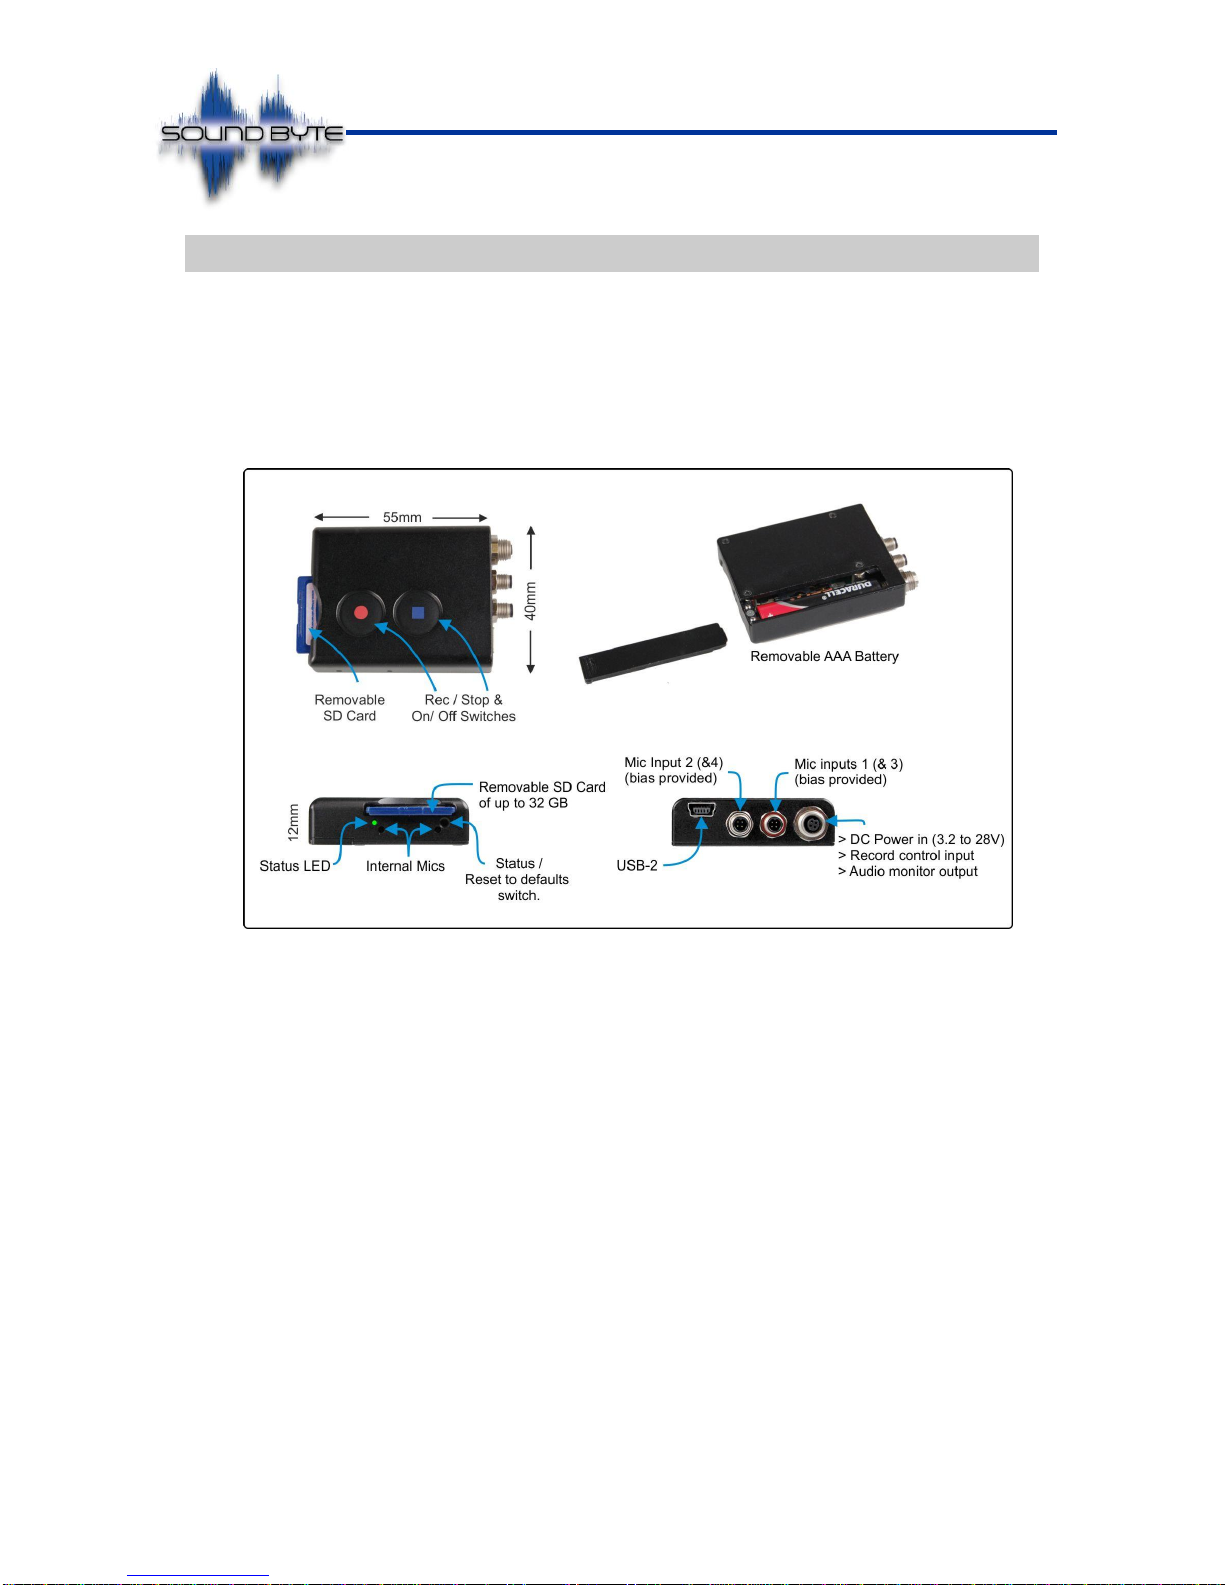
3Installation.......................................................................................................................7
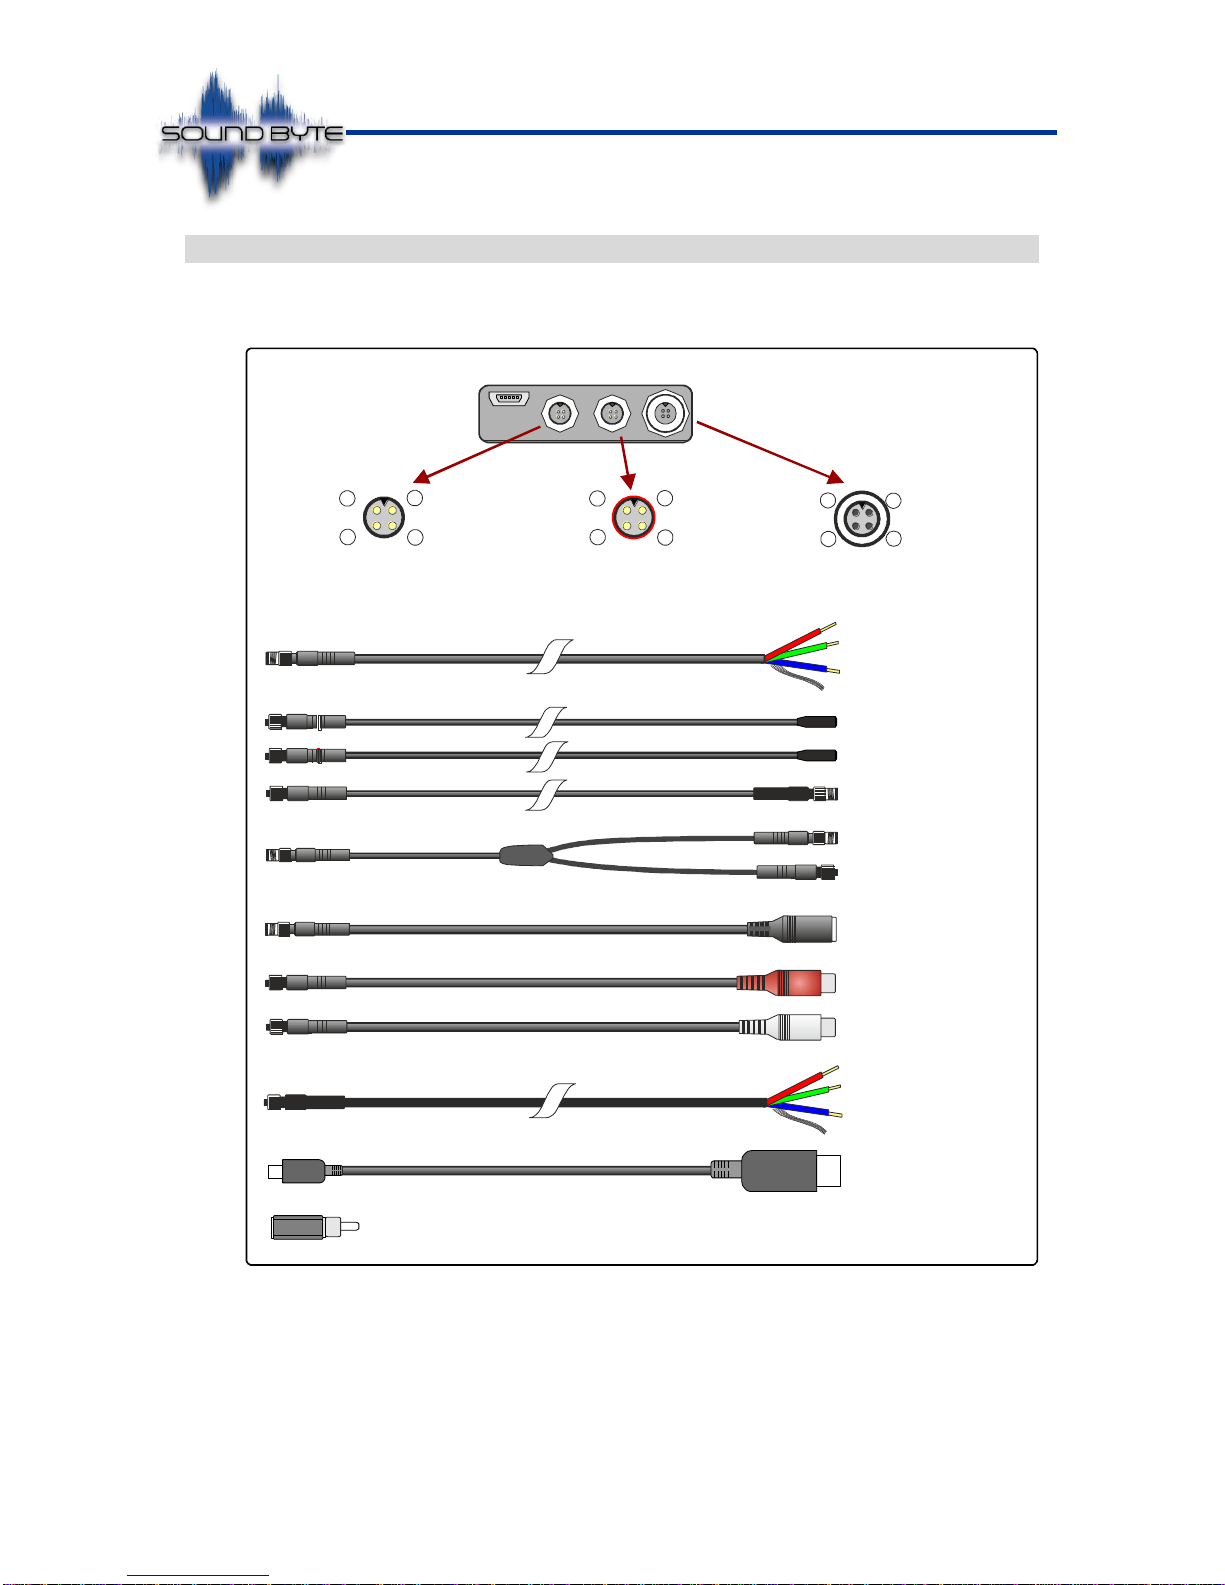
3.1 i-Conex Cable Set.....................................................................................................................8
3.2 Powering SoundByte...............................................................................................................10
3.3 External Microphones / Audio Inputs ......................................................................................11
3.4 External Record Control Input.................................................................................................13
3.5 Audio Monitor Output..............................................................................................................13
4Operation ......................................................................................................................14
4.1 SD Card Selection and Formatting .........................................................................................14
4.2 Basic Operation.......................................................................................................................15
4.3 Status LED..............................................................................................................................16
4.4 Front Panel Reset to Defaults Switch .....................................................................................17
5Evidential Integrity........................................................................................................17
6Playback........................................................................................................................18
6.1 Playback of Recordings ..........................................................................................................18
6.2 4 Channel Post-Recording Steering .......................................................................................21
6.3 Selecting a Region of Interest.................................................................................................22
6.4 Archive Open & Save..............................................................................................................23
6.5 WAV File Export & Import .......................................................................................................24
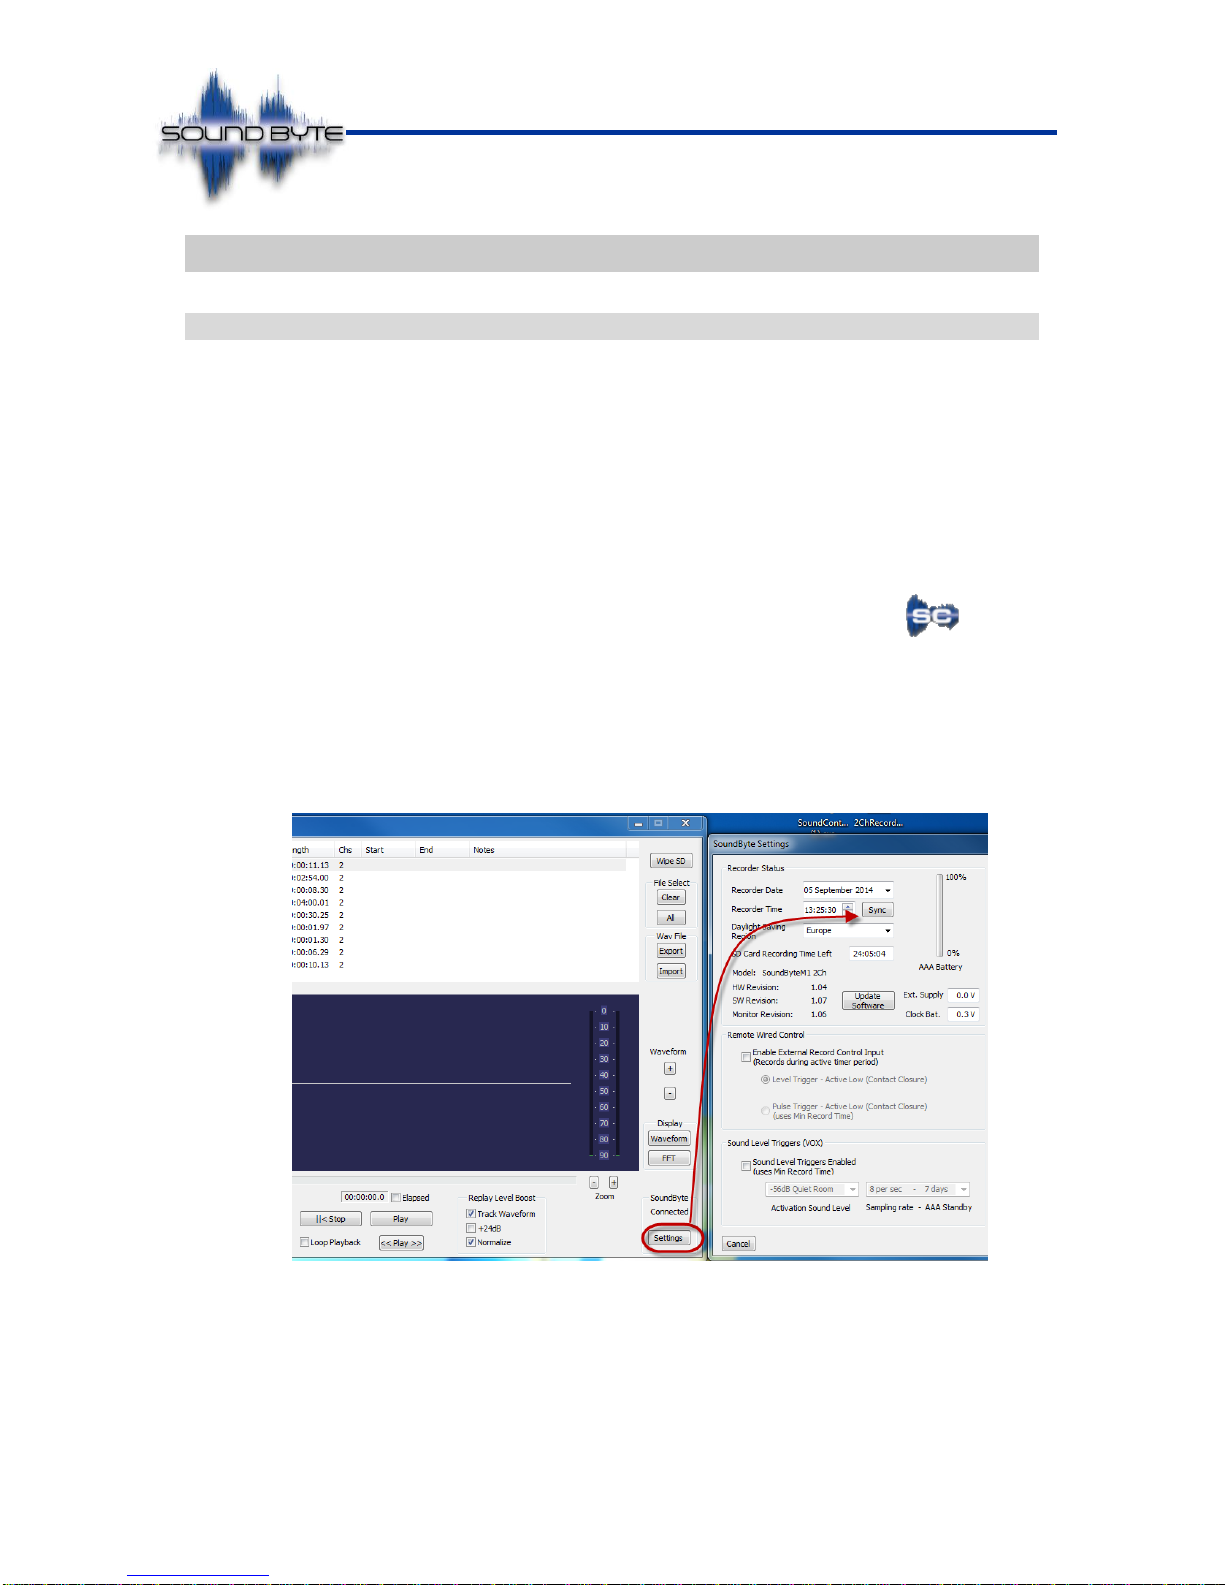
7Configuration................................................................................................................25
7.1 Record Status Section ............................................................................................................26
7.2 Remote Wired Control Input....................................................................................................27
7.3 Record Control Section...........................................................................................................28
7.4 Timer Record Section .............................................................................................................29
7.5 VOX (Voice operated switch)..................................................................................................30
7.6 Firmware Upgrades.................................................................................................................30
8Expected Record Times:..............................................................................................31
8.1 Max Record Time vs SD Card Capacity .................................................................................31
8.2 Expected Record Time with Internal AAA Battery ..................................................................31
8.3 Typical External Current Consumption ...................................................................................31
9Specification.................................................................................................................32

Issue: 2.86 Ovation Systems Ltd Page 3 of 32
www.ovation.co.uk
User Guide
1Introduction
SoundByte is a miniature ultra-high quality one, two, or optionally four, channel audio
recorder specifically designed for the most demanding covert surveillance applications.
Outstanding Audio Quality
With innovative ultra low-noise audio processing technology derived from broadcast
applications, SoundByte is able to record with a 20 bit resolution providing a dynamic
range of over 100dB. SoundByte is therefore able to capture a gun-shot to a pin-drop
without the need for AGC or user gain setup. With such undistorted detail, SoundByte
recordings are also ideal for post processing and enhancement.
Long Record Time & Fast File Downloads
A removable SD card of up to 128GB coupled with programmable quality and
sampling rates, provides up to 66 days of record time. Recordings are made in a
proprietary format with optional data encryption. Fast file downloads are assured via
the removable SD card or via high speed (20 MBytes/s) USB-2 interface.
SoundControl is a PC software manager that can play recordings directly from an SD
card, or via SoundByte’s USB port. The unit is also compatible with Ovation PUMA for
fast, evidentially-secure download of evidence to DVD or Blu-ray disk.
Easy To Set Up & Deploy
SoundByte is remarkably small, low power and can record for up to 100 hours with its
internal AAA battery. For longer record times, the unit can also be powered from a 3.4
to 28 V external supply. Record control by on-unit button, voice activation (VOX),
internal timers and a programmable external trigger input add to the system’s
versatility. High quality, internal or external Knowles microphones are included which
are quick and easy to wire-up and deploy with Ovation’s i-Conex interconnection
system.
1.1 Support, Latest Updates and Information
Ovation Systems’website includes a Secure User Area with the latest software
updates, data sheets, user guides etc. available for download. To gain access, please
email support@ovation.co.uk with the serial number of one of your units, together with
your name and organisation.
1.2 IMPORTANT: Internal Clock Battery Life
IMPORTANT►The clock within SoundByte is powered by an internal rechargeable
battery with an expected life of approximately six months. SoundByte
should therefore be connected to an external supply or powered via
the USB interface for a minimum of 10 hours every six months. For
the avoidance of doubt, the internal AAA battery does not charge the
internal clock battery. See section 7.1 page 26 regarding checking
the clock battery’s status.
SoundBytes are shipped with fully charged clock batteries.

Issue: 2.86 Ovation Systems Ltd Page 4 of 32
www.ovation.co.uk
User Guide
2Quick Start Guide
2.1 Initial Setup
SoundBytes are shipped with the internal clock set to UK time and set to automatically
adjust for European daylight saving changes.. The following procedure is required if
you need to change or check the clock before use.
1. Install SoundControl, the SoundByte player and configuration PC application, by
copying “SoundControlVn-nn.exe” from the “Applications” folder of the CD
provided to your PC’s hard drive. The latest software can also be downloaded
from Ovation’s Secure User Area, www.ovation2.co.uk (see Section 1.1, page 3).
2. Connect the SoundByte to your PC with the USB cable provided. If notified, allow
any USB drivers to be automatically installed by Windows before
proceeding.
3. Run SoundControl by double-clicking the SoundControl icon.
4. To set the time, click the [settings] button at the bottom right of the main player
window. Click [Settings] and then [Sync] in the “SoundByte Settings” window. TIP:
ensure your PC is synchronised to internet time before setting the SoundByte
clock.
5. Set the daylight savings zone as required.
Figure 1: Setting SoundByte’s Internal Clock
6. Make any other required configuration changes and click [OK]. (see Section 7,
page 25).
7. Remove the USB cable from SoundByte.

Issue: 2.86 Ovation Systems Ltd Page 5 of 32
www.ovation.co.uk
User Guide
2.2 Making a Recording
SoundByte is shipped configured for stereo recording with internal microphones
(SoundByte's default settings). This configuration can be changed by the
SoundControl PC application (see Section 7, page 25 ).
1. Install the AAA battery and SD card provided as shown below.
Figure 2: Battery Installation
2. Press the [Record Start] button. SoundByte then automatically formats the SD
card and starts recording. If successful, the front panel LED flashes green twice;
the first flash is battery status, second flash SD card status (see Section 4.3, page
16). The LED then flashes in sympathy with audio level changes.
3. Press [Record Stop] to complete the recording.
Figure 3: SoundByte User Interfaces.
NB►SoundByte’s internal clock battery is limited to 6 months unless it is recharged.
Please refer to Section 1.2, page 3.
+
Slide cover to
insert battery
Insert SD
Card
Record
Start
Internal
Microphones
Record
Stop
Status
LED
Status /
Reset to
Defaults
Button

Issue: 2.86 Ovation Systems Ltd Page 6 of 32
www.ovation.co.uk
User Guide
2.3 Playing Back a Recording
1. Attach the SoundByte with SD card to your PC via the USB cable provided or
remove the SD card and insert into your PC’s card reader. If notified, allow any
USB drivers to be automatically installed by Windows before proceeding.
Windows then shows an SD card is available, but no files will be listed as they are
contained in a hidden partition.
2. Run the SoundControl PC application by double-clicking the SoundControl icon
(see Section 2.1 above regarding installation of SoundControl).
3. SoundControl lists the available recordings in the hidden partition, and shows
these as “Takes” in the top Window (see screen-shot below).
To play, double-click the required file which also loads the content into the
waveform time-line. The playback volume is adjusted by the “Waveform” + and –
buttons, provided that the “Track waveform” tickbox is checked. (For more
information see Section 6.1, page 18).
Figure 4: Playback of recordings with SoundControl
4. All the files on the card can be archived, or a selection of files exported as WAV
files by the using “Archive” [Save] or “Wav File” [Export] buttons. The archived
and exported files are then playable in Windows Media Player or editing
applications such as Audacity (audacity.sourceforge.net). See sections 6.4 and
6.5.
Tip ►The “Normalise” option is recommend when archiving or exporting the
WAV files. This increases the volume level taking into account the average
and maximum audio levels within the original take.

Issue: 2.86 Ovation Systems Ltd Page 7 of 32
www.ovation.co.uk
User Guide
3Installation
SoundByte is fitted with Ovation’s i-Conex inter-connection system for easy installation
and deployment. The two channel unit has 2 internal microphones located on the front
of the unit along with 3 i-Connex connectors on the rear; 1 for power & control, and 2
for the external microphone inputs. The four channel unit has two additional internal
microphones located along the side of the unit.
Figure 5: SoundByte Interfaces

Issue: 2.86 Ovation Systems Ltd Page 8 of 32
www.ovation.co.uk
User Guide
3.1 i-Conex Cable Set
The 2 channel system is supplied with the following i-Conex cable set:
Figure 6: SoundByte 2 Channel i-Conex Cable Set
To connect, offer the i-Connex connector to the relevant input and with a small amount
of pressure, slowly turn until the connector seats (i.e. suddenly moves towards unit). At
this point the locking ring may be tightened.
Ground
1
4
2
3Audio Monitor
(After mic gain)
3.2 to 28V
DC In Rec Control
(contact to Gnd)
Mic Bias
(~3V DC)
Mic Bias
(~3V DC)
Audio
Ground Audio
Ground
1 1
4 4
Audio 2 Audio 1
Audio 4
(4 chan only)
Audio 3
(4 chan only)
2 2
3 3
1) DC In
DC power
2.1mm DC Skt
Red RCASkt
(Right input & Audio Out)
White RCA Skt
(Left input)
Knowles Mic
Pair
Audio out / power
splitter cable
1.0m Mic
extension
2) Record Control
3) Audio Out
4) Ground
Audio Input2 Audio Input1 Power & Control
1) Mic Bias
2)Audio in 3/4*
3) Audio 1/2
4) Ground
USB Cable
RCAPhono to 3.5 mm headphone jack socket adaptor.
1 x IC1C-5645
1 x IC1A-5865
2 x IC1C-5872
1 x IC1C-5875
1 x IC1C-5642
1x IC1C-5657
2 x IC1C-5646
x 1
x 1 *4 Channel unit only
Part of the above
Part of the above

Issue: 2.86 Ovation Systems Ltd Page 9 of 32
www.ovation.co.uk
User Guide
The 4 Channel SoundByte is supplied with the following additional cables:
Figure 7: SoundByte 4 Channel Additional Cables
Optional cables:
Figure 8: i-Conex Optional Cables
Audio In
splitter cable
1.0m Mic
extension
Knowles Mic
Pair
1 x IC1C-5874
1 x IC1A-5865
Part of the above
2 x IC1C-5872
5.0m Mic
extension
IC1C-5652

Issue: 2.86 Ovation Systems Ltd Page 10 of 32
www.ovation.co.uk
User Guide
3.2 Powering SoundByte
Internal Battery:
SoundByte can be powered by an internal AAA battery. Fit the battery as shown
below.
Figure 9: Fitting the Internal Battery
SoundByte is able to operate with alkaline or lithium AAA cells of 1.2 to 2.0 volts which
are inserted as shown above. Even if SoundByte is to be externally powered, it is still
recommended to fit an internal battery (see below).
External Power:
SoundByte can be powered externally from a 3.4 to 28V supply via the rear panel
i-Connex connector. Two power cables are included, one to free wires and an adapter
to a 2.1 mm DC jack.
Figure 10: External DC Power Connection
NB►USB can be only be used to power SoundByte when connected to
SoundControl. It is not possible to use the USB port as an external power
source for recording.
IMPORTANT►When powering SoundByte externally, it is strongly
recommended to fit a new internal AAA battery. This increases
record times and helps smooth the current spikes demanded by the
SD card. Furthermore it protects against SD card corruption should
the external supply be accidentally disconnected during record.
External power will be used in preference to the AAA battery which
can be regarded as a back-up.
+
Slide cover to
insert battery
DC In (3.2 to 28V)
Audio Out
Rec Control
Ground
2.1 mm DC jack
Centre +
OR
Power & Control Input

Issue: 2.86 Ovation Systems Ltd Page 11 of 32
www.ovation.co.uk
User Guide
3.3 External Microphones / Audio Inputs
External Microphones:
The 2 channel SoundByte supports either 2 internal or 2 external microphones which
are selected via the SoundControl PC control and configuration application (see
Section 7, page 25 ).
NB►When recording in mono (channel 1), the centre (red) input connector is active.
Figure 11: External Microphones
The 4 Channel SoundByte can support 4 internal or 2/4 external microphones. The
external microphones are connected as shown below.
Figure 12: 4 Channel External Microphones
RCA Phono Inputs:
Two i-Conex to RCA phono adaptor cables are provided which can be used for
external audio sources. TIP►The audio input level can be set to mic or line level via
SoundControl (see Section 7, page 25 ).
Figure 13: RCA Phono inputs
When mono recording, use the centre (red) input
Right
Left
Sleeve
Chan 1
Chan 3
Chan 4
Chan 2
Sleeve

Issue: 2.86 Ovation Systems Ltd Page 12 of 32
www.ovation.co.uk
User Guide
Interface Cable to Open Wires:
Two cables to open wires are included to allow you to connect your own audio inputs
to SoundByte as shown below.
Figure 14: Interface Cable to Open Wires
External 4 Channel Array Puck :
The optional 4 channel array puck microphone allows post recording steering of 4
channel recordings when the recorder is to 4 channels with external microphones. See
sections 7.3 page 28 and 6.2, page 21.
Figure 15: 4 Channel Array Microphone
Mic Bias
Mic Bias
Audio In 1
Audio In 2
Audio In 3
Audio In 4
Ground
Ground
4 channel array microphone puck
Left
Right
Front
Array mic should be
mounted horizontally

Issue: 2.86 Ovation Systems Ltd Page 13 of 32
www.ovation.co.uk
User Guide
3.4 External Record Control Input
The power connector includes a “Record Control” input which is software
programmable to start recording when connected to ground. By default, this control
line is disabled and is setup via the SoundControl PC application (see Section 7.2,
page 27). It can be configured to record when active (e.g. when a switch is closed) or
to record for a minimum time each time the input is temporarily triggered (e.g. by
external sensor such as a PIR detector).
Figure 16: External Record Control Input Example
3.5 Audio Monitor Output
SoundByte’s Audio monitor output is a mix of the 2 or 4 audio inputs after
amplification. It is enabled via by SoundControl (see Section 7.3, page 28). Connect
the power splitter cable and RCA phono cable as shown below.
Figure 17: Audio Monitor Output
Tip ►The monitor has enough output power to drive most headphones which can be
connected via the RCA phono to 3.5 mm jack socket adaptor provided.
Ground
DC In Record Control Audio out Ground
Record
Switch
Power & Control Input
Cable Colour Code:
DC Input Audio Monitor
Output
Optional RCA phono to 3.5 mm Jack socket adaptor

Issue: 2.86 Ovation Systems Ltd Page 14 of 32
www.ovation.co.uk
User Guide
4Operation
4.1 SD Card Selection and Formatting
SoundByte is designed to operate with SD cards of up to 128GB. There are a wide
variety of SD cards on the market but SanDisk Extreme cards are strongly
recommended.
NB:When using batteries, smaller capacity cards are recommended as, in general,
the lower the capacity the card the longer the battery life. See Section 8 page 31.
New cards are automatically wiped and formatted when SoundByte first starts
recording. The format divides the card in two partitions; a small Windows readable
partition of 63.7MB (so it looks like a normal card) and a hidden partition in
SoundByte’s own format, which is used to store the recordings. This partition can only
be read by the SoundControl PC application (see section 6, page 18).
If required, the card can be returned back to full capacity by a freeware SD card
formatting utility called “SDformatter” available from the SD Association
www.sdcard.org. Please note, a “Full Erase (with overwrite)” with “Format Size
adjustment ON” is required to completely remove any SoundByte recordings.
Figure 18: Using SD Formatter to fully clear a SoundByte SD Card

Issue: 2.86 Ovation Systems Ltd Page 15 of 32
www.ovation.co.uk
User Guide
4.2 Basic Operation
By default, SoundByte is shipped configured to record stereo audio from the internal
microphones with an 11 kHz audio bandwidth.
Figure 19: Basic Sound Byte operation
Switching on and off:
SoundByte automatically switches on as soon as recording starts and off as soon as
recording finishes. SoundByte does not have need for “Pause” or “Stop” modes
because it can switch on and off so quickly.
Making a recording:
To make a recording, simply insert an SD card and a battery (as shown above) and
press [Record Start]. Note: with the first recording on a new card, the green led will
flash for a few seconds as the card is first wiped and then SoundByte formatted before
recording can start. To conclude the recording, press [Record Stop]. It can then be
replayed by the SoundControl application (see Section 6, page 18).
Tip►If there’s any doubt regarding the unit’s configuration (especially with regard
to timers, VOX triggers etc) a reset to defaults is recommend before use. See
Section 4.4, page 17.
Insert SD
Card
Record
Start
Internal
Microphones
Record
Stop
Status
LED
Reset to
Defaults
Button

Issue: 2.86 Ovation Systems Ltd Page 16 of 32
www.ovation.co.uk
User Guide
4.3 Status LED
The status LED shows the status of the recorder when you press the [Record], [Stop]
buttons or make a short press of the front panel [Status /Reset] switch. The LED has
the following function. In general terms green indicates a correct function, red shows a
warning or error.
Normal LED operation on press of Start, Stop or Status buttons
1st Flash
2nd Flash
Subsequent Flashes
Green flash showing the
battery status (the longer
the flash the higher the
battery volts)
Green showing the SD
status (the longer the
flash the more unused
space is available)
When recording, LED
flashes green in
sympathy with audio
input level changes.
LED operation when in standby waiting for timer or VOX trigger
(see Sections 7.4 and 7.5)
........ .........
One green pulse every two seconds; armed waiting for timer.
..... ......
Two green pulses every two seconds; armed waiting for VOX
.. ...
Three green pulses every 2 seconds; armed waiting for a VOX
AND Timer trigger.
LED error conditions
Unexpected error
Green red, red; internal AAA battery low
Green red, red, red; bad or no SD card
Green, red, red, red, red; SD card full.
Green, red, red, red, red, red; low internal clock battery.
Figure 20: Status LED Operation.
The LED operation can be automatically switched off 5 seconds after each button
press by enabling “Covert LED mode” in SoundControl (see Section 7.3, page 28).

Issue: 2.86 Ovation Systems Ltd Page 17 of 32
www.ovation.co.uk
User Guide
4.4 Front Panel Reset to Defaults Switch
Figure 21: Status / Reset Switch Operation
To reset the SoundByte to defaults, press and hold the recessed front panel button
with ballpoint pen, or similar (as shown above). Keep pressing while the Status LED
flashes slow green. After 5 seconds the LED flashes fast green, indicating a reset to
defaults has taken place, at which time, the button may be released.
5Evidential Integrity
SoundByte recordings (referred to as Takes) are made to an SD card using sequential
Take numbers in a proprietary robust format to a hidden Windows partition. This
partition is only readable by the SoundControl player / configuration application which
lists all the files on the SD card. In order to maintain evidential integrity, it not possible
to delete or edit individual files on the card. In fact, the only way to delete recordings
on the card is by a low-level re-format of the SD card using SoundControl’s [Wipe SD]
button.
Once an SD card is loaded into SoundControl, the [Save All] Archive option saves all
the files on the card to a master archive. This archive consists of a summary “Info”
text file, along with the recordings saved as 32 bit WAV files. For integrity, the date,
time and length of each recording, serial number of the originating SoundByte, along
with other meta-data is embedded within each WAV file. This data can be read back
by SoundControl but is ignored by standard audio players and editors such as
Windows Media Player and Audacity.
The “Info” text file saved with an archive includes key data, such as the date of
archive, the originating SoundByte’s serial number and a SHA-256 hash code for each
WAV file.
See section 6.4, page 23 for more details regarding archives.
Status
LED Reset to
Defaults Button
Use ball-point pen
(or similar) to operate.

Issue: 2.86 Ovation Systems Ltd Page 18 of 32
www.ovation.co.uk
User Guide
6Playback
A PC application called SoundControl is used to configure SoundByte and playback
the recordings. The application is included on the CD supplied or can be downloaded
from Ovation Secure User Area www.ovation2.co.uk (see Section 1.1, page 3). Copy
“SoundControl.exe”to your hard drive and double-click to run.
6.1 Playback of Recordings
Note: SoundByte acts as a fast SD card reader when connected to a PC via USB.
1. Connect SoundByte to your PC via its USB connector, or, if you do not need to
configure SoundByte, you can remove the card and insert directly into your PC.
2. Windows will recognise the SD card but no recordings are listed by Windows as
they are made to a hidden partition.
3. Run the SoundControl application by double-clicking the SC icon. NB► If
SoundByte is recording when you connect SoundControl, you need to press
[Stop] before the USB connection can be made.
4. SoundControl automatically lists all the available files on the hidden partition.
(Shown as “Take 1” to “Take nnn”).
5. To play a recording, simply double-click the required “Take” in the list.
SoundControl then starts playing and loads the time-line window with an
amplitude waveform view of the Take.
Figure 22: Playing Back SoundByte Recordings

Issue: 2.86 Ovation Systems Ltd Page 19 of 32
www.ovation.co.uk
User Guide
Figure 23: SoundControl’s Playback Window
Playback Functions
Function
Description
Nudge (sec):
-5,+5, -15, +15
Jump forwards and backwards while playing.
Play control:
Stop:
Pauses playing on the first click and goes back to the beginning of the file on
the second click.
Play:
Play.
Elapsed:
Toggle time display between time of day (ToD) (default) or elapsed time from
the start of file.
Loop Playback:
Continually loop playback of the complete file.
<< Play >> :
Play the currently selected Region or audio file (see section 6.2).
Replay Level:
Track waveform:
The playback volume changes with the vertical waveform zoom (see Volume
below).
HPF
High pass filter. Reduces low frequencies below 300Hz from the playback.
Useful for removing “rumble” from in-vehicle recordings.
Normalise:
Automatically adjust the playback volume level taking into consideration peak
and average levels within the file.
Volume + / -:
Adjust playback volume in 6db steps ( see “Track Waveform” above).
Channel Select:
1,2,3,4:
Select channels for playback (default stereo: channel 1 left and 2 right, quad:
channel 1 + 3 left, 2 + 4 right).
Solo:
Select just one channel for playback.
Mono:
Playback selected channels mixed together as mono feed.

Issue: 2.86 Ovation Systems Ltd Page 20 of 32
www.ovation.co.uk
User Guide
I
cons displayed in SoundControl:
SD Card
Data Source
Icon:
File Type
Icon:
Master
Archive
Wav
File
SoundByte
Wav file
SoundByte
Native file
Archive Imported
WAV
SB
SD i
a
Ma
Display Functions
Function
Description
Waveform:
Waveform + / -:
Adjust the amplitude of the waveform in the display window (also used to
adjust the playback volume when “Track Waveform” is enabled)
Zoom + /-
Zooms the waveform display around the current play position.
Display:
Waveform:
Amplitude Waveform display.
FFT:
Fast Fourier Transform - frequency spectrum display.
File Functions
Function
Description
Archive:
Open:
Opens a previously saved archive.
Save All:
Save all the files in the list to an archive folder (see section 6.4, page 23).
Save Sel:
Save selected files to an archive folder (see section 6.4, page 23).
File select:
Clear
De-select all the files in the list.
All
Select all files in the list.
Wav File:
Export
Saves selected file or files as WAV file.
Import:
Load an individual WAV file.
Other:
Wipe SD card:
Clear all files on the SD card by wiping the card using by a low-level SD
erase, clearing all data on the card.
Archive:
Name used when saving an archive This name is also embedded with the
exported wave files and forms part of the Archive name.
Reference:
Reference included in the archive summary text file.
View SD
Show files on the SD card.
Table of contents