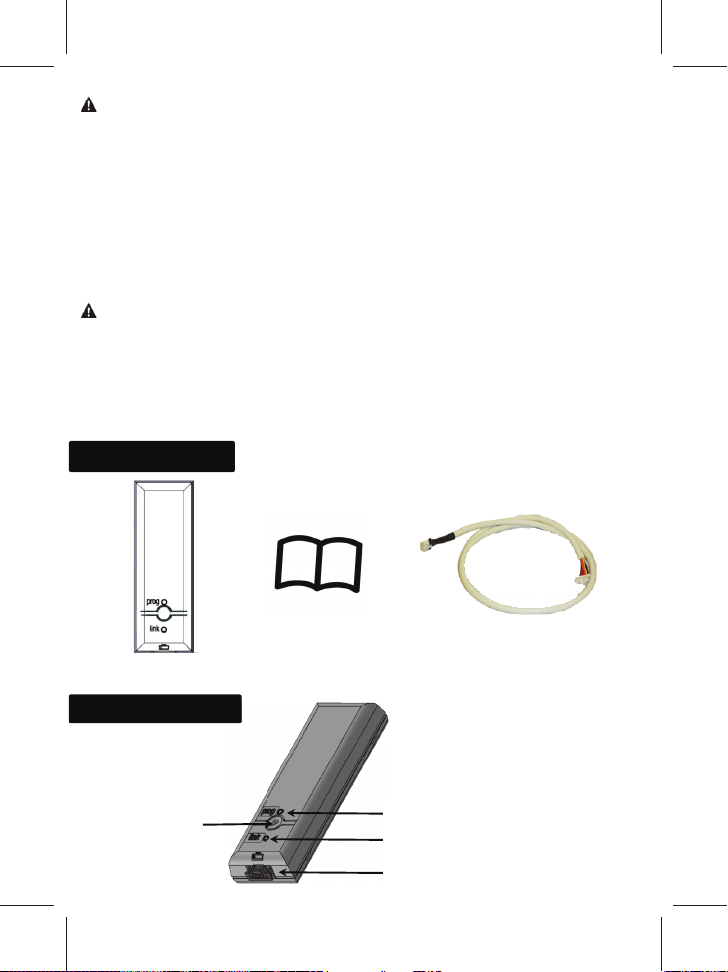
Overkiz HLRR User manual

Interface HLRR
Montage- und Gebrauchsanleitung
Allgemeines
Allgemeine Sicherheitshinweise
Informationen für Installateure
Achtung:
Achtung:
Warnhinweise
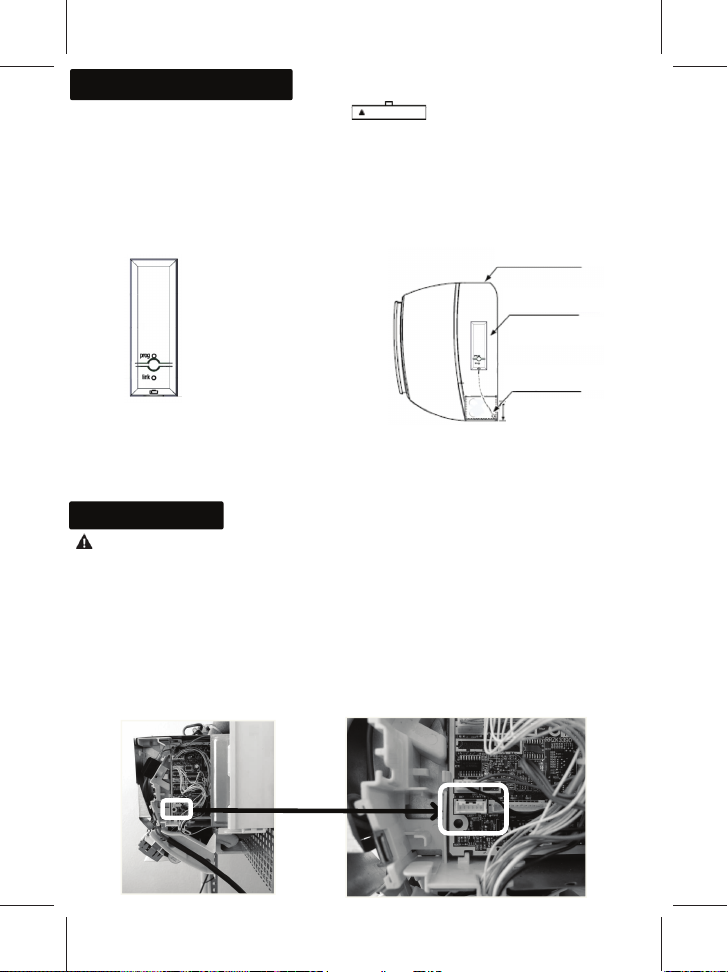
Die HLRR Schnittstelle
ermöglicht in Verbindung
mit dem TaHoma System
oder Hallo-Box die
Steuerung Ihrer
Klimaanlage aus der Ferne.
Warnhinweise
Vor der Montage des Produkts die Anleitung und die Sicherheitshinweise aufmerksam lesen.
(Installation erfolgt durch einen Fachmann aus).
Die unten stehenden Anweisungen genau befolgen und die Anleitung so lange
aufbewahren wie das Produkt in Gebrauch ist. Jegliche von Overkiz nicht vorgesehene
Montage oder Verwendung gilt als nicht konforme Benutzung. Sie führt, wie jegliche Nichtbeachtung
der Anweisungen in dieser Anleitung, zum Ausschluss der Haftung und der Garantie durch Overkiz.
- Nicht versuchen, das Gehäuse zu önen.
- Produkt nicht fallen lassen und vor Stößen schützen.
- Produkt nicht in Flüssigkeit tauchen.
- Verwenden Sie zur Reinigung des Gehäuses keine Schleif- oder Lösungsmittel. Reinigen Sie die
Oberäche mit einem weichen, trockenen Tuch.
- Produkt nicht im Freien verwenden. Anschlusskabel nicht nach außen verlegen.
- Jegliche von Overkiz nicht vorgesehene Verwendung oder Veränderung an der Anlage könnte den
Benutzer gefährden.
- Das Ausschalten des Produkts kann durch Abklemmen von der Klimaanlage erfolgen.
Achtung: Bei Nichtbeachtung der Bedienungshinweise besteht Verletzungs- oder Lebensgefahr.
- Sicherstellen, dass die Verbindungsanschlüsse bzw. die Stromversorgungsklemmen und/oder das Kabel
staubfrei sind. Gefahr eines Brandes oder Stromschlags.
- Verwenden Sie nur das mitgelieferte Kabel. Es darf nicht verändert werden. Das Kabel könnte heiß
werden und einen Brand auslösen.
- Die Schnittstelle nicht montieren, wo über Funk betriebene Geräte untersagt sind (die gültigen örtlichen
Vorschriften beachten).
- Die Schnittstelle nicht in unmittelbarer Nähe von Geräten betreiben, deren Betrieb durch Funkwellen
beeinträchtigt werden könnte.
- Die Schnittstelle nicht an Orten montieren, wo sich eventuell Personen mit Herzschrittmacher aufhalten.
- Die Schnittstelle nicht in feuchter Umgebung (beispielsweise einem Bad) montieren.
- Sicherstellen, dass Kinder nicht an die Schnittstelle gelangen können. Es besteht Verletzungsgefahr.
- Die Klimaanlage nicht an einem Ort montieren, an dem die Gefahr eines Gasaustritts besteht. Falls die
Klimaanlage Gasen ausgesetzt ist, kann dies einen Brand verursachen.
- Die Klimaanlage ist für Räume bestimmt, in denen sich Personen aufhalten. Sie darf nicht zur
Konservierung von Lebensmitteln, für Tiere, Panzen, Präzisionsmaschinen, Kunstwerke, medizinische
Geräte usw. eingesetzt werden. Es können Schäden am Gerät oder Fehlfunktionen auftreten.
DE
Warnhinweise: Die Nichtbeachtung der Bedienungshinweise kann zu Unfällen oder zur
Beschädigung des Geräts führen.

Informationen für Endbenutzer
Bitte beachten
Bitte beachten
Warnhinweise
1 x Schnittstelle
1 x Anschlusskabel
Länge: 1 m
1 x Anleitung
Produktbeschreibung
Leuchtanzeige "Prog"
Leuchtanzeige "Link" (Status)
Steckverbindung zur
Klimaanlageneinheit
Programmier-
taste
- Sicherstellen, dass die Klimaanlage während der Funkübertragung eingeschaltet ist.
Bei Problemen folgende Punkte kontrollieren, um das Auftreten von Schäden zu vermeiden:
- Im Falle eines anormalen Betriebs besteht die Gefahr eines elektrischen Schlages oder Brandgefahr.
Lassen Sie die Schnittstelle von einem Monteur installieren.
- Im Falle eines fehlerhaften Kontakts zwischen der Innen- und Außeneinheit kann das Produkt heiß
werden und Feuer fangen.
- Achten Sie auf die Sicherheit der Personen, die sich in den klimatisierten Räumen aufhalten; insbeson-
dere Kinder, ältere Personen oder Personen mit Behinderungen dürfen keine Einstellungen an den
Geräten vornehmen.
- Austretendes Wasser oder ein geringer Füllstand in den Kreisläufen der Inneneinheit kann zu einer
Fehlfunktion führen und die Klimaanlage beschädigen.
- Die Inneneinheit nicht über Möbeln oder sonstigen Gegenständen montieren. Bei Undichtigkeit
oder sinkendem Wasserstand könnten diese beschädigt werden.
- Während der Kühl- oder Entfeuchtungsphasen die Einheit nicht bei geöneter Tür oder oenem
Fenster betreiben (Umgebungsfeuchtigkeit über 80%). Aus den beweglichen Klappen können
Wassertropfen austreten und Gegenstände beschädigen, die sich unter der Inneneinheit benden.
Der Schaden kann zunehmen, wenn das Problem bei Bedienung aus der Ferne nicht rechtzeitig
erkannt wird.
Inhalt der Verpackung
Anschluss
Schnittstelle
Anschluss
Klimaanlage

Installation und Konfiguration
Unterer Bereich
Warnhinweis
Die Schnittstelle wird über den durch das Logo im unteren Bereich der Schnittstelle
gekennzeichneten Steckanschluss mit der Klimaanlageneinheit verbunden. Verwenden Sie nur das
mit der Schnittstelle mitgelieferte Kabel.
Die Schnittstelle nicht in unmittelbarer Nähe einer Metalloberäche und/oder in einem Kabelkanal,
in dem Elektrokabel verlaufen, montieren.
1) Die Schnittstelle muss mittels doppelseitigem Klebeband an der Wand oder der Klimaanlage
angebracht werden.
2) Die Schnittstelle senkrecht montieren (Steckanschluss nach unten, siehe nachstehende
Abbildung).
Klimaanlage
Schnistelle
Öffnen
Schnittstelle seitlich an der
Klimaanlage anbringen
40 mm
i. Vor der Installation sicherstellen, dass die Montageäche sauber ist.
ii. Sicherstellen, dass die Abdeckung für die Leitungen der Inneneinheit für Wartungsarbeiten entfernt
werden kann und die Schnittstelle mittels doppelseitigem Klebeband seitlich an der Klimaanlage
angebracht ist.
- Vor Anschließen der Schnittstelle den Stromversorgungsstecker herausziehen.
- Falls die Stromversorgung über die Wärmepumpe erfolgt, diese über den Sicherungsschalter unterbrechen.
1) Die Abdeckung an der Frontseite der Klimaanlage und den Metalldeckel am elektrischen Anschlussgehäuse
entfernen.
2) Das mit der Schnittstelle mitgelieferte Kabel wird mit dem Stecker an der elektronischen Platine im
Anschlussgehäuse verbunden. Der Stecker ist im Allgemeinen mit CN7 oder CN1101 gekennzeichnet. Die
Nummer des Steckers können Sie der Montageanleitung der Klimaanlage entnehmen.
3) Schließen Sie den Deckel des Anschlussgehäuses wieder; dabei darauf achten, dass das Kabel nicht
eingeklemmt wird.
4) Schließen Sie die Abdeckung an der Frontseite der Klimaanlage.
Kabelanschluss
Die Schnittstelle wird über den durch das Logo im unteren Bereich der Schnittstelle

0
Einlernen der Klimaanlage
Die PROG-Taste bietet zwei Funktionen:
- Reset der Schnittstelle: Länger als 7 Sekunden auf die Taste drücken, bis die
Leuchtanzeige PROG erlischt. Die Konguration der Schnittstelle
ist vollständig gelöscht.
Wenn der Knopf losgelassen wird, leuchtet die Anzeige PROG dauerhaft.
- Einlernmodus: Durch Drücken auf den Knopf (ca. 3 Sekunden) bis zum
Aueuchten der Anzeige PROG wird die Schnittstelle in den
Einlernmodus versetzt.
Wird der Knopf losgelassen, blinkt die Leuchtanzeige PROG,
bis das Einlernen abgeschlossen ist (innerhalb von 8 Minuten).
- Ziehen Sie für weitere Informationen die TaHoma Anleitung zurate.
Die Leuchtanzeigen informieren über den Funktionszustand der Schnittstelle.
- Die Leuchtanzeige PROG gibt gemäß folgender Tabelle den Kongurationszustand der Schnitts-
telle wieder:
Technische Daten
- Funkfrequenzen 868.25MHz, 868.95MHz und 869.85MHz gemäß Norm.
- Schutzart IP30.
- Nutztemperaturbereich +5°C bis 35°C.
- Maximale Nutzungshöhe: < 2000m.
- Staubschutzklasse: Klasse 2.
- Zulässige Luftfeuchtigkeit beim Betrieb: zwischen 30% und 80%.
- Abmessungen (L x B x H) 105 x 36 x 16,5 mm.
- ABS Kunststogehäuse.
- Spannungsversorgung 12V Gleichstrom 42mA.
Recycling und CE-Konformitätserklärung
Produkt nicht über den Haushaltsabfall entsorgen. Geben Sie es entsprechend den
geltenden Vorschriften bei den kommunalen Sammelstellen oder im Handel ab,
um das Recycling zu gewährleisten.
Hiermit erklären wir, dass das Gerät den grundlegenden Anforderungen sowie den anderen
relevanten Bestimmungen der Richtlinie 1999/5/EC entspricht.
Allumé Aucune configuration n'est enregistrée
Eteint L'interface est appairée avec la box
Clignotant La configuration est démarrée. En attente d'une découverte radio
- Eine blinkende Leuchtanzeige LINK zeigt eine Datenübertragung zu oder von der Schnittstelle an.
Leuchtet
Aus
Blinkt
Keine Konguration gespeichert
Die Schnittstelle ist an der TaHoma Box eingelernt
Die Konguration wurde gestartet. Warten auf eine Funkverbindung

Interface HLRR
Operating and installation guide
General information
General safety advice
For installers
Caution
Caution
Warnings
The HLRR interface for
the TaHoma system or
Hi-Box allows you to
remotely monitor your air
conditioning system.
Warnings
Please read the guide and safety precautions before installing the product. (Installation to
be performed by a professional).
Follow all of the instructions below carefully and keep the guide for the entire life of the
product. Any installation or use not foreseen by Overkiz is non-compliant. This invalidates
the warranty and discharges Overkiz of all liability, as does any failure to comply with the instructions
given herein.
Caution: Failure to follow the precautions for use may result in injury or death.
Warnings: Failure to follow the precautions for use may result in accidents or equipment
damage.
- Make sure there is no dust on connection points such as the power terminals and/or on the cable. Risk
of re or electric shocks.
- Only use the cable supplied. It must not be altered. Risk of cable heating, resulting in a re.
- Do not install the interface in a location where devices using radio frequencies as a transmission
medium are prohibited (refer to the applicable local standards).
- Do not install the interface near devices that could be aected by radio waves.
- Do not install the interface in a location where there may be people with heart pacemakers.
- Do not install the interface in an environment with high humidity (e.g. bathroom).
- Do not allow children to touch the interface. Risk of injury.
- Do not install the air conditioning unit in a location where there is a possibility of gas leaks.
Gas accumulating around the air conditioning unit could result in a re.
- The air conditioning unit is designed for people. Do not use it to cool food, animals, plants,
precision machinery, art, medicine, etc. Risk of damage, injury or malfunction.
EN
- Do not try to open the housing.
- Avoid dropping or impacts.
- Never immerse the product in liquid.
- Do not use abrasive products or solvents to clean the housing. Its surface can be cleaned using
a soft dry cloth.
- Do not use this product outdoors. Do not route the connection cable outdoors.
- Any use or modication of the equipment not foreseen by Overkiz could endanger users.
- The product can be switched o by disconnecting it from the air conditioning system.

For users
Caution
Caution
Warnings
1 x Interface
1 x Connection cable
Length: 1m1 x Guide
Product description
"Prog" indicator light
"Link" indicator light (Status)
Connector to air conditioning unit
Programming
button
- Make sure that the air conditioning unit is active during radio communication operations.
To prevent damage, check the following points in case of problems:
- Abnormal operation may result in re or electric shocks. Have the interface installed by a qualied
installer.
- In the event of a contact failure between the indoor and outdoor unit, the product may become hot,
resulting in a re.
- Consider the health and safety of those in the air conditioned environment, particularly children,
elderly people and disabled people, who must not work on a faulty device.
- A water leak or drop in the water level in the indoor unit's circuits may cause malfunctions and
damage the air conditioning system.
- Do not install the indoor unit above furniture or any other equipment. These could be damaged in
the event of a water leak or drop in the water level.
- Do not operate the unit with a door or window open during the cooling or dehumidifying phase
(ambient humidity above 80%). Water droplets may fall from the moving aps and damage
equipment placed under the indoor unit. The damage may be worse if the problem is not detected
during remote operations.
Box contents
Interface
side
Airconditioning
unit side

Installation and configuration
Lower part
Warning
The interface is connected to the air conditioning unit via the connector identied by the logo
, located on the lower part of the interface. Only use the cable supplied with
the interface.
Do not install the interface near a metal surface and/or in a trough containing electrical cables.
1) The interface must be installed on the wall or on the air conditioning unit,
with double-sided adhesive tape.
2) Install the interface vertically (connector at the bottom) as shown below.
air condioning unit
interface
opening
ax the interface on
the side of the air
conditioning unit
40 mm
i. Make sure the surface is clean before installing.
ii. Make sure that the cover on the indoor unit pipework can be removed for maintenance on the
equipment, and that the interface is axed to the side of the air conditioning unit using double-sided
adhesive tape.
- Ensure the power plug is disconnected before connecting the interface.
- Cut the power supply to the circuit breaker if the power supply comes from the heat pump.
1) Remove the cover from the front of the air conditioning unit and the metal cover from the electrics box.
2) The cable supplied with the interface must be connected to the electronic board inside the electrics
box. The connector is usually marked CN7 or CN1101. Refer to the air conditioning system installation
manual to conrm the connector number.
3) Close the electrics box cover, taking care not to obstruct the cable.
4) Close the cover on the front of the air conditioning unit.
, located on the lower part of the interface. Only use the cable supplied with
Connecting the cable

0
The PROG button is used to access two functions:
- Interface reset: Press and hold the button for more than 7 seconds until
the PROG indicator light goes out. The interface conguration is completely
cleared.
When the button is released, the PROG indicator light remains
continuously lit.
- Pairing mode: Press and hold the button (approximately 3 seconds)
until the PROG indicator light comes on. The interface is in pairing mode.
When the button is released, the PROG indicator light ashes until
pairing is complete (up to 8 minutes).
- Refer to the TaHoma guide for the signal pick-up procedure.
The indicator lights show the interface's operating state.
- The PROG indicator light gives information during the interface conguration process,
based on the table below:
Technical specifications
- Radio frequencies 868.25MHz, 868.95MHz and 869.85MHz, in compliance with the standard.
- Index protection rating IP30.
- Operating temperature +5°C to 35°C.
- Maximum operating altitude: < 2000m.
- Pollution category: Class 2.
- Operating humidity: between 30% and 80%.
- Dimensions (l x w x h) 105 x 36 x 16.5 mm.
- ABS plastic housing.
- 12V 42mA DC supply.
Recycling and Declaration of Conformity
Do not dispose of this product with the household waste. Please take it to a collection point
or an approved centre to ensure it is recycled correctly.
We declare that this product complies with the essential requirements and other relevant
provisions of Directive 1999/5/EC.
Allumé Aucune configuration n'est enregistrée
Eteint L'interface est appairée avec la box
Clignotant La configuration est démarrée. En attente d'une découverte radio
- The ashing LINK indicator light means that data is being sent to or by the interface.
Pairing the air conditioning unit
On
O
Flashing
No conguration stored
The interface is paired with the box
Conguration has started. Awaiting radio signal

Interface HLRR
Manuel d’installation et d’utilisation
Généralités
Consignes générales de sécurité
Pour les installateurs
Attention
Attention
Avertissements
Avertissements
Merci de lire la notice et les précautions de sécurité avant de procéder à l’installation du
produit. (installation à réaliser par un professionnel)
Suivre précisément chaque instruction mentionnée ci-dessous et conserver la notice aussi
longtemps que le produit. Toute installation ou utilisation non prévue par Overkiz est non
conforme. Elle entrainerait, comme tout non-respect des instructions gurant dans cette notice,
l’exclusion de toute responsabilité et de la garantie Overkiz.
- Ne pas tenter d’ouvrir le boitier.
- Eviter les chutes et les chocs.
- Ne jamais tenter d’immerger le produit dans un liquide.
- Ne pas utiliser de produits abrasifs ni solvants pour nettoyer le boîtier. Sa surface peut être nettoyée
à l’aide d’un chion doux et sec.
- Ne pas utiliser ce produit en extérieur. Ne pas faire passer le câble de connexion à l’extérieur.
- Toute utilisation ou modication sur l’équipement non prévue par Overkiz pourrait entrainer un
danger pour l’utilisateur.
- L’extinction du produit peut être réalisée en le débranchant du système de climatisation.
Attention : En cas de non respect des précautions d’utilisation, un risque de blessure ou de mort
existe.
Avertissements : Le non respect des précautions d’utilisation peut entraîner des accidents ou
une dégradation du matériel.
- S’assurer qu’il n’y a pas de poussière sur les points de connexion tels que les bornes d’alimentation
et/ou sur le câble. Un incendie ou un choc électrique peut survenir.
- Merci de n’utiliser que le câble fourni. Il ne doit pas être modié. Le câble pourrait chauer et un
incendie pourrait se déclencher.
- Ne pas installer l’interface où les dispositifs utilisant les radiofréquences comme média de transmis-
sions sont interdits (Se référer aux normes locales en vigueur).
- Ne pas installer l’interface à proximité de dispositifs qui pourraient être aectés par les ondes radio.
- Ne pas installer l’interface où des personnes disposant d’un stimulateur cardiaque peuvent se
trouver.
- Ne pas installer l’interface dans un environnement humide (par exemple une salle de bains).
- S’assurer que les enfants ne touchent pas à l’interface. Un danger de blessure existe.
- Ne pas installer le climatiseur dans un endroit où de potentielles fuites de gaz peuvent exister. Si du
gaz entoure le climatiseur, un incendie peut se déclencher.
- Le climatiseur est destiné aux personnes. Ne pas l’utiliser pour la conservation des aliments, pour les
animaux, pour les plantes, pour les machines de précision, pour l’art, pour la médecine etc. Une
détérioration ainsi que des dysfonctionnements peuvent se produire.
FR L’interface HLRR associée
avec le système TaHoma ou
la Hi-Box permet de
contrôler à distance votre
installation de climatisa-
tion.

Pour les utilisateurs
Attention
Attention
Avertissements
1 x Interface
1 x Câble de connection
Longueur : 1m1 x Notice
Description du produit
t
Voyant “Prog“
Voyant “Link“ (Statut)
Connecteur vers unité de climatisation
Bouton de
programmation
- Merci de vérier que le climatiseur est en fonction durant les opérations de communication radio.
An de limiter les dégâts, merci de vérier les points suivants lorsque des problèmes surviennent :
- Un fonctionnement anormal peut créer un choc électrique ou un incendie. Merci de demander à un
installateur d’installer l’interface.
- En cas de faux contact entre l’unité intérieure et extérieure, le produit peut chauer et un incendie
peut se déclencher.
- Etre attentif à la santé des occupants de l’endroit climatisé, notamment aux enfants, aux personnes
agées ou handicapées qui ne doivent pas intervenir sur un appareil défectueux.
- Une fuite de réfrigérant dans le circuit de l'unité intérieure peut provoquer un dysfonctionnement
et dégrader le système de climatisation.
- Ne pas installer l’unité intérieure au-dessus de meubles ou tout autre matériel. En cas de fuite de
condensat ou de réfrigérant, ils pourraient être endommagés.
- Ne pas faire fonctionner l’unité avec une porte ou une fenêtre ouverte durant les phases de
refroidissement ou de déshumidication (humidité ambiante à plus de 80%). Les volets mobiles
peuvent entrainer la chute de gouttes d’eau et endommager le matériel placé sous l’unité intérieure.
Sa détérioration peut être agravée si le problème n’est pas remarqué lors d’opérations à distance.
Contenu de la boîte
Côté
Interface Côté
Climatiseur

Installation et configuration
Partie inférieure
Avertissement
L’ Interface est connectée à l’unité de climatisation via le connecteur identié par le logo
situé sur la partie inférieure de l’interface. Merci de n’utiliser que le câble fourni avec
l’interface.
Ne pas installer l’interface à proximité d’une surface métallique et/ou dans une goulotte contenant
des câbles electriques.
1) L’interface doit être installée sur le mur ou sur le climatiseur, avec du ruban adhésif double face.
2) Installer l’interface en position verticale (connecteur vers le bas) comme indiqué ci-dessous.
climaseur
interface
ouverture
xer l’interface sur le
côté du climatiseur
40 mm
i. S’assurer que la surface soit propre avant toute installation.
ii. Vérier que le couvercle de la tuyauterie de l’unité intérieure peut être retiré lors de la maintenance de
l’équipement et que l’interface est xée sur le côté du climatiseur avec un adhésif double face.
1) Retirer la façade de l’unité de climatisation ainsi que le capot du boitier électrique.
2) Le câble livré avec l’interface est à brancher sur le connecteur de la carte électronique à
l’intérieur du boîtier électique. Le connecteur est généralement repéré par CN7 ou CN1101. Se
reporter au manuel d’installation du système de climatisation an de conrmer le numéro du
connecteur.
3) Refermer le capot du boitier électrique en veillant à ne pas bloquer le câble.
4) Refermer la façade de l’unité intérieure.
- Déconnecter la prise d’alimentation avant de procéder au branchement de l’interface.
- Couper la source d’alimentation au disjoncteur dans le cas où l’alimentation se fait par la pompe à
chaleur.
situé sur la partie inférieure de l’interface. Merci de n’utiliser que le câble fourni avec
Connexion du câble

0
Appairage du climatiseur
Le bouton PROG donne accès à deux fonctionnalités :
- Reset de l’interface : Appuyer sur le bouton plus de 7 secondes jusqu’à ce que
le voyant PROG s’éteigne. La conguration de l’interface est totalement eacée.
Quand le bouton est relâché le voyant PROG reste allumé en permanence.
- Mode appairage : Appuyer sur le bouton (environ 3 secondes) jusqu’à ce
que le voyant PROG s’allume, ce qui met l'interface en mode appairage.
Quand le bouton est relâché, le voyant PROG clignote jusqu’à ce que
l’appairage soit eectué (dans un délai de 8 minutes).
Spécifications techniques
- Fréquences radio 868.25MHz, 868.95MHz et 869.85MHz conformément à la norme.
- Indice de protection IP30.
- Température d’utilisation +5°C à 35°C.
- Altitude maximale d’utilisation: < 2000m.
- Catégorie de pollution: Classe 2.
- Humidité de fonctionnement: entre 30% à 80%.
- Dimensions (L x l x h) 105 x 36 x 16,5 mm.
- Boitier plastique ABS.
- Alimentation 12V continu 42mA.
Recyclage et déclaration de conformité
Ne pas jeter le produit avec les ordures ménagères. Veiller à le déposer dans un point de
collecte ou dans un centre agréé an de garantir le recyclage.
Nous déclarons que l’appareil est conforme aux exigences essentielles et aux autres
dispositions pertinentes de la directive 1999/5/CE.
Allumé Aucune configuration n'est enregistrée
Eteint L'interface est appairée avec la box
Clignotant La configuration est démarrée. En attente d'une découverte radio
- Merci de se référer à la notice de TaHoma ou de la Hi-Box pour la découverte.
Les voyants renseignent sur l’état de fonctionnement de l’interface.
- Le voyant PROG donne des informations durant le processus de conguration de l’interface
suivant le tableau ci-dessous:
- Le voyant LINK clignotant indique que des données sont transmises à ou par l’interface.

Interface HLRR
Manuale di installazione e d'uso
Informazioni generali
Istruzioni generali di sicurezza
Per gli installatori
Attenzione
Attenzione
Avvertenze
L'interfaccia HLRR abbinata
al sistema TaHoma o Hi-box
permettedi controllare a
distanza il vostro impianto di
climatizzazione.
Avvertenze
Leggere attentamente il manuale d'uso e le precauzioni di sicurezza prima di procedere
all'installazione del prodotto. (L'installazione deve essere eseguita da un professionista).
Attenersi assolutamente a ogni istruzione indicata a seguire e conservare il manuale d'uso
per l'intera durata di utilizzo del prodotto. Si considera non conforme qualsiasi installazione
o utilizzo non previsto da parte di Overkiz, che comporta, così come il mancato rispetto delle istruzioni
riportate nel presente manuale, l'annullamento della responsabilità e della garanzia Overkiz.
- Non tentare di aprire la scatola.
- Evitare cadute e urti.
- Non tentare mai di immergere il prodotto in liquidi.
- Non utilizzare prodotti abrasivi né solventi per la pulizia della scatola. La sua supercie può essere pulita
usando un panno morbido e asciutto.
- Non utilizzare il prodotto all'esterno. Non lasciar passare il cavo di collegamento all'esterno.
- Qualsiasi utilizzo o modica al dispositivo, non prevista da Overkiz, potrebbe essere causa di pericolo per
l'utente.
- È possibile spegnere il prodotto scollegandolo dall'impianto di climatizzazione.
Attenzione: in caso di mancato rispetto delle precauzioni d'uso, sussiste un pericolo di lesioni o
di morte.
Avvertenza: il mancato rispetto delle precauzioni d'uso può comportare incidenti o l'usura del
materiale.
- Vericare l'assenza di polvere sui punti di connessione, quali i morsetti di alimentazione e/o sul cavo.
Sussiste il pericolo di incendio o di scosse elettriche.
- Utilizzare esclusivamente il cavo fornito in dotazione, che non deve essere modicato, poiché
potrebbe surriscaldarsi e causare un incendio.
- Non installare l'interfaccia laddove sono vietati i dispositivi che utilizzano radiofrequenze come mezzi
di trasmissione (fare riferimento alle norme locali in vigore).
- Non installare l'interfaccia in prossimità di dispositivi che potrebbero essere soggetti a onde radio.
- Non installare l'interfaccia laddove possono trovarsi persone portatrici di pacemaker.
- Non installare l'interfaccia in ambienti umidi (ad esempio in un bagno).
- Assicurarsi che i bambini non tocchino l'interfaccia. Sussiste un pericolo di lesioni.
- Non installare il climatizzatore in un luogo dove possano esistere potenziali fughe di gas.
Se il climatizzatore è circondato da gas, sussiste un pericolo di incendio.
- Il climatizzatore è destinato alle persone. Non utilizzare per la conservazione di alimenti, sugli animali,
sulle piante, sulle macchine di precisione, per opere artistiche, per la medicina ecc. Possono vericarsi
usura e malfunzionamenti.
IT

Per gli utenti
Attenzione
Attenzione
Avvertenze
1 interfaccia
1 cavo di collegamento
Lunghezza: 1 m
1 manuale d'uso
Spia "Prog"
Spia “Link“ (stato)
Connettore verso l'unità
di climatizzazione
Pulsante di
programmazione
- Vericare che il climatizzatore sia in funzione durante le operazioni di comunicazioni radio.
Al ne di limitare i danni, vericare i seguenti punti in caso di problemi:
- Un funzionamento anomalo può causare scosse elettriche o un incendio. Richiedere l'installazione
dell'interfaccia da parte di un installatore.
- In caso di falso contatto tra l'unità interna ed esterna, il prodotto potrebbe surriscaldarsi
provocando un incendio.
- Proteggere la salute degli occupanti del locale climatizzato, in particolare dei bambini, degli
anziani o portatori di handicap che non devono intervenire sull'apparecchio difettoso.
- Una fuoriuscita di acqua o un abbassamento del livello d'acqua nei circuiti dell'unità interna può
provocare un malfunzionamento compromettendo l'impianto di climatizzazione.
- Non installare l'unità interna al di sopra dei mobili o di qualsiasi altro materiale, in quanto
potrebbero danneggiarsi in caso di fuoriuscita o di abbassamento del livello d'acqua.
- Non far funzionare l'unità con porte o nestre aperte durante la fase di rareddamento o di
deumidicazione (umidità ambiente superiore all'80%). Le imposte mobili possono causare la
caduta di gocce d'acqua e danneggiare il materiale posizionato sotto l'unità interna. Il danno può
peggiorare se il problema non è rilevato durante le operazioni a distanza.
Lato
Interfaccia
Lato
Climatizzatore
Contenuto della confezione
Descrizione del prodotto

Parte inferiore
Avvertenza
L'interfaccia è collegata all'unità di climatizzazione dal connettore contrassegnato dal logo
sulla parte inferiore dell'interfaccia.
Utilizzare esclusivamente il cavo fornito in dotazione con l'interfaccia.
Non installare l'interfaccia in prossimità di una supercie metallica e/o in una canalina portacavi elettrici.
1) L'interfaccia deve essere installata sul muro o sul climatizzatore con un nastro biadesivo.
2) Installare l'interfaccia in posizione verticale (connettore rivolto verso il basso) come indicato
di seguito.
climazzatore
interfaccia
apertura
ssare l'interfaccia sul
lato del climatizzatore
40 mm
i. Vericare la pulizia della supercie prima di procedere all'installazione.
ii. Vericare che il coperchio della tubazione dell'unità interna possa essere rimosso in caso
di manutenzione del dispositivo e che l'interfaccia sia ssata sul lato del climatizzatore con biadesivo.
- Vericare di scollegare la presa di alimentazione prima di procedere al collegamento dell'interfaccia.
- Scollegare l'alimentatore dal disgiuntore se l'alimentazione è fornita dalla pompa di calore.
1) Rimuovere il coperchio anteriore del climatizzatore e il coperchio metallico della scatola elettrica.
2) Il cavo fornito in dotazione con l'interfaccia deve essere collegato al connettore della scheda
elettronica all'interno della scatola elettrica. Il connettore è generalmente contrassegnato con CN7 o
CN1101. Fare riferimento al manuale d'installazione dell'impianto di climatizzazione per confermare il
numero del connettore.
3) Rissare il coperchio della scatola elettrica vericando di non bloccare il cavo.
4) Rissare il coperchio anteriore del climatizzatore.
sulla parte inferiore dell'interfaccia.
Installazione e configurazione
Collegamento del cavo

0
Il pulsante PROG consente di accedere a due funzioni:
- Ripristino dell'interfaccia: Premere il pulsante per oltre 7 secondi nché
la spia PROG non si spegne. La congurazione dell'interfaccia è completamente
cancellata.
Rilasciando il pulsante, la spia PROG rimane accesa in modo permanente.
- Modalità di accoppiamento: Premere il pulsante (circa 3 secondi)
nché la spia PROG non si accende e posiziona l'interfaccia nella
modalità di accoppiamento. Rilasciando il pulsante, la spia PROG
lampeggia no alla realizzazione dell'accoppiamento (in un intervallo di 8 minuti).
- Fare riferimento al manuale di TaHoma per informazioni sulla copertura.
Le spie forniscono informazioni sullo stato di funzionamento dell'interfaccia.
- La spia PROG fornisce informazioni durante il processo di congurazione dell'interfaccia in base
alla seguente tabella:
Specifiche tecniche
- Frequenze radio 868.25MHz, 868.95MHz e 869.85MHz in conformità alla normativa.
- Grado di protezione IP30.
- Temperatura di esercizio da +5 °C a 35 °C.
- Altezza massima di utilizzo: < 2000 m.
- Classe di inquinamento: classe 2.
- Umidità di esercizio: 30% - 80%.
- Dimensioni (B x P x H) 105 x 36 x 16,5 mm.
- Scatola in plastica ABS.
- Alimentazione 12 V continua 42 mA.
Non smaltire il prodotto con i riuti domestici. Provvedere a consegnarlo a un punto
di raccolta o a un centro autorizzato per garantirne il riciclaggio.
Dichiariamo che l'apparecchio è conforme ai requisiti fondamentali e alle altre disposizioni
pertinenti della direttiva 1999/5/CE.
Allumé Aucune configuration n'est enregistrée
Eteint L'interface est appairée avec la box
Clignotant La configuration est démarrée. En attente d'une découverte radio
- La spia LINK lampeggiante indica che i dati sono trasmessi alla o dall'interfaccia.
Accoppiamento del climatizzatore
Accesa
Spenta L'interfaccia è accoppiata alla scatola
Lampeggiante La congurazione è iniziata. In attesa della copertura radio
Nessuna congurazione registrata
Riciclaggio e Dichiarazione di conformità

Interface HLRR
Gids voor de installatie en het gebruik
Algemeen
Algemene veiligheidsvoorschriften
Voor de installateur
Let op
Let op
Waarschuwingen
Met de interface HLRR,
die hoort bij het
TaHoma-systeem of Hi-Box,
kunt u op afstand uw
airconditioning bedienen.
Waarschuwingen
Lees deze handleiding en de veiligheidsvoorzorgen voordat u het product installeert.
(Installatie te worden uitgevoerd door een professional).
Volg nauwlettend alle hierna volgende instructies en bewaar de handleiding net zo lang
als het product. Iedere installatie of gebruik die niet voorzien is door Overkiz is niet
doelmatig. Hierdoor en door het negeren van de instructies in deze handleiding, vervallen
iedere aansprakelijkheid en garantie van Overkiz.
- Probeer niet het apparaat te openen.
- Vermijd vallen en schokken.
- Dompel het product nooit in een vloeistof.
- Geen schuur- of oplosmiddelen gebruiken om het schoon te maken.
De buitenkant kan schoongemaakt worden met een zachte droge doek.
- Gebruik dit product alleen binnenshuis. Houd de aansluitkabel binnenshuis.
- Ieder gebruik of wijziging aan het apparaat die niet voorzien is door Overkiz kan een gevaar voor
de gebruiker betekenen.
- Het product kan worden uitgezet door het los te maken van het airconditioningssysteem.
Let op: Het niet naleven van de voorzorgen voor het gebruik, kan een risico op letsel of
levensgevaar veroorzaken.
Waarschuwingen: Door het niet naleven van de voorzorgen voor het gebruik kunnen
ongelukken ontstaan of kan de installatie beschadigen.
- Zorg ervoor dat de aansluitpunten en de voedingsklemmen en/of de kabel stofvrij zijn. Hierdoor kan
brand of een elektrische schok ontstaan.
- Gebruik alleen de meegeleverde kabel. Deze mag niet worden gewijzigd. Hierdoor kan de kabel te
heet worden en brand ontstaan.
- Installeer de interface niet op een plaats die verboden is voor apparaten die radiofrequentie als
transmissiemethode gebruiken (raadpleeg de ter plaatse geldende normen).
- Installeer de interface niet in de nabijheid van apparaten die beïnvloed kunnen worden door
radiogolven.
- Installeer de interface niet op een plaats waar zich personen met een pacemaker kunnen bevinden.
- Installeer de interface niet op een vochtige plaats (bijvoorbeeld een badkamer).
- Zorg ervoor dat kinderen de interface niet kunnen aanraken. Hierdoor kan letsel ontstaan.
- Installeer de airconditioning niet op een plaats waar een risico op gaslekken bestaat.
Door gas rondom de airconditioning kan brand ontstaan.
- De airconditioning is bestemd voor personen. Gebruik hem niet voor het conserveren van
levensmiddelen, voor dieren, voor planten, voor precisiemachines, voor kunstvoorwerpen,
voor medicijnen enz. Hierdoor kunnen schade en storingen ontstaan.
NL

Voor de gebruiker
Let op
Let op
Waarschuwingen
1 x interface
1 x verbindingskabel
Lengte: 1 m
1 x handleiding
Productbeschrijving
"Prog"-led
"Link"-led (status)
Uitgang naar airconditioningsunit
- Controleer of de airconditioning aan is als u de afstandsbediening gebruikt.
Om onnodige schade te voorkomen, moet u de volgende punten controleren wanneer er problemen zijn:
- Door een abnormale werking kan brand of een elektrische schok ontstaan. Laat de interface daarom
door een installateur installeren.
- Door een slecht contact tussen de binnen- en de buitenunit, kan zich warmte ontwikkelen en
daardoor brand ontstaan.
- Let op de gezondheid van de gebruikers van de gekoelde ruimte, met name kinderen, ouderen of
gehandicapten. Zij mogen niet aan een defect apparaat komen.
- Door waterlekkage of een te laag waterpeil in de binnenunit kan een storing optreden en kan het
airconditioningssysteem defect raken.
- Installeer de binnenunit niet boven meubels of andere apparaten. In geval van waterlekkage
zouden zij kunnen beschadigen.
- Laat de unit niet werken met een open deur of venster tijdens het koelen of drogen van de ruimte
(vochtigheid in de ruimte hoger dan 80%). Er kunnen waterdruppels van de beweegbare kleppen
vallen waardoor voorwerpen onder de binnenunit kunnen beschadigen. Als het probleem niet
wordt ontdekt tijdens de onbewaakte werking kan aanzienlijke schade ontstaan.
Inhoud van de doos
Voor de
interface
Voor de
airconditioning
Programmeer-
knop

Installatie en configuratie
Onderkant
Waarschuwing
De Interface wordt verbonden met de airconditioningsunit via de uitgang die te herkennen
is aan het symbool aan de onderkant van de interface. Gebruik alleen de met
de interface geleverde kabel.
Installeer de interface niet in de buurt van een metalen oppervlak en/of in een kabelgoot met
elektrische kabels.
1) De interface moet worden geïnstalleerd aan de muur of, met dubbelzijdig plakband,
op de airconditioning.
2) Installeeer de interface rechtop (met de uitgang aan de onderkant) zoals hieronder is aangegeven.
aircondioning
interface
openen
bevestig de interface
aan de zijkant van de
airconditioning
40 mm
i. Zorg dat het oppervlak schoon is voor de installatie.
ii. Controleer of het deksel van de leidingen van de binnenunit kan worden verwijderd voor onderhoud
van het apparaat en of de interface met dubbelzijdig plakband goed vastzit aan de zijkant van de
airconditioning.
- Maak de voedingsstekker los vóór het aansluiten van de interface.
- Schakel de voeding uit met de hoofdschakelaar als de voeding afkomstig is van de warmtepomp.
1) Verwijder het deksel aan de voorkant van de airconditioning en het metalen deksel van de
elektrische doos.
2) De met de interface meegeleverde kabel moet worden aangesloten op de ingang van de
elektronische printplaat in de elektrische doos. De ingang is meestal aangegeven met CN7 of CN1101.
Raadpleeg de installatiehandleiding van het airconditioningssysteem om het juiste nummer van de
ingang te zien.
3) Sluit het deksel van de elektrische doos zonder de kabel af te knellen.
4) Sluit het deksel aan de voorkant van de airconditioning.
Aansluiting van de kabel
is aan het symbool aan de onderkant van de interface. Gebruik alleen de met

0
De PROG-knop geeft toegang tot twee functies:
- Resetten van de interface: Druk langer dan 7 seconden op de knop tot
de PROG-led dooft. De conguratie van de interface is totaal gewist.
Als de knop wordt losgelaten blijft de PROG-led permanent branden.
- Koppelingsmodus: Druk op de knop (ongeveer 3 seconden) tot
de PROG-led gaat branden. De interface komt in de koppelingsmodus.
Als de knop wordt losgelaten blijft de PROG-led knipperen tot de
koppeling is voltooid (dit kan tot 8 minuten duren).
- Raadpleeg de handleiding van TaHoma voor het zoeken.
De leds geven informatie over de staat van de werking van de interface.
- De PROG-led geeft informatie tijdens de conguratie van de interface, zie de tabel hieronder:
Technische specificaties
- Radiofrequenties 868,25 MHz, 868,95 MHz en 869,85 MHz conform met de normen.
- Beschermingsklasse IP30.
- Gebruikstemperatuur +5 °C tot 35 °C.
- Max. gebruikshoogte: < 2000 m.
- Vervuilingsklasse: Klasse 2.
- Vochtigheid tijdens de werking: tussen 30% en 80%.
- Afmetingen (L x b x h) 105 x 36 x 16,5 mm.
- Kunststof kast: ABS.
- Voeding 12 V continu 42 mA.
Recycling en conformiteitsverklaring
Gooi het product niet weg met het huishoudelijk afval. Let er op dat u het bij een
inzamelpunt of depot inlevert zodat het gerecycleerd kan worden.
Hierbij verklaren wij dat het product in overeenstemming is met de essentiële eisen en de
andere relevante bepalingen van de Europese richtlijn 1999/5/EG.
Brandt Geen enkele configuratie is opgeslagen
Uit De interface is gekoppeld met de box
Knippert De configuratie is bezig. Wachten op een radiosignaal
- De LINK-led knippert als gegevens worden uitgewisseld met de interface.
Koppelen van de airconditioning
Table of contents
Languages:
Popular Recording Equipment manuals by other brands

National Instruments
National Instruments PCI-GPIB Getting started

Phonocar
Phonocar 4/072 manual

Sima
Sima SSW-4 user manual

Addi-Data
Addi-Data ADDICOM PA 7300 Technical description

Waves
Waves DSPro StageGrid 4000 user guide

Audio Technica
Audio Technica System 10 Stompbox ATW-1501 Installation and operation