OVERWATCH XE22 User manual

Body Camera User’s Manual
XE22
USER MANUAL
1

Body Camera User’s Manual
Table of Content
Preface..........................................................................................................................................................3
Brief Introduction and Main Features .................................................................................................4
Buttons Description ..................................................................................................................................5
Interface Introduction .............................................................................................................................7
Operations...................................................................................................................................................8
Operation for BodycamTool.................................................................................................................12
Operations for 4G BodyCamera Connection ...................................................................................14
Specification..............................................................................................................................................20
Packing List ...............................................................................................................................................21
2

Body Camera User’s Manual
Preface
Thank you for using OverWatch Security. This manual is applicable for the ‘XE22’ Body Camera.
Please read the manual carefully before using the device. Please keep this manual for reference in
the future. The content of this manual is subject to be changed without notice.
Important notice
•Please keep the device from high temperature.
•When smoke, smell or noise comes out from the device, shut down the
power immediately, and contact your supplier in time.
•Please contact your supplier if the device is not working properly. No warranty
will be covered if the damage caused by unauthorized disassembly or repair.
•Please do NOT charge the device at high temperature over 45 degrees
Celsius, it could possibly cause the explosion of the battery. Please use the
certificated battery from the original factory ONLY.
•Please read this manual carefully before using the device, and follow
the instructions when using the device.
•Please do NOT kick or hit the product to avoid device damage and data missing.
•Keep the device away from high temperature and high humidity environment.
•Keep the device away from strong interference source.
•Please backup the data recorded by the device in time.
•Please keep the lens clean for good image quality.
•Please keep your user name and password safe.
3

Body Camera User’s Manual
Brief Introduction and Main Features
Brief introduction
The body cameras are the portable devices that can record video and audio. The devices can
also transmit live video and audio through 3G or 4G, do live tracking with GPS. The devices
have a TFT monitor and buttons on it and user can operate the device easily. The body
cameras are usually used by police man, security guard, and other law enforcement officers.
Main features
•The device is in compact size and suitable for portable use of recording.
•User can get live video and audio through 3G, 4G or WiFi.
•User can get live tracking of the device through built-in GPS in the device. The
GPS data will also be recorded into the record file with audio and video, so user
can get the location information in the record file.
•Use lithium battery for power supply. Device can be recording continuously for
10 hours.
•Built-in 32G storage space. (32G~128G optional storage space)
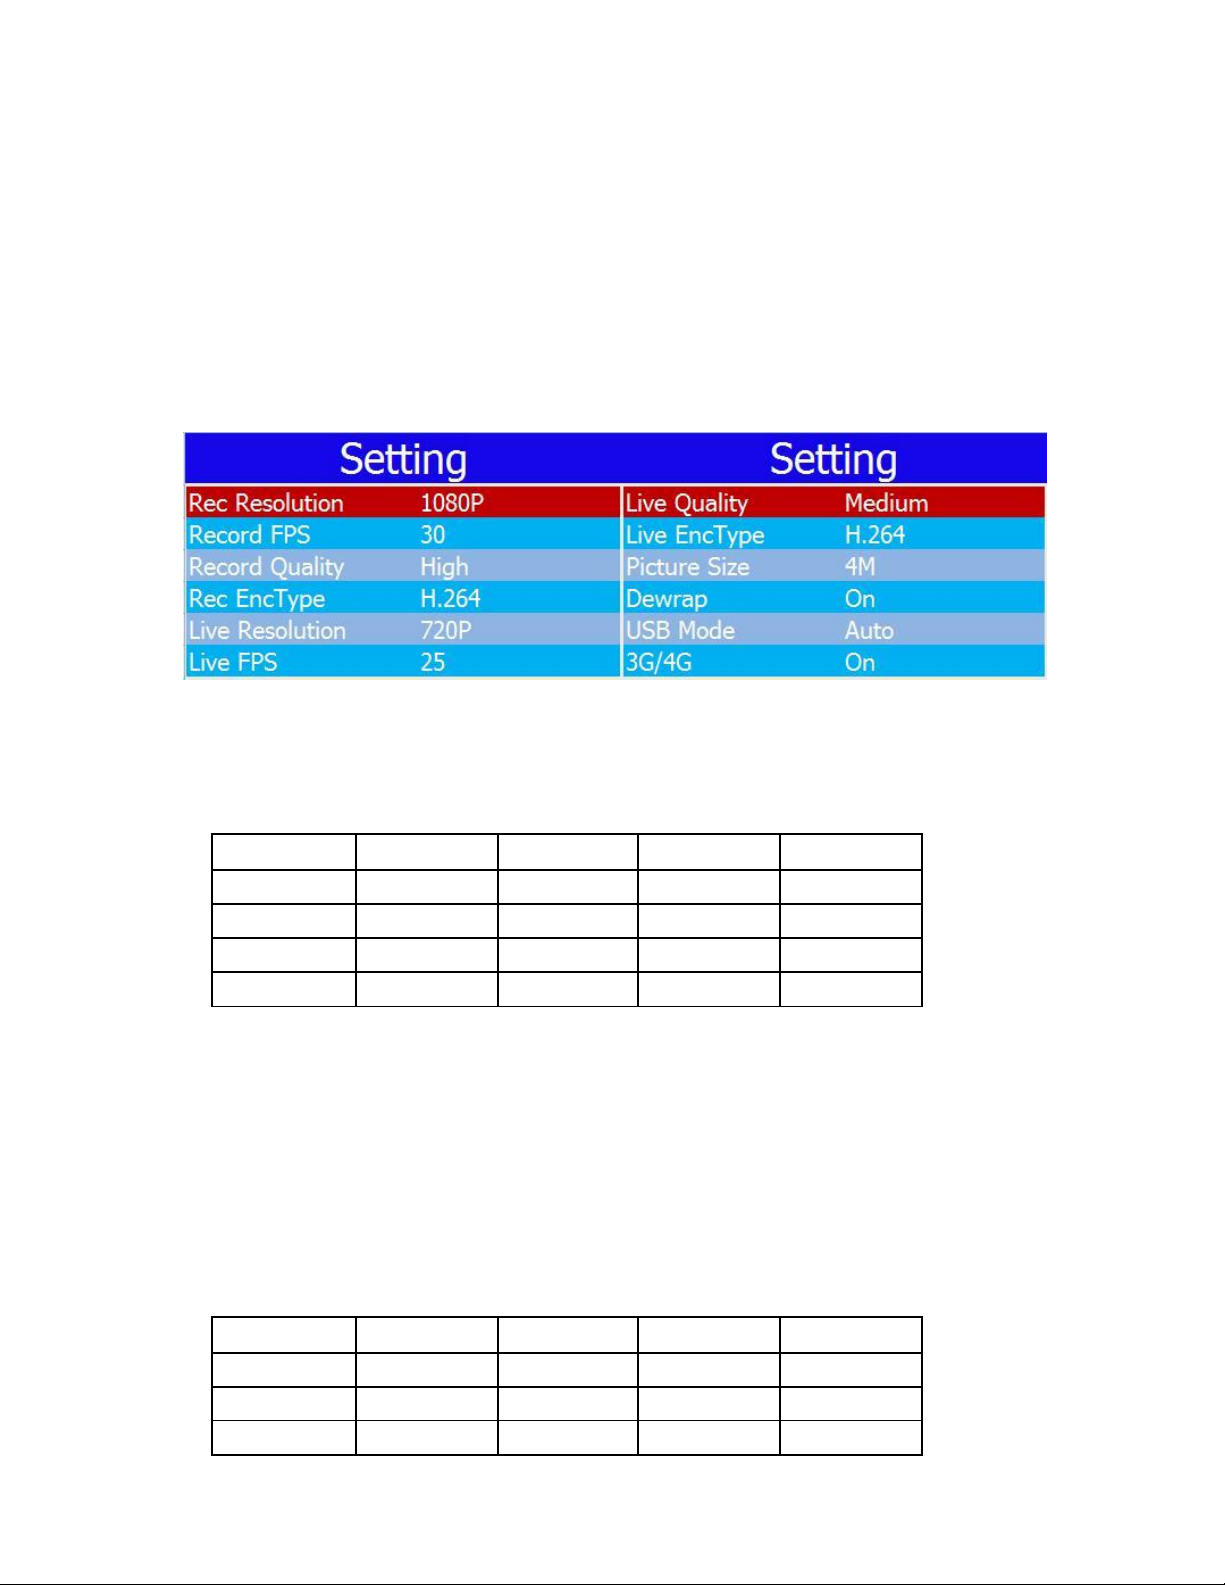
•Built-in 4 million pixel cameras, support recording at 1512P, 1440P, 1296P or
1080P resolution, support taking picture with 64M, 16M and 4M.
•Support IR. Support recording at night.
•Record file name have information on date, time, record type, which make it
easier for searching.
•User can explore, search and playback the files on the device.
•Support panic button. The panic button alarm can be sent to control center
through 3G/4G.
•Record encryption makes the evidence more safe.
•Support H.264 and H.265 video compression.
•Device can display device ID, user ID, date and time.
•Device can display information about battery usage, charging status, system time
and memory space. Device has light indication for power on, recording video or
audio. Green light indicates power on, red light indicates video recording, yellow
light indicates audio recording.
•Device can report event alarm, including alarm for battery running low,
insufficient memory space alarm etc.
•Device has log files. Device with log events that include power on/off, recording
video, recording audio, taking pictures, GPS status fixed, 3G/4G connection, and
WiFi connection.
4

Body Camera User’s Manual
Buttons Description
5

Body Camera User’s Manual
Buttons Description
Buttom
Icon
Action
Function
Short Press
When device is ON, short press to turn on/off the screen.
Power
Long press
1.
When device is OFF, power on device when holding for over 3 seconds.
2.
When device is ON, power off device when holding for over 3 seconds.
Talk
PTT
Short Press
Start talking back.
back
(Need to connect to interphone or server through internet★)
Short Press
Start recording when device is ON, Stop recording after pressing it again.
Record
Long press
Power ON and start recording when device is OFF.
Short Press
1.
Start to snap.
Snap
2.
Snap when device is recording and store the picture.
Long press
Holding for 3 seconds will turn on the flash light when device is ON.
Audio
Short Press
1.
Start recording audio when device is ON.
Record
2.
Switch to record audio when device is recording video.
Laser
Short Press
Turn on the laser when device is ON (only when laser is enabled in menu)
Long press
Holding for 3 seconds will turn on the IR (when IR is in manual mode)
SOS
Long press
Holding for 3 seconds to starts an alarm and recording, send the alarm to
server at the same time★
SIM
SIM
Insert /
Insert a SIM card into the slot and use 4G service to connect internet★
Eject
USB
USB
Connect
For charging, data transmission, external camera, headset and interphone ect.
Menu/
Short Press
1.
Display the main menu on the screen when device is in preview mode.
2.
Confirm the setting changed.
OK
Long press
Switch 1080P, 720P or other REC resolution in preview mode.
Up
Short Press
Scroll up the menu or zoom out the view in preview mode.
Down
Short Press
Scroll down the menu or zoom in the view in preview mode.
1.
When menu is displayed, press to return to the upper level menu;
Return /
Short Press
2.
When device is idle, press to play back recorded video, audio and pictures.
3. When recording, press the button will mark the recording video as IMP file.
Play
Long press
Disable/Enable menu operaton when recording.
6

Body Camera User’s Manual
Indicator
LED Indicator
Colour
Description
ON:Charging complete
Indicator 1
Blue
Twinkling: Charging
OFF:Not charging
Green
Twinkling slowly:Idle
Twinkling faster: Face recognition is working
Indicator 2
ON: Live streaming or menu operating
Red
Video recording in progress
Yellow
Audio recording in progress
Interface Introduction
7

Body Camera User’s Manual
Operations
1. Power On/Off
When the device is OFF, holding the “Power” button for 3 seconds will turned on the device.
When the device is ON, short press the “Power” button will turn On/Off the monitor, press
and hold the “Power” button for 3 seconds will turn off the device.
2. Record Video
When device is ON, short press the “Record” button to start recording, the device will vibrate
once and indicator will turn red. When the device is recording, press the “Record” button again
will stop recording with vibration and beep.
When device is ON, holding the “SOS” button for 3 seconds to active the alarm system and
start recording.
When the device is OFF, holding the “record” button for 3 seconds will power on the device
and start recording video.
3. Record Audio
When the device is ON, press “Audio Record” button to start recording, the device will vibrate
once and the indicator will turn yellow. Press the “Audio Record” button again, the device will
stop recording.
4. Take Picture
When the device is ON, press “Snap” button to take pictures.
5. IR
When the IR setting is Manual, holding the “IR” button for 3 seconds can turn On/Off the IR
light; When the IR setting is Auto, the IR switchs according to the ambient light illumination.
When the IR is ON, the Bodycam’s view will be black and white.
6. Play Back
Short Press the “Return” button, the “Playback” menu will be displayed. Use “UP” and “DOWN”
button to choose the directory and file to play, The directories and files are named with date and
time. See the picture below, the directory of “20190101_20” means those videos in the folder is
recorded between 20:00 and 21:00 in the day of 2019/01/01, “203315” means the video is
generated at 20:33:15, “1030h” means that is a general video with 30fps@1080P.
6.1 Play back video files
In “Video” directory, there are directories named with date and hour, press “OK” button to
access the directories and press “OK” button to play back. The video format is AVI.
6.2 View the pictures
8

Body Camera User’s Manual
In the “Photo” directory, there are directories named with time. Choose the picture file and
press “OK” button to view the pictures. The picture format is JPG.
6.3 Play Audio
In the “Audio” directory, there are directories named with time. Choose the audio file and
press “OK” to play the audio. The audio format is WAV.
7. Settings
When the device is in preview mode, press “menu” button to show the “Setting” menu. Press
“UP” or “Down” to scroll up or down in the menu. Press “OK” to set the configuration. Press
“Return” to return to the upper level menu.
•The Rec resolution is for recording. The default setting is 1080P(1920*1080).
•The default record FPS is 30 FPS. The higher of the FPS, the smoother of the video footage.
•Recording quality refers to the bit rate of recording, the higher of the bit rate value,
theoretically, the better image we can get from the video footage.
H.264/H.265
Super
High
Medium
Low
1080P
8/ 4M
5/ 3M
3/ 1.8M
1.2/ 1M
1296P
9/ 5M
6/ 3.5M
3/ 2.4M
2/ 1.5M
1440P
10/ 6M
7/ 4M
4/ 2.5M
2/ 1.5M
1512P
10/ 6M
7/ 4M
4/ 2.5M
2/ 1.5M
•The Rec EncType is for recording files compression, given H.264 and H.265 two options.
Theoretically, H.265 consumes 50% less storage space than H.264 under the same picture
quality.
•The Live resolution is for video streaming through 4G/3G or WiFi. The default resolution
is (1280*720), the higher value we set, the better image we can get from the live
streaming.
•The Live view FPS for video streaming through 4G/3G or WiFi. The higher of the FPS, the
smoother of the live video.
•The default value of live quality is “medium”. We can get a better live streaming base on
the higher live quality value.
H.264/H.265
Super
High
Medium
Low
720P
2/
2M
1.5/ 1.5M
1/
1M
0.8/ 0.5M
1080P
3/
3M
2.5/ 2M
1.8/
1.5M
0.8/ 0.5M
1296P
3.5/
3.5M
2.8/ 2.8M
2/ 1.8M
1.5/ 1M
9

Body Camera User’s Manual
1440P
4/ 4M
3/ 3M
2 2M
1.5/ 1M
1512P
4/ 4M
3/ 3M
2 2M
1.5/ 1M
•The Live EncType is for live streaming compression, include H.264 and H.265 two options.
Theoretically, H.265 consumes 50% less data transmission than H.264 under the same
picture quality.
•Picture size means the picture’s resolution when you snap; the picture’s resolution you
took when device record, which is base on the record resolution.
•When the Dewarp is ON, it means that the camera has distortion correction to make the
picture more realistic and accurate; when the Dewarp is OFF, the lens angle is bigger and
zoom in/zoom out is available with the setting.
•The default USB mode is “Auto”. User can choose from “Auto”, “Host” or “Device” mode.
•“Host” means that device is working on 4G/3G or WiFi mode; “Device” means camera is
communicating with PC; “Auto” means that camera can detect the USB connected, if the
USB cable connects with PC, camera will work on “device” mode, if the USB cable connects
with charger, camera will work on “Host” mode.
•The 3G/4G setting is used to turn On/Off 3G/4G module.
•The WiFi setting is to turn On/Off the WiFi and AP. The default AP password is 12345678.
WiFi list can show the list of WiFi searched by device, which makes camera connecting a
WiFi more easier.
•Device support an external camera connection with USB cable, when the setting change
to “ON”, device will restart and then detect the external camera connection, if an external
camera connected, device’s screen will switch to the external camera view.
•Camera support face recognition that is to detect human’s face, if a man’s face were similar
to a picture stored in the database, device would trigger an alarm and start recording.
We can create an “images” folder as the database in TF card, copy the pictures to the folder,
those pictures format should be “jpg” or ”bmp”, the picture’s size should smaller than 320x240
(24bit).
10

Body Camera User’s Manual
•The GPS module is to turn on/off the GPS, when the GPS connected, the GPS icon will turn
green.
•LCD brightness is Used for controlling the monitor’s brightness. Given “High”, “Medium”,
“Low” 3 options.
•The setting of Autoscreen Off is for turning off screen automatically, when the setting is
OFF, you have to press power button to turn screen off.
•Quick charge means that device will turn off when device is charging by charger.
•The record mode can be “Auto” and “Manual”. When it is “Auto”, device will record video
automatically after device power on, and when it is “Manual”, video record needs to press
record button.
•The earliest files (except the IMP files) can be overwritten when the memory card is going
to overflow.
•The IR switch mode can be “Auto” and “Manual”. “Auto” means IR will automatically switch
depends on ambient light illumination, “Manual” means that holding the “IR” button for 3
seconds to switch IR.
•The microphone volume can be choose from 0 to 10. The higher of the setting value, the
more sounds information device can get from the surrounding.
•The speaker volume can be from 0 to 10. The default volume is 9.
•Voice reminder is to turn On/Off the “beep” when pressing buttons. The record and snap
reminder voice will always be on even when the “Voice Reminder” is set to “Off”.
•External audio includes “Headphone”, “Interphone”, “None” 3 options. The setting should
refer to the external device connected with camera.
•File length means the length of each saved video file. You can select from “5 Minutes” to
“30 Minutes”.
•“Record Encrypt” means that the video is encrypted when you record, the encrypted video
can be played with special player, the default password is 888888.
•Pre-Recording means that device records 10 seconds video and store in RAM cyclically in
advance when you press the “record” button.
•Post-Recording means that device will continue recording within the setting time after you
press the “record” button to end the record. The options include 5s, 10s, 20s, off.
11

Body Camera User’s Manual
•The default laser setting is “disable”, which means that you can NOT turn on laser light by
pressing “IR/Laser” button, to turn on the laser you must change the setting to “enable”.
•When the password protect is ON, it needs you to enter the password to get into the
setting and playback interface.
•Set the language for the device. According to the body camera’s registration, the default
is English.
•Talk group means that several people can talk in a group, it needs an internet platform to
support the function.
•Talk P2P means that 2 people can talk to each other in a “talk group”, it needs an internet
platform to support the function.
•The device information includes hardware version, firmware version, MCU version, Device SN,
vendor ID, product ID, Lan IP, 3G/LTE IP、WiFi IP, Gate way, DNS0, DNS1, Server IP, Server
Port, 4G/3G Module, IMEI, Operator Name, Signal Level, WiFi Module, WiFi MAC, AP Name.
Operation for BodyCam Tool
◆Install the BodycamTool
Support Windows2000/WindowsXP/Vista/Windows7/Windows8 and Windows10, if it’s your
device first time to connect your PC, you need to install the BodycamTool software to make
your PC communicate with our device.
1.1 Connect device to your PC’s USB port with USB cable, then your
PC will generate a “CD driver”, see the picture: , and then find the
software ”BodycamTool.exe” in the “CD driver”.
1.2 Double click the BodycamTool.exe to set up the software, and click the “finish” button to
finish the installation.
12

Body Camera User’s Manual
And then it will continue to install the USB driver, see the picture as below:
Click “next” button to go on the driver’s installation, then the driver install successfully, click
“Finish” to end the installation, see the picture as below.
◆Login BodycamTool
1. Double click the icon to run the software after your device connect to your PC, click
“Detect” button to read the product ID,when the “Status” box shows “InitDev Device
Success!”, which means that BodycamTool connects device successfully, input the
password 888888;click “Login” button, the “Status” box shows Login Device Success!
See the picture as below:
13

Body Camera User’s Manual
2. In the first part we can see the “Enable USB Disk” button that means device’s memory
can be read by PC, “Time Sync” means that device’s time can synchronize to your PC.
Note those three setting “Reset to Default”/“Format Disk”/“Newpassword”, Once the
factory settings are restored, the current settings saved will be restored to the factory
default settings. Format SD indicates that the data inside the device will be erased
completely. Device default password is 888888, if you want to modify the password,
Please make it easy to remember.
In the second part user can set “Area”/ “Country”/ “City” according to your current
location, after that the time zone will change automatically. For “APN”, the first box is
where the APN should be typed. The second box is for the username and the last box is
for the password. Most standard sim cards don’t have a username or password so you
can leave those sections blank.
3. The third part include device information and WiFi, click “Get” button to read the default
information, you can click “Set” to modify this information after you input a new one (the
“Device NO.” can NOT be changed). Input “WiFiSSID” and “WiFi password”, then
click “Add” button to add the WiFi to device and then click “Get” to check if the WiFi
was adding successfully.
4. The forth part is server config, Select the “ServerName” to “CMSV6” and click “Get”
button to get the default server setting, modify the server IP in “IP” box and then click
“Set” to save the IP setting. (6608 port is the default one, generally the default port
doesn’t need to change).
6. The fifth part is about “PTT” and “Log”. For “Enable”/ “Disable”/ “Auto” respectively
means full duplex/ half duplex/ auto mode. Click “Export log” to export log to the device
storage.
7. The sixth part for device upgradation.
Note: To avoid detecting device failed due to inadequate power, try to connect it in rear USB
slot in your PC.
Operations for 4G BodyCamera Connection
This part is only for built-in 4G or WiFi module device.
14

Body Camera User’s Manual
1. Connect to the internet with 4G SIM card.(make sure “USB Mode” setting is Auto)
a. Insert a available 4G SIM card into the BodyCamera’s card slot.(Refer the picture in page5)
b. After you insert the 4G SIM card, device will do a self-detection to check if a SIM is there
, once the device has connected to the internet, you can see a 4G signal icon on the
screen, and the other “M” icon beside 4G signal icon will turn green, which means the
device has connected to the server.
2. Connect to the internet with WiFi. (If the device has NOT built in WiFi model, you can
skip this part )
a. Remove the USB cable from device after you have set WiFi to your device.(follow the
BodyCamTool WiFi setting)
b. Then go back to the device and find the wifi setting, change the setting to be “ON”(default
setting is “OFF”)。And then you can find the WiFi signal icon and “W” icon on the screen, when
the “W” icon turns green, which means the device has connected to the server.
3. Connect the website: www.mobilecam2.net with your PC’s browser, and download the CMSV6
platform to install it in your PC(according to your PC’s OS to select a proper one). You also can
find the platform software in the CD ROM.(Find ios version from apple store )
4. Double click the CMSV6 icon , and then you can see the login interface, enter the given
user name, password and server IP before click “Login” button.
15

Body Camera User’s Manual
5. The operation of CMSV6 platform
5.1 The Map
a. The status of the device can be observed in the device list. Where the icon turns green
that indicating the device is online and connected to the GPS to get the location
information; the pink icon indicates that the device is online but device fails to get the
GPS signal; the gray icon indicates that the device is offline.
b. Status in PTZ control shows the current basic information of the device; PTZ: PTZ
operation such as rotation angle, focus, aperture, light, wipers, etc; Color: Remote control
camera mode (from top to bottom: brightness, contrast, color, saturation, exposure);
★VOIP: Including intercom, listening and broadcasting. For intercom that allow you to
communicate between the platform and equipmen, for monitor means the background
sound of the device can be individually monitored, and the broadcast is a function that
allow you to send voice messages to devices. (Due to the device has not built in
relevant module, PTZ and color functions are not available)
c. The map: Show the location information of device.
d. The event box: Show the action information of the device, such as devices get
online/offline etc.
e. Live video: To preview the video.
f. Menu bar & Toolbar: menu bar includes System, View, Setting; Toolbar includes Map/
Video/ Track/ Record/ Manage/ Other.
5.2 Video
16

Body Camera User’s Manual
a. Start to preview the video: double click the device icon in the list to preview the video.
b. The amount of screen for one page to preview, you can choose a proper one to preview
video, see the icons:
c. Zoom in and zoom out : You can zoom in or zoom out the video though clicking the
two buttons.
d. Group switching button : You can switch the current group to preview previous or
next group.
e. Aspect ratio button : To set the three different video preview resolutions: full window,
4: 3, 16: 9.
f. Display mode button : Including Real Good and Fluent Good two options, Real Good
means that the live video’s real-time is the first priority; Fluent Good means that the live
video’s fluency is the first priority.
g. Capture image button : With Capture Image and Front-end capture.
Capture Image: Capture the image basing on the video screen
Front-end capture: Capture the image basing on the device’s camera
h. Sound button : To turn on or turn off the sound.
i. Start video button : Including Start video, Open all video and Display polling window.
Start video: Start the current default video
Open all video: Start all windows’ video
Display polling window: To set the corresponding time to play the video in turn.
j. Stop video button : Including Stop video, Close all video, Clear data, Clear all data.
Stop video: To stop current default video
17

Body Camera User’s Manual
Close all video: To stop whole windows’ video
Clear data: To clear the memory channel information for the current focus window
Clear all data: To clear the memory channel information for the whole current window
k. Full-screen button : To show the video with full-
screen. 5.3 Track
User can perform track search according to the specified conditions and export the relevant
data. First, select the device, then select the start and end time, click Search. See the
picture below:
Button’s icon and function
icon
function
Start or pause playing the track
Stop playing the track
Delete the current GPS data
Export the current GPS data to Excel
Add the current track to the line
List of searching history
5.4 Record
The user can download and play the video file in the device storage, see steps below:
a. Select the device and pick the search time, then select the vehicle device (video), click
Search. (If you want to download photo in the device storage, you can choose "vehicle
device (picture)")
18

Body Camera User’s Manual
b. After that, click the file options to see the files that the device recorded during that time
period.
c. Right click the mouse to select the file to download (press Ctrl to select multiple files),
click on the “download”, when the files were downloaded, you can see the directory of the
downloaded files in the download options, see the picture below.
Note: packing video is not available for downloading.
d. Open the downloaded folder, play the downloaded videos with special player (such as
hplayer) offered by supplier. (The platform’s player does not support to play the recorded
video in device’s memory online or offline).
e. If the download is stopped or the download fails due to network reasons, the video file
also can be played (just for finished part). In the case that the user does not exit the
software, you can continue to download the video by clicking "Continue downloading" in
the right-click menu of the download list.
19

Table of contents
Other OVERWATCH Digital Camera manuals