manuals.online logo
Brands
  1. Home
  2. •
  3. Brands
  4. •
  5. Pacific Casual
  6. •
  7. Patio Furniture
  8. •
  9. Pacific Casual 5JGZ7152-DB User manual

Pacific Casual 5JGZ7152-DB User manual

Owner’s Manual
Description: PORTABLE PATIO GAZEBO
Style Number: 5JGZ7152-DB
Warning:
KEEP ALL FLAME AND HEAT SOURCES AWAY FROM THIS TENT FABRIC.
This Tent is Made With Fabric That Meets CPAI-84 Specification For Flame Resistance.
It is Not Fire Proof. The Fabric Will Burn If Left In Continuous Contact With Any Flame
Source. The application of any foreign substance to the tent fabric may render the
flame-resistant properties ineffective.
Always read and follow the instructions before use. Be cautious to avoid pinching your
hands or fingers in any of the moving parts as frame opens and closes.
The gazebo is designed to provide shade only. Do not use this gazebo in strong wind
and rain. Wind and rain can damage the gazebo and could result in injury to you and
others.
Extra Reminder:This gazebo is for sun shade only, not water proof and not intended
to use in the rain. the water will sit easily at the canopy fabric as indicated in below
diagram and severely damage the gazebo. Please take a minute to take down the
gazebo before rain!
Always stake or weight down your gazebo at any time once set up.
This gazebo is NOT a permanent structure. Do not leave the gazebo unattended.
Take down and store it away after use.
To erect this gazebo requires a minimum of two persons. Keep all children away from
the assembly area.
Care and Maintenance
Wash frame and canopy with a mild solution of soap and water, rinse thoroughly. Dry
completely. Do not use bleach or solvents.
Inspect frame periodically to ensure all bolts and nuts are tight.
Always return the gazebo to the carry bag after use. Be sure the gazebo is completely
dry before storing it.
SET-UP INSTRUCTIONS
IMPORTANT : DO NOT USE EXCESSIVE FORCE DURING ANY PART OF
SET-UP
NOTE: First Time Attachment is Required
Canopy Top and frame are shipped unattached to avoid damage. A first time set
up requires that top be attached on to the frame with velcro. Once canopy top is
permanently attached, set up and take down are easily accomplished within
seconds.
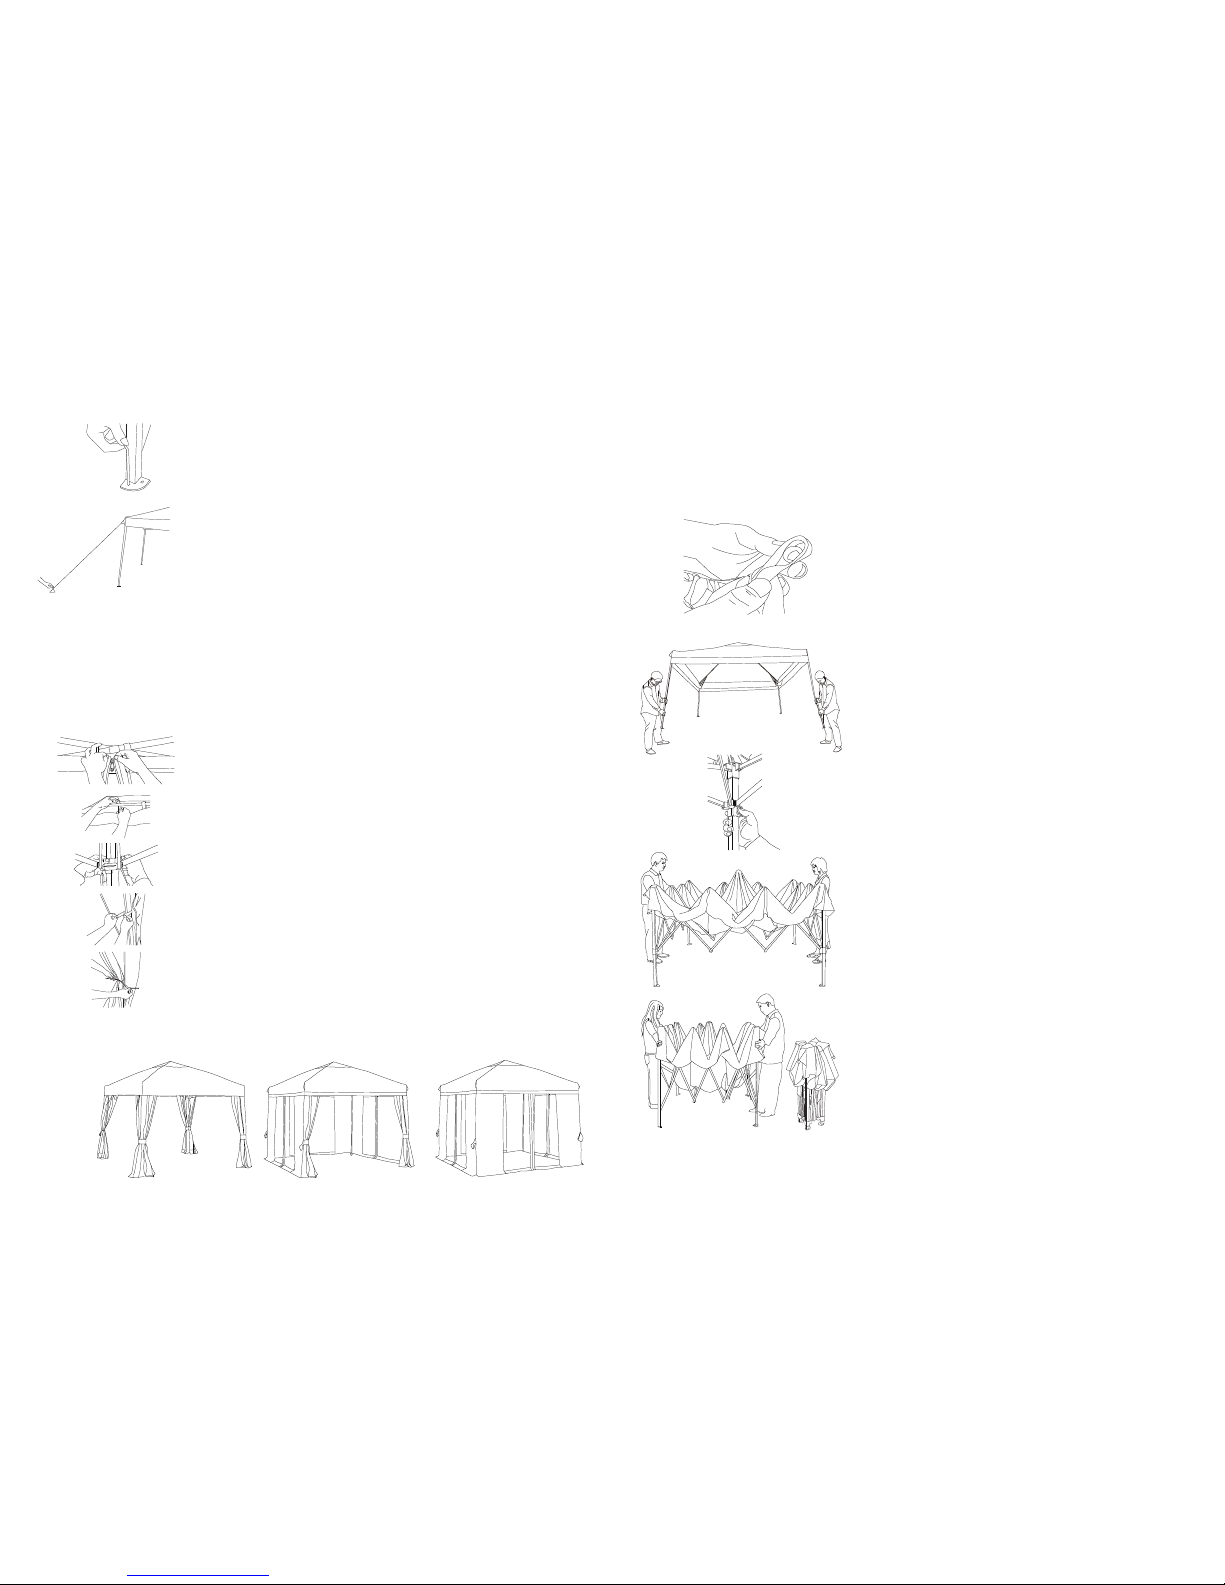
1. Stand frame upright. Starting at the corners, with
partner standing on the opposite side, grasp the two
outer legs, slightly lift the frame off the ground and
step backward, stopping at full arms’ length.
2. Unfold the fabric canopy pack, place the fabric top over
the top frame. Use the velcro pads to secure each
corner of the cover to the frame under the plastic caps
3.
Each partner should then grasp the bottom of the
middle frame section(cross beams) where it forms
diamond. Lift slightly and slowly walk backward
until the frame is fully extended.
Be careful not to
pinch your finger or pull backward too hard as this
may result in the bending of cross beams.
4. Engage the slider at each corner by pushing up
the slider with one hand while holding down the top of
the leg with the other hand. Repeat this operation at
remaining corners.
5. To secure the fabric top to the frame, please wrap the
velcro loop straps around roof tubes and cross beams.
6. Pull down the Inside valances to cover the beam tubes.
velcro the adjacent valances together for clean look.
7. Lift two adjacent outer legs and pull out inner legs gently
until spring loaded snap button pops in position. Repeat
on the remaining legs.The gazebo offers three height levels.
To adjust, lift the leg up, carefully depress the snap button
at knuckle and slowly pull out the inner leg until the snap
button pops in next position. Repeat on the other legs.
1 of 2
Danger: Water may accumulate here!
TAKE-DOWN INSTRUCTIONS
IMPORTANT :DO NOT USE EXCESSIVE FORCE DURING TAKING-DOWN.
PLEASE REMOVE ANCHORS AND GUY ROPES BEFORE TAKING DOWN
SCREEN & CORNER CURTAIN ASSEMBLY
1. Unpack the screen and corner curtain combo kit, locate the
the zipper end of the screen panel, position it in the middle of
two legs. Place the combo out around the frame.
2. Lift the inside valance, match the combo up to frame.
Attach the combo panels to cross tubes by velcro straps.
3. Tuck the upper corner of screen upto the corner of outside
valance. Secure to the upper corner frame with velcro straps.
4. Further secure combo to legs with velcro straps.
5. You may zip the screen all around to keep insects out. Or leave
one side unzipped as entrance. by adjusting the attachement
location of combo panels at cross beams, you may hold back
the combo panels with tiebacks for drapery look.
2 of 2
SUGGESTED SCREEN USAGES
1. Please reverse the screen assembly procedures
to remove the screen. Warning: to keep the
crotchets on velcro from catching your screen,
please press firmly together the male and female
strips of velcro and form the loop right after undo
the velcro from tubes.
2. With the partner, lift two adjacent outer legs
slightly, depress snap button and telescope inner
legs up into outer legs. Undo the velcro straps of
the fabric top from around the roof tubes and
cross beams. Failure to do so may result in the
tear of fabric during take-down.
3. CRITICAL STEP TO AVOID FRAME DAMAGE!
Release sliders at all four corners by gently
depressing the push button and pushing the sliders
down a bit.
4. With partner on the opposite side, grasp the
upper portion of outer legs and slightly lift up.
Shake the frame slightly and step towards
partner until the canopy is 3/4 closed. Please
do not push too hard!
5. Grasp the adjacent outer legs and push the unit
together until fully closed. Be careful not to
pinch your fingers!
Make sure the fabric canopy is completely dry
and then returns your folded pop up gazebo to
the carry bag for storage.
8. Stake down the gazebo by driving the 4 small anchors
through the hole on each base foot. This will keep the
leg from moving sideways in mild weather conditions.
9. Measure out from the leg to a proper distance and secure
the four big anchors to ground at 45 degree angle. Tie up
one end of each guy rope to triangular shaped rope holder
located on the outside fabric corners. Tie the other end of
each rope to the anchor on the ground. Make sure the guy
ropes have the proper tension.
THIS GAZEBO MUST BE SECURED TO THE GROUND
WITH ANCHORS AND GUY ROPES.
If you have any questions or comments about this product, please contact us at
[email protected] or Customer Service Line: (888) 445 - 6690

Popular Patio Furniture manuals by other brands

astreea IGLOO L PLUS Quick installation guide

astreea

astreea IGLOO L PLUS Quick installation guide

GAGGIO FLASH Installation and use manual

GAGGIO

GAGGIO FLASH Installation and use manual

CB2 FILAKI Assembly instructions

CB2

CB2 FILAKI Assembly instructions

Extremis INUMBRA Assembly instructions

Extremis

Extremis INUMBRA Assembly instructions

real living GBO-TY-C17BLK Assembly instructions

real living

real living GBO-TY-C17BLK Assembly instructions

JR Home Patioflare PF-CH3612PK Assembly instructions

JR Home

JR Home Patioflare PF-CH3612PK Assembly instructions

Patio Festival PF20126 Assembly instructions

Patio Festival

Patio Festival PF20126 Assembly instructions

MAY SZ131 installation instructions

MAY

MAY SZ131 installation instructions

above ONECLICK Click Series Quick assembly guide

above

above ONECLICK Click Series Quick assembly guide

Costway NP10966 manual

Costway

Costway NP10966 manual

TDC USA 21944 instructions

TDC USA

TDC USA 21944 instructions

Costway NP10670 manual

Costway

Costway NP10670 manual

Hartman 68134145 Assembly instructions

Hartman

Hartman 68134145 Assembly instructions

PATIOJOY HW69353 manual

PATIOJOY

PATIOJOY HW69353 manual

Essential Garden LT-9062-1 owner's manual

Essential Garden

Essential Garden LT-9062-1 owner's manual

Woodline PE35SAS Assembly instructions

Woodline

Woodline PE35SAS Assembly instructions

Treasure Garden BW50 Assembly and operation guide

Treasure Garden

Treasure Garden BW50 Assembly and operation guide

Scolaro Galileo Retractable 3x3 Assembling Instruction

Scolaro

Scolaro Galileo Retractable 3x3 Assembling Instruction

manuals.online logo
manuals.online logoBrands
  • About & Mission
  • Contact us
  • Privacy Policy
  • Terms and Conditions

Copyright 2025 Manuals.Online. All Rights Reserved.