16 17
I
I nostri prodotti sono studiati per raggiungere i massimi standard qualitativi, funzionali e di
design. Ci auguriamo che il vostro nuovo tagliacapelli REVOLUTION di PALSON sia di vostro
gradimento.
Prima di utilizzarlo la prima volta:
Prima di utilizzare questo tagliacapelli per la prima volta, caricarlo completamente per un’ora e mezza
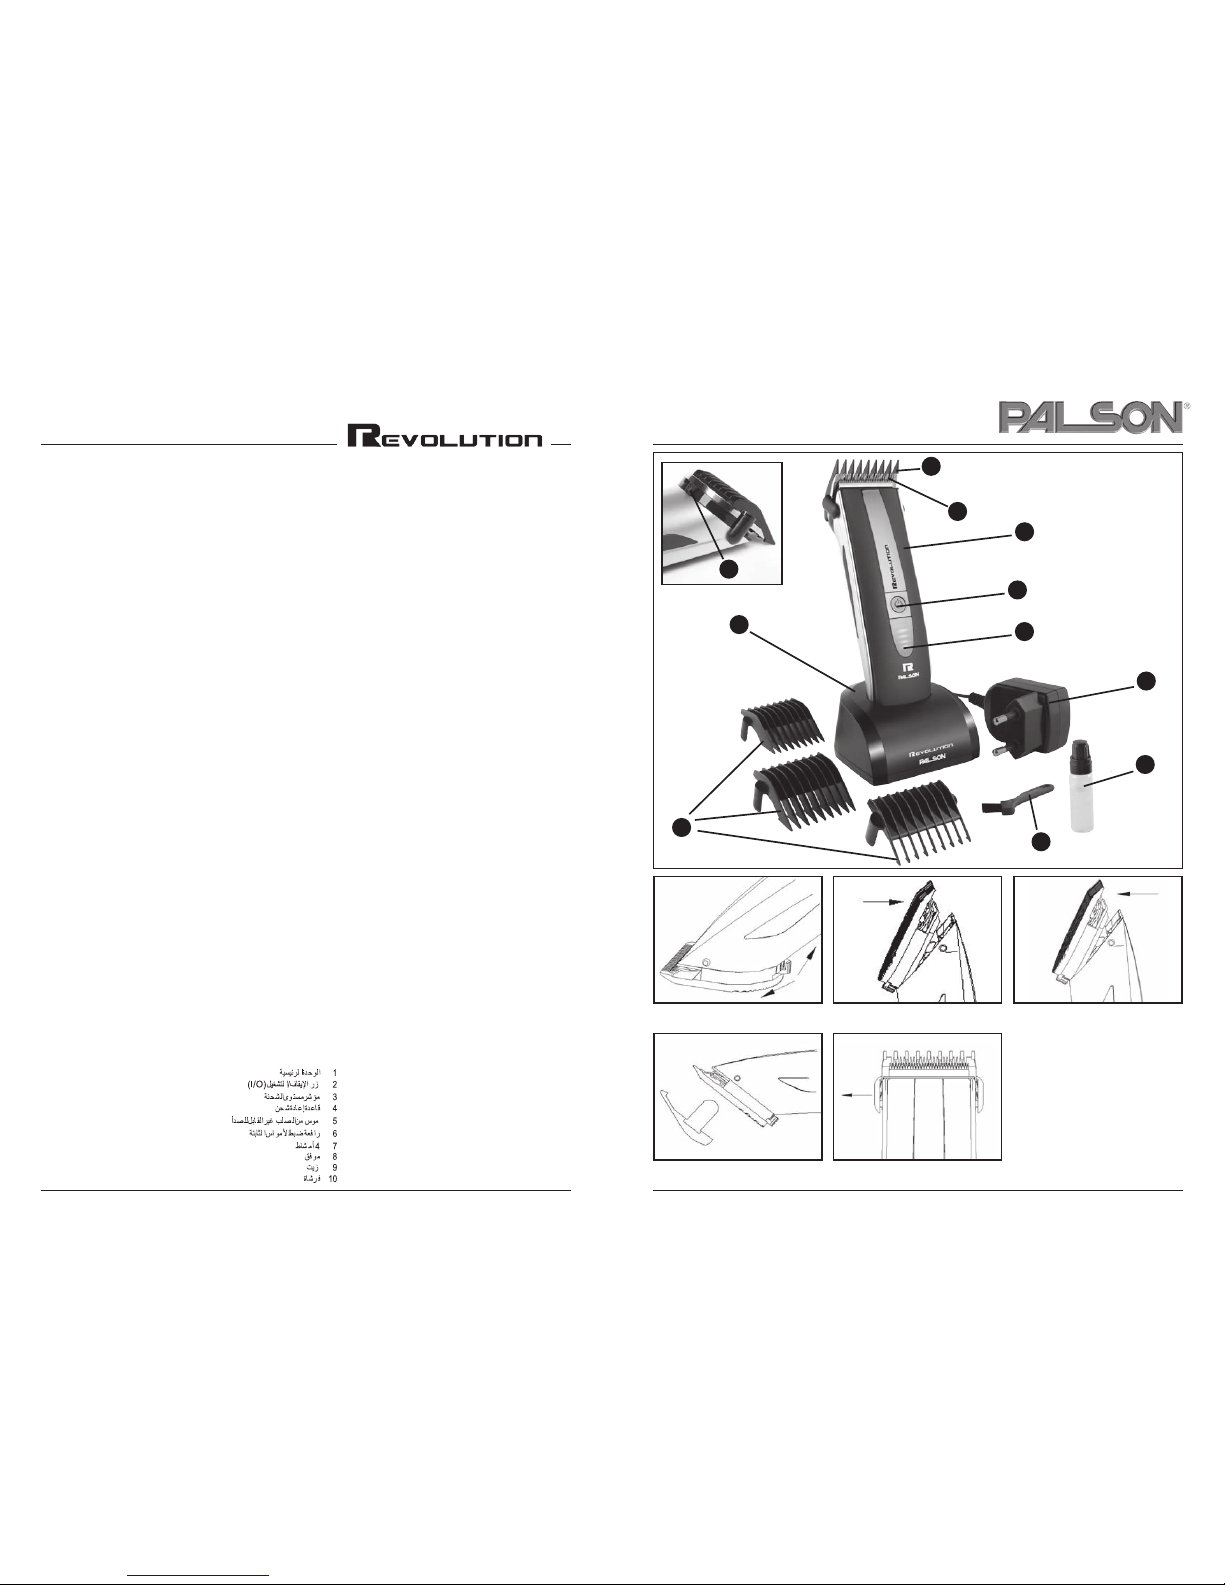
per attivare la batteria ricaricabile interna. 4 pettini compresi nella confezione: 3, 6, 9 e 12 mm.
Conservare il presente manuale per future consultazioni.
Istruzioni per l’uso:
Questo tagliacapelli può essere utilizzato sia con il cavo, sia senza.
1. Collegare l’adattatore allo spinotto della batteria situato nella parte inferiore del tagliacapelli e,
successivamente, collegare l’adattatore alla corrente (prestare attenzione alla tensione: deve
corrispondere con quella indicata nella targhetta identificativa dell’adattatore). Il tempo totale
di carica è di un’ora e mezza. È anche possibile effettuare la ricarica collegando il caricatore
alla parte inferiore del tagliacapelli. A carica completata, si può utilizzare ininterrottamente per
oltre 45 minuti. L’indicatore luminoso indicherà il livello di carica.
2. Premere leggermente l’interruttore prima di iniziare a utilizzarlo. Se la batteria non dispone di
carica sufficiente, caricarlo con l’apposito adattatore.
3. Questo modello con funzione di regolazione delle lame permette di regolare la posizione di
taglio della lametta (Fig. 1).
4. Questo prodotto non è adatto all’uso da parte di persone (bambini compresi) la cui esperienza,
le cui conoscenze o il cui stato fisico, sensoriale o mentale non consenta loro di utilizzarlo in
modo sicuro, a meno che non abbiano ricevuto istruzioni relative all’uso dell’apparecchio da
parte di una persona responsabile della loro sicurezza o non siano sotto la supervisione di
quest’ultima. È opportuno che i bambini facciano uso dell’apparecchio sotto la supervisione
di un adulto per evitare che lo utilizzino come un giocattolo.
5. Se il cavo elettrico è danneggiato, deve essere sostituito dal produttore o dal servizio di
assistenza autorizzato o da un tecnico qualificato, onde evitare eventuali pericoli.
Montaggio e smontaggio della lametta
1. Per montarla, inserire la lametta nella fessura di installazione e, successivamente, premere
l’assieme verso l’interno fino a che non si sente un “clic”. Fig. 2 (nella direzione indicata dalla
freccia)
2. Per smontarla, afferrare il tagliacapelli al rovescio e tirare leggermente la lametta verso la
parte esterna dell’apparecchio, per estrarla. Fig. 3 (nella direzione indicata dalla freccia).
Come utilizzare il pettine
1. Posizionare le stanghette del pettine sulle sporgenze situate su entrambi i lati del tagliacapelli
e formare un angolo di 90° con la lametta della parte inferiore; infine, procedere al montaggio.
Fig. 4 (nella direzione indicata dalla freccia)
2. Per estrarre il pettine, separare le stanghette dello stesso dal corpo principale del tagliacapelli.
Fig. 5 (nella direzione indicata dalla freccia)
Manutenzione delle lame
1. Spingere la lama verso l’esterno del tagliacapelli e, successivamente, utilizzare lo spazzolino
per eliminare i residui dalla lametta. Lubrificare lo spazio che separa la lametta fissa e quella
mobile con 2 o 3 gocce d’olio.
2. Pulire la lametta regolarmente.
Processo di ricarica
- Non ricaricare il tagliacapelli a temperature inferiori a 0°C o superiori a 40°C.
- Non effettuare la ricarica in luoghi soggetti a raggi solari perpendicolari o accanto a fonti di
calore.
- Il tempo totale di carica standard è di un’ora e mezza. Onde evitare danni alla batteria, non
superare tale tempo di ricarica.
Precauzioni
- Pulire il corpo dell’apparecchio utilizzando solamente un panno leggermente inumidito con
acqua o con una soluzione delicata di acqua e sapone.
- Non utilizzare mai soluzioni corrosive.
- Non immergere il tagliacapelli nell’acqua.
- Tenerlo lontano dalla portata dei bambini.
- Questo tagliacapelli potrebbe scaldarsi durante l’uso o la ricarica; si tratta di un fenomeno
assolutamente normale.
- Quando si tiene in mano il tagliacapelli, non afferrarlo per il cavo di alimentazione: si
rischierebbe di danneggiarlo o di provocare incidenti.
- Non manipolare i pezzi mobili in modo scorretto.
PROTEZIONE DELL’AMBIENTE
I prodotti elettrici non devono essere smaltiti con i normali rifiuti domestici. È necessario
consegnare il presente apparecchio al proprio centro di riciclaggio locale affinché venga smaltito
in modo sicuro.
Grazie per la fiducia accordataci scegliendo uno dei nostri prodotti.