Palsonic VCR-9600-CONNECTIONSETTING CHANNELSSETTING TIMERTROUBLE... Product information sheet

VCR-9600
EASY GUIDE
VIDEO CASSETTE RECORDER
Type Tested
Electrical
Safety
AS/NZS 3250 Lic 4168
Standards Australia
Note:
This is a reduced version of the of the full instructuion manual.
If you require more information please obtain the full version.

.
Remote Control Operation
This VCR can be operated with the remote control from
up to a distance of about 23 feet (7 meters) and within an
angle of 15 degrees either side of center.
There must be no obstacles between the remote control
unit and the remote sensor of the VCR.
Battery Installation
Remove the battery cover on the rear of the unit.
(See Figure 1.)
Install two size “AA” batteries into the battery com-
partment. (See Figure 2.)
Close the battery cover. (See Figure 3.)
Fig. 1 Fig. 2 Fig. 3
Notes
Loading and Unloading
Loading
Insert a cassette tape with its labeled side up as shown
in the cassette compartment. The cassette will be auto-
matically drawn inside the compartment.
Unloading
Press the STOP/EJECT button. The cassette will be
ejected from the cassette compartment.
Remove the cassette by pulling it toward you.
To Prevent Accidental Erasure
Every video cassette has a safety tab to prevent
accidental erasure. Breaking off the safety tab is
recommended for prevention from accidental erasure of
the contents. If a tape without the safety tab is to be
reused, cover the gap with a piece of adhesive tape.
Be sure to install batteries properly to match the
polarity diagrams drawn inside the battery compart-
ment.
Do not mix a new battery with an old one.
Do not heat, disassemble, short or throw used batteries
into a fire.
Precautions on Use
Pressing two or more function buttons on the remote
control unit at the same time may result in improper
operation or damage.
Do not place the remote control unit in an area where
it may become wet.
Do not place the remote control unit near high heat.
Dropping the remote control unit on a hard surface
may result in damage.
Do not use benzene, thinner or other petroleum
based solvent to clean the remote control unit. To
clean, wipe a soft cloth slightly moistened with a mild
detergent, and then wipe dry with a soft cloth.
Video Cassette Tape
Only the video cassette tapes marked with can
be used in this VCR.
A cassette tape cannot be loaded or unloaded unless the
AC power cord is connected to the AC outlet.
Tape Speeds and Maximum Recording
Playback Time
TAPE SPEED TYPE OF THE VIDEO CASSETTE TAPE
E-300 E-180 E-120 E-60
SP (Standard Play) 5hrs 3 hrs 2 hrs 1 hr
Care of the Video Cassette Tape
Avoid violent vibration or shock.
Do not place in a location where strong magnetic
fields exist (near a motor, transformer or magnet).
Never place or store in direct sunlight.
Avoid dusty places,
Place the cassette in the cassette case and store
vertically.
Never store tape in a humid location.
INTRODUCTION
1
.
.
.
.
.
.
.
.
.
.
.
.
.

Equipment Connection
TV Antenna
To watch a picture from the VCR using this connection,
it is necessary to set one of the TV channels as the
"Video channel". See Preparations in Video Channel
Setting (on Page 6).
1. Connect the antenna (or CATV) connector to the
ANT. IN socket.
2. Connect the accessory coaxial cable between the
RF OUT socket and the TV.
Connection of VCR and TV Using
Audio/Video Connector
In this case use the A/V mode specified on your TV,
instead of UHF channel 32 or another unoccupied
channel.
Power Supply Cable
Connect to a wall AC outlet.
INSTALLATION
2

Language
Clock
AMS
Video Channel Setting Initial Settings
This setting is necessary for RF connections (when the
SCART cable is not used to connect this unit and the
TV). This setting is not necessary for AV connections
using the SCART cable. Start from the initial Settings in
the next section.
When the video channel setting is complete and you
press the OPERATE/TIMER button to switch on the
power, the on-screen language setting screen appears
as the first of the initial settings. Set the initial settings in
the order below.
1.
2.
3.
4.
5.
Switch on the test signal switch on the rear panel of
the main unit.
Press the OPERATE/TIMER button and switch on
the power for the VCR.
Switch on the power for the TV and select the TV
channel 32 so that the test picture is clearly dis-
played on the TV.
If channel 32 of your TV is occupied, select another
unoccupied TV channel eg. between channels 30
and 39.
If the TEST screen does not appear or not clear, use
a small screwdriver and turn the RF channel adjust-
ment (CH ADJ) on the rear panel so that the test
picture is clearly displayed on the TV.
Switch off the test signal switch on the rear panel of
the main unit.
TEST TEST TEST TEST
TEST TEST TEST TEST
TEST TEST TEST TEST
TEST TEST TEST TEST
TEST TEST TEST TEST
TEST TEST TEST TEST
TEST TEST TEST TEST
TEST TEST TEST TEST
TEST TEST TEST TEST
TEST TEST TEST TEST
TEST TEST TEST TEST
TEST TEST TEST TEST
Order for initial Settings
1
2
3
4
On-screen Language Setting
You can select one of five languages (English,
German, French, Italian, Spanish) to be used for
the OSP display.
Clock Setting
Timer recording and other such functions require
that the current time (hour and minute) and date
(day, month, year) be set.
AMS (Auto Memory System)
This automatically stores the channels in memory
and assigns positions.
Ends (the unit returns automatically to the Menu
screen.)
Note
If you press the OPERATE/TIMER button to turn off
while setting the initial settings, the next screen is
displayed when the power is turned on again.
PREPARATIONS
3
.
Menu
1
2
3
4

CHANNEL PRESET
There are two ways to preset channels: Automatic
tuning with AMS and manual tuning.
AMS Operation
Automatic tuning with AMS is executed during the initial
settings, so normally it is not necessary. AMS is neces-
sary at such times as when you take the unit to another
region. See Initial Settings 3 AMS (Auto Memory Sys-
tem) on Page7.
Manual Tuning
Manual tuning is used when there is a channel that was
not preset by AMS or when you want to swap the channel
at any position.
1. Press the MENU button to call out the menu screen
Using the buttons
2.
3.
4.
5.
6.
Select CHANNEL PRESET and press the SHIFT>
button. The channel preset screen appears.
Only five positions are displayed on the screen.
Select the number of the position to be changed and
press the SHIFT> button.
The picture for the selected channel is displayed
while the OSD button is being pressed.
Select the channel and press the SHIFT> button.
Select whether or not this channel is to be skipped
when you move through the channels with the
buttons (yes: skipped; no: not skipped),
then press the SHIFT> button.
To add or change other positions, repeat Steps 3.-5.
Automatic Channel Changing
If a channel you have placed at some position already
exists at another position, those channels and their skip
settings are automatically swapped.
Example:
If you changed from Channel 022 to Channel 045 at
Position 02, since Channel 045 is already at Position 01
Channel 022 is swapped to Position 01.
CHANNEL PRESETTING
POS
01
02
CH
045
022
SKIP
NO
YES
POS
01
02
03
04
05
CH
002
* 022 *
045
101
121
SKIP
NO
NO
NO
YES
YES
<-- YES: Skipped
NO: Not Skipped
Display while a channel
is being tuned.
4
SELECT =[ V ]
ENTER =[>]
END =[MENU]
V
CHANNEL PRESET
POS
01
02
CH
045
022
SKIP
YES
NO
CHANNEL PRESET

Basic Operation
1.
2.
3.
4.
Press the OPERATE/TIMER button.
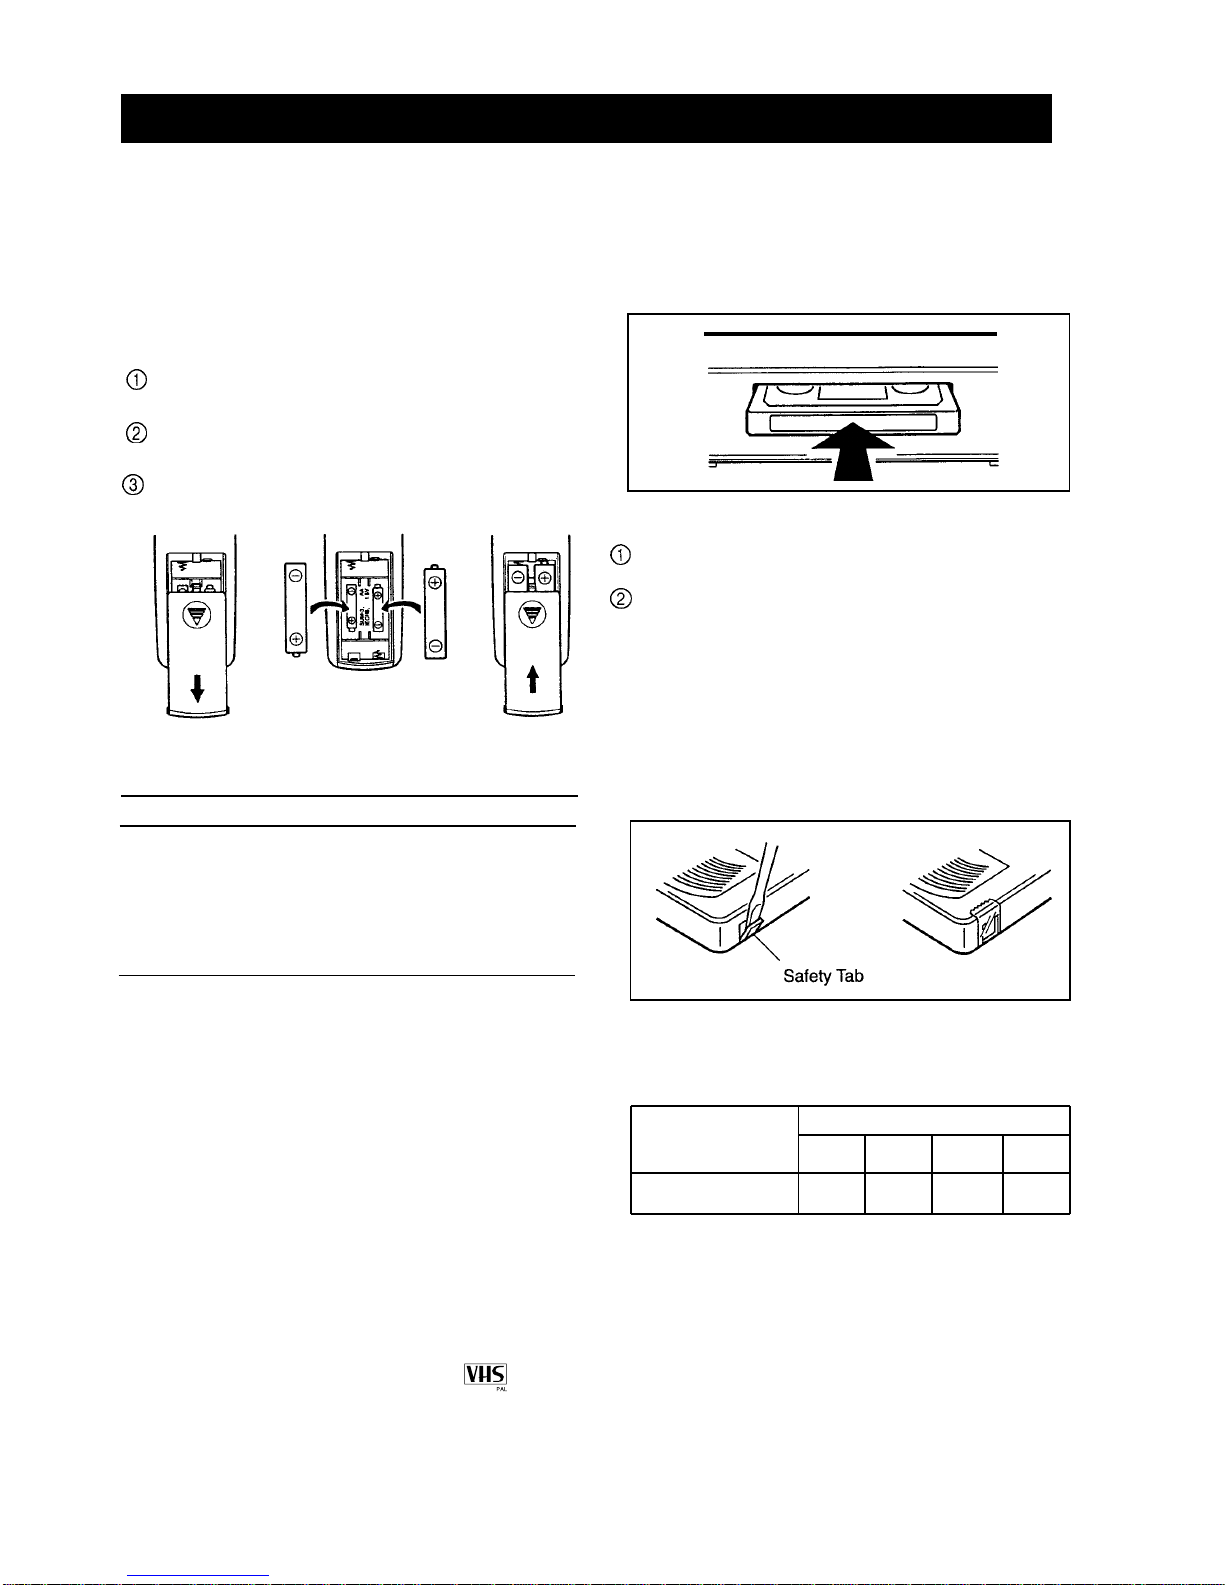
Insert a cassette tape into the CASSETTE
LOADING SLOT.
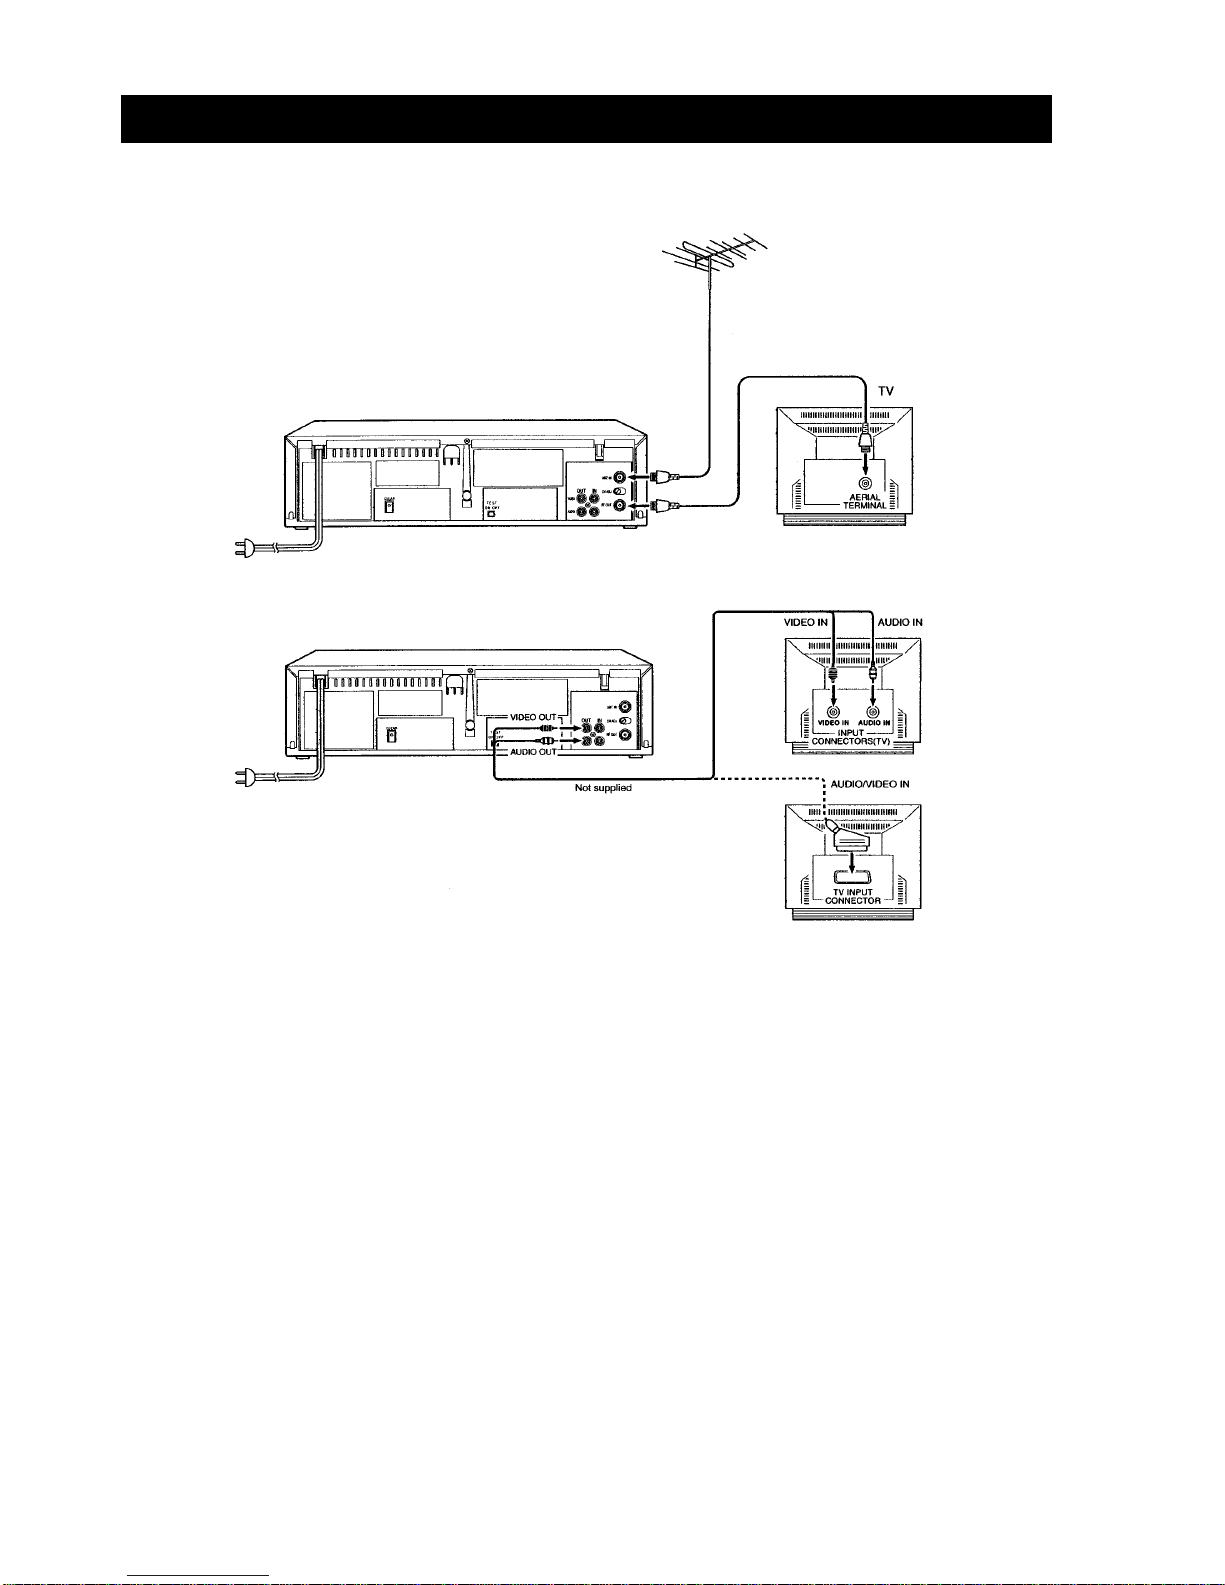
Turn on the TV and select the channel for video
viewing.
Press the PLAY button to start playback.
To stop playback:
Press the STOP/EJECT button.
To rewind a tape in Stop mode:
Press the REW button.
To advance a tape rapidly in Stop mode:
Press the FF button.
To stop fast forwarding or rewinding:
Press the STOP/EJECT button.
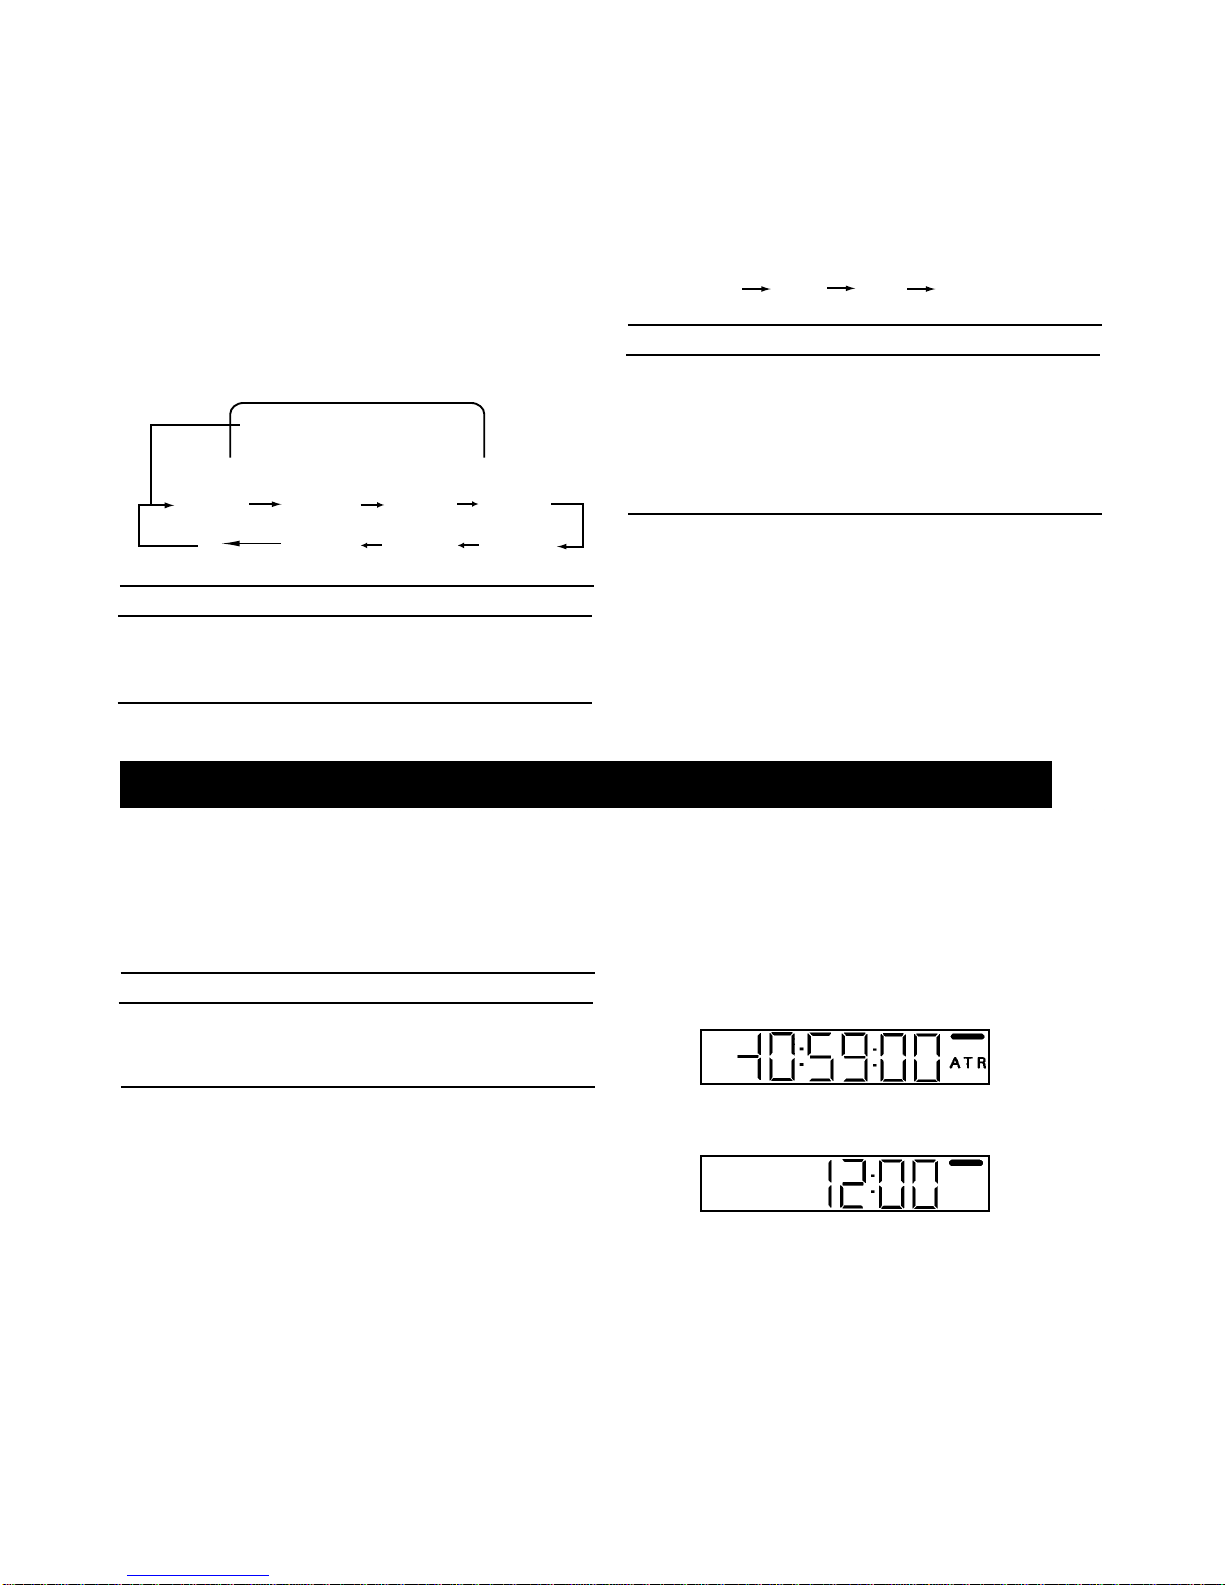
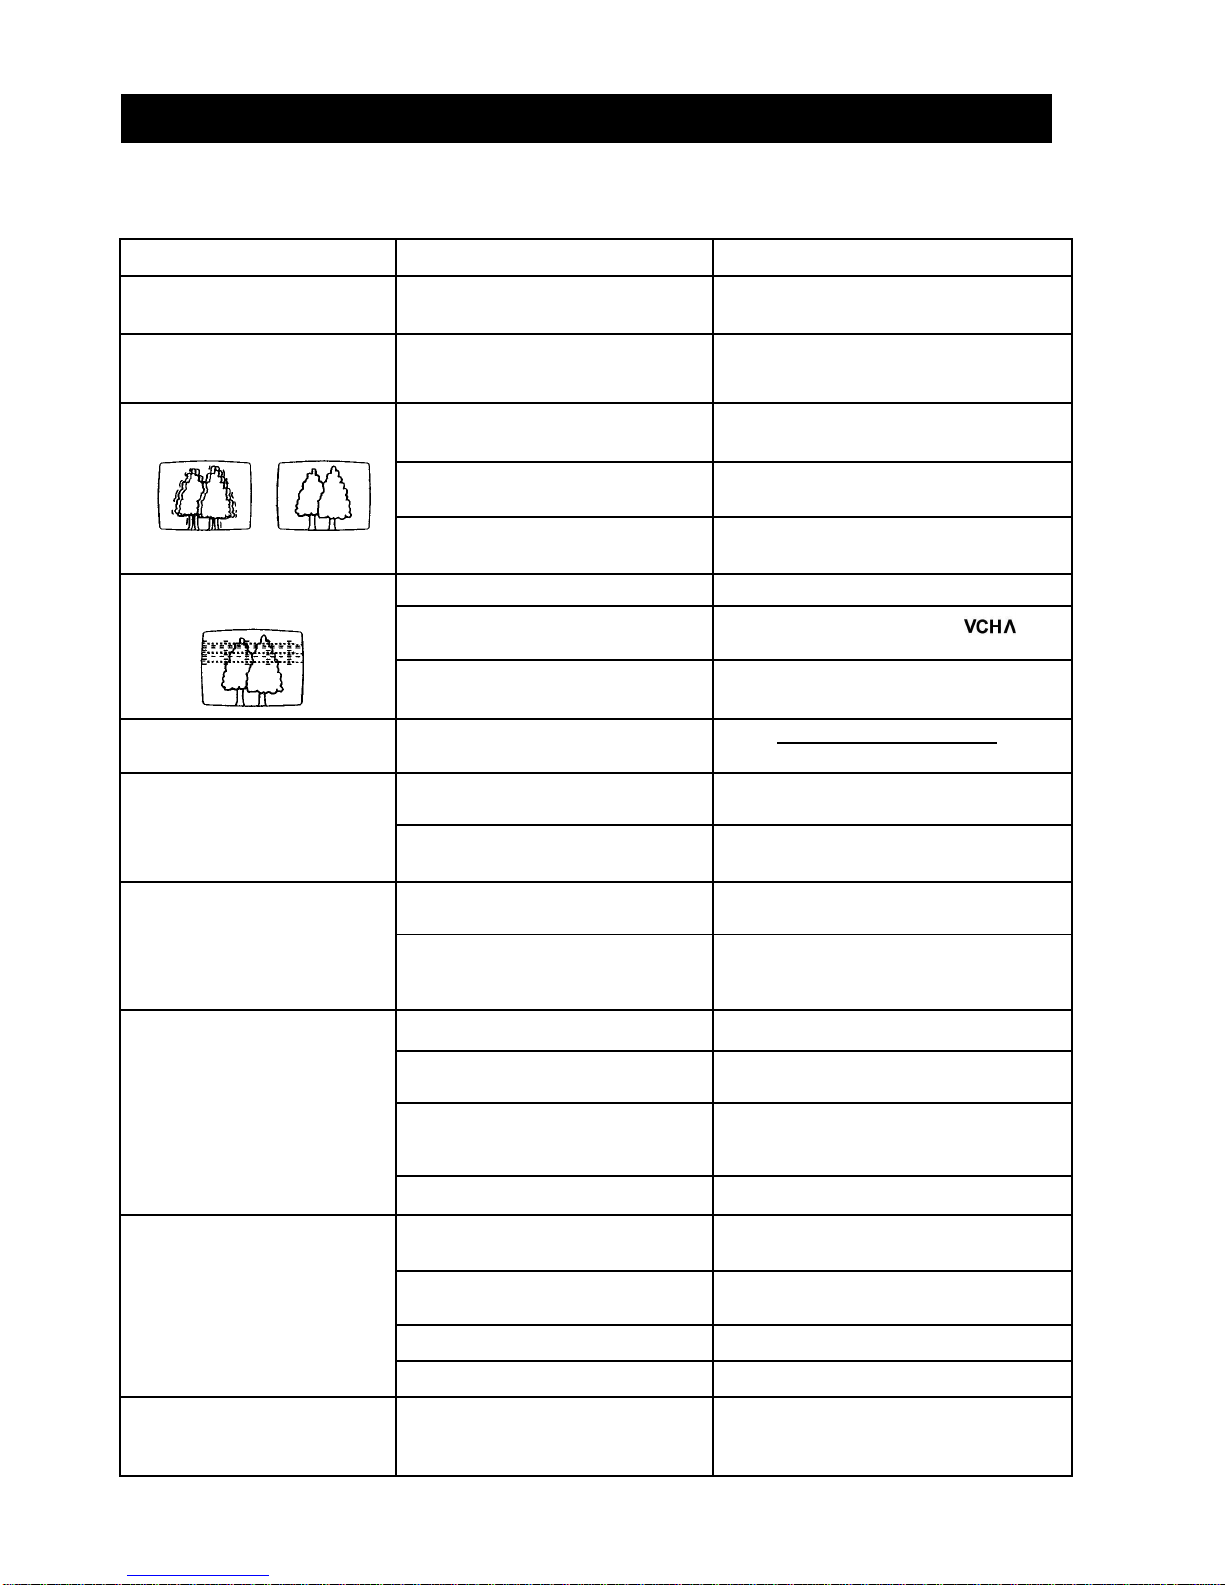
Digital Tracking Control
Auto tracking
When playback starts or playback speed is changed
during playback, VCR enters Auto tracking mode.
At this time, the indication ATR blinks on the multi-
display for a few seconds.
Manual tracking
If video noise appears in the picture after putting the
VCR into Auto tracking mode, use the Manual tracking
adjustment function. Press the buttons until
the best possible picture is obtained.
To return to Auto tracking mode, press the PLAY button
for more than 2 seconds.
The noise on the screen may not be completely
removed depending on the tape used, especially
when the tape has been recorded on another VCR.
Picture Control (Video Enhancer)
During playback, press the NUMBER button 5 or 6 to
obtain desired picture enhancement.
To make the picture softer, press the NUMBER button 5.
To make the picture sharper press the NUMBER button
6.
The enhaticement level is indicated by figures (-9 to 9)
on the Multi-display.
Auto Rewind System
When a tape reaches its end in Playback, Fast Forward
or Record mode except OTR and Programme Timer
Recording, it will be automatically rewound to its
beginning and the unit will be switched to Stop mode.
Full Auto/Auto Playback System
Full Auto Playback
Simply insert a cassette tape without a safety tab into the
VCR while the unit is turned off. The following operations
will be performed automatically:
1. The VCR is turned on and the tape starts to
playback.
2. The tape is rewound to the beginning when it reaches
the end.
3. The tape is ejected and the VCR is turned off.
Auto Playback
Auto Playback is used when the VCR has already been
turned on.
1. The tape starts to playback.
2. The tape is rewound to the beginning when it reaches
the end. The VCR is not turned off.
The Auto Playback or Full Auto Playback mode will be
released if one of the tape related buttons (FF, REW,
PAUSE, STOP/EJECT, PLAYor OPERATE/TIMER)
is pressed.
Auto Head Cleaner
This VCR is equipped with an Automatic Video Head
Cleaner. This feature will ensure that your VCR always
performs at its best by keeping the video heads clean of
dirt that can distort picture quality. The Auto Head
Cleaner engages automatically each time a tape is
inserted or ejected.
5
PLAYBACK
Notes Notes

Basic Operation Auto Turn on System
1.
2.
3.
4.
5.
Press the OPERATE/TIMER button.
Press the buttons to select a desired
channel to be recorded.
Insert a cassette tape with a safety tab.
Press the REC button to start recording.
To finish recording, press the STOP/EJECTbutton.
Checking the Picture Being
Recorded
Turn on the TV and tune to the channel for video viewing.
If a cassette without a safety tab is inserted, it will
automatically eject when the REC button is pressed.
This protects the recorded contents on tape against
accidental erasure.
If the tape reaches its end during recording, it will be
automatically rewound to its beginning and the unit
will be switched to Stop mode.
In the Pause mode, it is possible to change a channel.
Recording One Programme
While Viewing Another
1.
2. Press the OPERATE/TIMER button.
Set the TV for normal TV viewing and select the
channel to be viewed.
3. Select a desired channel to be recorded with the
buttons.
4. Insert a cassette tape with a safety tab.
5. Press the REC button to start recording.
6. To finish recording, press the STOP/EJECT button
When a cassette tape with a safety tab is inserted with
the VCR turned off, the VCR will be automatically turned
on.
Pause Function
To stop recording momentarily
1. Press the PAUSE button during recording.
2. To release the pause mode and resume recording,
press the REC button
REC Review
During normal recording (excluding timer recording and
OTR), pressing the PAUSE button causes the VCR to
rewind and display the last half second of the recording.
This allows you to check a recording while it is being
recorded.
Recording from Another VCR
With this VCR, you can make recordings from an
external source, e.g. copying onto this VCR from a
second VCR.
1.
2.
3.
Connect another VCR or an external equipment to
this VCR.
Press the 0/AUX button twice so that the line input
indicator "AU" appears.
Play the tape on VCR A for playback and press the
REC button on VCR B.
VCR A (another VCR)
VCR B (your VCR)
6
RECORDING
Notes
.
.
.

One-touch Timer Recording
(OTR)
This allows you record for up to 5 hours with automatic
turn-off.
1.
2.
Press the REC button during recording.
The VCR enters OTR mode.
Select the recording duration by pressing the REC
button repeatedly. The OTR indication appears on
the TV screen.
The OTR recording will start immediately.
OTR 1:30 P23
OTR 0:30
2:00
O
OTR 1:00
If the REC button is pressed during OTR recording,
the remaining recording time is indicated on the TV
screen and is automatically reduced.
Changing OTR Duration
The OTR duration can be changed by pressing the REC
button even after the OTR recording has started.
When the REC button is pressed once, the next record-
ing duration is selected.
e.g. When the remaining recording time is 13 minutes,
the indication changes:
0:13 0:30 1:00
If the tape reaches its end during OTR recording, it will
be automatically stopped and the unit will be turned
Off.
When OTR recording has finished, the VCR will auto-
matically switch to Timer Recording Standby mode if
there is Timer program data.
Counter Display
When a cassette tape is inserted, the counter display
appears. The counter starts counting up or down when
the PLAY, REC, FF or REW button is pressed.
CLOCK/COUNTER Display Switching
To change the counter display to the clock display, press
the CLOCK (clock/counter) button.
The counter display automatically reverts to the clock
display when the unit is turned off or a cassette tape
is ejected.
Counter Display
Clock Display
Counter Reset
To reset the counter to "0:00:00", press the RESET button.
7
COUNTER FUNCTION
Notes
Notes
Notes
.
.
......
OTR 1:30 OTR 2:00
OTR 3:00OTR 5:00 OTR 4:00

Check the following list of problems and remedies before calling service personnel. The problem may be one you can
solve yourself.
SYMPTOM CAUSE REMEDY
No power supply to the VCR. AC Mains Cord is not connected. Connect the AC Mains cord to the AC
outlet.
Power is on but the VCR does
operate. Dew condensation inside the VCR. Leave the VCR with the AC mains
cord connected. (It takes aprox-
mately 2 hours for the VCR to dry out
Poor picture or no picture on TV
during Playback or recording. TV channel is not set to the video
channel. Set the TV channel to the correct one.
The video channel of the TV is not
fine tuned. Fine tune the video channel of the TV
set.
Connections between the TV and
the VCR are not properly made. Check these connections and con-
nect them correctly.
Picture shakes No colour
Noise in the picture during
playback. The video heads are dirty. Have the video heads cleaned.
The tracking adjustment is bad. Adjust thetracking using the
buttons
The cassette tape is old and/or
defective. Replace with a new one.
Noise bars, poor or no colour
on pause mode. This is normal on PAUSE mode
and is not a fault condition.
The REC button does not
operate. The safety tab of the cassette is
removed Place a piece of adhesive tape over
the gap.
The tape has run out. Replace with another one with
sufficient length.
Recording does not complete. The tape has run out during
recording. Replace with a new one.
More than one programme has
has preset within the same
preset
Re-programme the information.
No timer recording.
The programmed data is not correct.
Re-programme data correctly.
The active channel is not tuned
with the built-in tuner of VCR. Select the channel on which the broad-
casting programme is aired.
The VCR is not ready for timer
recording. Hold down the OPERATE/TIMER
button more than 3 seconds to
illuminate timer indicator.
Clock indicates inaccurate time. Set clock to the current time.
No remote control unit
operation. Not operated in the proper
operation range. Use the remote control unit within the
operation range.
An obstacle exists between the
remote control unit and the VCR. Remove the obstacle.
Batteries are exhausted or dead. Replace them with new ones.
Battery polarities are incorrect. Insert batteries correctly.
Correct indication does not
appear in the display panel. Clear the data stored in the unit’s
memory with the CLEAR button and
input data again.
OTHERS
8

PALSONIC CORPORATION PTY LTD
1 JOYNTON AVENUE
WATERLOO NSW 2017 AUSTRALIA
TEL:(02)9313 7111
FAX:(02)9313 7555
www.palsonic.com.au
PALSONIC CUSTOMER SERVICE
TELEPHONE
AUSTRALIA: 1300 657 888
Note:
This is a reduced version of the of the full instructuion manual.
If you require more information please obtain the full version.
This manual suits for next models
1
Table of contents
Other Palsonic VCR System manuals

Palsonic
Palsonic VCR2120A User manual

Palsonic
Palsonic VCR-9688 User manual

Palsonic
Palsonic VCR-9600 User manual

Palsonic
Palsonic VCR-2110-CONNECTIONSETTING CHANNELSSETTING TIMERTROUBLE... Product information sheet

Palsonic
Palsonic VCR 2120 User manual

Palsonic
Palsonic VCR6200HS User manual

Palsonic
Palsonic VCR2110 User manual