Panacom PA-7851 User manual

Pg. 1


Pg. 3
PA-7851 - USER MANUAL
Thanks for purchasing Panacom PA-7851 DECT Cordless Telephone
witn Answering Machine. Please read this manual carefully before us-
ing this Telephone, which is the best guideline offering best service.
UNPACKING YOUR PHONE
In the box you will nd:
The cordless handset
The base unit
Two rechargeable battery cells
A battery compartment cover
A telephone line cable for the base unit
A mains power lead and adapter for the base unit charger pods,
each with an attached mains power lead and adapter, for multihand-
set system
** Keep your sales receipt as it is your guarantee.
If any item are damaged or missing contact your nearest CCT store
for assistance.
Please have your receipt ready when you call.
Charging batteries for the first time
Before you start to use your telephone make sure that all batter-
ies are fully charged for 15 hours.
Important note: This telephone is not designed for Emergency calls
when the mains power fails
For Emergency calls you should have a basic phone that operates
without mains power, connected to your line so that you can make
calls during a power failure.

Pg. 4
A: Earpiece
B: OK key
Press to select the function dis-
played on the handset screen di-
rectly above it.
C: Back/Clear key
Press to delete one digit/character
in editing mode.
Press to select the function dis-
played on the handset screen di-
rectly above it.
Press and hold to change the hand-
set idle display between Handset
Name and Date/Time.
D: Navigation keys
Press UP to access the Call log and
press DOWN to access the Phone-
book, when in idle mode.
Press UP/DOWN to increase or de-
crease earpiece volume during a call.
Scroll up/down a menu list or go to
the previous or next record.
E: Talk key / Speakerphone Key
Press to answer an incoming exter-
nal or internal call.
Press to dial the displayed number.
F: Hang-up/Exit key
Press and hold to switch the hand-
set power on/off.
Press to end a call.
Press to return to idle mode in
other menus.
G: Menu key
Press to access the main menu.
H: Recall (Flash) key
You may need the Recall function
during a call if your phone is con-
nected to a PBX.
A
B
D
C
EF
G
H
I
JK
LM
N
/ Speakerphone Key

Pg. 5
I: Redial key
Press to access the Redial list.
Press to dial the last dialed number during direct dialing mode.
J: Keypad lock
Press and hold to lock/unlock keypad.
Press and hold to toggle between the external and internal calls when
both are set up.
K: Ringer off key
Press and hold to turn the ringer on/off.
Press and hold to insert a pause during a call if your phone is con-
nected to a PBX.
L: Mute key
Press to mute/unmute the handset microphone.
M: Call transfer/Intercom key
Press to initiate an internal call.
Press to hold the line and page another handset during a call.
Press and hold to initiate a conference call.
N: Microphone
ANSWERING MACHINE OPERATION BY BASE
You can use the keys on the base station to perform the basic
functions of the answering machine.
A
C
D
F
E
G
B
ATurn the answering ma-
chine on/off
BDelete current message,
long press to delete all read
messages
CIncrease speaker volume
DGo back to previous mes-
sage or replay current mes-
sage
ESkip to next message
FPlay/Stop message play-
back
GDecrease speaker volume

Pg. 6
WHAT’S ON THE DISPLAY?
WHAT THE ICONS MEAN?
A Display Icons
B Displays when in menu mode
to confirm your selection.
C Indicates that more options
are available.
Use the UP / DOWN keys to
scroll up/down.
D Displays when in menu
mode.
Select BACK to return to the previ-
ous menu level. Select BACK to de-
lete the last digit/ character entered.
D
C
A
B
Battery Charge Level Indicates battery is fully charged.
Battery Charge Level Indicates battery is fully discharged.
Call Indicates that an external call is connected or held.
Icon blinks when receiving an incoming call.
Message Indicates you have a new Voice Mail message.
Caller display Indicates you have new missed calls, or the call log
is being viewed.
Phonebook Displays when the phonebook is accessed.
Alarm Displays when the alarm clock is activated.
Ringer Off Displays when ringer volume is turned off.
Signal Level Indicates that the handset is registered and within
range of the base station. Icon blinks when the handset is out of range
or is searching for a base.

Pg. 7
READ FIRST BEFORE USE
Choosing a site for the base unit and charger pod
If you have a Broadband line
If you connect your telephone to a line with a broadband connec-
tion, you will need to insert a microlter between the telephone and
the telephone line, otherwise you may get interference between the
telephone and the broadband, which could cause problems.
In a home with broadband, every telephone must have a microlter
connected, not just the one at the telephone point that your modem
is connected to. If you need more broadband microlters, contact
your broadband supplier.
The base unit and charger pod(s) should be placed on a level sur-
face, in a position where:
• the mains adapter plug will reach an easily accessible 230-V AC
switched mains supply socket - never try to lengthen the mains
power cable
• the base unit’s telephone line cable will reach your telephone line
socket or extension socket (the charger pod does not have a tele-
phone line connection)
• it is not close to another telephone - this can cause radio interfer-
ence
• it is not close to a sink, bath or shower, or anywhere else where it
might get wet
• it is not close to other electrical equipment - fridges, washing ma-
chines, microwave ovens, uorescent lights, televisions etc.

Pg. 8
• it is away from hot, humid conditions and strong sunlight
Radio signals between handset and base unit
To use your handset and base unit together, you must be able to main-
tain a radio link between them. Be aware that any large metal objects,
like a refrigerator, a mirror, ling cabinet, etc, between the handset and
the base unit may block the radio signal. Other solid structures, like
walls, may reduce the signal strength.
INTERFERENCE
If the sound quality gets worse as you move around while on a call,
this is probably caused by interference between the handset and the
base unit, perhaps because you are too near to another phone or
other electrical equipment. Move to a different position to clear the
interference. If you do not move, it might cause a short break or your
call may be cut off.
Mains power connection
IMPORTANT - The base unit and charger pod must be used with the
mains adapters supplied with the unit.
Using any other adapter will result in non-compliance with EN60950,
and will invalidate any approval given to this apparatus.
Battery safety - CAUTION
ONLY use the rechargeable batteries supplied with the handset.
DO NOT use non-rechargeable batteries - they may explode and
cause damage to your telephone.
CAUTION
RISK OF EXPLOSION IF BATTERY IS REPLACED BY AN
INCORRECT TYPE.
DISPOSE OF USED BATTERIES ACCORDING TO THE
INSTRUCTIONS.
Checking your answering machine messages remotely
(Only for TAM models)
Before you can use the remote access feature to check your answer-
ing machine messages, you must change your master PIN code. Your
master PIN code cannot be the default 0000.
Installation and Set-up
Fit the rechargeable batteries in each handset
1) Install the AAA batteries (Brand name: CORUN, Capacity: Ni-MH 1.2V/
550mAh, or Brand name: SANIK, Capacity: Ni-MH 1.2V/550mAh) into hand-
set in accordance with the polarity marked in the battery compartment.

Pg. 9
2) Close the battery compartment cover, sliding it into place and
pressing rmly to make sure it is secure.
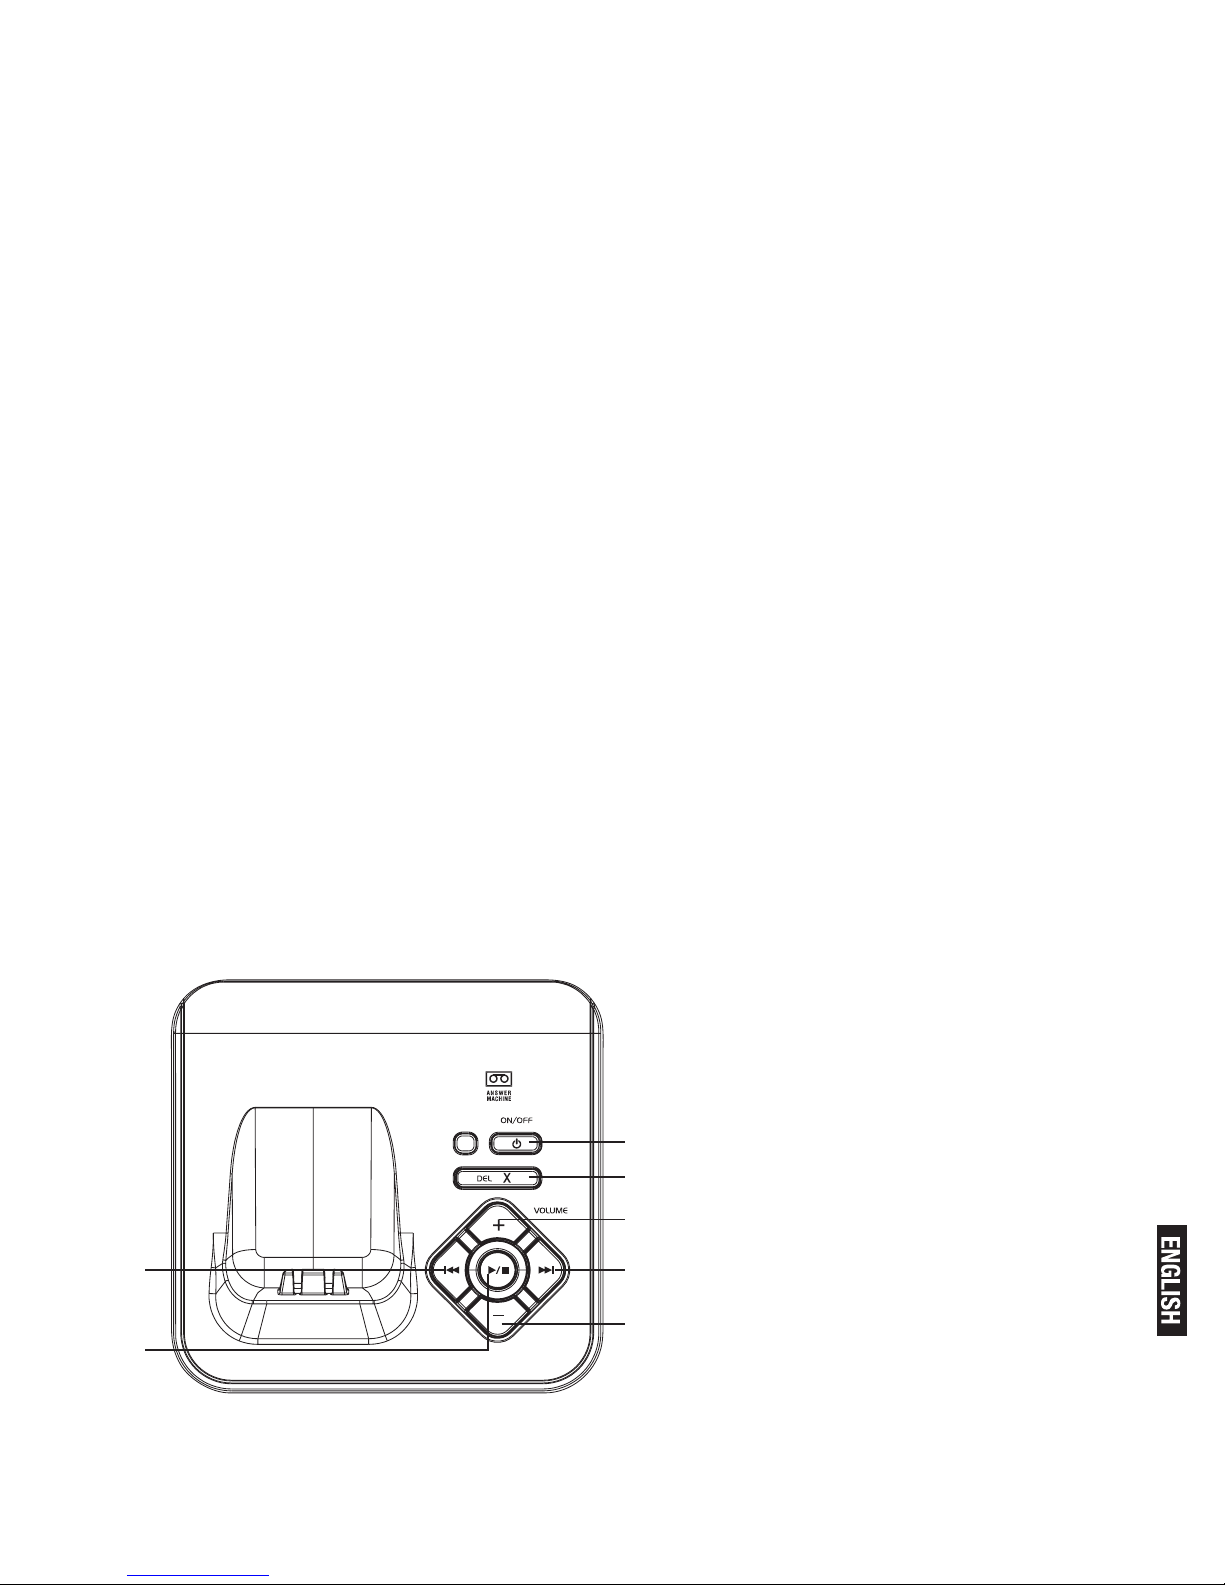
Connecting AC (electrical) power
1. Plug the base power adaptor (Type: IW506E, 100-
240Vac/6Vdc/500mA) cord into the power jack on rear panel of the
base and the other end into a 100-240Vac 50-60Hz electrical outlet.
2. Connect telephone line cord into the phone jack on rear panel of
the base and the other end into a main socket, Plug the charger power
adaptor (Type: IW156E, 100-240Vac/6Vdc/150mA) cord into the pow-
er jack on rear panel of charger and the other end into a 100-240Vac
50-60Hz electrical outlet.
Before you use the cordless handset for the first time, it’s impor-
tant to charge the batteries fully.
Leave the handset on the charging cradle for 15 hours.
The battery charge symbol will blink when you’re charging an empty
battery.
If you think that the symbol isn’t showing the correct battery charge
level, rst check that the handset is correctly positioned in the charg-
ing cradle.
If you’re sure that it is, remove and ret the batteries. Please note
that it’s normal for the mains adapter to become warm this doesn’t
indicate a fault.
CAUTION: Use only the power supply that came with this unit. Using
other power supplies may damage the unit.
Base adaptor type is IW506E, 100-240Vac/6Vdc/500mA;
Charge adaptor is IW156E, 100-240Vac/6Vdc/150mA.
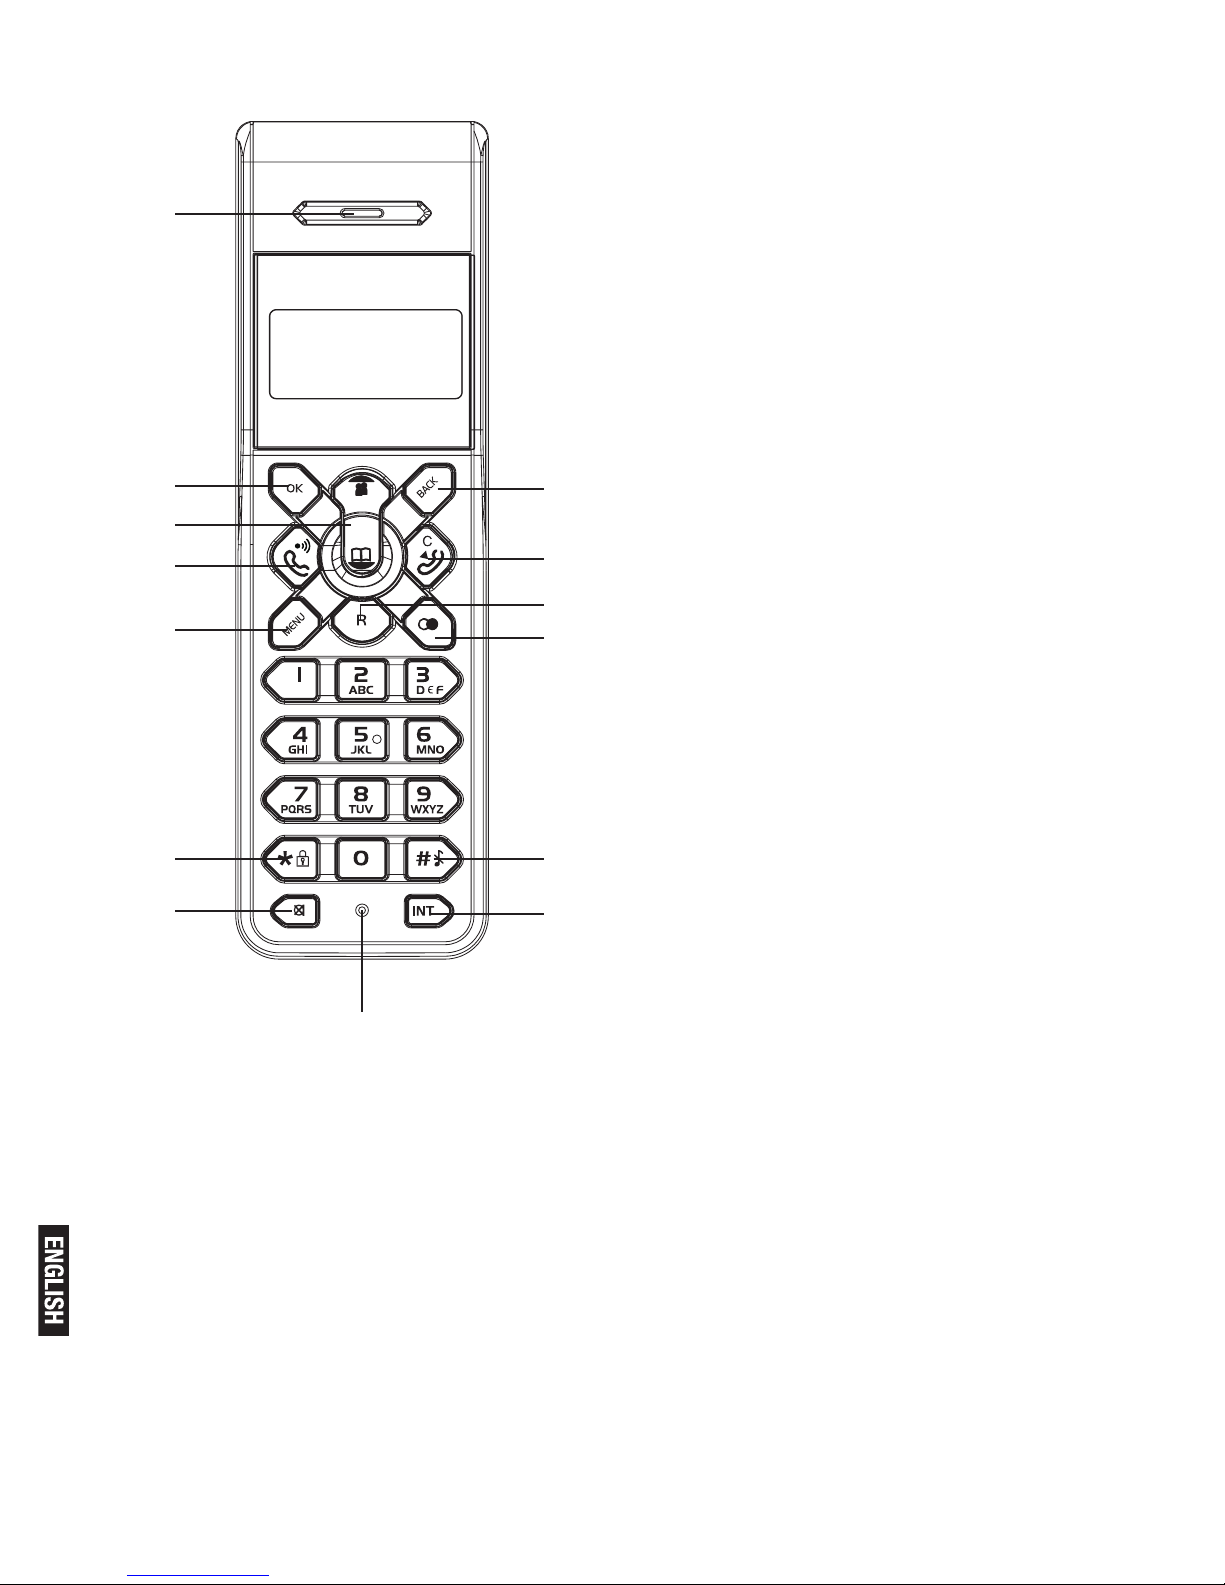
Your Telephone Operations
Switching on/off
Press and hold the HANG-UP/EXIT key for more than 2 seconds to
switch on/off the handset in idle mode.
** You can switch the handset off and save battery charge.
Notes: When the handset is OFF, it cannot be used for making calls in-
cluding emergency calls. There will be no ringing during an incoming call.
To answer a call, you will need to switch it back on. It may take some time
for the handset to re-establish a radio link with the base unit.
To lock/unlock the keypad

Pg. 10
Press and hold the STAR key for 1 second to lock/unlock the keypad
in idle mode.
Note: Incoming calls can still be answered even if the keypad was
locked.
Set time and date
Note: If you subscribe to the Caller Display service, the time and date
will be set automatically when you receive a call, but you may still
need to set the correct year.
1. Press MENU key to enter menu selection.
2. Press the Navigation key to select CLOCK&ALARM and then press
OK key to select.
3. Press OK key to select DATE/TIME. The last stored date is displayed.
Enter the current date (YY-MM-DD), press OK, then enter the time (HH-MM).
4. Press the Navigation key to select AM or PM (if the time is in 12
HOURS format) and then press OK key to conrm. A conrmation
beep is played.
Change your handset’s name
1. Press MENU key to enter menu selection.
2. Press the Navigation key to select PERSONAL SET and then press
OK key to select.
3. Press the Navigation key to select HANDSET NAME and then press
OK key to select. The current handset name is displayed.
4. Press BACK/CLEAR key to delete the characters one by one.
Enter the new name (maximum 10 characters) and press OK key to conrm.
A conrmation beep is played.
Change the display language
1. Press MENU key to enter menu selection.
2. Press the Navigation key to select PERSONAL SET and then press
OK key to select.
3. Press the Navigation key to select LANGUAGE and then press OK
key to select.
4. Press the Navigation key to your desired language and press OK
key to conrm. A conrmation beep is played.
** Once the display language is set, the option menus on the handset
will switch to display in the selected language immediately.
Make and answer calls
Make a call
Predialling

Pg. 11
Dial the number (maximum 24 digits) and then press TALK key.
Direct dialling
Press TALK key to take the line and then dial the number (maximum
24 digits).
Call from redial list
Press REDIAL key in idle mode.
Press the Navigation key to an entry in the redial list and then press
TALK key.
Call from the call log
Press CALL LOG (UP) key in idle mode.
Press the Navigation key to an entry in the call list and then press
TALK key.
Note: You need to subscribe to Caller Line Identication service to be
able to see the caller’s number or name in the call log.
Call from the phonebook
Press PHONEBOOK (DOWN) key in idle mode.
Press the Navigation key to an entry in the phonebook and then press
TALK key.
Answer and end a call
1. When the phone rings, press TALK key.
2. To end a conversation, press HANG-UP/EXIT key.
Warning: When the handset rings during an incoming call, please do
not hold the handset too close to your ear as the volume of the ringing
tone may damage your hearing.
IMPORTANT NOTE: You can simply place the handset back on its
base station or charger pod to end the call.
Make sure that you have not deactivated the auto hang-up feature.
Adjust the earpiece volume
During a call, press the Navigation key to select from VOLUME 1 to
VOLUME 3.
Mute/unmute microphone
When the microphone is muted, the handset displays MUTE ON, and
your caller cannot hear you.
During a call, press the MUTE key to turn on/off the microphone.
Paging The paging feature enables you to locate a missing handset if
the handset is in range and contains charged batteries.
Press HANDSET LOCATOR key located at the back of the base
station. All the registered handsets start to ring.

Pg. 12
Once retrieved, press any key on the handset or the HANDSET
LOCATOR key again to end the paging.
Call waiting
If you have subscribed to Call Waiting service, the earpiece will emit
a beep tone to inform you that there is a second incoming call. The
number or name of the second caller will also be displayed on your
phone if you have subscribed to Caller Line Identication service (CLI).
Please contact your network provider for more information on this service.
Using your phonebook
Your phone can store up to 50 phonebook memories. Each phone-
book entry can have a maximum of 24 digits for the phone number
and 12 characters for name.
How to enter characters?
When you select a eld in which you can enter text, you can enter the
letters that are printed on the keys by pressing the relevant key once
or several times.
For example, press 2 once to insert the letter ‘A’, press 2 twice to
insert the letter B, and so on... Spaces and other symbols can be
entered using the
1 or 0 key.
Store a contact in the phonebook
1. Press MENU key to enter menu selection.
2. Press the Navigation key to select PHONEBOOK and then press
OK key to select.
3. Press OK key again to enter NEW ENTRY.
4. Enter the name of the contact (maximum 12 characters).
To edit, press BACK/CLEAR key to delete the last character entered.
Press OK key to conrm the name entry.
5. Enter the number of the contact (maximum 24 digits) and then press
OK key to conrm. A conrmation beep is played.
** You cannot store a new phonebook entry when the memory is full.
In this case, you have to delete existing entries to make space for
new entries.
** When storing the number, enter the full number including the STD
(area) code if you subscribe to caller display, otherwise it will not dis-
play the name when there is an incoming call.
Access phonebook
1. Press PHONEBOOK (DOWN) key in idle mode to browse the

Pg. 13
phonebook entries. Alternatively, you can press the MENU key, to dis-
play PHONEBOOK and then press OK key to select.
2. Press the Navigation key to select LIST and then press OK key to conrm.
The phonebook entries will be listed in alphabetical order, and you can
press Navigation key to scroll through the stored entries.
3. Press OK key to view the details of the selected entry.
** Instead of pressing the Navigation key to browse the phonebook
entries, you can press the numeric key corresponding to the rst letter
of the entry you wish to locate. For example, pressing 2 will show the
entries starting with A.
Pressing 2 again will show the entries starting with B, and so on...
Modify a phonebook entry
1. Press MENU key to enter menu selection.
2. Press the Navigation key to select PHONEBOOK and then press
OK key to select.
3. Press the Navigation key to select EDIT ENTRY and then press OK
key to select.
4. Press the Navigation key to select an entry to edit and then press OK key.
The current name is displayed.
Edit the name and then press OK key to conrm.
5. Edit the number and then press OK key to conrm. A conrmation
beep is played.
Delete a phonebook entry
1. Press MENU key to enter menu selection.
2. Press the Navigation key to select PHONEBOOK and then press
OK key to select.
3. Press the Navigation key to select DELETE and then press OK key
to select.
4. Press the Navigation key to select an entry to delete and then press OK key.
5. Press OK key again to conrm. A conrmation beep is played.
Delete all entries from the phonebook list
1. Press MENU key to enter menu selection.
2. Press the Navigation key to select PHONEBOOK and then press
OK key to select.
3. Press the Navigation key to select DELETE ALL and then press OK
key to select.
4. Press OK key again to conrm. A conrmation beep is played.
Direct access memory
There are 2 direct access memories (Keys 1 & 2) in addition to the

Pg. 14
phonebook memory. A long press on the keys in idle mode will auto-
matically dial the stored phone number.
Add/edit direct access memory
1. Press MENU key to enter menu selection.
2. Press the Navigation key to select PHONEBOOK and then press
OK key to select.
3. Press the Navigation key to select DIRECT MEM. and then press
OK key to select.
4. Press the Navigation key to select KEY 1 or KEY 2 and then press OK key.
The stored name is displayed, or NO NUMBER if it is empty.
If there is no number stored for the selected key or if you want to
change the name or number currently stored, press MENU key to en-
ter direct memory menu to add/edit the name or number.
5. Press the Navigation key to select EDIT NUMBER and then press
OK key to select. The display shows the currently stored name, or
ENTER NAME if here is no number stored. Edit or enter the name you
want and then press OK key. The display shows the currently stored
number, or ENTER NUMBER if there is no number stored. Edit or enter
the number you want and then press OK key to conrm. A conrma-
tion beep is played.
Delete direct access memory
1. Press MENU key to enter menu selection.
2. Press the Navigation key to select PHONEBOOK and then press
OK key to select.
3. Press the Navigation key to select DIRECT MEM. and then press
OK key to select.
4. Press the Navigation key to select KEY 1 or KEY 2 and then press OK key.
The stored name is displayed (or NO NUMBER if it is already empty).
5. Press MENU key to enter direct memory menu.
6. Press the Navigation key to select DELETE and then press OK key to select.
Press OK key again to conrm. A conrmation beep is played.
Using the redial list
The redial list stores the last 5 numbers dialed. A maximum of 24 digits
can be displayed for each entry.
Access redial list
1. Press REDIAL key in idle mode and press Navigation key to browse
the redial list. The last number dialed will appear rst in the redial list.
2. Press OK key to view the details of the selected entry.
Save a redial number into the phonebook

Pg. 15
1. Press REDIAL key in idle mode to go to the redial list.
2. Press the Navigation key to select an entry.
3. Press MENU key to display SAVE NUMBER, then press OK key to
display ENTER NAME. Enter the name of the contact (maximum 12
characters) and then press OK key to save the entry, and return the
display to the redial list.
Delete a redial number
1. Press REDIAL key in idle mode to go to the redial list.
2. Press the Navigation key to select an entry and then press MENU key.
3. Press the Navigation key to select DELETE and then press OK key to select.
4. Press OK key again to conrm. A conrmation beep is played.
Delete the redial list
1. Press REDIAL key in idle mode to go to the redial list.
2. Press the MENU key.
3. Press the Navigation key to select DELETE ALL and then press OK
key to select.
4. Press OK key again to conrm. A conrmation beep is played.
Using the call log
To receive Caller ID you may need to contact your telephone service
provider, and they will inform you also of any charges for it.Caller ID
lets you see the phone numbers of your callers on the handset display,
before you answer and in your Call Log afterwards.The Call Log stores
the last 10 external calls, whether or not you answered the call, so you
can call them back later.
Only the most recent call is saved if there are repeat calls from the
same number. When the Call Log is full, the next new call will replace
the oldest entry.
If you’ve got a new call in the Call Log, the Caller Display icon will ap-
pear on the handset display.
If the received number is the same as one in your phonebook, the
name from the phonebook will display as well as the number.
If a call is from someone who withheld their number, the display will
show WITHHOLD ID.
If the call is from someone whose number is unavailable, or if you
have not subscribed to Caller ID but have set the date and time, the
display will show CALLING when it is received and UNAVAILABLE in
the Call Log.
Access call log
Press CALL LOG(UP) key in idle mode and press Navigation key to

Pg. 16
browse the call list. The calls are displayed in chronological order with
the most recent call at the top of the list.
1. Press OK key to display more details of the call, including the date
and time.
Save call list entry into the phonebook
2. Press CALL LOG(UP) key in idle mode to go to the call list.
3. Press the Navigation key to select an entry and then press MENU key.
4. Press the Navigation key to select SAVE NUMBER and then press
OK key to select.
Enter the name of the contact (maximum 12 characters) and then
press OK key to conrm.
Delete a Call Log entry
1. Press CALL LOG(UP) key in idle mode to go to the call list.
2. Press the Navigation key to select an entry and then press MENU key.
3. Press the Navigation key to select DELETE and then press OK key to select.
(Press OK key again to conrm. A conrmation beep is played.)
Delete all entries in the Call Log
1. Press CALL LOG (UP) key in idle mode to go to the call list.
2. Press the MENU key.
3. Press the Navigation key to select DELETE ALL and then press OK
key to select.
(Press OK key again to conrm. A conrmation beep is played.
Answering machine operation by handset
You can use the answer machine menu on the handset to access and
change the settings for all the answering machine functions.
Turn the answering machine on or off
1. Press MENU key to enter menu selection.
2. Press the Navigation key to select ANSW MACHINE and then press
OK key to select.
3. Press the Navigation key to select ANSW. ON/OFF and then press
OK key to select.
4. Press the Navigation key to select ON or OFF and then press OK
key to conrm.
5. A conrmation beep is played. Press HANG-UP/EXIT key to go
back to idle mode.
* You can also turn the answering machine on or off by pressing the
ON/OFF
key on the base.

Pg. 17
** If the answering machine is turned off and the master PIN is still set
at its default 0000, the answering machine will not answer to any in-
coming ringing, but if the master PIN has been changed, it will answer
after 10 rings to allow remote access.
The outgoing message
The model is supplied with two predened outgoing messages (OGM)
used for the different answer modes.
There are 2 answer modes available: Answer Only and Answer & Record.
By default, the answer mode is ANSW.&RECORD, which allows a
caller to leave a message on the answering machine. This can be
changed to ANSWER ONLY mode, which does not allow callers to
leave any messages on the answering machine.
Set the answer mode
1. Press the MENU key to enter menu selection.
2. Press the Navigation key to select ANSW MACHINE and then press
OK key to select.
3. Press the Navigation key to select ANSWER MODE and then press
OK key to select.
4. Press the Navigation key to select ANSWER ONLY or
ANSW.&RECORD and then press OK key to conrm.
Record a personalised outgoing message
* You can choose to replace the predened OGM with your own pre-
recorded personalised messages.
1. Press the MENU key to enter menu selection.
2. Press the Navigation key to select ANSW MACHINE and then press
OK key to select.
3. Press the Navigation key to select RECORD OGM and then press
OK key to select.
4. Press the Navigation key to select ANSWER ONLY or
ANSW.&RECORD and then press OK key to conrm.
5. Press the Navigation key to select RECORD OGM.
6. Press OK key to start recording your new outgoing message.
7. Press OK key again to end the recording.
* The maximum length of an outgoing message is 2 minutes.
* To hear your outgoing message, select PLAY at step 5.
* To delete a personalised outgoing message and return to the pre-
dened one,
select DELETE at step 5.

Pg. 18
Playback and delete messages
The last recorded message is played rst via the loudspeaker on
model
Old messages cannot be played again until after all new messages
have been played.
Playback recorded messages
1. Press the MENU key to enter menu selection.
2. Press the Navigation key to select ANSW MACHINE and then press
OK key to select.
3. Press the OK key to start playback.
* During message playback you can press MENU key, then Naviga-
tion to select options to REPEAT the current message, skip forward
to the NEXT
message, skip back to the PREVIOUS message or DELETE the cur-
rent message.
Delete all recorded messages
1. Press the MENU key to enter menu selection.
2. Press the Navigation key to select ANSW MACHINE and then press
OK key to select.
3. Press the Navigation key to select DELETE ALL and then press OK
key to select.
Using the intercom
Intercom, call transfer and conference are only possible with at least 2
handset registered to the same base station. It allows you to make free
internal calls, transfer external calls from one handset to another, and
set up a 3-way conference with two handsets and an external call.
If you try to make a call while another handset is already on an exter-
nal call, you’ll hear a busy tone for a few seconds before the display
returns to idle.
Intercom another handset
Press INT key in idle mode.
Intercom is established immediately if there are only 2 registered
handsets.
If there are more than 2 registered handsets, the handset numbers
which are available for intercom, and a * , will be displayed. Press the
specic handset number you wish to call, or press * to ring all hand-
sets, to start intercom.
Transfer an external call to another handset
During the call, press INT key to put the external call on hold

Pg. 19
(the caller can no longer hear you).
Intercom is established immediately if there are only 2 registered
handsets.
If there are more than 2 registered handsets, the handset numbers
which are available for intercom, and a ‘*’, will be displayed. Press
the specic handset number you wish to call, or press ‘*’ to ring all
handsets, to start intercom.
Press TALK key on the called handset to answer the internal call,
where both internal callers can talk. Intercom is established.
Press HANG-UP/EXIT key on the rst handset to transfer the
external call to the called handset. The external call is transferred.
** If there is no answer from the called handset, press INT key to re-
sume the external call.
Answer an external call during intercom
During intercom, a new call tone is emitted when there is an incoming
external call.
Press TALK key to answer the external call and end the intercom.
Connection with the external call is established.
** To put the internal call on hold and answer the incoming external
call, press INT key.
Switch between an internal and external call
During the call, press INT key to switch between an internal or
external call.
Establish a three-party conference call
The conference call feature allows one external call to be shared with
two handsets (in intercom). The three parties can share the conversa-
tion and no additional network subscription is required.
During an external call, press INT key to put the external call on
hold (the caller can no longer hear you).
If there are more than 2 registered handsets, the handset numbers
which are available for intercom will be displayed. Press the specic
handset number you wish to call to start intercom.
Press TALK key on the called handset to answer the internal call,
where both internal callers can talk. Intercom is established.
Press and hold INT key for 2 seconds on the rst handset to start
the three-party conference. CONFERENCE will be displayed on the
screen once the conference call is established.
Handset Tone
Set the ring volume

Pg. 20
There are 5 ringer volume options (OFF, LEVEL 1, LEVEL 2, LEVEL 3
and LEVEL 4). The default level is LEVEL 2.
1. Press MENU key to enter menu selection.
2. Press the Navigation key to select PERSONAL SET and then press
OK key to select.
3. Press the Navigation key to select HANDSET TONE and then press OK
key to select and show RING VOLUME. Press the OK key again to select.
4. Press the Navigation key to your desired volume level and then
press OK key to conrm. A conrmation beep is played.
Set the ring melody
There are 10 ring melodies available on your handset.
1. Press MENU key to enter menu selection.
2. Press the Navigation key to select PERSONAL SET and then press
OK key to select.
3. Press the Navigation key to select HANDSET TONE and then press
OK key to select.
4. Press the Navigation key to select RING TONES and then press
OK to select.
5. Press the Navigation key to your desired melody and then press OK
key to conrm. A conrmation beep is played.
Activate/deactivate key tone
A single tone is emitted when a key is pressed. You can enable or dis-
able the key tone. By default, the key tone is ON.
1. Press MENU key to enter menu selection.
2. Press the Navigation key to select PERSONAL SET and then press
OK key to select.
3. Press the Navigation key to select HANDSET TONE and then press
OK key to select.
4. Press the Navigation key to select KEY BEEP and then press OK
to select.
5. Press the Navigation key to select ON or OFF and then press OK
key to conrm. A conrmation beep is played.
Activate/deactivate auto hang-up
This function enables you to end a call automatically by simply placing the
handset on the base station. By default, the Auto Hang up feature is ON.
1. Press MENU key to enter menu selection.
2. Press the Navigation key to select PERSONAL SET and then press
OK key to select.
3. Press the Navigation key to select AUTO HANG-UP and then press
Table of contents
Languages:
Other Panacom Cordless Telephone manuals