Panacom IP-5953 User manual

USER MANUAL
IP CAMERA
WITH APP
IP-5953
3.0
megapixel

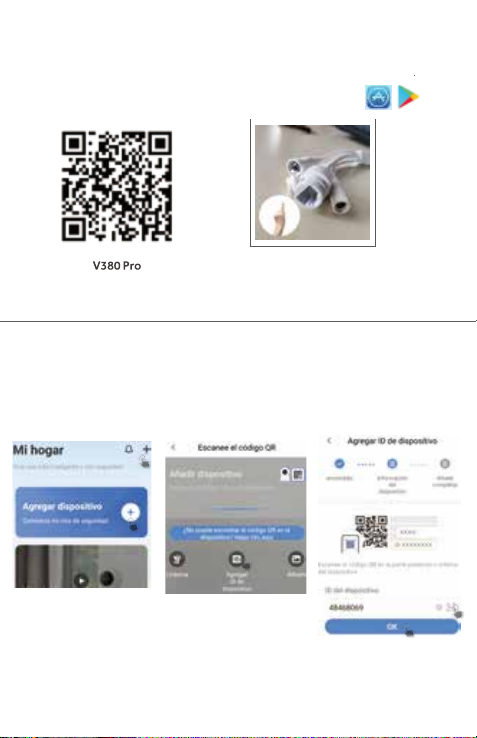
Or you can search“V380pro”on the Google play or Apple store
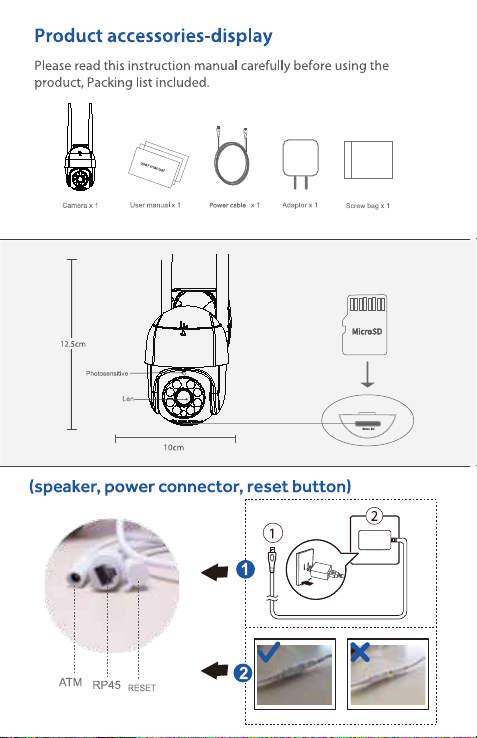
Reset the device
Press the button in 5 seconds, it speak
“Restore factory setting” and then reset is starting
Network conguration
1.Click “+” icon 2.Click "ID" icon 3. Input Device ID number,
then click"Conrm".

4.Create a " Device Name",
then click Finish
5.Go into Wi section of mobile setup,
then connect the wi name
of ip camera
6.Click"Settings", then click
"Set Passowrd "
7. Create user name and
password, then click conrm,
and click "Complete the
network conguration",
10. Click"Delete" to remove
the Ip camera
11. Input your account
password to delete the Ip
camera.
12. If losing the product ID code,
this QR code can help for setup,
but please use V380 Pro App
scanner.
8. If click "Only for AP hotpot
connection", then click "Setting",
"Network", go to see step 9.
9. Click "Wi station mode", nd
your oce/home wi name, and
click"Save", the connection is
completed.

Device Sharing
13. Click "Share"
1
2
3
4
5
6
7
8
9
10
11
1. Cloud - it is cloud service
2. General - it show Nickname & device ID
3. Network - it shows WIFI details
4. Password - change the device password
5. Device time - it change the time zone
6. Firmware version - it get update this software
7. Alarm settings - it turn on the alarm function
a, Alarm period - select all day/daytime/night/time setting
b, Alarm area - it select which area to use this alarm.
c, Alarm sound - it must trun on.
d, Hint sound type - use default sound or make it by yourself
8. Recording setting - Insert a card in the Ip camera
before Ip camera turn on.
9. PTZ Auto patrol - setup what the location need the Ip camera
watching on.
a, Preset position setting - preset 6 locations for tracking.
b, Automatic PTZ calibration - make the camera go back to starting point.
c, Automatic patrolling - Set a route with 6 postion with a perid of time,
it will check all the preset location according to the time set.
d, Timing Guard - each preset location can set a period of time for patrolling
10. PTZ speed setting - it changes the rotating speed for the camera
11.Advance settings - change the IP setup by manual or auto way
IP-5902
14. Input the APP Email or
APP mobile number, then
click "invite" to your friend
15. The inviter using V380Pro will
receive this message, click "Accept".

12. Cloud - it is for Cloud service
13. Arm/Disam - it starts for a function of arm and disarm
14. Share - it can share each ip camera to other people
by email address.
15. Delete - it can delete the ip camera
16. Settings - it go into more setup.
17. Device - it list out all the ip camera
18.Cloud - it is for Cloud service
19.News - it shows information for the ip camera
20.Profile - it shows the user account
21.Play/Stop - it starts/stops the Ip camera.
22.Speaker - it turns on and turn off.
23.Picture resolution(SD is 640*460,HD is 1920*1080)
24.Display - 4 camera can show on the display
25.Left/Right - the camera go to another IP camera
26.Full Screen - it make the display in full screen.
27.Snapshot - it captures a picture for the position.
28.Record - it is an image recording function.
29.Speak - press it can speaking
30.Replay - Insert a micro SD card in Ip camera, the
recording will start
31.More - it has included 4 functions
a, inversion - it turns around the display in 180 degrees.
b, Preset PTZ - it presets 6 locations
c, Motion track - it can preset the location to let
the Ip camera tracking.
d, PTZ calibration - it make the Ip camera turn around
12 13 14 15 16
17 18 19 20
21 22 2423 25 26
27 28 29 30 31
INTERNATIONAL WARRANTY
Terms and Conditions
1. Panacom warrants the operation of this product to be free from any manufacturing
and/or material defect for a period of 6 months from the date of purchase by the user.
2. This warranty is limited to the repair and/or replacement of this product, according to
our own criterion, free of charge within the stipulated term and it does not extend to
consequential or incidental damages to other products that may be used with this unit.
3. The warranty shall be voided in the following cases: a) repair or attempt to repair by
third parties not authorized by the company. b) in case of performing any type of cut in
connection cables, plugs, connectors, or other adapters different from the original ones
provided by the company.
4. To make this warranty effective, you shall contact the Authorized Service Center of
your country and they shall carry out the pertinent procedure. In order to start the
necessary procedure to get said warranty, you shall hand in the Original Purchase
Invoice where the purchase date, dealer name and
5. Transportation, freight, stay and/or insurance expenses, if any, are not covered by
this warranty.
REPAIR SERVICE
To ask for customer service please call 0810-888-7262.

ESPAÑOL
MANUAL DE USO
IP-5953 CÁMARA IP
CON APP
3.0
megapixel
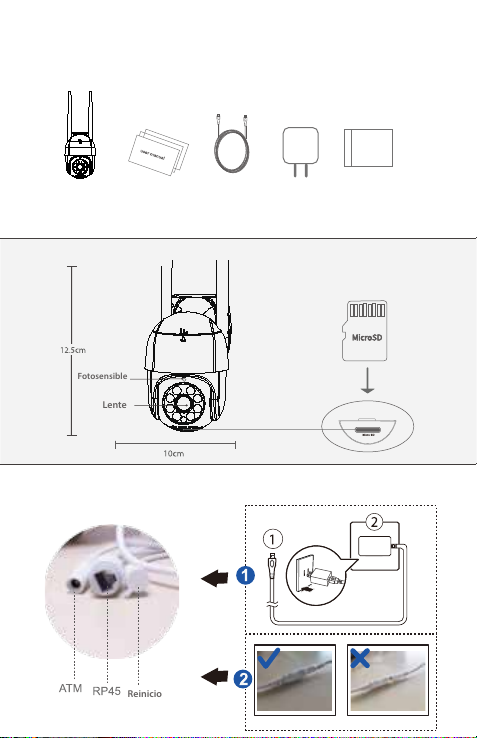
Accesorios del producto
Lea atentamente este manual de instrucciones antes de utilizar
el producto, incluída la lista de embalaje.
AdaptadorCámara Manualde uso Cable de alimentacion Caja
Lente
Fotosensible
Reinicio
(parlante, conector de alimentación, botón de reinicio)
Reset the device
Press the button in 5 seconds, it speak
“Restore factory setting”and then reset is starting
O puede buscar "V380pro" en Google Play o Apple Store.
Descargue primero la aplicación cliente móvil
El teléfono móvil escanea el código QR para descargar la
APLICACIÓN del cliente móvil.
1. Haga clic en el icono "+" 2.Haga clic en el icono "ID" 3. Escriba el número de ID del
dispositivo, luego haga clic
en "Conrmar".
Conguración de la red

4. Cree un "Nombre
del dispositivo", luego
haga clic en Terminar
5. Vaya a la sección Wi de la
conguración móvil, luego conecte
el nombre wi de camara ip
6. Haga clic en "Conguración",
luego haga clic en
"Congure contraseña"
7. Cree un nombre de usuario y
contraseña, luego haga clic en
conrmar y haga clic en "Completar
la conguración de la red",
10. Haga clic en "Eliminar"
para quitar la cámara IP
11. Ingrese la contraseña de
su cuenta para eliminar la
cámara IP.
12. Si pierde el código de
identicación del producto, este
código QR puede ayudar con la
conguración, pero use el escáner
de la aplicación V380 Pro.
8. Si hace clic en "Solo para
conexión de punto de acceso AP",
luego haga clic en "Conguración",
"Red", vaya al paso 9.
9. Haga clic en "Modo de estación
Wi", busque el nombre de wi de
su ocina/hogar y haga clic en
"Guardar", la conexión se completa.
Table of contents
Languages:


