manuals.online logo
Brands
  1. Home
  2. •
  3. Brands
  4. •
  5. Panasonic
  6. •
  7. Digital Camera
  8. •
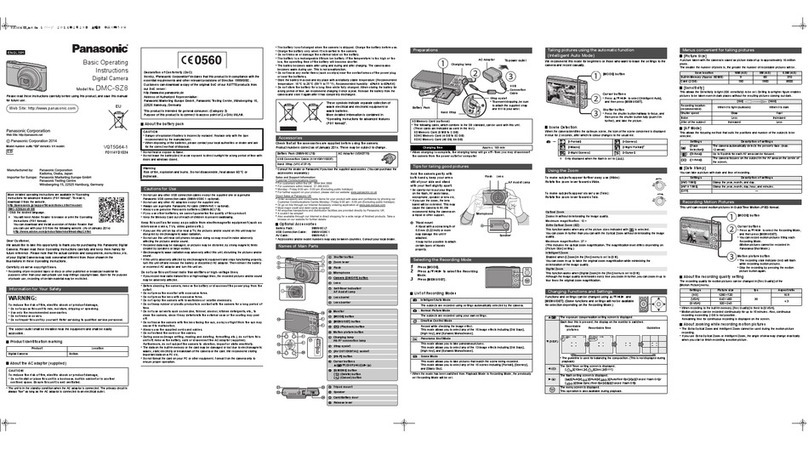
  9. Panasonic Lumix DMC-SZ5 Instruction manual

Panasonic Lumix DMC-SZ5 Instruction manual

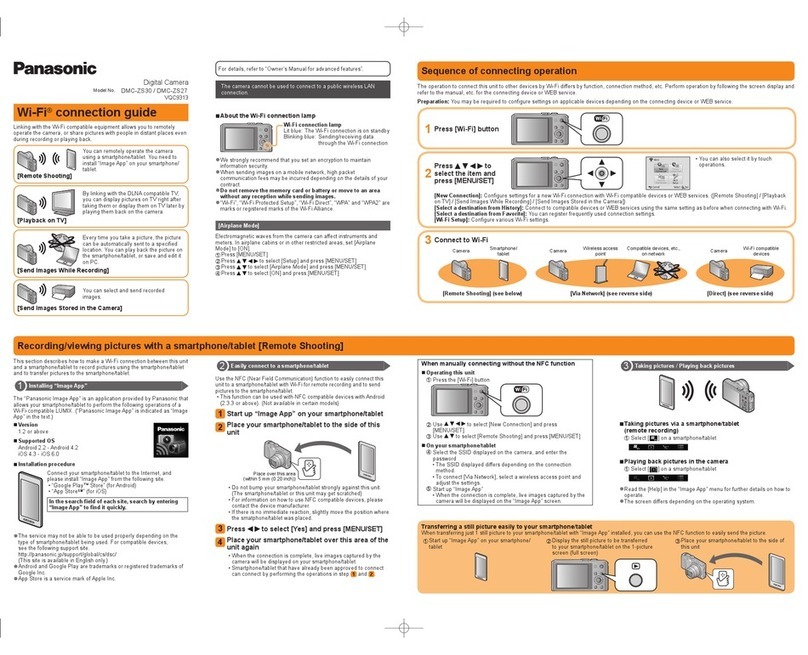
Let’s connect to the Wi-Fi
Register the wireless access point (broadband

router)/Connect to the smartphone
Wi-Fi connection guide
Setting up the Wi-Fi connection
Completion of [Wi-Fi Wizard]
[Smart Transfer]
[Remote Control]
[Send Image]
[Wireless TV Playback]
[Wireless Print]
The camera is not capable of connecting to a wireless network via public wireless LAN.
You can connect Wi-Fi compatible devices to the camera over the wireless network.

A PC, AV devices, etc. must be connected to a wireless access point (broadband router) in advance.

Press the power button to turn the camera on.1)
The first time you turn on the camera after purchase, setup items are displayed in the following order: Language selection•
*
Clock setting Wi-Fi Wizard.
This item may not be displayed depending on the region of purchase.*
To configure the connection settings by using [Wi-Fi Wizard] from the second time on, select [Wi-Fi Wizard] in the [Wi-Fi Setup] menu by pressing [Wi-Fi].•
Make the [Wi-Fi Wizard] settings according to on-screen instructions.2)
Make the settings in the following order: [Smart Transfer]• [Remote Control] [Send Image] [Wireless TV Playback] [Wireless Print]
You can select whether to make the connection settings for each function. If you select [Skip], you can skip the settings and proceed to the next function’s settings.•
The Wi-Fi connection lamp blinks blue during sending/receiving data via Wi-Fi, and lights blue while the Wi-Fi connection is on standby.•
Preparation: Install the smartphone application “LUMIX LINK” (See at right)
Connect to the smartphone. (See1) at right)
The setting is complete. (proceed to [Send Image])2)
Register the wireless access point (broadband router). (See1) at right)
Set the destination.2)
The setting is complete. (proceed to [Wireless Print])
3)
Register the wireless access point (broadband router). (See1) at right)
Set the destination.2)
The setting is complete. ([Wi-Fi Wizard] ends)
3)
Register the wireless access point (broadband router). (See
1)
at right)
Set the destination.2)
[PC]/[Cloud Sync. Service]/[AV device]
If you transfer to [PC], create a folder that receives the data on the PC in advance.•
Refer to “Operating Instructions for advanced features (PDF format)” for details.
If you select [Cloud Sync. Service], you can register to the “LUMIX CLUB” (See•
at right) and transfer images to a Cloud Folder on the web.
Register the wireless access point (broadband router). (See
1)
at right)
Set the destination.2)
[PC]/[Cloud Sync. Service]/[WEB service]/[Home] in [AV device]/[External]
in [AV device]
If you send to [PC], create a folder that receives the data on the PC in advance.•
Refer to “Operating Instructions for advanced features (PDF format)” for details.
If you select [Cloud Sync. Service], you can register to the “LUMIX CLUB” (See•
at right) and send images to a Cloud Folder on the web.
If you select [Home] in [AV device], you can send images to DLNA-compatible•
Panasonic device in your home.
If you select [AV device], you can•
transfer images to DLNA-compatible
Panasonic device in your home.
(When [Cloud Sync. Service] is
3)
selected)
Register to “LUMIX CLUB”.
The setting is complete.
4)
(proceed to [Remote Control])
If you are using a wireless access point (broadband router)/

smartphone that supports WPS*1 (Push button)
Select [WPS (Push-Button)]
Select [Manual Connection]
If you are using a wireless access point (broadband router)/

smartphone that does not support WPS (Push button)
If you select [External] in [AV device], you can send images to•
Panasonic AV device compatible with “LUMIX CLUB” owned
by your relatives and friends who live far away.
(When [Cloud Sync. Service], [WEB service] or3)
[External] in [AV device] are selected)
Register to “LUMIX CLUB”.
(When [WEB service] or [External] in [AV device] are4)
selected)
Set the SNS or AV device destination.
The setting is complete. (proceed to [Wireless TV Playback])
5)
A
B
C
Transfer recorded images to a PC, Cloud Folder or AV devices
automatically.
Using the smartphone application “LUMIX LINK”, you can remotely
record/play back images on the smartphone screen and send images
in the camera to other devices or WEB service.
You can select and send recorded images to a PC, Cloud Folder, AV
devices, or upload images to SNS (Social Networking Services) via
services on the web.
Turn the device to connect to the camera on. If the device to connect is off, Wi-Fi connection settings sometimes cannot be made.•
Move this camera closer to the wireless access point (broadband router), or change the direction of this camera.•
Check the settings of the wireless access point (broadband router).•
The camera may not display or connect to a wireless access point (broadband router) depending on the radio wave condition.•
Refer to the “LUMIX CLUB” site for details.
http://lumixclub.panasonic.net/eng/c/
The “LUMIX LINK” is an application provided by Panasonic that allows your
smartphone to perform the following operations of a Wi-Fi-compatible LUMIX.
Record/Play back pictures by controlling a Wi-Fi-compatible LUMIX on a•
smartphone screen.
Send images stored in a Wi-Fi-compatible LUMIX to other devices or WEB services.•
Sending the location information acquired by the smartphone to this unit.•
The service may not be able to be used properly depending on the type of•
smartphone being used. For compatible devices, see the following support
site.
http://panasonic.jp/support/global/cs/dsc/ (This Site is English only.)
When downloading the app on a mobile network, high packet communication•
fees may be incurred depending on the details of your contract.
Version: 2

OS: Android 2.2 - Android 4.0

Installation procedure

Version: 2

OS: iOS 4.3 - iOS 5.1

Installation procedure

Connect your Android device to a network.
1)
Select “Google Play2) TM Store”.
Enter “LUMIX LINK” into the search box.
3)
Select “LUMIX LINK” and install it.
4)
The icon will be added to the menu.•
Connect the iPhone to the network.
1)
Select “App Store2) SM”.
Enter “LUMIX LINK” into the search box.
3)
Select “LUMIX LINK” and install it.
4)
The icon will be added to the menu.•
You can display recorded pictures on a DLNA-compatible TV.
See the reverse side for details on how to use the respective
functions.
When a Wi-Fi connection cannot be made
You can print recorded pictures wirelessly from a PictBridge (wireless
LAN-compatible)
*
printer.
Compliant with the DPS over IP standards.*
When registering a
wireless access point
(broadband router)
When registering a
wireless access point
(broadband router)
WPS (Wi-Fi Protected Setup
*1. TM) allows a user to connect wireless LAN
devices compatible with WPS to one another. Moreover, the user can
make the security settings. For compatibility information, refer to the
manuals of your devices.
For details, refer to the manuals of your devices.
*2.
For details, refer to the manuals of your devices.
*3.
Set the wireless access point (broadband router)
to the WPS mode.*2
Select the wireless access point (broadband
router) to be connected, and enter the encryption
key into the camera.*3
Enter the SSID and the password displayed on
the camera into the smartphone.*3
Set the smartphone to the WPS mode.*2
Press [DISP.] to extend the connection waiting•
state.
When connecting with
the smartphone
When connecting with
the smartphone
For AndroidTM apps (As of August 2012)
Digital Camera
Model No. DMC-SZ5
VQC9095
About LUMIX CLUB

About the smartphone application “LUMIX
LINK”
For iOS apps (As of August 2012)
Power button

[Wi-Fi] button

Wi-Fi connection lamp

You can make the settings of the skipped functions from the Wi-Fi menu by pressing the [Wi-Fi]. Please refer to “Operating Instructions for
advanced features (PDF format)” for details.
DMC-SZ5VQC9095WiFiGuideeng.indd1DMC-SZ5VQC9095WiFiGuideeng.indd1 2012/07/1717:05:172012/07/1717:05:17
[Smart Transfer]
Transfer recorded images to a PC, Cloud Folder or AV devices automatically.
You can take, play back, and send images using the smartphone application “LUMIX LINK”.
You can send recorded images to PC, Cloud Folder or AV devices or upload them to SNS.
You can display recorded pictures on a DLNA-compatible TV.
[Remote Control]
Record
Live Control Remote Operation
Playback Send
You can print recorded pictures wirelessly from a PictBridge (wireless LAN-compatible) printer.
[Send Image]
[Wireless TV Playback]
[Wireless Print]
Create a folder that receives images on the PC in advance. Refer to the•
“Operating Instructions for advanced features (PDF format)” for details.
Turn the computer on.•
Create a folder that receives images on the PC in advance. Refer to the•
“Operating Instructions for advanced features (PDF format)” for details.
Turn the computer on.•
The destination AV device must be set up in advance. Refer to the AV•
device instruction manual for details.
The destination AV device must be set up in advance. Refer to the AV•
device instruction manual for details.
To send images to a Panasonic AV device compatible with “LUMIX•
CLUB” *, register the AV device on the “LUMIX CLUB” in advance, and
also register the AV device’s address number on the camera in advance.
Refer to the “Operating Instructions for advanced features (PDF format)”
and the AV device instruction manual for details.
The list of compatible devices is available on the website below:*
http://panasonic.jp/support/global/cs/dsc/ (This site is English only.)
Read the [Help] in the “LUMIX LINK” menu for further details on how to operate.•
A DLNA-compatible TV is required.•
A PictBridge (wireless LAN-compatible) printer is required.•
In addition to the above, location information acquired on the smartphone can be written to images taken on the camera or camera menus can be set
up on the smartphone. Refer to “Operating Instructions for advanced features (PDF format)” for details.
The screen differs depending on the operating system.*
You can perform the camera's picture-taking
operation from a smartphone.
This feature is useful when taking group photos•
or when taking pictures with the camera left at a
location away from you.
Pictures that are taken are saved on the camera.•
Number of

recordable pictures
Camera battery

indication
Zoom

Shutter

Menu display

Name of the

connected device
Pictures in the camera can be played back on the
smartphone screen.
You can post images to SNS by operating the
smartphone or save them on the smartphone.
The destination confirmation screen is displayed.•
Select [Yes].
The confirmation screen is displayed only when•
the connection destination is already set. When
[Yes] is selected, the camera image is displayed
on the TV.
The confirmation screen is displayed only when•
the connection destination is already set. Select
[Yes].
The screen that shows the camera is waiting to•
be connected with the smartphone is displayed.
Confirm that the connection destination of the•
smartphone is set to this unit.
Image transmission is executed after charging ends.•
Depending on the specifications of the PC, [Smart Transfer] may fail.•
Only the images you recorded when [Auto Transfer] is set to [ON] are•
transferred.
When sending images to a PC When sending images to a PC
When sending images to AV device When sending images to an AV device in your home
When sending images to AV device outside your home
Press [Wi-Fi].
1)
Press and hold the [Wi-Fi].
1)
Operations you can perform on a smartphone

Press2)

/

/

/

to select [Smart Transfer],
and press [MENU/SET].
Start the “LUMIX LINK”.2)
When the connection between the camera and the
smartphone is complete, the smartphone screen displays
images in the camera. The LCD monitor of the camera
turns off after displaying the remote control message.
Press
3)

/

to select [Auto Transfer],
and press [MENU/SET].
Press
4)

/

to select [ON], and press [MENU/SET].
Turn off the camera.
5)
(When using a power outlet)
6)
Connect the AC adaptor (supplied) and this camera with the
USB connection cable (supplied), and insert the AC adaptor
(supplied) into the power outlet.
(When using a PC)
Connect this unit to a PC with the USB connection cable (supplied).
LUMIX LINK
9
92
3
4
5
6
1
100-0001
1/9
Press [Wi-Fi].
1)
Preparation:
Set the TV to DLNA waiting mode.
Select the image.
4)
When [SINGLE] is selected
Press

/

to select the image.
When [MULTI] is selected
Press

/

/

/

to select the image, and press [DISP.].
(repeat this step)
Press [MENU/SET].
5)
Press2)

/

/

/

to select [Send Image],
and press [MENU/SET].
Press
3)

/

to select an image, and press [MENU/SET].
Press
4)

to select [Print start], and press [MENU/SET].
Press2)

/

/

/

to select [Wireless TV
Playback], and press [MENU/SET].
Press2)

/

/

/

to select [Wireless Print],
and press [MENU/SET].
Press
3)

/

to select [SINGLE] or [MULTI],
and press [MENU/SET].
Refer to the operating instructions for your TV.•
Press [Wi-Fi].
1)
Press [Wi-Fi].
1)
Let’s use the Wi-Fi functions
Android and Google Play are trademarks or registered trademarks of Google Inc.•
App Store is a service mark of Apple Inc.•
“Wi-Fi”, “Wi-Fi Protected Setup”, “WPA” and “WPA2” are marks or registered marks of the Wi-Fi Alliance.•
Note
Switch to Playback Mode.•
You can connect with this unit to a smartphone via a wireless access•
point (broadband router) by pressing [DISP.] on the waiting-screen for a
connection with a smartphone.
DMC-SZ5VQC9095WiFiGuideeng.indd2DMC-SZ5VQC9095WiFiGuideeng.indd2 2012/07/1717:05:202012/07/1717:05:20

Other manuals for Lumix DMC-SZ5

4

Other Panasonic Digital Camera manuals

Panasonic LUMIX DMC-GF7KGN User manual

Panasonic

Panasonic LUMIX DMC-GF7KGN User manual

Panasonic DMC-FH8S Installation and service instructions

Panasonic

Panasonic DMC-FH8S Installation and service instructions

Panasonic Lumix DMC-FZ50 User manual

Panasonic

Panasonic Lumix DMC-FZ50 User manual

Panasonic Lumix DMC-FX70 Technical specifications

Panasonic

Panasonic Lumix DMC-FX70 Technical specifications

Panasonic LUMIX DMC-FX50 User manual

Panasonic

Panasonic LUMIX DMC-FX50 User manual

Panasonic Lumix DMC-LX100 User manual

Panasonic

Panasonic Lumix DMC-LX100 User manual

Panasonic Lumix DMC-LS1PP User manual

Panasonic

Panasonic Lumix DMC-LS1PP User manual

Panasonic P2HD AJ-HPX3700 User manual

Panasonic

Panasonic P2HD AJ-HPX3700 User manual

Panasonic Lumix DMC-S3 Installation and service instructions

Panasonic

Panasonic Lumix DMC-S3 Installation and service instructions

Panasonic LUMIX DMC-TZ82 User manual

Panasonic

Panasonic LUMIX DMC-TZ82 User manual

Panasonic AJHDC27V - CAMERA VTR User manual

Panasonic

Panasonic AJHDC27V - CAMERA VTR User manual

Panasonic AWHE100N - HD INTEGRATED CAMERA User manual

Panasonic

Panasonic AWHE100N - HD INTEGRATED CAMERA User manual

Panasonic Lumix DMC-FX37P User manual

Panasonic

Panasonic Lumix DMC-FX37P User manual

Panasonic DC-BGH1 User manual

Panasonic

Panasonic DC-BGH1 User manual

Panasonic LUMIXDMC-FX100 User manual

Panasonic

Panasonic LUMIXDMC-FX100 User manual

Panasonic Lumix DMC-TZ70 User manual

Panasonic

Panasonic Lumix DMC-TZ70 User manual

Panasonic DX-GX800 Owner's manual

Panasonic

Panasonic DX-GX800 Owner's manual

Panasonic AW-UN70KPC User manual

Panasonic

Panasonic AW-UN70KPC User manual

Panasonic DMC-TZ80EB User manual

Panasonic

Panasonic DMC-TZ80EB User manual

Panasonic LUMIX DMC-G7K Technical specifications

Panasonic

Panasonic LUMIX DMC-G7K Technical specifications

Panasonic Lumix DMC-G2 User manual

Panasonic

Panasonic Lumix DMC-G2 User manual

Panasonic DMC-FX30A - Lumix Digital Camera Instruction Manual

Panasonic

Panasonic DMC-FX30A - Lumix Digital Camera Instruction Manual

Panasonic DMC-ZS10S Installation and service instructions

Panasonic

Panasonic DMC-ZS10S Installation and service instructions

Panasonic DMC-G85KBODY User manual

Panasonic

Panasonic DMC-G85KBODY User manual

Popular Digital Camera manuals by other brands

Nikon COOLPIX S02 user manual

Nikon

Nikon COOLPIX S02 user manual

Sony Cyber-shot DSC-S600 instruction manual

Sony

Sony Cyber-shot DSC-S600 instruction manual

Nikon D70 VBA10401 Repair manual

Nikon

Nikon D70 VBA10401 Repair manual

Casio Exilim EX-Z4U Function guide

Casio

Casio Exilim EX-Z4U Function guide

Samsung TL205 user manual

Samsung

Samsung TL205 user manual

Cobra DC5200 user manual

Cobra

Cobra DC5200 user manual

Sony Cyber-shot DSC-HX350 instruction manual

Sony

Sony Cyber-shot DSC-HX350 instruction manual

Kodak Retina IIIS Servicing

Kodak

Kodak Retina IIIS Servicing

Nikon Z 7II user manual

Nikon

Nikon Z 7II user manual

Pentax K-m/K2000 operating manual

Pentax

Pentax K-m/K2000 operating manual

FujiFilm FinePix S9000 owner's manual

FujiFilm

FujiFilm FinePix S9000 owner's manual

Hasselblad Xpan instruction manual

Hasselblad

Hasselblad Xpan instruction manual

Pentax IQZoom 105R Operation manual

Pentax

Pentax IQZoom 105R Operation manual

Spypoint TINY-3 user manual

Spypoint

Spypoint TINY-3 user manual

GE J1456W Specifications

GE

GE J1456W Specifications

Samsung FlatFOTO 2.0 user manual

Samsung

Samsung FlatFOTO 2.0 user manual

HP Photosmart R740 Series quick start guide

HP

HP Photosmart R740 Series quick start guide

Canon EOS Rebel T4i instruction manual

Canon

Canon EOS Rebel T4i instruction manual

manuals.online logo
manuals.online logoBrands
  • About & Mission
  • Contact us
  • Privacy Policy
  • Terms and Conditions

Copyright 2025 Manuals.Online. All Rights Reserved.