Pantograms GS1501 User manual

TABLE OF CONTENTS
1
Welcome
Congratulations on the purchase of your GS1501 Embroidery Machine and becoming part of the Pantograms
team. This JUMP START kit includes all the necessary information to help you get started as quickly and eas-
ily as possible. After reading this manual, be sure to watch the enclosed CD about our Forté software.
GETTING STARTED (section 1)
Service and Support ................................................................................................................................. 1-1
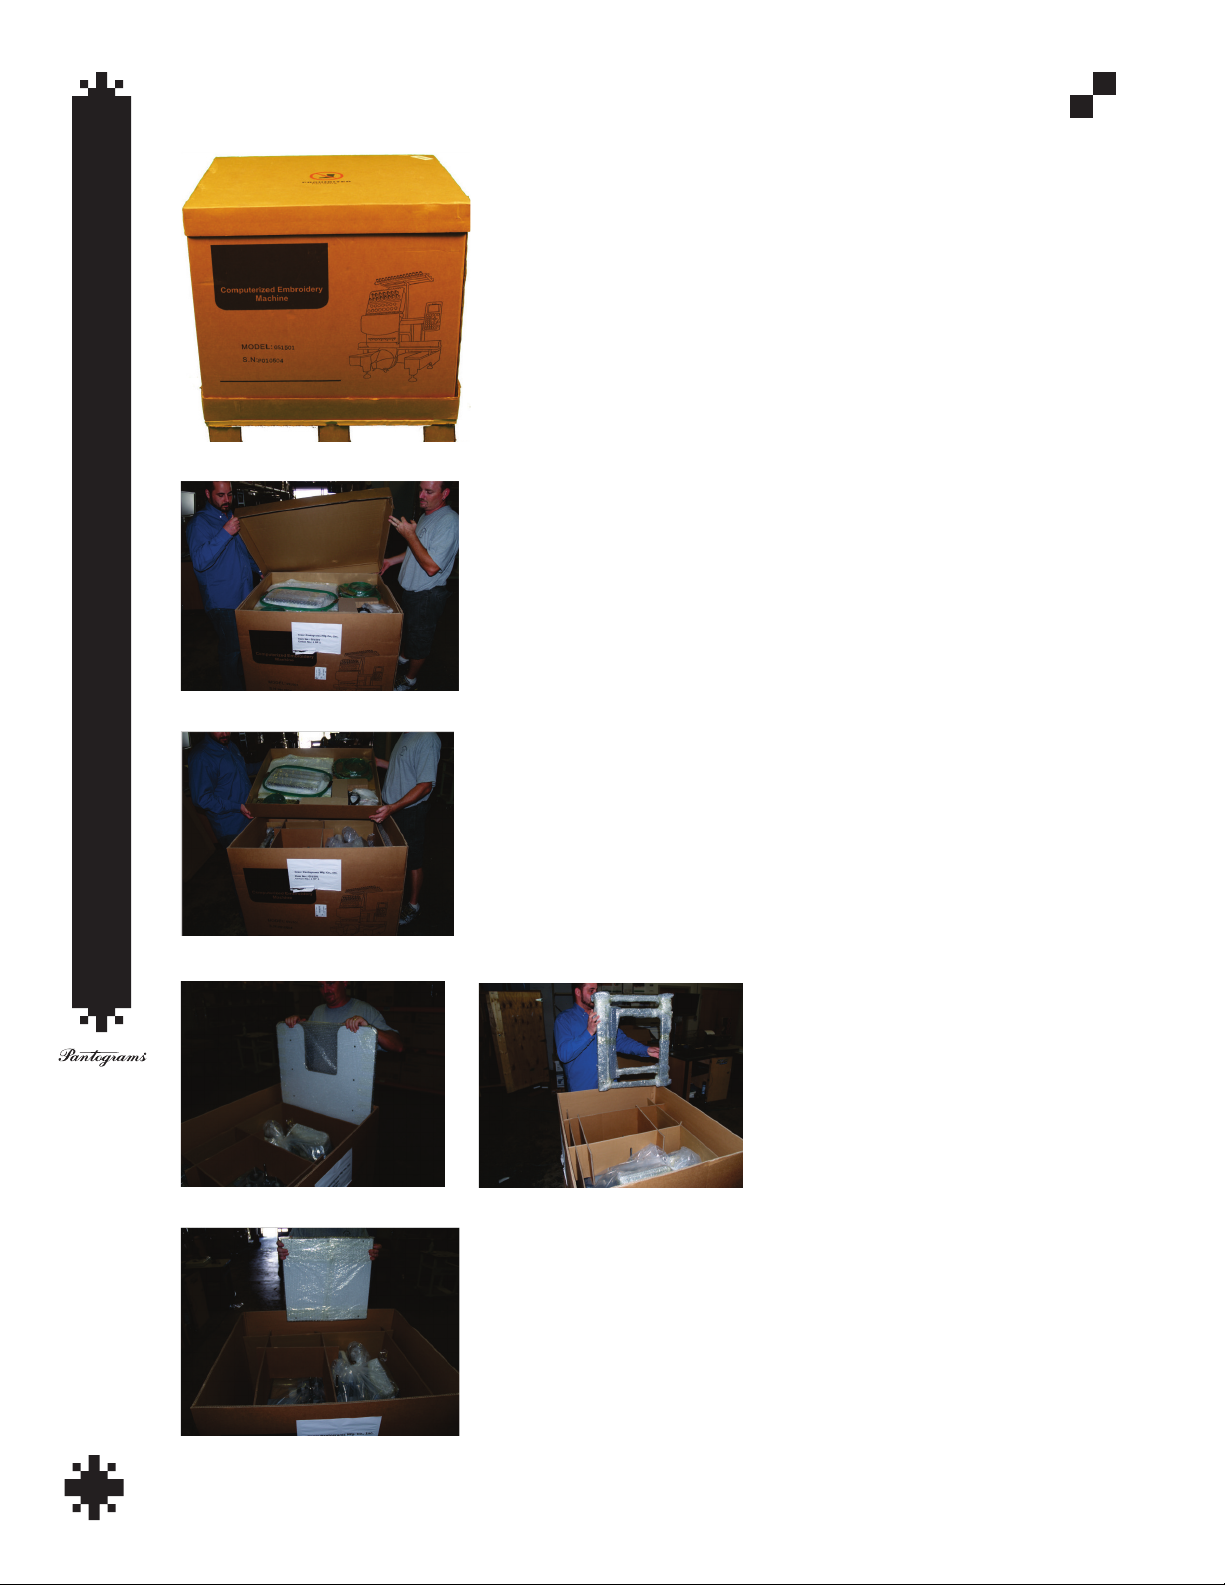
Unpacking Your GS1501 Embroidery Machine ........................................................................................ 2,3
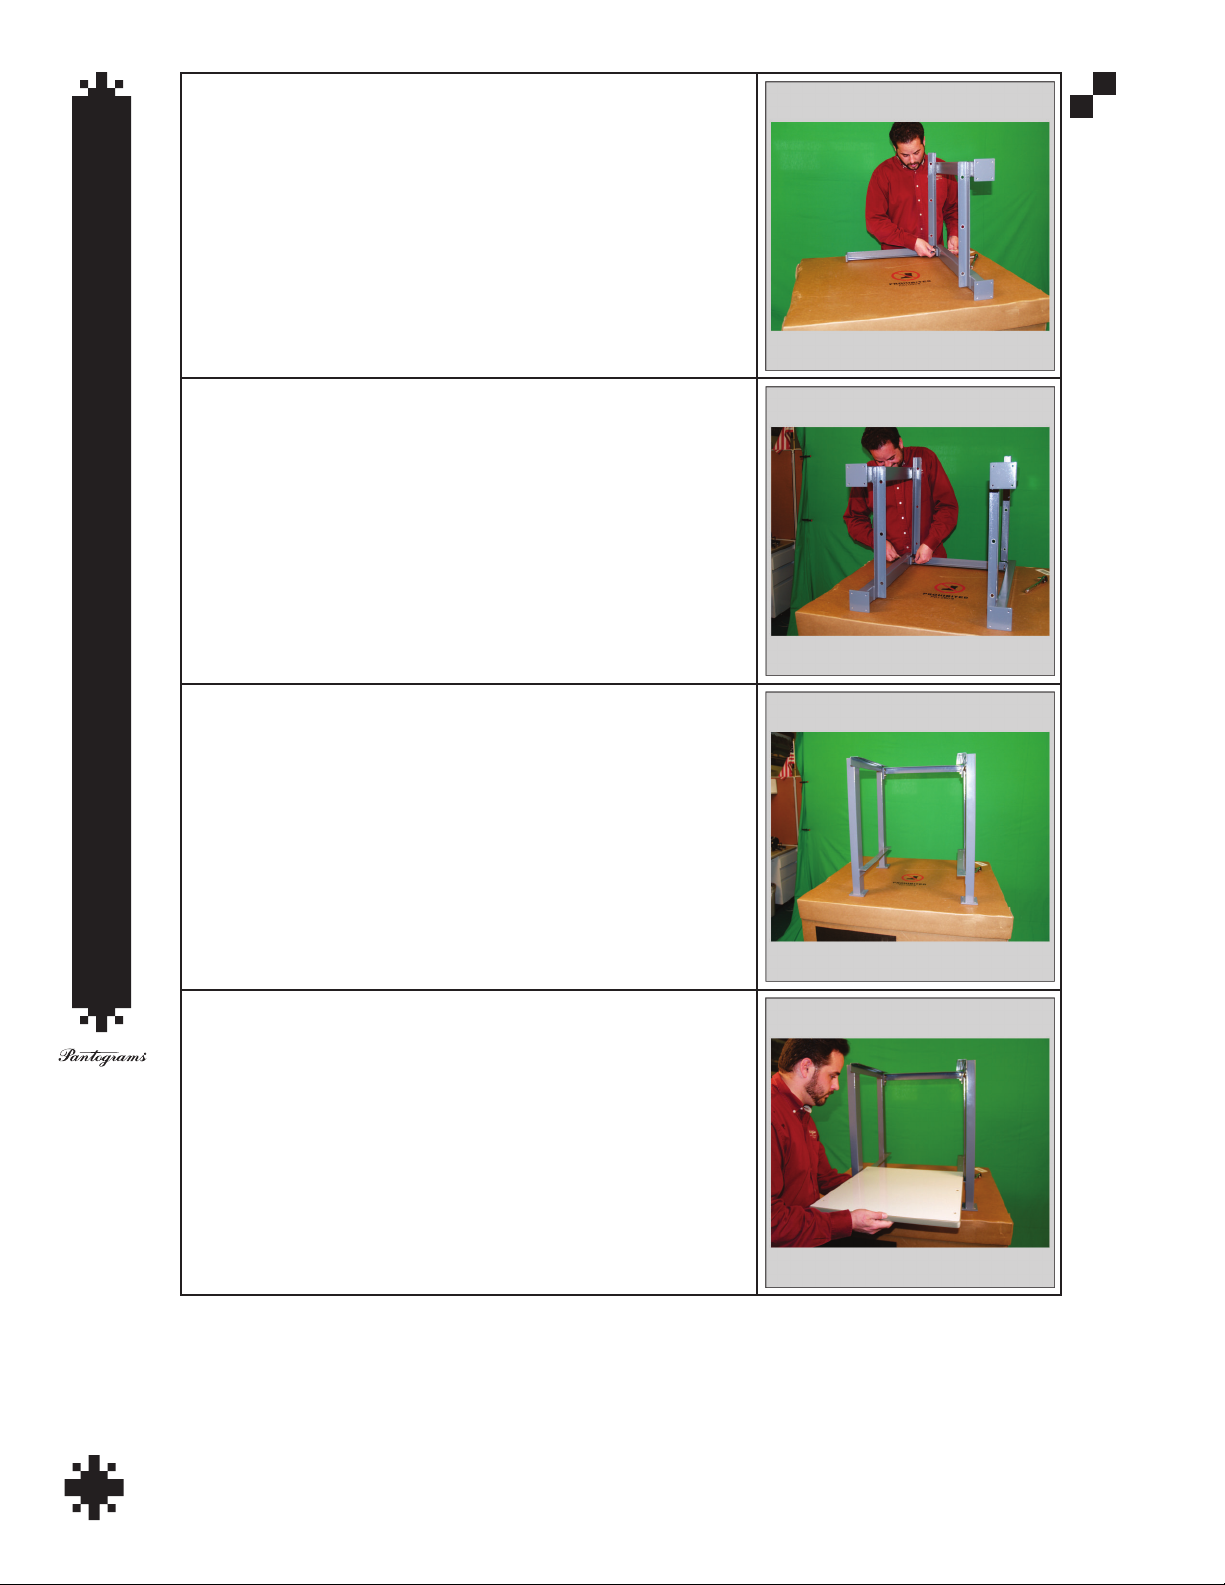
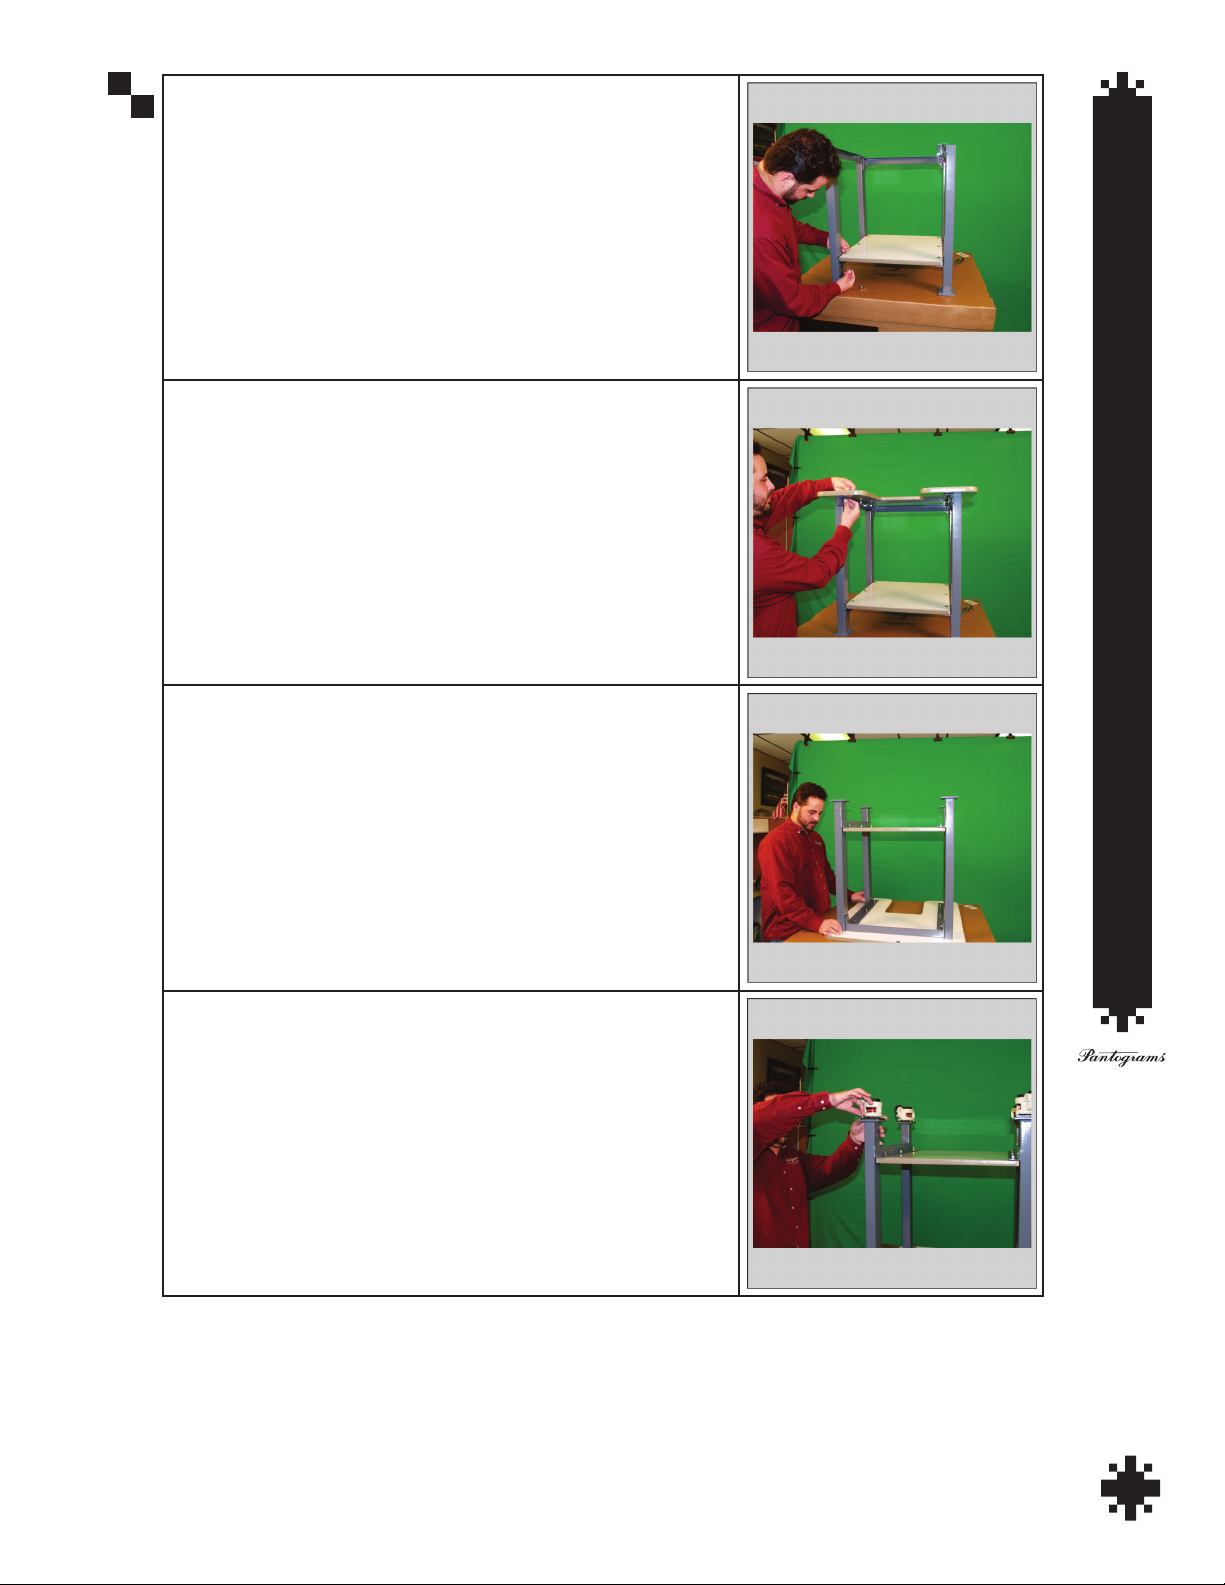
Setting Up Your GS1501 Work Station ............................................................................................... 4,5,6,7
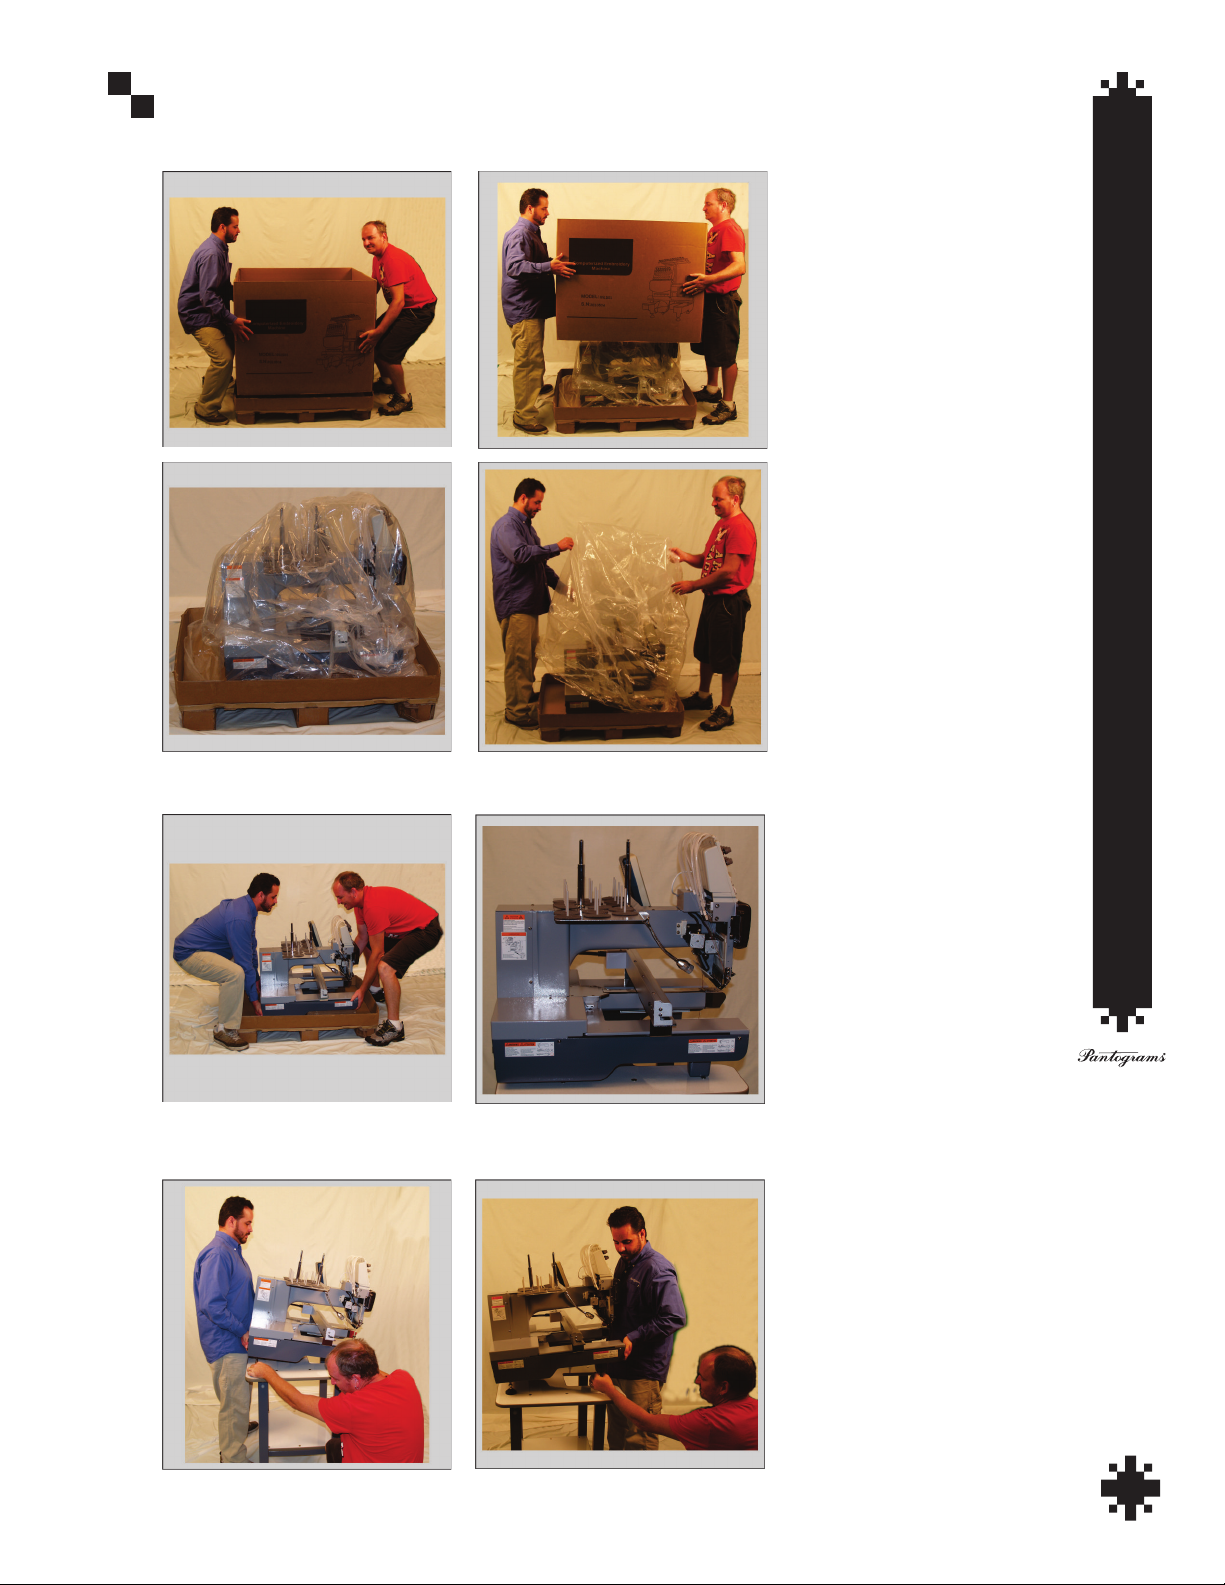
Setting Up Your GS1501 Embroidery Machine.....................................................................................8,9,10
Threading the GS1501 .................................................................................................... 11,12,13,14,15,16,17
Attaching the Tubular Arms...............................................................................................................18,19,20
Tracing the Design ............................................................................................................................... 21,22
Installing the Cap Driver and Embroidering the Test Cap Design ..............................................23,24,25,26
The GS1501 Control Panel .............................................................................................................. 27,28,29
Hooping Material on a Round Hoop .......................................................................................................... 30
Installing Forté Embroidery Suite Software ............................................................................................... 31
How to Load a Job ..................................................................................................................................... 32
EMBROIDERY BASICS (section 2)
Stitch Formation........................................................................................................................................ 2-1
Needles ........................................................................................................................................................ 2
Thread .......................................................................................................................................................... 4
Bobbins ........................................................................................................................................................ 5
Backing ..................................................................................................................................................... 6,7
Stitch Troubleshooting.................................................................................................................................. 8
Needle, thread and Stabilizer Chart ............................................................................................................ 9
Tension ........................................................................................................................................................11
Hoops ........................................................................................................................................................ 12
Hooping Aids.............................................................................................................................................. 13
Tools .....................................................................................................................................................14,15
Hooping Technique ................................................................................................................................16,17
Hooping a Structured Cap ......................................................................................................................... 18
Hoopless Frame Technique ....................................................................................................................... 19
Hooping a Large Item or a Jacket Back..................................................................................................... 20
Attaching a Large Hoop to the GS1501 ..................................................................................................... 21
Hooping a Satin Jacket .............................................................................................................................. 22
Common Hooping Problems...................................................................................................................... 23
Embroidery Placement.................................................................................................................... 24,25,26
Anatomy of a Cap....................................................................................................................................... 27
MACHINE BASICS (section 3)
GS1501 Embroidery Machine ...................................................................................................................3-1
Setting the Upper Thread............................................................................................................................. 3
Bobbin Placement in Case........................................................................................................................... 4
Common Adjustments - Thread Breaks ...................................................................................................... 5
Setting the Upper Thread Tension .............................................................................................................. 6
Thread Looping ........................................................................................................................................... 7
Cleaning the Machine .................................................................................................................................. 7
GS1501 Control Panel .................................................................................................................8,9,10,11,12
Oiling the GS1501 ............................................................................................................................. 13,14,15

TABLE OF CONTENTS
2
EMBROIDERY SOFTWARE (section 4)
Looking at the Work Area..........................................................................................................................4-1
Basic Digitizing............................................................................................................................................. 2
EMBROIDERY BUSINESS (section 5)
Pricing ...................................................................................................................................................... 5-1
Stitch Count ................................................................................................................................................. 2
Digitizing Fees and Decisions ..................................................................................................................... 3
Copyright, Trademark and Licensing ....................................................................................................... 4,5
Stock Designs ............................................................................................................................................. 6
GLOSSARY AND RESOURCES (section 6)
Glossary of Embroidery Terms ................................................................................................................. 6-1
Glossary of Embroidery Machine Terms ..................................................................................................... 4
Fabric Terminology....................................................................................................................................... 5
Industry Trade Shows .................................................................................................................................. 6
Trade Organizations..................................................................................................................................... 6
Industry Publications.................................................................................................................................... 6

GETTING STARTED
1
Getting Started with Your Pantograms
GS1501 Embroidery Machine
Thank you for choosing Pantograms as your embroidery system provider. We strongly recommend you to read the
following instructions for setting up the embroidery machine and sewing your rst test designs.
Service and Support
The talented and knowledgeable people in our service and support department are ready to assist you
should questions or problems arise. We strive to give the best support in the embroidery industry by offering
Website, email and telephone support.
For Website Support visit www.pantograms.com and click on support (or email support@pantograms.com).
You will nd a variety of topics related to your machine and software.
For telephone support call 1-800-872-1555.
Monday – Friday, 8:30 a.m. – 5:00 p.m. (EST).
If you don’t immediately speak with someone, please leave a message with your name, phone number and
message and one of our technicians will return your call. All calls received by 4:00 p.m. EST will be returned
the same business day.
Pantograms Website
Visit our Website at www.pantograms.com for more information about our products, machine support and
embroidery support.
EmbSupplies Website
To order embroidery supplies, visit our embroidery supply Website at www.embsupplies.com.
Digital HeatFX Website
To order heat transfer supplies, visit our heat transfer supply Website at www.DigitalHeatFX.com.

GETTING STARTED
2
Unpacking Your GS1501 Embroidery Machine
Contents of box containing the workstation:
• Embroidery machine
• Thread stand
• Tabletop
• Workstation
• Cap option
• Tubular hoop holder
• Tool kit
• Sample test design
• Starter kit
• Owner’s manual
• Hoops per your sales order
• Blank cap
• Other accessories you ordered
Tolls needed to unpack:
Scissors or box cutters
Note: Save the crate for future shipping should service be required.

GETTING STARTED
3
Unpacking Your GS1501
Cut and remove the straps that encircle the box.
Remove the box lid.
Remove the inner tray containing the hoops and other accessories.
Remove the workstation components.
Replace the lid on the box to assemble the workstation.

GETTING STARTED
4
Workstation Assembly
The following components make up the workstation:
(2) Two Side Frames
(1) One Back Support
(1) One Lower Shelf
(1) One Table Top
(4) Four Casters
Assorted fasteners
You will need 5mm and 6mm Allen wrenches and a 12mm wrench or socket for the assembly process.
These tools can be found in the toolbox that was included with your GS1501.
**IMPORTANT - DO NOT TIGHTEN FASTENERS UNTIL ASSEMBLY IS COMPLETE**
Attach Casters
Back Support
Table Tops
Side of Workstation

GETTING STARTED
5
Step 1 - Fasten back support to one side frame.
Step 2 - Fasten other side frame to back support.
Step 3 - Stand workstation frame upright.
Step 4 - Place lower shelf onto supports.

GETTING STARTED
6
Step 5 - Line up holes in shelf and support. Insert bolts through holes
in both shelf and support and attach nut.
Step 6 - Place table top on workstation. Line up holes and insert bolts
through both table top and frame and attach nuts.
Step 7 - Flip workstation over so that it is sitting on its table top.
Step 8 - Attach casters with four bolts per caster.

GETTING STARTED
7
Step 9 - Tighten bolts holding back support to side frames.
Step 10 - Tighten bolts holding lower shelf and table top being careful
not to over tighten.
Step 11 - Insert plugs to cover bolts holding back support and side
frames.
You have now completed assembly of the workstation and it is ready to receive your GS1501.

GETTING STARTED
8
Remove the cover and lift off the outer shell of the GS1501 box.
Two people can now lift the machine at its base and place it on the workstation.
One person should carefully lift the back of the machine while the other inserts the feet into the treaded
holes at each corner.
Your GS1501 is now ready for its initial setup.
Unpacking the GS1501

GETTING STARTED
9
Remove the Phillips screw from the top of the two posts that will sup-
port the thread tree.
Using a 2.5mm Allen wrench, loosen (but do not completely remove)
the set screw in the post then raise the post up to its nal position and
re-tighten the set screw.
Repeat these steps for the other post.
Set the thread tree on top of the posts, aligning the holes in the thread
tree with the holes at the top of the posts.
GS1501 Setup

GETTING STARTED
10
Using the screws that were previously removed, attach the thread tree
to the posts and tighten.
You are now ready to install the thread on your GS1501

GETTING STARTED
11
Threading Your GS1501
Unwrap the thread tails from the post on the right and left hand sides
of the machine.
Carefully separate the thread by gently running your ngers through
the bundle.
Attach each of the thread tubes to the thread tree.

GETTING STARTED
12
Take the end of the thread and insert through the eyelet next to the
top tensioner for each thread.
Run each thread from the eyelet through the thread tree.
Open the box containing the thread for your machine. Each cone is
individually wrapped.
The following chart shows how each thread corresponding to each needle should be passed through the
thread tree.

GETTING STARTED
13
To remove the wrapper, simply hold the plasic rmly and twist and
pull.
Remove the adhesive label from the bottom of the thread cone by
pushing in at the center, then discard.

GETTING STARTED
14
To release the tail of the thread unsnap the base of the cone, and
unwind until the thread is completely out of the base. Place the colors
on whatever needle number you choose.
Repeat the above steps for the other 14 cones and place on the
thread rack.
Using a modied square knot, also known as a surgeon’s knot, tie the
end of thread hanging from the thread tree to the corresponding cone
of thread.

GETTING STARTED
15
Using a pair of tweezers, carefully pull the thread loose from the Vel-
cro bar. Make sure to grasp the thread behind the needle; gently pull
the thread until the knot is just in front of the needle.
Once the knot is directly in front of the eye of the needle, pull it out so
that it lines up with the eye, and pull gently and the knot should pass
through. If the knot does not pass through, trim the thread and thread
the needle directly. Once the needle is threaded, make sure the
thread passes through the hole at the base of the presser foot.
How to tie a surgeon’s knot

GETTING STARTED
16
Now continue to gently pull the thread through the needle and presser
foot and pull it into the spring at the front of the needle case then trim
the thread above the spring.
Gently pull enough thread from the cone and loop it to the right of the
upper tensioner.
Slide the thread between the tension disks, making sure to be inside
the tab located at the 3 o’clock position.

GETTING STARTED
17
Remove any slack by pulling the thread back towards the cone of
thread
Repeat the above steps until the GS1501 is completely threaded.
Note: Plug the power cord into the back of the machine and then into a standard 110 power outlet. We do
recommend the use of an uninteruptable power supply (UPS) or a high quality surge protector to help protect
your investment. Press the power switch to turn on.

GETTING STARTED
18
Attaching the Tubular Arms
The tubular arms are what holds the hoop in place during normal
embroidery and are very easy to attach.
Install the left arm as shown below, notice which notches should be
used, and also how the arm is attached to the pantograph. Tighten
securely with the Allen wrench.
Repeat the procedure for the right arm; once again notice which
notches should be used.
Table of contents
Popular Sewing Machine manuals by other brands

Singer
Singer 1412 instruction manual

Singer
Singer Scholastic 5511 Features & benefits

Baby Lock
Baby Lock Symphony BLSY Instruction and reference guide addendum

Brother
Brother Innov-is NS2750D Quick reference guide

Royal Consul Europe
Royal Consul Europe EVA Royal 1234 DF Operator's manual

Singer
Singer 281-83 parts list