Paula Deen PDPC26L User manual

!
1
PRESSURE COOKER
INSTRUCTION MANUAL
MODEL PDPC26L

Meet Paula Deen
Culinary icon Paula Deen
is a self-made entrepreneur who
learned her savory secrets from
her grandmother. She started
her career in the food industry
with a small catering company
called The Bag Lady, but
business quickly outgrew her
home kitchen. Taking a leap of
faith, she opened her first
restaurant, The Lady and Sons,
which has since become a
tourist hot spot in Savannah,
GA. With her huge personality,
delectable recipes and heart of
gold, Paula next found herself in
talks with TV execs after a friend
introduced her to some
influential people in the
business. The rest, as they say,
is history.
In addition to her television
success, Paula has sold more
than 11,000,000 copies of her
14 cookbooks and launched the
Paula Deen Network, an
interactive digital portal that
combines cooking, lifestyle and
game shows with great recipes,
meal-planning tools and more.
2

WHAT’S INCLUDED
3
Pressure Cooker, Lid, Inner Pot, Power Cord, Rice
Measuring Cup, Rice Spoon, Condensation Cup

IMPORTANT SAFEGUARDS
When using electrical appliances, basic safety
precautions should be followed as follows:
• Read all the instructions.
• Intended for household use only.
• Do not use the appliance for anything other than
intended use.
• Do not operate this unit in the presence of explosives
and/or flammable fumes.
• Remove the unit and the instruction manual from the
box and remove all packing materials.
• The inner pot should be washed before first use.
• Do not touch the lid or any of the stainless steel
surfaces when in use, as these surfaces will become
very hot during operation. Use the lid handle to adjust
and remove the lid.
• When handling and lifting the pressure cooker, use
the side handles and pot holders.
• Do not lift the pressure cooker by the lid handle.
• Do not leave the appliance unattended during
operation. Close supervision is necessary when any
appliance is used by or near children to avoid injury
to themselves or others.
• Do not operate any appliance with a damaged cord
or plug, or after the appliance malfunctions or has
been damaged in any manner.
4

• Once you have started the cooking cycle you can
NOT remove the lid until all the pressure has been
released. It is recommended that you follow the safe
method for the pressure to release, which depends
upon the contents or liquids inside.
• Do not place the unit on or near gas or electric
cooktops or in a heated oven to avoid damage.
• Keep the pressure cooker away from flammable and
explosive articles.
• Use only replacement parts provided by the
manufacturer.
• To protect against electrical shock, do not immerse
power cord, plugs, or the whole unit in water or any
other liquid.
• A short power cord is provided to minimize the risks
resulting from becoming entangled in or tripping over
a longer cord.
• Never unplug directly from the unit when turning off,
always unplug from the wall outlet first.
• The use of an extension cord is not recommended.
• Place the unit on a level surface away from walls and
cupboards. Do not let the cord hang over the edge of
a table or counter, or come into contact with hot
surfaces.
• Always plug the cord into the appliance first, then
plug the cord into a grounded three-prong wall outlet.
To disconnect, make sure the unit is turned off, then
unplug from the wall outlet.
5

• Unplug the pressure cooker when not in use and
before cleaning. Allow to cool before cleaning or
taking off parts.
• Make sure the unit is unplugged before moving the
unit.
• Extreme caution must be used when moving an
appliance containing oil or other hot liquids. Do not
move the appliance during cooking.
• Always place ingredients in the inner pot of the
pressure cooker to avoid damage to the heating
element.
• Never use the pressure cooker without the inner pot
provided.
• Do not place the inner pot of the pressure cooker
onto a gas or electric burner.
• Do not use a damaged or cracked inner pot.
• Never operate the pressure cooker without food or
liquid in the inner pot.
• If you are using plastic utensils, do not leave them
inside the appliance when hot.
• Do not place the inner pot when hot on any surface
that may be affected by heat.
• Do not place inner pot when hot into cold water or
freezer.
• Do not place anything, other than the lid, on top of
the pressure cooker when assembled, when in use
and when stored.
• Make sure when filling the inner pot, do not fill past
the 2/3 mark on the inner pot. When cooking foods
6

that expand such as rice or dried vegetables, do not
fill the unit over the 1/2 mark on the inner pot. Over
filling may cause a risk of clogging the exhaust pipe.
• This unit cooks under pressure. Improper use may
result in a scalding injury, make sure the unit is
properly closed before operating.
• Do not use the pressure cooker near or under
surfaces that are heat sensitive or those that may be
damaged by steam.
• To avoid scalding from escaping steam, carefully lift
the lid angled away from yourself.
• Never forcefully open the lid as the contents are
under pressure, extremely hot, and could cause
burns. Wait until sufficient heat and pressure have
subsided and the lid is unlocked to open the lid.
• If you use the quick release method by using the
pressure release button steam and liquids will be
released through the pressure relief valve. Use
caution, as the steam and liquids will be very hot. Do
not attempt to force open the lid as the contents are
under pressure and extremely hot and could cause
burns.
• Do not use outdoors.
• SAVE THESE INSTRUCTIONS.
7
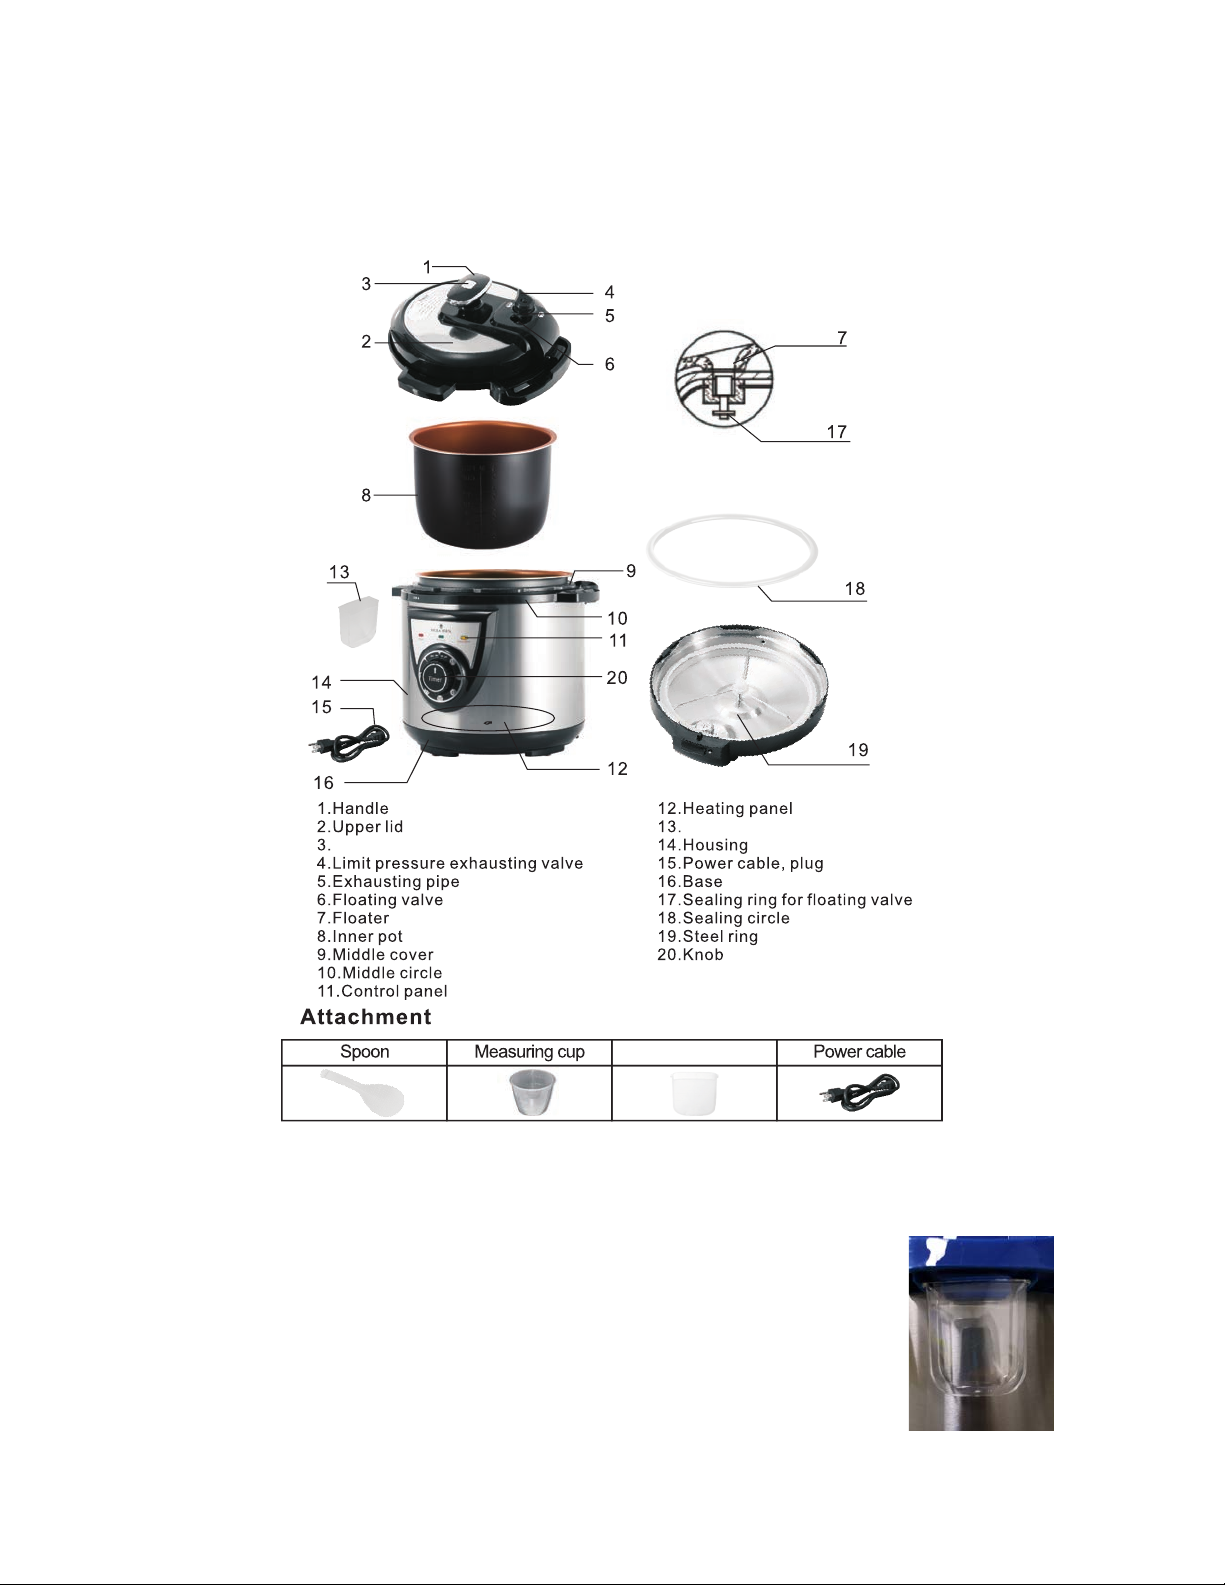
PARTS IDENTIFICATION
8
Condensation Cup
Please note this does not come attached and will be located with the
rice spoon and rice measuring cup. The condensation cup attaches to
the outside of the pressure cooker (see photo to the right) to collect
condensation while the unit is under pressure. The condensation cup
needs to be installed before use. Please empty and clean after each
use.
Condensation Cup
Pressure Release Button
Condensation Cup

SUGGESTED COOKING TIMES
BEFORE FIRST USE
1. Remove all packaging materials. Please locate
the power cord before throwing away packaging
materials.
2. Clean the inner pot and lid with hot water,
dishwashing liquid, and a non-abrasive sponge.
3. Wipe the inside and outside of the appliance with
a cloth.
9
INGREDIENT
TIME
Soup
30 minutes
Rice
10 minutes
Cake
30 minutes
Yogurt
8 hours
Poultry
20 minutes
Meat
1 hour
Beans
25 minutes
Vegetables/Fish
5 minutes

USING THE APPLIANCE
1. Plug the cord in. Then plug the cord into a wall
outlet. Note: If a time is not set the unit will go
into keep warm. WARNING: Always plug the
cord into the unit first. Always unplug the cord
from the wall outlet first.
2. Open the lid with the control panel facing you,
grasp the lid handle and turn the lid clockwise
until the arrow aligns with open position located
on the unit. Lift up the lid. Note: The lid is able to
stand up. See picture.
3. Following a recipe provided, add food and liquid
into the cooking pot, while following the
guidelines below.
•Food and liquid cannot exceed 2/3 of the
cooking pot height.
•For food that expands easily in water, the
liquid level can not exceed 1/2 of the cooking
pot height.
10

4. Close the lid by lowering it onto the pressure
cooker. With the arrow in the open position,
grasp the lid handle and turn it counterclockwise
until the arrow aligns with the close position on
the unit.
•WARNING: Never attempt to open the lid
while pressure cooking. In the event the lid is
not closed properly the unit will not build
pressure, air will be leaking from the lid, if this
happens unplug the unit, allow the unit to cool
completely and release any pressure from the
unit (this could take up to 30 minutes).
5. In order to cook under pressure, the lid must be
on the unit and the pressure exhaust valve
turned toward “Pressure”.
CAUTION
•When cooking food containing a high amount
of liquid and/or the “Keep Warm” yellow
indicator light is on, do not manually release
the pressure, as food and liquid will spurt from
the exhaust pipe.
•When the unit is under pressure keep hands
and face away from the unit as it is extremely
hot.
11

6. Turn the dial to the time specified for the recipe,
the red heating light will illuminate. The
countdown timer will start immediately. When
pressure is reached the pressure light will
illuminate.
Note: During the initial cooking cycle it is normal for
air to come out of the float valve for 10 to 20
seconds. After the cold air is expelled, the remaining
interior air temperature increases and the float valve
will close.
7. After pressure cooking is complete the unit will
go into the keep warm mode and the yellow
“Keep Warm” light will illuminate.
8. If a recipe states that the pressure needs to be
released on its own, unplug the cooker and let
the unit sit for 10-30 minutes depending upon the
contents inside. Then follow with pressing the
pressure release button before opening the lid.
WARNING: Be careful when releasing pressure with recipes
containing liquid such as soups or stews, as food and liquid
will spurt from the exhaust pipe.
9. To use the manual release function, Unplug the
pressure cooker and press the pressure release
button until pressure is released. Use caution
when releasing pressure as hot steam will be
released.
12

10. When you no longer hear steam escape out of
the exhaust valve the lid will open freely.
11. Remove the lid by grasping the handle and
twisting the lid clockwise to the open position.
The lid will rest on slot by the condensation cup
on the unit. To completely remove the lid pull
straight up. As noted, the lid will not open unless
all the pressure is released. Never force open
the lid if it does not open freely, the unit is still
under pressure.
12. To turn the unit off, unplug the unit from the wall
outlet.
Note: The unit will continue to cook food while in the
keep warm function so it is important to turn off the
unit if the food is completely cooked and there is no
need to keep the food warm.
13

CLEANING
Clean after every use.
1. Before cleaning unplug the unit and allow to cool
completely.
2. Wash inner pot, condensation cup and lid in hot
water with dish liquid. Rinse and dry thoroughly.
To clean the condensation cup, remove from the
side of the unit, once cleaning is finished click
the condensation back onto the side.
3. Wipe the external surface of the pressure cooker
with a soft damp cloth and dry surfaces with soft
dry cloth. Do not use detergent or abrasives as
these may scratch the coating.
Note: Never immerse the pressure cooker housing in
water.
To clean the Sealing Circle and Floater
14
Hold%the%aluminum
cover%plate%handle
Take%out% the% aluminum%cover%plate Take%out% the% sealing%circle
Clean%sealing%circle
Clean%aluminum%cover%plate
Clean%the%lid
Clean%the%floater
Place the cover plate back
on the lid.
Place the sealing circle back on.

COOKING TIPS
•It is very important to have a liquid such as water, stock, juice,
or wine in the pressure cooker in order to create steam. At
least 1 to 2 cups are necessary to create adequate steam.
Thicker sauces such as barbecue or tomato sauce will not
create steam.
•When cooking a rice, bean, or pasta dish, do not fill the inner
pot more than the 1/2 way mark. When cooking soup or
stocks, do not exceed the 2/3 mark.
•If you live in higher altitudes, you may need to increase the
cooking times slightly. It is suggested to extend the cooking
time by 5% for every 1,000 feet above sea level.
•All the recipes were tested by weight, so if you wish to cook a
larger piece of meat, you will need to increase the cooking
time. Add 10 minutes to the suggested cooking time for every
additional pound of meat.
•If your meat is not as tender as you would like it, simply add
1/2 cup of liquid and increase the cook time by 10 minutes.
•If you ever complete a recipe and the cooking liquid is thinner
than you would like, simply reduce with the lid off until the
desired consistency is achieved.
15

COOKING CHART
INGREDIENT
AMOUNT
TIME
SUGGESTED
(MINUTES)
LIQUID
(CUPS)
Vegetables
Artichokes, trimmed
3 Medium
14
2
Beans, Black
1 cup
20
2
Beans, Navy
1 cup
8
2- 2 1/2
Beans, Pinto
1 cup
15
3
Beans, Red Kidney
1 cup
5
3 1/2
Beans, String
1 lb.
3
1/2
Beets
6 medium
15
2
Cabbage Head,
quartered
1 medium
10
21
Carrot, 2” pieces
2 cups
5
1 1/2
Corn on the cob
6 ears
4
1 1/2
Parsnips, cubed
2 cups
4
2
Squash, Acorn,
halved
4 halves
13
1 1/2
Squash, Butternut
1/2” slices
8 slices
4
1/2
Meats, Poultry,
Seafood
Beef Brisket
3 lbs.
90
2-3
Beef Ribs
6 whole
15
2
Chicken, boneless,
skinless pieces,
frozen
4 whole
5
2
INGREDIENT
16

Chicken, legs
5
20
2
Chicken, quartered
3 lbs.
20
2
Chicken, whole
3 lbs.
20
3
Chuck Roast
3 lbs.
20
2-3
Corned Beef
3 lbs.
90
3
Baby Back Ribs
2 slabs
20
2
Lamb Shanks
2-3 lbs.
30
2
Pork Chops (8-10oz.
each)
3-4
12
2
Short Ribs
3 lbs.
35
2
Spare Ribs
1 slab
30
2
Stew Meat 1” pieces
3 lbs.
18
4
Turkey Breast
5 lbs.
45
3
Veal Shanks (8oz.
each)
3
30
2
Potatoes
Potato, Baking
4 large
15
2
Potato, Red Bliss
up to 20
7
2
Potato, White,
cubed
3 cups
5
1/2
AMOUNT
TIME
SUGGESTED
(MINUTES)
LIQUID
(CUPS)
INGREDIENT
17

TROUBLE SHOOTING
18
Problem
Reason
Solution
It is difficult to close the
lid.
The sealing ring is out of
place.
The float valve is stuck in
the push rod.
Place the sealing circle
properly.
Push the rod in place.
It is difficult to open the
lid.
After releasing, the float
valve has not gone down.
Press the float valve
down.
Steam is leaking from the
lid.
The sealing ring is out of
place.
There is food residue on
the sealing ring.
There is an abrasion on
the sealing ring.
The cover is not properly
placed.
Install the sealing ring
properly.
Clean the sealing ring
after every use.
Replace the sealing ring.
Close the lid properly.
Steam is leaking from the
float valve.
There is food residue on
the sealing ring.
There is an abrasion on
the sealing ring or the
float valve.
Clean the sealing ring
after every use.
Replace the sealing ring
or float valve.
The float valve will not
rise.
There is not enough food
or liquid in the pot.
Steam is leaking from the
lid or the float valve.
Place enough liquid or
food inside the pot.
Please see points above
about the lid or float valve
leaking.

RECIPES
Hard Boiled Eggs
Serves 10
Essential for deviled eggs, Easter eggs, egg salad, Cobb salad,
the list goes on… The pressure cooker prepares eggs perfectly
every time without overcooking.
10 eggs
2 ½cups water
Place eggs in pressure cooker, pour in water; secure lid.
Set the pressure cooker dial to 7 minutes.
When cook time is complete, and pressure is fully released, open
lid with caution.
19

The Lady’s Cheesy Mac
Serves 6-8
4 cups uncooked elbow macaroni
4 cups chicken stock
2 cups milk
4 cups grated cheddar cheese
5 eggs, beaten
1 cup sour cream
1 teaspoon salt
1 teaspoon pepper
4 tablespoons butter
Add macaroni and stock to pressure cooker. Secure lid and set
dial to 8 minutes.
When cook time is complete, and pressure is fully released,
carefully open lid.
Turn the dial to 5 minutes.
Stir in milk, sour cream and butter.
Stir in the cheese and stir till melted completely.
Stir in the beaten eggs until smooth and well blended.
Serve warm as a side dish or a main course.
20
Table of contents


