AmazonBasics B079LNTDQV Operating and safety instructions

B079LNTDQV, B079LPM137
Electric Pressure Cooker
Autocuiseur Électrique
Elektrischer Schnellkochtopf
Pentola a Pressione Elettrica
Olla a Presión Eléctrica

English ..................................... 3
Français ................................. 36
Deutsch.................................. 74
Italiano................................. 110
Español................................ 144
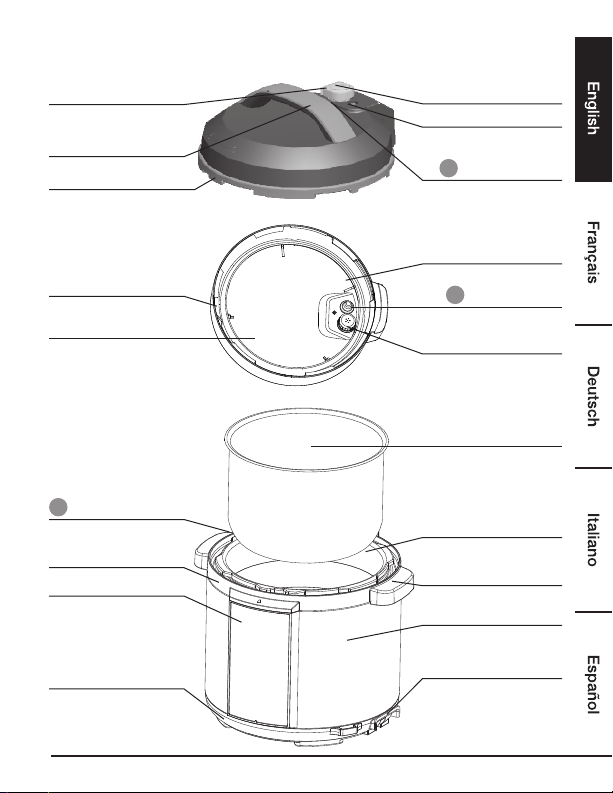
• Pictures in the text are for reference only. Please refer to the actual product.
•
Please read the User Manual carefully before use and keep it in a convenient place for future reference.
Note: All contents of this document have been carefully checked. Any technical improvements shall
be placed in the revised manual without notice; for any changes in appearance and color, those of the
actual product shall prevail.
• Les images contenues dans le texte sont données uniquement à titre de référence. Veuillez vous
référer au produit réel.
• Veuillez lire attentivement le manuel d’utilisation avant utilisation, et conservez-le dans un endroit
pratique afin de pouvoir vous y référer ultérieurement.
Remarque : L’ensemble du contenu du présent document a été soigneusement vérifié. Toute
amélioration technique doit être placée dans le manuel révisé sans notification préalable. Pour toute
modification de l’apparence et de la couleur, celles du produit réel prévalent.
• Die Bilder im Text dienen nur als Referenz. Bitte beziehen Sie sich auf das tatsächliche Produkt.
• Bitte lesen Sie die Bedienungsanleitung vor dem Gebrauch sorgfältig durch und bewahren Sie sie
zum späteren Nachschlagen an einem geeigneten Ort auf.
Hinweis: Sämtliche Inhalte dieses Dokuments wurden sorgfältig geprüft. Technische Verbesserungen
können ohne vorherige Ankündigung in die überarbeitete Bedienungsanleitung aufgenommen werden.
Bei Änderungen des Designs und der Farben sind die des tatsächlichen Produktes maßgebend.
• Le immagini nel testo sono di solo riferimento. Considerare il prodotto reale.
• Leggere attentamente il manuale utente prima dell’uso e conservarlo in un luogo adatto come futuro
riferimento.
Nota: tutti i contenuti di questo documento sono stati verificati con attenzione. Qualsiasi miglioramento
tecnico deve essere riportato nella versione aggiornata del manuale senza avviso; in caso di eventuali
modifiche nell’aspetto e nel colore, prevarranno quelle del prodotto reale.
• Las imágenes en el texto son solo de referencia. Por favor, consulte el producto real.
• Lea detenidamente el Manual del Usuario antes de usarlo y guárdelo en un lugar conveniente para
futuras consultas.
Nota: todo lo contenido de este documento ha sido cuidadosamente revisado. Cualquier mejora
técnica podrá incluirse en el Manual revisado sin previo aviso, para cualquier cambio en apariencia y
color, prevalecerán los del producto real.

3
Welcome Guide •English
Precautions
Read all the instructions
1. Do not operate any appliance with a
damaged cord or plug or after the appliance
malfunctions or has been damaged in any
manner. Return appliance to the nearest
authorized service facility for examination,
repair, or adjustment.
2. This appliance is for household use only. Do
not use outdoors.
3. Keep electrical appliances out of reach from
children or infirm persons. Do not let them
use the appliance without supervision. Keep
the appliance and its cord out of reach of
children. This appliance is not a toy.
4. Appliances can be used by persons with
reduced physical, sensory or mental
capabilities or lack of experience and
knowledge if they have been given
supervision or instruction concerning use of
the appliance in a safe way and understand
the hazards involved.

4
5. Do not immerse any part of the appliance in
water or other liquid.
6. Please turn off and unplug the appliance
before cleaning, maintenance or relocation
and whenever it is not in use.
7. This appliance is intended to be used in
household and similar applications such as:
–Staff kitchen areas in shops, offices and
other working environments;
–farm houses;
–by clients in hotels, motels and other
residential type environments;
–bed and breakfast type environments;
8. The pressure regulators allowing the escape
of steam should be checked regularly to
ensure that they are not blocked.
9. The container must not be opened until the
pressure has decreased sufficiently.
10.The appliance is not intended to be operated
by means of an external timer or a separate
remote-control system.
11.Cooking appliances should be positioned in a
stable situation with the handles positioned to
avoid spillage of the hot liquids.
12.The heating element surface is subject to
residual heat after use, do not touch.

5
13.The cooker cannot gain pressure when the
lid is not well closed and the lid cannot be
opened when the inner pressure is too high.
14.Do not let children near the pressure cooker
when in use.
15.Do not put the pressure cooker into a heated
oven.
16.Move the pressure cooker under pressure
with the greatest care. Do not touch hot
surfaces. Use the handles and knobs. If
necessary, use protection.
17.Do not use the pressure cooker for any
purpose other than the one for which it is
intended.
18.This appliance cooks under pressure.
scalding may result from inappropriate use
of the pressure cooker. Make sure that the
cooker is property closed before applying
heat, see “Instructions for use”.
19.Never force open the pressure cooker. Do
not open before making sure that its inner
pressure has completely dropped. See
“Instructions for use”.
20.Never use your pressure cooker without
adding water or food, except the sauté
function, this would seriously damage it.

6
21.Do not fill the cooker beyond 2/3 of its
capacity. When cooking foodstuffs which
expand during cooking, such as rice or
dehydrated vegetables, do not fill the cooker
to more than half of its capacity.
22.Use the appropriate heat source(s) according
to the instructions for use.
23.After cooking meat with a skin (e.g. ox
tongue) which may swell under the effect of
pressure, do not prick the meat with swollen
skin; you might be scalded.
24.When cooking doughy food, gently shake the
cooker before opening the lid to avoid food
ejection.
25.Before each use, check that the valves are
not obstructed. See the instructions for use.
26.Never use the pressure cooker in its
pressurized mode for deep or shallow frying
of food.
27.Do not tamper with any of the safety systems
beyond the maintenance instructions
specified in the instructions for use.
28.Only use manufacturer’s spare parts in
accordance with the relevant model. In
particular, use a body and a lid from the same
manufacturer indicated as being compatible.
29.KEEP THESE INSTRUCTIONS.

7
Warning
1. When discharging keep your face or hand
away from the relief pipe and from the lid
during operation to avoid scalding.
2. Unplug the appliance from the power supply
supply before removing food.
3. Do not touch the lid during cooking or
heating-up.
4. Never block the periphery of the clamping
position to ensure safety.
5. Never attempt to uncover the cooker when
the float valve is flopping or pressure is inside.
6. Please mind any flowing hot water from the
pressure discharging valve when opening the
cover.
7. The silicone ring is not a safety device.
8. Improper installation could cause hazards.
Please mind correct installation.
9. Avoid spillage on the connector.
The Waste Electrical and Electronic Equipment (WEEE) Directive aims to minimize the
impact of electrical and electronic goods on the environment, by increasing re-use and
recycling and by reducing the amount of WEEE going to landfill. The symbol on this
product or its packaging signifies that this product must be disposed separately from
ordinary household wastes at the end of its service life. Be aware that it is your
responsibility to dispose of electronic equipment at recycling centers in order to
conserve natural resources. Each country should have its collection centers for electrical
and electronic equipment recycling. For information about your recycling drop off area,
please contact your related electrical and electronic equipment waste management
authority, your local city office, or your household waste disposal service.

8
Product specification
Model MY-CS6004WPA
Capacity 5.5 L
Power Supply 220V~240V 50/60Hz
Rated Power 1000 W
Size of Inner Pot 22 cm
Working Pressure 80 kPa
Keep Warm Temperature 60 °C - 80 °C
Accessories
Spoon Soup Spoon
User Manual Measuring cup
Power Cord Components

9
Product Structure
Exhaust valve handle
Upper cover handle
Lid
Seal ring
Internal side of lid
Water box (note)
Housing cover
Control Box
Base
3
Exhaust opening
Float valve
Exhaust valve (note)
Seal ring bracket
Sealing gate (note)
Block proof cover
Inner pot
Outer pot
Cooker body handle
Cooker body
Power cord socket
1
2

10
Note:
1Exhaust valve: Pull out the exhaust valve from the lid. Clean the internal side of the exhaust
valve and the exhaust valve and float valve of the lid with a brush and cloth at least once a
month.
2Sealing gate: Please remove oil and dirt from the sealing gate with detergent and a brush. With
residual oil and dirt in it, it may appear in yellowish. After washing, it may recover its original
color as stainless steel. It is recommended to clean the sealing gate once every 2 months.
3Water box: After cooking, the steam may stay in the water box of the external pot as water.
Water in the box should be removed to avoid unpleasant odors, please clean it with a clean
cloth.
Structural diagram of float valve
Tips:
Confirm that the float valve, block proof cover and seal ring are correctly installed before use each
time;
Before putting the inner pot into the cooker each time, please remove the dirt and water from the
external side of the inner pot and internal side of the external pot;
Please move the product by the handle of the cooker body; please remove the water from the
housing cover with a cloth.

11
Instructions before use
When using the first time, please take out all accessories from the cooker body, read the User
Manual carefully, particularly the instructions for use and cautions for avoiding property loss or
physical injury.
Operation Part
Delay Timer Button
Pressure Level Button
“-” Button
Manual Setting Button
Keep Warm/ Button
Cooking Timer Button
“+” Button
Menu Button
Menu Function Panel
Optional pressure maintaining function
This function allows you to adjust the pressure level according to your personal requirements by
pressing the “Pressure Level” button, it must be in “Manual Setting” mode.
Cooking Timer Function
If the pressure maintaining time is adjusted by pressing the “+”/“-” button, it must be in “Manual
Setting” mode
Delay Timer Function
Set the finish cooking time by pressing the “+”/“-” button

12
Disassemble and install the block proof cover and seal ring
Disassemble and install the block proof cover
Block proof cover
Disassemble:
Pull it out upwards
Install:
Press it down to install
1. Check if the seal ring and block proof cover are correctly installed in the upper cover before use
each time.
2. After use, please clean the seal ring and around the block proof cover to avoid jamming the
cover, keep it clean to avoid unpleasant odors.
Disassemble and install the seal ring
Seal ring
Disassemble:
Pull it out upwards
Install:
Press it down to install
1. Please do not pull the seal ring, otherwise, a deformed seal ring may influence the seal ring and
pressure effect.
2. Do not use the damaged seal ring, please replace it at an authorized repair office.

13
Use and maintain the inner pot
1. Do not empty
It may cause the inner pot to stain yellowish or spotted or deform the bottom if it is empty for
a long time.
2. Do not use it to store the acid, alkali and preserved foods for a long period
Although the inner pot has excellent anti-corrosion performance, it may cause corrosion of a
certain degree; the recommended keep warm time must not exceed 2 h.
3. Keep it clean to prolong the service life
Do not immerse it in water for a long period.
Clean the inner pot with soap, weak detergent or warm water to remove dust, oil and dirt.
4. Do not use a metal scraper or other harder tools, otherwise it will damage the inner surface of
the pot.
Prepare for cooking
Step 1: Opening the lid correctly
• Hold the handle of the upper cover, turn it about 30° counter clockwise until the “ ” mark on
the edge of the upper cover is aligned with the “ ” mark on the edge of the housing cover, and
then lift the upper cover.
Step 2: Check if the parts and accessories of the lid are
well installed
• Check if the float valve and exhaust valve are jammed, confirm if the sealing ring and block
proof cover are well installed.

14
Prepare for cooking
Step 3: Take out the inner pot, put the foods and water
into the inner pot
• The total amount of food and water must not exceed the Max mark on the inner pot.
• The maximum rice and water amount when cooking must not exceed the Max mark on the
inner pot.
Step 4: Put the inner pot into the cooker
• Wipe to clean the external surface of the inner pot, foreign objects and water are not allowed on
the inner surface of the electric pressure cooker;
• Turn the inner pot to the left and right to ensure good contact with the heating plate.

15
Prepare for cooking
Step 5: Safely close the lid
• Before closing the lid, check if the sealing ring is well installed.
• Hold the handle of the upper cover, align the “ ” on the edge of the upper cover with the “ ”
mark on the edge of the housing cover, put the top cover horizontally on the cooker body, turn
the upper cover about 30° clockwise to the lock position, and align the “ ” mark on the edge
of the housing cover with the “ ” mark on the lid.
Step 6: Position the exhaust valve well
Sealing schematic diagram Exhaust schematic diagram
• When working, please turn the exhaust valve to the sealing position, which means the electric
pressure cooker remains at a sealing state;
• For manual exhaust, please turn the exhaust valve handle to the exhaust position, the electric
pressure cooker remains at an exhaust state; when exhausting, do not hold your hands or face
above the exhaust opening;
• Check if the float valve drops down before working (before heating, the float valve is down).

16
Function Selection
General Function
1. Prepare for cooking according to the procedure listed on Page 10.
2. Switch on if the buttons are inactive during use, please confirm if the lid is closed at the right
place, the buttons are inactive if the lid is not closed correctly for products of this series.
3. Select the required function in standby mode, press the “Menu” button to select a function,
press the “+”/“-” button to switch the function; Different functions require different cooking
times, the more food, the longer the cooking time.
4. Press one function button, 10 s later, the electric pressure cooker starts to select the program
of the corresponding function; 10 s after selecting the function, the electric pressure cooker
starts working. When the cooker is working, press the “Keep Warm/ ” button to cancel the
current operating mode and return to standby mode.
5. After cooking, the cooker may automatically enter into keep warm mode. The keep warm time
must not exceed 2 h!
After cooking, the indicator of the corresponding function goes off, the keep warm indicator
goes on, the cooker makes a sound and enters into keep warm mode.
In standby mode, press the “Keep Warm/ ” button, the keep warm indicator goes on, the
cooker makes a sound and enters into keep warm mode.
Tips:
In any mode, press the “Keep Warm/ ” button to cancel the current operating mode and return
to standby mode.
When the cooker is working, it is normal that it makes a “clucking” sound, please do not be
alarmed if this occurs.
To cook a small amount of food, the inner pot may possibly be lifted when opening the lid, please
shake the lid to drop the inner pot in the cooker body and then remove the lid.
Safely open the lid
1. Cut off the power supply or remove the power plug
2. Exhaust method
A. Quickly open the lid
Turn the exhaust valve to the exhaust position for exhausting, until the float valve drops down. (For
non-fluid foods)
B. Generally open the lid
Keep the electric pressure cooker cool naturally until the float valve drops down.

17
3. Open the lid
Turn the upper cover counter clockwise with your left hand, turn the cover to its maximum open
position, lift the upper cover with your right hand to open the lid.
Do not open the lid before the pressure in the pot has been completely released, do not open the
lid with force if it is difficult to open.
Do not pull out the exhaust valve when turning the exhaust valve.
After cooking fluid foods (porridge and soup), do not turn the exhaust valve; before opening the lid,
please cut off the power supply to allow it to cool naturally until the float drops.
After cooking a large amount of food, please do not immediately exhaust, it is recommended to
keep warm for a certain period before opening the lid.
Operation Guidelines
Standby
After supplying power, the default is standby mode, the digital screen flashes “----”
Meat
1. Normal cooking: In standby mode, press the “Menu” button, the “ ” indicator goes on, the
digital screen flashes “P01”, 10 s later if no button is pressed, the product automatically starts
cooking at “Meat”, the digital screen displays “P01”, and starts a countdown when pressure
rises in the cooker.
2. Preset cooking: In standby mode, press the “Menu” button, press the “Delay Timer” button
again, the “Delay Timer” indicator flashes, the digital screen flashes the time, start to adjust the
preset time, press the “+’’/“-” button to adjust the minutes, press it once to adjust by 10 min.
10 s after setting, the product automatically starts preset cooking at “Meat”, the digital screen
displays the finishing time and starts a countdown.
3. Exit operating mode: Press the “ ” button to exit the current operating mode.
Poultry
1. Normal cooking: In standby mode, press the “Menu” button, the “ ” indicator goes on, the
digital screen flashes “P01”; press “+” one time, the digital screen displays “P02”. 10 s later if
no button is pressed, the product automatically starts cooking at “Poultry”, the digital screen
displays “P02”, and starts a countdown when pressure rises in the cooker.
2. Preset cooking: In standby mode, press the “Menu” button, then press “+” one time, the
digital screen displays “P02”, press the “Delay Timer” button again, the “Delay Timer” indicator
flashes, the digital screen flashes the time, start to adjust the preset time, press the “+’’/“-”
button to adjust the minutes, press it once to adjust by 10 min. 10 s after setting, the product
automatically starts preset cooking at “Poultry”, the digital screen displays the finishing time and
starts a countdown.
3. Exit operating mode: Press the “ ” button to exit the current operating mode.

18
Vegetable
1. Normal cooking: In standby mode, press the “Menu” button, the “ ” indicator goes on, the
digital screen flashes “P01”, then press “+” two times, the digital screen displays “P03”. 10 s
later if no button is pressed, the product automatically starts cooking at “Vegetable”, the digital
screen displays “P03”, and starts a countdown when pressure rises in the cooker.
2. Preset cooking: In standby mode, press the “Menu” button, then press “+” two times, the
digital screen displays “P03”, press the “Delay Timer” button again, the “Delay Timer” indicator
flashes, the digital screen flashes the time, start to adjust the preset time, press the “+’’/“-”
button to adjust the minutes, press it once to adjust by 10 min. 10 s after setting, the product
automatically starts preset cooking at “Vegetable”, the digital screen displays the finishing time
and starts a countdown.
3. Exit operating mode: Press the “ ” button to exit the current operating mode.
Steam
1. Normal cooking: In standby mode, press the “Menu” button, the “ ” indicator goes on, the
digital screen flashes “P01”, then press “+” three times, the digital screen displays “P04”. 10
s later if no button is pressed, the product automatically starts cooking on “Steam”, the digital
screen displays “P04”, and starts a countdown when pressure rises in the cooker.
2. Preset cooking: In standby mode, press the “Menu” button, then press “+” three times, the
digital screen displays “P04”, press the “Delay Timer” button again, the “Delay Timer” indicator
flashes, the digital screen flashes the time, start to adjust the preset time, press the “+’’/“-”
button to adjust the minutes, press it once to adjust by 10 min. 10 s after setting, the product
automatically starts preset cooking at “Steam”, the digital screen displays the finishing time and
starts a countdown.
3. Exit operating mode: Press the “ ” button to exit the current operating mode.
Sauté
1. Normal cooking: In standby mode, press the “Menu” button, the “ ” indicator goes on, the
digital screen flashes “P01”, then press “+” four times, the digital screen displays “P05”. 10
s later if no button is pressed, the product automatically starts cooking at “Sauté”, the digital
screen displays a “0:30” countdown.
2. Exit operating mode: Press the “ ” button to exit the current operating mode.
3. Please note that this function requires use without the lid.
Slow Cook
1. Normal cooking: In standby mode, press the “Menu” button, the “ ” indicator goes on, the
digital screen flashes “P01”, then press “+” five times, the digital screen displays “P06”. 10 s
later if no button is pressed, the product automatically starts cooking at “Slow Cook”, the digital
screen displays a “8:00” countdown.
2. Exit operating mode: Press the “ ” button to exit the current operating mode.

19
White Rice
1. Normal cooking: In standby mode, press the “Menu” button, the “ ” indicator goes on, the
digital screen flashes “P01”, then press “+” six times, the digital screen displays “P07”. 10 s
later if no button is pressed, the product automatically starts cooking at “White Rice”, the digital
screen displays “P07”, and starts a countdown when pressure rises in the cooker.
2. Preset cooking: In standby mode, press the “Menu” button, then press “+” six times, the
digital screen displays “P07”, press the “Delay Timer” button again, the “Delay Timer” indicator
flashes, the digital screen flashes the time, start to adjust the preset time, press the “+’’/“-”
button to adjust the minutes, press it once to adjust by 10 min. 10 s after setting, the product
automatically starts preset cooking at “White Rice”, the digital screen displays the finishing time
and starts a countdown.
3. Exit operating mode: Press the “ ” button to exit the current operating mode.
Brown Rice
1. Normal cooking: In standby mode, press the “Menu” button, the “ ” indicator goes on, the
digital screen flashes “P01”, then press “+” seven times, the digital screen displays “P08”. 10
s later if no button is pressed, the product automatically starts cooking at “Brown Rice”, the
digital screen displays “P08”, and starts a countdown when pressure rises in the cooker.
2. Preset cooking: In standby mode, press the “Menu” button, then press “+” seven times, the
digital screen displays “P08”, press the “Delay Timer” button again, the “Delay Timer” indicator
flashes, the digital screen flashes the time, start to adjust the preset time, press the “+’’/“-”
button to adjust the minutes, press it once to adjust by 10 min. 10 s after setting, the product
automatically starts preset cooking at “Brown Rice”, the digital screen displays the finishing time
and starts a countdown.
3. Exit operating mode: Press the “ ” button to exit the current operating mode.
Beans
1. Normal cooking: In standby mode, press the “Menu” button, the “ ” indicator goes on, the
digital screen flashes “P01”, then press “+” eight times, the digital screen displays “P09”. 10
s later if no button is pressed, the product automatically starts cooking at “Beans”, the digital
screen displays “P09”, and starts a countdown when pressure rises in the cooker.
2. Preset cooking: In standby mode, press the “Menu” button, then press “+” eight times, the
digital screen displays “P09”, press the “Delay Timer” button again, the “Delay Timer” indicator
flashes, the digital screen flashes the time, start to adjust the preset time, press the “+’’/“-”
button to adjust the minutes, press it once to adjust by 10 min. 10 s after setting, the product
automatically starts preset cooking at “Beans”, the digital screen displays the finishing time and
starts a countdown.
3. Exit operating mode: Press the “ ” button to exit the current operating mode.

20
Broth
1. Normal cooking: In standby mode, press the “Menu” button, the “ ” indicator goes on, the
digital screen flashes “P01”, then press “+” nine times, the digital screen displays “P10”. 10
s later if no button is pressed, the product automatically starts cooking at “Broth”, the digital
screen displays “P10”, and starts a countdown when pressure rises in the cooker.
2. Preset cooking: In standby mode, press the “Menu” button, then press “+” nine times, the
digital screen displays “P10”, press the “Delay Timer” button again, the “Delay Timer” indicator
flashes, the digital screen flashes the time, start to adjust the preset time, press the “+’’/“-”
button to adjust the minutes, press it once to adjust by 10 min. 10 s after setting, the product
automatically starts preset cooking at “Broth”, the digital screen displays the finishing time and
starts a countdown.
3. Exit operating mode: Press the “ ” button to exit the current operating mode.
Curry
1. Normal cooking: In standby mode, press the “Menu” button, the “ ” indicator goes on, the
digital screen flashes “P01”, then press “+” ten times, the digital screen displays “P11”. 10
s later if no button is pressed, the product automatically starts cooking at “Curry”, the digital
screen displays “P11”, and starts a countdown when pressure rises in the cooker.
2. Preset cooking: In standby mode, press the “Menu” button, then press “+” ten times, the
digital screen displays “P11”, press the “Delay Timer” button again, the “Delay Timer” indicator
flashes, the digital screen flashes the time, start to adjust the preset time, press the “+’’/“-”
button to adjust the minutes, press it once to adjust by 10 min. 10 s after setting, the product
automatically starts preset cooking at “Curry”, the digital screen displays the finishing time and
starts a countdown.
3. Exit operating mode: Press the “ ” button to exit the current operating mode.
Soup
1. Normal cooking: In standby mode, press the “Menu” button, the “ ” indicator goes on, the
digital screen flashes “P01”, then press “+” eleven times, the digital screen displays “P12”. 10
s later if no button is pressed, the product automatically starts cooking at “Soup”, the digital
screen displays “P12”, and starts a countdown when pressure rises in the cooker.
2. Preset cooking: In standby mode, press the “Menu” button, then press “+” eleven times, the
digital screen displays “P12”, press the “Delay Timer” button again, the “Delay Timer” indicator
flashes, the digital screen flashes the time, start to adjust the preset time, press the “+’’/“-”
button to adjust the minutes, press it once to adjust by 10 min. 10 s after setting, the product
automatically starts preset cooking at “Soup”, the digital screen displays the finishing time and
starts a countdown.
3. Exit operating mode: Press the “ ” button to exit the current operating mode.
This manual suits for next models
1
Table of contents
Languages: