– 7–
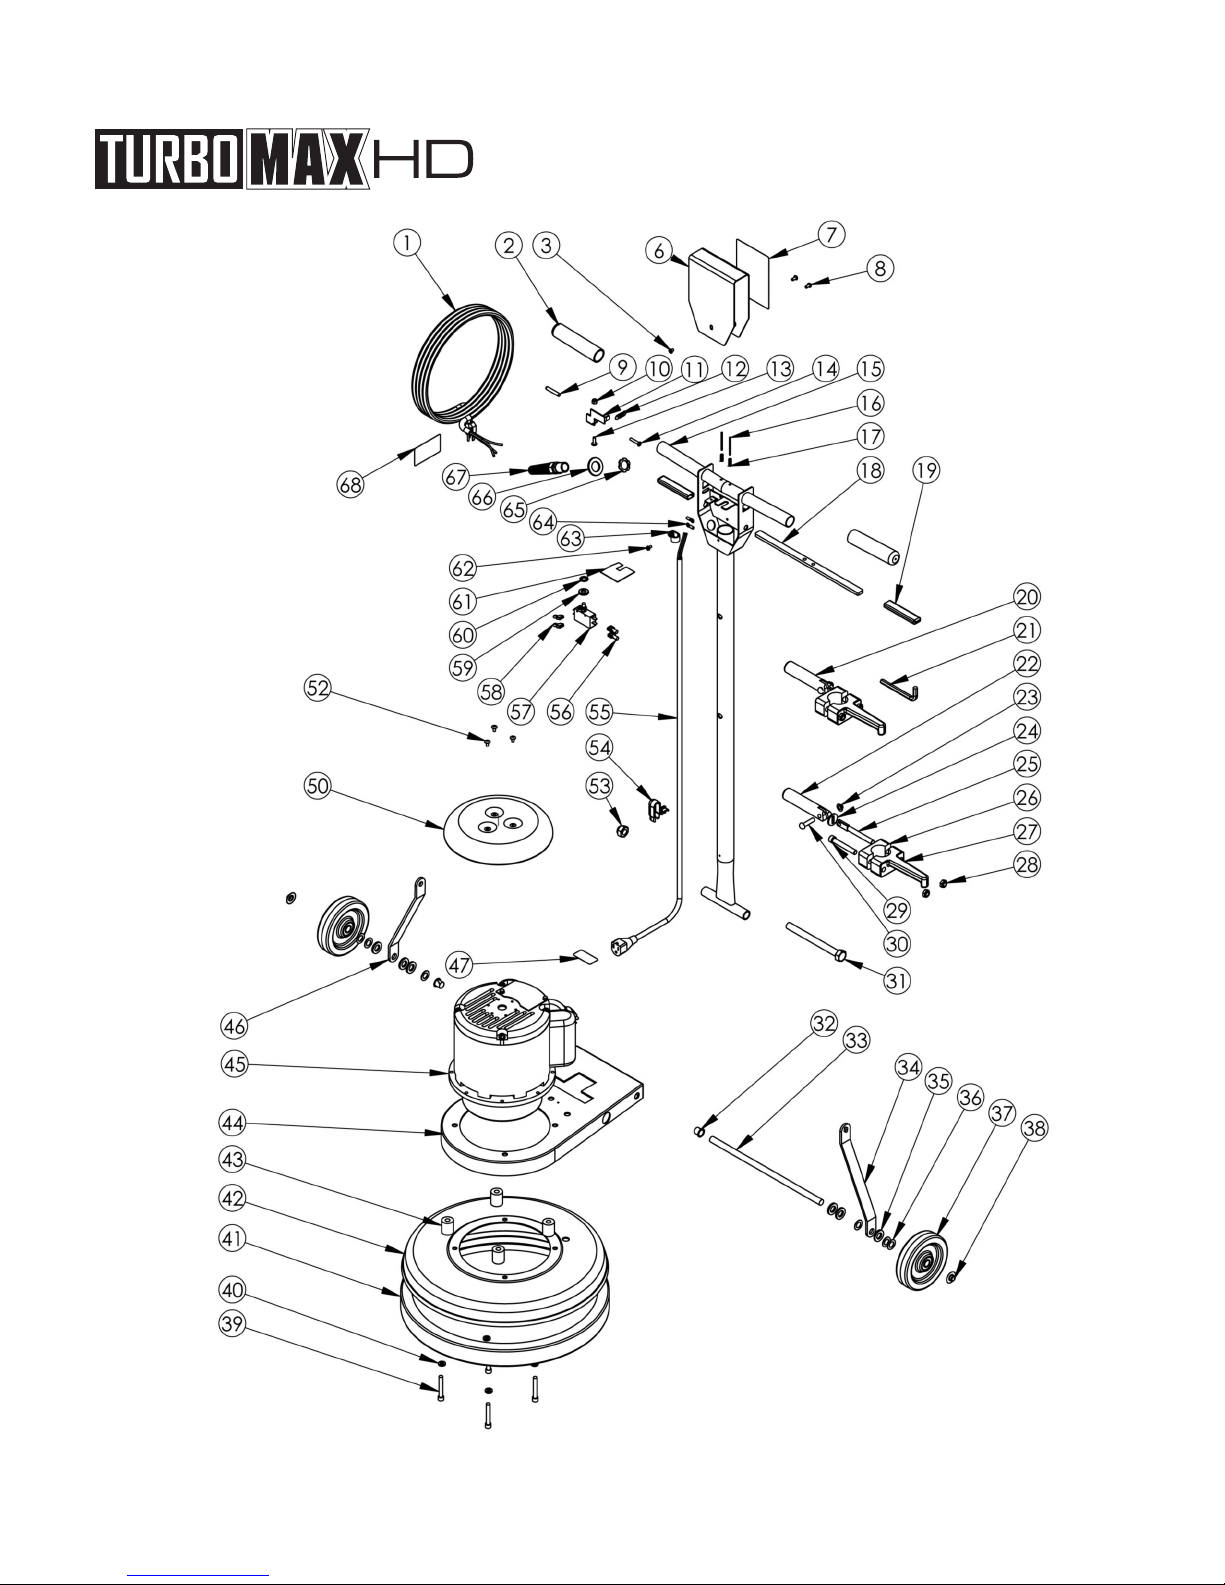
REPLACEMENT PARTS LIST
1 PAB11487 Power Cord, 14-3, 50 FT, SJTW 1
2 PA 11498 Grip 2
3 PAC11528 Screw, 10-32 X .25 in 1
6 PAD11496B Switch Box Cover, Black 1
7 PAH11493 Label, Safety, Floor Machine 1
8 PAC11529 Screw, 10-32 X .375 in 2
9 PA 11519 Lever Grip, Lockout, Black 1
10 PAC00278 Locknut, 10-32, Nylon, SS 1
11 PAD11494 Lockout Bracket 1
12 PAD11524 Spring, Lockout 1
13 PAC90007 Screw, 10-32 X .625 hillips, Truss Head, SS 1
14 PAC11491 Screw, 10-32 X 1 in, SS 1
15 PAD11479 Handle, Chrome, Floormachine 1
16 PAC00306 Roll Pin, .125 X 1.75 2
17 PAD11523 Spring, Trigger 2
18 PAD11495 Trigger, Zinc Plated 1
19 PA 11520 Lever Grip, Trigger, Black 2
20 PA11507A Assembled Locking Handle, Cord Hook 1
21 PAC11619 Allen Wrench, .31 in 1
22 PAD11497 Handle, Locking Clamp 1
23 PAC11538 Cap Nut, .31 in, Push-On 1
24 PAC00259 Washer, Slotted, Zinc 1
25 PAC11536 Spade Bolt, .375-16 X 4 in 1
26 PAD11507 Cord Hook Clamp 1
27 PAD11507-2 Cord Hook Body 1
28 PAC11558 Locknut, Black Oxide, Thin 2
29 PAC11502 Socket Cap Screw, .375-16 X 2.5 in 1
30 PAC11537 Dowel Pin, .31 X 1.5 in 1
31 PAC13101 Screw, Hex Cap, M14-2.0 1
32 PA 00674 Bushing, .50 in, Nylon 2
33 PAD11510 Axle, Floor Machine 1
34 PAD11482 Handle Brace, Right, Black 1
35 PAC00240 Washer, Shoulder, Nylon 6
36 PAC11559 Washer, .515 X .875 X .032 6
37 PAG11943 Wheel, 5 in Saturn 2
38 PAC02305 Cap Nut, .5in Push-on 2
39 PAC11501 Socket Cap Screw, .31 - 18 4
40 PAC00251 Lockwasher, .31, Split 4
41 PAE11477 Bumper, 17 in Floor Machine 1
42 PAD11485B Brush Cover, 17 in, Black 1
43 PA 11521 Spacer, Base, Floor Machine 4
44 PAD11483 Frame, Motor, Black 1
45 PA11476A HD Motor W-Gearbox, 1 .5 HP 1
46 PAD11481 Handle Brace, Left, Black 1
47 PAH10976-1 Label, UL STD 561-507 1
50 PAD11490B Drip Cover, Black 1
52 PAC11916 Screw, 10-32 X .375 Phillips 3
53 PAC13100 Nut, M14-2.0 Nylon Insert 1
54 PAB10734 Strain Relief, Handle 1
55 PAB11513 Cord, Handle, 14-3 SJTW 1
56 PAB11762 Terminal Lug, Nylon, Female 2
57 PAB11465 Switch, DPST, Pushbutton 1
58 PAB00177 Terminal Lug, Female, QD, .25 X .032 2
59 PAC00252 Washer, .375 in, Flat 1
60 PAC11541 Washer, .375 in, Star 1
61 PAB11518 Switch Insulation 1
62 PAC00284 Screw, 10-32 X .375 Ground 1
63 PAB00187 Cable Clamp, Nylon, .43 in. 1
64 AB00180-10-3 Ring Terminal, #10 Center 2
65 PAB11505 Strain Relief Nut, Metal 1
66 PAC11560 Washer, .93 ID X 1.5 OD 1
67 PAB11504 Strain Relief, Metal 1
68 PAH02548-2 Label, Important, Cord 1
PART NUMBER PART NAME QTY PART NUMBER PART NAME QTY