Pedicraft Canopy Enclosed Bed User manual

Pedicraft Canopy Enclosed Bed
Operations Manual
Before using the Canopy Enclosed Bed, carefully read this Operations Manual.
Be sure you understand all the information in this manual before using the bed.
Instructions for Use ……………………………………………………………………………………………
3
Cleaning Instructions …………………………………………………………………………………………
4
Maintenance & Warranty ……………………………………………………………………………………
5
Bed Assembly Instructions …………………………………………………………………………………
6
Canopy Cover Installation Instructions ……………………………………………………………..
9
Zip-Out Mesh Bottom Cleaning Instructions ……………………………………………………..
17
For technical assistance call 800-223-7649
Pedicraft, Inc
4134 St. Augustine Road
Jacksonville, FL 32207
800-223-7649
904-396-9627
Fax 904-346-3947
www.pedicraft.com
Rev. 9 - 091919

2 of 18
Pedicraft Inc. 4134 St. Augustine Rd. Jacksonville, FL 32207 Ph: 904-396-9627
Rev. 9 - 091919
Note to end user:
Record the following information about your bed and retain this manual for
reference. Please have this information available if you contact Pedicraft about your
bed.
Model number
_________________
Serial number
_________________
Date received
_________________
Purchased from
_____________________________________________
Address
_____________________________________________
City, State. Zip
_____________________________________________
Contact name
_____________________________________________
Contact phone
_____________________________________________
Maintenance check (see page 5)
Date:______ By: _________ Date:______ By: _________ Date:______ By: _________
Date:______ By: _________ Date:______ By: _________ Date:______ By: _________
Date:______ By: _________ Date:______ By: _________ Date:______ By: _________
Date:______ By: _________ Date:______ By: _________ Date:______ By: _________
Date:______ By: _________ Date:______ By: _________ Date:______ By: _________
Date:______ By: _________ Date:______ By: _________ Date:______ By: _________
Date:______ By: _________ Date:______ By: _________ Date:______ By: _________
Date:______ By: _________ Date:______ By: _________ Date:______ By: _________
Maintenance Notes

3 of 18
Pedicraft Inc. 4134 St. Augustine Rd. Jacksonville, FL 32207 Ph: 904-396-9627
Rev. 9 - 091919
Instructions for Use
The Canopy Bed is intended for use during a patient’s sleeping hours to
prevent falls and wandering while others in the house are sleeping. It is not
intended to be used for extended periods when the patient is awake and
unsupervised.
Enclosed beds are intended for medically fragile patients with chronic
illness such as cerebral palsy, brain trauma or other severe disability. They
are not intended to restrain a difficult but otherwise healthy child or adult.
•Do not leave patient unattended when any one of the mesh panels is open.
•Always raise side rails when patient is unattended and position bed at lowest
level.
•If Bed is equipped with optional Head Elevation Crank, do not leave an active
patient unattended when the head of the bed is raised.
•Zippers must be secured with attached ties to prevent patient from exiting bed
unsupervised. Ties should be routinely inspected to make sure that they are
secure. Space is provided on page 2 of this manual to record inspections.
•If double-zipper opening is used for equipment access, make certain that the
opening does not allow the patient to reach the zipper pulls. You may want to
secure the two zipper pulls together with Velcro ties to prevent the patient
from opening the enclosure.
•The mattress should be routinely inspected for tears in the vinyl cover.
Replace the mattress if tears are evident.
•Do not substitute the mattress provided with this bed with any other type or
size of mattress. The mattress must fit snugly to prevent gaps which may
entrap the patient.

4 of 18
Pedicraft Inc. 4134 St. Augustine Rd. Jacksonville, FL 32207 Ph: 904-396-9627
Rev. 9 - 091919
Cleaning of Canopy Cover and Sure-Chek®Mattress
Wipe clean all parts of the Canopy Bed Cover with lukewarm, soapy water on a
regular basis. The Canopy Enclosed Bed is equipped with a zip-out Bottom Mesh
Section so that it can be easily removed and immersed in lukewarm, soapy water for
thorough cleaning. See Operations Manual for specific instructions. The entire cover
may be removed also, and immersed in lukewarm, soapy water for thorough
cleaning.
Clean the Sure-Chek®Mattress with mild soap and lukewarm water. Rinse with
clean water. Do not use harsh detergents, cleansers or solvents. Daily cleaning of
the Mattress is recommended. The mattress should be routinely inspected for tears
in the vinyl cover. Replace the mattress if tears are evident.
AIR DRY ONLY. Do not use any form of heat drying. Heat will damage the Canopy
Cover and Mattress. You may reinstall the cover on the frame while it is still damp
but do not reinstall the Mattress until the Cover is completely dry. If you hang the
Cover over the bed frame to dry, cover the corners of the Bed to prevent water from
getting into the openings at the top of the corner posts. Allow at least 2 hours
drying time.
Cleaning of Metal Surfaces
Use a damp sponge or soft cloth with a mild soap or detergent solution. Be sure to
follow the manufacturer’s directions for diluting cleaning solutions. Thoroughly rinse
with clean water and dry. Failure to properly rinse and dry will leave a corrosive
residue which may cause damage to the metal surfaces or be harmful to people.

5 of 18
Pedicraft Inc. 4134 St. Augustine Rd. Jacksonville, FL 32207 Ph: 904-396-9627
Rev. 9 - 091919
Maintenance
The frequency of routine maintenance will vary depending on how active the patient
is. A patient who is very active in the bed may cause the bolts and zipper ties to
loosen sooner than expected. Record maintenance checks in the space provided on
page 2 of this manual.
•All bolts and screws should be checked at least once every six months. Tighten
if necessary.
•Zipper ties should be routinely inspected to make sure that they are secure.
•The mattress should be inspected for tears in the vinyl cover. Fluid can leak
through small tears. The mattress should be replaced as soon as tears are
evident.
•The mesh cover should be inspected for holes and tears.
Warranty
Pedicraft, Inc. guarantees the Canopy Bed frame components to be free of defects in
workmanship or materials for a period of three years from the date of shipment to
the purchaser. The Canopy Bed Mattress and Canopy Cover and bed frame padding
and covers are guaranteed to be free of defects in workmanship or materials for a
period of ninety (90) days from the date of shipment to the purchaser. In case any
purchaser finds a defect in workmanship or materials, promptly notify Pedicraft at
800-223-7649.
The purchaser must return the article as per instructions and Pedicraft will replace,
repair or refund the purchase price, at its sole discretion. All replaced or repaired
items will be shipped freight prepaid from the factory to the purchaser. Any extra
costs resulting from failure to obtain prior shipping instructions from Pedicraft will be
borne by the customer.
Any changes or modifications of the equipment by the purchaser without the express
written permission of Pedicraft, Inc., will void this warranty. Failure to follow
cleaning instructions may void warranty.

6 of 18
Pedicraft Inc. 4134 St. Augustine Rd. Jacksonville, FL 32207 Ph: 904-396-9627
Rev. 9 - 091919
Figure 1
Assembly of the bed is easier with two
people.
Place one End Frame on its side. The padded
Cross Bar identifies the top of the frame.
Position the Mattress Deck on its side just
below the padding on the End Frame
Figure 2
Place the brackets of the Mattress Deck
through the End Frame one at a time past
the point where the holes line up.
Bring the bottom bracket back through the
End Frame and align the holes in the bracket
with the holes in the End Frame.
Figure 3
Pull the square tube of the End Frame over
the Mattress Deck bracket and align the
holes. The fit will be very snug.
Insert four 2" bolts and washers from the
outside of the frame and attach nuts. Do not
fully tighten.
Attach the second End Frame.
Figure 4
Attach padded Support Bars to the top of
the bed frame with 2" bolts. Do not fully
tighten.
If bed is a height adjustable model, continue
to next figure. If not, skip to figure 11.

7 of 18
Pedicraft Inc. 4134 St. Augustine Rd. Jacksonville, FL 32207 Ph: 904-396-9627
Rev. 9 - 091919
Figure 5
Remove one of the gray hydraulic cylinders
that are temporarily attached to the square
tubing of the Mattress Deck.
The casters are attached to the cylinders.
Handle cables carefully. Do not stretch or
disconnect. Fluid will leak.
Figure 6
Remove 2 nuts and 2 washers from cylinder.
Set aside.
Move cylinder through the End Frame to the
outside of the bed leg and insert attached
bolts through leg.
Reattach nut and washers. Tighten securely.
Figure 7
Repeat to attach 3 remaining hydraulic
cylinders at corners of bed.
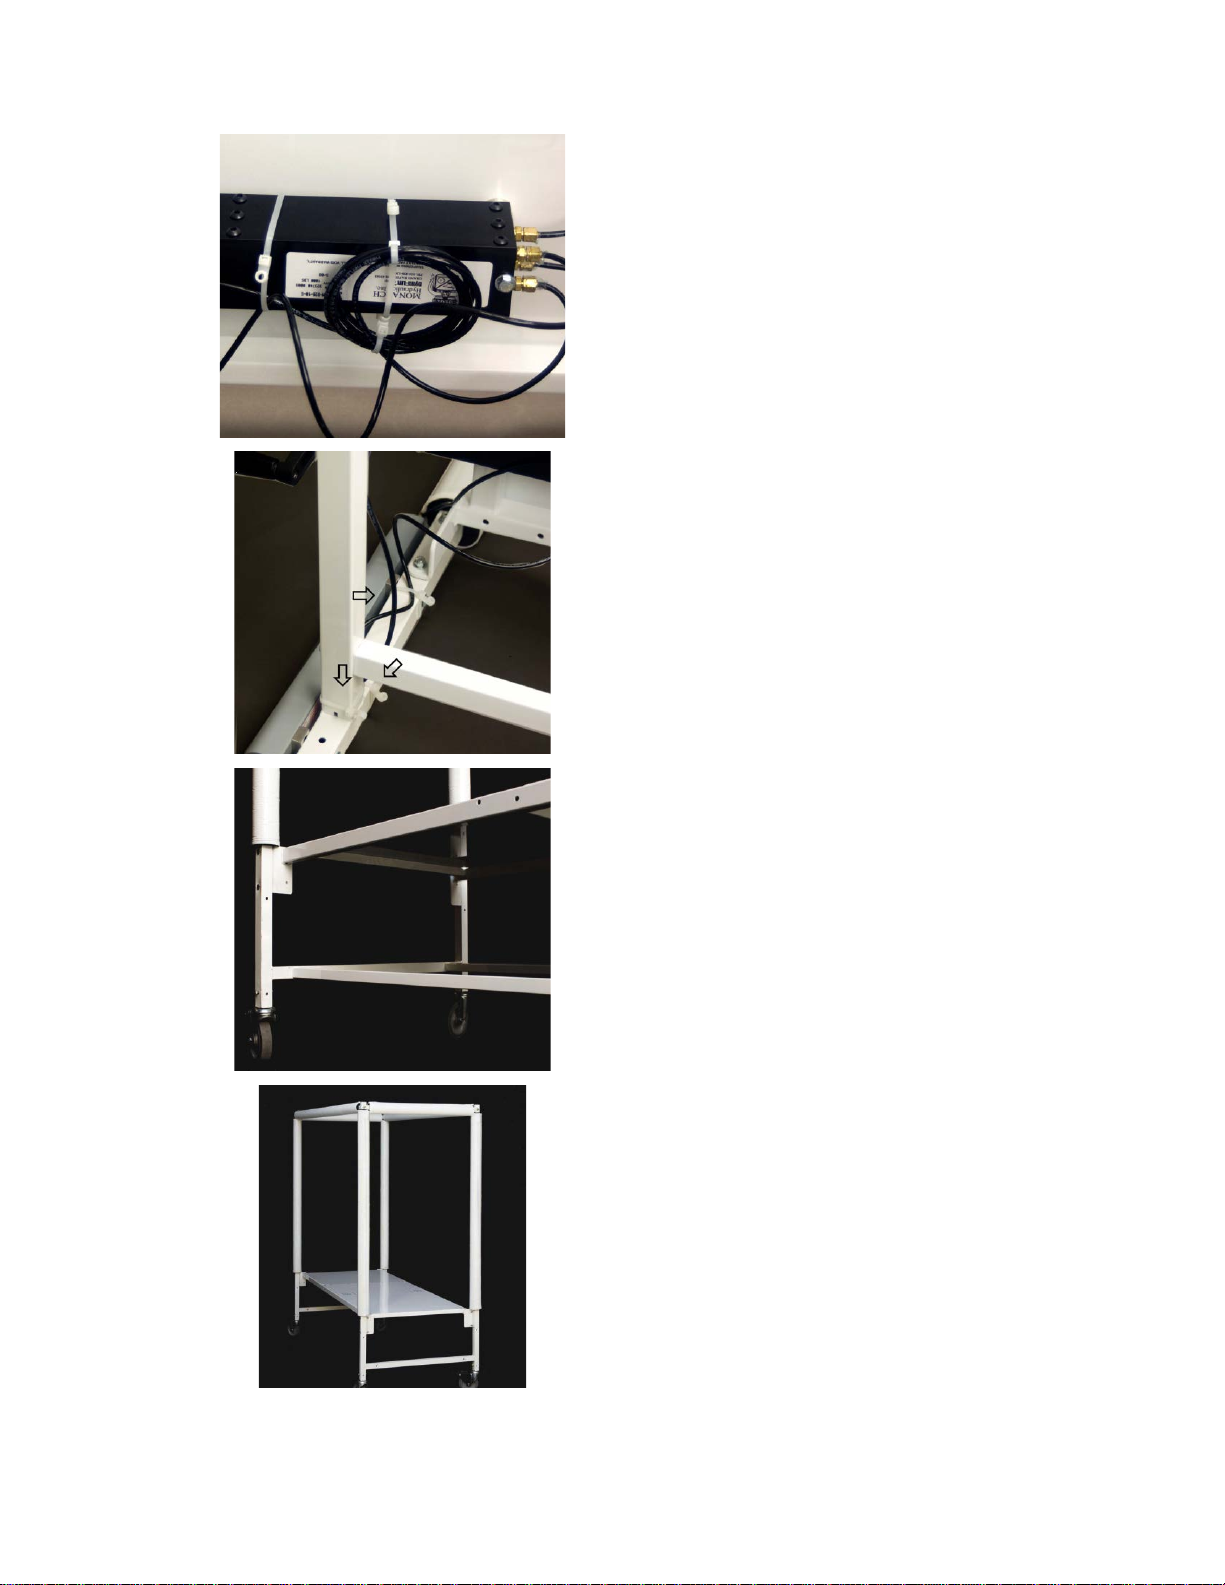
Figure 8
Secure hydraulic cables to bed frame with
cable ties.
8 of 18
Pedicraft Inc. 4134 St. Augustine Rd. Jacksonville, FL 32207 Ph: 904-396-9627
Rev. 9 - 091919
Figure 9
Figure 10
Figure 11
Attach unpadded Support Bars at the second
set of holes below the Mattress Deck with 2"
bolts. Do not fully tighten at this time.
Figure 12
Tighten all bolts in the following order (but
do not over-tighten): Mattress Deck, Lower
Support Bars, Upper Support Bars.
With one person at each end of Bed Frame,
raise Bed to upright position.
9 of 18
Pedicraft Inc. 4134 St. Augustine Rd. Jacksonville, FL 32207 Ph: 904-396-9627
Rev. 9 - 091919
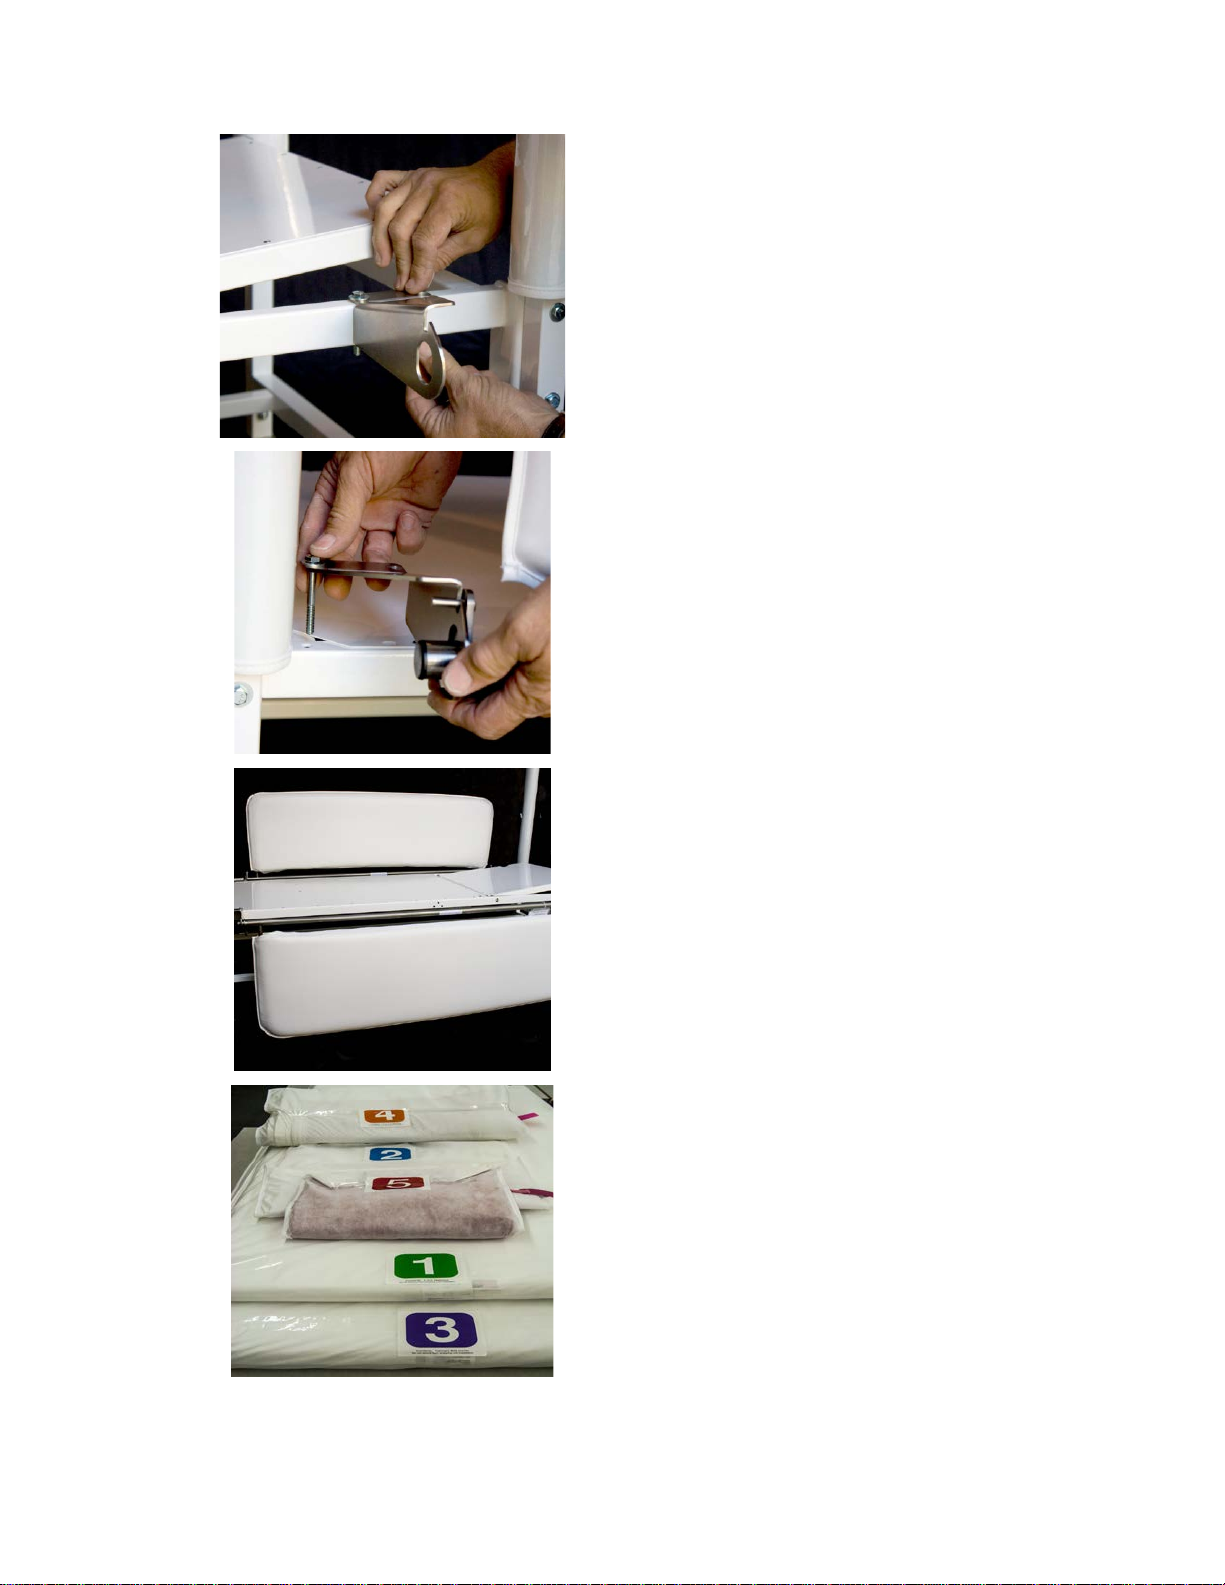
Figure 13
Using 2¼" bolts, nuts and washers
(provided) attach Bracket to bed frame next
to bed head. Then place side gate into
bracket.
Figure 14
Place second Bracket onto other end of side
gate and using 2¼" bolts, nuts and washers
(provided) attach to Mattress Deck at foot
end of bed.
Figure 15
Repeat at opposite side of bed. Side gates
are now attached.
We recommend washing your hands after
assembling the Bed and before handling the
Canopy Cover and Mattresses.
Figure 16
All fabric and vinyl components will be used
in the following steps. These components
will be used in numeric order. Please do not
unwrap these components until they are to
be installed so that they remain clean.

10 of 18
Pedicraft Inc. 4134 St. Augustine Rd. Jacksonville, FL 32207 Ph: 904-396-9627
Rev. 9 - 091919
Figure 17
IMPORTANT: Remove wrapping from 2"
mattress , and place on Mattress Deck
before proceeding to next steps.
Cover floor area with drop cloths (provided).
Figure 18
Remove wrapping from zip-out mesh or
quilted bottom . Lay out zip-out bottom
panel on top of the 2” (4” if bed is equipped
with quilted bottom) mattress. If the bed is
equipped with head elevation, raise head
section to its highest position. If the bed is
equipped with knee elevation, raise knee
section to its highest position.
Figure 19
If the bed is equipped with Padded Hea
d and
Foot Boards, tuck the bottom panel under
the head and foot boards.
Under the head end, wrap Velcro strips
around square tube and tuck under bottom
panel so that they adhere to the Velcro
attached to the bottom panel.
Figure 20
Grasp each corner zip and place each
end on
opposite sides of the corner post of the bed.

11 of 18
Pedicraft Inc. 4134 St. Augustine Rd. Jacksonville, FL 32207 Ph: 904-396-9627
Rev. 9 - 091919
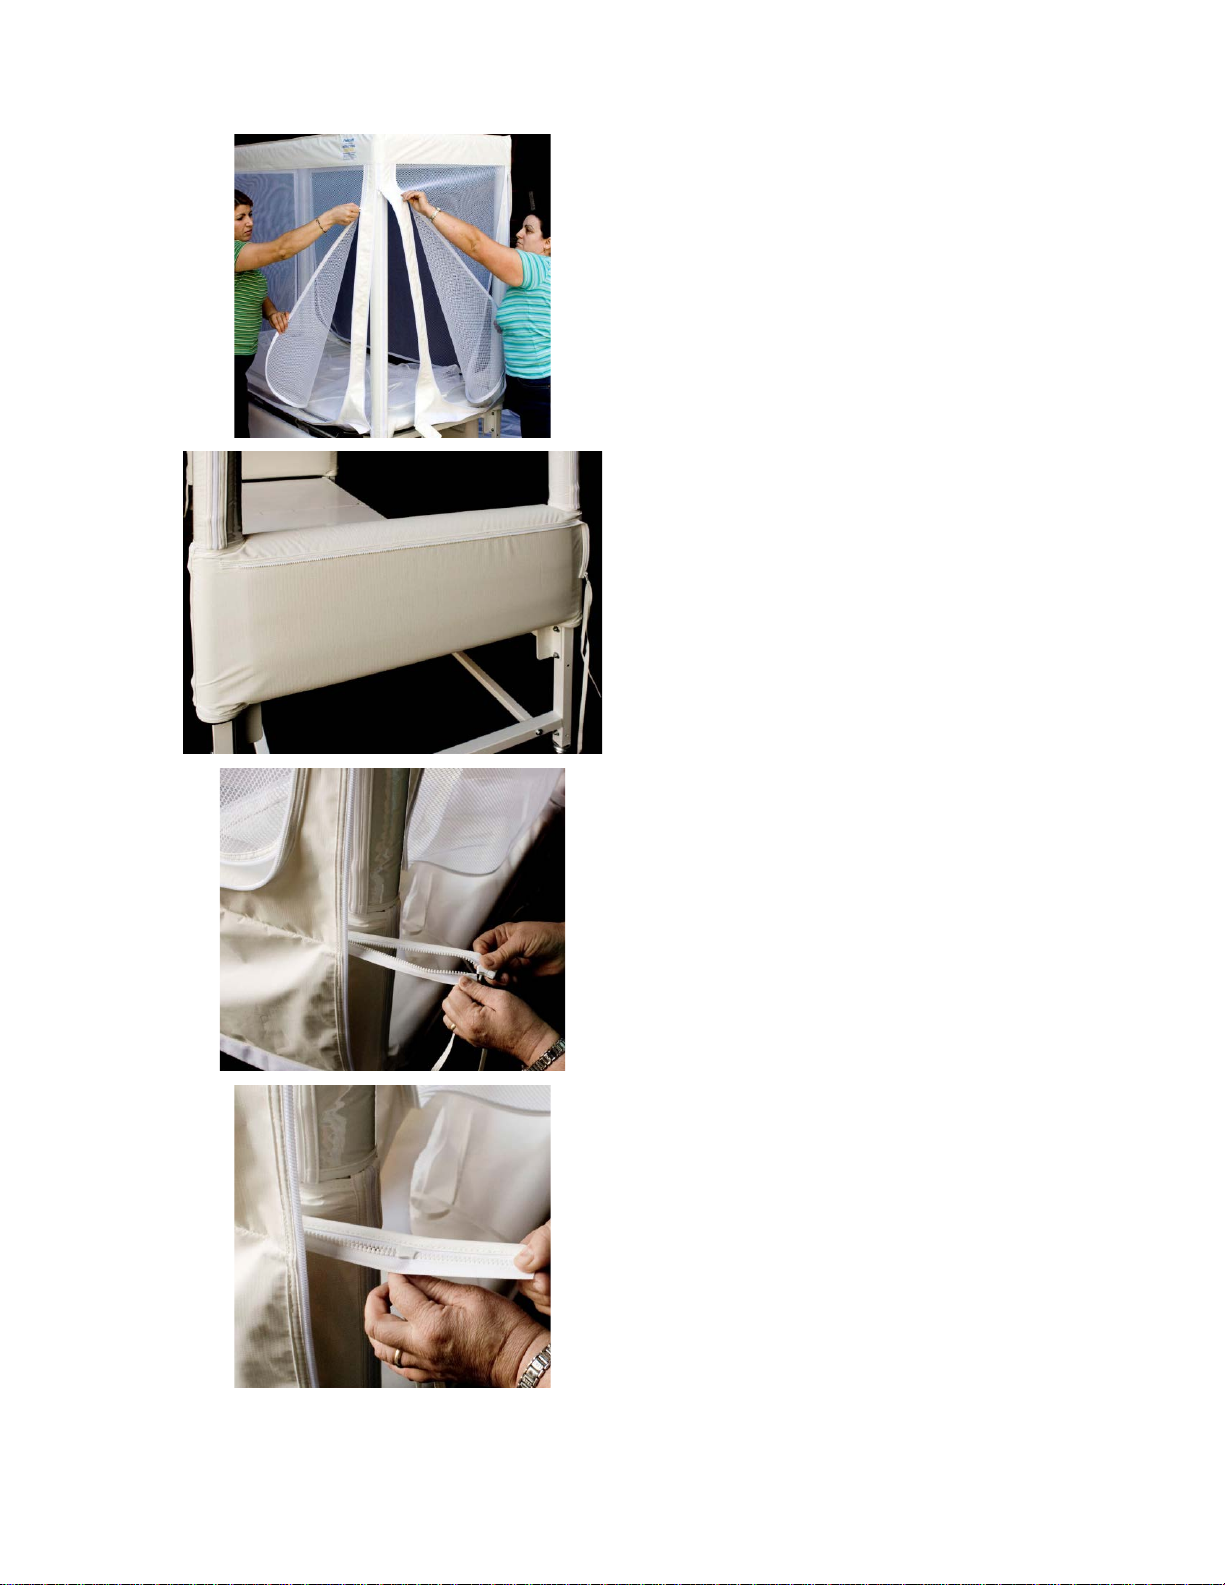
Figure 21
Make sure the vinyl corner and bottom panel
seam lays flat on the mattress and is not
twisted.
Figure 22
Grasp each zipper end and pull around
corner post. Join zip ends to start the zip
closure.
Figure 23
Pull zip tab (equipped with long, nylon zip
pull) firmly to complete closure of each
corner.
Figure 24
Zip closure should finish below the vinyl-
coated padding (and above the hydraulic leg
on height adjustable beds) on each corner
post.

12 of 18
Pedicraft Inc. 4134 St. Augustine Rd. Jacksonville, FL 32207 Ph: 904-396-9627
Rev. 9 - 091919
Figure 25
Using the long, nylon zip pull, tie zip tab
around each bed corner post.
WARNING: Failure to tie each zip tab
around each bed corner post could result in
the patient exiting the bed.
Figure 26
If bed has a quilted bottom panel a second
mattress is not used. Skip to Figure 27.
If bed has a mesh bottom panel, unwrap 3”
mattress and place on top of installed zip-
out mesh bottom.
Figure 27
Remove wrapping paper from Canopy Cover
and locate "foot" logo at foot end of bed.
Each person takes two corners of canopy
cover and places them firmly over top of
frame posts.
Figure 28
The cover will now drop into place ready for
the following actions.
13 of 18
Pedicraft Inc. 4134 St. Augustine Rd. Jacksonville, FL 32207 Ph: 904-396-9627
Rev. 9 - 091919
Figure 29
Unzip all four window panels.
Figure 30
If bed is equipped with Padded Head and
Foot Boards, follow these instructions.
Otherwise skip to figure 39.
Zipper is to be matched to zipper on
Canopy cover.
Figure 31
Join open ended zipper.
Figure 32
Close zipper.

14 of 18
Pedicraft Inc. 4134 St. Augustine Rd. Jacksonville, FL 32207 Ph: 904-396-9627
Rev. 9 - 091919
Figure 33
Lift end of Canopy Cover and continue
closing zipper as shown.
Figure 34
Lift end of Canopy Cover and continue
closing zipper as shown.
Figure 35
Photo shows zipper fully closed as seen from
inside of bed.
Figure 36
Locate zipper ties for just-completed
attachment of Padded Head and Foot Board
to the Canopy Cover. These ties are marked
with a thick gray stitch.

15 of 18
Pedicraft Inc. 4134 St. Augustine Rd. Jacksonville, FL 32207 Ph: 904-396-9627
Rev. 9 - 091919
Figure 37
Secure zipper ties by tying to bed leg.
WARNING: Failure to tie
zipper ties around
the bed leg could result in the patient
exiting the bed.
Figure 38
Padded Head and Foot Board zipper ties tied
securely to the bed leg.
WARNING: Failure to tie
zipper ties around
the bed leg could result in the patient
exiting the bed.
Figure 39
To attach the zip-out mesh/quilted bottom
to Canopy Cover, close matching zippers on
all sides.
Figure 40
Continue to attach the zip-out bottom to
Canopy Cover by closing matching zippers
on all four sides.

16 of 18
Pedicraft Inc. 4134 St. Augustine Rd. Jacksonville, FL 32207 Ph: 904-396-9627
Rev. 9 - 091919
Figure 41
Feed zipper tie through prepared hole in
mesh and secure by tying to bed leg.
WARNING: Failure to tie all 4 zipper ties
around the bed leg could result in the
patient exiting the bed.
Figure 42
Unfold Velcro band attached to the bottom
edge of the Canopy Cover.
Figure 43
Close both corner post zippers and feed
zipper ties through prepared holes in mesh.
Figure 44
Secure both zipper ties by tying to bed leg.
WARNING: Failure to tie both zipper ties
around the bed leg could result in the
patient exiting the bed.
Wrap Velcro tabs at corners to complete the
Canopy Cover installation.

17 of 18
Pedicraft Inc. 4134 St. Augustine Rd. Jacksonville, FL 32207 Ph: 904-396-9627
Rev. 9 - 091919
Figure 45
Close four Canopy windows.
Figure 46
Attach bed skirt using Velcro bands.
Figure 47
Raise side gate and lock into place.
Canopy Bed assembly and fabric and vinyl
component installation is complete.
Figure 48
To remove zip-out mesh/quilted bottom for
cleaning, locate zipper ties (see Figure 41).
Untie zipper ties and unzip all four sides of
the zip-out bottom. Remove zip-out bottom
and clean according to cleaning instructions
included in this manual.

18 of 18
Pedicraft Inc. 4134 St. Augustine Rd. Jacksonville, FL 32207 Ph: 904-396-9627
Rev. 9 - 091919
Figure 49
To reattach the zip-out bottom after
cleaning, lay the mesh/quiilted bottom on
top of the 2” or 4” mattress. At the end of
the long zippers for both the zip-out bottom
and the Canopy Cover there will be a
colored stitch. Match the color to ensure the
proper orientation of the zip-out bottom.
Figure 50
After matching the colored stitch, zip all four
sides.
Figure 51
Feed zipper tie through prepared hole in
mesh and secure by tying to bed leg.
WARNING: Failure to tie all 4 zipper ties
around the bed leg could result in the
patient exiting the bed.
Figure 52
Assembly is complete.
Table of contents
Popular Indoor Furnishing manuals by other brands

Regency
Regency LWMS3015 Assembly instructions

Furniture of America
Furniture of America CM7751C Assembly instructions

Safavieh Furniture
Safavieh Furniture Estella CNS5731 manual

PLACES OF STYLE
PLACES OF STYLE Ovalfuss Assembly instruction

Trasman
Trasman 1138 Bo1 Assembly manual

Costway
Costway JV10856 manual


