Peg-Perego DESERT TENERE Installation instructions

FI000501G09
DÉSERT TÉNÉRÉ
Model Number IGMC0004
12V
USO E MANUTENZIONE
IT
USE AND CARE
EN
UTILISATION ET ENTRETIEN
FR
DE
GEBRAUCH UND WARTUNG
BRUGSANVISNING
DA
KÄYTTÖOHJE
FI
BRUKSANVISNING
NO
SV
BRUKSANVISNING
ES
EMPLEO Y MANUTENCION
PT
USO E MANUTENÇÃO
TR
BAKIM VE KULLANIM
RU
ЭКСППУТАЦИЯ
EL
ΧΡΗΣΗ ΚΑΙ ΣΥMΤΗQΗΣΗ
SL
UPORABA IN VZDRŽEVANJE

1 2 3
4 5 6
7 8 9
121110
1413 15

1716
2019
18
21
242322
272625
2928
C
A
30
B
1
2
1
2

B
C
31 33
34 35 36
32
BAB
C
A
B
37 38

2 AMP.
20 AMP.
MEVA0012
MEPU0002
MEPU0007
MEPU0036
SAGI9997J
b
r
bk bk
bk
r
b
r
w
11 12
13
15
14
16
bk bk
rbk
r/wbk/b
THERMO
PROTECTOR
THERMO
PROTECTOR
12
14
16
11
13
15
MEIE0022
MEIE0451
bb
b
wbbk
SAGI9997J
r
bk
MEPU0033
2
31
r
MOTOR
RIGHT
LEFT
MOTOR
b = blu
bk = nero
r = rosso
w = bianco
b = blue
bk = black
r = red
w = white
b = bleu
bk = noir
r = rouge
w = blanc
b = blau
bk = schwarz
r = rot
w = weiß
b = azul
bk = negro
r = rojo
w = blanco
b = azul
bk = preto
r = vermelho
w = branco
b = moder
bk = črn
r = rdeč
w = bel
b = blå
bk = sort
r = rød
w = hvid
b = sininen
bk = musta
r = punainen
w = valkoinen
b = blå
bk = svart
r = rød
w = hvit
b = blå
bk = svart
r = röd
w = vit
b = mavi
bk = siyah
r = kirmizi
w = beyaz
b = синий
bk = черньій
r = красньій
w = бепьій
b = Μπλe
bk = Μaύρο
r = Κόκκινο
w = Άφσπρο
2 AMP.
20 AMP.
MEVA0012
MEPU0002
MEPU0036
SAGI9997J
b
r
bk bk
bk
r
b
r
w
11 12
13
15
14
16
bk bk
rbk
r/wbk/b
THERMO
PROTECTOR
THERMO
PROTECTOR
12
14
16
11
13
15
MEIE0022
MEIE0439
bb
b
wbbk
SAGI9997J
r
bk
MEPU0033
MOTOR
RIGHT
MOTOR
LEFT
b = blu
bk = nero
r = rosso
w = bianco
b = blue
bk = black
r = red
w = white
b = bleu
bk = noir
r = rouge
w = blanc
b = blau
bk = schwarz
r = rot
w = weiß
b = azul
bk = negro
r = rojo
w = blanco
b = azul
bk = preto
r = vermelho
w = branco
b = moder
bk = črn
r = rdeč
w = bel
b = blå
bk = sort
r = rød
w = hvid
b = sininen
bk = musta
r = punainen
w = valkoinen
b = blå
bk = svart
r = rød
w = hvit
b = blå
bk = svart
r = röd
w = vit
b = mavi
bk = siyah
r = kirmizi
w = beyaz
b = синий
bk = черньій
r = красньій
w = бепьій
b = Μπλe
bk = Μaύρο
r = Κόκκινο
w = Άφσπρο
A
B
solo per europa
only for europe
seulement pour europe
einzig für europa
solo para europa
só para Europa
samo za Evropo
Kun for Europa
Vain Eurooppaa varten
Bare for Europa
Bara för Europa
yalnõzca Avrupa için
только для Европы
μόνο για την Ευρώπη

1 SPST0468AE
2 SPST0409N
3 ARGI0008N
3 bis ARGI0021N
4 MEPU0002
5 ASGI0057JN
6 ASGI0060N
7 IAKB0014
8 SPST3677N
9 IKCB
10 SPST0473RF
11 SPST0208N
12 SPST8590NP
13 ASGI0159NP
14 SAGI0169NGP
15 SAGI3058DN
16 SAGI3058SN
17 SPST3359N
18 ASGI0062NP
19 SPST0169GP
20 SAGI0166N
21 SPST0345N
22 SPST0072
23 SPST3357AE
24 ASGI0137
25 SAGI0203GP
26 SPST0096
27 SPST0250GP
28 ASGI0059GP
29 SPST3358N
30 SOFF0062Z
31 SAGI3059GA
32 SPST3361GR
33 SPST0234GP
34 SAGI0415GP
35 SOFF0150Z
36 ASGI0061Z
37 SAGI0494N
38 SPST3409N
39 ARGI0010L30
40 SAGI9962XXKTG
41 SPMV0170GR
42 ASGI0042GP
43 MMST0002
44 SPST3820N
45 MEIE0451
46 MEIE0439
47 MMEV0248
48 SPST8066GL
49 SOFF0410Z
50 SPST3819N
48
1
2
3
4
6
7
8
9
10
5
11
12
13
14
17 18
15
19
20
22
23
26
28 44
50
31
42
43
32
33 34
35 36
37
38
40
41
39
49
29
27
30
24
25
21
16
3 bis
47
2
20
0012
0002
0007
0036
9997
b
b b
b
b
11 12
13
15
14
16
b b
b
bb
12
14
16
11
13
15
0022
0451
bb
b
bb
9997
b
0033
2
31
A
2A
20A
A0012
0002
0036
A9997
b
b b
b
b
11 12
13
15
14
16
b b
b
bb
12
14
16
11
13
15
0022
0439
bb
b
bb
A9997
b
0033
B
45
46
solo per europa
only for europe
seulement pour europe
einzig für europa
solo para europa
só para Europa
samo za Evropo
Kun for Europa
Vain Eurooppaa varten
Bare for Europa
Bara för Europa
yalnõzca Avrupa için
только для Европы
μόνο για την Ευρώπη

• PEG PEREGO vi ringrazia per aver preferito
questo prodotto. È da oltre 50 anni che
PEG PEREGO porta a spasso i bambini:
appena nati con le sue famose carrozzine
e passeggini, poi con i fantastici veicoli
giocattolo a pedali e a batteria.
• Leggete attentamente questo manuale
istruzioni per familiarizzare con lʼuso del
modello e insegnare al vostro bambino
una guida corretta, sicura e divertente.
Conservare poi il manuale per ogni futuro
riferimento.
• I nostri giocattoli sono conformi ai
requisiti di sicurezza previsti dal Consiglio
della EEC e dal “U.S. Consumer Toy Safety
Specification” e approvati dal TÜV e dallʼ
I.I.S.G. Istituto Italiano Sicurezza Giocattoli.
Peg Perego S.p.A. è certificata ISO
9001.
La certificazione offre ai clienti e
ai consumatori la garanzia di una
trasparenza e fiducia nel modo
di lavorare dell'impresa.
• Peg Perego potrà apportare in qualunque
momento modifiche ai modelli descritti in
questa pubblicazione, per ragioni di natura
tecnica o aziendale.
Anni 3-8
La PEG PEREGO offre un servizio di
assistenza post-vendita, direttamente o
tramite un network di centri di assistenza
autorizzati, per eventuali riparazioni o
sostituzioni e vendita di ricambi originali.
Per contattare i centri assistenza vedere
sul retro della copertina di questo manuale
dʼistruzioni.
La Peg Perego è a disposizione dei suoi
Consumatori per soddisfare al meglio ogni
loro esigenza.
Per questo, conoscere il parere dei ns.
Clienti, è per noi estremamente importante
e prezioso.
Le saremo quindi molto grati se, dopo
aver utilizzato un ns. prodotto, vorrà
compilare il QUESTIONARIO SODDISFAZIONE
CONSUMATORE che troverà in
Internet al seguente indirizzo:
“www.pegperego.com/SSCo.html.it”
segnalando eventuali osservazioni o
suggerimenti.
ATTENZIONE: LE OPERAZIONI DI MONTAGGIO
DEVONO ESSERE EFFETTUATE SOLO DA
ADULTI.
PRESTARE ATTENZIONE A QUANDO SI ESTRAE
IL VEICOLO DALL'IMBALLO.
LE VITI E I COMPONENTI SI TROVANO
CONFEZIONATI, ALL'INTERNO DELL'IMBALLO.
LA BATTERIA É GIA POSIZIONATA
ALLʼINTERNO DEL VEICOLO.
MONTAGGIO
1 • Attenzione: controllare che i bulloni
della forcella anteriore siano ben
serrati.
2 • Posizionare il manubrio.
3 • Posizionare la piastra di fissaggio del
manubrio come mostrato in figura.
4 • Avvitare le tre viti.
5 • Posizionare il cruscotto inserendolo tra
le due linguette della mascherina.
6 • Fissare il cruscotto con le due viti in
dotazione.
7 • Collegare la spina della manopola-
acceleratore alla spina impianto.
8 • Inserire il cavo nellʼapposita sede come
in figura.
9 • Posizionare il parabrezza sulla
mascherina;
10 •Avvitare.
11 •Posizionare la freccia;
12 •Avvitare.
13 •Posizionare a scatto la griglia sul telaio
facendo attenzione ad agganciare tutti
SERVIZIO ASSISTENZA
ITALIANO e tre i ganci.
14 •Applicare a scatto la targa.
15 •Applicare a scatto il fanale posteriore.
16 •Posizionare e fissare con le quattro viti
il portapacchi.
17 •Posizionare il bauletto sul portapacchi
e spingerlo indietro per fissarlo.
18 •Con lʼattrezzo in dotazione svitare i
dadi dellʼassale ruota posteriore da
entrambe le parti;
19 •Sfilare i distanziali;
20 •Posizionare le ruote stabilizzatrici;
21 •Applicare le rondelle e poi i dadi;
22 •Riavvitare. Attenzione: quando togliete
le ruote stabilizzatrici ricordatevi di
rimettere i distanziali.
23 •Svitare la vite della sella.
24 •Sollevare la sella premendo sui due
lati. Attenzione: richiudere sempre la
sella dopo le operazioni allʼinterno del
vano batteria.
25 •Collegare le due spine e richiudere la
sella. Il veicolo é pronto allʼuso.
CARATTERISTICHE E USO DEL VEICOLO
26 •A: manopola acceleratore. Ruotare la
manopola verso il basso per far partire
il veicolo;
B: pulsante clacson.
27 •C: freno. Premendo il pedale del freno
il veicolo si arresta.
28 •SECONDA VELOCITÁ: svitare la vite ed
alzare il tappo del serbatoio;
29 •Premere il pulsante posizionandolo
sulla seconda velocità. Chiudere
riavvitando il tappo.
30 •Per aprire il bauletto sganciare i lacci di
gomma.
31 •Il bauletto é trasportabile grazie alla
comoda maniglia.
SOSTITUZIONE DELLA BATTERIA
32 •Svitare la vite e sollevare la sella
premendo sui due lati. Scollegare le
spine.
33 •Svitare il fermabatterie.
34 •Sostituire la batteria. Riposizionare e
avvitare il fermabatteria con le due viti.
Collegare le due spine e richiudere la
sella.
CARICA DELLA BATTERIA
ATTENZIONE: LA CARICA DELLE BATTERIE
E QUALSIASI INTERVENTO ALL'IMPIANTO
ELETTRICO DEVONO ESSERE EFFETTUATE DA
ADULTI.
LA BATTERIA PUÓ ESSERE CARICATA ANCHE
SENZA RIMUOVERLA DAL GIOCO.
35 •Scollegare la spina A dellʼimpianto
elettrico dalla spina B della batteria
premendo lateralmente.
36 •Inserire la spina del caricabatterie ad
una presa domestica seguendo le sue
istruzioni allegate. Collegare la spina B
con la spina C del caricabatterie.
37 •A carica ultimata staccare il
caricabatteria dalla presa domestica,
poi scollegare la spina C dalla spina B.
38 •Inserire a fondo, fino allo scatto, la
spina B nella spina A. Ad operazioni
ultimate ricordarsi sempre di chiudere
e fissare la sella.
Prima di utilizzare il veicolo per la prima
volta, caricare le batterie per 18 ore. Non
osservare questa procedura potrebbe
causare danni irreversibili alla batteria.
AVVERTENZE
La carica delle batterie deve essere
effettuata e supervisionata solo dagli adulti.
Non lasciare che i bambini giochino con le
batterie.
CARICA DELLA BATTERIA
• Caricare la batteria seguendo le istruzioni
allegate al caricabatterie e comunque non
superare le 24 ore.
• Caricare per tempo la batteria non appena
il veicolo perde velocità, eviterete danni.
•
Se lasciate fermo il vostro veicolo per
lungo tempo, ricordatevi di caricare
la batteria e di tenerla scollegata
dall'impianto; ripetete l'operazione di
ricarica almeno ogni tre mesi.
• La batteria non deve essere caricata
capovolta.
• Non dimenticare le batterie in carica!
Controllare periodicamente.
• Usare solo il caricabatterie in dotazione e
le batterie originali PEG PEREGO.
• Non mischiare vecchie e nuove batterie.
• Le batterie devono essere inserite con la
corretta polarità.
• Le batterie sono sigillate e non
necessitano manutenzione.
ATTENZIONE
• LE BATTERIE CONTENGONO SOSTANZE
TOSSICHE CORROSIVE.
NON MANOMETTERLE.
• Le batterie contengono elettrolita a base
acida.
• Non provocare contatto diretto tra i
terminali della batteria, evitare forti urti:
rischio di esplosione e/o incendio.
• Durante la carica la batteria produce gas.
Caricare la batteria in luogo ben ventilato,
lontano da fonti di calore e materiali
infiammabili.
• Le batterie esaurite devono essere rimosse
dal veicolo.
• È sconsigliato appoggiare le batterie agli
indumenti; si potrebbero danneggiare.
SE VI É UNA PERDITA
Proteggete i vostri occhi; evitare il contatto
diretto con l'elettrolita: proteggete le vostre
mani.
Mettere la batteria in una borsa di plastica
e seguire le istruzioni sullo smaltimento
batterie.
SE PELLE O OCCHI ENTRANO IN CONTATTO
CON LʼELETTROLITA
Lavare abbondantemente con acqua
corrente la parte intaccata.
Consultare il medico immediatamente.
SE LʼELETTROLITA VIENE INGERITO
Sciacquare la bocca e sputare.
Consultare il medico immediatamente.
SMALTIMENTO DELLE BATTERIE
Contribuite alla salvaguardia dellʼambiente.
Le batterie usate, non vanno buttate tra i
rifiuti domestici.
Potete depositarle presso un centro di
raccolta di batterie
usate o di smaltimento rifiuti speciali.
Informatevi presso il vostro comune.
Questo prodotto è conforme alla Norma di
Sicurezza EN 71e alla Norma di Sicurezza
per i giocattoli elettrici EN 50088; non è
conforme alle disposizioni delle norme di
circolazione su strada e pertanto non può
circolare su strade pubbliche.
MANUTENZIONE E CURA
• Controllare regolarmente lo stato del
veicolo, in particolare lʼimpianto elettrico,
i collegamenti delle spine, i cappucci di
protezione ed il caricabatterie. In caso
di difetti accertati, il veicolo elettrico
ed il caricabatterie non devono essere
utilizzati. Per riparazioni usare solo pezzi
di ricambio originali PEG PEREGO.
• La PEG PEREGO non si assume nessuna
responsabilità in caso di manomissione
dellʼimpianto elettrico.
• Non lasciare le batterie o il veicolo vicino
a fonti di calore come caloriferi, caminetti,
etc.
• Proteggere il veicolo da acqua, pioggia,
neve etc.; usarlo su sabbia o fango
potrebbe causare danni a pulsanti, motori
e riduttori.
• Se il veicolo agisce in condizioni di
sovraccarico, come su sabbia soffice,
fango o terreni molto sconnessi,
lʼinterruttore di sovraccarico toglierà
immediatamente potenza. Lʼerogazione di
potenza riprenderà dopo alcuni secondi.
• Lubrificare periodicamente (con olio
leggero) parti semovibili come cuscinetti,
sterzo etc.
ISTRUZIONI DI MONTAGGIO
MANUTENZIONE E SICUREZZA
BATTERIE
MANUTENZIONE E SICUREZZA
VEICOLO

potenza riprenderà dopo alcuni secondi.
IL VEICOLO NON FUNZIONA?
• Verificare che non ci siano cavi scollegati
sotto la piastra dellʼacceleratore.
• Verificare che non ci siano cavi scollegati
dai motoriduttori.
• Controllare il funzionamento del pulsante
dellʼacceleratore ed eventualmente
sostituirlo.
• Controllare che la batteria sia attaccata allʼ
impianto elettrico.
IL VEICOLO NON HA POTENZA?
• Caricare le batterie. Se dopo la ricarica
il problema persiste far controllare le
batterie ed il caricabatterie da un centro
assistenza.
• Le superfici del veicolo possono essere
pulite con un panno umido e, se
necessario, con prodotti di uso domestico
non abrasivi.
Le operazioni di pulizia devono essere
effettuate solo da adulti.
• Non smontare mai i meccanismi del
veicolo o i motori, se non autorizzati dalla
PEG PEREGO.
Conforme a EN 50088
Batteria ricaricabile da 12V 8Ah al piombo
sigillata.
2 motori da 140 W
SICUREZZA
ATTENZIONE! LA SUPERVISIONE DI UN
ADULTO É SEMPRE NECESSARIA.
• Non adatto a bambini di età inferiore a 36
mesi per la presenza di piccole parti che
possono essere ingerite o inalate.
• Non usare il veicolo su strade pubbliche,
dove cʼè traffico e macchine parcheggiate,
su pendenze ripide, vicino a gradini e
scale, corsi dʼacqua e piscine.
• I bambini devono sempre indossare scarpe
durante lʼuso del veicolo.
• Quando il veicolo è operativo fare
attenzione affinché i bambini non mettano
mani, piedi o altre parti del corpo,
indumenti o altre cose, vicino alle parti in
movimento.
• Non bagnare mai componenti del veicolo
come motori, impianti, pulsanti, etc.
• Vicino al veicolo non usare benzine o altre
sostanze infiammabili.
• Il veicolo deve essere usato
esclusivamente da un solo bambino.
DIVERTIMENTO SENZA INTERRUZIONI: tenete
sempre un set-batterie carico di ricambio
pronto allʼuso.
Per la sicurezza del bambino: prima di
azionare il veicolo, leggere e seguire
attentamente le seguenti istruzioni.
• ATTENZIONE:
Controllare che tutte le borchie di
fissaggio siano ben salde.
2ª VELOCITÁ
Inizialmente si consiglia lʼutilizzo della 1ª
marcia.
Prima di inserire la 2ª velocità,
assicurarsi che il bambino abbia acquisito
dimestichezza con il veicolo.
• 1a VELOCITÁ (per principianti):
Con entrambe le mani sul manubrio girare
lʼacceleratore verso il basso; il veicolo si
mette in moto ad una velocità di circa 3,7
Km/h.
• 2a VELOCITÁ (per esperti):
Con entrambe le mani sul manubrio girare
lʼacceleratore verso il basso; il veicolo si
mette in moto ad una velocità di circa 7,5
Km/h.
• FRENO:
Per frenare decellerare girando la
manopola verso lʼalto e schiacciare il
pedale del freno.
Insegnate al vostro bambino un uso
corretto del veicolo per una guida sicura e
divertente.
• Prima di partire assicurarsi che il percorso
sia sgombro da persone o cose.
• Guidare con le mani sul manubrio e
guardare sempre la strada.
• Frenare per tempo per evitare scontri.
• Inserire la 2ª velocità solo quando il
bambino ha imparato correttamente lʼuso
del volante, della 1ª velocità e del freno.
• ATTENZIONE! in prima velocità, il veicolo
é dotato di effetto differenziale come
le vere automobili: su terreni lisci e con
un solo bambino, le due ruote possono
avere velocità diverse con possibilità di
slittamento/rallentamento delle stesse.
• ATTENZIONE! Se il veicolo agisce in
condizioni di sovraccarico, come su sabbia
soffice, fango o terreni molto sconnessi,
lʼinterruttore di sovraccarico toglierà
immediatamente potenza. Lʼerogazione di
PROBLEMI? ENGLISH
•PEG PEREGO® thanks you for choosing this
product. For over 50 years, PEG PEREGO
has been taking children for an outing: first
with its famous baby carriages and strollers,
later with its pedal and battery operated toy
vehicles.
•Read this instruction manual carefully to
learn the use of this vehicle and to teach
your child safe and enjoyable driving. Please
keep this manual for use as a reference in
the future.
•Our toys conform with the safety
requirements provided by the Council
of the EEC, of the T.Ü.V.; of the I.I.S.G.
Istituto Italiano Sicurezza Giocattoli, and
the U.S. Consumer Toy Safety Specification
F963.
Peg Perego S.p.A. is an ISO
9001 certified company.
The fact that we are certified
provides a guarantee of our
honesty for our customers, and
fosters trust in the companyʼs
way of working.
•Peg Perego reserves the right to modify
or change their product. Price, literature,
manufacturing processes or locations or
any combination of these above mentioned
entities may change at any time for any
reason without notice with impunity.
Years 3-8
PEG PEREGO offers after-sales services,
directly or with a network of authorized
service centers for repairs or replacement
parts. See the back cover of this instruction
manual for a list of service centers.
Peg Perego is at the consumer's service,
meeting every need in the best way
possible. This is why our customers'
opinions are so important and valuable to
us. We would be very grateful if you would
kindly fill in the CUSTOMER SATISFACTION
QUESTIONNAIRE after using one of our
products. You will find the questionnaire on
the Internet at
"www.pegperego.com/SSCo.html.en-UK".
Please note any observations or suggestions
you may have on the questionnaire.
ADULT ASSEMBLY REQUIRED.
USE CARE WHEN UNPACKING AS
COMPONENTS TO BE ASSEMBLED MAY POSE
A SMALL PARTS/SHARP EDGE HAZARD.
BATTERY ALREADY INSTALLED IN VEHICLE.
ASSEMBLY
1 • Warning: ensure that the front fork
bolts are well tightened.
2 • Put the handlebar in place.
3 • Place the handlebar fastener plate as
shown in the figure.
4 • Screw the 3 screws.
5 • Place the dash between the two tabs on
the grill.
6 • Fasten the dash into place using the two
screws that come with the vehicle.
7 • Connect the throttle handle to the
installation.
8 • Insert the cable into the crack.
9 • Place the windscreen on the grill.
10 •Screw.
11 •Put the arrow in place.
12 •Place the screws.
13 • Place the grill on the frame and snap it
into place, making sure to fasten all three
hooks.
14 • Snap the license plate into place.
15 • Snap the taillight into place.
16 • Position the luggage carrier and fasten it
using the four screws.
17 • Place the case on the luggage carrier and
push it towards the back to fasten it.
18 •Using the tool supplied, unscrew the
nuts located each side of the side rear
CUSTOMER SERVICE
ASSEMBLY INSTRUCTIONS
REGOLE PER UNA GUIDA SICURA

wheel axle.
19 •Remove the struts.
20 •Fit the stabiliser wheels.
21 •Place the washers and then the nuts as
shown in the drawing.
22 •Tighten. Warning: when yuo remove
the stabiliser remember to reinsert the
spaces.
23 • Loosen the screws on the seat.
24 •Raise the saddle by pushing forward
on both sides. Caution: always
reclose and re-screw the saddle after
doing anything inside the battery
compartment.
25 •Connect the two plugs and close the
saddle back down. The vehicle is ready
for use.
VEHICLE FEATURES AND INSTRUCTIONS
FOR USE
26 •A: hand throttle. Turn the knob
downwards to start the vehicle. B: horn
button.
27 •C: brake. The vehicle stops when the
brake pedals is pressed.
28 •2nd SPEED: unscrew and lift off the cap
of the petrol tank;
29 •Press the button and select the 2nd
speed setting. Close by screwing the
cap back on.
30 • Unfasten the rubber clasps to open the
case.
31• The case has a convenient carrier handle.
REPLACING THE BATTERY
32 •Remove the screw and raise the saddle
by pushing forward on both sides.
Unplug the plug.
33 •Unscrew the battery fastener.
34 •Replace the battery. Install the battery
fastener and secure it into position
using the two screw. Connect the two
plug and close the saddle back down.
BATTERY RECHARGE
WARNING: BATTERY CHARGING AND EVERY
OTHER OPERATION ON THE ELECTRICAL
SYSTEM MUST BE CARRIED OUT BY ADULTS
ONLY.
THE BATTERY CAN ALSO BE CHARGED
WITHOUT REMOVING IT FROM THE TOY.
35 •Unplug vehicle wiring terminal A
from battery terminal B, by pressing
terminals on side and pulling apart.
36 •Plug the battery charger terminal to a
wall outlet following the instructions
enclosed. Connect the plug B to the
battery charger plug C.
37 •Once the charge is completed unplug
recharger from wall outlet. Unplug
recharger cord terminal C from battery
terminal B.
38 •Plug battery terminal A into vehicle
wiring terminal B. Close saddle.
Before riding, charge your batteries for 18
hours to initiate them. Failure to do this will
result in permanent battery damage.
CAUTION
Only adults should recharge batteries,never
children.
Never allow children to handle batteries.
Do not mix old and new batteries.
CHARGE BATTERY
• Charge the batteries no longer than 24
hours, following the instructions enclosed
with the battery charger.
• Charge the battery, as the vehicle shows
low power, in this way you will avoid
damage to the battery.
• If you donʼt use your vehicle for a long
period of time unplug the battery from
the main wire harness of the vehicle.
Remember to charge the battery at least
every three months.
• Never charge the battery upside down.
• Do not forget batteries during charging!
Check them periodically.
• Never use a replacement recharger or
batteries unless they are approved by PEG
PEREGO.
• Batteries are sealed and maintenance free.
• Battery polarity must be observed when
connecting battery to wiring.
WARNING
• BATTERIES CONTAIN TOXIC AND
CORROSIVE SUBSTANCES. DO NOT TAMPER
WITH THEM.
• Batteries contain an acid-based
electrolyte.
• Do not make direct contact between
battery terminals, as this can cause an
explosion or fire.
• Charging produces explosive gases.
Charge batteries in a well ventilated area
away from sources of heat and flammable
materials.
• Exhausted batteries are to be removed
from the vehicle.
• Do not place the batteries near clothing to
avoid damage.
IF A LEAK DEVELOPS
Shield your eyes. Avoid direct contact with
the electrolyte, protect your hands.
Place battery in a plastic bag and follow
directions listed below.
IF ELECTROLYTE COMES IN CONTAC WITH
SKIN OR CLOTHING
Flush with cool water for at least 15
minutes.
See a physician at once.
IF ELECTROLYTE IS INJESTED
Rinse your mouth and spit.
See a physician at once.
DISPOSAL OF BATTERIES
Help protect the environment!
Do not throw used batteries in your regular,
house hold trash.
Dispose of the old batteries in an approved
dumping station; contact your local
environmental protection agency office for
further information.
This product conforms to EN 71 and
conforms to EN 50088 safety standard for
electric toys. This vehicle is not intended
for use on streets, around traffic or parked
cars.
MAINTENANCE AND CARE
• Regularly check the conditions of the
vehicle, particularly the electrical system,
the plug connections, the covering caps
and the charger. In case of fault, do not
try to use the vehicle and the charger.
For repair use only original PEG PEREGOʼs
spare parts.
• PEG PEREGO assumes no liability if the
electrical system is tampered with.
• Do not leave vehicle or batteries near
sources of heat such as radiators, stoves,
fireplaces, etc.
• Protect vehicle from water, rain, snow, etc.
• When operating in overload conditions,
such as soft deep sand, mud or rough
uneven terrain, the overload circuit
breaker will automatically disconnect
the power. After 10 or more seconds,the
circuit breaker will automatically reset,
howevere you must eliminate overload
conditions to resume normal driving.
• Periodically lubricate (with a light weight
oil) moving parts, such as wheel bearings,
steering linkages, where they rotate or
touch one another.
• The vehicleʼs surface can be cleaned
with a dampcloth. Do not use abrasive
cleaners. The cleaning must be carried out
by adults only.
• Never disassemble the vehicles
mechanisms or motors unless authorized
by PEG PEREGO.
Conforms a EN 50088
Recargeable battery 12V 8Ah sealed lead-
acid battery.
Two 140W motors
SAFETY
WARNING! THE CAR MUST BE USED UNDER
ADULT SUPERVISION.
• Not suitable for children under the age
of 36 months. The small pieces could be
swallowed or inhaled.
• Never use the vehicle on steep slopes or
near steps or stairs. This vehicle is not
suitable for use on public highways.
• Children should always wear shoes when
riding in or driving a ride-in/ride-on
vehicle.
• Do not allow children to place their hands,
feet or any part of their body, clothing or
other articles near the moving parts while
vehicle is in operation.
• Do not allow the electrical components,
motors, wiring, switches of your
motorized vehicle to become wet and
never wash it with a hose.
• Never use gasoline or other flammable
substances near the vehicle.
• The vehicle is constructed just for one
child.
DON'T STOP THE FUN: always have freshly
charged, back-up batteries on hand.
For your childʼs safety: please read and
follow all instructions below before
operating.
• ATTENTION:
Check the fastening studs to be sure they
are tight.
2nd SPEED
Initially we suggest using only the 1st
speed and the reverse gear. Before moving
into 2nd speed be sure that the child has
become familiar with operating the vehicle.
• 1st speed slow speed (beginner drivers):
With both hands on the handlebars, turn
the throttle downwards; the vehicle goes
forward at 2.3 mph.
• 2nd speed fast speed (exsperienced
drivers):
With both hands on the handlebars, turn
the throttle downwards; the vehicle goes
forward at 4,7 mph.
• BRAKE:
To stop decelerate by turning the knob
upwards and press the brake pedal.
Teach your child the proper use of this
vehicle for a safe and fun play time.
• Before starting be sure that the way is free
from people and objects.
• Drive with both hands on the handlebars
and keep your eyes on the road at all
times.
• Stop in time to avoid accidents.
• Use the 2nd speed only after your child
has the maturity and the reflexes to
operatye vehicle safety.
• CAUTION! In first gear, the vehicle as a
differential effect like real cars: on smooth
terrain and with one child, the two wheels
may turn at different speeds, resulting in
possible sliding/deceleration.
• CAUTION! When operating in overload
conditions, such as soft deep sand, mud
or rough uneven terrain, the overload
circuit breaker will automatically
disconnect the power. After 10 or
more seconds,the circuit breaker will
automatically reset, howevere you must
eliminate overload conditions to resume
normal driving.
IF THE VEHICLE DOES NOT OPERATE?
• Check that all the plugs are properly
connected.
• Check to make sure that no cords are
disconnected from the reduction gears.
• Check the accelerator switch, if vehicle
runs replace switch.
• Check that the battery is connected to the
electrical system.
IF THERE IS NO POWER?
• Fully recharge the batteries. If the problem
persists, check with an Authorized PEG
PEREGO Service Center.
RULES FOR SAFE DRIVING
BATTERY MAINTENANCE
AND SAFETY
PROBLEMS?
VEHICLE MAINTENANCE
AND SAFETY

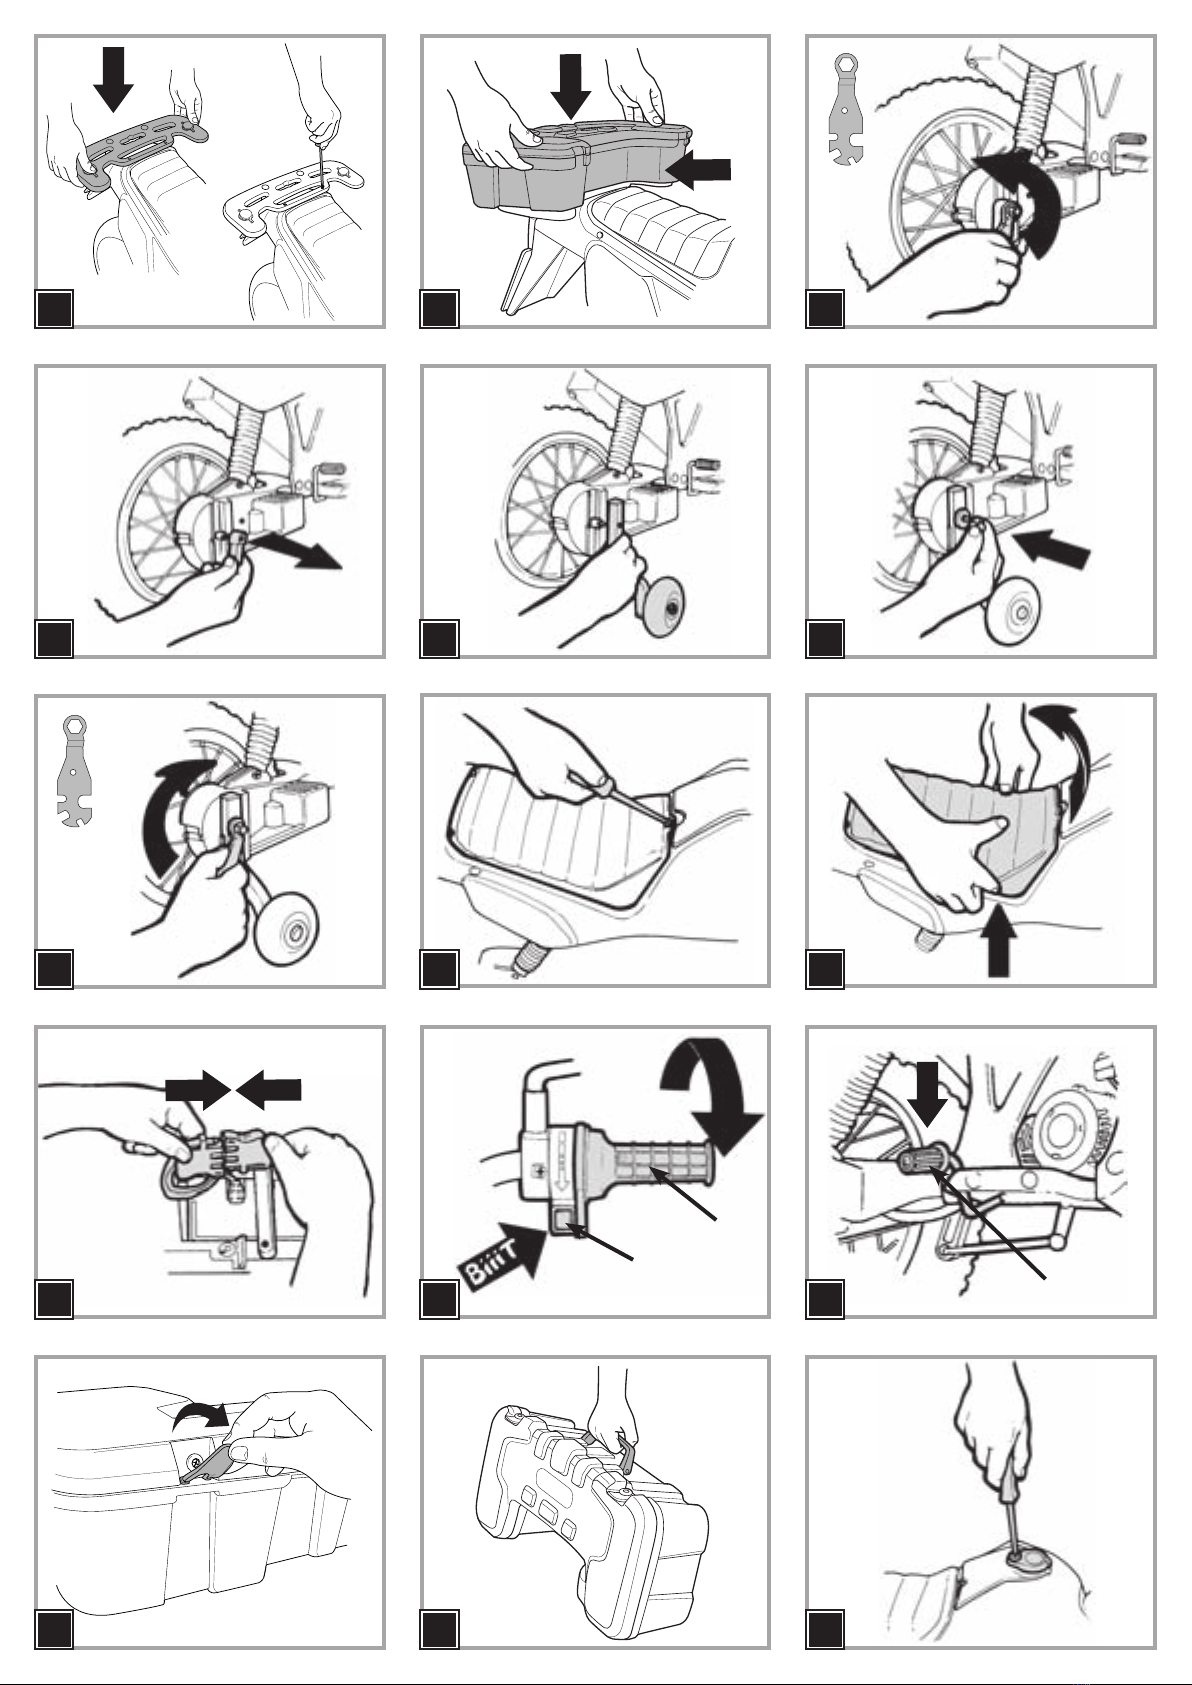
16 • Positionner et fixer le porte-bagages à
lʼaide des quatre vis.
17 • Positionner la malette sur le porte-
bagages et la pousser en arrière pour la
fixer.
18 • A lʼaide de lʼoutil fourni en dotation,
dévisser les écrous situés des deux
côtés de lʼaxe de la roue arrière.
19 • Déposer les entretoises.
20 • Montre le roues de stabilisation.
21 • Placer les rondelles et ensuite les
écrous.
22 • Revisser. Attention: quand on enlève
les roulettes stabilisatrices, se rappeler
de remettre les entretoise.
23 • Dévisser la vis de la selle.
24 • Soulever la selle en appuyant en avant
sur les deux côtes. Attention: refermer
et revisser toujours la selle après avoir
effectué les opérations à lʼintérieur du
moteur.
25 • Brancher les deux proses et refermer
la selle. Le véhicule est prêt pour être
utilisé.
CARACTÉRISTIQUES ET EMPLOI DU VÉHICULE
26 • A: POIGNEE DʼACCELERATEUR. Tourner
la poignée ver le bas pour faire partir le
véhicule. B: BOUTON DU KLAXON.
27 • C: FREIN. Appuyer sur la pédale du frein
pour faire arrêter le véhicule.
28 • 2dne VITESSE: Dévisser et soulever le
bouchon du réservoir.
29 • Appuyer sur le bouton en le plaçant sur
la 2nde vitesse. Fermer en vissant le
bouchon.
30 • Pour ouvrir la malette, décrocher les
cordons en caoutchouc.
31 • La malette est transportable grâce à la
poignée pratique.
REPLACEMENT DE LA BATTERIE
32 • Enlever la vis et soulever la selle en
appuyant en avant sur les deux côtes.
Debrancher les deux proses.
33 • Enlever le porte-batterie.
34 • Remplacer la batterie. Mettre le porte-
batterie en place et le fixer à lʼaude des
deux vis. Brancher le deux proses et
refermer la selle.
CHARGE DE LA BATTERIE
ATTENTION : LA CHARGE DE LA
BATTERIE ET TOUTE INTERVENTION SUR
LʼINSTALLATION ÉLECTRIQUE DOIVENT ÊTRE
EFFECTUÉES PAR DES ADULTES.
IL EST POSSIBLE DE CHARGER LA BATTERIE
SANS LA DÉMONTER DU JOUET.
35 • Débrancher la fiche A de la fiche B en
appuyant sur les côtés.
36 • Insérer la fiche du chargeur de la
batterie dans une prise de courant
en suivant les instructions jointes.
Brancher la fiche B et la fiche C du
chargeur de la batterie.
37 • Uen fois la charge terminée, débrancher
le chargeur de batterie C de la prise
domestique en premier lieu et ensuite
de la fiche de la batterie B.
38 • Insérer à fond jusquʼau déclic la fiche
A dans la fiche B. Une fois toutes les
opérations terminées, veiller à bien
refermer la selle.
Avant dʼutiliser le véicule pour la premièr
fois, recharger les batteries pendant 18
heures. La non-observation de cette
brochure risque de provoquer des
dommagas irréversibles à la batterie.
PRECAUTION
Les batteries ne doivent être rechargées que
par ou sous la supervision dʼadultes.
Ne pas laisser les enfants jouer avec les
batteries.
RECHARGEMENT DES BATTERIES
•
Charger les batteries sans dépasser les
24 heures et en suivant les instructions
jointes au chargeur de batterie. Le non-
respect de ces temps risque de raccourcir
la durée de vie des batteries.
• Recharger les batteries à temps, dès que
le véhicule perd de la vitesse, pour éviter
de les endommager.
• Si on laisse le véhicule arrêté pendant un
long intervalle, se rappeler de recharger
la batterie et de la laisser débranchée
de lʼinstallation; répéter lʼopération de
rechargement tous les trois mois au
moins.
• La batterie ne doit pas être rechargée
retournée.
• Ne pas oublier la batterie en
rechargement! Contrôler périodiquement.
• Utiliser uniquement le chargeur de
batterie fourni et les batteries originales
PEG PEREGO.
• Ne pas mélanger les vieilles batteries avec
les neuves.
• Les batteries doivent être mises en place
avec la polarité correcte.
• Les batteries sont scellées et nʼexigent
pas de maintenance.
ATTENTION
• LES BATTERIES CONTIENNNENT DES
SUBSTANCES TOXIQUES ET CORROSIVES.
NE PAS LES OUVRIR.
• Les batteries contiennent des électrolytes
à base dʼacide.
• Ne pas provoquer de contact direct entre
les plots de la batterie, éviter les chocs
forts: risque dʼexplosion et dʼincendie.
• Pendant le rechargement, la batterie
produit des gaz. Recharger la batterie
dans un lieu bien aéré, loin de toute
source de chaleur et de matériaux
inflammables.
• Les batteries déchargées doivent être
enlevées du véhicule.
• Eviter que les batteries entrent en contact
avec les vêtements: ceux-ci pourraient
s'abîmer.
EN CAS DE FUITE
Se protéger les yeux. Éviter tout contact
direct avec le électrolyte: se protéger les
mains. Mettre la batterie dans un sac en
plastique et suivre les instructions sur
lʼélimination des batteries.
SI LA PEAU OU LES YEUX ENTRENT EN
CONTACT AVEC LE ELECTROLYTE
Laver abondamment les parties concernées
à lʼeau courante.
Consulter immédiatement un médecin.
EN CAS DʼINGESTION DE ELECTROLYTE
Se rincer la bouche et cracher.
Consulter immédiatement un médecin.
ELIMINATION DES BATTERIES
Contribuons à la sauvegarde de
lʼenvironnement.
Les batteries usées ne doivent pas être
jetées dans les ordures ménagères.
On peut les déposer dans un centre
de récupération de batteries usées ou
dʼélimination de déchets spéciaux;
sʼinformer à la mairie.
Ce produit est conforme aux Normes de
Sûreté EN 71et conforme aux Normes
de Sûreté pour les jouets électriques
EN 50088; il nʼest pas conforme aux
dispositions des normes de circulation
routière et ne peut par conséquent pas
circuler sur la voie publique.
SÉCURITÉ MAINTENANCE ET ENTRETIEN
• Contrôler régulièrement lʼétat du véhicule,
en particulier l'installation électrique, le
branchement des fiches, les capots de
protection et le chargeur de batterie.
Si lʼon trouve des défauts, le véhicule
électrique et le chargeur de batterie
ne doivent par étre utilisés. Pour les
réparations, nʼutiliser que des pièces de
rechange dʼorigine PEG PEREGO.
• PEG PEREGO décline toute responsabilité
en cas de mauvaise utilisation de
l'installation électrique.
• Ne pas laisser les batteries ou le véhicule
à proximité de sources de chaleur comme
des radiateurs, des cheminées, etc.
•
Protéger le véhicule de lʼeau, de la pluie,
de la neige, etc.
MAINTENANCE ET SECURITE
BATTERIE
ENTRETIEN ET SÉCURITÉ
DU VÉHICULE
FRANÇAIS
•PEG PEREGO® vous remercie de votre
confiance et vous félicite d'avoir choisi ce
produit. Depuis plus de 50 ans, PEG PEREGO
emmène en promenade les enfants: à peine
nés, avec ses fameux landaus et poussettes
et plus tard, avec ses fantastiques véhicules
à pédales et à batterie.
•Lire attentivement ce manuel d'instructions
pour se familiariser avec l'utilisation du
modele et enseigner a l'enfant a conduire
prudemment tout en s'amusant. Garder ce
manuel pour toute necessite future.
•Nos jouets répondent aux conditions
de sécurité prévues, par le Conseil de la
EEC, par le “U.S. Consumer Toy Safety
Specification” et approuvés par le T.Ü.V.
et par le I.I.S.G. Istituto Italiano Sicurezza
Giocattoli.
Peg Perego S.p.A. bénéficie de
la certification ISO 9001.
La certification assure aux clients
et aux consommateurs une
garantie de transparence et de
confiance dans la façon dont
travaille lʼentreprise.
•Peg Perego pourra apporter à tout moment
des modifications aux modéles décrits dans
cette publication, pour des raison de nature
technique ou commerciale.
Ans 3-8
PEG PEREGO offre un service dʼassistance
après-vente, directement ou à travers un
réseau de centres dʼassistance autorisés
pour les éventuelles réparations ou pour
le remplacement et la vente de pièces de
recharge dʼorigine. La liste des centres
dʼassistance est fournie sur la dernière page
de ce manuel dʼinstructions.
Peg Perego est à la disposition de ses
consommateurs pour satisfaire au mieux
toutes leurs exigences. À cette fin,
connaître lʼavis de nos clients est pour
nous extrêmement important et précieux.
Nous vous saurions donc gré, après avoir
utilisé lʼun de nos produits, de bien vouloir
remplir le QUESTIONNAIRE SATISFACTION
DU CONSOMMATEUR
que vous trouverez sur Internet à lʼadresse
suivante: “www.pegperego.com/SSCo.html.
en-UK”, et de nous faire vos éventuelles
observations ou suggestions.
L'ASSEMBLAGE DOIT-ÊTRE FAIT PAR UN
ADULTE. PRENDRE GARDE DE NE PAS
LAISSER À PROXIMITÉ DES ENFANTS LES
COMPOSANTS DE PETITES TAILLES OU AUX
BORDS TRANCHANTS.
LA BATTERIE EST DÉJÀ EN PLACE À
LʼINTÉRIEUR DU VÉHICULE.
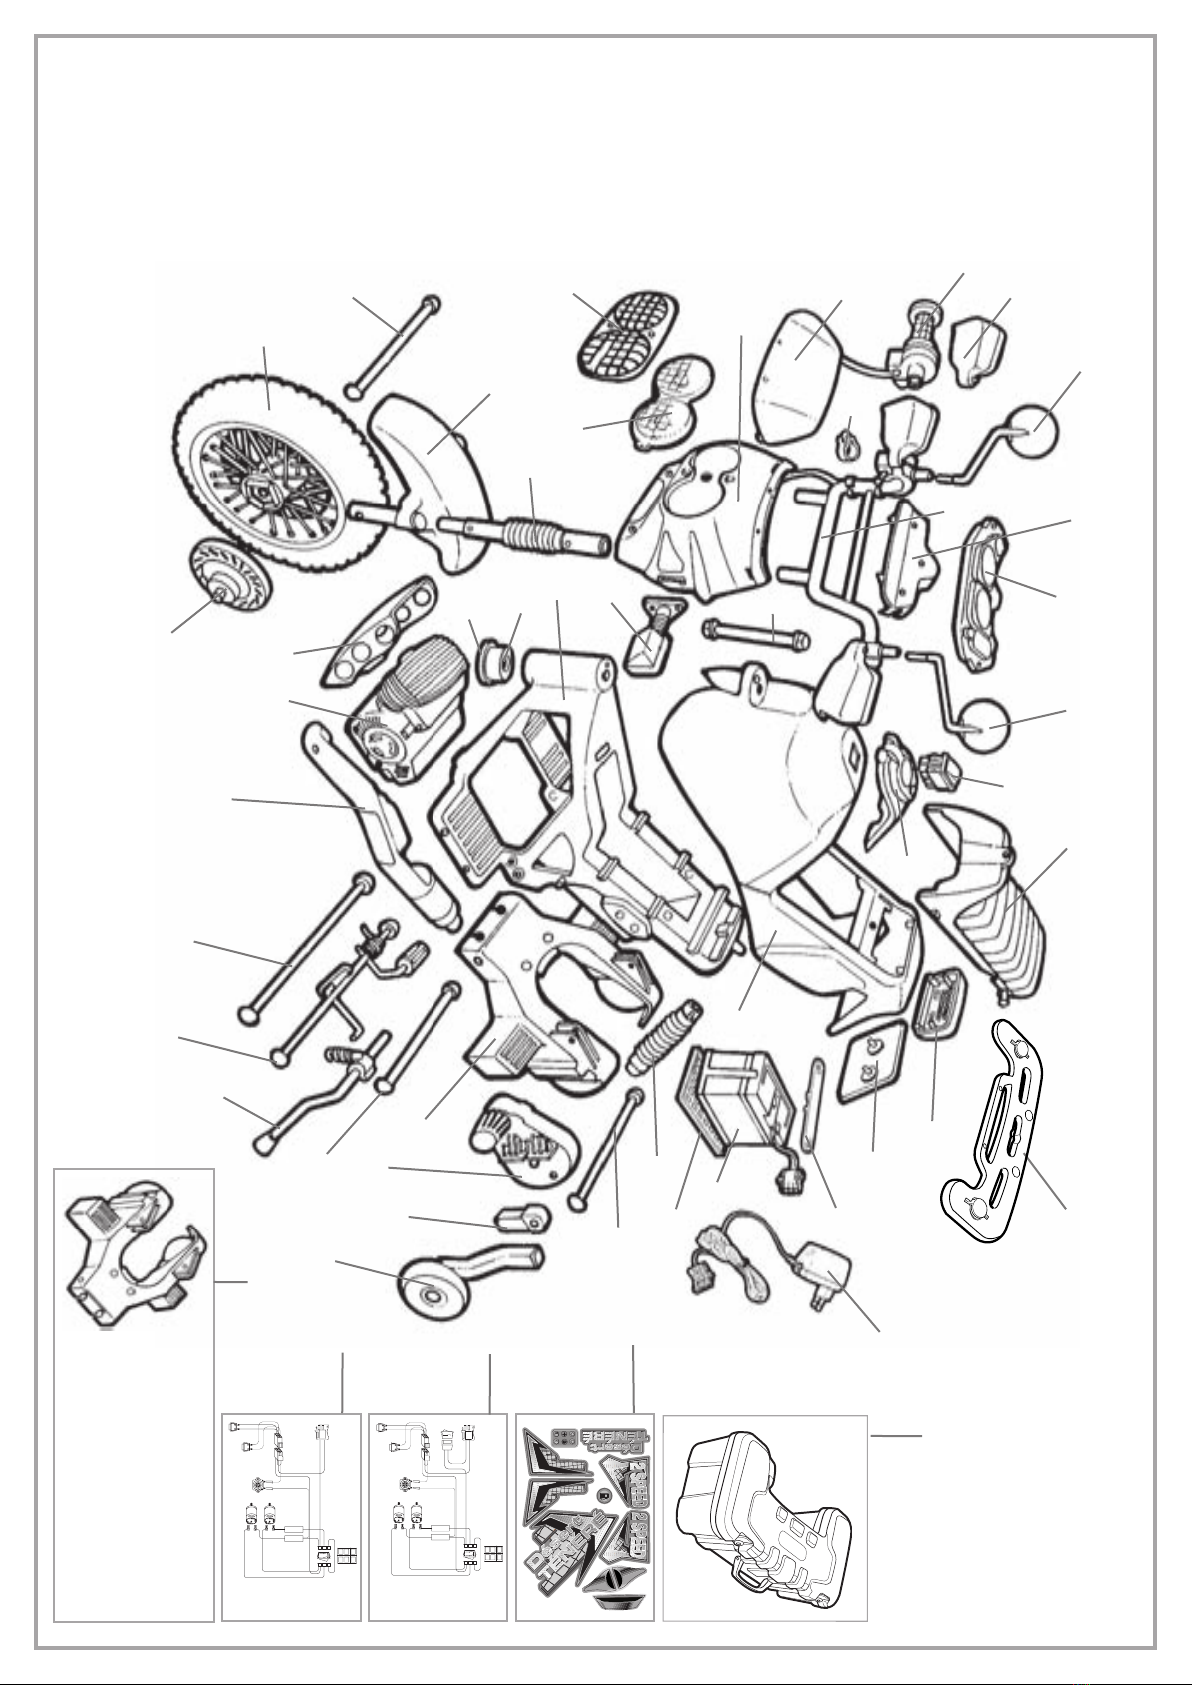
MONTAGE
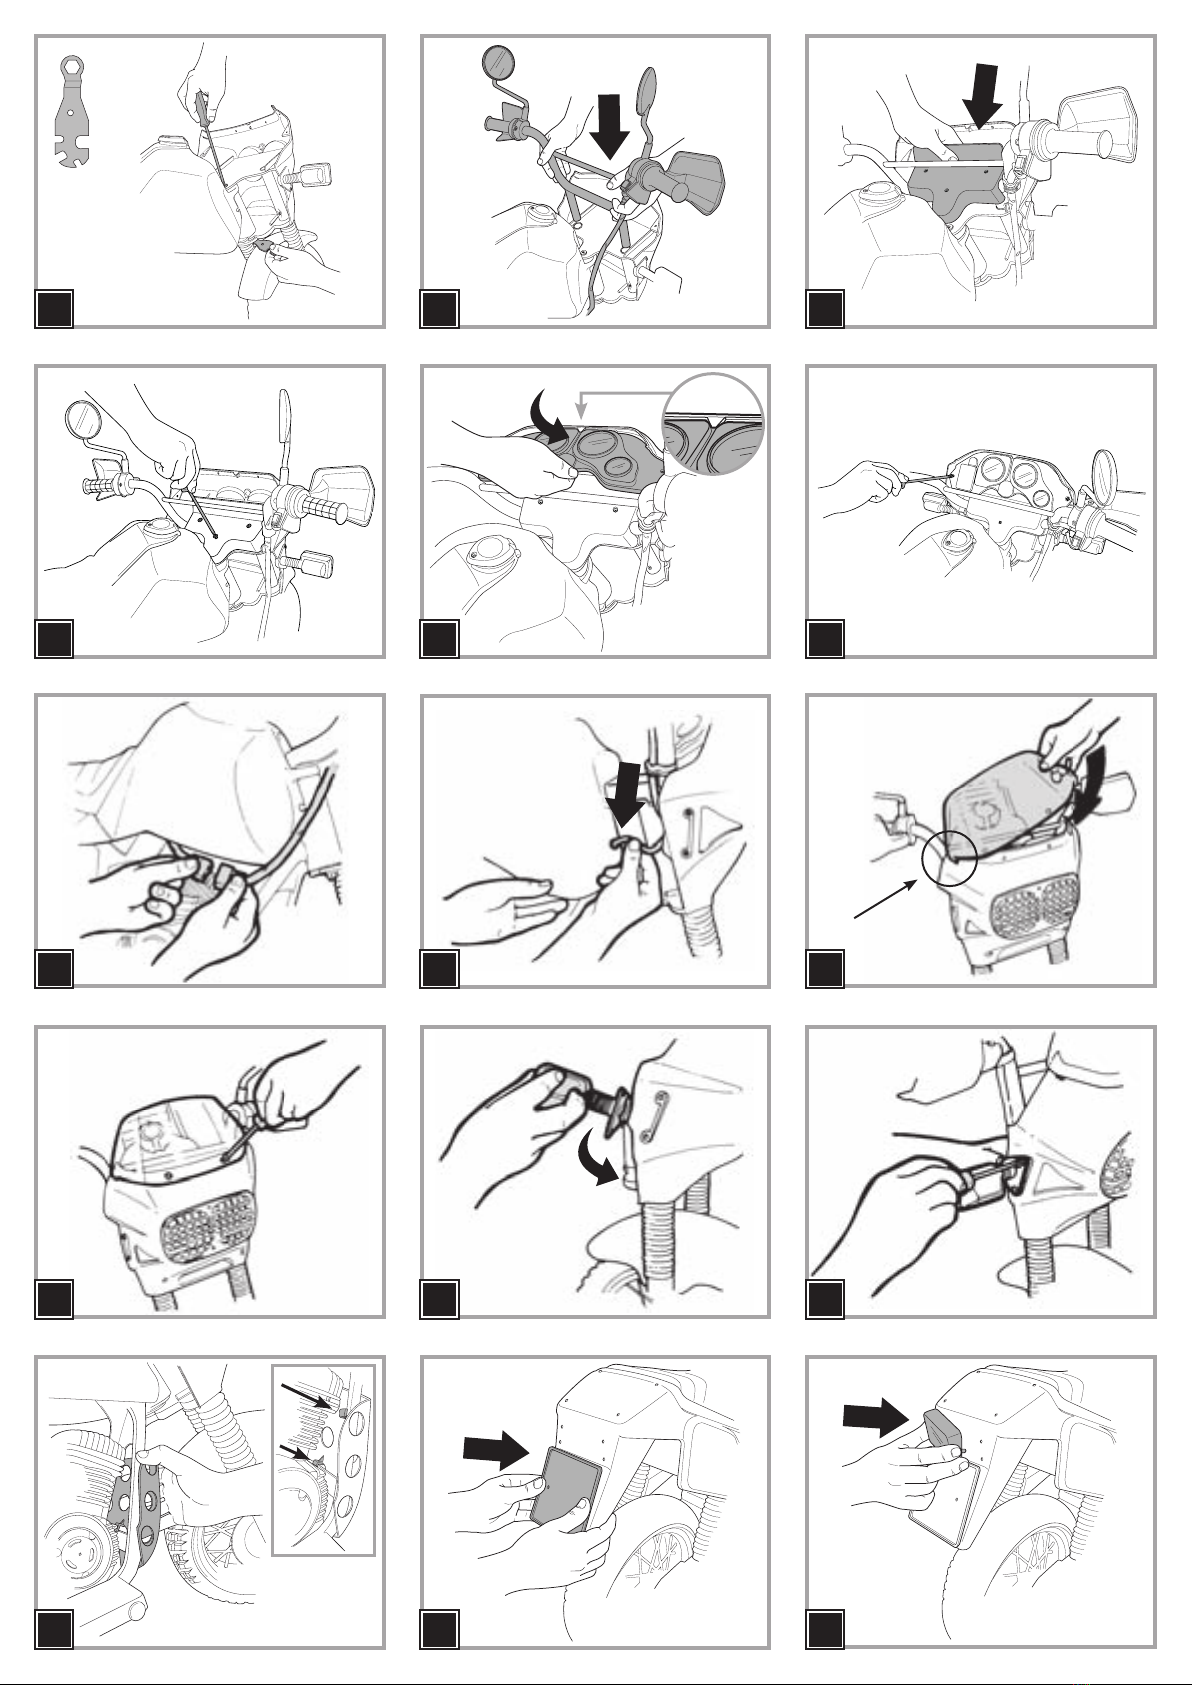
1 • Attention: contrôler si les boulons de la
fourche avant sont bien serrés.
2 • Mettre le guidon en place.
3 • Positionner la plaque de fixation du
guidon comme indiqué sur la figure.
4 • Visser le 3 vis.
5 • Positionner le tableau de bord en
lʼinsérant entre les deux languettes du
cache.
6 • Fixer le tableau de bord avec les deux
vis fournies.
7 • Relier la prise de la manette de
lʼaccélérateur à la prise de lʼinstallation.
8 • Insérer le cable dans la fissure prevue.
9 • Placer le pare-brise sur la calandre.
10 • Visser.
11 • Mettre la flèche en place.
12 • Visser.
13 • Positionner la grille sur le cadre
jusquʼau déclic, en prenant soin
dʼaccrocher les 3 crochets.
14 • Appliquer la plaque jusquʼau déclic.
15 • Appliquer le feu arrière jusquʼau déclic.
SERVICE DʼASSISTANCE
INSTRUCTIONS DE MONTAGE

• Si le véhicule fonctionne en conditions
de surcharge, comme sur la sabble mou,
la boue on les terrains très accidentés,
lʼinterrupteur de surcharge coupe
immédiatement le courant. La distribution
de courant reprend au bout de quelques
secondes.
• Lubrifier périodiquement (avec une
huile légère) les parties mobiles comme
roulements à billes, direction, etc.
• Les surfaces du véhicule peuvent être
nettoyées avec un chiffon humide et, s'il
est necessaire, avec des produits d'emploi
domestique. Les opérations de nettoyage
doivent être effectuées exclusivement par
des adultes.
• Ne jamais démonter les mécanismes du
véhicule ou les moteurs, sauf autorisation
de PEG PEREGO.
Conforme a EN 50088
accu rechargeable da 12V 8Ah avec plomb
sigillée
2 moteurs de 140W
SECURITE
ATTENTION! LA SURVEILLANCE DʼUN
ADULTE EST TOUJOURS NECESSAIRE.
• Ce produit n'est pas destiné aux enfants
de moins de 36 mois. La présence de
petites pièces est dangereuse parce
qu'elles pourraient être avalées ou
inhalées.
• Ne pas utiliser le véhicule sur la voie
publique, là où il y a de la circulation et
des voitures en stationnement, sur les
pentes raides, près de gradins, dʼescaliers,
de cours dʼeau et de piscines.
• Les enfant doivent toujours porter des
chaussures quand ils utilisent le véhicule.
• Quand le véhicule fonctionne, faire
attention à ce que les enfants ne mettent
pas les mains, les pieds ou dʼautres
parties du corps, des vêtements ou
dʼautres choses près des parties en
mouvement.
• Ne jamais mouiller les composants
du véhicule comme les moteurs, les
installations, les touches, etc.
• Ne jamais utiliser dʼessence ou dʼautres
substances inflammables près du véhicule.
• Le véhicule est assembler seulement
pour un enfant.
JEU SANS INTERRUPTION: toujours avoir un
jeu de batteries chargées prêtes à servir.
Pour la sécurité de lʼenfant, avant de mettre
le véhicule en marche, lire et suivre les
instructions suivantes avec attention.
• ATTENTION !
Vérifier que tous les clous de fixation
soient assurés.
2nde VITESSE
Au début, nous conseillons dʼutiliser la 1ere
marche.
Avant de passer en 2nde, sʼassurer que
lʼenfant a acqius une certaine familiarité
avec le véhicule.
• 1ere VITESSE (pour les debutants):
Mettre les deux mains sur le guidon,
tourner lʼaccélérateur vers le bas; le
véhicle se met en marche à une vitesse
dʼenviron 3,7 Km/h.
• 2nde VITESSE (pour les experts):
Mettre les deux mains sur le guidon,
tourner lʼaccélérateur vers le bas; le
véhicle se met en marche à une vitesse
dʼenviron 7,5 Km/h.
• FREIN:
Pour freiner, ralentir en tournant la
poignée vers le haut et appuyer sur la
pédale du frein.
Enseigner à lʼenfant à utiliser le véhicule
correctement pour conduire en sécurité tout
en sʼamusant.
• Avant de partir, sʼassurer que le parcours
est libre de personnes ou de choses.
• Conduire avec les mains sur le guidon et
toujours regarder la route.
• Freiner à temps pour éviter les
accrochages.
•PEG PEREGO® bedankt sich für den Kauf
eines seiner Spielfahrzeuge. Schon seit über
50 Jahren fahren Kinder mit PEG PEREGO:
In den berühmten Kinderwagen und
Kindersportwagen sitzen sie bereits, wenn
sie noch nicht einmal laufen können, und
später vergnügen sie sich mit den tollen
Tret- und Elektro-Batterie Spielfahrzeugen.
•Bitte lesen Sie aufmerksam die
Bedienungsanleitung durch, damit Ihnen
der Gebrauch des Modells geläufig ist
und Sie Ihrem Kind einen sicheren und
unterhaltsamen Gebrauch zeigen können.
Bitte bewahren Sie das Handbuch auch für
spätere Hinweise auf.
•Unsere Spielwaren entsprechen den
vorgesehenen Sicherheits-Erfordernissen,
die vom Rat der Europäischen Wirtschaft-
Gemeinschaft festgelegt wurden. Außerdem
sind sie T.Ü.V. / GS- geprüft und
zugelassen, und I.I.S.G. Istituto Italiano
Sicurezza Giocattoli.
Peg Perego S.p.A. ist gemäß ISO
9001 zertifiziert.
Die Zertifizierung garantiert
den Kunden und Verbrauchern
Transparenz und ermöglicht das
Vertrauen in die Arbeitsweise
unseres Unternehmens.
•Peg Perego behält sich vor, farbliche und
technische Änderungen vorzunehmen.
Jahre 3-8
PEG PEREGO bietet Hilfestellung nach dem
Verkauf, direkt oder über das Netz der
Kundendienststellen (siehe beiliegendes
Verzeichnis) für etwaige Reparaturen oder
Ersatzleistungen und die Bereitstellung von
Originalersatzteilen an.
Zur Kontaktaufnahme mit den
Kundendienststellen siehe Rückseite des
Umschlags dieser Anleitung.
Als Peg Perego stehen wir unseren Kunden
für jeden Bedarf immer gerne zur Seite.
Deshalb ist es auch extrem wichtig, über
die Meinung unserer Kunden Bescheid
zu wissen. Wir bitten Sie, das FORMULAR
ÜBER DIE KONSUMENTENZUFRIEDENHEIT
nachdem Sie unsere Produkte ausprobiert
haben, auszufüllen. Das Formular ist
unter folgender Internetadresse abrufbar:
“www.pegperego.com/SSCo.html.en-UK”
Wir würden uns über Anmerkungen und
Ratschläge freuen.
ACHTUNG: DIE MONTAGE DARF NUR VON
ERWACHSENEN VORGENOMMEN WERDEN.
BEIM AUSPACKEN DES FAHRZEUGES
VORSICHT WALTEN LASSEN.
HINWEIS: ALLE SCHRAUBEN LIEGEN IN EINEM
SAECKCHEN IN DER VERPACKUNG.
DIE BATTERIE BEFINDET SICH BEREITS IM
FAHRZEUG.
MONTAGE
1 • Achtung: Bitte überprüfen, ob die
Schrauben der Vordergabel fest
angezogen sind.
2 • Das Lenkrad aufstecken.
3 • Die Platte zur Befestigung des Lenkers
wie in der Abbildung anordnen.
4 • Wie abgebildet, wieder anschrauben.
5 • Das Armaturenbrett so positionieren,
dass es zwischen den beiden Laschen
der Abdeckung eingesetzt werden
kann.
6 • Das Armaturenbrett mithilfe der beiden
mitgelieferten Schrauben befestigen.
7 • Den Stecker des Handgaschebels
mit dem Stecker des Kabelsatzes
verbinden.
8 • Das Kabel in den Schlitz hineidrücken.
9 • Die Windschutzscheibe aufstecken.
10 • Mit den zwei Schrauben montieren.
11 • Die Blinker anbringen.
DEUTSCH
KUNDENDIENST
MONTAGEANWEISUNGEN
• Mettre en 2nde quand lʼenfant a appris à
se servir correctement du guidon, de la
1ere vitesse et du frein.
• ATTENTION! En première vitesse, le
véhicule bénéfice dʼun effet différentiel,
comme les véritables automobiles: sur
des terrains dégagés et avec un enfant
seulement, les deux roues peuvent
présenter des vitesses différentes, ce qui
peut causer un patinage/ralentissement
de celles-ci.
• ATTENTION! Si le véhicule fonctionne en
conditions de surcharge, comme sur la
sabble mou, la boue on les terrains très
accidentés, lʼinterrupteur de surcharge
coupe immédiatement le courant. La
distribution de courant reprend au bout
de quelques secondes.
LE VEHICULE NE MARCHE PAS?
• Vérifier qu'il n'y a pas de câbles
débranchés sons la plaque de
l'accélérateur.
• Vérifiez que tous les câbles du
motoréducteur sont branchés.
• Contrôler le fonctionnement de la
touche de l'accélérateur et le remplacer
éventuellement.
• Contrôler si la batterie est branchée à
l'installation électrique.
LE VÉHICULE MANQUE DE PUISSANCE?
• Recharger la batterie. Si après 'avoir
rechargée le problème persiste, faire
contrôler la batterie et le chargeur de
batterie par un centre d'assistance.
Nos véhicules sont garantis pendant une
période de six mois à compter de la date
dʼachat (le ticket de caisse faisant foi)
contre vice ou défaut de fabrication, à
lʼexception de la batterie et du chargeur
(se reporter aux instructions dʼutilisation
détaillées dans cette notice).
La garantie sʼapplique dans le cadre dʼune
utilisation normale du véhicule, le fabricant
se réservant le droit dʼexpertiser les pièces.
Le fabricant ne saurait en aucune manière
être tenu responsable en cas:
• de non respect des recommandations de
ce manuel dʼutilisation.
• de mauvaise utilisation du véhicule ou
dʼendommagements accidentels.
• de modifications techniques du véhicule
qui pourraient endommager le véhicule
et entraîner de graves dangers pour la
sécurité de lʼenfant.
• dʼusure normale des pièces (exemples:
roues).
Conserver cette notice dʼutilisation durant
toute la durée de vie du véhicule.
REGLES POUR UNE CONDUITE SURE
PROBLEMES?
GARANTIE

Vor dem ersten Gebrauch des Fahrzeuges
die Batterien 18 Stunden lang laden. Bei
Unterlassung dieser Maßnahme kann die
Batterie definitiv beschädigt werden.
ACHTUNG
Das Laden der Batterien darf nur von
Erwachsenen ausgeführt und überwacht
werden.
Kinder nicht mit den Batterien spielen
lassen.
LADEN DER BATTERIEN
• Die Batterien nicht länger als 24 Stunden
laden und sich dabei an die Anweisungen
halten, die dem Ladegerät beigelegt
sind. Das Nichtbeachten dieser Dauer
beeinträchtigt die Lebensdauer der
Batterien.
• Die Batterien rechtzeitig laden, sobald das
Fahrzeug an Geschwindigkeit verliert. Auf
diese Weise verhindern Sie Schäden.
• Sollte das Fahrzeug längere Zeit unbenutzt
bleiben, vergessen Sie nicht, die Batterie
zu laden und sie aus dem Fahrzeug zu
nehmen; das Neuladen mindestens alle
drei Monate wiederholen.
• Die Batterie nicht umgedreht laden.
• Die Batterien nicht am Ladegerät
vergessen! In Zeitabständen kontrollieren.
• Nur das mitgelieferte Ladegerät und
die Original-PEG PEREGO-Batterien
verwenden.
• Neue und gebrauchte Batterien nicht
vermischen.
• Die Batterien polrichtig einsetzen.
• Die Batterien sind versiegelt und erfordern
keine Wartung.
ACHTUNG
• DIE BATTERIEN NICHT VERLETZEN, SIE
ENTHALTEN KORROSIVE UND GIFTIGE
STOFFE.
• Sie enthalten außerdem Elektrolyte auf
Säurebasis.
• Die Batterieenden nicht Anschlußklemmen
nicht Kurzschließen und sie keinen starken
Stössen aussetzen: Explosions- und
Brandgefahr.
• Während des Ladens erzeugt die Batterie
Gas. Das Laden daher in gut gelüfteten
Räumen vornehmen, nicht in der Nähe
von Wärmequellen und entflammbaren
Materialien.
• Die leeren Batterien sind aus dem
Fahrzeug zu Ehmen.
• Die Batterien sollten mit der Kleidung
nicht in Berührung kommen; sie könnten
beschädigt werden.
UNDICHTE BATTERIEN
Schützen Sie Ihre Augen und Ihre Hände;
vermeiden Sie jeden direkten Kontakt mit
das Elektrolyte. Geben Sie die Batterie
in eine Plastiktüte und entsorgen Sie die
Batterie vorschriftsmäßig.
IM FALLE EINER BERÜHRUNG DER HAUT
ODER DER AUGEN MIT DEM ELEKTROLYTEN
Augen oder Haut mit reichlich fließendem
Wasser waschen.
Sofort den Arzt aufsuchen.
VERSCHLUCKEN DES ELEKTROLYTEN
Den Mund ausspülen und ausspucken.
Sofort den Arzt aufsuchen.
BATTERIE-ENTSORGUNG
Leisten Sie einen Beitrag zum
Umweltschutz!
Batterien gehören nicht in den Hausmüll.
Als Verbraucher sind Sie gesetzlich
verpflichtet, gebrauchte Batterien
zurückzugeben. Sie können Ihre alten
Batterien bei den öffentlichen Sammelstellen
in Ihrer Gemeinde oder überall dort
abgeben, wo Batterien der betreffenden
Art verkauft werden. Dabei müssen diese
Batterien/Akkus entladen, oder gegen
Kurzschluß gesichert sein.
Diese Zeichen finden Sie auf
schadstoffhaltigen Batterien:
Pb = Batterie enthält Blei
Cd =Batterie enthält Cadmium
Hg =Batterie enthält Quecksilber
Dieses Produkt entspricht der
Sicherheitsnorm EN 71 für Mechanische
Sicherheit und der EN 50088 für
elektrischer Sicherheit; es entspricht nicht
der Straßenverkehrszulassungsordnung und
darf daher nicht auf öffentlichen Straßen
benutzt werden.
INSTANDHALTUNG UND WARTUNG
• Regelmäßig den Zustand des Fahrzeuges
prüfen, vor allem die Elektroanlage, die
Steckerverbindungen, die Schutzhauben
und das Ladegerät.
Bei festgestellten Schäden dürfen das
Elektrofahrzeug und das Ladegerät nicht
mehr benutzt werden. Für Reparaturen
nur Original-PEG PEREGO Ersatzteile
verwenden.
• PEG PEREGO übernimmt keine Garantie
bzw. Haftung, sofern die elektrische
Anlage verändert worden ist,bzw.
keine PEG PEREGO-Original-Ersatzteile
eingesetzt worden sind!
• Die Batterien oder das Fahrzeug nicht
in der Nähe von Wärmequellen, z.B.
Heizkörpern, Kaminen, usw. abstellen.
• Das Fahrzeug vor Wasser, Regen, Schnee
usw. schützen.
• Beim Einsatz des Faharzeuges unter
Überlastbedingungn, z.B. auf weichem
Sand, Schlamm oder unter schwierigen
Geländebedingungen, schaltet der
Überlastschalter sofort die Leistung ab.
Die Stromzuführung wird nach einigen
Sekunden wieder aufgenommen.
• Regelmäßig die beweglichen Teile wie
Lager, Lenkrad usw. mit einem leichten Öl
schmieren.
• Die Oberfläche des Fahrzeugs kann
mit einen feuchten Tuch und wenn
notwendig, mit Wasch- oder Spülmitteln
gereinigt werden. Die Reinigung sollte
ausschließlich durch Erwachsene erfolgen.
• Ohne vorherige Genehmigung seitens
PEG PEREGO ist das Abmontieren der
Fahrzeugmechanismen oder der Motoren
untersagt.
Nach EN 50088
Wiederlaufbare Batterie 12V 8Ah mit
Bleiversiegeltung
2 Motoren je 140W
SICHERHEITSHINWEISE
ACHTUNG! DIE ÜBERWACHUNG SEITENS
EINES ERWACHSENEN IST UNERLÄSSLICH.
• Dieses Produkt ist für Kinder unter 36
Monate nicht geeignet. Kleinteile können
verschluckt oder eingeatmet werden.
• Das Fahrzeug darf nicht auf öffentlichen
Straßen und Parkplätzen benutzt werden.
Wege mit starkem Gefälle und Treppen
sind nicht zu befahren Die Nähe von
Wasserläufen und Schwimmbecken ist zu
meiden.
• Beim Gebrauch des Fahrzeuges müssen
die Kinder immer Schuhe tragen.
• Beim Betrieb des Fahrzeuges darauf
achten, daß die Kinder weder Hände,
Füße oder andere Körperteile, noch
Kleidungsstücke oder andere Gegenstände
in die Nähe der sich bewegenden Teile
bringen.
• Die Teile des Fahrzeuges, z.B. Motor, die
elektriche Anlage, Tasten usw. nie mit
Wasser in Berührung bringen.
• Benzin oder andere entflammbare
Stoffe nicht in der Nähe des Fahrzeuges
benutzen.
• Das Kinderfahrzeug ist nur für die
Benutzung durch ein Kind ausgelegt.
VERGNÜGEN OHNE UNTERBRECHUNG:
halten Sie immer einen Satz einsatzbereiter
Batterien bereit.
Für die Sicherheit Ihres Kindes: Bitte lesen
und befolgen Sie die nachstehenden
Anweisungen, bevor Sie das Fahrzeug
benutzen.
WARTUNG UND SICHERHEIT
FAHRZEUG
REGELN FÜR EINE SICHERE FAHRT
12 • Mit den zwei Schrauben montieren.
13 • Das Gitter am Gestell befestigen und
dabei darauf achten, dass alle drei
Haken eingehangen werden.
14 • Das Nummernschild anbringen.
15 • Das Rücklicht anbringen.
16 • Den Gepäckträger an der
entsprechenden Stelle positionieren
und mit den vier Schrauben befestigen.
17 • Die Gepäckbox auf dem Gepäckträger
anordnen und nach hinten drücken, um
sie zu befestigen.
18 • Mit dem beiliegenden
Schraubenschlüssel die Muttern an der
Hinterradachse lösen.
19 • Die Distanzstücke entfernen.
20 • Durch die Stützräder ersetzen.
21 • Anschließend die Beilagscheiben und
Muttern wieder aufstecken.
22 • Die Stützräder festschrauben. Achtung:
beim Abmontieren der Stützräder
darf nicht vergessen werden, die
Distanzstücke wieder anzubringen.
23 • Die Schraube des Sitzes lösen.
24 • Sitz beidseitig in Pfeilrichtung
zusammendrücken und nach
oben ziehen. Achtung! Aus
Sicherheitsgründen Sitz immer wieder
festschrauben.
25 • Die beiden Stecker verbinden und den
Sitz wieder schließen. Das Fahrzeug ist
gebrauchsbereit.
EIGENSCHAFTEN UND GEBRAUCH DES
FAHRZEUGS
26 • A: handgashebel. Den Handgashebel
nach hinten drehen und das Motorrad
startet; B: HUPE. Drucktaste für Hupe.
27 • C: BREMSE. Das Fußbremspedal
drücken und das Motorrad bleibt sofort
stehen.
28 • 2. GESCHWINDIGKEIT: Den Tankdeckel
abschrauben und hochheben.
29 • Die Drucktaste betätigen und auf die
2.Geschwindigkeit einstellen. Durch
Wiederaufschrauben des Deckels
schließen.
30 • Um die Gepäckbox zu öffnen, die
Gummischlingen abnehmen.
31 • Die Gepäckbox lässt sich dank
des bequemen Griffs ganz einfach
transportieren.
BATTERIEWECHSEL
32 • Die Schrauben lösen. Sitz beidseitig in
Pfeilrichtung zusammendrücken und
nach oben ziehen. Den Stecker der
Batterie vom Stecker des Kabelsatzes
trennen, indem gleichzeitig der
Schnappverschluß niedergedrückt wird.
33 • Den Deckel der Batterie losschrauben
und entfermer.
34 • Die Batterien in das Fahrzeug
einsetzen. Die Batteriehalterung
zuschrauben. Die beiden Stecker
verbinden und den Sitz wieder
schließen.
AUFLADEN DER BATTERIE
ACHTUNG: DAS AUFLADEN DER BATTERIEN
UND JEDER EINGRIFF AN DER STROMANLAGE
DÜRFEN AUSSCHLIESSLICH VON
ERWACHSENEN DURCHGEFÜHRT WERDEN.
DIE BATTERIE KANN BEIM AUFLADEN AUCH
IM SPIELZEUG GELASSEN WERDEN.
35 • Den Stecker der Batterie B vom Stecker
des Kabelsatzes A trennen, indem
gleichzeitig der Schnappverschluß
niedergedrückt wird.
36 • Den Stecker des Batterieladegeräts
in eine Haushaltssteckdose stecken
und sich dabei an die beigelegten
Anweisungen halten. Den Stecker B mit
dem Stecker C des Batterieladegeräts
anschließen.
37 • Nach dem Aufladen den Stecker
des Ladegerätes C von der
Haushaltssteckdose trennen. Den
Stecker des Ladegerätes C von der
Steckverbindung der Batterie B trennen.
38 • Die Stecker der Batterie B und des
Kabelsatzes A wieder miteinander
verbinden. Zuletzt die Sitze schließen
und aus Sicherheitsgründen mit der
Schraube befestigen.
WARTUNG UND SICHERHEIT
BATTERIEN

•PEG PEREGO® le agradece que haya
elegido este producto.
Hace más de 50 años que PEG PEREGO
lleva a pasear a los niños: al nacer, con sus
famosos coches-cuna y coches de paseo,
después con los fantásticos vehículos de
juguete a pedal y con batería.
•Lea atentamente este manual de
instrucciones para familiarizarse con el uso
del modelo y enseñar a su niño un modo
de conducir correcto, seguro y divertido.
Conserve después el manual para cualquier
consulta futura.
•Nuestros juguetes respetan los requisitos
de seguridad previstos por el Consejo de
la EEC, por el “U.S. Consumer Toy Safety
Specification” y están aprobados por
el T.Ü.V. y por el I.I.S.G. Istituto Italiano
Sicurezza Giocattoli.
Peg Perego S.p.A. cuenta con la
certificación ISO 9001.
Dicha certificación ofrece
tanto a los clientes como a los
consumidores la garantía de una
transparencia y confianza por
lo que concierne al modo de
trabajar de la empresa.
•Peg Perego podrá modificar los modelos
descritos en este prospecto, por razones
técnicas o comerciales.
Años 3-8
ATENCIÓN: NO SE ACONSEJA SU USO A
MENORES DE 3 AÑOS.
ATENCIÓN: ANTES DE UTILIZAR EL
PRODUCTO, LEER TODAS LAS INSTRUCCIONES.
PEG PEREGO ofrece un servicio de asistencia
post-ventat, directamente o a través de
una red de centros de asistencia técnica
autorizados (véase la lista adjunta), para
eventuales reparaciones o substituciones
y venta de recambios originales. Para
contactar con los centros de asistencia
véase la parte de atrás de la cubierta de
este manual de instrucciones.
Peg Perego está a disposición de sus
Consumidores para satisfacer lo mejor
posible todas sus exigencias. Por eso,
conocer lo que piensan nuestros Clientes,
es para nosotros muy importante y
fundamental. Le agradeceremos mucho
si, después de haber utilizado uno de
nuestros productos rellena el FORMULARIO
DE SATISFACCIÓN DEL CONSUMIDOR que
encontrará en internet en la siguiente
dirección: “www.pegperego.com/SSCo.html.
en-UK”
indicando las posibles observaciones o
sugerencias.
REQUIERE ENSAMBLAMIENTO DE UN
ADULTO.
AL GUNOS COMPONENTES AL SER
ENSAMBLADOS PODRIAN TENER PARTES
PEQUEÑAS.
PUNTAS FILOSAS QUE PUDEN SER
PERJUDICIAL.
LA BATERÍA YA ESTÁ DENTRO DEL
VEHÍCULO.
MONTAJE
1 • Atención: controlar que los pernos
de la horquilla anterior estén bien
apretados.
2 • Posicionar el manillar.
3 • Poner la placa de fijación del manillar
como indica la figura.
4 • Ensorcar como se indica en la figura.
5 • Poner el salpicadero metiéndolo entre
las dos lenguetas de la calandra.
6 • Fijar el salpicadero con los dos tornillos
que se entregan.
7 • Conectar la clavija del acelerador de
mano con la clavija de la instalaciòn.
ESPAÑOL
SERVICIO DE ASISTENCIA
INSTRUCCIONES DE MONTAJE
• ACHTUNG:
Sicherstellen, dass alle
Radbefestigungsbolzen fest angezogen
sind.
2. GESCHWINDIGKEIT
Am Anfang ist es ratsam, nur die
1.Geschwindigkeit zu nutzen. Bevor das
Motorrad auf die 2. Geschwindigkeit
eingestellt wird, muss sichergestellt sein,
daß das Kind eine gewisse Fahrsicherheit
erworben hat.
• 1. Geschwindigkeit (für anfänger):
Mit beiden Händen auf dem Lenkrad
den Handgashebel nach unten drehen;
das Fahrzeug fährt mit einer niedrigen
Geschwindigkeit von ungefähr 3,7 km/h
an.
• 2. Geschwindigkeit (für fortgeschrittene):
Mit beiden Händen auf dem Lenkrad den
Handgashebel nach unten drehen; das
Fahrzeug fährt mit einer Geschwindigkeit
von ungefähr 7,5 km/h an.
• BREMSE:
Zum Abbremsen des Motorrades den
Handgashebel nach oben drehen und das
Fußbremspedal drücken.
Zeigen Sie Ihrem Kind den korrekten
Umgang mit dem Fahrzeug für ein sicheres
und unterhaltsames Spiel.
• Sich vor dem Anfahren vergewissern, daß
der Bewegungsradius frei von Personen
und Gegenständen ist.
• Während der Fahrt die Hände auf dem
Lenkrad lassen und immer auf den
Fahrweg schauen.
• Rechtzeitig bremsen, um Auffahren zu
vermeiden.
• Die 2. Geschwindigkeit erst einstellen,
wenn das Kind die Fahrt mit der
1.Geschwindigkeit, den Gebrauch des
Rückwärtsganges und der Bremse sicher
erlernt hat.
• ACHTUNG! Bei der ersten Geschwindigkeit
ist das Fahzeug wie die echten Autos mit
Differentialeffekt versehen: auf ebenen
Flächen und mit nur einen Kind Können
die Räder verschiedene Geschwindigkeiten
haben, d.h. sie können unterschiedlich
gleiten/bremsen.
• ACHTUNG! Beim Einsatz des Faharzeuges
unter Überlastbedingungn, z.B. auf
weichem Sand, Schlamm oder unter
schwierigen Geländebedingungen, schaltet
der Überlastschalter sofort die Leistung
ab. Die Stromzuführung wird nach einigen
Sekunden wieder aufgenommen.
DAS FAHRZEUG FUNKTIONIERT NICHT?
• Die korrekte Verbindung der Kabel unter
dem Gaspedal überprüfen.
• Sicherstellen, dass sich kein Kabel vom
Motor gelöst hat.
• Die Funktion der Drucktaste des
Fahrpedals kontrollieren und bei Bedarf
diese ersetzen.
• Prüfen ob die Batterie mit dem Motor
verbunden ist.
DAS FAHRZEUG LÄUFT LANGSAM?
• Die Batterien laden. Sollte die
Schwierigkeit auch bei neugeladenen
Batterien bestehen, diese und das
Ladegerät von einer Kundendienststelle
kontrollieren lassen.
PROBLEMATIK?
8 • Injertar el cable en su propria cavidad.
9 • Posicionar el parabrisas sobre la rejilla
anterior.
10 • Atornillar.
11 • Posicionar el intermitente.
12 • Atornillar.
13 • Poner a presión la rejilla en el chasis
enganchando bien los tres ganchos.
14 • Aplicar a presión la matrícula.
15 • Aplicar a presión el faro trasero.
16 • Poner y fijar con los cuatro tornillos el
portaequipajes.
17 • Poner el maletero en el portaequipajes
y empujarlo hacia detrás para fijarlo.
18 • Desenroscar con la herramienta
especial las tuercas del eje de la rueda
trasera por ambos lados.
19 • Desenroscar los distanciadores.
20 • Aplicar las ruedas estabilizadoras.
21 • Colocar les arandelas y a continuación
las tuercas.
22 • Atornillar. Cuitado: cuando quite las
ruedas estabilizadoras no se olvide de
volver a colocar los distanciadores.
23 • Quitar el tornillo del sillín.
24 • Levanter el sillín presionando primero
en los dos lados. Attención: volver
a cerrar y enroscar siempre el sillín
después de realizar operaciones en el
interior del motor.
25 • Conectar los dos clavijas y cerrar el
sillín. El vehículo está preparado para
ser usado.
CARACTERÍSTICAS Y USO DEL VEHÍCULO
26 • A: mando acelerador: girar el mando
hacia abajo para poner el vehículo en
mancha. B: pulsador bocina.
27 • C: FRENO: Presionando el pedal del
freno, el vehículo se para.
28 • 2a VELOCIDAD: Destornillar y levantar
el tapón del tanque.
29 • Presionar el botón colocándolo en la
2a velocidad. Cerrar reatornillando el
tapón.
30 • Para abrir el maletero desenganchar los
cordoncitos de caucho.
31 • El maletero se puede transportar
gracias a su cómoda asa.
CAMBIO DE LA BATTERÍA
32 • Quitar el tornillo y levanter el sillín
presionando primero en los dos lados.
Desconectar la clavija-instalación de la
clavija-bateria, pulsando de lado.
33 • Desenroscar el portabatterías.
34 • Cambie la baterìa. Posicionar y
atornillar el portabatterías con los dos
tornillos. Conectar los dos clavijas y
cerrar el sillín.
CARGA DE LA BATERÍA
ATENCIÓN: LA CARGA DE LAS BATERÍAS Y
CUALQUIER OPERACIÓN EN LA INSTALACIÓN
ELÉCTRICA TIENEN QUE SER EFECTUADAS
SÓLO POR ADULTOS.
LA BATERÍA TAMBIÉN SE PUEDE CARGAR SIN
QUITARLA DEL JUGUETE.
SÓLO PARA EL BRASIL: TENSIÓN DEL
CARGADOR: 127V - 60 HZ. OBSERVACIÓN:
NO UTILIZAR EL CARGADOR DE LA BATERÍA
CON UNA TENSIÓN DE 220V.
35 • Desconectar la clavija-instalación A de
la clavija-bateria B, pulsando de lado.
36 • Introducir la clavija del cargador
de baterías en una toma doméstica
siguiendo las instrucciones incluidas.
Conectar el enchufe B con el enchufe
del cargador de baterías C.
37 • Una vez finalizada la carga desconectar
el cargador C de la toma de corriente y
después desconectar la clavija C de la
clavija B.
38 • Introducir a fondo hasta el “clic” la
clavija A e la clavija B. Finalizada la
operación recuerde siempre cerrar el
sillin.
Antes de utilizar el vehìculo por primera
vez, cargar las baterìas durante 18 horas.
No respetar este procedimiento podrìa
causar daños irreversibles a la baterìa,
anulando su garantìa.
ADVERTENCIAS
No mezcle baterías viejas y nuevas. Las
MANTENIMIENTO Y SEGURIDAD
BATERÍAS

• FRENO:
Para frenar, desacelerar girando el mando
hacia arriba y apretar el pedal del freno.
Enséñe a su niño el uso correcto del
vehículo para que maneje en condiciones de
seguridad y se divierta.
• Antes de partir, verifique que el recorrido
esté libre de personas o cosas.
• Manejar con las manos sobre el manillar y
mirar siempre el camino.
• Frenar a tiempo para evitar choques.
• Insertar la 2a velocidad solamente cuando
el niño ha aprendido correctamente a usar
el manillar, la primera velocidad y el freno.
• ¡ATENCIÓN! En primera velocidad, el
vehículo está dotado de efecto diferencial
como los verdaderos automóviles: en
terrenos lisos y con un solo niño, las
dos ruedas pueden tener velocidades
diferentes con posibilidad de patinaje/
deceleración de las mismas.
• ¡ATENCIÓN! Si el vehículo funciona en
condiciones de sobrecarga, por ejemplo
sobre arena blanda, barro o terrenos
muy accidentados, el interruptor de la
sobrecarga contará inmediatamente la
potencia. El sumunistro de corriente se
readunará después de algunos segundos.
¿EL VEHÍCULO NO FUNCIONA?
• Verificar que no haya cables desconectados
debajo de la placa del acelerador.
• Comprobar que no haya cables
desconectados de los motorreductores.
• Controlar el funcionamiento del pulsador
del acelerador y eventualmente sustituirlo.
• Controlar que la batería esté conectada a
la instalación eléctrica.
¿EL VEHÍCULO NO TIENE POTENCIA?
• Cargar las baterías. Si después de
cargables el problema persiste hacer
controlar las baterías y el cargabaterías en
un centro de asistencia.
las caperuzas de protección y el cargador.
En caso de defectos comprobados, el
vehículo eléctrico y el cargador no deben
utilizarse. Para las reparaciones utilizar
sólo piezas de recambio originales PEG
PEREGO.
• PEG PEREGO no asume ninguna
responsabilidad en caso de uso indebido
de la instalación eléctrica.
• No deje las baterías o el vehículo cerca
de fuentes de calor como caloríferos,
chimeneas, etc.
• Proteja el vehículo contra el agua, lluvia,
nieve, etc.
• Si el vehículo funciona en condiciones
de sobrecarga, por ejemplo sobre
arena blanda, barro o terrenos muy
accidentados, el interruptor de la
sobrecarga contará inmediatamente la
potencia. El sumunistro de corriente se
readunará después de algunos segundos.
• Lubricar periódicamente (con aceite
liviano) las partes móviles como cojinetes,
dirección, etc.
• Las superficies del coche deben limpiarse
con un paño húmedo y, si es necesario,
con productos adecuados de uso
doméstico. Las operaciones de limpieza
deben ser realizadas únicamente por
adultos.
• No desmonte nunca los mecanismos del
vehículo o los motores, sin autorización
de la PEG PEREGO.
Conforme a EN 50088
battería recargable da 12V 8Ah con plomo
cerrato
2 motor 140W
SEGURIDAD
¡ATENCIÓN! LA SUPERVISIÓN DE UN ADULTO
ES SIEMPRE NECESARIA.
• No adecuado para niños de edad inferior a
36 meses: contiene piezas pequeñas que
podrían ser tragadas o inhaladas.
• No usar el vehículo en vías públicas,
donde hay tránsito y coches estacionados,
en pendientes fuertes, cerca de escaleras,
canales y piscinas.
• Los niños deben usar siempre zapatos
durante el uso del vehículo.
• Cuando el vehículo está funcionando,
preste atención para que los niños no
metan manos, pies u otras partes del
cuerpo, indumentarias u otras cosas, cerca
de las partes en movimiento.
• No mojar nunca los componentes del
vehículo como motores, instalaciones,
botones, etc.
• No usar gasolina u otras substancias
inflamables cerca del vehículo.
• El vehículo está construido para un solo
niño.
DIVERSIÓN SIN INTERRUPCIONES: tenga
siempre un juego de baterías cargadas de
recambio listo para el uso.
Para la seguridad del niño: antes de
accionar el vehículo, lea y siga atentamente
las siguientes instrucciones.
• ATENCIÓN:
Controlar que todos los bullones de
fijación estén bien sujetos.
2ª VELOCIDAD
Al comienzo se aconseja utilizar la 1a
marcha.
Antes de utilizar la 2a velocidad, verificar
que el niño haya aprendido a manejar bien
el vehículo.
• 1a VELOCIDAD (para principiantes):
Con ambas manos en el manillar girar el
acelerador hacia abajo, el vehículo se pone
en marcha a una velocidad reducida de
aproximadamente 3,7 km/h.
• 2a VELOCIDAD (para expertos):
Con ambas manos en el manillar girar
el acelerador hacia abajo, el vehículo
se pone en marcha a una velocidad de
aproximadamente 7,5 km/h.
REGLAS PARA CONDUCIR EN
CONDICIONES DE SEGURIDAD
¿PROBLEMAS?
baterías deben ser cargadas sólo por
personas adultas.
No deje que los niños jueguen con las
baterías.
CARGA DE LAS BATERÍAS
• Cargar la batería siguiendo las
instrucciones incluidas en el cargador y
no superar en ningün caso las 24 horas.
No respetar estostiempos puede acortar la
vida de las baterías.
• Cargue las baterías a tiempo, apenas el
vehículo pierda velocidad. De este modo
se evitarán otros daños.
• Si el vehículo se queda sin usarlo por
largo tiempo, recuérdese de cargar la
batería y de mantenerla desconectada de
la instalación; repita la operación de carga
al menos cada tres mees.
• La batería no debe recargarse en posición
invertida.
• ¡No se olvide de las baterías que se están
cargando! Contrólelas periódicamente.
• Use sólo el cargador en dotación y las
baterías originales PEG PEREGO.
• Inserte las baterías con la correcta
polaridad.
• Las baterías están selladas y no necesitan
de mantenimiento.
ATENCIÓN
• LAS BATERÍAS CONTIENEN SUBSTANCIAS
TÓXICAS CORROSIVAS.
NO SE DEBEN MANIPULAR ABUSIVAMENTE.
• Las baterías contiene electrolita de base
ácida.
• No provoque el contacto directo entre los
terminales de la batería, evite choques
fuertes: riesgo de explosión o incendio.
• Mientras se están cargando, las baterías
producen gas. Cárguelas en un lugar
bien ventilado, lejos de fuentes de calor y
materiales inflamables.
• Las baterías agotadas se deben sacar del
vehículo.
• No coloque las baterías sobre prendas
porque se podrían dañar.
SI HAY UNA PÉRDIDA
Protéjase los ojos. Evite el contacto directo
con la electrolita: proteja sus manos.
Ponga la batería en una bolsa de plástico y
siga las instrucciones para la eliminación de
baterías.
SI PIEL Y OJOS ENTRAN EN CONTACTO CON
LA ELECTROLITA
Lave abundantemente con agua corriente la
parte tocada.
Consultar un médico inmediatamente.
SI SE INGIERE EL ELECTROLITO
Enjuagar la boca y escupir.
Consultar con un médico inmediatamente.
ELIMINACIÓN DE BATERÍAS
Contribuya a salvaguardar el medio
ambiente.
Las baterías usadas no se deben tirar junto
con la basura doméstica.
Se pueden entregar a un centro de
recolección de baterías usadas o de
eliminación de residuos especiales;
infórmese en su Ayuntamiento.
No mezcle baterías viejas y nuevas.
Las baterías deben ser cargadas sólo por
personas adultas.
No deje que los niños jueguen con las
baterías.
Este producto ha sido fabricado conforme
a las Normas de Seguridad EN 71 y a las
Normas de Seguridad para los juguetes
eléctricos EN 50088; pero no con las
disposiciones del Reglamento del Tránsito
en la calle y por lo tanto no puede circular
en vías públicas.
MANTENIMIENTO Y CUIDADOS
• Controle periódicamente el estado del
vehículo, en especial la instalación
eléctrica, las conexiones de los enchufes,
MANTENIMIENTO Y SEGURIDAD
VEHICULO

CARGA DA BATTERIA
• Carregue a bateria seguindo as instruções
anexas ao carregador de baterias e nunca
ultrapasse as 24 horas.
• Carregue a bateria sempre que o veículo
perder velocidade. Deste modo se evitarão
outros danos.
• Se você não utilizar o veículo por um
longo período de tempo, mantenha a
bateria desconectada da instalação;
lembre-se de recarregá-la pelo menos a
cada três meses.
• A bateria não deve ser carregada em
posição invertida.
• Não se esqueça das baterias enquanto
estão sendo carregadas! Verifique-as
periodicamente.
• Use somente o carregador de bateria
incluído e as baterias originais PEG
PEREGO.
• Não misture baterias novas com velhas.
As baterias devem ser inseridas com a
polaridade na posição correta.
• As baterias são lacradas e não necessitam
de manutenção.
ATENÇÃO
• AS BATERIAS CONTÊM SUBSTÂNCIAS
TÓXICAS CORROSIVAS.
NÃO DEVEM SER MANUSEADAS.
• As baterias contêm eletrólito em base
ácida.
• Não provoque contato direto entre as
extremidades da bateria; evite batidas
fortes: risco de explosão e/ou incêndio.
• Durante a carga, a bateria produz gás.
Carregue a bateria em um local bem
ventilado, longe de fontes de calor e
materiais inflamáveis.
• As baterias descarregadas devem ser
retiradas do veículo.
• Não é aconselhável apoiar as baterias
sobre roupas; podem ser danificadas.
EM CASO DE VAZAMENTO
Proteja os olhos; evite o contato direto com
o eletrólito: proteja as mãos.
Coloque a bateria em um saco plástico
e siga as instruções sobre o descarte de
baterias.
SE A PELE OU OS OLHOS ENTRAREM EM
CONTATO COM O ELETRÓLITO
Lave abundantemente com água corrente a
parte atingida.
Consulte um médico imediatamente.
SE O ELETRÓLITO FOR INGERIDO
Enxaguar a boca e cuspir.
Consulte um médico imediatamente.
DESCARTE DE BATERIAS
Contribua para a preservação do meio
ambiente.
As baterias usadas não devem ser jogadas
no lixo doméstico.
Podem ser entregues a um centro de coleta
de baterias usadas ou de eliminação de
resíduos especiais; informe-se em seu
município.
Este produto está em conformidade com a
Norma de Segurança EN 71 e com a Norma
de Segurança para brinquedos elétricos EN
50088; porém não está em conformidade
com as disposições das normas de
circulação nas ruas e, portanto, não pode
circular em vias públicas.
MANUTENÇÃO E CUIDADOS
• Verifique regularmente o estado do
veículo, principalmente a instalação
elétrica, as conexões dos plugues, capas
de proteção e o carregador de baterias.
Em caso de defeitos comprovados, o
veículo e o carregador de baterias não
devem ser utilizados.
Para os reparos, use somente peças para
troca originais PEG PEREGO.
• A PEG PEREGO não assume nenhuma
responsabilidade em caso de uso indevido
da instalação elétrica.
9 • Posicionar o pára-brisa sobre a
máscara.
10 •Atarraxar.
11 •Posicionar o pisca-pisca.
12 •Atarraxar.
13 • Posicione a grelha a encaixe sobre o
chassis a prestar atenção a enganchar
todos os três ganchos.
14 • Aplique a placa a encaixe.
15 • Aplique o farol traseiro a encaixe.
16 • Posicione e fixe o porta-pacotes com
os quatro parafusos.
17 • Posicione a caixa sobre o porta-pacotes
e para fixá-lo empurre para trás.
18 •Com a ferramenta fornecida
desatarraxar as porcas do eixo da roda
posterior de ambas as partes.
19 •Desfiar os distanciais.
20 •Posicionar as rodas estabilizadoras.
21 •Aplicar as anilhas e logo depois as
porcas.
22 •Reatarraxar. Atenção: quando remover
as rodas estabilizadoras lembre-se de
posicionar novamente os distanciais.
23 • Desatarraxe o parafuso do assento.
24 •Levantar o selim pressionando nos dois
lados. Atenção: lembre-se de fechar
sempre o selim depois das operações
ao interno do compartimento da
bateria.
25 •Conexar as duas tomadas e fechar o
selim. O veículo é pronto para o uso.
CARACTERÍSTICAS E USO DO VEÍCULO
26 •A: manopla aceleradora. Girar a
manopla para baixo para partir com o
veículo. B: botão da buzina.
27 •C: freio. Pressionando o pedal do freio
o veículo pára.
28 •SEGUNDA VELOCIDADE: desatarraxar o
parafuso e levantar a tampa do tanque.
29 •Pressionar o botão posicionando-
o na segunda velocidade. Fechar
atarraxando a tampa novamente.
30 • Para abrir o maleiro desenganche os
laços de borracha.
31 • O maleiro pode ser transportado graças
à cómoda manilha.
SUBSTITUIÇÃO DA BATERIA
32 •Extrair o parafuso e levantar o
selim pressionando nos dois lados.
Desconexar as tomadas.
33 •Desatarraxar o fixador das baterias.
34 •Substituir a bateria. Reposicionar e
atarraxar o fixador da bateria com
os dois parafusos. Conexar as duas
tomadas e fechar bem o selim.
CARREGAR A BATERIA
ATENÇÃO: O CARREGAMENTO DAS
BATERIAS OU QUALQUER OUTRA OPERAÇÃO
A EFECTUAR NA INSTALAÇÃO ELÉCTRICA
DEVE SER FEITA POR ADULTOS.
A BATERIA TAMBÉM PODE SER CARREGADA
SEM SER RETIRADA DO BRINQUEDO.
TENSÃO DO CARREGADOR: 127V - 60Hz.
OBSERVAÇÃO: NÃO LIGAR O CARREGADOR
DA BATERIA EM TENSÃO DE 220V.
35 •Desconexar a tomada A do sistema
eléctrico da tomada B da bateria
pressionando lateralmente.
36 •Inserir a tomada do carregador de
baterias em uma tomada de parede
seguindo as instruções anexadas.
Ligar a tomada B com a tomada C do
carregador de baterias.
37 •Uma vez terminada a carga da bateria
na tomada de parede, desconexar a
tomada C da tomada B.
38 •Inserir profundamente, até o impulso,
a tomada B na tomada A. Uma vez
terminadas as operações lembre-se
sempre de fechar e fixar o selim.
Antes de utilizar o veículo pela primeira
vez, carregue as baterias por 18 horas. Não
respeitar este procedimento poderá causar
danos irreversíveis à bateria.
ADVERTÊNCIAS
A carga das baterias deve ser feita e
supervisionada somente por adultos.
Não deixe que as crianças brinquem com as
baterias.
PORTUGUÊS
•PEG PEREGO agradece por você ter
escolhido este produto.
Há mais de 50 anos que a PEG PEREGO leva
as crianças para passear: logo ao nascer,
com seus famosos carros berço e carros
passeio, depois com os fantásticos veículos
de brinquedo, a pedal e a bateria.
•Leia atentamente este manual de
instruções para familiarizar-se com o uso
do modelo e ensinar seu filho a conduzi-lo
de forma correta, segura e divertida. Depois
conserve o manual para qualquer futura
consulta.
•Nossos brinquedos estão em conformidade
com os requisitos de segurança previstos
pelo Conselho da EEC, pelo "U.S.Consumer
Toy Safety Specification" e aprovados
pelo T.Ü.V. e pelo I.I.S.G. Istituto Italiano
Sicurezza Giocattoli.
A Peg Perego S.p.A. é
certificada ISO 9001.
A certificação oferece aos
clientes e aos consumidores a
garantia de uma trasparência e
confiança no modo de trabalhar
da empresa.
•Peg Perego poderá apresentar, a qualquer
momento, modificações nos modelos
descritos neste prospecto, por razões de
natureza técnica ou comercial.
3 a 8 Anos
ATENÇÃO: NÃO RECOMENDÁVEL PARA
MENORES DE 3 ANOS.
ATENÇÃO: LEIA TODAS AS INSTRUÇÕES
ANTES DE USAR O PRODUTO.
A PEG PEREGO oferece um serviço de
assistência pós-venda, direta ou através de
uma rede de postos de assistência técnica
autorizada, para eventuais reparos ou
substituições e venda de peças originais.
Para procurar os centros de assistência
veja atrás da capa do presente manual de
instruções.
A Peg Perego está à disposição dos seus
Consumidores para satisfazer o melhor
possível cada uma das suas exigências.
Para isso, conhecer a opinião dos nossos
Clientes é extremamente importante e
precioso. Ficaremos, por conseguinte,
muito gratos se depois de ter utilizado
um dos nossos produtos, preencher o
QUESTIONÁRIO DE SATISFAÇÃO DOS
CONSUMIDORES que encontrará na Internet,
no seguinte endereço:
“www.pegperego.com/SSCo.html.en-UK”
indicando eventuais observações ou
sugestões.
ATENÇÃO: AS OPERAÇÕES DE MONTAGEM
DEVEM SER FEITAS SOMENTE POR ADULTOS.
PRESTE ATENÇÃO AO RETIRAR O VEÍCULO
DA EMBALAGEM.
TODOS OS PARAFUSOS ENCONTRAM-
SE EM UM SAQUINHO NO INTERIOR DA
EMBALAGEM.
A BATERIA JÁ ESTÁ POSICIONADA NO
INTERIOR DO VEÍCULO.
MONTAGEM
1 • Atenção: controlar que os parafusos do
garfo anterior sejam bem apertados.
2 • Posicionar o guidão.
3 • Posicione a placa de fixação da pega,
como indicado na figura.
4 • Atarraxar os três parafusos.
5 • Posicione o painel a introduzi-lo entre
as duas linguetas da mascherina.
6 • Fixe o painel com os dois parafusos
fornecidos.
7 • Conexar a tomada da manopla-
aceleradora à tomada do sistema.
8 • Inserir o cabo na própria sede como na
figura.
SERVIÇO DE ASSISTÊNCIA
INSTRUÇÕES DE MONTAGEM
MANUTENÇÃO E SEGURANÇA
DAS BATERIAS
MANUTENÇÃO E SEGURANÇA DO
VEÍCULO

• Guiar com as mãos sobre o guidão e
controlar sempre a estrada.
• Freiar com tempo onde evitar acidentes.
• Inserir a 2ª velocidade somente quando a
criança aprendeu correctamente a usar o
volante, a 1ª velocidade e o freio.
• ATENÇÃO! Em primeira velocidade, o
veículo é dotado de efeito diferencial como
as automóveis verdadeiras: em terrenos
lisos e com uma só criança, as duas rodas
podem chegar a ter velocidades diversas
com possibilidade de deslizamento/
retardamento das mesmas.
• ATENÇÃO! Se o veículo funciona em
condições de sobrecarregamento, como na
areia fina, lama ou terrenos muito dificeis,
o interruptor de sobrecarga removerá
imediatamente a potência. A distribuição
da potência se restabelecerá depois de
alguns segundos.
O VEÍCULO NÃO FUNCIONA?
• Verificar que não existam cabos
desconexados embaixos da chapa do
acelerador.
• Verificar que não existam cabos
desconexados non motoredutores.
• Controlar o funcionamento do botão do
acelerador e eventualmente substituí-lo.
• Controlar que a bateria seja ligada ao
sistema eléctrico.
O VEÍCULO NÃO HÁ POTÊNCIA?
• Carregar as baterias. Se depois de ter
carregado o problema continua, controlar
as baterias e o carregador de baterias por
um centro de assistência.
• Não deixe as baterias ou o veículo perto
de fontes de calor como aquecedores,
lareiras, etc.
• Se o veículo funciona em condições
de sobrecarregamento, como na areia
fina, lama ou terrenos muito dificeis,
o interruptor de sobrecarga removerá
imediatamente a potência. A distribuição
da potência se restabelecerá depois de
alguns segundos.
• Proteja o veículo da água, chuva, neve,
etc.; usá-lo sobre a areia ou barro poderia
causar danos aos botões, motores e
redutores.
• Lubrifique periodicamente (com óleo fino)
as partes móveis como os eixos, volante,
etc.
• As superfícies do veículo podem ser
limpas com um pano úmido e, se
necessário, com produtos de uso
doméstico não abrasivos.
As operações de limpeza devem ser feitas
somente por adultos.
• Nunca desmonte os mecanismos ou os
motores do veículo sem a autorização da
PEG PEREGO.
Em conformidade com a EN 50088
Bateria recarregável de 12V 8Ah ao chumbo
selada.
2 motores de 140 W
SEGURANÇA
ATENÇÃO! É SEMPRE NECESSÁRIA A
SUPERVISÃO DE UM ADULTO.
• Não adaptado a crianças com idade
inferior a 36 meses devido à presença
de peças passíveis de ser ingeridas ou
inaladas.
• Não use o veículo em vias públicas, onde
houver trânsito e carros estacionados,
em declives íngremes, perto de degraus e
escadas, cursos de água e piscinas.
• As crianças devem sempre usar sapatos
durante o uso do veículo.
• Quando o veículo estiver funcionando,
preste atenção para que as crianças não
coloquem as mãos, pés ou outras partes
do corpo, roupas ou outras coisas, perto
das partes em movimento.
• Nunca molhe os componentes do veículo
como motores, instalações, botões, etc.
• Não use gasolina ou outras substâncias
inflamáveis perto do veículo.
• O veículo deve ser usado exclusivamente
por uma criança de cada vez.
DIVERSÃO SEM INTERRUPÇÕES: tenha
sempre um jogo de baterias de reserva,
pronto para o uso.
Para a segurança da criança: antes de
acionar o veículo, leia e siga atentamente as
seguintes instruções.
• ATENÇÃO:
Verifique se todos os parafusos de fixação
das rodas estão bem apertados.
2ª VELOCIDADE
Inicialmente se aconselha de usar a 1ª
marcha.
Antes de inserir a 2ª velocidade, assegurar-
se que a criança tenha aprendido a usar
muito bem o veículo.
• 1a VELOCIDADE (para principiantes):
Com ambas as mãos sobre o guidão girar
o acelerador para baixo, o veículo se
acende e parte com uma velocidade de
cerca 3,7 Km/h.
• 2a VELOCIDADE (para espertos):
Com ambas as mãos sobre o guidão girar
o acelerador para baixo, o veículo se
acende e parte com uma velocidade de
cerca 7,5 Km/h.
• FREIO:
Para freiar, desacelerar girando a manopla
para o alto e pisar no pedal do freio.
Ensinar a seu filho de manter um uso
correcto do veículo com uma guia segura e
divertente.
• Antes de partir assegurar-se que o
percurso seja livre de pessoas ou coisas.
PROBLEMAS?
REGRAS PARA DIRIGIR COM
• PEG PEREGO se vam zahvaljuje za nakup
tega izdelka. PEG PEREGO prevaža otroke
že večkot 50 let: takoj po rojstvu v svojih
slavnih vozičkih, nekoliko pozneje pa na
perfektnih vozilih - igračah s pogonom na
pedale ali na akumulatorje.
• Skrbno preberite ta priročnik z navodili,
da bi vam bilo laže uporabljati izdelek
in naučiti otroka, kako pravilno in varno
voziti ter se ob tem tudi zabavati. Priročnik
shranite, da ga boste lahko še kdaj prebrali.
• Naše igrače ustrezajo varnostnim
predpisom Sveta EGS in “Varnostni
specifikaciji uporabniških igračZDA”,
potrdila sta jih TÜV in I.I.S.G. - Italijanski
inštitut za varnost igrač.
9001 Peg Perego S.p.A. ima
certifikat ISO 9001.
Certifikat za stranke in
porabnike pomeni garancijo
transparentnosti in zaupanja v
delo podjetja.
• Peg Perego se lahko kadarkoli odloči, da
bo spremenil modele, objavljene v katalogu,
najsi bo to zaradi tehničnih ali podjetniških
razlogov.
Od 3-8 let
PEG PEREGO ponuja pomočuporabnikom, ki
so kupili izdelek, neposredno ali prek svoje
mreže pooblaščenih centrov za pomoč
uporabnikov, za morebitna popravila,
zamenjave ali nakup originalnih rezervnih
delov. Kontaktni podatki centra za pomoč
uporabnikom so na zadnji platnici tega
uporabniškega priročnika. Peg Perego je
vedno na voljo svojim strankam, da v kar
največji meri izpolni njihove potrebe.
Zato je za nas zelo pomembno, da
poznamo mnenje svojih strank. Hvaležni
vam bomo, če si boste, ko boste
uporabili naš izdelek, vzeli čas in izpolnili
VPRAŠALNIK O ZADOVOLJSTVU STRANK, ki
ga boste našli na naših spletnih straneh,
na naslovu: www.pegperego.com/SSCo.
html.en-UK, v katerega boste zapisali svoja
opažanja in pripombe.
POZOR: IZDELEK SMEJO SESTAVITI
IZKLJUČNO ODRASLE OSEBE. PAZITE, KO
IZDELEK VLEČETE IZ EMBALAŽE. VIJAKI IN
DELI SO ZAVITI
V NOTRANJOSTI EMBALAŽE. AKUMULATOR
JE ŽE NA SVOJEM MESTU V VOZILU.
SESTAVLJANJE
1 • Opozorilo: preverite, da so svorniki
sprednjih vilic dobro priviti.
2 • Postavite krmilo na mesto.
3 • Postavite pritrditveno ploščo krmila,
kot prikazuje risba.
4 • Privijte vse tri vijake.
5 • Na njeno mesto postavite armaturno
ploščo in jo vstavite med dva jezička
maske.
6 • Pritrdite armaturno ploščo z dvema
priloženima vijakoma.
7 • Priključite vtičročice za pospeševanje
na vtičnapeljave.
8 • Vstavite kabel v ustrezno ležišče, kot
prikazuje risba.
9 • Postavite vetrobran na masko;
10 • Privijte.
11 • Na njegovo mesto postavite smerokaz;
12 • Privijte.
13 • S klikom na ogrodje pripnite mrežico
in pazite, da boste vstavili vse tri
spenjalne člene.
14 • S klikom na njeno mesto postavite
tablico.
15 • S klikom nataknite zadnji žaromet.
16 • Na njegovo mesto postavite prtljažnik
in ga privijte s štirimi vijaki.
17 • Na prtljažnik postavite kovček in ga
potisnite nazaj, da bi ga pritrdili.
SLOVENŠČINA
POMOČUPORABNIKOM
NAVODILA ZA SESTAVLJANJE

KOROZIVNE SNOVI. NE POSEGAJTE V
AKUMULATORJE.
• Akumulatorji so napolnjeni z elektrolitom
na kisli osnovi.
• Ne vzpostavljajte direktnega kontakta med
končniki na akumulatorjih in izogibajte se
močnim udarcem: tvegate eksplozijo ali
požar.
• Med polnjenjem akumulatorja se sprošča
plin. Akumulator polnite v zračnem
okolju, dalečod virov toplote in gorljivih
materialov.
• Prazne akumulatorje morate odstraniti iz
vozila.
• Svetujemo vam, da akumulatorjev
ne odlagate na oblačila; lahko bi jih
poškodovali.
ČE AKUMULATOR PUŠČA
Zavarujte si oči; izogibajte se
neposrednemu stiku z elektrolitom:
zaščitite si roke. Akumulator odložite v
plastično vrečko in upoštevajte navodila za
varno odlaganje akumulatorjev.
ČE PRIDE ELEKTROLIT V STIK S KOŽO ALI
OČMI
Prizadeto mesto sperite z veliko tekoče
vode. Takoj se posvetujte z zdravnikom.
ČE BI ELEKTROLIT POPILI
Splaknite usta in izpljunite. Takoj se
posvetujte z zdravnikom.
ODSTRANJEVANJE AKUMULATORJEV
Prizadevajte si za varovanje okolja.
Izrabljenih akumulatorjev ne mečite med
gospodinjske odpadke. Zavržete jih lahko v
centru za zbiranje izrabljenih baterij ali za
zbiranje posebnih odpadkov. Pozanimajte
se v svoji občini.
Ta izdelek ustreza Varnostnim predpisom
EN 71e in Varnostnim predpisom za
električne igrače EN 50088; ne ustreza
predpisom normativom za vožnjo po
cestah, zato se z njim otroci ne smejo voziti
po javnih cestah.
VZDRŽEVANJE IN SKRB
• Redno preverjajte stanje vozila, še posebej
električne dele, povezavo vtičev, zaščitnih
pokrovčkov in polnilnika akumulatorjev.
Če opazite okvare, električnega dela
in polnilnika akumulatorjev ne smete
uporabljati. Za popravilo uporabljajte le
originalne nadomestne dele PEG PEREGO.
• PEG PEREGO ne prevzema odgovornosti za
primer poseganja v električno napravo.
•
Ne puščajte akumulatorjev ali vozila
ob virih toplote, na primer radiatorjih,
kaminih itd.
• Vozilo zaščitite pred vodo, dežjem,
snegom itd.; uporaba vozila na pesku ali
v blatu lahko gumbe, motor in reduktorje
poškoduje.
• Če vozilo deluje s preobremenitvami, na
primer na mehkem pesku, na blatni ali
zelo razdrapani površini, bo stikalo za
preobremenitev izključilo tok. Delovanje
se bo vzpostavilo po nekaj sekundah.
• Občasno namažite (z lahkim oljem) dele,
ki jih je mogoče odstraniti, kot so ležaji,
volan itd.
• Površine vozila lahko očistite z mokro
krpo in, če je to potrebno, blagim
detergentom za rabo v gospodinjstvu.
Čistijo ga lahko samo odrasli.
• Nikoli ne snemajte mehanskih delov vozila
ali motorja, če vas za to ni pooblastil PEG
PEREGO.
Izdelano v skladu z EN 50088
Svinčev akumulator 12 V, 8 Ah, zapečaten.
2 motorja po 140 W
VARNOST
POZOR: OTROKE NAJ MED IGRO VEDNO
NADZORUJE ODRASLA OSEBA.
• Ni primerno za otroke, mlajše od 36
mesecev, saj so na vozilu majhni delci, ki
jih je mogoče požreti ali vdahniti.
18 • S priloženim orodjem odvijte matice z
osi zadnjih koles na obeh straneh;
19 • Snemite distančnike;
20 • Namestite pomožna kolesa;
21 • Nataknite podložke in matice;
22 • Privijte nazaj. Opozorilo: ko snemate
pomožna kolesa, se spomnite, da
morate distančnike namestiti nazaj.
23 • Odvijte vijak sedeža.
24 • Dvignite sedež, tako da pritisnete ob
straneh. Opozorilo: ko končate z delom
v prostoru akumulatorja, vedno zaprite
sedež.
25 • Sestavite oba vtiča in zaprite sedež.
Vozilo je pripravljeno za rabo.
LASTNOSTI IN UPORABA VOZILA
26 • A: ročica za pospeševanje. Ročico
zavrtite navzdol, da bi zagnali vozilo;
B: gumb za trobljo.
27 • C: zavora. Če pritisnete zavorni pedal,
se vozilo ustavi.
28 • DRUGA PRESTAVA: odvijte vijak in
dvignite pokrovček rezervoarja;
29 • Pritisnite gum in ga postavite v položaj
druge prestave. Zaprite tako, da
privijete pokrovček.
30 • Da bi odprli kovček, odpnite gumijaste
zaponke.
31 • Ker je opremljen s priročnim ročajem,
lahko kovček tudi prenašate.
ZAMENJAVA AKUMULATORJA
32 • Odvijte vijak in dvignite sedež, tako da
pritisnete ob straneh. Iztaknite vtiče.
33 • Odvijte zaustavljalnik akumulatorja.
34 • Zamenjajte akumulator. Postavite ga na
njegovo mesto in privijte zaustavljalnik
akumulatorja z dvema vijakoma.
Sestavite oba vtiča in zaprite sedež.
POLNJENJE AKUMULATORJA
POZOR: POLNJENJE AKUMULATORJA IN
VSE DRUGE POSTOPKE, POVEZANE Z
ELEKTRIČNO NAPELJAVO, SMEJO IZVAJATI LE
ODRASLE OSEBE. AKUMULATOR JE MOGOČE
NAPOLNITI, NE DA BI GA SNELI Z IGRAČE.
35 • Odklopite vtičA električne napeljave z
vtiča B akumulatorja, tako da pritisnete
ob strani.
36 • Vtaknite vtičpolnilnika za akumulator
v vtičnico domačega električnega
omrežja in upoštevajte priložena
navodila. Povežite vtičB z vtičem C
polnilnika za akumulator.
37 • Ko končate polnjenje, odklopite
polnilnik akumulatorja iz domačega
omrežja in odklopite vtičC z vtiča B.
38 • Do konca, tako da klikne, vstavite vtič
B v vtičA. Ko končate, vedno zaprite in
pritrdite sedež.
Preden boste vozilo prvičuporabili, naj se
akumulator polni 18 ur. Če tega postopka
ne boste upoštevali, bi se lahko akumulator
nepopravljivo poškodoval.
OPOZORILA
Akumulator smejo polniti ali polnjenje
nadzorovati samo odrasle osebe. Ne
dovolite, da bi se z akumulatorjem igrali
otroci.
POLNJENJE AKUMULATORJA
Napolnite akumulatorje, tako da sledite
navodilom, priloženim polnilniku.
Akumulator se ne sme polniti večkot 24 ur.
• Če boste akumulator napolnili, takoj ko
začne vozilo izgubljati hitrost, se boste
izognili njegovim poškodbam.
• Če bo vozilo dlje časa stalo, napolnite
akumulator in ga odklopite iz naprave;
napolnite ga vsaj vsake 3 mesece.
• Akumulatorja ne smete polniti, če stoji na
glavi.
• Ne pozabite na akumulator, ki se polni!
Akumulator redno pregledujte.
• Uporabljajte le priložene polnilnike in
originalne akumulatorje PEG PEREGO.
• Ne mešajte novih in starih akumulatorjev.
• Akumulator morte vstaviti tako, da
upoštevate njegovo polariteto.
• Akumulatorji so zapečateni in jih ni treba
vzdrževati.
POZOR
• V AKUMULATORJIH SO STRUPENE IN
VZDRŽEVANJE IN VARNOST VOZILA
• Vozila ne uporabljajte na javnih cestah,
kjer je tekočali stoječpromet, na
strminah, ob stopnicah, vodnih tokovih ali
bazenih.
• Otroci morajo imeti med vožnjo na vozilu
vedno obute čevlje.
• Ko je vozilo v pogonu, pazite, da otroci
ne bodo vtikali rok, nog ali drugih delov
telesa, oblačil ali drugih predmetov med
premikajoče se dele.
• Nikoli ne polivajte delov vozila, kot so
motor, naprave, gumbi itd., z vodo.
• Ob vozilu nikoli ne uporabljajte bencina ali
drugih vnetljivih snovi.
• Na vozilu se sme voziti le en otrok.
NEPREKINJENA ZABAVA: vedno imejte
pripravljen komplet polnih baterij.
Za varnost otroka: preden vključite vozilo,
preberite navodila in se jih natančno držite.
• OPOZORILO:
Preverite, da so vse pritrditvene zaponke
dobro pritrjene.
2. PRESTAVA
Za začetek vam svetujemo uporabo 1.
prestave. Preden vključite 2. prestavo, naj
se otrok nauči uporabljati 1. prestavo in naj
se na vozilu počuti varnega.
• 1. PRESTAVA (za začetnike):
Ko ima otrok obe roki na krmilu, naj ročico
za hitrost obrne navzdol; vozilo bo speljalo
s hitrostjo približno 3,7 km/h.
• 2. PRESTAVA (za izkušene):
ko ima otrok obe roki na krmilu, naj ročico
za hitrost obrne navzdol; vozilo bo speljalo
s hitrostjo približno 7,5 km/h.
• ZAVORA:
Da bi vozilo zavrli, obrnite ročico navzgor
in pritisnite zavorni pedal.
Otroka naučite pravilno uporabo vozila, da
bo vozil varno in da se bo ob tem lahko
zabaval.
• Preden spelje, se prepričajte, da je pot
prosta, da na njej ni oseb ali stvari.
• Voziti je treba z rokami na volanu in
vedno gledati na cesto.
• Pravočasno zavrite vozilo, da se ne bi
zaleteli.
• 2. prestavo vključite šele, ko otrok že
obvlada pravilno uporabo volana, 1.
prestave in zavore.
• POZOR! 1. prestava vozila je opremljena
z diferencialnim učinkom, tako kot pravi
avtomobili: na gladki površini in ko na
traktorju sedi le en otrok, se lahko kolesa
vrtijo različno hitro, lahko zdrsnejo ali
upočasnijo.
• POZOR! • Če vozilo deluje s
preobremenitvami, na primer na mehkem
pesku, na blatni ali zelo razdrapani
površini, bo stikalo za preobremenitev
izključilo tok. Delovanje se bo vzpostavilo
po nekaj sekundah.
VOZILO NE DELUJE?
• Vozila Preverite, da ni po ploščico
pospeševalnika kakšen kabel odklopljen.
• Vozila Preverite, da ni kakšen kabel
odklopljen z reduktorja.
• Vozila Preverite delovanje gumba
za pospeševanje in če ne deluje, ga
zamenjajte.
• Vozila Preverite, da je akumulator
priključen na električno napeljavo vozila.
VOZILO NIMA MOČI?
• Vozila Napolnite akumulatorje. Če
po polnjenju akumulatorja težava še
vedno obstaja, odnesite akumulatorje
in polnilnike v center za pomoč
uporabnikom.
VZDRŽEVANJE AKUMULATORJEV
IN VARNOST
PRAVILA ZA VARNO VOŽNJO
TEŽAVE?

DANSK
• PEG PEREGO takker jer for at have valgt
dette produkt. I over 50 år har PEG PEREGO
taget børn med på ture: som spædbørn i
de berømte barnevogne og klapvogne, og
senere med de fantastiske batteridrevne
legetøjsbiler med pedaler.
• Læs omhyggeligt denne brugervejledning
for at få kendskab til brugen af bilen, og
lære dit barn om korrekt, sikker og sjov
kørsel. Opbevar vejledningen til senere
opslag.
• Vort legetøj er i overensstemmelse med
sikkerhedskravene fra EU-rådet og “U.S.
Consumer Toy Safety Specification ”, og det
er ligeledes godkendt af T.Ü.V., og I.I.S.G.
Istituto Italiano Sicurezza Giocattoli.
Peg Perego S.p.A. er ISO 9001
certificeret.
Denne certificering giver
kunderne og forbrugerne
garanti for klare og pålidelige
arbejdsmåder på fabrikken.
• Peg Perego forbeholder sig ret til når som
helst at foretage ændringer på de modeller,
der er beskrevet i denne udgivelse, enten af
tekniske årsager eller p.g.a. firmaets behov.
3-8 år
PEG PEREGO tilbyder en kundeservice efter
salget - der enten kan benyttes direkte,
eller gennem et netværk af autoriserede
servicecentre – ved behov for reparation
eller udskiftning, samt for salg af originale
reservedele. Læs oplysningerne på bagsiden
af omslaget på brugervejledningen ved
behov for henvendelse til kundeservicen.
Peg Perego er til Forbrugernes rådighed
for at opfylde alle behov, og det er meget
vigtigt og betydningsfuldt for os, at vi
kender vore Kunders mening.
Derfor vil vi være meget glade for, hvis I
efter at have brugt vort produkt, udfylder
SPØRGESKEMA OM KUNDETILFREDSHED,
der kan findes på Internet-adressen: "www.
pegperego.com/SSCo.html.en-UK" her
kan I skrive eventuelle bemærkninger eller
forslag.
PAS PÅ: MONTERINGEN MÅ UDELUKKENDE
UDFØRES AF VOKSNE.
VÆR FORSIGTIG VED UDTAGNING AF BILEN
FRA EMBALLAGEN.
ALLE SKRUER FINDES I EN POSE INDE I
EMBALLAGEN.
BATTERIET ER ALLEREDE INDSAT I
KØRETØJET
MONTERING
1 • Pas på: kontroller at boltene på den
forreste gaffel er korrekt strammet.
2 • Placer styret.
3 • Placér styrets fastgøringsplade, som
vist på illustrationen.
4 • Stram de tre skruer.
5 • Placér instrumentbrættet ved at
sætte det ind mellem de to tapper på
dækpladen.
6 • Fastgør instrumentbrættet med de to
medfølgende skruer.
7 • Tilslut gashåndtagets stik til anlæggets
stik.
8 • Indsæt kablet i lejet, som vist på
illustrationen.
9 • Placer vindskærmen på dækpladen.
10 •Skru vindskærmen fast.
11 •Placer blinklyset.
12 •Skru blinklyset fast.
13 • Pres gitteret på plads på stellet; sørg
for at alle tre kroge griber fat.
14 • Pres nummerpladen på plads.
15 • Pres baglygten på plads.
16 • Placér og fæstn bagagebæreren med de
fire skruer.
17 • Anbring bagagekufferten på
bagagebæreren og skub den tilbage for
at fæstne.
18 • Skru møtrikkerne af baghjulets
aksel i begge sider ved hjælp af det
medfølgende værktøj.
19 •Træk afstandsstykkerne ud.
20 •Placer støttehjulene.
21 •Sæt først spændskiverne på, og
derefter møtrikkerne.
22 •Stram igen. Pas på: når støttehjulene
fjernes, skal man huske at genindsætte
afstandsstykkerne.
23 • Skru sadlens skrue af.
24 •Løft sadlen ved at trykke i begge sider.
Pas på: luk altid sadlen efter indgreb i
bat terirummet.
25 •Tilslut de to stik og luk sadlen.
KØRETØJETS EGENSKABER OG BRUG
26 •A: GASHÅNDTAG. Drej håndtaget
nedad for at få motorcy klen til at køre.
B: HORN
27 •C: bremse. Ved tryk på bremsepedalen
standser motorcyklen.
28 •ANDEN HASTIGHED: skru tankens prop
af, og løft den.
29 •Tryk knappen hen på anden hastighed.
Luk ved at skrue proppen på igen.
30 • Løs gummibåndene for at kunne åbne
bagagekufferten.
31 • Bagagekufferten kan bæres vha.
håndtaget.
UDSKIFTNING AF BATTERI
32 •Træk skruen ud og løft sadlen ved at
trykke i begge sider. Afbryd stikkene.
33 •Skru batteriholderen af.
34 •Indsæt sikringen i batteriet; opbevar
reservesikringerne; anbring batteriet
på motorcyklen; placer og skru
batteriholderen på ved hjælp af de to
skruer; tilslut de to stik og luk sadlen
igen.
OPLADNING AF BATTERIET
PAS PÅ: BATTERIOPLADNING OG ETHVERT
INDGREB I DET ELEKTRISKE ANLÆG MÅ
UDELUKKENDE UDFØRES AF VOKSNE.
BATTERIET KAN OGSÅ OPLADES UDEN AT
FJERNE DET FRA LEGETØJET.
35 •Afbryd stik A på elanlægget fra stik B
på batteriet ved at trykke i siden.
36 •Indsæt batteriopladerens stik i en almin
delig stikkontakt i overensstemmelse
med de medfølgende instruktioner.
Forbind stik B til stik C på
batteriopladeren.
37 •Når opladningen er færdig, skal
man afbryde batteriopladeren fra
stikkontakten i muren, og derefter
afbryde stik C fra stik B.
38 •Indsæt stik B helt i bund i stik A. Husk
altid at lukke og fastgøre sadlen efter
at dette er udført.
Inden bilen bruges første gang skal
batterierne oplades i 18 timer. Hvis denne
regel ikke overholdes, kan batteriet blive
uopretteligt skadet.
ADVARSLER
Opladningen af batterierne må udelukkende
udføres og overvåges af voksne.
Tillad aldrig at børnene leger med
batterierne.
OPLADNING AF BATTERIET
• Oplad batteriet i overensstemmelse
med oplysningerne, der følger med
batteriopladeren, og batteriet må under
ingen omstændigheder oplades i mere end
24 timer.
• Oplad batteriet i tide, så snart bilen
begynder at tabe hastighed, således at
beskadigelser kan undgås.
• Hvis bilen står stille i længere tid,
skal man huske at oplade batteriet og
afbryde det fra anlægget; batteriet skal
genoplades mindst hver 3. måned.
• Batteriet må ikke oplades mens det er
vendt på hovedet.
• Glem aldrig batterier under opladning!
Kontrollér jævnligt batteriet.
• Benyt kun den medfølgende batterioplader
og originale batterier fra PEG PEREGO.
• Bland aldrig gamle og nye batterier.
• Batterierne skal indsættes med den
korrekte polaritet.
• Batterierne er forseglede og har ikke
behov for vedligeholdelse.
PAS PÅ
• BATTERIERNE INDEHOLDER GIFTIGE OG
ÆTSENDE STOFFER. BATTERIERNE MÅ IKKE
ÅBNES.
• Batterierne indeholder elektrolyt med
syrebasis.
• Sørg for at der ikke opstår direkte kontakt
mellem batteriernes terminaler; undgå
kraftige slag: fare for eksplosion og/eller
brand.
• Under opladningen udvikler batteriet
gas. Oplad batteriet på et sted med god
ventilation, langt fra varmekilder og
antændelige materialer.
• Tømte batterier skal fjernes fra bilen.
• Det frarådes at lade batterierne komme i
berøring med tøj; det kan blive ødelagt.
I TILFÆLDE AF LÆKAGE
Beskyt øjnene; sørg for ikke at komme i
direkte kontakt med elektrolytten: beskyt
hænderne.
Læg batteriet i en plastiktaske og følg
instruktionerne for bortskaffelse af
batterier.
HVIS HUD OG ØJNE KOMMER I KONTAKT
MED ELEKTROLYT
Skyl det berørte område grundigt med
rindende vand.
Søg lægehjælp med det samme.
HVIS ELEKTROLYTTEN ER BLEVET SLUGT
Drik små mundfulde vand, magnesiummælk
eller æggehvider.
Fremkald ikke opkast.
Søg lægehjælp med det samme.
BORTSKAFFELSE AF BATTERIERNE
Vær med til at bevare naturen.
De brugte batterier må ikke smides ud med
almindeligt husaffald.
Batterierne kan indleveres ved et
opsamlingscenter for brugte batterier
eller bortskaffelse af specialaffald; spørg
kommunen.
Dette produkt er i overensstemmelse
med sikkerhedsstandarden EN 71 og
sikkerhedsstandarden EN 50088 for
elektrisk legetøj; produktet er ikke i
overensstemmelse med reglerne for kørsel
på almindelige veje, og må således ikke
køre på offentlige veje.
VEDLIGEHOLDELSE OG BESKYTTELSE
• Kontrollér jævnligt bilens stand, specielt
det elektriske anlæg, forbindelserne
til stikkene, beskyttelseshætterne og
batteriopladeren. Hvis der fastslås
defekter, må den elektriske bil og
batteriopladeren ikke benyttes. Ved
reparation må man udelukkende anvende
originale reservedele fra PEG PEREGO.
• PEG PEREGO påtager sig intet ansvar, hvis
der foretages ændringer i det elektriske
anlæg.
• Efterlad aldrig batterierne eller bilen i
nærheden af varmekilder, såsom ovne,
pejse, etc.
• Beskyt bilen mod vand, regn, sne,
etc.; hvis bilen bruges på sand eller i
mudder kan det medføre beskadigelse af
trykknapper, motor og gear.
• Hvis bilen udsættes for overbelastning,
såsom ved kørsel på blødt sand, i mudder,
eller på meget usammenhængende
overflader, vil overbelastningsafbryderen
straks afbryde effekten. Effektudsendelsen
vil blive genoptaget efter nogle få
sekunder.
• Smør jævnligt de bevægelige dele, såsom
lejer, rat, etc. (med let olie).
• Bilens overflader kan rengøres med en
fugtet klud, eller om nødvendigt med
almindelige husholdningsmidler uden
slibestoffer. Rengøringen må udelukkende
udføres af voksne.
KUNDESERVICE
MONTERINGSVEJLEDNING
VEDLIGEHOLDELSE AF BATTERIERNE
OG BATTERISIKKERHED
VEDLIGEHOLDELSE AF BILEN OG
BILENS SIKKERHED

• Afmontér aldrig mekaniske dele fra
bilen eller motorerne, med mindre der
foreligger autorisation fra PEG PEREGO.
I overensstemmelse med EN 50088
Genopladeligt og forseglet bly-batteri på
12V 8Ah.
2 motorer på 140 W
SIKKERHED
PAS PÅ! DER ER ALTID BEHOV FOR EN
VOKSEN TIL OPSYN.
• Ikke egnet til børn under 36 måneder pga.
smådele, der kan sluges eller indåndes.
• Benyt aldrig bilen på offentlige veje,
hvor der findes trafik og parkerede
biler, på stejle skråninger, i nærheden af
trappetrin, vandløb og svømmebassiner.
• Børnene skal altid være iført sko under
kørsel.
• Når bilen kører, skal man være
opmærksom på, at børnene ikke fører
hænder, ben eller andre legemsdele,
tøj eller ting, i nærheden af delene i
bevægelse.
• Sørg for at bilens komponenter, såsom
motorerne, anlæggene, trykknapperne,
etc., aldrig bliver våde.
• Brug aldrig benzin eller andre antændelige
stoffer i nærheden af bilen.
• Sikkerhedsselerne er kun til leg, og yder
således ingen beskyttelse.
SJOV UDEN AFBRYDELSER: hav altid et ekstra
sæt batterier klar til brug.
Af hensyn til barnets sikkerhed: inden bilen
startes skal følgende instruktioner læses og
overholdes omhyggeligt.
• PAS PÅ:
Kontrollér at alle fastgøringsnav sidder
korrekt fast.
2. HASTIGHED
I begyndelsen anbefales det, at man
anvender 1. gear.
Inden 2. hastighed tilsluttes, skal man være
sikker på, at barnet har lært at bruge bilen.
• 1. GEAR lav fart:
Drej gashåndtaget nedad mens begge
hænder holdes på styret; motorcyklen
vil begynde at køre med en hastighed på
cirka 3,7 Km/t.
• 2. GEAR høj fart:
Drej gashåndtaget nedad mens begge
hænder holdes på styret; motorcyklen
vil begynde at køre med en hastighed på
cirka 7,5 Km/t.
• BREMSE:
Det elektriske bremsesystem stopper auto
matisk køretøjet, når barnet løfter foden
fra pedalen.
Lær dit barn, hvordan bilen køres på en
sikker og sjov måde.
• Inden bilen startes, skal man sørge for, at
kørebanen er fri for personer eller ting.
• Kør med hænder på rattet, og se altid på
kørebanen.
• Brems i tide for at undgå sammenstød.
• Tilslut først 2. hastighed, når barnet
har lært at bruge rattet, 1. hastighed og
bremsen korrekt.
• PAS PÅ! på første hastighed har bilen
differentialeeffekt, som rigtige biler: på
glatte overflader, og med et enkelt barn
i bilen, kan de to hjul have forskellig
hastighed med mulighed for udskridning/
hastighedsnedsættelse.
• PAS PÅ! Hvis bilen udsættes for
overbelastning, såsom ved kørsel på
blødt sand, i mudder, eller på meget
usammenhængende overflader, vil
overbelastningsafbryderen straks afbryde
effekten. Effektudsendelsen vil blive
genoptaget efter nogle få sekunder.
FUNGERER BILEN IKKE?
• Kontrollér at der ikke er afbrudte kabler til
speederpladen.
REGLER FOR SIKKER KØRSEL
ER DER PROBLEMER?
• Kontrollér at der ikke er afbrudte kabler til
gearmotoren.
• Kontrollér at speederkontakten fungerer,
og udskift den om nødvendigt.
• Kontrollér at batteriet er tilsluttet til det
elektriske anlæg.
HAR BILEN INGEN KØREKRAFT?
• Oplad batterierne. Hvis problemerne
ikke løses efter opladning af batterierne,
skal batteriopladeren og batterierne
kontrolleres ved et servicecenter.
Der er 2 års reklamationsret på køretøjet.
Medbring købsbon ved henvendelse.
Reklamationsretten dækker alle køretøjets
dele ved normal og korrekt brug med
undtagelse af batterier og hjul. Læs derfor
brugsanvisningen nøje igennem, inden
køretøjet tages i brug. Skader forvoldt
som følge af voldsom brug dækkes ikke af
garantien.
GARANTIREPARATION
KIRAMA ApS er servicesamarbejdspartner
for Peg Pérego S.p.A. i Skandinavien.
Firmaet lagerfører alle gængse reservedele
og har faguddannet personale til
varetagelse af evt. reparationer.
Kontakt KIRAMA ApS (eller KIRAMA's partner
i Sverige og Norge), hvis der konstateres
fejl eller mangler på køretøjet. Såfremt
reparationen ikke kan klares pr. telefon,
skal køretøjet fremsendes til:
Danmark
KIRAMA ApS Service
Enggade 6
8700 Horsens
Tlf.: 75 61 39 99
Fax: 75 61 10 95
Kontaktperson: Kim Maarup
e-mail: [email protected]
Køretøjet tages kun til reparation efter
forudgående aftale. Køretøjer, der
fremsendes uden forudgående aftale, vil
blive afvist.
Såfremt køretøjet skal repareres under
garanti, sendes det franko til én af
ovenstående adresser.
Nedenstående skema skal altid udfyldes
ved fremsendelse af el-køretøjer, der skal
repareres under garanti.
Afsender:
Navn:
Adresse:
Postnr./by:
Kontaktperson:
Tlf.nr.:
Fejl, der ønskes udbedret:
Med venlig hilsen
Peg Pérego S.p.A. / KIRAMA ApS
REKLAMATIONSRET EL-KØRETØJER

se neljällä ruuvilla.
17 • Aseta tavaratila tavaratelineen päälle ja
kiinnitä se työntämällä sitä taaksepäin.
18 •Ruuvaa mukana tulevalla avaimella
takapyörän akselin mutterit irti
kummaltakin puolelta.
19 •Irroita välikappaleet.
20 •Aseta paikoilleen vakautuspyörät.
21 •Aseta tiivisteet ja sitten mutterit.
22 •Ruuvaa kiinni. Huomio: poistaessasi
vakautuspyörät muista asettaa takaisin
välikappaleet.
23 • Löysää satulan ruuvi.
24 •Nosta satula painaen molemmilta
puolilta. Huomio: sulje aina satula
akkutilassa tehtyjen toimenpiteiden
jälkeen.
25 •Yhdistä kaksi pistoketta ja sulje satula.
LEIKKIAJONEUVON OMINAISUUDET JA
KÄYTTÖ
26 •A: KAASUKAHVA. Käännä kaasukahvaa
alaspäin, jotta ajoneuvo lähtee
liikkeelle. B: TORVEN PAINIKE
27 •C: jarru. Painamalla jarrupoljinta
ajoneuvo pysähtyy
28 •KAKKOSNOPEUS: kierrä tankin kantta ja
nosta se ylös.
29 •Paina painiketta ja aseta se
kakkosnopeudelle. Sulje kiertämällä
kansi kiinni.
30 • Avaa tavaratila irrottamalla kuminauhat.
31 • Tavaratilaa voidaan kantaa kätevästä
kahvasta.
AKUN VAIHTAMINEN
32 •Irroita ruuvi ja nosta satula painamalla
molemmilta puolilta. Irroita pistokkeet.
33 •Ruuvaa akun pidätin auki.
34 •Laita sulake akkuun; säilytä
varasulakkeet; aseta akku ajoneuvoon;
aseta ja ruuvaa akun pidätin paikoilleen
kahdella ruuvilla; liitä molemmat
pistokkeet ja sulje satula.
AKUN LATAAMINEN
HUOM.: VAIN AIKUISET SAAVAT
LADATA AKUN TAI SUORITTAA MUITA
SÄHKÖLAITTEISTOON LIITTYVIÄ
TOIMENPITEITÄ.
AKKUA EI TARVITSE VÄLTTÄMÄTTÄ
IRROTTAA LEIKKIAJONEUVOSTA LATAUSTA
VARTEN.
35 •Irroita sähkölaitteiston pistoke A akun
pistokkeesta B painaen sivuista.
36 •Liitä akkulaturin pistoke tavalliseen
pisto rasiaan noudattaen sen liitteen
mukaisia ohjeita. Liitä pistoke B
akkulaturin pistokkeeseen C .
37 •Latauksen loputtua irroita akkulaturi
pistorasiasta, irroita sitten pistoke C
pistokkeesta B.
38 •Aseta paikoilleen työntämällä pohjaan
asti pistoke B pistokkeeseen A kunnes
kuulet napsauksen. Toimenpiteen
lopuksi muista aina sulkea ja kiinnittää
satula paikoilleen.
Ennen kuin käytät ajoneuvoa ensimmäistä
kertaa lataa akkuja 18 tunnin ajan. Tämä
toimenpiteen huomiotta jättäminen saattaa
aiheuttaa korjaamatonta vahinkoa akulle.
VAROITUKSIA
Akkujen lataus ja latauksen valvonta tulee
suorittaa vain aikuisten toimesta.
Älä anna lasten leikkiä akuilla.
AKUN LATAUS
• Lataa akut akkulaturissa liittenä olevien
ohjeiden mukaan, älä ylitä 24 tuntia.
• Lataa akku ajoissa, heti kun ajoneuvon
nopeus alkaa hidastua; näin vältytään
vahingoilta.
• Jos ajoneuvoa ei käytetä pitkään aikaan,
muista ladata akku ja säilytä sitä erillään
laitteesta; toista uudelleenlataus ainakin
joka kolmas kuukausi.
• Akkua ei tule ladata ylösalaisin.
• Älä unohda akkuja lataukseen! Tarkista
säännöllisesti.
• Käytä vain laitteen mukana tulevaa
akkulaturia ja alkuperäisiä PEG PEREGO
akkuja.
• Älä sekoita uusia ja vanhoja akkuja.
• Akut tulee asettaa paikoilleen huomoiden
oikea napaisuus.
• Akut ovat tiivistettyjä eikä niitä tarvitse
huoltaa.
HUOMIO
• AKUT SISÄLTÄVÄT MYRKYLLISIÄ JA
SYÖVYTTÄVIÄ AINEITA. ÄLÄ SORMEILE
NIITÄ.
• Akut sisältävät akkuhappoa.
• Älä aiheuta akun pinteiden välistä suoraa
kosketusta, vältä kovia iskuja: räjähdys
ja/tai tulipalovaara.
• Latauksen aikana akku tuottaa kaasua.
Lataa akku hyvin tuuletetussa tilassa,
kaukana lämmönlähteistä ja helposti
syttyvistä materiaaleista.
• Tyhjät akut tulee poistaa ajoneuvosta.
• Akkuja ei pidä asettaa vaatteiden päälle;
ne saattavat vahingoittua.
VUODON SATTUESSA
Suojaa silmiäsi; vältä suoraa kosketusta
akkuhapon kanssa; suojaa kätesi.
Aseta paristo muovikassiin ja noudata
pariston hävittämistä koskevia ohjeita.
JOS IHO JA SILMÄT JOUTUVAT KOSKETUKSIIN
AKKUHAPON KANSSA
Pese hapon kanssa kosketuksiin joutunut
kohta runsaalla juoksevalla vedellä.
Ota välittömästi yhteys lääkäriin.
JOS AKKUHAPPOA ON NIELTY
Juo pieniä siemauksia vettä,
magnesiamaitoa tai munanvalkuaisia.
Älä yritä oksentaa.
Ota välittömästi yhteys lääkäriin.
AKKUJEN HÄVITTÄMINEN
Suojele ympäristöä.
Käytettyjä akkuja ei saa heittää
kotitalousjätteiden sekaan.
Voit viedä akut käytettyjen akkujen tai
erikoisjätteiden keräyspisteeseen; kysy
neuvoa asuinkunnastasi.
Tämä tuote vastaa EN 71
Turvallisuusnormia ja sähköisten
leikkikalujen turvallisuusnormia EN 50088;
se ei vastaa liikenteessä ajamista koskevia
säädöksiä, eikä sillä siis saa ajaa yleisillä
teillä.
HUOLTO
• CTarkista säännöllisin väliajoin ajoneuvon
kunto, varsinkin sähkölaitteisto,
pistokkeiden liitännät, suojakuvut ja
akkulaturi. Mikäli vikoja ilmenee, sähköistä
ajoneuvoa ja akkulaturia ei saa käyttää.
Käytä korjauksiin ainoastaan alkuperäisiä
PEG PEREGO varaosia.
• PEG PEREGO ei ota vastuuta siinä
tapauksessa, että sähkölaitteistoa on
sormeiltu.
• Älä jätä akkuja tai ajoneuvoa lämmön
lähteiden, kuten lämpöpattereiden,
kaminoiden jne. läheisyyteen.
• Suojaa ajoneuvo kastumiselta, sateelta,
lumelta jne.; ajoneuvon käyttäminen
hiekalla tai mudassa saattaa vahingoittaa
painikkeita, moottoria ja välityksiä.
• Jos ajoneuvo ylikuormittuu, esimerkiksi
ajaessa pehmeällä hiekalla, mudassa
tai erittäin epätasaisessa maastossa,
ylikuormitussuoja katkaisee välittömästi
tehon syötön. Tehon syöttö alkaa
uudelleen muutaman sekunnin kuluttua.
• Voitele säännöllisin väliajoin (kevytöljyllä)
liikkuvat osat, kuten laakerit, ohjaus, jne.
• Ajoneuvon pinnat voidaan puhdistaa
kostealla rievulla ja tarvittaessa
kotikäyttöön tarkoitetuilla tuotteilla, jotka
eivät ole hankaavia. Puhdistustoimenpiteet
tulee suorittaa ainoastaan aikuisten
toimesta.
• Älä milloinkaan irrota ajoneuvon koneistoa
tai moottoreita, ellei PEG PEREGO valtuuta
siihen.
Vastaa EN 50088
Uudelleen ladattava lyijyllä suljettu akku
12V 8Ah.
2kpl 140 W mottoria
AJONEUVON HUOLTO JA
TURVALLISUUS
AKKUJEN HUOLTO JA TURVALLISUUS
• PEG PEREGO kiittää teitä valitsemastanne
tuotteesta. Jo yli 50 vuoden ajan
PEG PEREGO on kuljettanut lapsia:
vastasyntyneille kuuluisat lastenvaunut ja
lastenrattaat joita seuraavat upeat polku- ja
akkukäyttöiset leikkiajoneuvot.
• Lukekaa huolellisesti tämä opaskirja
tutustuaksenne tämän mallin käyttö-
ohjeisiin ja opettaaksenne lapsellenne
oikea, turvallinen ja hauska ajotapa.
Säilyttäkää opaskirja myöhempää käyttöä
varten.
• Leikkikalumme täyttävät EEC:n Neuvoston
turvallisuusmääräykset sekä T.Ü.V:n
hyväksymät “U.S Consumer Toy Safety
Specification” –määräykset, I.I.S.G. Istituto
Italiano Sicurezza Giocattoli.
Peg Perego S.p.A. on ISO 9001 -
sertifioitu.
Sertifikaatti takaa yhtiön
työtapojen läpinäkyvyyden ja
sen, että asiakkaamme voivat
luottaa niihin.
• Peg Perego voi tehdä muutoksia tässä
julkaisussa kuvattuihin malleihin milloin
tahansa teknisistä tai tuotannollisista syistä.
3-8 vuotiaat
PEG PEREGO tarjoaa myynnin jälkeisiä
palveluja, joko suoraan tai valtuutetun
huoltokeskuksen kautta, korjauksia tai
vaihtoja ja alkuperäisten varaosien myyntiä
varten. Huoltopalvelun yhteydenottotiedot
näkyvät tämän asennusoppaan etusivun
kääntöpuolella.
Me Peg Peregolla olemme aina
asiakkaidemme käytettävissä
täyttääkseemme heidän toivomuksensa
parhaamme mukaan. Tästä syystä
asiakkaidemme näkemysten tunteminen
on meille ensisijaisen tärkeää ja arvokasta.
Siksi olemme hyvin kiitollisia, jos
tuotteemme käytön jälkeen vastaatte
ASIAKKAIDEN TYYTYVÄISYYSKYSELYYN,
jonka löydätte Internet-osoitteesta www.
pegperego.com/SSCo.html.en-UK, ja
esitätte meille mahdollisia huomautuksia ja
ehdotuksia.
HUOMIO: ASENNUSTOIMENPITEET TULEE
SUORITTAA AINOASTAAN AIKUISEN
TOIMESTA.
OLE VAROVAINEN PURKAESSASI AJONEUVOA
PAKKAUKSESTA.
KAIKKI RUUVIT OVAT PAKKAUKSEN SISÄLLÄ
OLEVASSA MUOVIPUSSISTA.
AKKU ON JO ASENNETTU AJONEUVON
SISÄÄN
ASENNUS
1 • HUOMIO: varmista, että etuhaarukan
pultit ovat lujasti kiinnitetty.
2 • Aseta ohjaustanko paikoilleen.
3 • Aseta ohjaustangon kiinnityslevy
paikalleen kuvan osoittamalla tavalla.
4 • Ruuvaa kiinni kolme ruuvia.
5 • Aseta kojelauta paikalleen laittamalla
se jäähdyttimen säleikön kahden
kielekkeen väliin.
6 • Kiinnitä kojelauta kahdella mukana
toimitetulla ruuvilla.
7 • Yhdistä kaasukahvan pistoke
sähkölaitteiston pistokkeeseen.
8 • Asettele kaapeli vastaavaan kohtaan
kuvan mukaisesti.
9 • Aseta tuulilasi etupäälliselle.
10 •Ruuvaa.
11 •Aseta vilkku paikalleen.
12 •Ruuvaa.
13 • Napsauta ristikko kiinni runkoon
varmistaen, että se kiinnittyy kaikkiin
koukkuihin.
14 • Napsauta rekisterikilpi paikalleen.
15 • Napsauta takavalo paikalleen.
16 • Aseta tavarateline paikalleen ja kiinnitä
SUOMI
HUOLTOPALVELU
ASENNUSOHJEET
This manual suits for next models
1
Table of contents
Other Peg-Perego Motorcycle manuals
Popular Motorcycle manuals by other brands

Husqvarna
Husqvarna 1989 510 TE Owner's manual / workshop manual

BMW
BMW R 1250 GS Adventure HP Rider's manual

Yamaha
Yamaha 2011 WR250FA Owner's service manual

Royal Enfield
Royal Enfield Bullet 350-ES owner's manual

KTM
KTM 2009 690 Rally Factory Replica owner's manual

AGUSTA
AGUSTA Turismo Veloce 800 LU550 Maintenance manual