PEL International Age 76 Series User manual

INSTRUCTIONS D’ASSEMBLAGE
ASSEMBLY INSTRUCTIONS
Les dessins peuvent différer de votre modèle
The drawings may differ from your model
Collection Age
Série 76
N.B. : Il est important de lire
les instructions avant
de débuter l’assemblage.
N.B. : It is important
to read the instructions
before proceeding
to assemble the unit.

Liste de pièces / Parts list
2
N.B. : Pour plus de facilité, veuillez bien vérifier si vous avez toutes les pièces
de montage mentionnées ci-dessous et surtout, suivez bien les étapes dans l’ordre.
Outils requis : Tournevis carré ou étoile et 2 clés 1/2 po
Note : To facilitate assembly, please check if you have all the listed
mounting parts and follow instructions in the given order.
Required tools : Star-shaped or square screwdriver and two 1/2” wrenches.
CODE QTÉ / QTY DESCRIPTION ILLUSTRATION
Chaise pré-assemblée
Pre-assembled chair
1 1
Ensemble de coussins
Cushion set
2 1
Rondelle de nylon de 1” diamètre
Nylon washer 1” diameter
62
32Appuis-bras
Armrests
Vis mécaniques (5/16 X 3/4”)
Machine screws (5/16 X 3/4”)
42
52Écrous auto-bloquants (5/16”)
Self-locking nuts (5/16”)
7
9
10
4
1
4
Vis mécaniques (1/4 X 2 1/2”)
Machine screws (1/4 X 2 1/2”)
8 2 Poignée d'assistance
Safety handles
Ressort
Spring
Rondelles d’arrêt
Lock washer

3
1
Étape / Step
Back
Mounting
You will need two 1/2” wrenches to
perform this step.
1. Pull the back of the chair up (figure 1)
Note: The junction points between the seat
and the back are normally lubricated on
both sides; do not wipe the grease out, it
prevents the chair from squeaking.
2. Insert screw #4 through all parts as
shown on figure 2.
3. Place nylon washer #6 between the
back’s post and the seat’s frame.
4. Tighten firmly while securing nut #5
with a 1/2” wrench.
CAUTION : Nut #5 is self-locking. Make
sure to tighten it firmly by threading the
bolt through the nylon insert (figure 3).
5. Repeat this procedure on the other side
of the chair.
Fixation
du dossier
Vous aurez besoin de 2 clés de 1/2 po pour
cette étape.
1. Relevez le dossier à la verticale (dessin 1).
N.B. : Il est normal que les points de jonction
du siège et du dossier soient graissés des deux
côtés; n’enlevez pas cette graisse, elle est
nécessaire pour empêcher la chaise de grincer.
2. Insérez la vis #4 dans l’orifice des pièces
tel que montré sur dessin 2.
3. Placez la rondelle de nylon #6 entre
le montant du siège et du dossier.
4. Serrez fermement en maintenant l’écrou
#5 avec une clé 1/2 po.
ATTENTION : l’écrou #5 est autobloquant,
s’assurer de serrer celui-ci fermement en
passant le boulon à travers la bague de nylon
(dessin 3).
5. Répétez la même procédure pour l’autre
côté de la chaise.
1
3
#4
#6
#5
2
Mécanisme de bloquage
Blocking mechanism

4
2
Étape / Step
instaLLation
du ressort
1. Accrocher le ressort #9 à l’arrière
à l’endroit indiqué dans le dessin.
2. Appliquer une pression sur la barre
en “V” et sur la barre transversale
du dossier pour accrocher le ressort.
spring
instaLLation
1. Install spring #9 in the back of the chair
on the designated area shown on
picture below.
2. Apply pressure on the “V” rod and
on the transversal rod of the back to hang
the spring as shown on picture below.
1
2

3
Étape / Step
1
Fixation des
appuis-Bras
Cette étape nécessite un tournevis carré.
1. Alignez les orifices de l’appui-bras et de
la poignée d’assistance #8 avec ceux du
bras tubulaire (dessin 1) et utilisez la vis
mécaniques #7 et la rondelle d'arrêt #10 afin
de les maintenir en place.
2. Enrouler chacun des velcros autocollants
autour des 3 supports (dessin 2).
3. Bien centrer le panneau en superposant
les velcros.
4. Répétez l’opération pour l’autre bras.
arMrests
Mounting
You will need a screwdriver, either square,
to perform this step.
1. Align holes from armrest and handle #8
with the ones on the frame (figure 1) and
use machine screws #7 and lock washer #10
to hold them in place.
2. Roll up each of the self-adhesive velcros
around the 3 brackets (figure 2)
3. Center the panel and align with velcros.
4. Repeat the procedure for the other armrest.
2
5
Velcro
Enrouler / Roll up
Velcro
Velcro
#7
#10

6
4
Étape / Step
2
3
1
Fixation des
coussins
1. Rassemblez le dos et le siège avec
la fermeture éclair (dessin 1).
2. Insérez l’enveloppe du coussin sur
le dossier de métal du dos (dessin 2).
3. Insérez l’enveloppe du coussin sur
le siège de métal et fixez le velcro
(dessin 3).
cusHions
instaLLation
1. Zip the seat and back together
(figure 1).
2. Slide the cushion envelope over
metal back (figure 2).
3. Slide the cushion envelope on
the metal seat and attach Velcro
(figure 3).

7
5
Étape / Step
aJusteMent
des pattes
1. Ajuster les pattes à la hauteur
désiré en vissant ou dévissant
celles-ci par le boulon fix.
2. Bloquer avec l’écrou en le vissant
par le haut.
adJustaBLe
Legs
1. Adjust height of the chair by
screwing or unscrewing them
to the desired height with the help
of the fixed nut closer to the ground.
2. Block with nut by screwing
it upward.
1
2

Warranty
1 year (from the date of purchase and upon presentation of the invoice)
The warranty on the product AGE appllies against defects in workmanship.
This warranty will lose effect in the following cases:
• The clothing is altered by any inappropriate product
• Commercial or industrial use of of the product
• Damage such as, burns liquid liquid spill, torn fabric and excessive rubbing
• Squeaking related to a lack of grease or over crewed side panels
• The chair is not well assembled**
• Abusive product use
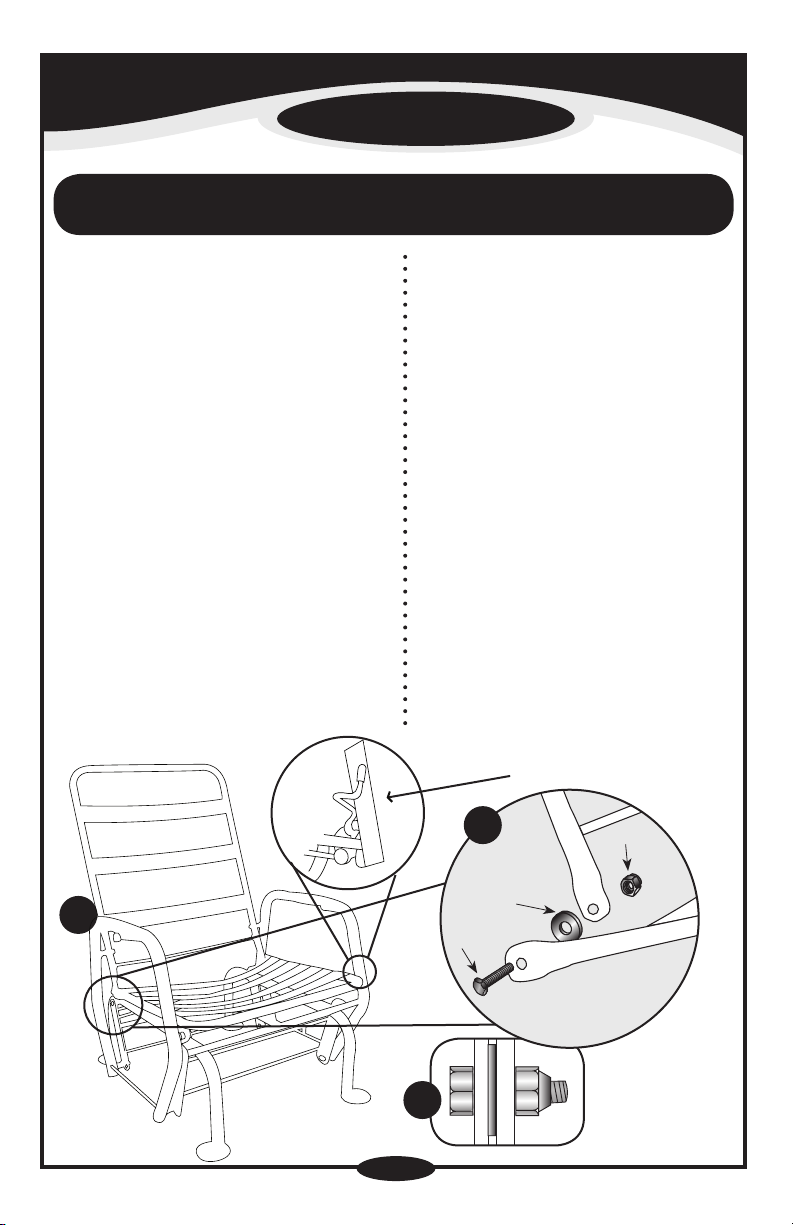
** THIS CHAIR BEING SOLD PARTIALLY ASSEMBLED AND INSTRUCTIONS FOR COMPLETING THE ASSEMBLY BEING CLEARLY
INDICATED, NO WARRANTY WILL APPLY IF PROBLEMS OCCUR BECAUSE THE CHAIR WAS NOT ASSEMBLED WELL.
PEl IntErnAtIonAl ltéE will, at its own choice, repair or replace any part proven defective upon its own
verification and approbation.
SAFETY PRECAUTIONS :
Here are a few tips to help you appreciate our products.
• Never recline and rock the chair at his maximum at the same time.
• Children should not be allowed to play on or with this furniture.
• To prevent dammages, put this furniture away from walls.
Sincerely,
8
IMPRIMÉ AU CANADA / PRINTED IN CANADA
1 an (à partir de la date d’achat et sur présentation de la facture)
La garantie sur les produits AGE s'applique à tout défaut de fabrication.
Cette garantie ne s'applique pas dans les cas suivants :
• Si le tissu a été endommagé par un produit non conforme ou inadéquat
• L'usage commercial et industriel du produit
• Les dommages accidentels tels que brûlures, liquide renversé, déchirures, frottement excessif
• Le grincement dû à un manque de graisse ou aux panneaux latéraux vissés avec excès
• Le mauvais assemblage du fauteuil **
• Un usage abusif du produit
** PUISQUE CE FAUTEUIL EST VENDU PARTIELLEMENT ASSEMBLÉ ET QUE LES INSTRUCTIONS POUR L’ASSEMBLAGE
SONT CLAIREMENT INDIQUÉES, AUCUNE GARANTIE NE S’APPLIQUE SI DES PROBLÈMES SURVIENNENT À LA SUITE
D’UN MAUVAIS ASSEMBLAGE DU FAUTEUIL.
Notre obligation selon cette garantie est de réparer ou de remplacer toute pièce défectueuse après vérification et
approbation de PEl IntErnAtIonAl ltéE.
MESURES DE SÉCURITÉ :
Voici quelques conseils vous permettant de mieux apprécier nos produits.
• Ne jamais incliner le fauteuil à son maximum et se bercer en même temps
• Afin d’éviter des accidents, ne pas laisser les enfants jouer sur ou avec ce fauteuil
• Afin d’éviter des dommages, placer le fauteuil à une distance raisonnable du mur
En vous remerciant,
Garantie
This manual suits for next models
1
Table of contents
Popular Indoor Furnishing manuals by other brands

BLACK RED WHITE
BLACK RED WHITE RUSO S407-KOM3W3D Assembly

Leroy Merlin
Leroy Merlin CLOVE Assembly manual

S-BOL
S-BOL WF307275 Assembly instructions

GFW
GFW Hollywood Assembly instructions

FourStar
FourStar 11225119 Assembly instructions

Julian Bowen Limited
Julian Bowen Limited Blenheim Velvet Wing Bed Assembly instructions

Williams-Sonoma
Williams-Sonoma Rigdon Assembly instructions

Jysk
Jysk BATALDEN 5236700 Assembly instructions

STILFORD
STILFORD STPR15FBKT Assembly instructions

RSA Lighting
RSA Lighting QCM5104 installation instructions

Birlea
Birlea TORONTO BED Assembly instructions

overstock
overstock 194S8308-LCPW Assembly instruction