pellenc RASION 2 SMART User manual

LAWN MOWER
RASION 2 SMART
Operating instructions 59_143879-B
09/2020
ENG
Translation of the
original user guide
READ THE USER GUIDE CAREFULLY BEFORE USE
.


LAWN MOWER RASION 2 SMART
59_143879-B
TABLE OF CONTENTS
1. INTRODUCTION ..................................................................................................................... 5
2. SAFETY ................................................................................................................................... 6
2.1. GENERAL SAFETY WARNINGS .................................................................................................... 6
2.1.1. TRAINING ......................................................................................................................................... 6
2.1.2. PREPARATION .................................................................................................................................. 6
2.1.3. OPERATION ...................................................................................................................................... 6
2.1.4. MAINTENANCE AND STORAGE ....................................................................................................... 7
2.2. SAFETY MEASURES ASSOCIATED WITH CHARGER AND BATTERY USE ............................. 7
2.3. PERSONAL PROTECTION EQUIPMENT ....................................................................................... 7
2.4. SAFETY SIGNAGE .......................................................................................................................... 8
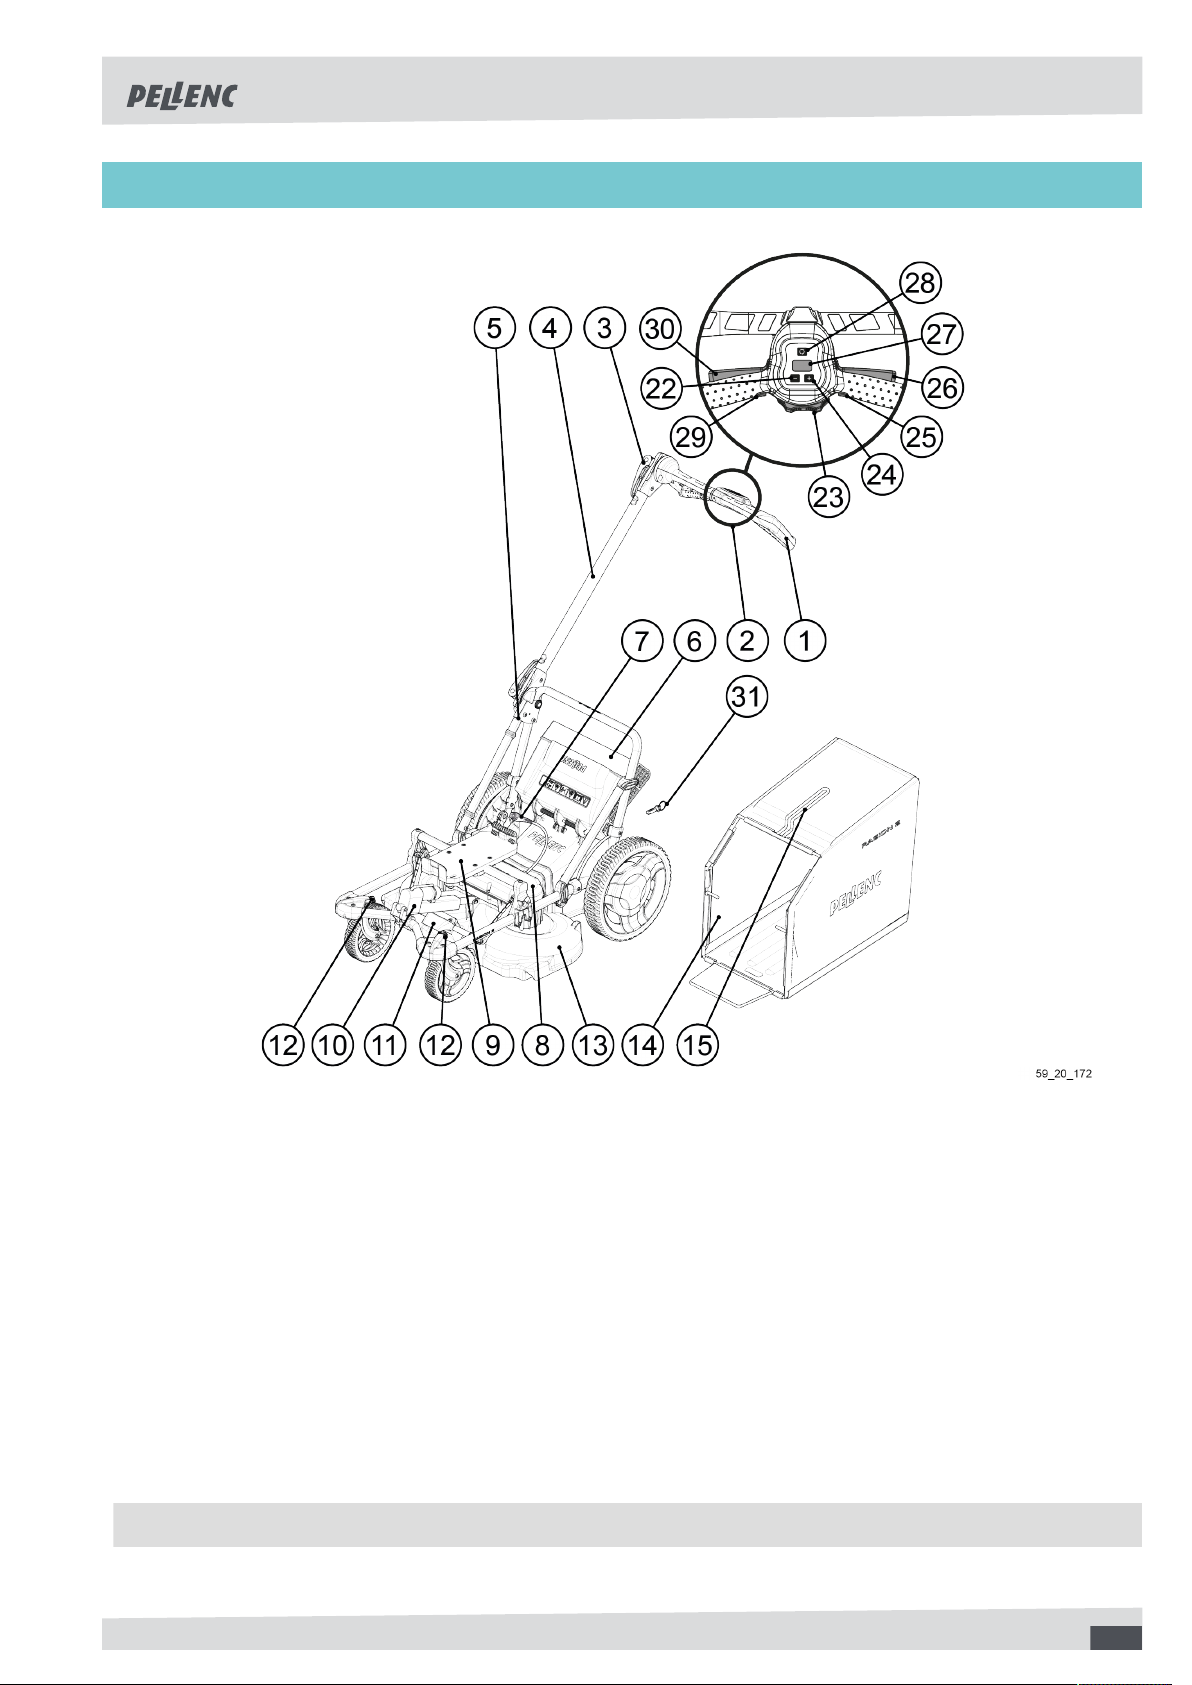
3. DESCRIPTION AND FEATURES .......................................................................................... 9
3.1. TECHNICAL CHARACTERISTICS .................................................................................................. 9
3.2. NOISE LEVELS .............................................................................................................................. 10
4. COMMISSIONING ................................................................................................................. 11
4.1. UNFOLD THE MOWER INTO THE WORKING POSITION .......................................................... 11
4.2. COLLECTING BIN CAPACITY ...................................................................................................... 13
4.3. INSTALLATION OF A BATTERY TRAY ....................................................................................... 13
4.4. 750 / 1200 / 1500 BATTERY: INSTALLATION AND CONNECTION ........................................... 14
4.5. ALPHA 260 / 520 BATTERY: INSTALLATION AND CONNECTION ........................................... 15
5. USE ....................................................................................................................................... 17
5.1. TURN THE BATTERY ON / OFF .................................................................................................. 17
5.2. SETTINGS ...................................................................................................................................... 17
5.2.1. CONTROL UNIT .............................................................................................................................. 18
5.2.2. ADJUSTING THE TRAVEL SPEED .................................................................................................. 18
5.2.3. ADJUSTING THE ROTATIONAL SPEED OF THE BLADES ............................................................... 18
5.2.4. ADJUSTING THE CUTTING HEIGHT ............................................................................................... 20
5.3. CONTROLS .................................................................................................................................... 21
5.3.1. STEERING CONTROLS ................................................................................................................... 21
5.3.2. BOOST OF MOVEMENT FUNCTION ............................................................................................... 21
5.3.3. MOWING CONTROLS ..................................................................................................................... 22
5.3.4. THE BOOST FUNCTION ................................................................................................................. 22
5.3.5. COMBINATION OF CONTROLS ...................................................................................................... 23
5.3.6. LOCK / UNLOCK THE FRONT WHEELS DIRECTION ....................................................................... 24
5.3.7. ENABLE/DISABLE THE PARKING BRAKE/TRANSPORT BRAKE ...................................................... 24
5.4. IMMOBILIZER SYSTEM ................................................................................................................ 25
5.4.1. SECURITY KEY ............................................................................................................................... 25
5.4.2. INCLINOMETER .............................................................................................................................. 26
5.5. ADVICE FOR USE ......................................................................................................................... 26
5.5.1. MOWING METHOD ......................................................................................................................... 27
5.5.2. CUTTING HEIGHT ........................................................................................................................... 27
3

LAWN MOWER RASION 2 SMART
59_143879-B
5.5.3. SLOPES .......................................................................................................................................... 28
5.5.4. DAMP GROUND .............................................................................................................................. 28
5.5.5. MOWING WITH GRASS COLLECTION ............................................................................................ 28
5.5.6. MOWING WITHOUT GRASS COLLECTION ..................................................................................... 29
5.5.7. MOWING WASTE ............................................................................................................................ 29
6. MAINTENANCE .................................................................................................................... 30
6.1. MAINTENANCE FREQUENCY ...................................................................................................... 30
6.2. USEFUL ADVICE FOR RISK FREE MAINTENANCE .................................................................. 31
6.2.1. CUTTING BLADES .......................................................................................................................... 31
6.2.2. CUTTER HOUSING ......................................................................................................................... 32
6.2.3. WHEELS ......................................................................................................................................... 33
6.2.4. COLLECTING BIN ........................................................................................................................... 33
6.2.5. CLEANING THE OPTICAL SENSOR ................................................................................................ 33
7. INCIDENTS AND TROUBLESHOOTING ............................................................................. 34
8. STORAGE AND TRANSPORT ............................................................................................ 36
8.1. FOLD THE MOWER INTO THE TRANSPORT POSITION ........................................................... 36
8.2. STORAGE ...................................................................................................................................... 37
8.3. OFF-SEASON STORAGE ............................................................................................................. 38
9. ACCESSORIES AND CONSUMABLES .............................................................................. 38
10. GENERAL WARRANTIES .................................................................................................. 39
10.1. STATUTORY WARRANTY .......................................................................................................... 39
10.1.1. LATENT DEFECTS WARRANTY .................................................................................................... 39
10.1.2. LEGAL WARRANTY OF CONFORMITY ......................................................................................... 39
10.2. COMMERCIAL WARRANTYPELLENC ...................................................................................... 40
10.2.1. CONTENT ..................................................................................................................................... 40
10.2.2. DURATION OF THE WARRANTY .................................................................................................. 40
10.2.3. IMPLEMENTATION OF THE COMMERCIAL WARRANTY ............................................................... 41
10.3. PAID AFTER-SALES SERVICE .................................................................................................. 41
10.3.1. GENERAL INFORMATION ............................................................................................................. 41
10.3.2. WEAR PARTS AND CONSUMABLES ............................................................................................. 41
10.3.3. SPARE PARTS .............................................................................................................................. 41
11. COMPLIANCE STATEMENTS ........................................................................................... 42
11.1. "EC" DECLARATION OF CONFORMITY: RASION 2 ................................................................ 42
4

LAWN MOWER RASION 2 SMART
59_143879-B
1. INTRODUCTION
Dear Customer,
Thank you for purchasing your Lawn mower Rasion 2 Smart . Correctly used and maintained, this tool will give a
satisfactory performance for many years.
Warning
Your device contains numerous recoverable or recyclable materials. Return it to your
dealer or, failing this, to an approved servicing centre to be treated.
Comply with the regulations in force in your country as concerns environmental protection associated with your
activity.
Warning
It is imperative that you read through the ENTIRE user’s manual before using or servicing the
tool. Always comply with the instructions and illustrations in the manual.
All through this user guide you will find advisory notes and information entitled: NOTE, IMPORTANT, ATTENTION
and WARNING.
The points marked “NOTE” indicate additional information.
The points marked “IMPORTANT” warn the user of a potential risk to the equipment.
The points marked “ATTENTION” warn the user of a potentially hazardous situation which if not avoided leads to
minor injuries.
The points marked “WARNING” warn the user of a potentially hazardous situation which if not avoided leads to
serious injury or death.
The warning indicates that damage resulting from failure to comply with the procedures and instructions is not
covered by the warranty and the owner will be liable for any repair costs.
Safety indications are also given on the tool; they remind you of the safety precautions to be taken. Identify and
read these indications before using the tool. Immediately replace any indications that may become partially illegible
or deteriorated.
Refer to Section 2.4, “Safety signage” for the location diagram of the safety stickers affixed to the tool.
No part of this manual may be reproduced without the written permission of the company PELLENC. The illustrations
given in this manual are for information purposes and are in no way contractual. The PELLENC company reserves
the right to make any modification or improvement to its products as deemed necessary without informing customers
already in possession of a similar model. This manual forms an integral part of the tool and must accompany the
tool if it changes hands.
5

LAWN MOWER RASION 2 SMART
59_143879-B
2. SAFETY
2.1. GENERAL SAFETY WARNINGS
Warning
Read all safety warnings, instructions, illustrations and specifications provided with this
power tool. Failure to follow all instructions listed below may result in electric shock, fire and/
or serious injury.
Note
Retain all the safety measures and instructions for later reading.
This device is not intended for use by individuals (including children) with reduced physical, sensory or mental
capabilities, nor by anyone lacking in experience or knowledge, except if they are supervised or have received prior
instructions from a person responsible for their safety.
• Your Lawn mower Rasion 2 Smart is a professional tool whose use is reserved exclusively for cleaning of green
spaces (grass, dense grasses, woody weeds and brambles).
• The PELLENC SAS company accepts no responsibility for any damage caused by improper or unspecified use
different from its original intention.
• The PELLENC SAS company accepts no responsibility for any damage caused by the use of non-original parts
or accessories.
Operating rules to be respected for your safety when using lawn mowers with electric motors.
2.1.1. TRAINING
1. Read the instructions carefully. Become familiar with the controls and the proper use of equipment.
2. Never allow children or individuals who are unfamiliar with these instructions to use the machine. National
regulations may restrict operator age.
3. Never operate the machine while other people, especially children, or pets, are nearby.
4. Keep in mind that the operator or user is responsible for any accidents caused by them and the dangers that
other people or their property may run.
2.1.2. PREPARATION
1. During operation of the machine, always wear protective footwear and long trousers. Do not operate the ma-
chine barefoot or in sandals. Avoid wearing loose clothing or items with loose cords, or a tie.
2. Inspect the entire area where the machine will be used and remove all objects that might be thrown by it.
3. Before use, always visually inspect the machine to ensure that its cutting elements, bolts and the assembly in
general, are not worn or damaged. Replace sets of worn or damaged components in order to maintain proper
balance. Replace damaged or difficult to read labels.
4. Before use, check the power cable to detect signs of damage or aging. Immediately disconnect the battery if
the cable becomes damaged during use. Do not touch the cable before turning off the battery. Do not use
the machine if the cable is damaged or worn.
2.1.3. OPERATION
1. Only operate the machine in daylight or in good artificial light. Use safety equipment. Always wear eye protec-
tion.
6

LAWN MOWER RASION 2 SMART
59_143879-B
2. Avoid operating the machine on wet grass. Remove any adjusting wrenches before switching the tool on.
3. Always place your feet firmly when on slopes.
4. Walk, never run.
5. Mow transversely on slopes, never up and down.
6. Be very careful when changing direction on slopes.
7. Do not mow excessively steep slopes.
8. Use the machine with extreme caution when using it in reverse or pulling it toward you.
9. Turn off the cutting elements if the machine has to be tilted for transport through non-grassy areas and when
it has to be transported to or brought back from the location where it is to be used.
10. Never use the machine with defective guards or without safety devices in place, for example deflectors and/
or grass catchers.
11. Start the engine, drive carefully according to instructions and with your feet at a safe distance from the cutting
elements.
12. Do not put hands or feet near or under rotating parts. Never allow the ejection opening to get clogged.
13. Do not transport the machine while the power source is attached.
14. To stop the machine, turn off the battery and remove the battery connector. Make sure all moving parts have
completely stopped.
15. Stop the machine and remove the power-off device. Make sure all moving parts have completely stopped
• before leaving the machine,
• before cleaning any jams, or emptying the chute,
• before checking, cleaning or repairing the machine,
• after hitting an object inspect the machine to detect any damage and carry out repairs before restarting and
using it.
If the machine begins to vibrate abnormally, it is essential at once to:
• inspect the machine to see if it is damaged,
• check if any parts have worked loose, and tighten them if necessary,
• repair or replace any damaged parts.
2.1.4. MAINTENANCE AND STORAGE
1. Make sure all nuts, bolts and screws are kept tight to be sure that the equipment is in good operating condition.
2. Check for wear or damage to the grass catcher frequently.
3. Replace worn or damaged parts so that the machine remains safe.
4. Take all precautions necessary when it comes to multi-blade machines, since the rotation of one cutting element
can cause all the others to rotate.
5. When adjusting the machine, avoid getting fingers caught between the moving blades and the fixed parts.
6. Always allow the machine to cool down before storing.
7. Pay attention during routine maintenance of the cutting elements, as they may still be moving, even if the power
source is cut off.
8. Replace worn or damaged parts so that the machine remains safe. Only use certified spare parts and acces-
sories.
2.2. SAFETY MEASURES ASSOCIATED WITH CHARGER AND BATTERY USE
Important
Please refer to the tool battery instructions.PELLENC
2.3. PERSONAL PROTECTION EQUIPMENT
Equipment Wear
1 Safety helmet --
2 Protective visor --
7

LAWN MOWER RASION 2 SMART
59_143879-B
3 Protective gloves Recommended
4 Safety footwear Mandatory
5 Ear protection Recommended
6 Protective goggles Mandatory
7 Jacket or over-sleeves Recommended
8 Work trousers Recommended
2.4. SAFETY SIGNAGE
Use the lawn mower with caution.
Pictograms on the ejection flap of the machine indicate the main precautions to be respected to avoid injury:
1 2 3 4
1. Read the user manual
Read the instructions carefully and follow the safety precautions.
2. Risk of injury
Ensure the people in the vicinity are not at risk from matter ejected from the machine.
Keep a safe distance of at least 15 meters between the machine and people in the vicinity.
3. Caution - the cutting blades are very sharp!
Keep your feet and hands away from the blade and the cutting area.
Remove the safety locking device before performing maintenance work and before leaving the mower unattended,
regardless of the duration.
4. Noise levels
Sound power dB
8

LAWN MOWER RASION 2 SMART
59_143879-B
3. DESCRIPTION AND FEATURES
1. Handle
2. Control unit
3. Handle adjusting lever
4. Handlebar
5. Handlebar adjusting lever
6. Ejection flap
7. 9-pin power cord
8. Cutter deck housing cover
9. 750/1200/1500 battery holder
10. Cutting height adjustment handle
11. Density sensor
12. Front wheels lock bolts
13. Cutter deck housing
14. Collecting bin
15. Collection bin handle
22. '-' button
23. Lawn mower direction button
24. '+' button
25. Right reverse button
26. Right trigger
27. LCD display
28. Menu button
29. Left reverse button
30. Left trigger
31. Security key
3.1. TECHNICAL CHARACTERISTICS
9

LAWN MOWER RASION 2 SMART
59_143879-B
Model Rasion 2 Smart
Dimensions when folded (l x w x h) 887 x 620 x 613 mm
Dimensions when unfolded (l x w x h) 1650 x 620 x 884 mm
Unladen weight (without battery or collecting bin) 30 kg
Cutting width 60 cm
Cutting height 25/35/45/55/65/75 mm
Collecting bin capacity 70 L
Weight of the empty collecting bin 2.7 kg
Cutter deck housing Cast aluminum
Maximum power 1600 Watts
Forward speed 2/3/4 or 5 km/h
Reverse speed 2 km/h
Safety equipment Removable security key
Sealing IP54
Battery-life According to use and battery type
Determination of the sound levels and vibration rates is based on the operating conditions at the nominal maximum
speed.
Maximum weighted sound pressure level A (ref. 20 µPa)
at the user's position
LpA = 83.5 dB(A) K = 2.5 dB
Values determined according to the sound measurement standards EN60335-2-77.
Symbol Value Unit Reference Remark
LWAm 92 dB(A) 1 pW Measured sound power level
LWAg 93 dB(A) 1 pW Guaranteed sound power level
The recording of the measured sound power level and of the guaranteed sound power level has been performed
according to a procedure in accordance with directive 2000/14/EC.
Vibration emission value as per EN60335-2-77 ahW = 0.7m/s²and K = 0.3m/s²
3.2. NOISE LEVELS
The noise generated by the mower and the battery life
both depend directly on the turning speed of the cutting
blades:
The faster the blades are turning, the greater the noise
and the lower the battery life. When the AUTO mode is
enabled, the noise generated will increase as the rota-
tional speed of the blades increases.
10

LAWN MOWER RASION 2 SMART
59_143879-B
4. COMMISSIONING
In the packing box, the mower is in the transport position.
The handlebar (4) is folded forwards and locked in place
by the adjusting lever (5).
To start using the mower, the mower must be unfolded
and in the working position.
4.1. UNFOLD THE MOWER INTO THE WORKING POSITION
Note
To be able to maneuver your lawn mower easily, chose a comfortable and agreeable working position to suit
your body shape.
Unlock the handlebar adjustment lever (5) by pulling it
back.
Fully tilt the handlebar (4) backwards.
11

LAWN MOWER RASION 2 SMART
59_143879-B
Adjust the tightness using the thumb wheel.
Push back the handlebar adjustment lever (5).
Unlock the handle adjustment lever (3).
Adjust the angle of the handle (1).
12

LAWN MOWER RASION 2 SMART
59_143879-B
Adjust the tightening by completely tilting the handle ad-
justment lever (3) and screwing or unscrewing its central
screw.
Lock the handle adjustment lever (3) to lock the handle.
4.2. COLLECTING BIN CAPACITY
Note
The mower works like a vacuum cleaner that throws the cut grass into the collecting bin. Ensure that you
always empty the collecting bin before it is full to avoid impairing the performance.
Overloading the bag may damage it. Before attaching the collecting bin to the lawn mower, always check it
for holes, tears or damage.
Lift the ejection flap (6) and slide the collecting bin (14)
into the notches located at the rear of the mower.
Note
Always check that the collecting bin is correctly attached to the lawn mower before you begin mowing.
4.3. INSTALLATION OF A BATTERY TRAY
The mower is equipped with the 750/1200/1500 battery support as standard. To use an Alpha 260/520 type battery,
the factory-installed support must be removed and replaced by a optional suitable support.
13

LAWN MOWER RASION 2 SMART
59_143879-B
Remove the 4 fixing screws of the pre-fitted battery tray.
Note
The Alpha 260/520 battery holder is sold with the
harness.
Remove the battery holder from the harness before
installing it on the mower.
Remove the battery tray that is to be replaced.
Place the alternative battery tray on the frame tube.
Install and tighten the 4 fixing screws of the battery tray.
4.4. 750 / 1200 / 1500 BATTERY: INSTALLATION AND CONNECTION
Check the battery life before use. If necessary, recharge
the battery using the charger supplied with the battery
(See the battery instruction manual).
Slide the battery from the rear into the upper hook of the
battery tray (9).
Clip the front of the battery into the lower hook of the
battery tray (9).
Check that the battery is completely locked on the tray.
59N_18_036
To remove the battery from the battery tray (9), lift it while
pressing the release button.
59N_18_037
14

LAWN MOWER RASION 2 SMART
59_143879-B
Before electrically connecting the battery to the mower,
check that the battery power indicator is off.
The power indicator (represented by a flash) should not
be visible on the battery display.
59N_18_041
Connect the power cable (7) of the mower to the battery
connector
Screw up tight and check that the cable is properly con-
nected.
59N_18_042
Caution
To prolong the life of the connectors, it is advisable to protect them when they are disconnected.
Therefore, avoid leaving the connector in contact with abrasive or dirty surfaces, or subjecting
it to major impacts (falls).
4.5. ALPHA 260 / 520 BATTERY: INSTALLATION AND CONNECTION
After having installed the appropriate battery tray, the procedure for installing an Alpha 260 / 520 type battery is
identical.
Check the battery life before use. If necessary, recharge
the battery using the charger supplied with the battery.
Slide the battery onto the guide of the battery tray.
15

LAWN MOWER RASION 2 SMART
59_143879-B
Move the battery along the guide until the locking clip
holds the battery in place.
Check that the battery is completely locked on the tray
with the battery safety lock.
Then connect the end of the mower cable to the battery
(23) taking care to align the polarizers.
Screw up tight and check that the cable is properly con-
nected.
Caution
To prolong the life of the connectors, it is advisable to protect them when they are disconnected.
Therefore, avoid leaving the connector in contact with abrasive or dirty surfaces, or subjecting
it to major impacts (falls).
16

LAWN MOWER RASION 2 SMART
59_143879-B
5. USE
The mower is now ready for use but before starting to mow, the battery must be turned on. Proceed as indicated
below:
5.1. TURN THE BATTERY ON / OFF
750 / 1200 / 1500 battery: Turn on the battery by press-
ing the upper or lower push button (battery power icon
present).
Note
When the battery is connected to the mower, the
battery display is turned towards the handlebar, so
that it is visible from the operator’s position.
Alpha 260 / 520 battery: Turn on the battery by pressing
the push button on the Alpha 260 / 520 battery support.
5.2. SETTINGS
Wait for the display to stabilize at the last set speed value A-2, A-3, A-4 or A-5 before making adjustments.
17

LAWN MOWER RASION 2 SMART
59_143879-B
5.2.1. CONTROL UNIT
The following settings are adjusted from the control unit
(2):
• the forward speed of the lawn mower (A)
• the turning speed of the cutting blades (C)
• the cutting height (H)
To switch from one setting to another, press the 'menu'
button (28)
To increase the value of a setting, press on '+' (24)
To decrease the value of a setting, press on '-' (22)
5.2.2. ADJUSTING THE TRAVEL SPEED
This is a self-propelled mower. When the forward switch is activated, the engines drive the rear wheels and the
mower moves forward on its own, leaving you to guide it. The self-propelling motor provides significant help for
effortless mowing of garden slopes or embankments.
If necessary, press on the 'menu' button (20) until you
reach the forward speed setting adjuster (represented by
the letter A):
As required, press on the '+' (24) or '-' (22) button to select
one of the four possible settings:
• A-2: with traction, slowest speed (2 km/h)
• A-3: with traction, moderate speed (3 km/h)
• A-4: with traction, accelerated speed (4 km/h)
• A-5: with traction, top speed (5 km/h)
5.2.3. ADJUSTING THE ROTATIONAL SPEED OF THE BLADES
Two different setting modes are possible:
18

LAWN MOWER RASION 2 SMART
59_143879-B
- 5.2.3.1. AUTOMATIC BLADE SPEED:
The density sensor (11) at the front of the lawn mower
can be used to automatically adjust the turning speed of
the cutting blades that varies between 3000 and 5000
rpm depending on the density of the grass.
For the mower adapt the turning speed of the cutting
blades automatically, set the lawn mower in C-H mode.
When the optical sensor is covered with dirt, it can no
longer analyse the density and the height of the grass to
be cut. The lawn mower therefore stops the blades from
turning and the displays the message 'OPT'.
To clean the density sensor (11), see Section 6.2.5,
“Cleaning the optical sensor”
If you wish to continue working regardless, switch to
manual mode and choose one of the four turning speeds
C-1, C-2, C-3 or C-4 and clean the sensor later.
- 5.2.3.2. MANUAL BLADE SPEED:
You can also manage the turning speed of the cutting blades manually by configuring the lawn mower in one of the
three possible settings C-1, C-2, C-3 or C-4.
The thicker and higher the grass, the faster the turning speed of the blades should be.
- 5.2.3.3. SELECTING THE TYPE OF TURNING SPEED:
Press the 'menu' button (28) until you reach the menu
corresponding to the adjustment of the rotational speed
of the cutting blades represented by the letter C.
Then press on the '+' (24) or '-' (22) button to select the
blades rotational speed type:
• C-H: auto-adjusted speed: 3000 to 5000 rpm
• C-1: manual speed 1: 3,000 rpm
• C-2: manual speed 2: 3,666 rpm
• C-3: manual speed 3: 4,333 rpm
• C-4: manual speed 4: 5,000 rpm
19

LAWN MOWER RASION 2 SMART
59_143879-B
Note
The blades continue to rotate as long as the right trigger (26), used to make the mower move forwards, remains
pressed. This means that you can release the left trigger (30) whilst mowing. When the right trigger (26) is
released, the blades stop rotating at the same time as the mower stops moving.
You can use the mower's motor to move it without turning the cutting blades.
5.2.4. ADJUSTING THE CUTTING HEIGHT
The distance between the cutting blades and the ground can be configured electronically in order to adapt the
cutting height to your needs. There are 6 different settings available at 10 mm intervals from 25 mm at the shortest
to 75 mm at the highest.
Press on the 'menu' button (28) until you reach the cutting
height setting (represented by the letter H).
If necessary, press on the '+' (24) or '-' (22) button to se-
lect the setting of your choice:
• H0: Parking brake/transport brake
• H25: 25 mm between the ground and the cutting
blades
• H35: 35 mm between the ground and the cutting
blades
• H45: 45 mm between the ground and the cutting
blades
• H55: 55 mm between the ground and the cutting
blades
• H65: 65 mm between the ground and the cutting
blades
• H75: 75 mm between the ground and the cutting
blades
Note
If the grass you are mowing is thick, you may need to go over it several times to obtain a uniform cut.
Note
If in doubt about which cutting height to choose, always start mowing with the highest cutting height. Examine
the result on a small area and, if necessary, adjust the cutting height again, being careful not to cut more than
1/3 of the height of the grass.
20
Table of contents
Other pellenc Lawn Mower manuals
Popular Lawn Mower manuals by other brands

Dixon
Dixon KODIAK KODIAK 52 Operator's manual

EDEN PARC
EDEN PARC EP175B107HK instruction manual

Lastec
Lastec ARTICULATOR XF100 Series Operator's manual

Craftsman
Craftsman 917.271650 owner's manual

Snapper
Snapper LT12D331B Series Safety instructions & operator's manual

Air Force
Air Force F-19 Gen3 owner's manual