pellenc Rasion Easy User manual

Rasion Easy
CONTENTS:
Translation of the
original user guide
ENG
READ THE USER’S GUIDE CAREFULLY BEFORE USE
USER GUIDE
• Rasion Easy Lawn mower
• Collecting bin
• Security key
59_132416_B - 01/2018


TABLE OF CONTENTS
INTRODUCTION ...........................................................................................................4
SAFETY INSTRUCTIONS ....................................................................................................4
GENERAL SAFETY INSTRUCTIONS FOR THE TOOL .........................................................................5
SAFETY MEASURES ASSOCIATED WITH CHARGER AND BATTERY USE ........................................................6
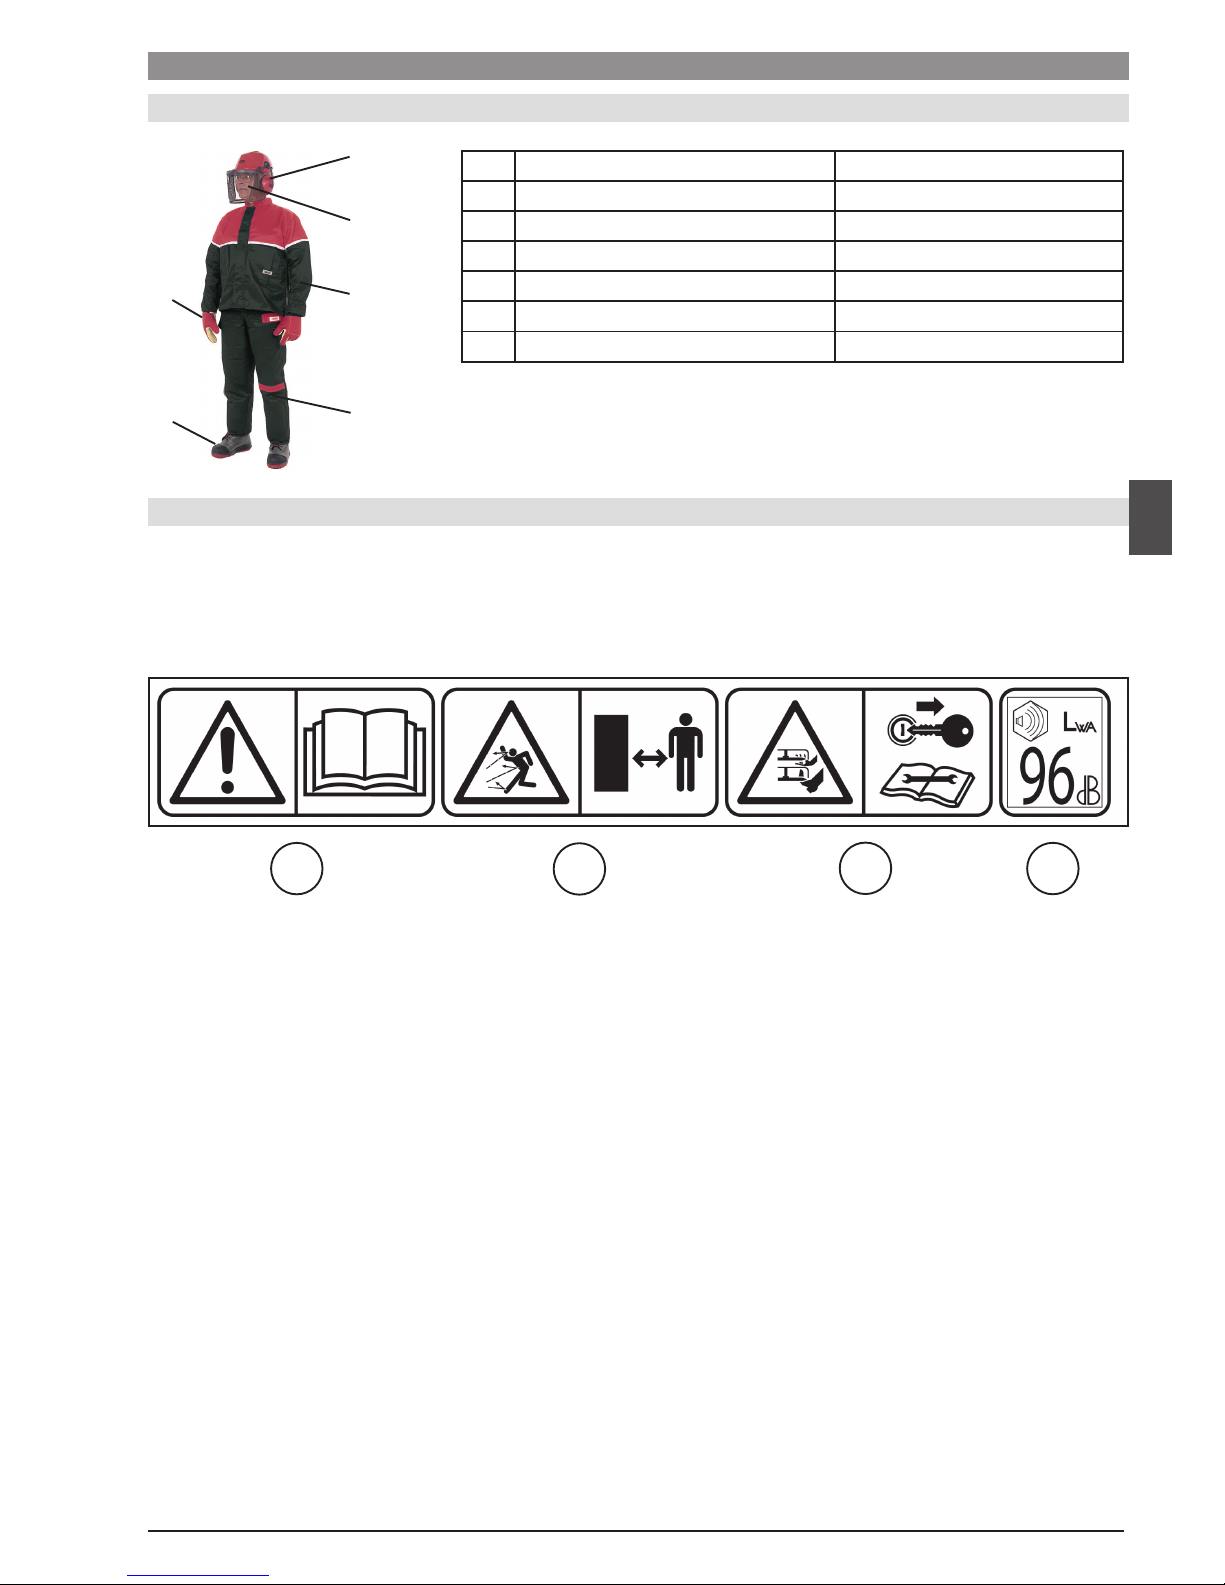
SAFETY SIGNALS..........................................................................................................7
SAFETY EQUIPMENT ...................................................................................................7
SAFETY SIGNALS ......................................................................................................7
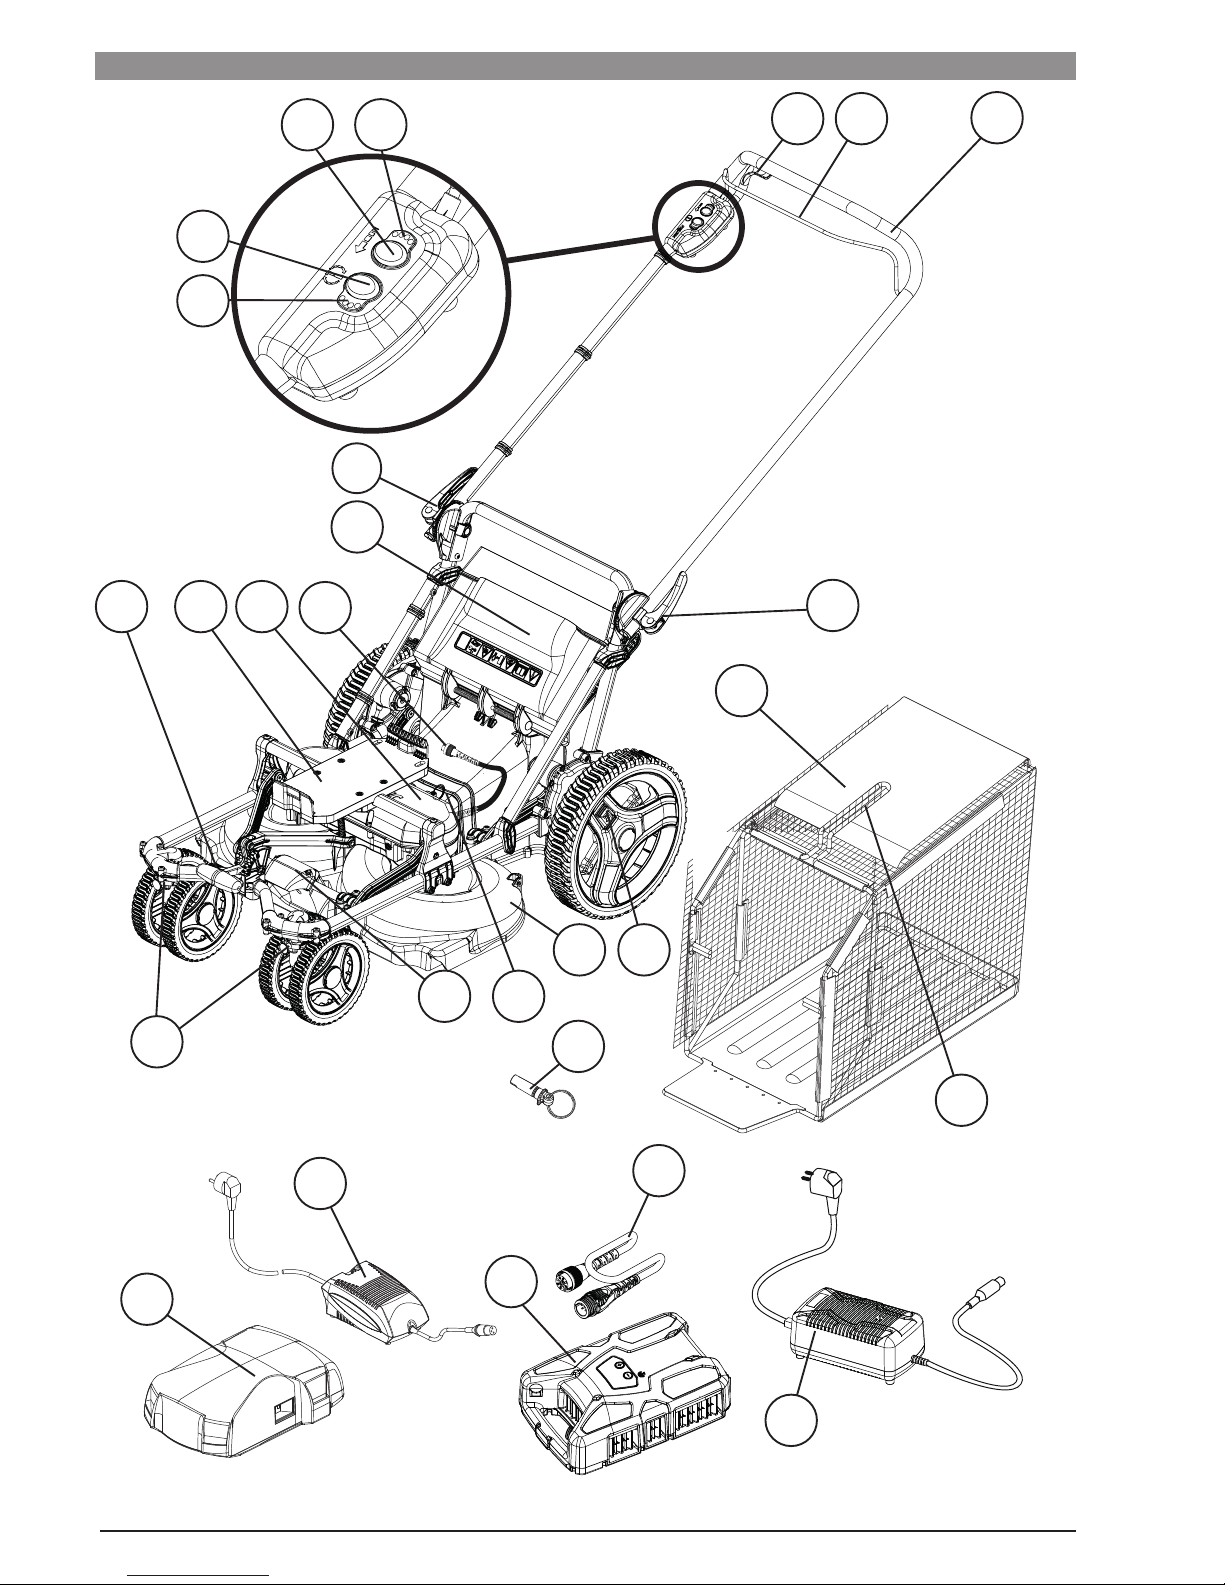
DESCRIPTION AND TECHNICAL CHARACTERISTICS ............................................................................8
TECHNICAL CHARACTERISTICS .........................................................................................9
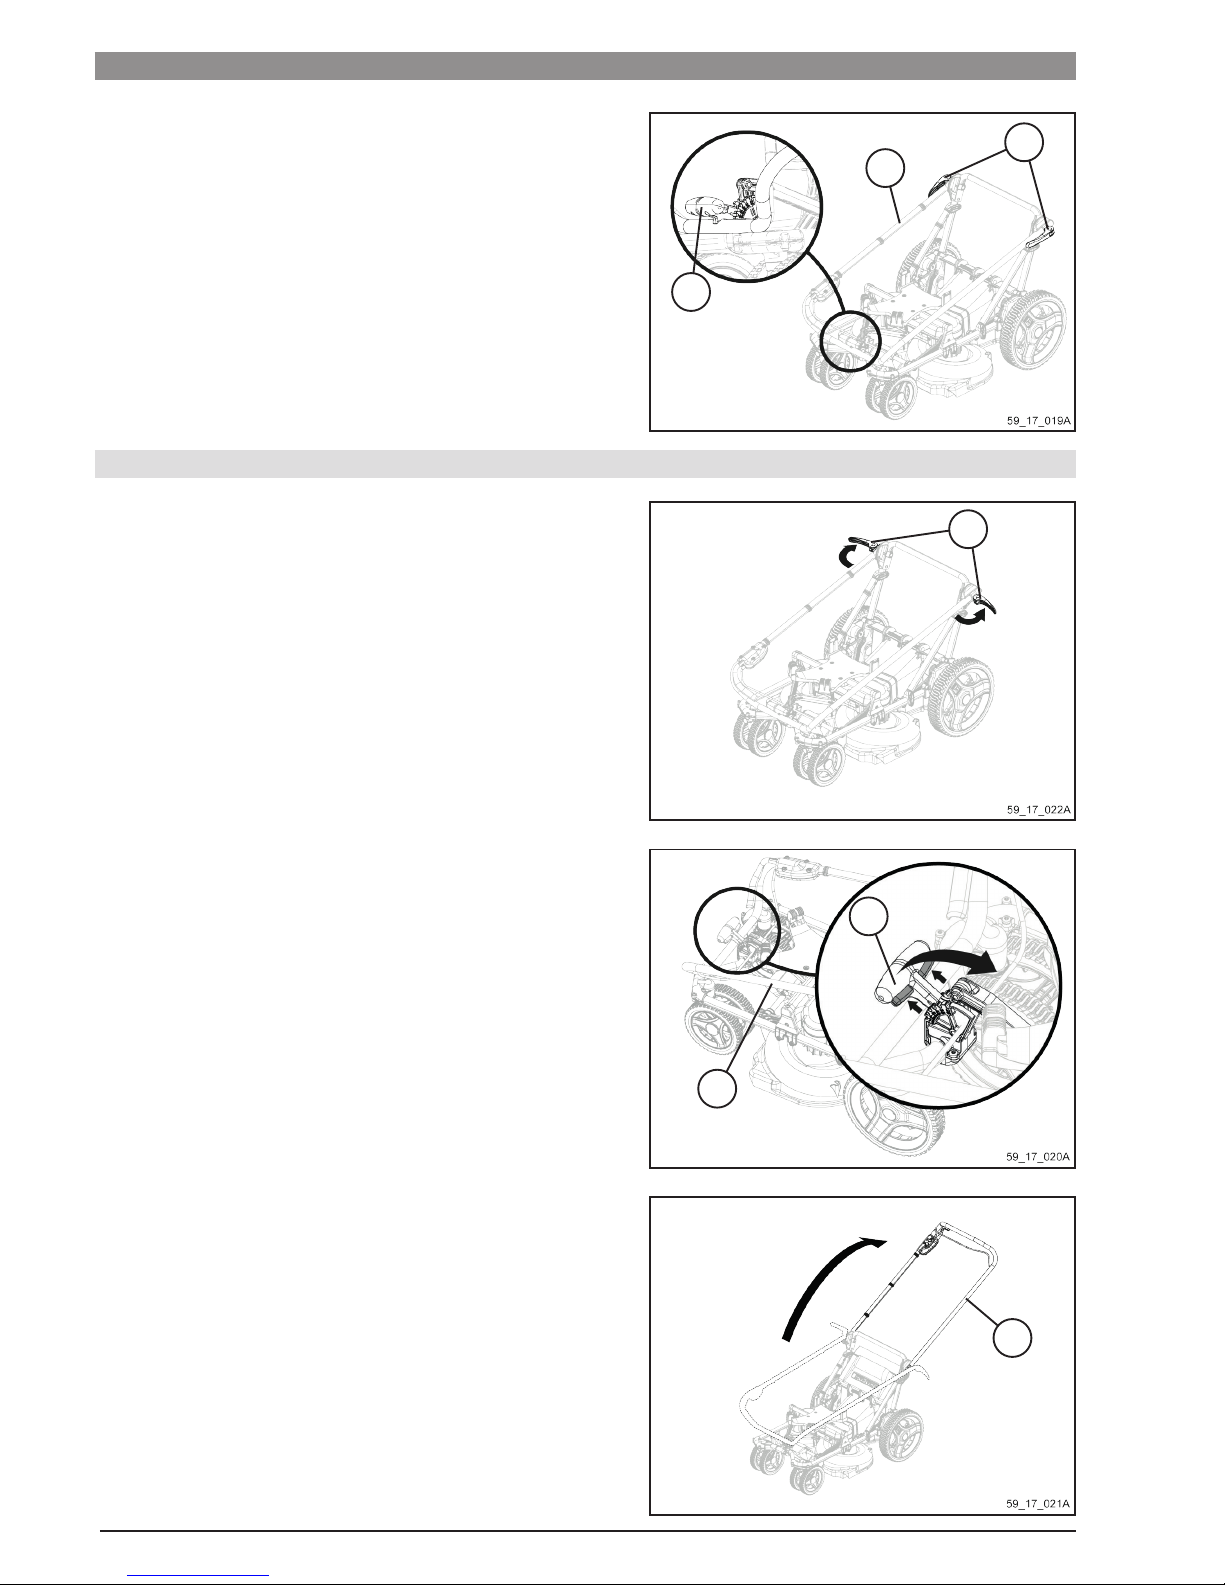
TOOL PREPARATION ......................................................................................................10
UNFOLDING THE TOOL ................................................................................................10
FITTING THE COLLECTING BIN .........................................................................................11
INSTALLATION OF A BATTERY HOLDER ..................................................................................12
INSTALLATION OF THE 1500 BATTERY ...................................................................................12
FITTING THE 400 / 700 / 800 / 1100 BATTERY...............................................................................13
CONNECTING THE 1500 BATTERY .......................................................................................13
CONNECTING THE 400 / 700 / 800 / 1100 BATTERY .........................................................................14
IMMOBILISER SYSTEM ................................................................................................15
PRELIMINARY SETTINGS ON THE TOOL......................................................................................17
TURNING THE BATTERY ON ............................................................................................17
ADJUSTING THE CUTTING HEIGHT ......................................................................................17
CONTROL UNIT.......................................................................................................17
FORWARD SPEED OF THE LAWNMOWER ................................................................................18
TURNING SPEED OF THE BLADES ......................................................................................18
ACCELERATION AND HANDLING OF THE TOOL ...............................................................................21
STEERING CONTROLS ................................................................................................21
MOWING CONTROLS ..................................................................................................22
BLOCKING/UNBLOCKING THE FRONT WHEELS ...........................................................................23
ACTIVATING / DEACTIVATING THE DECLUTCHING OF THE REAR WHEELS .....................................................24
TRANSPORTATION BRAKE .............................................................................................24
WORKING BRAKE.....................................................................................................25
ADVICE FOR USE .........................................................................................................26
MOWING METHOD ....................................................................................................26
CUTTING HEIGHT .....................................................................................................26
SLOPES .............................................................................................................27
DAMP GROUND ......................................................................................................27
MOWING WITH COLLECTION ...........................................................................................28
MOWING WITHOUT COLLECTION .......................................................................................28
MOWING WASTE .....................................................................................................28
MAINTENANCE ...........................................................................................................30
MAINTENANCE FREQUENCY ...........................................................................................30
USEFUL ADVICE FOR RISK FREE MAINTENANCE ..........................................................................31
HOUSING............................................................................................................31
WHEELS ............................................................................................................31
COLLECTING BIN .....................................................................................................32
CUTTING BLADES ....................................................................................................32
CHANGING PARTS ....................................................................................................32
TRANSPORT / STORAGE...................................................................................................33
TRANSPORT .........................................................................................................33
STORAGE ...........................................................................................................
33
OFF-SEASON STORAGE .......................................................................................33
ACCESSORIES AND CONSUMABLES ........................................................................................34
TROUBLESHOOTING AND TOOL PROTECTION ................................................................................35
PELLENC S.A. WARRANTY AND AFTER SALES SERVICE .......................................................................37
"EC" STATEMENT OF COMPLIANCE .........................................................................................39
3

PLEASE SAVE THESE INSTRUCTIONS
This manual contains important information and operating instructions for the following tool : the Rasion Easy
lawn mower
It is IMPERATIVE that you read through the ENTIRE USER'S MANUAL before using or servicing the tool.
Always comply with the instructions and illustrations in the manual.
INTRODUCTION
SAFETY INSTRUCTIONS
Dear Customer,
Thank you for purchasing the Rasion Easy lawn mower. Correctly used and maintained, this tool will give years of satisfactory
performance.
Comply with the regulations in force in your country regarding environmental protection associated with your
activity.
ENVIRONMENTAL PROTECTION
Your equipment comprises numerous materials which can be valorised or recycled. Entrust
these to your reseller or to an approved service centre so that they can be processed.
All through this user guide you will nd advisory notes and information entitled: REMARK, CAUTION /
WARNING.
A REMARK provides additional information, claries a point or explains a step to be followed in detail.
The CAUTION and WARNING advisories are used to dene a procedure which, if neglected or incorrectly
performed, may lead to serious damage to the equipment and/or personal injury.
This advisory:
G
indicates that if the procedures or instructions are not complied with, any damage will not
be covered by the warranty and the owner will be responsible for the repair costs.
Safety indications are also given on the tool; they remind you of the safety precautions to be taken. Identify
and read these indications before using the tool. Immediately replace any indications that may become
partially illegible or deteriorated.
Refer to the «SAFETY INDICATIONS» heading in order to identify the location of the safety
indications on the tool.
No part of this manual may be reproduced without the written consent of PELLENC. The illustrations
given in this manual are for information purposes and are in no way contractual. PELLENC reserves the
right to make any modication or improvement to its products as deemed necessary without informing
customers already in possession of a similar model. This manual forms an integral part of the tool and must
accompany the tool if it changes hands.
4

• The Rasion Easy lawn mower is a professional tool whose use is reserved exclusively for cleaning of green
areas (grass, dense grasses, woody weeds and brambles).
• PELLENC SA accepts no liability for any damage caused by improper use or use other than that for which it is intended.
• PELLENC SA accepts no liability for any damage caused by the use of non-original parts or accessories.
SAFETY INSTRUCTIONS
GENERAL SAFETY INSTRUCTIONS FOR THE TOOL
CAUTION Read all the safety measures and all the instructions.
Retain all the safety measures and instructions for later reading.
Training
a. Read the instructions carefully. Become familiar with the controls and the proper use of equipment.
b. Never allow children or individuals who are unfamiliar with these instructions to use the machine. National regulations may
restrict operator age.
c. Never operate the machine while other people, especially children, or pets, are standing nearby.
d. Keep in mind that the operator or user is responsible for any accidents caused by them and the dangers that other people
or their property may be subject to.
This device is not intended for use by anyone (including children) with reduced physical, sensory or mental capabilities,
nor by anyone lacking in experience or knowledge, except if they are supervised or have received prior instructions from
a person responsible for their safety.
PLEASE SAVE THESE INSTRUCTIONS
OPERATING RULES TO BE RESPECTED FOR YOUR SAFETY WHEN USING LAWN MOWERS WITH ELECTRIC MOTORS.
Operation
a. Only operate the machine in daylight or in good articial light. Use safety equipment. Always wear eye protection.
b. Avoid operating the machine on wet grass. Remove adjusting keys before turning the tool on.
c. Always place your feet rmly when on slopes.
d. Walk, never run.
e. Mow transversely on slopes, never up and down.
f. Be very careful when changing direction on slopes.
g. Do not mow excessively steep slopes.
h. Use the machine with extreme caution when using it in reverse or pulling it toward you.
i. Shut off the cutting elements if the machine has to be tilted for transport through non-grassy areas and when it has to be
transported to or brought back from the location where it is to be used.
j. Never use the machine with defective guards or without safety devices in place, for example deectors and/or collecting
bins.
k. Start the motor carefully according to instructions and with your feet at a safe distance from the cutting elements.
l. Do not tilt the machine when starting up the motor, unless it has to be tilted for starting. In this case, do not tilt it more than is
absolutely necessary and only tilt the part that is away from the operator.
m. Do not start the machine when the operator is in front of the ejection opening.
n. Do not put hands or feet near or under rotating parts. Never allow the ejection opening to get clogged.
o. Do not transport the machine while the power source is attached.
Preparation
a. During operation of the machine, always wear resistant footwear and long trousers. Do not operate the machine barefoot or
in sandals. Avoid wearing loose clothing or items with loose cords, or a tie.
b. Inspect the entire area where the machine will be used and remove all objects that can be projected by it.
c. Before use, always visually inspect the machine to ensure that the cutting elements, bolts and assembly of the latter are not
worn or damaged. Replace sets of worn or damaged components in order to maintain proper balance. Replace damaged
or unreadable labels.
d. Before use, check the power cable to detect signs of damage or ageing. Immediately disconnect the battery if the cable
becomes damaged during use. DO NOT TOUCH THE CABLE UNTIL YOU TURN OFF THE BATTERY. Do not use the
machine if the cable is damaged or worn.
5

SAFETY INSTRUCTIONS
p. Stop the machine and turn off the battery and remove the battery connector. Make sure all moving parts have completely
stopped.
q. Stop the machine and remove the power-off device. Make sure all moving parts have completely stopped
- before leaving the machine,
- before cleaning blockages or unclogging the chute,
- before checking, cleaning or repairing the machine,
- after impact with a foreign object. Inspect the machine to detect any damage and make repairs before restarting and
using it.
If the machine starts to vibrate abnormally (check it immediately)
- inspect the machine to see if it is damaged,
- repair or replace any damaged parts,
- check if the parts are loose and tighten if necessary.
Maintenance and Storage
a. Make sure all nuts, bolts and screws are kept tight to be sure that the equipment is in good operating condition.
b. Check for wear or damage to the collecting bin frequently.
c. Replace worn or damaged parts so that the machine remains safe.
d. Take all precautions necessary when it comes to multi-blade machines, since the rotation of a cutting element can cause
the rotation of all of the others.
e. When adjusting the machine, avoid getting ngers caught between the moving blades and the xed parts.
f. Always allow the machine to cool down before storing.
g. Pay attention during routine maintenance of the cutting elements, they may still be moving, even if the power source is cut
off.
h. Replace worn or damaged parts so that the machine remains safe. Only use original spare parts and accessories.
SAFETY MEASURES ASSOCIATED WITH CHARGER AND BATTERY USE
Please refer to the battery instructions of the relevant Pellenc tools.
6

3
4
15
26
14
3
2
SAFETY SIGNALS
SAFETY EQUIPMENT
1– Read the user manual
Read the instructions carefully and follow the safety precautions.
2– Risk of injury
Ensure that people in the vicinity are not injured by projections from the machine.
Keep a safe distance of at least 15 metres between the machine and people in the vicinity.
3– Caution - the cutting blades are very sharp!
Keep your feet and hands away from the blade and the cutting area.
Remove the locking device before performing maintenance work and before leaving the mower unattended, regardless of the
duration.
4– Noise Levels
Sound power 96 dB
SAFETY SIGNALS
Your lawn mower must be used with care.
With this in mind, pictograms to remind you of the main precautions to be taken have been included on the ejection ap of the
machine. Their meaning is explained below
Protective equipment Wearing
1Hard-wearing gloves Recommended
2 Safety footwear Recommended
3 Ear protection Recommended
4 Safety goggles Recommended
5 Safety jacket or over-sleeves Recommended
6 Work trousers Recommended
7

DOC_59_18_001A
1
2
45
8
8
10
16
9
12 11
13
18
20
19
14
21
3
6
7
17
15 22
23
20
19
24
DESCRIPTION AND TECHNICAL CHARACTERISTICS
8

DESCRIPTION AND TECHNICAL CHARACTERISTICS
TECHNICAL CHARACTERISTICS
Vibration emission value as per EN60335-2-77 ahW = 1.1 m/s2and K = 1.5 m/s
The sound levels and vibration rates are determined based on the operating conditions at the maximum nominal speed.
Maximum weighted acoustic pressure level A (ref. 20 µPa) at the user's position LpA = 84 dB(A) K = 1.5 dB
Values determined according to the acoustic measurement standards EN60335-2-77.
Symbol Value Unit Reference Remark
LWAm 94 dB(A) 1 pW Measured sound power level
LWAg 96 dB(A) 1 pW Guaranteed sound power level
The recording of the measured sound power level and of the guaranteed sound power level has been performed according to a
procedure in accordance with directive 2000/14/EC.
Model RASION EASY
Dimensions when folded (l x w x h) 885 x 620 x 601 mm
Dimensions when unfolded (l x w x h) 1534 x 620 x 1067 mm
Unladen weight (without battery or collecting bin) 29 kg
Cutting width 60 cm
Cutting height 25/35/45/55/65/75 mm
Gathering capacity 70 L
Weight of the empty collecting bin 3 kg
Cutter housing Cast aluminium
Maximum power 1100 Watts
Turning speed of cutting blades: manual mode 3000/4000/5000 rpm
Turning speed of cutting blades: automatic mode 3000 to 5000 rpm
Forward speed: 1/2,3/3,7/5 km/h
Speed in reverse drive 1/2 km/h
Safety equipment Removable security key
Sealing IP54
Battery life Depending on the use and type of battery
1– Handlebar
2– Blade On/Off bar
3– Drive trigger
4– Forward speed indicator LEDs
5– Speed selector knob
6– Blade speed selector knob
7– Blade speed indicator LEDs
8– Handlebar adjusting levers
9– Ejection ap
10– Battery power cable
11– Cutting deck cover
12– Battery support
13– Height adjustment handle
14– Front wheel locking pin
15– Density sensor (ICC)
16– Cutter housing
17– Rear wheel locking button
18– Collecting bin
19– CB50xx battery charger (not included)
20– Pellenc battery ULIB 400 / 700 / 800 / 1100 /
1500 (not supplied)
21– Collection bin handle
22– Security key socket
23– Security key
24– Adaptor cable for 1500 battery (supplied with
1500 battery)
9

13
13
1
1
8
8
1
TOOL PREPARATION
UNFOLDING THE TOOL
- With one hand, hold the cutting height adjustment
handle (13) whilst simultaneously pressing on the two
buttons to release its position.
- Hold the buttons down and pull the handle backwards.
- With your other hand, release the handlebar (1) and
reposition the handle in the notch in which it was held.
- Release the buttons and ensure that the handle is
correctly locked.
Your lawn mower is currently congured in transport
mode. The handlebar (1) is folded forward and is held
in place by the cutting height control knob (13) and the
handlebar adjustment levers (8).
Follow the start-up instructions below to begin to use
your lawn mower.
- Tilt the handlebar (1) backwards.
- Unlock the adjustment levers (8) by pulling them
backwards.
10

8
918
- Lift the ejection ap (9) and slide the collecting bin (18)
in the notches located at the rear of the lawn mower.
TOOL PREPARATION
FITTING THE COLLECTING BIN
The lawn mower works like a vacuum cleaner that throws the cut grass into the collecting
bin. Ensure that you always empty the collecting bin before it is full to avoid impairing the
performance. Overloading the bag may damage it. Before attaching the collecting bin to the
lawn mower, always check it for holes, tears or damage.
To be able to easily manoeuvre your lawn mower, chose a comfortable and agreeable working
position to suit your morphology.
Always check that the collecting bin is correctly attached to the lawn mower before you
begin mowing.
- Lock the two adjusting levers (8) to lock the handlebar
in the desired position (six positions are shown on
clamping nut, detail A).
- Adjust the tightness with the knob (detail B).
11

12
12
12
20
12
20
12
TOOL PREPARATION
INSTALLATION OF THE 1500 BATTERY
INSTALLATION OF A BATTERY HOLDER
The mower is tted at the base with a 1500 battery holder A different battery holder can be tted if a ULIB
400 / 700 / 800 / 1100 battery is used.
- Remove the 4 screws holding the battery holder (12) in
place.
- Put the preferred battery holder (12) onto the frame
tube.
- Insert and tighten the 4 battery holder xing screws
(12).
- Check the charge of the battery (20) before use.
Recharge the battery, when necessary, using the
charger (19) provided with the battery.
- Slide the battery (20) from the rear into the upper hook
on the battery holder (12).
- Clip the front of the battery (20) into the lower hook of
the battery holder (12).
- Check that the battery is completely locked on the
holder.
- To remove the battery (20) from the battery holder
(12), lift it and press on the release button.
12

20
12
10 24
TOOL PREPARATION
FITTING THE 400 / 700 / 800 / 1100 BATTERY
- Check the charge of the battery (20) before use.
Recharge the battery, when necessary, using the
charger (19) provided with the battery.
- Slide the battery (20) from the front as far as the upper
hooks on the battery support (12).
- Release the back of the battery to position it
horizontally on the support.
- Push the lower hooks on the support until they clip
onto the battery.
- Check that the battery is completely locked on the
support.
PLEASE NOTE: Only 400 / 700 / 800 / 1100 batteries with a red connector can be used with the
mower.
CONNECTING THE 1500 BATTERY
- Check the battery power indicator is off (battery power
icon not shown).
- Connect the adaptor cable for the 1500 battery (24) to
the battery power cable (10) taking care to align the
locators.
13

20 10
20 24
CONNECTING THE 400 / 700 / 800 / 1100 BATTERY
To prolong the life of the connector, it is advisable to protect it when unplugged. Therefore,
avoid bringing the connector into contact with abrasive or dirty surfaces, or subjecting it to
major impacts (falls).
TOOL PREPARATION
- Check that the battery switch is turned off (position '0').
- Connect the power cable (10) to the battery (20) taking
care to align the fool-proong devices.
- Connect the adaptor cable for the 1500 battery (24)
to the battery connector (20) taking care to align the
locators.
To prolong the life of the connectors, they should be protected when unplugged. So avoid
letting them come into contact with abrasive or dirty surfaces, or subjecting them to major
impacts (falls).
14

23
22
G
a. Security key:
- Insert the security key (23) into the socket (22).
Thislawnmoweristtedwithakeyimmobilisersystemthatpreventsthemotorfromstarting
if the key is not in its socket.This system helps to limit the risks of accidents and theft.
TOOL PREPARATION
IMMOBILISER SYSTEM
CAUTION:
Take the security key with you whenever you step away from the lawn mower or your work
isnished.Keepthekeywithyouorinasecureplacewhereit cannotbeaccessedby
unauthorised people.
If the key is pulled out or not detected, the lawn mower will stop immediately. The display
shows 'CLE' and cuts off power from the battery. To restart the mower, turn off the battery,
insert the security key in its socket and turn the battery back on.
The lawn mower will work once again.
- For your safety, it is impossible to start the blades
when it is in a vertical position:
- for cleaning
- for unclogging
- to change worn parts
This lawn mower is equipped with an inclinometer that prevents engine start up when the
mower is steeply inclined or turned over.
b. Immobiliser system:
15

Flashing error code for
safety shut down:
TOOL PREPARATION
CAUTION: If you are working on steep sloping ground, the angle of your lawn mower may be
too steep and the motor will not start. This is not due to a problem with the lawn mower but to
the triggering of a safety device.
Positionthelawnmoweronatground(slope<20°)tounblocktheimmobiliser.
ATTENTION: If you are working on steep sloping ground, the angle of your lawn mower may
be too steep and the motor will not start. This is not due to a problem with the lawn mower but
to the triggering of a safety device.
Ifyoudonotplacethemoweronlevelground(slope<20°),aashingerrorcodecorresponding
to the safety shut down of the mower will appear on the control box.
16

13
5
6
ADJUSTING THE CUTTING HEIGHT
PRELIMINARY SETTINGS ON THE TOOL
- Hold the cutting height adjustment handle (13) rmly
whilst simultaneously pressing on the two buttons to
release its position.
- Hold the buttons down and move the handle to one of
the six available positions, from 75 mm for the highest
cutting height to 25 mm for the lowest.
If you do not know which cutting height to use, start with the highest. Look at the results on
a small surface area and change the cutting height if necessary.
TURNING THE BATTERY ON
The cutting height is adjusted using the handle (13) to select one of six different cutting heights, from 75
mm at the highest, to 25 mm at the lowest.
CONTROL UNIT
You can start conguring the settings of the mower after
the battery is powered up.
The following can be set from the control box:
• The forward speed of the mower using the forward
speed selector knob (5).
• The rotational speed of the cutting blades using the
blade cutting speed selector knob (6).
- ULIB 400 / 700 / 800 / 1100 battery: Turn on the
battery by ipping the switch to the 'I’ position.
- ULIB 1500 battery: Turn the battery on by pressing on
the upper or lower pushbutton (battery power supply
icon present).
Congratulations! Your tool is now ready to operate.
You just need to turn on the battery and make a few preliminary settings (if they have not already been
done) and you can start mowing.
When the battery is powered up, the 8 LEDs
on the control box come on, one after the other.
17

5
6
PRELIMINARY SETTINGS ON THE TOOL
FORWARD SPEED OF THE LAWNMOWER
TURNING SPEED OF THE BLADES
- Perform several successive presses on the blade
rotation speed selector knob (6) to go from the
automatic speed to speed 1 (3000 rpm), speed 2
(4000 rpm) and nally to speed 3 (5000 rpm).
The four LEDs in the lower part of the control unit are indicate the blade rotation speed: 1, 2, 3 or 4. The
blade rotation speed can be modied at any time, before or after starting the lawn mower's motor.
Forward speed: Forward acceleration
- Press the speed selector knob several times
successively (5) in order to change from speed 1 (1
km/h) to speed 2 (2.3 km/h), then to speed 3 (3.7
km/h) and nally to speed 4 (5 km/h).
Forward speed: Reverse acceleration
- Pressing on the forward speed selector knob (5) to
switch from speed 1 (1 km/h) to speed 2 (2 km/h).
Beyond that, the reverse speed will remain be 2 km/h
even if 3 or 4 LEDs are on.
The four LEDs in the top of the control panel indicate the forward speed of the mower: 1, 2, 3 or 4. The
travel speed can be changed at any time before or after starting the mower’s engine.
For safety reasons the travel speed in reverse does not exceed 2km/h.
This is a self-propelled mower. As you press and hold the trigger, the motors drive the rear wheels and the
lawn mower moves forward by itself, you just need to steer. The driving power of this lawn mower offers
considerable assistance in effortlessly mowing gardens on a slope or tilt.
18

15
15
PRELIMINARY SETTINGS ON THE TOOL
You can also manage the turning speed of the cutting blades manually by conguring the lawn mower in
one of the 3 possible settings.
The thicker and higher the grass, the faster the turning speed of the blades should be.
The density sensor (15) located at the front of the mower
automatically regulates the rotation speed of the cutting
blades, which will varies between 3000 and 5000 rpm
depending on the density and height of the grass.
For the mower to automatically adjusts the speed of the
cutting blades, you must set the mower to automatic; a
single green LED will light up.
When the optical sensor is soiled, it can no longer
analyse the density and the height of the grass to be cut.
The mower stops the rotation of the cutting blades and a
ashing error code is displayed on the control box.
a. Automatic blade speed:
The optical sensor (15) must therefore be cleaned so
that the lawn mower can continue to automatically adjust
the turning speed of the cutting blades.
Turn off the battery.
Always clean the optical sensor with water and a wet
cloth then turn the battery back on.
Never use solvents!
If you still want to continue working, switch to manual
mode, select one of the three speeds and clean the
sensor later.
b. Manual blade speed:
Flashing error code of
the obstructed optical
sensor:
19

6
PRELIMINARY SETTINGS ON THE TOOL
In Boost mode the mower accelerates to its maximum speed (5000 rpm) for 2.5 seconds, then
returns to its set speed.
The boost function can be activated at any time in both automatic or manual mode. It is useful
when mowing irregularities are encounter (tall, dense grasses etc.) and avoids having to change
the initial settings of the mower.
The noise generated by the mower and the battery life
both depend directly on the turning speed of the cutting
blades:
The faster the blades are turning, the greater the noise
and the lower the battery life.
When the AUTO mode is enabled, the noise generated
will increase as the rotational speed of the blades
increases.
b. Boost function:
c. Noise Levels
The boost function can be activated using the bar (2) (see mowing commands page 22).
- Press the button (6) to select the type of blade rotational
speed (illustration of the view from the workstation)
1xedgreenLED: self-regulated speed: 3000 to 5000 rpm
2xedLEDs: Manual speed 1: 3000 rpm
3xedLEDs: Manual speed 2: 4000 rpm
4xedLEDs: Manual speed 3: 5000 rpm
a. Selecting the type of turning speed:
20
Other manuals for Rasion Easy
1
Table of contents
Other pellenc Lawn Mower manuals
Popular Lawn Mower manuals by other brands

Poulan Pro
Poulan Pro 433401 Operator's manual

Toro
Toro Recycler 21762 Operator's manual

Victa
Victa 125 cc operating instructions

Scag Power Equipment
Scag Power Equipment CHEETAH SCZ SCZ61V-31FX Operator's manual

Husqvarna
Husqvarna HU725AWD/BBC / 961430104 Illustrated parts list

Craftsman
Craftsman 917.388012 owner's manual