Pentair BLUEFURY LITE User manual

371885 (REV 12/2016) 1
English Deutsch
Nederlands
Español Italiano
2
14
26
38
50
62
INSTALLATION GUIDE / INSTALLATIEHANDLEIDING
BEDIENUNGSANTLEITUNG / GUIDE D’INSTALLATION
GUIA DE INSTALACION / GUIDE ALL’INSTALLAZIONE
Français
PRESSURE SIDE POOL CLEANER
BLUEFURY®LITE
IMPORTANT SAFETY INSTRUCTIONS READ AND FOLLOW ALL INSTRUCTIONS SAVE THESE INSTRUCTIONS
AQUATIC SYSTEMS 371885 (Rev. 12/2016)

371885 (REV 12/2016) 2
Customer Support
HERENTALS, BELGIUM (8:30 A.M. to 4:30 P.M.) CET
Website : www.pentairpooleurope.com
E-mail : poolemea@pentair.com
The manufacturer, Pentair, has the right to modify the products without previous noce for as far as the characteriscs are not
really changed by this.
© 2016 Pentair, Inc. All rights reserved. This document is subject to change without noce.
Trademarks and disclaimers: All Pentair trademarks and logos are owned by Pentair, Inc. BLUEFURY® and Pentair Aquac Sys-
tems™ are trademarks of Pentair Inc. and/or its aliated companies in the United States and/ or other countries. Unless ex-
pressly noted, names and brands of third pares that may be used in this document are not used to indicate an aliaon or
endorsement between the owners of these names and brands and Pentair Inc. Those names and brands may be the trademarks
or registered trademarks of those third pares.
Failure to follow the instrucons in this manual may result in serious adverse health eects, or even serious or fatal
injury. Failure to follow the instrucons in this manual will in all cases invalidate all guarantees and liability on the
part of the manufacturer. INSTALLERS, OPERATORS AND OWNERS MUST READ THESE WARNINGS AND ALL INSTRUCTIONS IN THE
OWNER’S MANUAL BEFORE USING THIS CLEANER. THESE WARNINGS AND THE OWNER’S MANUAL MUST BE LEFT WITH THE
HOME OWNER.
Aenon Installer: This guide contains important informaon about the installaon, operaon and safe use of this product.
This informaon should be given to the owner and/or operator of this equipment aer installaon of the pool cleaner.
Aenon User: This manual contains important informaon that will help you in operang and maintaining this pool cleaner. Please
retain it for future reference. Consult Pentair with any quesons regarding this equipment.
Before installing this product, read and follow all warning noces and instrucons which are included. Failure to follow safety warnings
and instrucons can result in severe injury, death, or property damage. Visit www.pentairpooleurope.com for addional free copies
of these instrucons.
Consumer Informaon and Safety
Thispoolcleaner is designed andmanufacturedtoprovidemanyyearsof safeandreliableservicewheninstalled,operatedandmaintained
according to the informaon in this manual. Throughout the manual, safety warnings and cauons are idened by the “ ” symbol.
Be sure to read and comply with all of the warnings and cauons.
Stop pump before aempng to clean unit. Do not allow swimmers in the pool while pool cleaner is operang. Hose
can trip or entangle swimmers which could result in drowning.
Moving parts may injure hands or ngers. Stop pump before aempng to clean out pool cleaner.
English
IMPORTANT WARNING AND SAFETY INSTRUCTIONS
Important Noce:

371885 (REV 12/2016) 3
General Installaon Informaon
Pre-Installaon Check List
Before installing your cleaner, review and understand all warnings and safety informaon in this guide. Failure to follow these instrucons
or improper installaon of the cleaner can result in damage to the pool nish or the vinyl liner, Most cleaners are not designed to traverse
from oor to wall when the pool cove is 90%. There may be other structures installed in the pool that the cleaner cannot navigate, BE
AWARE and supervise the cleaner during unique condions. Pentair Aquac Systems disclaims any liability for repairs or replacement to
any of these structures or components of the customer’s pool.
Before installing the cleaner in a vinyl liner pool:
Check liner closely for signs of deterioraon or damage from age, chemicals, pool wall damage, etc. If any damage is found, have a qualied
pool professional make all the necessary repairs. Also, if there are stones, roots, etc., under the liner, remove them before installing the
cleaner.
Before installing the cleaner in a gunite pool or a pool that is parally or completely led:
Make sure pool nish is in proper condion as staining, etching, cracking or delaminang may worsen.
Repair loose les and ghten any loose light rings.
Before installing the cleaner, clean your lter system:
Make sure you have cleaned the lter, including backwashing, rinsing, and emptying all baskets. A clean system is necessary for proper
cleaner operaon and coverage.
Before installing the cleaner, understand cleaner coverage:
The cleaner is designed to rid your pool of debris in approximately 4-6 hours. Less me could be needed, depending on the pool size. The
cleaner was not designed to automacally clean steps or swimouts, or to work under a solar cover. The cleaner may get stuck in these
areas which can result in damage to the pool nish or vinyl liner. Pentair Aquac Systems disclaims any liability for repairs or replacement
to any of these structures or components of the consumer’s pool. It was also not designed to do inial cleanup for a new pool or when
opening your pool for the season.
AFTER installing the cleaner, make sure the cleaner is operang correctly:
The cleaner may need some minor adjustments to make sure it is operang properly so there is no damage to the pool nish. Certain vinyl
liner paerns are parcularly suscepble to surface wear, paern removal, ink rubbing o of, or serious scratches to the paern caused
by objects coming into contact with the vinyl surface, including automac pool cleaners. Pentair Aquac Systems is not responsible for
any paern removal, abrasions or markings on vinyl liners. Periodically inspect the cleaner components and the cleaner performance to
ensure it is operang as designed. Replace and/or repair any worn or damages components. Failure to follow instrucons or improper
installaon of the cleaner may result in damage to the cleaner, pool nish or the vinyl liner.
Limited Warranty Terms & Condions
Before installing your cleaner, review and understand all warnings, safety and warranty informaon in this guide. Failure to follow these
instrucons or improper installaon of the cleaner can result in damage to the pool nish or the vinyl liner, Pentair Aquac Systems
disclaims any liability for repairs or replacement to any of these structures or components of the customer’s pool.
Limited Warranty : 2 years
Further details : www.pentairpooleurope.com
Disclaimer of Liability - About your Pool and Pressure Side Pool Cleaner
There are a multude of factors that contribute to the life of your pool. The pool cleaner is a very passive product that will have no impact
on pool life.
Please be aware that over me, deterioraon, discoloraon and brileness of any pool nish can be caused separately by, or in combinaon
with, age, an imbalance in pool water chemistry, improper installaon and other factors. Pressure side pool cleaners will not remove or
cause wear on “good” pool plaster. In fact, the opposite is true–pool plaster will eventually cause wear on the cleaner.
The same situaon holds true for vinyl-lined in-ground swimming pools, because vinyl liners are also aected by the environment and
factors such as pool water chemistry, sunlight and the pool’s surroundings. Therefore over me, vinyl can become brile and weak. In
addion, vinyl-lined pools are aected by the workmanship, composion and installaon of the liner and the workmanship and quality
of construcon of the supporng walls and pool base. These are all factors which can contribute to liner failure. The existence of any of
these type of condions in your pool is not caused by the use or operaon of the pool cleaner. The manufacturer disclaims any liability
for repairs or replacement to any of these structures or components of the customer’s pool.
The pool owner must assume all responsibility for the condion and maintenance of the pool’s surface, water and deck.
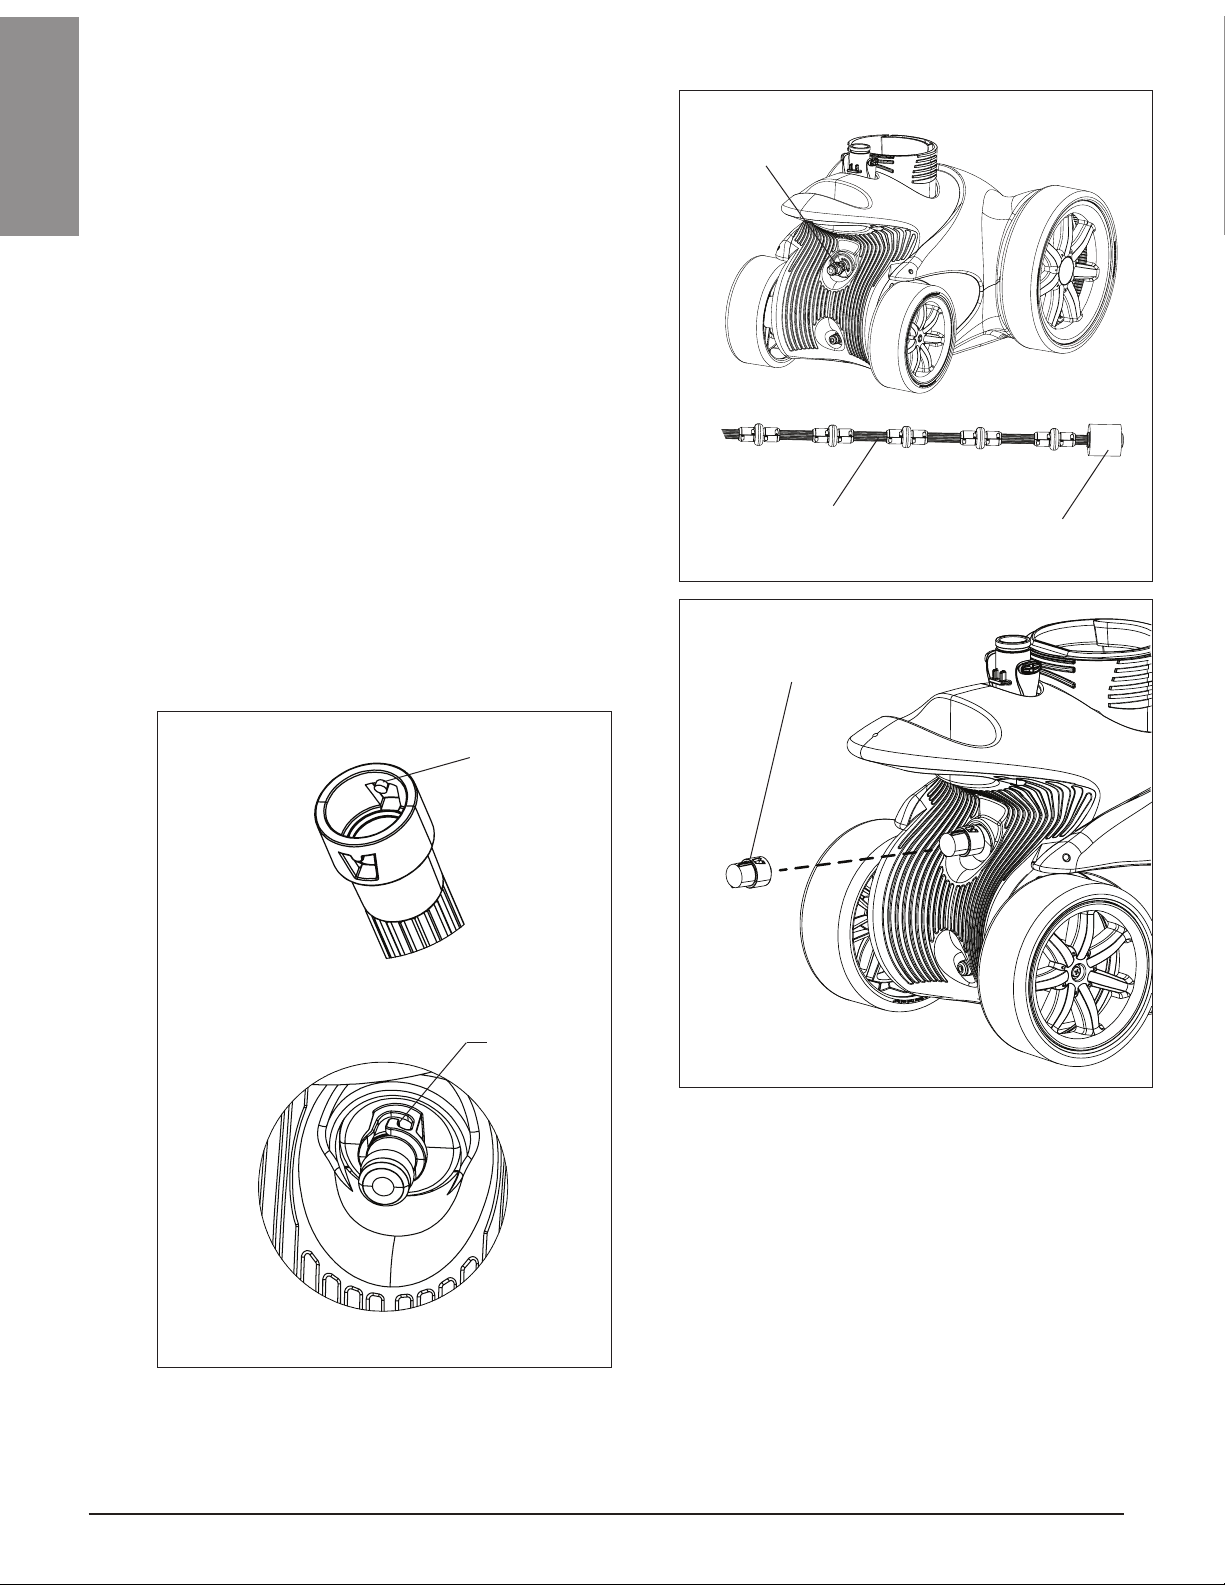
Before the cleaner is installed, please take a moment to record the serial number. This number is located on your warranty card
and on the back of the cleaner near the rear jets. You will be asked for this number when you contact our Technical Support
Department.
SERIAL #__________________________________
English

371885 (REV 12/2016) 4
English
CLEANER OVERVIEW
Overview
The BLUEFURY®LITE Pressure Side Pool Cleaner travels in a random paern throughout the pool, vacuuming and sweeping
the boom. The climbing ability of the BLUEFURY LITE is dependent on the pools shape. It will climb beer in pools without
sharp angles or curves in theo transion from the pool oor to the pool wall.
Approximately every 3-1/2 minutes the cleaner will go into back up mode. At this me the Backup Valve will pull the cleaner
away from its last locaon, allowing the cleaner to bypass any obstrucon and help randomize the pool coverage.
Note: Before you install and operate your cleaner, read
through these important guidelines:
1. Always disconnect the cleaner from the pool wall when
cleaning or back washing the pool lter.
2. Dirt in the plumbing will clog the cleaner. Aer cleaning
or back washing the lter, let the ltraon system run
for at least ve minutes before reconnecng the cleaner.
3. New plumbing lines should be ushed out before
installing the cleaner.
4. The cleaner should not be used to remove plaster dust
in new pools.
5. Always remove the cleaner before swimmers enter the
pool.
6. Always handle the cleaner with care.
7. Always pick up the cleaner by the handle, especially
when liing the unit out of the water.
8. Do not handle the cleaner while it is operang.
9. Always remove the cleaner from the pool before
chemical shock treatments (super chlorinate). As a rule,
any pool water that is unsafe for swimming is unsafe for
the cleaner.
10. Carefully cut the feed hose following the instrucons on
page 3.
11. By following these simple guidelines, you can help
protect against injury and prolong the life of your
cleaner.
12. Refer to “Important Warning And Safety Instrucons”
on pages ii - iii for addional installaon and safety
informaon.
1. BLUEFURY LITE Cleaner Head
2. Debris Bag
3. Sweep Hose
4. Feed Hose Assembly (Not shown)
• 2-10 . [3 m.] secons
• 1-7.5 . [2.3 m.] secon
• 1-2.5 . [0.8 m.] secon
5. Backup Valve (Not shown)
6. Wall Fing
7. Wall Adapter
8. Debris Seal
Note: The cleaner system is delivered with
debris seal installed inside of cleaner head.
9. Flow Gauge
Cleaner Components
1
2
8
6
7
9
3

371885 (REV 12/2016) 5
English
Booster Pump Installaon
Please refer to the instrucons included with your booster pump for installaon informaon.
Please follow these instrucons carefully.
INSTALLATION
Calculang Cleaner Speed/RPM
To determine whether the BLUEFURY® LITE Pressure Side Pool Cleaner is receiving the proper water pressure:
1. Turn o the pool pump, and carefully remove the cleaner from the pool.
2. Mark the front re/wheel with a marker, such as a blade of grass stuck under the re.
3. Have someone restart the pool pump and booster pump while you place the cleaner just beneath the pool’s water surface.
Note: Be sure to hold onto the sweep hose to avoid geng wet, as ow will return to the sweep hose when the pump is
restarted.
4. Count the number of full rotaons made by the marked wheel over a period of one minute. The number of rotaons will give
you the revoluons per minute; or RPM’s.
Note: Be sure that the back-up valve isn’t cycling at this me.
5. For proper performance, the BLUEFURY LITE cleaner operates between 35 - 42 RPMs.
If the RPM is below 35, call your local Pool Professional or contact Pentair’s Technical Support Department.
If the RPM is higher than 42, adjust the valve at the wall ng, as described under “Adjusng Water Flow to the Cleaner” on
page 8, unl the RPMs fall back under 42 RPM.
Installing the Wall Fing and Adapter
1. Remove and disconnect any exisng pool cleaner and/or
wall ng.
2. Switch on the ltraon pump and booster pump, to ush
out the plumbing line.
3. Switch o lter pump and booster pump.
4. If using a wall ng adapter produced by a
manufacturer other than Pentair, ensure that the red or
blue ow restrictor plate is removed from the from the
wall ng adapter before connuing to next step.
The restrictor plate can be easily removed by pressing it
out with your thumbs (See Figure 1).
Note: Failure to remove the ow restrictor plate from a
non-Pentair wall ng adapter will prevent the cleaner
from receiving enough water ow. This will lead to a slow
cleaner and longer cleaning cycles.
5. Insert wall ng adapter into the dedicated 1-1/2” NPT
threaded return line. Hand ghten unl snug. See Figure
2.
6. Align wall ng with the quick lock pegs inside the wall
adapter. Push the wall ng into the wall adapter unl
it booms out. Twist 1/4 turn clockwise to lock the wall
ng. Pull gently outward to engage quick lock pegs.
See Figure 2.
Figure 2 Installing the Wall Fing
LOW
HI
Wall Fing Adapter
(Shown Installed)
O-Ring
Wall Fing
Quick
Lock Peg
Figure 1
Flow Restrictor
Plate
Wall Fing Adapter
(Shown Uninstalled)

371885 (REV 12/2016) 6
English
Measure Deepest Part of Pool
Main Drain
Adjusng the Hose Assembly to Fit Pool
The hose assembly consists of: Two 10 . (3 m.) secons,
one 7.5 . (2.3 m.) secon, one 2.5 . (0.8 m.) secon and a
backup valve.
Important to the Performance of the Cleaner: Measure, cut,
and assemble the hose secons as described in Step 1 and Step
2. Use strong scissors or a sharp knife to cut the hoses. Be sure
to slide the oats out of the way when cung hose. Cut hose
ends as straight as possible.
Step 1: Sizing Hose Secon 1
1. Measure the deepest part of the pool. See Figure 3.
Note: The grate or domed main drain, at the boom of the
pool, is usually the deepest point. If the depth is greater
than 10 . [3 meters], do not cut the hose, and proceed
to Step 2.
2. If the pool depth is less than 10 . [3 meters], disconnect
the so light grey lead hose, labeled secon one, from the
back-upvalve.Cuttheleadhose sothelengthwithback-up
valve is equal to the deepest part of the pool. See Figure 4.
Example: If the pool is 8.5 . [2.6 meters] deep, cut 1.5 .
[0.5 meters] o of the hose labelled secon one (since the
hose is 10 . [3 meters]).
3. Discard excess hose. Reconnect the newly cut lead hose to
the back-up valve on the feed hose. All three hose secons
should now be connected.
Step 2: Sizing Hose Secons 2 and 3
4. Aach the hose assembly to the wall ng. See Figure 5.
Then aach the wall ng (with hose) to the wall adaptor.
See Figure 5. Take the opposite end of the hose assembly
and walk to the farthest point of the pool from the wall
adaptor. To prevent over stretching the hose, rest the hose
on top of the pool water. Measure the excess hose length
(hose that extends beyond pool edge). This determines the
amount of hose to be cut from secons 2 and 3.
5. Disconnect feed hose assembly from the wall adaptor.
Disconnect secons 2 and 3 from the rst swivel closest
to the wall ng.
6. Cut half of the total excess hose length from each hose
labeled secon 2 and secon 3 (assembled with four
oats) equally. Both feed hose secons should be the
same length aer cung.
Example: If there is 6 . [1.8 meters]of excess hose. Cut 3
. [0.9 meters] o of secon 2 and secon 3. (Half of 6 .
[1.8 meters] = 3 . [0.9 meters] each)
If more than 3 . [0.9 meters] is cut from each hose secon,
remove one (1) oat from each hose secon.
Note: For large pools requiring extra hose lengths you will
need to purchase one (1) addional hose, P/N 360266 (10
. [3 meters] single hose). Aach extra hose secons at
the wall ng using supplied swivel and mender nuts.
Figure 6
Figure 5
Figure 3
Figure 4
Wall Fing
Hose Assembly
WALL FITTING
SWIVEL
SWIVEL
FLOATS
10 FT (3 M)
WHITE OR GREY
HOSE SECTION
MARKED SWIVEL
REMOVE EXCESS MATERIAL
FROM HOSE ON EITHER SIDE OF
MARKED SWIVEL AS DESCRIBED
IN STEPS 2 AND 3.
FLOATS
FLOATS
10 FT (3 M)
WHITE OR GREY
HOSE SECTION
10 FT (3 M)
SOFT HOSE
FARTHEST POINT OF
POOL PERIMETER
FROM WALL FITTING
BACKUP
VALVE
7½ FT. (2.3 M.) EXAMPLE DIMENSIONS
(Your Measurement May Differ)
NOT TO SCALE
Lead Hose Length = Deepest Part of Pool
Float Quick
Connect Fing
(connects to
cleaner)
Swivel
Measuring the Lead Hose

371885 (REV 12/2016) 7
English
Step 3: Connecng Hose Secons
1. Aer the hose secons have been cut to size, reconnect
them by pushing the hose end over the barb on the swivel.
Note: Be sure to push the hose all the way to the boom
of the barb.
2. Movethemendernuttowardthehosebyturningclockwise
and rotang unl ght on hose. Use pliers if needed.
Note: Be sure the same number of oats are le on hose
secons 2 and 3, as described in Step 2 on page 3.
3. Tocheckthatthehoseiscuttothecorrectlength,reconnect
the hose and wall ng to the wall adaptor. Take the
opposite end of the hose assembly and walk to the farthest
point of the pool from the wall adaptor. The hose should
reach the edge of the pool but should not extend more
than 6 inches (15 cm) beyond the pool edge.
4. You can now connect the cleaner to the hose.
Connecng the Hoses to Swivels
Barb on Swivel
Feed
Hose
Mender Nut
WATER FLOW
DIRECTION
Figure 7
Figure 8
WALL FITTING
FARTHEST POINT OF
POOL PERIMETER
FROM WALL FITTING
BACK UP
VALVE
LEAD
HOSE
SECOND
SWIVEL
FEED HOSE (2)
FIRST
SWIVEL
FEED HOSE
(1)

371885 (REV 12/2016) 8
English
Assembling the Cleaner
1. Aach the Quick Connect ng on the end of the hose to the feed tube on the BLUEFURY®LITE Pressure Side Pool Cleaner.
Be sure the snaps are engaged.
2. Aach the debris bag to the cleaner. Push the bag over vacuum tube to click it into place.
3. Review checklist before use:
• Hoses cut properly and oats evenly spaced.
• Mender nuts are ght on feed hose.
• Wall ng secure and in place.
• Debris bag and hose assembly aached.
• Ensure debris seal is aached. See Figure 9.
Using the Cleaner
1. Lower the cleaner carefully into pool.
2. Switch ON the FILTER PUMP.
3. Wait at least 60 seconds to allow air to blow out of the hose.
4. Switch ON the BOOSTER PUMP.
Assembling the Cleaner
Debris Bag
Sweep Hose
Quick Connect Fing
(with built-in swivel)
Feed Tube
Lead Hose
Mender Nut
Debris Seal
Debris Seal
Figure 9 Feed Tube

371885 (REV 12/2016) 9
English
CLEANER ADJUSTMENTS AND OPERATION
Cleaner Operaon
Note: The BLUEFURY®LITE Pressure Side Pool Cleaner may need some minor
adjustments to ensure it is operang properly and to get the best performance
possible.
When operang correctly, the cleaner will travel in a random paern throughout
the pool, vacuuming and sweeping the pool.
• The climbing ability of the cleaner depends on the pool structure and water
ow.
• Two hour cleaning cycle is recommended for average size residenal (15’ x
30’ [4.6 m x 9.1 m]) pools.
• It will perform more eciently in pools without sharp transions between
pool oor and walls.
• The cleaner goes into a back up mode approximately every 3-1/2 minutes for approximately 15 seconds.
• If pool has a high level of debris, run the cleaner in two short cycles. Empty the debris bag between cycles.
Cleaning the Debris Bag
1. Detach the bag strap from the hose.
2. Press the release buon on the cleaner vacuum tube and carefully pull up to
remove the bag from the cleaner. See Figure 10.
3. Open bag closure by pulling apart the fabric tabs at the top of the bag (see
Figure 11). Holding the boom of the bag, turn over to empty debris out of
the top. If needed, rinse bag with a hose.
4. To close, press together the hook and loop fabric at the top of the bag and run
nger along enre length of bag so it is completely closed.
5. Be sure debris seal is on the vacuum tube. See Figure 9, on page 5.
6. Slide the debris bag collar over the vacuum tube unl it clicks in place.
7. Reaach the strap onto the feed hose.
8. To keep bag from folding during operaon, aach the strap above rst feed
line oat. Slide oat down if needed.
Note: It is easier to empty the debris bag when it is dry. A second bag
(purchased separately) may be used while the used debris bag is drying.
Cleaning the In-Line Filter
When cleaning the cleaner’s debris bag you should also inspect the in-line lter’s debris screen. The debris screen will be found
roughly 18 inches (45.7 mm) from the wall ng.
To clean the in-line lter’s debris screen:
1. Pull the cleaner out of the water and place it at on the
pool deck.
2. Twist apart the lter housing cap and lter housing.
3. Remove the debris screen from the lter housing and
remove all debris. Use a hose to ush out any dirt.
4. Reinstall the debris screen into the lter housing and thread
the housing cap back onto the housing. Hand ghten only.
Figure 10
Bag Release
Buon
Figure 11
Use tabs to pull
bag apart
To Cleaner
From Wall Fitting
Filter Housing
Cap Filter
Housing
Figure 12

371885 (REV 12/2016) 10
English
Installing and Removing the Sweep Hose
The BLUEFURY®LITE Pressure Side Pool Cleaner comes from the
factory with a Sweep Hose Cap installed over the Sweep Hose
Connecon (see Figure 14). This cap blocks ow through the
sweep hose connecon when the sweep hose is not being used.
1. To remove the sweep hose cap, while pushing the sweep hose
cap in towards the cleaner, turn it 1/4 turn counter-clockwise
to unlock. Remove the cap from the sweep hose connecon
by pulling is straight o the sweep hose connecon.
2. Line up the lock tabs on the inside of the sweep hose ng
(small round ng on the end of the sweep hose) to the
locking slots on the cleaner’s sweep hose connecon. See
Figure 15.
3. Push the sweep hose ng onto the sweep hose connecon
and turn clockwise unl it stops (about 1/4 turn). Pull the
sweep hose ng away from the cleaner to lock it into place.
4. To remove the sweep hose, while pushing the sweep hose
ng towards the cleaner turn counter-clockwise unl it
stops (about 1/4 turn). Pull the sweep hose from the sweep
hose connecon and store it in a safe place.
Locking Slot
Sweep Hose Connecon
Lock Tab
Sweep Hose Fing
Figure 15
Sweep Hose
Connecon
Sweep Hose Sweep Hose
Scrubber
Figure 13
Sweep Hose Cap
Figure 14

371885 (REV 12/2016) 11
English
Adjusng Water Flow to the Cleaner
Incorrect water ow to the BLUEFURY®LITE Pressure Side Pool Cleaner can
cause a variety of performance issues. To achieve proper performance,
the BLUEFURY LITE cleaner must operate between 35 - 42 RPMs. See
page 2, “Calculang Cleaner Speed/RPM” for instrucons on determining
your cleaner’s RPM.
Flow can be adjusted at the wall ng using the wall ng valve.
To adjust ow to the cleaner:
1. Using a athead screwdriver, turn the valve clockwise (to reduce ow)
or counter-clockwise (to increase ow). See Figure 16.
Turn counterclockwise to
OPEN
Figure 16

371885 (REV 12/2016) 12
English
MAINTENANCE
Periodic Maintenance
Periodically inspect the BLUEFURY®LITE Pressure Side Pool
Cleaner and its components. Replace and/or repair any worn
or damaged components. Failure to follow instrucons or
improper installaon of the cleaner can result in damage to
the cleaner, pool nish, or vinyl liner.
The following parts are wear items that should be inspected
periodically and replaced as needed:
Tires
The res are designed to protect the boom of your pool
and provide tracon. Tires will wear and need to be replaced
occasionally.
Debris Bags
The cleaner comes with a general purpose bag and is used
for all debris types. Replace bag when the fabric is torn or
punctured.
Note: To prolong the life of your cleaner, remove it from
pool before adding chemicals.
Sweep Hose
The sweep hose is provided to help keep hard to reach
corners of your pool clean. Replace sweep hose scrubber as
necessary if used.
Sweep Hose Roller Rings
Your sweep hose has a series of roller rings to protect the
sweep hose. Replace the rings as needed. Ensure the roller
rings rotate freely.
Backwashing the Pool Filter
Always disconnect the cleaner from the pool wall before
cleaning or backwashing the pool lter. Aer cleaning or
backwashing, let the pool ltraon system and booster pump
run for a minimum of ve minutes to ush out the return lines
before reconnecng the cleaner.
Storage and Winterizing
You may leave the wall adapter in the wall and store the
hoses straight, without any kinks. If storing the hose coiled,
be sure to lay the hose straight in the sun for 12 to 24 hours
before using again.
Cleaning the Wall Fing Debris Screen
Inside the wall ng is a stainless steel screen that acts as a
secondary lter. This screen captures debris that may have
passed through the pool lter.
IMPORTANT! A dirty screen may be an indicaon of
potenal issues in your pool lter system and you may need
to contact your local pool professional.
Note: Running the cleaner without the debris screen can
damage the cleaner and void the warranty.
To clean the debris screen:
1. Switch the booster pump and then the ltraon pump o.
2. Remove the wall ng from the wall adaptor.
3. Pull the screen out from inside the wall ng.
4. Rinse thoroughly unl clean and insert back inside the
wall ng.
5. Whenever cleaning, backwashing or repairing the pool lter,
also clean the wall ng screen aer your rst cleaner cycle.
The wall ng debris screen should
be cleaned once a week. Failure to
regularly clean the debris screen could damage the
cleaner.
Cleaning the Debris Screen
Figure 17 Feed Hose
Mender Nut
Hose Connector
Wall Fing
Debris Screen
Replacement parts
An up-to-date copy of the replacement part can be found on our website : www.pentairpooleurope.com

371885 (REV 12/2016) 13
English
Problem Correcve Acon
Cleaner doesn’t move or
moves slowly. Ensure lter pump and booster pump are on and moving water. (You may need to clean your pool lter
system.)
Ensure the wall ng debris screen is free of debris; you may need to remove and rinse.
Ensure the in-line lter’s debris screen is free of debris; you may need to remove and rinse. .
Check for proper ow by calculang cleaner speed/RPM . Adjust the ow at the wall ng if needed.
Check all feed hose connecons and swivels for leaks.
Ensure a ow restrictor plate is not installed in the wall ng adapter. Remove restrictor plate if
present.
Check for debris that may be jammed in the gear teeth on one of the front drive wheels. Gently rotate
the front wheels backward to dislodge debris.
Check to see if the rear wheels are spinning freely. Replace wheels if necessary.
Ensure the backup valve cycles approximately every 3-1/2 minutes, reposioning the cleaner.
Cleaner hangs at steps. Ensure the backup valve cycles approximately every 3-1/2 minutes, reposioning the cleaner.
Check for proper ow by calculang cleaner speed/RPM. Adjust the ow at the wall ng if needed.
Cleaner lts to one side. Usually indicates a full debris bag. Empty the debris bag.
Note: Cleaner at mes will lt on one side (on two wheels) during a turn cycle. Watch the cleaner for
a few minutes to see if it posions itself upright.
Cleaner does not go in
reverse.
Ensure the backup valve cycles approximately every 3-1/2 minutes, reposioning the cleaner.
Check for proper ow by calculang cleaner speed/RPM. Adjust the ow at the wall ng if needed.
Ensure the wall ng debris screen is free of debris; you may need to remove and rinse.
Ensure the in-line lter’s debris screen is free of debris; you may need to remove and rinse.
Cleaner will not climb. Check debris bag. Empty the debris bag if full.
Check for proper ow by calculang cleaner speed/RPM. Adjust the ow at the wall ng if needed.
Note: The climbing ability of the cleaner depends on pool shape and available water ow. It will
climb beer in pools without sharp angles or in the transion from the pool oor to the pool wall.
Hoses tangling in loops. Check the length of the feed hose. If it is too long it may cause the hose to tangle or loop.
Ensure the feed hose is oang on the pool surface. Hose oats should be spaced approximately two
feet apart. See page 3 for hose oat posioning.
Ensure the hose swivels spin freely. Replace swivels if ght.
Ensure the feed hose has no kinks or bends.
Booster pump very
noisy.
Ensure lter pump and booster pump are on and moving water. (You may need to clean your pool lter
system.)
Ensure wall ng is properly installed. If leaking, O-Ring may need to be replaced.
Contact your local pool professional - possible booster pump issue.
Rear wheels dragging/
not spinning.
Ensure the wheel is free of tangled debris.
Use the following troubleshoong informaon to solve potenal issues with the BLUEFURY®LITE Pool Cleaner.
TROUBLESHOOTING

371885 (REV 12/2016) 14
Kundendienst
HERENTALS, BELGIEN (08:30 Uhr bis 16:30 Uhr) MEZ
Webseite: www.pentairpooleurope.com
E-Mail: poolemea@pentair.com
Der Hersteller Pentair behält sich das Recht vor, Produkte ohne vorherige Ankündigung soweit zu ändern, als deren Merkmale dadurch nicht
maßgeblich verändert werden.
© 2016 Pentair, Inc. Alle Rechte vorbehalten. Änderungen an diesem Dokument sind vorbehalten.
Warenzeichen und Haungsausschluss: Pentair, Inc. ist Inhaber aller Pentair-Handelsmarken und Logos. BLUEFURY® und Pentair Aquac Sys-
tems™ sind Handelsmarken von Pentair Inc. und/oder den verbundenen Unternehmen in den USA und/oder in anderen Ländern. Sofern nicht
ausdrücklich anders angegeben werden die gegebenenfalls in diesem Dokument bezeichneten Namen und Marken von Driherstellern nicht
dahingehend verwendet, um auf eine Beziehung oder Unterstützung zwischen den Inhabern dieser Namen und Marken und Pentair, Inc. hin-
zuweisen. Diese Namen und Marken sind gegebenenfalls die Warenzeichen dieser Drihersteller.
Die Nichtbeachtung der Sicherheitsanweisungen in diesem Handbuch kann zu ernsten Gesundheitsschäden oder sogar zu
schweren oder tödlichen Verletzungen führen. Die Nichtbeachtung der Anweisungen in diesem Handbuch führt in jedem Fall
zum Erlöschen aller Garanen und jeglicher Haung seitens des Herstellers. MONTEURE, SCHWIMMBADBETREIBER UND -BESITZER MÜSSEN
DIESE WARNHINWEISE UND ALLE ANWEISUNGEN IM HANDBUCH LESEN, BEVOR SIE DIESEN REINIGER BENUTZEN. DIESE WARNHINWEISE UND
DAS HANDBUCH MÜSSEN BEIM HAUSBESITZER VERBLEIBEN.
Achtung Installateur: Diese Anleitung enthält wichge Informaonen zur Montage, zum Betrieb und zur sicheren Benutzung dieses
Produkts. Diese Unterlagen müssen nach der Installaon des Poolreinigers an den Besitzer und/oder den Betreiber dieses Geräts
weitergegeben werden.
Achtung Benutzer: Dieses Handbuch enthält wichge Informaonen für den Betrieb und die Wartung dieses Poolreinigers. Bie bewahren Sie es für
zukünige Einsichtnahme auf. Wenden Sie sich an Pentair, wenn Sie Fragen zu diesem Gerät haben.
Lesen und befolgen Sie alle in diesem Handbuch enthaltenen Warnhinweise und Anweisungen, bevor Sie das Produkt installieren. Bei Nichtbefolgung
der Sicherheitswarnhinweise und -anweisungen kann es zu schweren Verletzungen, zum Tod oder zu Sachschäden kommen. Zusätzliche kostenlose
Versionen dieser Anweisungen erhalten Sie unter www.pentairpooleurope.com.
Konsumenteninformaon und Sicherheit
Dieser Poolreiniger wurde so entworfen und hergestellt, dass er viele Jahre sicher und zuverlässig in Betrieb ist, wenn er gemäß den Anweisungen
in diesem Handbuch installiert, betrieben und gewartet wird. Im gesamten Handbuch sind Sicherheitswarnungen und -hinweise durch das Symbol
“
” gekennzeichnet. Alle diese Warnungen und Hinweise müssen beachtet und eingehalten werden.
Stoppen Sie die Pumpe, bevor Sie versuchen, das Gerät zu reinigen. Während der Poolsauger in Betrieb ist, darf der Pool nicht von
Schwimmern benutzt werden. Der Schlauch kann Schwimmer behindern oder umschlingen, was zu Ertrinken führen könnte.
Durch bewegliche Teile können Hände oder Finger verletzt werden. Stoppen Sie die Pumpe, bevor Sie versuchen, den Poolreiniger zu
säubern.
Deutsch
WICHTIGE WARNHINWEISE UND SICHERHEITSANWEISUNGEN
Wichger Hinweis:

371885 (REV 12/2016) 15
Allgemeine Informaonen zur Montage
Checkliste vor der Installaon
Bevor Sie Ihren Poolsauger installieren, lesen Sie bie alle Warnhinweise und Sicherheitsanweisungen in diesem Handbuch aufmerksam durch. Wenn
diese Anweisungen nicht befolgt werden oder der Poolsauger nicht ordnungsgemäß installiert wird, kann das zu einer Beschädigung der Pool-Oberäche
oder der Vinylverkleidung führen. Die meisten Poolsauger sind nicht dafür ausgelegt, vom Boden auf die Wand zu wechseln, wenn die Poolwölbung
90 % beträgt. Im Pool können sich auch andere Strukturen benden, die der Reiniger nicht bewälgen kann. SEIEN SIE VORSICHTIG und überwachen Sie
den Reiniger unter besonderen Bedingungen. Pentair Aquac Systems lehnt jede Haung für Reparaturen oder Ersatz solcher Strukturen oder Bauteile
im Pool des Kunden ab.
Vor der Installaon des Poolsaugers in einem Pool mit Vinylverkleidung:
Überprüfen Sie die Verkleidung sorgfälg auf Zeichen von Verschleiß, Beschädigungen aufgrund von Alterung, Beschädigung der Poolwand usw. Bei
einer etwaigen Beschädigung ist ein qualizierter Poolspezialist mit der Durchführung der notwendigen Reparaturen zu betrauen. Auch sämtliche Steine,
Wurzeln usw., die sich eventuell unter der Verkleidung benden, müssen vor der Installaon des Poolsaugers enernt werden.
Vor der Installaon des Poolsaugers in einem Spritzbeton-Pool bzw. eines teilweise oder vollständig veriesten Pool:
Vergewissern Sie sich, dass sich die Oberäche des Pools in einem guten Zustand bendet, da sich Verschmutzung, Verätzungen, Sprünge oder Delami-
nierungen verschlechtern könnten.
Reparieren Sie lose Fliesen und befesgen Sie etwaige lose Lichtringe.
Säubern Sie Ihr Filtersystem, bevor Sie den Poolreiniger installieren:
Sorgen Sie dafür, dass Sie den Filter gereinigt haben, einschließlich Rückspülung, Spülen und Leeren aller Körbe. Ein sauberes System ist die Voraussetzung
für den ordnungsgemäßen Betrieb und die Leistung des Poolreinigers.
Beachten Sie die Leistungsdaten des Poolreinigers, bevor Sie ihn installieren:
Der Poolreiniger ist so ausgelegt, dass Ihr Pool in ca. 4 bis 6 Stunden schmutzfrei ist. In Abhängigkeit von der Poolgröße ist gegebenenfalls weniger
Zeit erforderlich. Der Poolreiniger wurde nicht für die automasche Reinigung von Treppen oder Leitern oder den Betrieb unter einem Sonnenschutz
konzipiert. In solchen Bereichen kann der Reiniger stecken bleiben, was zu einer Beschädigung der Pool-Oberäche bzw. der Vinylverkleidung führen
kann. Pentair Aquac Systems lehnt jede Haung für Reparaturen oder Ersatz solcher Strukturen oder Bauteile im Pool des Kunden ab. Auch wurde er
nicht für die Erstreinigung eines neuen Pools oder eines Pools zu Saisonbeginn konstruiert.
Kontrollieren Sie NACH der Montage des Geräts die richge Funkon des Poolreinigers:
Gegebenenfalls müssen ein paar kleinere Anpassungen vorgenommen werden, um die ordnungsgemäße Funkon zu gewährleisten und die Oberäche
des Pools nicht zu beschädigen. Besmmte Strukturen von Vinylverkleidungen sind besonders anfällig gegenüber Oberächenverschleiß, Strukturabtrag,
Farbabrieb oder schwere Kratzer an der Struktur, wenn Gegenstände wie auch automasche Poolreiniger mit der Vinyloberäche in Kontakt kommen.
Pentair Aquac Systems übernimmt keine Verantwortung für Strukturabtrag, Abrieb oder Spuren auf Vinylverkleidungen. Überprüfen Sie regelmäßig
die Bauteile und die Leistung des Poolreinigers, um sicherzustellen, dass er wie vorgesehen funkoniert. Sämtliche verschlissenen oder beschädigten
Teile müssen ersetzt und/oder repariert werden. Wenn die Anweisungen nicht befolgt werden oder der Reiniger nicht ordnungsgemäß installiert wird,
kann das eventuell zu einer Beschädigung des Reinigers, der Pool-Oberäche oder der Vinylverkleidung führen.
Allgemeine Geschäsbedingungen der beschränkten Garane
Bevor Sie Ihren Poolreiniger installieren, lesen Sie bie alle Warnhinweise, Sicherheitsanweisungen und Garaneinformaonen in diesem Handbuch
aufmerksam durch. Wenn diese Anweisungen nicht befolgt werden oder der Poolreiniger nicht ordnungsgemäß installiert wird, kann das zu einer
Beschädigung der Pool-Oberäche oder der Vinylverkleidung führen. Pentair Aquac Systems lehnt jede Haung für Reparaturen oder Ersatz solcher
Strukturen oder Bauteile im Pool des Kunden ab.
Beschränkte Garane: 2 Jahre
Weiterführende Informaonen: www.pentairpooleurope.com
Haungsausschluss – Informaonen zu Ihrem Pool und Ihrem druckseigen Poolreiniger
Es gibt viele Faktoren, die einen Einuss auf die Nutzungsdauer Ihres Pools haben. Der Poolreiniger ist ein äußerst passives Produkt, das sich nicht auf
die Lebensdauer des Pools auswirkt.
Bie beachten Sie, dass im Laufe der Zeit bei jeder Pool-Oberäche Verschleißerscheinungen, Verfärbungen und Sprödigkeiten aureten können, die durch
Alter, unausgeglichene Pool-Chemikalien falsche Installaon und andere Faktoren bzw. eine Kombinaon davon bedingt sind. Druckseige Poolreiniger
sind nicht für die Enernung oder Abnutzung von "gutem" Pool-Kunststo verantwortlich. In Wirklichkeit tri das Gegenteil zu: Der Pool-Kunststo
sorgt für eine Abnutzung des Poolreinigers.
Dasselbe gilt auch für in den Boden eingelassene Swimming-Pools mit Vinylverkleidung, da die Vinylverkleidungen auch der Umwelt und Faktoren wie
Poolwasserchemie, Sonnenlicht und Pool-Umgebung ausgesetzt sind. Daher kann es vorkommen, dass das Vinyl mit der Zeit ein wenig spröde und
schwach wird. Darüber hinaus sind Pools mit Vinylverkleidung von der Verarbeitungsgüte, Zusammensetzung und Installaon der Verkleidung sowie
der Ausführung und Bauqualität der Stützwände und des Poolbodens betroen. Diese Faktoren können alle zu Fehlern bei der Verkleidung führen. Das
Vorhandensein solcher Bedingungen in Ihrem Pool ist nicht durch die Verwendung oder den Betrieb des Poolreinigers bedingt. Der Hersteller lehnt jede
Haung für Reparaturen oder Ersatz solcher Strukturen oder Bauteile im Pool des Kunden ab.
Der Schwimmbadeigentümer muss sämtliche Verantwortung für den Zustand und die Wartung der Oberäche, des Wassers und des Decks des Pools
übernehmen.
Noeren Sie sich bie vor der Installaon des Poolreinigers die Seriennummer. Diese Nummer bendet sich auf Ihrer Garanekarte sowie
auf der Rückseite des Reinigers neben den hinteren Düsen. Wenn Sie Kontakt mit dem Technischen Support aufnehmen, müssen Sie diese
Nummer angeben.
SERIENNUMMER __________________________________
Deutsch

371885 (REV 12/2016) 16
ÜBERSICHT ÜBER DEN REINIGER
Übersicht
Der druckseige Poolreiniger BLUEFURY®LITE bewegt sich in einem Zufallsmuster durch den Pool und saugt und fegt dabei den Boden. Die
Kleerfähigkeit des BLUEFURY LITE hängt von der Form des Pools ab. Der Reiniger steigt besser in Pools ohne spitze Winkel oder Kurven im
Übergang zwischen Poolboden und Poolwand.
Etwa alle 3-1/2 Minuten wechselt der Reiniger in den Backup-Modus. In dieser Zeit zieht das Backup-Venl den Reiniger von seiner letzten
Posion weg und ermöglicht dem Reiniger, Hindernisse zu umgehen und das Reinigungsmuster im Pool zufälliger zu gestalten.
Hinweis: Lesen Sie diese wichgen Anweisungen, bevor Sie den
Reiniger installieren und in Betrieb nehmen.
1. Enernen Sie den Reiniger stets von der Poolwand,
wenn Sie den Poollter reinigen oder rückspülen.
2. Durch Schmutz in der Verrohrung wird der Reiniger verstop.
Lassen Sie das Filtraonssystem nach der Reinigung oder
Rückspülung des Filters mindestens fünf Minuten laufen,
bevor Sie den Reiniger wieder anschließen.
3. Neue Installaonsrohre müssen vor der Installaon des
Reinigers durchgespült werden.
4. Der Reiniger darf in neuen Pools nicht zur Enernung von
Verputzstaub verwendet werden.
5. Der Reiniger muss immer enernt werden, bevor der Pool
zum Schwimmen benutzt wird.
6. Behandeln Sie den Reiniger stets mit Sorgfalt.
7. Fassen Sie den Reiniger immer nur beim Gri an, besonders
wenn Sie das Gerät aus dem Wasser heben.
8. Berühren Sie den Reiniger nicht, wenn er in Betrieb ist.
9. Vor chemischen Schockbehandlungen (Superchlorierung)
muss der Reiniger immer aus dem Pool enernt werden. Als
Faustregel gilt, dass Poolwasser, in dem nicht geschwommen
werden sollte, auch nicht für den Reiniger geeignet ist.
10. Schneiden Sie den Zulaufschlauch sorgfälg gemäß den
Anweisungen auf Seite 3 ab.
11. Wenn Sie diese einfachen Anweisungen befolgen, helfen Sie
mit, Verletzungen vorzubeugen und die Lebensdauer Ihres
Reinigers zu verlängern.
12. Weitere Montageanweisungen und Sicherheitsinformaonen
nden Sie auf den Seiten ii bis iii unter "Wichge Warnhin-
weise und Sicherheitsanweisungen".
1. BLUEFURY LITE Reinigungskopf
2. Fremdkörperbeutel
3. Fegeschlauch
4. Zulaufschlauchsatz (ohne Abbildung)
• 2x 3 m-Abschnie
• 1x 2,3 m-Abschni
• 1x 0,8 m-Abschni
5. Backup-Venl (ohne Abbildung)
6. Wandverbindung
7. Wandadapter
8. Fremdkörperdichtung
Hinweis: Das Reinigungssystem wird mit
einer Fremdkörperdichtung geliefert, die im
Reinigungskopf installiert ist.
9. Durchussmessgerät
Bestandteile des Poolreinigers
1
2
8
6
7
9
3
Deutsch

371885 (REV 12/2016) 17
Installaon einer Druckerhöhungspumpe
Bie beachten Sie die Installaonsanweisungen in der Installaonsanleitung Ihrer Druckerhöhungspumpe.
Bie befolgen Sie diese Anweisungen sorgfälg.
MONTAGE
Berechnung der Reinigungsgeschwindigkeit (U/min)
So stellen Sie fest, ob der druckseige BLUEFURY® LITE Poolreiniger den erforderlichen Wasserdruck erhält:
1. Schalten Sie die Pumpe aus und nehmen Sie den Reiniger vorsichg aus dem Pool.
2. Kennzeichnen Sie den Vorderreifen bzw. das Vorderrad mit einer Markierung, etwa einem unter dem Reifen eingeklemmten Grashalm.
3. Lassen Sie jemanden die Poolpumpe und die Druckerhöhungspumpe wieder einschalten während Sie den Reiniger etwas unter der
Wasseroberäche platzieren.
Hinweis: Halten Sie den Fegeschlauch fest, damit Sie nicht nass werden, wenn beim Einschalten der Pumpe im Fegeschlauch wieder ein
Durchuss auri.
4. Zählen Sie die vollständigen Umdrehungen des markierten Rades während der Zeitspanne von einer Minute. Die Anzahl der Umdrehungen
ergibt die Umdrehungen pro Minute.
Hinweis: Vergewissern Sie sich, dass sich dabei das Backup-Venl nicht dreht.
5. Der BLUEFURY LITE Reiniger erbringt die beste Leistung bei 35–42 U/min.
Wenn die Drehzahl unter 35 liegt, wenden Sie sich an Ihren örtlichen Schwimmbadbauer oder kontakeren Sie die Abteilung Technischer
Support von Pentair.
Sollte die Drehzahl über 42 liegen, stellen Sie das Venl an der Wandverbindung wie unter "Anpassen des Wasserstroms zum Reiniger" auf
Seite 8 beschrieben ein, bis die Drehzahl unter 42 U/min fällt.
Installaon der Wandverbindung und des Adapt-
ers
1. Enernen Sie alle bestehenden Poolreiniger und/oder Wandverbind-
ungen und unterbrechen Sie die Stromversorgung.
2. Schalten Sie die Filterpumpe und die Druckerhöhungspumpe ein,
um die Installaonsrohre durchzuspülen.
3. Schalten Sie die Filterpumpe und die Druckerhöhungspumpe aus.
4. Wenn Sie einen Wandverbindungsadapter verwenden, der von ei-
nem anderen Hersteller als Pentair produziert wurde, vergewissern
Sie sich, dass die rote oder blaue Durchussbegrenzerplae vom
Wandverbindungsadapter abgenommen wird, bevor Sie mit dem
nächsten Schri forahren.
Die Begrenzerplae kann problemlos abgenommen werden, in-
dem Sie sie mit ihren Daumen herausdrücken (siehe Abbildung 1).
Hinweis: Wenn Sie die Durchussbegrenzerplae eines nicht von
Pentair stammenden Wandverbindungsadapters nicht abnehmen,
erhält der Reiniger keinen ausreichenden Wasserdurchuss. Dadurch
wird die Reiniger langsamer und die Reinigungszyklen länger.
5. SchließenSiedenWandverbindungsadapterandiedafürvorgesehene
Rückleitung mit 1-1/2"-NPT-Gewinde an. Ziehen Sie von Hand fest
an. Siehe Abbildung 2.
6. Richten Sie die Wandverbindung mit den Schnellverschlusszapfen im
InnerendesWandadaptersaus.DrückenSiedieWandverbindungbis
zum Anschlag in den Wandadapter. Drehen Sie die Wandverbindung
um eine Vierteldrehung im Uhrzeigersinn, um sie zu sperren. Ziehen
Sie san nach außen, um die Schnellverschlusszapfen zu betägen.
Siehe Abbildung 2.
Abbildung 2 Montage der Wandverbindung
LOW
HI
Wandverbindungsadapter
(installiert abgebildet)
O-Ring
Wandverbindung
Schnellver-
schlusszapfen
Abbildung 1
Durchussbe-
grenzerplae
Wandverbindungsadapter
(deinstalliert abgebildet)
Deutsch

371885 (REV 12/2016) 18
Tiefsten Punkt im Pool messen
Hauptabuss
Anpassen der Schlauchsatzes an den Pool
Der Schlauchsatz besteht aus folgenden Teilen: Zwei 3 m-Abschnie,
einem 2,3 m-Abschni, einem 0,8 m-Abschni und einem Backup-
Venl.
Wichg für die Leistung des Reinigers: Messen, kürzen und
installieren Sie die Schlauchabschnie wie in Schri 1 und Schri 2
beschrieben. Verwenden Sie eine kräige Schere oder ein scharfes
Messer zum Abschneiden der Schläuche. Achten Sie darauf, dass
die Schwimmer beim Abschneiden der Schläuche nicht im Weg sind.
Schneiden Sie die Schlauchenden so gerade wie möglich ab.
Schri 1: Dimensionierung des 1. Schlauchabschnis
1. Messen Sie den efsten Punkt im Pool. Siehe Abbildung 3.
Hinweis: Der Hauptabuss (Gier oder Verefung) am Boden
des Pools bendet sich gewöhnlich am efsten Punkt. Beträgt
die Tiefe mehr als 3 m, schneiden Sie den Schlauch nicht ab und
fahren Sie mit Schri 2 fort.
2. Beträgt die Tiefe des Pools weniger als 3 m, enernen Sie
den weichen, hellgrauen mit Abschni 1 gekennzeichneten
Pilotschlauch vom Backup-Venl. Kürzen Sie den Pilotschlauch
so, dass die Länge inklusive Backup-Venl dem efsten Teil des
Pools entspricht. Siehe Abbildung 4.
Beispiel: Wenn die Tiefe des Pools 2,6 m beträgt, schneiden Sie
40 cm vom Schlauch mit der Kennzeichnung Abschni 1 ab (da
die Länge 3 m beträgt).
3. Entsorgen Sie den überüssigen Schlauch. Schließen Sie den
neu zugeschnienen Pilotschlauch wieder an das Backup-Venl
am Zulaufschlauch an. Alle drei Schlauchabschnie sollten jetzt
angeschlossen sein.
Schri 2: Dimensionierung des 2. und 3. Schlauchabschnis
4. Befesgen Sie den Schlauchsatz an der Wandverbindung. Siehe
Abbildung 5. Befesgen Sie dann die Wandverbindung (mit
Schlauch) am Wandadapter. Siehe Abbildung 5. Nehmen Sie
das andere Ende des Schlauchsatzes und gehen Sie zu jenem
Punkt des Pools, der am weitesten vom Wandadapter enernt
ist. Um eine Überdehnung des Schlauchs zu verhindern, lassen
Sie den Schlauch auf dem Poolwasser schwimmen. Messen
Sie die überschüssige Schlauchlänge (jener Teil des Schlauchs,
der über den Rand des Pools hinausragt). Dadurch wird die
Schlauchlänge besmmt, die von den Abschnien 2 und 3 ab-
geschnien werden muss.
5. Trennen Sie den Schlauchsatz vom Wandadapter. Trennen Sie
die Abschnie 2 und 3 vom ersten Drehanschluss, der sich am
nächsten zur Wandverbindung bendet.
6. Schneiden Sie jeweils die Häle der gesamten überschüssi-
gen Länge von den mit Abschni 2 bzw. 3 gekennzeichneten
Schläuchen (mit vier Schwimmern ausgestaet) ab. Beide
Abschnie des Zulaufschlauchs sollten nach der Kürzung die
gleiche Länge haben.
Beispiel: Es gibt 1,8 m überschüssigen Schlauch. Schneiden Sie
jeweils 90 cm von Abschni 2 bzw. Abschni 3 ab. (Die Häle
von 1,8 m beträgt jeweils 90 cm.)
Wenn jeweils mehr als 90 cm von den einzelnen Schlauchab-
schnien abgeschnien wird, enernen Sie aus jedem Abschni
einen (1) Schwimmer.
Hinweis: Für große Pools müssen Sie einen (1) Zusatzschlauch,
Bestell-Nr. 360266 (3 m Einzelschlauch) kaufen. Befesgen Sie
die zusätzlichen Schlauchabschnie mithilfe der mitgelieferten
Drehanschlüsse und Blechmuern an der Wandverbindung.
Abbildung 6
Abbildung 5
Abbildung 3
Abbildung 4
Wandverbindung
Schlauchsatz
WANDVERBINDUNG
DREHANSCHLUSS
DREHANSCHLUSS
SCHWIMMER
3 METER
WEISSER ODER
GRAUER SCHLAUCH-
ABSCHNITT
MARKIERTER
DREHANSCHLUSS
ENTFERNEN SIE ÜBERSCHÜSSIGES
SCHLAUCHMATERIAL AUF BEIDEN
SEITEN DES MARKIERTEN
DREHANSCHLUSSES WIE IN DEN
SCHRITTEN 2 UND 3 BESCHRIEBEN.
SCHWIMMER
SCHWIMMER
3 METER
WEISSER ODER
GRAUER SCHLAUCH-
ABSCHNITT
3 METER WEICHER
SCHLAUCH
AM WEITESTEN VON DER
WANDVERBINDUNG ENTFERNTESTER
PUNKT DER POOLEINFASSUNG
BACKUP-VENTIL
2,3 M BEISPIELHAFTE ABMESSUNGEN
(Ihre Abmessungen können davon
abweichen)
NICHT MASSSTABGERECHT
Länge des Pilotschlauchs =
Tiefster Punkt des Pools
Schwimmer
Drehanschluss
Bemessung des Pilotschlauchs
Schnellverbin-
dungsstück
(Anschluss an den
Reiniger)
Deutsch

371885 (REV 12/2016) 19
Schri 3: Anschluss der Schlauchabschnie
1. Nachdem die Schlauchabschnie in der richgen Länge abgeschnit-
ten wurden, schließen Sie sie wieder an, indem Sie das lose Ende
über die Tülle an der Drehverbindung ziehen.
Hinweis: Der Schlauch muss bis zum Anschlag über die Tülle
gezogen werden.
2. Bewegen Sie die Blechmuer in Richtung Schlauch, indem Sie
sie im Uhrzeigersinn drehen, bis sie fest auf dem Schlauch sitzt.
Verwenden Sie dazu gegebenenfalls eine Zange.
Hinweis: Wie in Schri 2 auf Seite 3 beschrieben, müssen sich in
den Abschnien 2 und 3 jeweils die gleiche Anzahl von Schwim-
mern benden.
3. Um zu überprüfen, ob der Schlauch auf die richge Länge gekürzt
wurde, schließen Sie den Schlauch und die Wandverbindung
wieder an den Wandadapter an. Nehmen Sie das andere Ende
des Schlauchsatzes und gehen Sie zu jenem Punkt des Pools, der
am weitesten vom Wandadapter enernt ist. Der Schlauch muss
bis zum Poolrand reichen, darf aber nicht mehr als 15 cm über
den Poolrand reichen.
4. Sie können den Reiniger jetzt an den Schlauch anschließen.
Anschluss der Schläuche an die Drehanschlüsse
Tülle auf Drehver-
bindung
Zulaufschlauch Blechmuer
RICHTUNG DES WAS-
SERFLUSSES
Abbildung 7
Abbildung 8
WANDVERBINDUNG
AM WEITESTEN VON DER
WANDVERBINDUNG ENTFERNTESTER
PUNKT DER POOLEINFASSUNG
BACKUP-
VENTIL
PILOT-
SCHLAUCH
ZWEITER
DREHANSCHLUSS
WANDVERBINDUNG (2)
ERSTER
DREHANSCHLUSS
WANDVERBINDUNG
(1)
Deutsch

371885 (REV 12/2016) 20
Zusammenbauen des Reinigers
1. Bringen Sie das Schnellverbindungsstück am Ende des Schlauchs an der Zulaueitung des druckseigen BLUEFURY®LITE Reinigers an.
Vergewissern Sie sich, dass die Schnappverschlüsse einrasten.
2. Befesgen Sie den Fremdkörperbeutel am Reiniger. Drücken Sie den Beutel über das Saugrohr, bis er mit einem Klick einrastet.
3. Überprüfen Sie vor der Benutzung die Checkliste:
• Schläuche sind ordnungsgemäß gekürzt und die Schwimmer gleichmäßig verteilt.
• Die Blechschrauben sind fest am Zulaufschlauch angebracht.
• Die Wandverbindung ist gesichert und an der richgen Stelle.
• Der Fremdkörperbeutel und die Schlauchgruppe sind angeschlossen.
• Die Fremdkörperdichtung muss angeschlossen sein. Siehe Abbildung 9.
Benutzung des Reinigers
1. Versenken Sie den Reiniger vorsichg im Pool.
2. Schalten Sie die FILTERPUMPE EIN.
3. Warten Sie mindestens 60 Sekunden, damit das Wasser aus dem Schlauch geblasen werden kann.
4. Schalten Sie die DRUCKERHÖHUNGSPUMPE EIN.
Zusammenbauen des Reinigers
Fremdkörperbeutel
Fegeschlauch
Schnellverbindungsstück
(mit integriertem Drehanschluss)
Zulaueitung
Pilotschlauch
Blechmuer
Fremdkörperdich-
tung
Fremdkörperdichtung
Abbildung 9 Zulaueitung
Deutsch
Table of contents
Languages:
Other Pentair Pressure Washer manuals
Popular Pressure Washer manuals by other brands

Kärcher
Kärcher HD 2.0/10 Ed Operator's manual

Shark
Shark B2535H/1 Operating instructions and parts manual

Kärcher
Kärcher G 2600 FHE G manual

iPower
iPower APW3201KH Owner's Manual and Operating Instructions

Clarke
Clarke JET 9000B Operation & maintenance instructions

Nilfisk-ALTO
Nilfisk-ALTO MC 3C operating instructions