manuals.online logo
Brands
  1. Home
  2. •
  3. Brands
  4. •
  5. Pentax
  6. •
  7. Lens
  8. •
  9. Pentax TS420PE User manual

Pentax TS420PE User manual

自動絞り付きピンホールレンズ 取扱説明書
■品名
このたびはPENTAX CCTVレンズをお買上げいただきありがとうござ
います。ご使用の前にこの取扱説明書を必ずお読みいただき、正しくお使いく
ださい。お読みになった後は、いつでも見られるところに保管してください。
■レンズを安全にお使いいただくために
この製品の安全性については十分注意を払っておりますが、下記マー
クの内容については特に注意をしてお使いください。
■取扱い上のご注意
•レンズボディの汚れを落とすために、シンナーやアルコール、ベン
ジンなどの有機溶剤を使用しないでください。
•レンズ面に付いたゴミや汚れは、ブロワーやきれいなレンズブラシ
で取り除いてください。指紋や油がついたときは、市販のレンズク
リーニングペーパーにレンズクリーニング液をしみ込ませ、レンズ
中心部から周辺部に向け渦巻状に軽く拭き取ってください。
•接続ケーブルは、「自動絞り用ケーブルの接続」をご覧になり正し
く接続してください。
•レンズは精密光学機器です。落下・強い振動・衝撃・圧力などを加
えないでください。
•ホコリ・有害ガス・水分・塩分などがかからないようにしてくださ
い。故障の原因になります。
■レンズの取付け・取外し
取付け前にカメラのマウントをご確認ください。このレンズはCSマ
ウントですので、Cマウントカメラにはご使用になれません。
カメラによってはCマウント、CSマウントの切換えが可能なものも
ありますので、カメラの取扱説明書をご覧ください。
①
レンズを時計方向にねじ込んでください。
② レンズがしっかり固定される位置から反時計方向に1回転緩めて
ください。
③ 動きが感じられるまでカメラの方向へレンズを強く押してくださ
い。(これによりレンズ内のスリップ機構が緩みます。)
レンズを押しながら希望の方向、位置へ回転させてください。
④ 希望の位置になるまで②,③を繰り返し、希望の位置になりまし
たらしっかりと締め付けてください。
■自動絞り用ケーブルの接続
自動絞り用ケーブルをカメラのレンズアイリスコネクターに接続しま
す。
このレンズはDCドライブ方式です。カメラの自動絞り方式をご確認
のうえ、コネクターを接続してください。
■アイリス調整
このレンズはDCドライブ方式です。自動絞りの調整はカメラの取扱
説明書をご覧ください。
■バックフォーカスの合わせ方
このレンズはCSマウントにフランジバックを調整していますが、ピ
ントが合わせられない場合は、カメラの取扱説明書をご覧になり次の
手順でカメラのバックフォーカスを調整してください。
①
レンズの絞りが開放になるように次の方法で入射光量を調整します。
・ カメラの電子シャッターを高速シャッターにする
・ 市販のNDフィルターでレンズ前面を覆う
② なるべく遠い被写体を写してください(10m以上推奨)。
③ フォーカスを無限端[FAR]にし、カメラのバックフォーカス
を調整しピントを合わせてください。
■マークについて
本体側面にCEマーク表示のあるレンズは、
EU
(欧州連合)における
EMC
指令に関する規格
EN50130-4
及び
EN55022
に適合しています。
■アフターサービス
修理についてはお買い上げの販売店にご相談ください。
■商品構成
・レンズ本体    ・前キャップ  ・後キャップ
・取扱説明書
■外観図
■主な仕様
ご注意: このレンズの像は倒立像になりますので、カメラを上下逆
に取り付けるか、カメラの垂直・水平の偏向極性を逆にし
て使用してください。
警告 注意
この表示の欄は、「使用者が重大
な障害を受ける可能性があるこ
とを示す」内容です。
この表示の欄は、「使用者が軽傷
または中程度の障害を受けたり、
物的損害の可能性があることを
示す」内容です。
は、禁止事項を表すマークです。
は、注意を促すためのマークです。
警告
レンズ単体を通し、目で直接太陽を見ないでください。
失明の原因になります。
本製品を分解したリ、修理、改造しないでください。
火災、感電、故障の原因になります。
万一、煙が出る、臭いがする、あるいは発熱している場合、
そのまま使用すると火災、感電の原因になります。
接続ケーブルを傷付けたり、無理に曲げたり、ねじったり、引っ
張ったりしないでください。火災、感電、故障の原因になります。
注意
レンズをカメラから外した状態で、直接日光の当たる場所
に置かないでください。火災の原因になることがあります。
レンズの取付けはしっかりと締め付けてください。
締め付けが緩むと、落下してけがの原因になることがあります。
振動や衝撃のある場所に設置しないでください。締め付け
が緩むと、落下してけがの原因になることがあります。
TS420PE 
ピン番号 線色・仕様 JEITA※EIAJ RC-5204規
格準拠コネクター付き。
※社団法人電子情報技術
産業協会
1  青・制動コイル-
2  赤・制動コイル+
3  白・駆動コイル+
4  緑・駆動コイル-
画面サイズ 1/3型
マウント CS
焦点距離 4mm
絞り範囲 F2~F64
至近距離 0.3m 
駆動コイル抵抗 200Ω±10%(25℃)
制動コイル抵抗 700Ω±10%(25℃)
開方向作動電圧 +4V以下
閉方向作動電圧 0.5V以上(スプリング式)
作動温度範囲
-20℃~+50℃
ENGLISH ON THE BACK
H O Y A 株式会社
P E N T A X イ メ ージ ン グ ・ シ ステム事業部 セキ ュ リ テ ィ ー営業部
東京都板橋区前野町2丁目36番9号  〒174-8639
Tel.03-3960-0336  Fax.03-3960-0337
3170403-Z2-1 (J) S3095088
Auto-Iris Pinhole Lens Operating Instructions
■Model number
Thank you for choosing PENTAX CCTV lenses. Before operating this
lens, please read these instructions carefully. After reading this
Operating Instructions, keep it for future reference.
■For your safety on use of a lens
Before operating, pay special attention to the following remarks.
■Precautions
• Do not use organic solvents, such as thinners, alcohol or benzine to
remove stains from the lens.
• Use a blower or a clean lens brush to remove dust. When grease or
fingerprints are on the lens, wipe them off with a lens cleaning paper
and lens cleaner gently forming a swirl from the center to the
circumference.
• Connect the cable properly referring to the following list entitled
"Auto-iris Cable connections".
• This lens is a precision optical product. Avoid dropping, strong
vibration, shock and pressure on it.
• Keep the lens away from dust, poisonous gas, moisture and salt. It
may cause lens malfunction.
■Mounting and removing the lens
Before mounting the lens, confirm the camera mount matches the lens.
This lens cannot be used on a C mount camera.
Some cameras are C and CS mount compatible. Refer to the
Operating Instructions of the camera.
①Screw the lens clockwise into the camera.
②Loosen the lens from the tight position one full turn counter-
clockwise.
③Firmly push the lens towards the camera until a movement is felt.
(This releases a slipping clutch within the lens.)
While pushing, rotate the lens towards the desired direction and
position.
④If the lens is not at the desired position, repeat the procedures ②
and ③, and mount the lens firmly on the camera.
■Auto-iris Cable connections
Installation of the auto iris Cable. This is a DC Drive iris lens.
* Japan Electronics and Information Technology Industries Association
■Iris adjustment
This is a DC Drive iris lens. Please refer to Operating Instructions of
the camera.
■Adjusting back focus
The flange back of this lens is factory adjusted for CS mount camera.
In case you are unable to focus either at the shortest or longest focal
lengths, adjust the back focus of the camera by the following method,
referring to the Operating Instructions of the camera.
①Fully open the iris by either of the following methods.
・Set the auto electronic shutter of the camera to On.
・Cover front of the lens with a ND filter according to the prevailing
lighting conditions.
The brighter the lighting conditions, a higher ND factor is
required.
②Observe an image of a distant object. (Over 10m is recommended.)
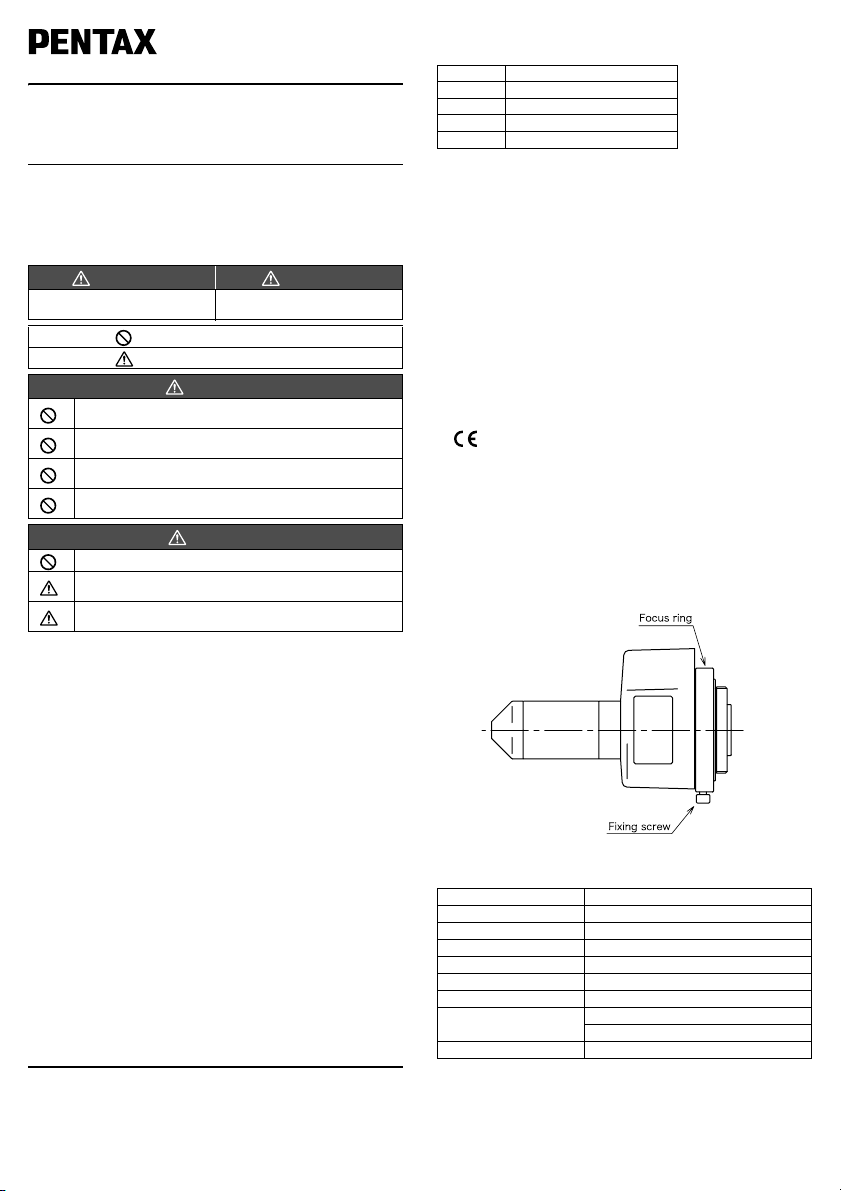
③Set the focus ring at [FAR] position, and then adjust back focus of
the camera.
■marking
The lenses having CE marking on the bodies are conformity with the
standards related to EMC directives by EU.
■After-sales servicing
Contact your supplier for after-sales servicing.
■Composition
・Lens body ・Front cap ・Rear cap
・Operating instructions
■External view
■Main specifications
Note: This type lens the images are reversed on the monitor both
vertically and horizontally.
To correct this overturn the camera or the deflection coils
both vertically and horizontally.
WARNING CAUTION
This alerts users to the possible
risk of personal harm.
This alerts users to the possible risk
of personal and material harm.
This is a warning to users.
This is to caution users.
WARNING
Do not look at the sun through the lens with the naked eye.
Loss of eyesight may occur.
Do not disassemble, repair or modify the lens.
Fire, electric shocks or malfunction may occur.
If the lens emits smoke, smells of smoke or gives off heat,
discontinue use immediately. Fire or electric shocks may occur.
Do not damage, bend, twist or pull on the cable. Fire, electric
shocks or malfunction may occur.
CAUTION
Do not leave unused lenses in direct sunlight. Fire may occur.
Mount the lens firmly on a camera, so that it will not loosen
and fall off.
Do not install the lens in a place where vibration and shock
are expected. It may come loose and fall off.
TS420PE 
Pin No. Color/Specifications This pin configuration is
conforming to JEITA*
Standard.
1
Blue / Damping Coil
-
2
Red / Damping coil
+
3
White / Driving coil
+
4
Green / Driving coil
-
Format size 1/3
Mount CS
Focal length 4mm
Iris range F2
~
F64
Minimum object distance 0.3m
Driving coil 200
Ω±
10
%(
25
℃) 
Damping coil 700
Ω±
10
%(
25
℃) 
Driving voltage +4V or less (Close to Open)
 
Over 0.5V (Open to Close)
 
Temperature range -20
℃
- +50
℃ 
HOYA CORPORATION
PENTAX Imaging Systems Division
Security Systems Sales Department
2-36-9, Maeno-cho, Itabashi-ku, Tokyo 174-8639, Japan
Phone +81-3-3960-0347 Fax. +81-3-3960-0337
3170403-Z2-1 (E) S3095088

Other Pentax Lens manuals

Pentax ADAPTER Q FOR K MOUNT User manual

Pentax

Pentax ADAPTER Q FOR K MOUNT User manual

Pentax 17-70mm - 17-70mm f/4 DA SMC AL IF SDM Lens User manual

Pentax

Pentax 17-70mm - 17-70mm f/4 DA SMC AL IF SDM Lens User manual

Pentax 67 Magnifier User manual

Pentax

Pentax 67 Magnifier User manual

Pentax takumar User manual

Pentax

Pentax takumar User manual

Pentax 26755 - SMC P FA 645 Zoom Lens User manual

Pentax

Pentax 26755 - SMC P FA 645 Zoom Lens User manual

Pentax 01 STANDARD PRIME User manual

Pentax

Pentax 01 STANDARD PRIME User manual

Pentax K 100D Super User manual

Pentax

Pentax K 100D Super User manual

Pentax DA 14mm f/2.8ED (IF) User manual

Pentax

Pentax DA 14mm f/2.8ED (IF) User manual

Pentax TS2V314CED User manual

Pentax

Pentax TS2V314CED User manual

Popular Lens manuals by other brands

VOIGTLANDER APO-LANTHAR 35mm F2 Aspherical instruction manual

VOIGTLANDER

VOIGTLANDER APO-LANTHAR 35mm F2 Aspherical instruction manual

Pentair Fiberworks Wide Angle Lens installation instructions

Pentair

Pentair Fiberworks Wide Angle Lens installation instructions

ADEMCO VIDEO ALM3V813 Operation manual

ADEMCO VIDEO

ADEMCO VIDEO ALM3V813 Operation manual

FujiFilm FUJINON XS20sx6.3BRM-K2 Operation manual

FujiFilm

FujiFilm FUJINON XS20sx6.3BRM-K2 Operation manual

VOIGTLANDER NOKTON 21mm F1.4 Aspherical VM instruction manual

VOIGTLANDER

VOIGTLANDER NOKTON 21mm F1.4 Aspherical VM instruction manual

FujiFilm FUJINON MKX18-55mmT2.9 owner's manual

FujiFilm

FujiFilm FUJINON MKX18-55mmT2.9 owner's manual

Navitar 1-62317 Dimensional drawing

Navitar

Navitar 1-62317 Dimensional drawing

luxvision TF-35 user manual

luxvision

luxvision TF-35 user manual

TeleVue ETHOS instructions

TeleVue

TeleVue ETHOS instructions

Olympus M.Zuiko ED 45mm f1.2 PRO instructions

Olympus

Olympus M.Zuiko ED 45mm f1.2 PRO instructions

FUJINON TF2.8DA-8 Operation manual

FUJINON

FUJINON TF2.8DA-8 Operation manual

Fujion YV2.1x2.8SR4A-SA2 specification

Fujion

Fujion YV2.1x2.8SR4A-SA2 specification

Tamron A030 owner's manual

Tamron

Tamron A030 owner's manual

DZOFILM Pictor Zoom 20-55 T2.8 user manual

DZOFILM

DZOFILM Pictor Zoom 20-55 T2.8 user manual

walimex 500/8,0 Lens T2 instruction manual

walimex

walimex 500/8,0 Lens T2 instruction manual

Leica SUMMARON-M 1:5,6/28mm instructions

Leica

Leica SUMMARON-M 1:5,6/28mm instructions

Honeywell HLD3V8MPD Specifications

Honeywell

Honeywell HLD3V8MPD Specifications

COLBOR CPL-80 user manual

COLBOR

COLBOR CPL-80 user manual

manuals.online logo
manuals.online logoBrands
  • About & Mission
  • Contact us
  • Privacy Policy
  • Terms and Conditions

Copyright 2025 Manuals.Online. All Rights Reserved.