PERFECTPASS StarGazer User manual

12/16/2016
TABLE OF CONTENTS
Page Number
Section 1 - Getting Started 1
Initial Setup
Getting Familiar with PerfectPass
Changing Modes
Section 2 - Slalom Mode 3
Selecting Slalom Modes
Calibrating Slalom Speeds 4
GPS Based Slalom 5
Classic Slalom 6
Section 3 - Jump Mode 7
Using Jump Mode
Jump Driving
Additional Information & Settings
Three Segment Timing 14
Section 4 - Trick Mode 15
Using Trick Mode
Section 5 - RPM Mode 17
Section 6 - Wakeboard Mode 18
Using Wakeboard Mode
Section 7 - Course Mapping (No Magnet Timing) 20
Section 8 - Additional Features 22
Screen Contrast
Name List
System Info
Servo Motor Test
Device Test
GPS Info - Clock
Section 9 - Installation 25
Section 10 - GPS Receiver Installation 30
Section 11 - Trouble Shooting/General Information 31
System Reset 32
APPENDIX
All Ball Timing Information

1
USER’S GUIDE
Section 1. GETTING STARTED
INITIAL SETUP - The display will guide you through this set up. Read slowly and carefully.
Your new PerfectPass system must now complete a short set up procedure to familiarize itself with
your particular boat and engine. (This may have been performed by your dealer if factory installed)
Step (1) INITIAL HRS 000 You can enter the number of hours on your boat using the UP Key if you
wish to use the PerfectPass hour meter. Press Menu to proceed.
Step (2) The display will now show [read in MPH ^ = Yes]. It is asking you if you would like the
display to operate in mph. If you do, confirm by pressing the UP key. If you want kph press
the DOWN key. (We have selected mph for illustration purposes)
Step (3) [WAKE Edition ^ = Y] The display will now ask if want the system to be a WakeEdition or a 3-
event Edition: For WakeEdition Press UP, for Three Event press DOWN.
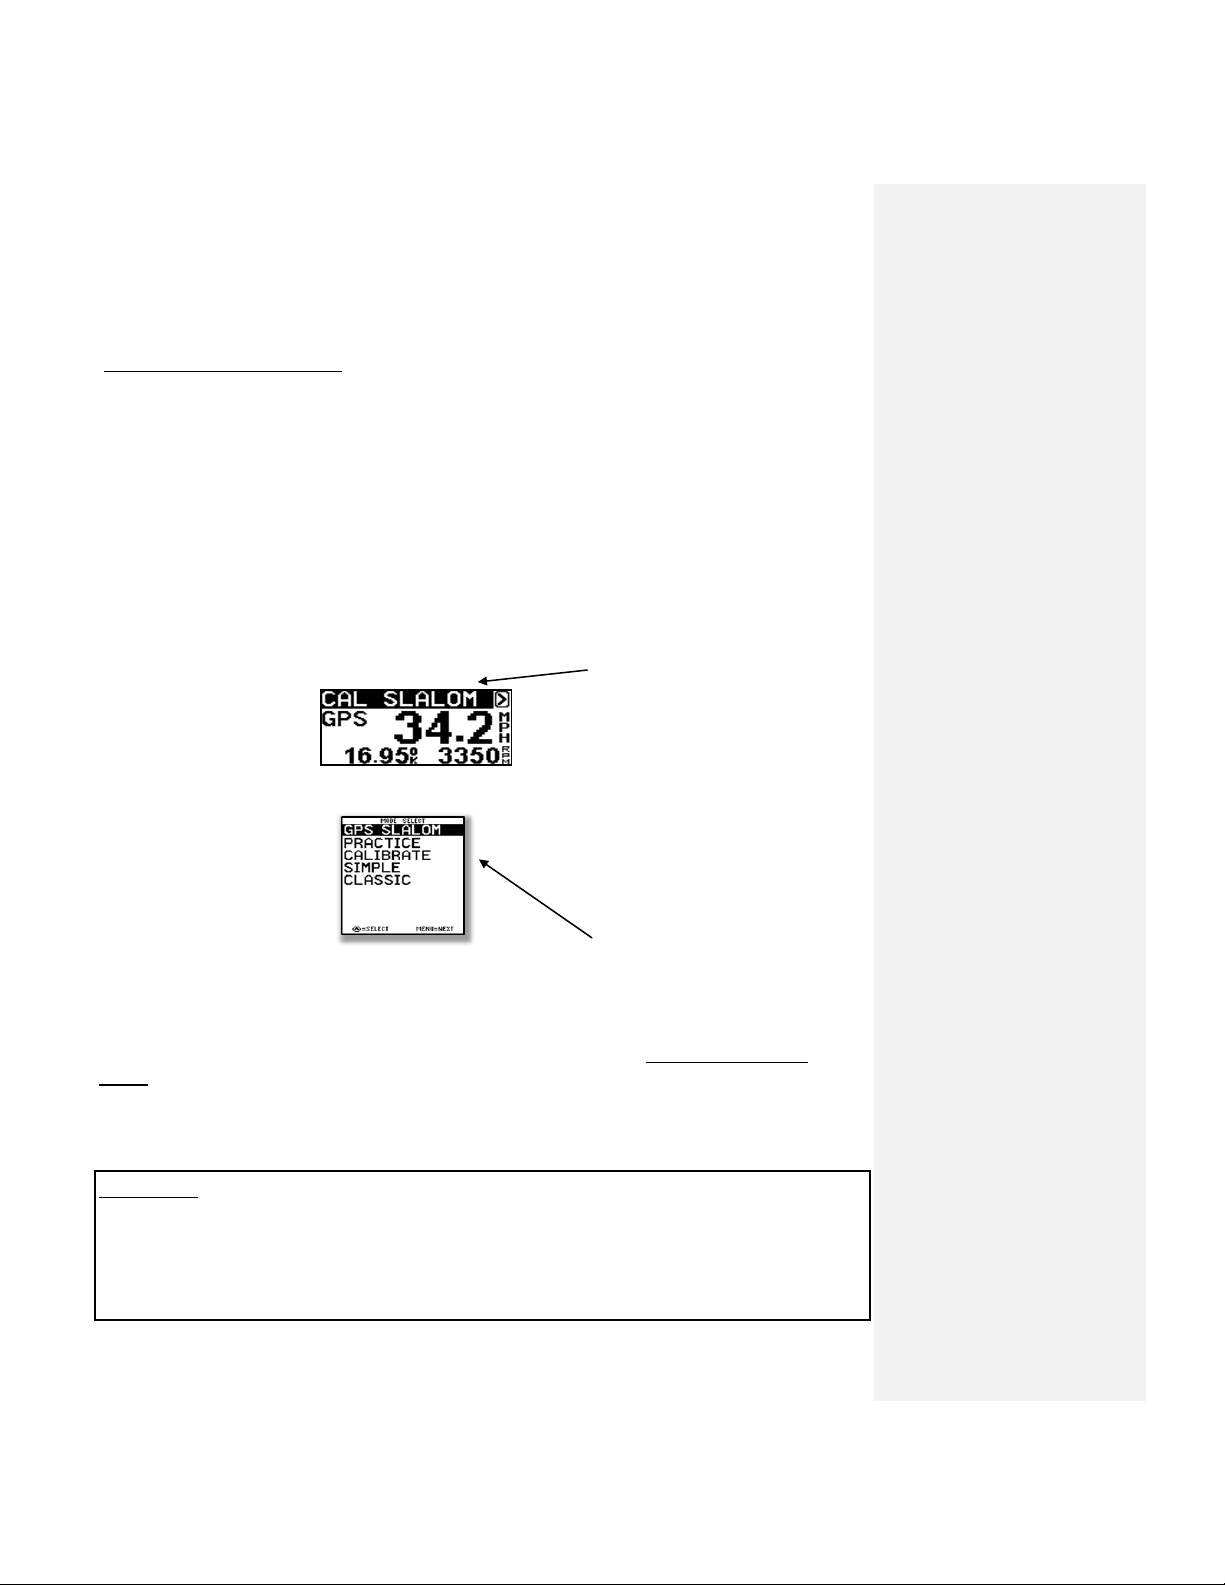
Step (4) The display will now move into the CALIBRATE Slalom mode, described in the next section.
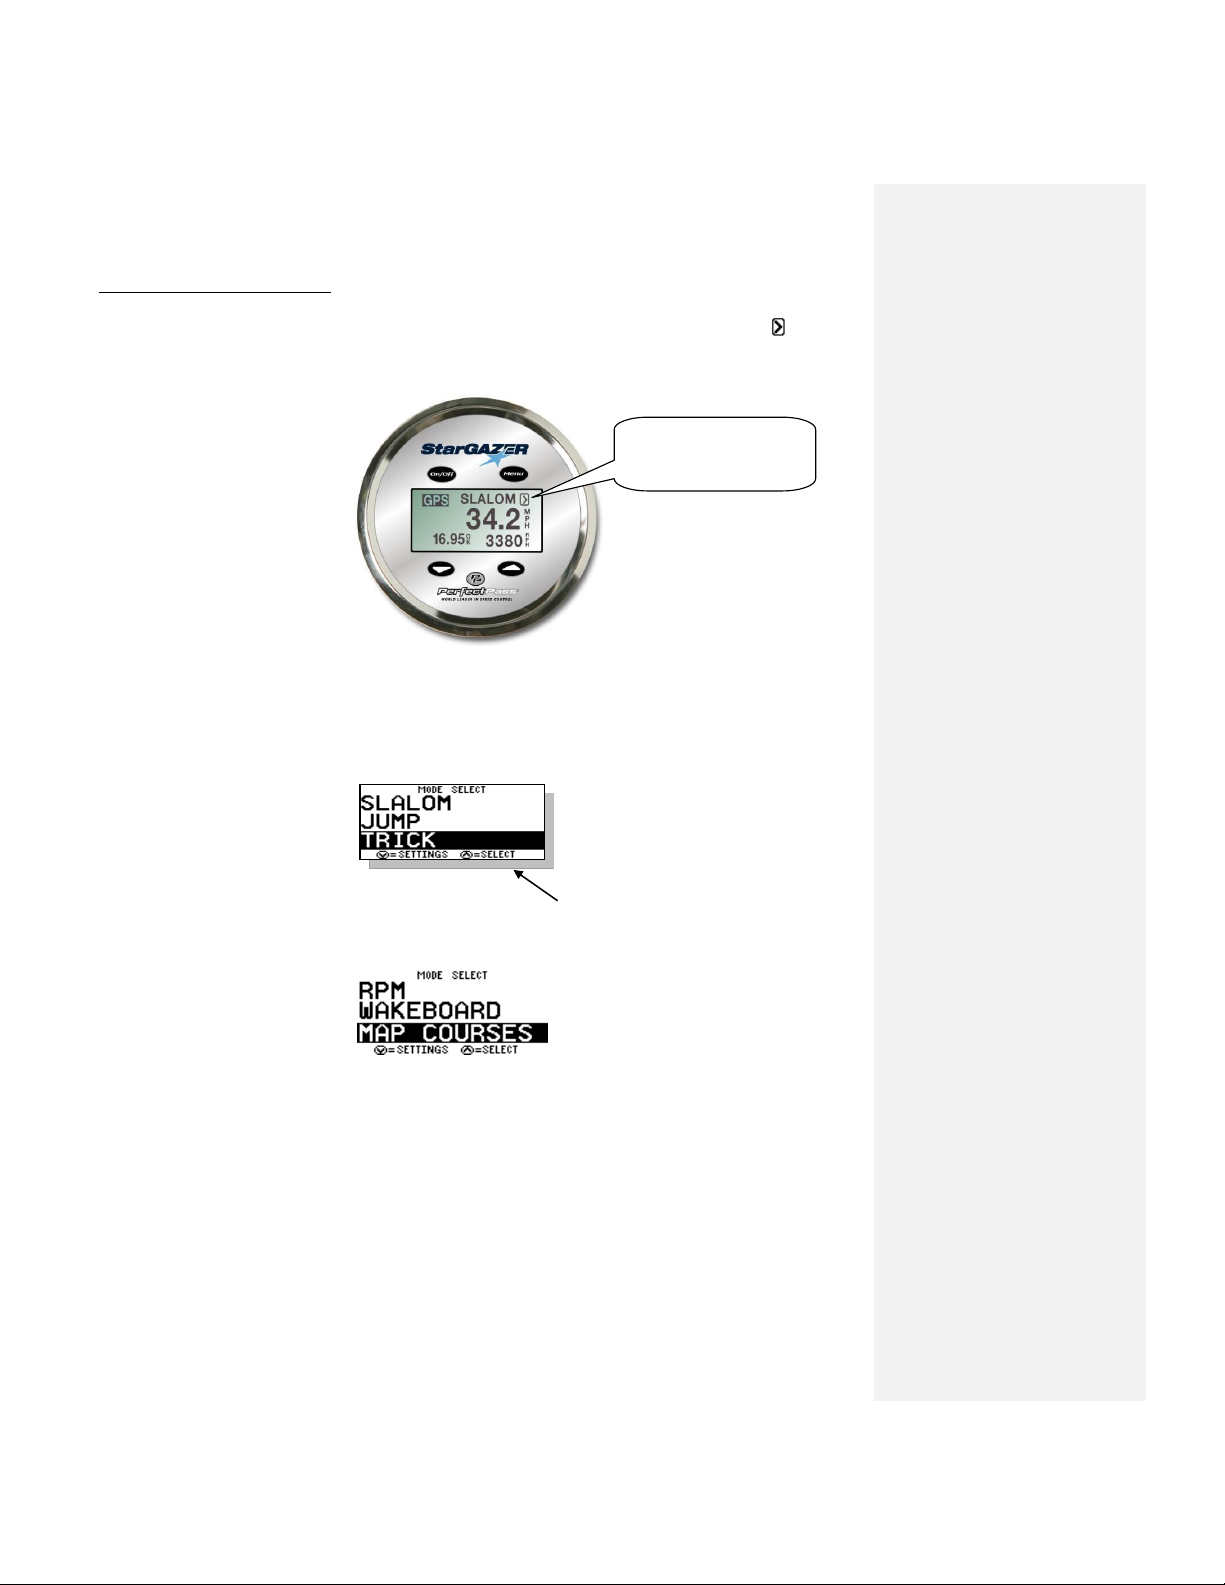
GENERAL SYSTEM INTERFACE
The System will always be powered & screen active, even when in the OFF Mode.
Turn Control ON or OFF while boat is in neutral or at idle is recommended.
Engaging System- Once you select speed, simply throttle up smoothly and when the actual
speed reaches the set speed, PerfectPass will take over automatically and you will hear an
audible beep. (Do not over throttle)
Disengage System –Simply pull back on the throttle.
BUTTON USE
ON/Off is used to turn control ON or OFF while boat is at idle or in neutral.
The Menu Button is similar to a mouse, the Menu button moves the cursor around the
PerfectPass screen.
UP & DOWN buttons are used to change speeds, settings, etc.
Anytime you see the “^” used in a question such as “Read in MPH ^ = Yes” means press the
UP Button “^” to confirm. The UP Key means Yes.
IMPORTANT: It is recommended you watch the following Star Gazer Three Event User Videos
found under “Support” at www.perfectpass.com.
-Navigating the Display Screen
-Calibrating Slalom in a Course
-Course Mapping

2
CHANGING SCREENS / MODES
To change to a different mode, simply press the Menu Button until the Menu Arrow Icon in the
upper right hand corner is highlighted. When the Menu Arrow in upper right corner is dark, press the
UP Key.
Once you press the UP Key and move from the Slalom Screen, the following screen will appear:
To change modes press the MENU key until the desired mode is highlighted. Press the UP key to go
into the highlighted mode. In this example, you would press Up Key to enter Trick Mode.
UP key to Select Highlighted Mode
(Trick)
The Menu Key moves the highlighted screen to the next Mode on the list, when highlighted press
the UP Key to select.
Menu Arrow
(Highlight and Press Up to
Change Modes)

3
Section 2. SLALOM MODE
SELECTING SLALOM MODE
There are several slalom modes to choose from:
-CAL BASELINE –GPS Slalom MUST be calibrated for accuracy in this mode before skiing
-GPS Slalom (Official Slalom Speeds)
-Practice Slalom (Same as above but in between speeds available)
-Classic Slalom (Same as 2007 version, RPM Control only)
-Simple Slalom (A new simple to use GPS Slalom Mode for up to 28 off). No Calibration required.
To select the Slalom Mode of your choice, simply highlight the word SLALOM at the top of the page
using the Menu Key, then press the UP Key.
Highlight Slalom and Press
UP Key.
Use Menu Key to highlight
Desired mode, UP to select.
Each individual Slalom Speed MUST BE CALIBRATED for accuracy in the CALIBRATE BASELINE
MODE. (The correct RPM must be set for each speed) Once calibrated, the calibration settings are
transferred automatically to the other modes. Therefore you must CALIBRATE your system at each
speed in this mode before moving to GPS Slalom.
Crew Weight
Most users do not need to worry about using the Crew Weight feature. If you calibrate with a crew
of 2 people, then you should be fine leaving it at 0. If you wish to use Crew Weight, enter the weight
of the full crew before calibrating baselines. To access, highlight the word Slalom and press the
DOWN KEY.

4
CALABRATING BASELINES (IN A COURSE USING TIMING)
MUST BE PERFORMED IN CALM WATER - NO WIND
Watch this on video under “Support” at www.perfectpass.com
To calibrate in a course you must first “MAP”your course using the NO MAG method on Page 20.
(The system uses the times to calibrate itself).
Enter the CAL BASELINE Mode to initially set up your baseline RPM settings.
CAL MODE SCREEN
Each official speed that you intend to use (24.9 –36 mph) must be calibrated for accuracy without a
skier using timing through the course. There is no need to calibrate the lower speeds. (23 mph &
lower)
Step. 1 Select Set Speed (Example: 34 mph). Ideally have 2 people in the boat.
Step. 2 Throttle up smoothly and engage system prior to entering course. You will hear the timing
beep and timer scrolling on the screen as you pass entrance gate.
Step. 3 The boat should be engaged and very steady by the entrance gates and steady all through
the course.
Step. 4 Stop boat and review the time on screen (Example 16.90 seconds)
Use Menu Key to highlight the Menu Arrow Icon in upper right hand corner and press
the Down Key to access the “Quick Calibrate Screen”. In this screen, quickly press the UP
Key to perform the Calibration. System will confirm “RPM Baseline & Speedo Calibrated”.
The system has now been calibrated for 34.2. If you run another pass at this speed, the displayed
speed on the screen and the course time should be near perfect in calm conditions.
1. Quick Calibrate
4. Menu Arrow
2. SETPOINT
Tachometer
Course Time
RPM Adjust
3. Baseline

5
Now switch to the next speed you wish to calibrate and repeat.
GPS SLALOM MODE
GPS Slalom Mode or Practice Mode are the most commonly used.
Skier Size (N=Normal)
Step.1 Select GPS SLALOM.
Step.2 Select Speed (Use Menu Key to highlight speed).
Step.3 Set Skier Size (ex: N)
Step 4 Tow Skier. (Pull skier up smoothly, do not over throttle in a short set up)
At the end of the course the full segment time will be on the screen. For mid course or “all
buoy”times, press the Down Key.
SKIER SIZE –Remember in GPS Slalom or Practice Slalom, you must have a Skier Size Letter selected
(F,L,N,X) when towing a skier. To change letters, simply highlight the letter (Ex; N) and press the up
or down keys to make a change.
FEATHER –For very small skiers.
LIGHT –For skiers 120 –160 pounds
NORMAL –160 –200 Pounds
XLARGE –For 200 + pounds.
PRACTICE MODE
In this mode, you can tweak the set speed so you can train at in-between speeds.
Highlight and adjust
running speed
You can set an “Adjust value”, for example” -.5”. With” -.5” set the actual running speed would be
33.7.

6
USING CLASSIC MODE (Non GPS Enhanced)
Step.1 Select speed and enter weight of crew. (Highlight slalom heading & press DOWN key).
Step.2 Enter the Skiers Weight on screen.
Step.3 Tow skier through course.
Step.4 At the end of course, review times and if slow or fast, use the RPM Adjust in upper left
hand corner to tweak speed. (ie: More rpm if slow, less if fast)
SIMPLE SLALOM
Slalom Mode
1. Select Slalom Mode. Simply set your speed and go.
2. If you wish to time your passes in a slalom course, you must “MAP” the course.
3. You can select speeds in 1 mph (1.5 kph) increments. The official speeds in MPH are: 24.9,
26.7, 28.6, 30.4, 32.3, 34.2, 36.0
4. The only adjustment to the pull is a value called “Pull Factor” found by highlighting the Menu
Arrow > in upper right corner, then press UP KEY. The word SLALOM is now highlighted, press
DOWN KEY for “Pull Factor”. Standard is 50, a higher value is more aggressive. (Range is 25–
100). We do not expect that you will need to adjust this.
5. Timing –If you “MAP” your course, the screen will show your Ball 3 and full course times as
you exit the course.
1. RPM Adjust
2. Name/Mode/Crew
3. Menu Arrow
4. Speed/SETPOINT
5. Course Times
6. Skier Weight
8. KX (Pull)
7. PX (Rope)
Tachometer

7
Section 3. JUMP MODE
USING JUMP MODE
WARNING: (Timing must be used in Jump mode and a proper two segment jump course is required
for system to work properly. Do not use PerfectPass in Jump mode without a proper course,
integrated timing and experienced operator. Because the counter cut pull and cut to the ramp are
different, you must have timing activated and running as the boat heads towards the ramp.
The Jump mode is RPM based and therefore baseline values must be established just as in Slalom
mode. Setting the jump baseline values must be done in a proper two segment jump course. Jump
Letter must be set at Afor this process.
The Jump mode main screen will appear as follows:
1. RPM Adjust
RPM adjust allows the driver to increase or decrease the overall times (1st & 2ng segment) by
putting in a positive or negative RPM adjustment.
Example: If the times are running consistently slow on both segments, you could add a value
such as +20 rpm and the speed will be increased. You may wish to do this for a particular
jumper (a heavy puller) or for a number of jumpers if the times are drifting in a certain
direction
2. Name/Mode/Crew/New Jumper
This section of the screen displays either the Mode Name or a Skier’s Name pulled from the
Name List.
Press UP key to access the Name List:
Name List is discussed in Section 8.
1. RPM Adjust
2. Name/Mode/Crew/
New Jumper
3. Menu Arrow
5. Course Times
6. Jump Letter
8. S2 Fine
7. S2 Percent
Tachometer
4. Speed/SETPOINT

8
Press DOWN key to access the New Jumper and Crew Weight
Press the UP key to enter a new jumper or
DOWN key to enter or edit the crew
weight. New Jumper is covered below.
Enter the Crew Weight in pounds using the
UP and DOWN keys. Press the MENU
key to confirm and continue.
3. Menu Arrow
Press UP key to change modes or mode settings:
This allows you to change modes and
mode settings. The Additional Jump
Settings will be discussed below.
Press DOWN key to Calibrate system:
The calibration screen is described
below in this section.
4. Speed/SETPOINT
The speed readout will turn into the SETPOINT when the engine is below 1500 RPM or the
Speed/SETPOINT is highlighted. When this is highlighted the metric conversion will appear in
this area of the screen.
Press UP or DOWN keys to select desired SETPOINT.

9
5. Course Times
This section of the screen displays the timing information from the last pass. If Jump Letter is
set to A and RTB, the second segment error from Return to Baseline will be displayed after
segment errors as seen below:
6. Jump Letter
The Jump Letter is a combination of Jumper Weight, Jumper Distance and ability. . This Jump
Letter represents how much throttle will be applied once the Rope Switch is closed as the
skier pulls. The higher the Jump Letter selected the more aggressive the pull will be. If you
are unsure what Jump Letter you should use then start by using the ‘New Jumper’ feature as
described below. This will automatically generate a Jump Letter based on your weight and
distance.
7. Second Segment Percent (S2%)
This is a percent of the Jump Letter RPM that is applied once the boat enters the 2nd segment.
Under IWSF and AWSA rules, the boat is permitted to speed up in the 2nd segment. The
higher the number, the more the boat will accelerate. A typically value for S2% is +60, the
higher the value, the faster the 2nd segment.
Example: If the 1st segment times are good, but the 2nd is a little slow, you would raise the
number.
S2 RTB –Works similar to S2%. Used when “Return to Baseline” is selected. Only applicable
if skiers are activating switch and use a Jump Letter of J or higher.
8. Second Segment Fine Adjust (S2 Fine)
This adjustment allows the driver to effectively fine adjust the 2nd segment only. It comes set
at 0, which means a neutral effect. A number such as 30 would increase the 2nd segment by
30 rpm. Higher number speeds up the second segment. If skier does not trigger switch or
has a letter less than J, S2 fine should be used to speed up second segment.
1st and 2nd Segment
Times
1st and 2nd Segment Errors
2nd Segment Error
from Return to
Baseline Times
Tolerance Indicator
= Good Times
= Slow Times
= Fast Times

10
Example: A jumper that does not cut and does not fully activate the switch may require extra
rpm in the 2nd segment to keep the 2nd segment in tolerance. (In this case, S2 Fine is more
effective than S2%).
Entering a New Jumper –To enter a new jumper highlight the NAME/MODE/CREW/NEW JUMPER
section of the screen and press the DOWN key. Then press the UP key to confirm you would like to
enter a New Jumper.
You will be asked to enter and answer the following information after which a Jump Letter will be
calculated for you and displayed on the main screen. Move to the next selection by pressing MENU.
Select desired SETPOINT
Enter jumper weight in pounds
Enter typical jumping distance in feet
Toggles between Fast Second Segment
and Return to Baseline
Return to Baseline (RTB) –If you selected Return to Baseline the screen will show to the right of
the Jump Letter. When RTB is selected the boat speed will immediately go to the baseline value as
boat enters the second segment. If you have a skier using the switch with a value of J or higher, you
can enter an S2 value which is a % of switch driven RPM. A setting above 0 will speed up boat in
second segment if required to balance times. (This is similar to S2% used when Faster 2nd Segment
is selected).
Fast 2nd Segment –If you selected to run the fast 2nd segment, the screen will show to the right
of the Jump Letter.
Calibrating RPM Baselines - You can set RPM Baseline values for all of the official jump speeds (28,
29.8, 31.7, 33.6, and 35.4) or just the ones you use regularly. Let us assume you wish to set up 33.6
mph (54 kph). Enter the SETPOINT of 33.6 mph by pressing the MENU key until the
‘Speed/SETPOINT’ section of the screen is highlighted, then adjust the SETPOINT to 33.6 = 54K. Set
the Jump Letter to A. Now bring the boat smoothly up to the SETPOINT to engage the system. (The
system engages as soon as the default RPM Baseline value is reached, the NAME/MODE section will
become highlighted, and an audible beep will sound). Enter the jump course and time both
segments. As you exit the course the times will be displayed and then the difference from actuals.
The display screen will show the 33.6 mph times. The jump letter is set at A, RTB (return to baseline
times are used). An example of this is shown in JUMP TIMING screens shown earlier in this section.
Comment [AA1]: Same thing here I
need a leason on how this workds

11
If the times are not in tolerance or close to actuals then the RPM Baseline values will require
adjustment. The easiest way to do this in Jump mode is to go to Quick Recalibrate by pressing the
DOWN key with the highlighted. This will bring you to the Calibration screen as seen below.
Press the UP key on the Quick Calibrate message to recalibrate the baseline based on the times
recorded from the last pass. In this example it is suggesting your RPM Baseline should be increased
by 135 rpm. When you perform a Quick Calibrate the suggested adjust of 135 will be added to the
baseline and saved in memory. The system will also calibrate the digital speedometer if the times
are with in the “OK” tolerance.
Now engage system and time boat again. If the times are still not close enough, repeat above steps
until accurate. If you wish to set up RPM Baseline values for other speeds (i.e. 31.7 mph), change the
SETPOINT and repeat the above steps.
JUMP DRIVING
WARNING –Using the Jump mode with Jump Switch is for experienced drivers and skiers only.
Please read carefully prior to operating. The pull is very aggressive and designed for tournament
water skiers only. You MUST have integrated timing and a proper jump course for system to operate
properly.
Assuming the RPM Baseline values have been accurately set, you are now ready to tow skiers.
First enter your Jump Letter or enter a “New Jumper” as explained above. The Jump Letter can be
changed by pressing the UP or DOWN keys with the Jump Letter highlighted on the screen.
The key to a good pull and good times is to get the correct Jump Letter. If the pull to the ramp is
solid and the first segment time is good, you know the Jump Letter is OK. If the time on the 1st
segment was slow, you will require a higher letter on the next pass and vice versa. (Once engaged,
push handle to full open position to allow PerfectPass room to throttle up when pulling long distance
jumpers).
If the first segment time was good, but the 2nd was slow, raise the S2%.
1. Quick Calibrate
4. Menu Arrow
2. SETPOINT
Tachometer
Course Time
RPM Adjust
3. Baseline

12
Important Note: If the timer is triggered prior to entering the course, it must be reset by pressing
the UP key. Failure to reset will result in an improper pull to the ramp.
ADDITIONAL SETTINGS
Additional Jump Settings are accessed by pressing the UP key on the Main Slalom Screen with the
highlighted. Then press the DOWN key when JUMP is highlighted on the Mode Select Screen. The
first three options can be accessed from the Main Slalom Screen as described above as well as in the
Jump Settings Screen.
Crew Weight –This setting can also be accessed on the main Slalom Screen as mentioned above or
through the Jump Settings screen. This value should be set to represent the total Crew Weight in
pounds in the boat. It is essential this value be properly setup to ensure you get good times.
Crew Weight Calculator - The system will add the weight of up to 3 individual crewmembers. Simply
go to “Crew Adj” on the list, then press the DOWN and UP keys together, enter the weight of crew
member #1, press MENU and do the same for crew member #2. The system will total the weight
automatically.
Calibrate –Press the UP key to enter the Baseline Calibration screen. This can also be accessed by
pressing the DOWN key with the highlighted on the Main Jump Screen.
New Jumper –Details for entering a new jumper are outlined above. This should be used when
unsure what Jump Letter to select.
CT (Counter Cut Time) - The maximum length of time the system will throttle once the skier pulls and
closes the switch on the counter cut. Example: a value of 175 is 1.75 seconds and may be used in a
tail wind. In a head wind you may want a longer pull so you could move it to 200 –220 (2.0 –2.2
seconds). The factory default is 190, or 1.9 seconds.
x8u and x8d - These settings were always riding in the software, but were not adjustable values.
With the higher horsepower engines and strong props being produced, these values are available for
adjustment if needed for high-end jumpers.
x8u –Represents the rate of throttle up on counter cut and cut for ramp once switch is activated.
The larger the value, the softer the start will be. In other words, the pull will not be as aggressive on
the start, but more gradual. The smaller the value, the more aggressive it will throttle up as switch
closes.
Example: A strong 6 Litre engine may need a larger X8u to avoid a strong initial pull as switch closes.
x8d –Represents the rate of throttle down once skier stops pulling. The higher the value, the slower
(softer) the throttle will return. The lower the value, the more aggressive it will throttle back.

13
Example: If a boat was not slowing quickly enough in the 2nd segment, you would lower the value.
Typical values 2008 Promo Boats with DBW PerfectPass
5.7L 6.0L
x8u 85 650
x8d 275 275
One Magnet Timing - In the background settings, you can switch from multi-magnet to one-ball
timing. If you select one- ball in Jump or Slalom, it carries over to the other mode.
Jump Settings
New Times (Faster Second Segment)
Examples for when towing jumpers over 120 Feet.
Jump Settings
S2%
S2 RTB
CT
Ski Nautique
Faster 60 –120
Faster 10
190
MasterCraft
Faster 60 –120
Faster 10
190
Malibu
Faster 60 –120
Slower 5
190
Others
Faster 60 –120
Slower 5
190
Important Tip: Once engaged, the throttle handle should be pushed forward to provide the system
with room to throttle up. For long distance jumpers, it should be moved to full open.

14
Effective May 2008, IWSF requires R & L Class Jump Events to run the new three segment timing.
PerfectPass will show this new segment, however, you must select ONE MAGNET METHOD as most
courses will not have a magnet in this new location.

15
Section 4. TRICK MODE
USING TRICK MODE
The trick mode is controlled via the speed signal from the GPS Receiver. (You simply select the
desired speed and go.
The main Trick screen will appear as:
1. SETPOINT
The speed at which would like the boat to engage and control. This number is adjusted in 0.1
mph (0.2 kph) increments. It can be adjusted while engaged (“on the fly”), or before it is
engaged.
2. Menu Arrow
Highlight Menu Arrow in upper right corner. Press UP key to change modes (Back to Slalom)
or to access KD settings:
As mentioned above this allows you to
change modes and mode settings.
TRICK DRIVING
Using Trick mode is relatively easy. Turn control ON, select the desired speed and drive smoothly to
the SETPOINT so PerfectPass can seamlessly take over. If you accelerate aggressively past the
SETPOINT, it will take the system several seconds to lock in the speed.
You should keep your hand on the throttle to ensure it does not pull back and disengage the system.
If you see the “More Throttle” on the screen, this indicates the system needs a little more manual
throttle.
3. Menu Arrow
2. Name/Mode
1. SETPOINT
Speed
Tachometer
Mode Indicator

16
If the skier falls, pull back on the throttle to disengage system. Slowly return to skier and pull them
back up again. System will take over automatically once SETPOINT is reached. Speed changes can be
made “on the fly”.
When you are finished with the speed control, go to neutral and press the ON/OFF key.
TRICK SETTINGS
Trick Setting (KD) is accessed by pressing the Down Key when the word “TRICK” is highlighted. See
above illustration.
Kd –This adjustable parameter controls the “firmness of the Pull”. The higher the number, = more
aggressive pull. Normal range 14 –28.

17
Section 5. RPM MODE
USING RPM MODE
In this mode, the screen will appear as follows:
Operating in this mode is very similar to using the Wakeboard or Trick modes, except the system is
now controlling to an RPM SETPOINT.
RPM DRIVING
Prior to towing the rider / skier, select the RPM SETPOINT by using the UP or DOWN keys with the
SETPOINT highlighted on the screen. Pull the rider up smoothly and continue to accelerate up to or
beyond the RPM SETPOINT so the system can engage and take control.
Changes can be made to the RPM SETPOINT while the system in engaged (“on the fly”) to fine-tune
the RPM you desire.
2. Menu Arrow
1. SETPOINT
Speed
Tachometer
Mode Indicator

18
Section 6. WAKEBOARD MODE
USING WAKEBOARD MODE
This is a speed-based mode using the GPS Data to control similar to the TRICK mode. The Main
Wakeboard Screen will appear as follows:
1. SETPOINT
The speed at which would like the boat to engage and control. This number is adjusted in
0.25 mph (0.5 kph) increments. It can be adjusted while engaged (“on the fly”), or before it is
engaged.
2. Name/Mode/Crew
This section of the screen displays either the Mode Name or a Skier’s Name pulled from the
Name List.
Press UP key to access the Name List:
Name List is discussed in Section 8.
3. Menu Arrow
Press UP key to change modes or mode settings:
As mentioned above this allows you to
change modes and mode settings.
3. Menu Arrow
2. Name/Mode
1. SETPOINT
Speed
Tachometer
Mode Indicator
Other manuals for StarGazer
2
Table of contents