manuals.online logo
Brands
  1. Home
  2. •
  3. Brands
  4. •
  5. Performax
  6. •
  7. Tent
  8. •
  9. Performax 72800AP Specifications

Performax 72800AP Specifications

This manual suits for next models

1

Popular Tent manuals by other brands

Nordcap Easy Up 400 Build-up instructions

Nordcap

Nordcap Easy Up 400 Build-up instructions

Zempire Neo Series instructions

Zempire

Zempire Neo Series instructions

CampTrails Grand Manan Assembly instructions

CampTrails

CampTrails Grand Manan Assembly instructions

Maanta ULISSE 90 Instructions and warnings

Maanta

Maanta ULISSE 90 Instructions and warnings

OZTENT JV SIGNATURE EDITION owner's manual

OZTENT

OZTENT JV SIGNATURE EDITION owner's manual

GigaTent Summer Chalet Mini Tent owner's manual

GigaTent

GigaTent Summer Chalet Mini Tent owner's manual

Outsunny 84C-230 manual

Outsunny

Outsunny 84C-230 manual

Crivit Outdoor 96716 instruction manual

Crivit Outdoor

Crivit Outdoor 96716 instruction manual

Reimo Marina instructions

Reimo

Reimo Marina instructions

Outsunny 84C-063 Assembly instruction

Outsunny

Outsunny 84C-063 Assembly instruction

EuroTrail ATLANTIS PRO manual

EuroTrail

EuroTrail ATLANTIS PRO manual

TiiTENT TB300 manual

TiiTENT

TiiTENT TB300 manual

Coleman 2000033134 Assembly & instruction manual

Coleman

Coleman 2000033134 Assembly & instruction manual

Ozark Trail W784.1 Assembly instructions and owner's manual

Ozark Trail

Ozark Trail W784.1 Assembly instructions and owner's manual

SlingFin CrossBow 2 instructions

SlingFin

SlingFin CrossBow 2 instructions

Coleman 9600-141 instructions

Coleman

Coleman 9600-141 instructions

Palram Arizona 5000 Wave - WINGS manual

Palram

Palram Arizona 5000 Wave - WINGS manual

COVERPRO 56184 Owner's manual & safety instructions

COVERPRO

COVERPRO 56184 Owner's manual & safety instructions

manuals.online logo
manuals.online logoBrands
  • About & Mission
  • Contact us
  • Privacy Policy
  • Terms and Conditions

Copyright 2025 Manuals.Online. All Rights Reserved.

1 of 2
Operator’s Instructions
MOBILE GARAGE STORAGE CABINET
Model: 72800AP
SKU: 211-4352
SAFETY INSTRUCTIONS
•WEAR SAFETY GLASSES AND GLOVES when assembling
this product.
•BE CAREFUL of sharp edges.
•DO NOT stand on the top or in drawers. You may fall which
may cause personal injury.
•DO NOT alter this product in any manner.
•Use brakes when not moving this product.
•Lock drawers/doors before moving this product.
•Swivel casters w/ brakes are designed to mount at front of
unit.
•Keep the product on a level surface. The product may be-
come unstable and tip if stored or moved on an un-level sur-
face, and may cause personal injury or product damage.
•The maximum weight for the shelf should be no more than
75 lbs.
•ALWAYS wear ANSI approved safety goggles when working
with tools and equipment.
PARTS
Ref #
Description
Qty
1
Molded bumpers
4
2
Hex screws, black
8
3
Brass cup washers
8
4
caster bolts,M8x20
16
5
Swivel casters without brake
2
6
Swivel casters with brake
2
Replacement keys may be ordered using the code which
appears on the faceplate of the lock.
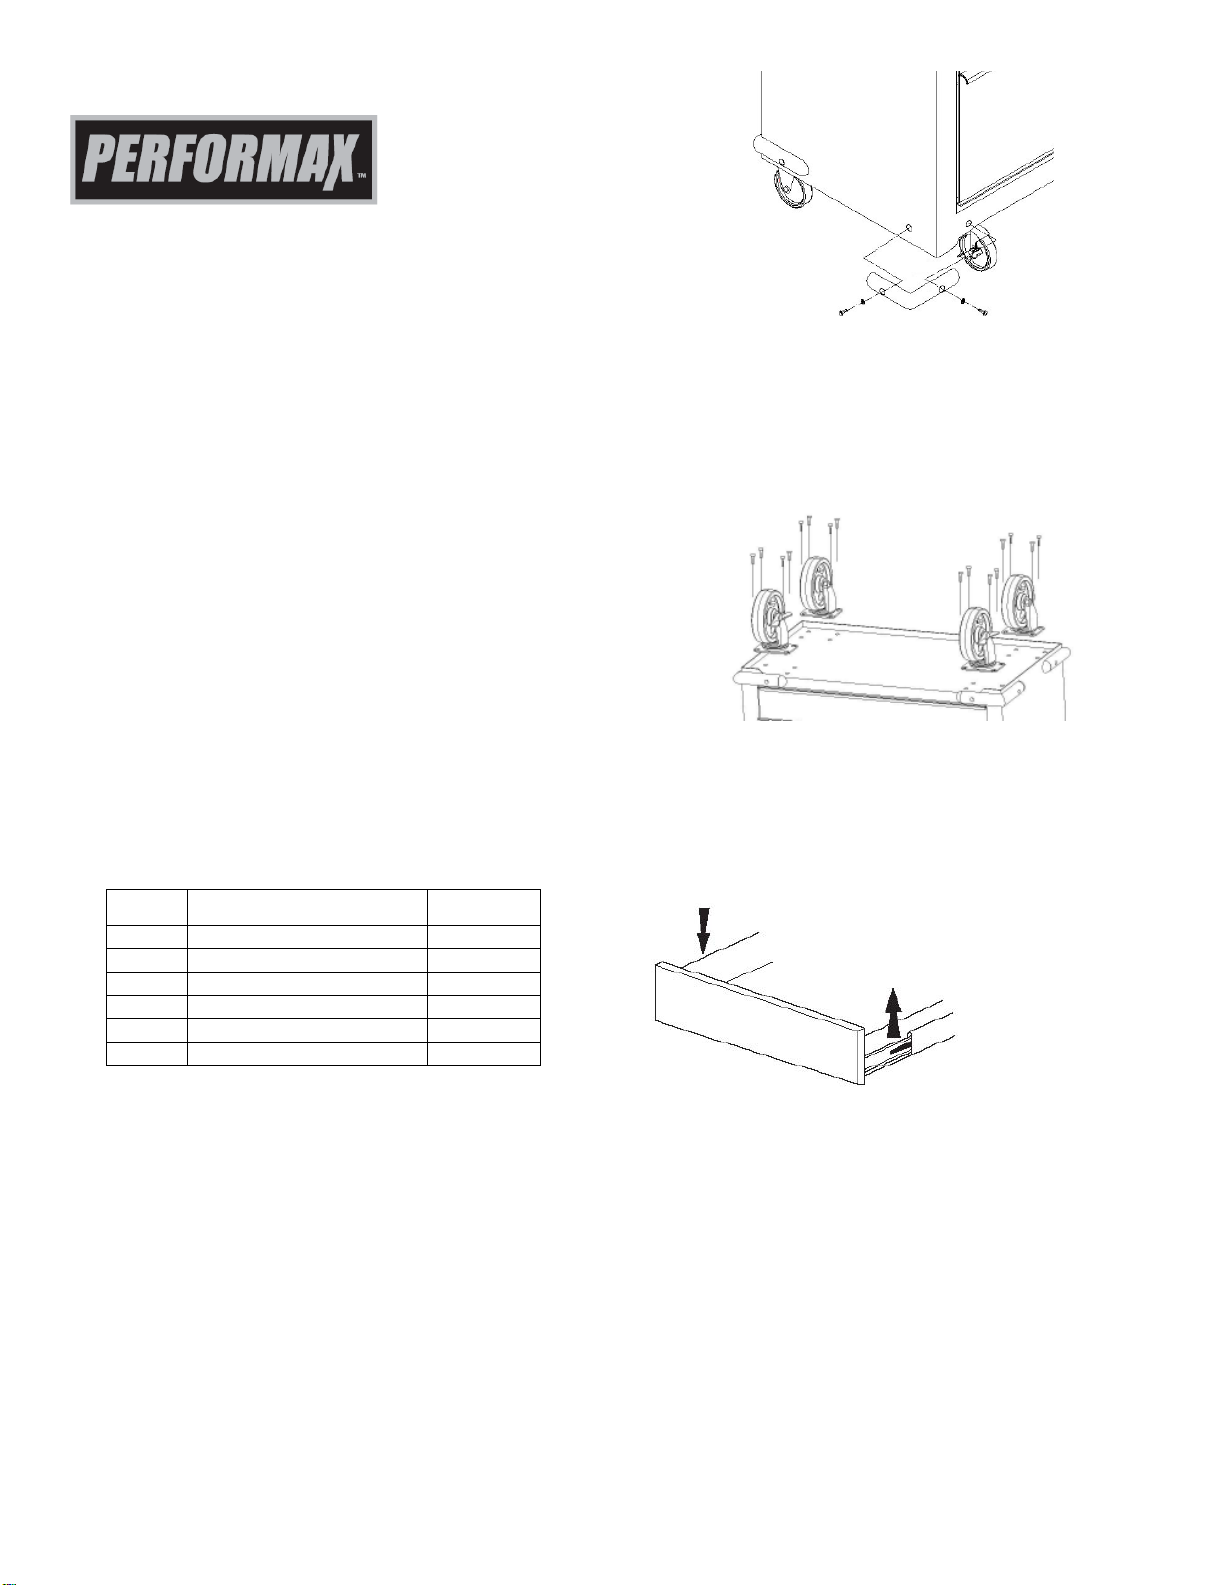
ASSEMBLY
You will need wrench for bolts used for installing casters.
To install corner bumpers
Position the bumpers over the corner holes. Insert the brass
cup washers then hex screws into bumper holes and tighten
with hex key provided. Do not over tighten.
To install casters
Carefully lay cabinet on its back using packing material to pro-
tect the paint finish. Position the two swivel casters without
brake on the back side of the cabinet bottom. Insert the bolts
through the caster plate and into the cabinet bottom. Tighten
securely. For the two swivel casters with brakes to be mounted
on front side of cabinet, install the front bolts first, then re-
maining bolts. Tighten securely. See figure below.
OPERATION
To remove shelf & adjust shelf location
Empty shelf. Pull out to almost full extension. Push up right
hand black release lever, while pulling down left hand black
release lever. While holding the levers in the positions as in-
structed below, pull the shelf outward until it is released from
the drawer slide. (See figure below)
Remove the set screw from the slides; push the mounting
channel up and out. Reinsert the mounting channel of the slide
to your desired level in the cabinet. Make sure both slides are
placed at the same level and insert the slide by pushing in and
down on the mounting slots. Insert the shelf in completely until
the slides lock into place.
2 of 2
Note: The set screw was installed for shipment purposes
and relocating the shelf does not require reinstalling the
screw. MAINTENANCE
•Lubricate the slides twice yearly.
•For casters, use high quality bearing grease, annually.
•Clean the doors and other steel surfaces with a mild deter-
gent and water periodically.
•Remove grease and oil from steel surfaces with most stand-
ard cleaning fluids. For safety, use a nonflammable cleaning
fluid.
Questions?:Please call toll free (866)441-5080
J42710F