Pettec Pet Cam Feel User manual

1
Pet Cam Feel
For a rewarding
relationship

2
HERE WE GO...
Thank you for choosing our pet cam. With the PetTec Pet Cam Feel you’ll al-
ways have your darling in view.
READ ALL INSTRUCTIONS AND WARNINGS IN THIS OPERATING
MANUAL BEFORE USING THE PET CAM Feel.
• Please do not disassemble and modify the PetTec Pet Cam Feel. The device
requires neither maintenance nor servicing. In case of malfunction, please
contact our customer service.
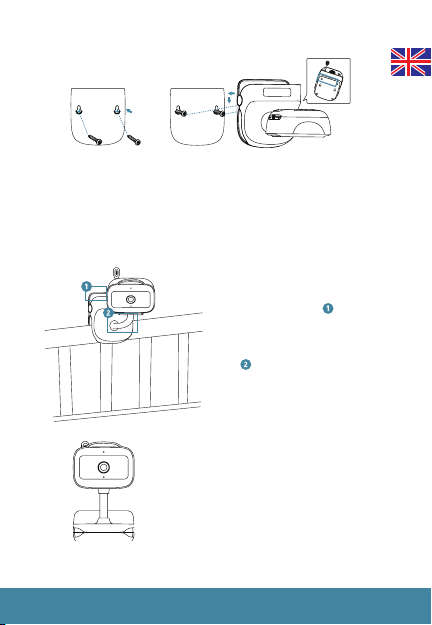
• In order to ensure proper use of the device, we recommend that you only
use the original parts. Use only the supplied assembly parts for mounting
the device.
• The device should not be affected by any renovation work, be it the use of
paint or wallpaper.
Legal Notice
• The PetTec Pet Cam Free has been designed for indoor use only. Laws in
your country may limit observation of areas outside of your home or pro-
perty. Please inform yourself about local legislation. To protect the privacy
of others, mount the camera so that you cannot record images of public
areas, streets, or your neighbor’s property. We also recommend informing
relatives, visitors and domestic workers about the camera and its function.
• Please note that the app will not inform you automatically in case of emer-
gency or burglary. If necessary, an emergency call must always be placed
by yourself. Stage10 GmbH does not provide any form of guarantee for mis-
sing or incorrect notifications or recordings.
Important safety instructions

3
Micro-SD-Card-Slot
PRODUCT OVERVIEW
Temperature and humidity sensor
Power On/Off
Ambient Light On/Off
Speech connection
Speaker
Reset button
Ambient Light
Status LED
Microphone
USB Type-C charging port
Charging control LED
Content:
• PetTec Pet Cam Feel
• Power plug
• USB Type-C to -A Cable
• Manual
• Screws and dowels
• Drilling template

4
IMPORTANT INSTRUCTIONS
Status LED (front side)
• Permanently red LED – no connection to internet possible
• LED blinking red – ready to connect to Wi-Fi
• LED blinking red quickly – Wi-Fi connection is in progress.
• Permanently blue LED – connection to Wi-Fi works properly
• LED blinking blue – ready for manual connection to Wi-Fi
• LED blinking blue quickly – manual Wi-Fi connection is
established.
• No LED – The camera is turned off / not operational.
Charge control LED (in plug compartment)
• Orange LED - camera is charging
• Green lit LED - battery is fully charged
USV Type-C cable feeder
The connector supplies power to the camera. If required, conventional USB
Type-C cables with different lengths may be used.
Microphone/speaker
The combination of built-in microphone and speaker allows two-way com-
munication.
Micro-SD card slot
Micro-SD cards up to 128GB in size may be used.

5
Reset button
The reset button must be pressed with a narrow object for approx. 5 seconds
to allow the camera to be reset to factory default settings.
To activate manual Wi-Fi setup, the reset button has to be pressed by a narrow
object for about 1 second.
Power button
Pressing the power button switches the camera on or off!
Pair button
The Pair button triggers a call! In this case, the user of the app is contacted
via video call!
LED button
Pressing the LED button turns the ambient light on or off! Individual settings
can be made in the settings of the camera

6
GETTING STARTED
1. Please connect the camera with a micro-USB cable and plug it into the
charger plug. The power plug must be connected to a power outlet.
2. After about a minute, the camera will beep and the LED will flash red. This
signals that the camera is ready to connect to the Wi-Fi network.
3. Download the „PetTec Snoop Cube“ app from the Apple App Store or Goo-
gle Play Store and install the app on your mobile device. Now follow the
instructions in the app to complete the camera setup successfully.
4. A Wi-Fi router with internet connection and the associated password must
be available. Your mobile device must be connected to the Wi-Fi network of
your router on which you want to connect the camera.
5. A stable Wi-Fi connection is required to ensure proper operation.
PetTec Snoop Cube App

7
MOOUNTING OPTIONS
Mounting with the clamp
1. Clamp the camera with , e.g. on the
edge of a piece of furniture, and turn
the housing to find an ideal viewing
angle.
2. Turn to adjust the viewing angle.
Free setting
1. The camera also stands freely on the
clamp.
2. Simply place the device in a safe
place.
Screwed mounting
1. Attach the screws to the wall according to the position of the drilling tem-
plate. Do not tighten the screws all the way, as you will need to leave a gap
to hang the camera.
2. Engage the mounting holes of the camera (at the bottom) into the screws
and press the camera down until it is fixed.

8
TECHNICAL DETAILS
Requirements
Data storage
Video & Audio
Image sensor
Audio
Motion and
noise detection
Temperature and
humidity detection
Dimensions & Weight
• High-Speed-Internet
• WiFi Connection
• Frequency 2.4 GHz
• Supports Micro-SD cards up to 128 GB
• Micro-SD cards available separately
(Requires class 10 oder higher)
• Resolution: 2304 (H) x 1296 (V)
• Format: H.264
• Field of vision: 110°
• Night vision: up to 10 m
• Full color
• 1/2.8” 3 Megapixel CMOS
• Digital zoom
• Loudspeaker
• Microphone
• Motion detection: 3 setting options available
• Noise detection: 3 setting options available
• Instant push notifications
• Upper and lower limit freely adjustable
• Immediate push notifications for values
outside the set limits
• Dimensions: 79 x 87 x 129mm
• Weight: 200g

9
Rechargeable battery
Energy
• Battery capacity: 3,350mAh Li-Ion battery
• Charging via USB ty-C cable via USB.power
supply unit
• Charging time: 6-8 hours
• Battery life: Ca. 5 hours
• Maximum power consumption: 2.5W
• Rated power (USB-C): DC 5V/1A
IMPORTANT INFORMATIONS
Radio signal
The radio transmission signal may be adversely affected by external influen-
ces (e.g., electric motors, defective electrical appliances). The range of the
radio transmission signal is usually limited within buildings. Similarly, the
structural works/conditions affect the radio range of the device. Bluetooth
devices such as headphones or speakers can also negatively affect the
radio signal of the device. The signal strength can also be reduced by
environmental influences such as humidity.
Environmental protection
Please note that non-disposable electrical and electronic appliances as well
as batteries must be recycled separately and in an environmentally friendly
manner (European Directive on Waste Electrical and Electronic Equipment).
Use the country-specific return and collection systems for the recycling of
electrical and electronical appliances as well as for batteries. Disposal of bat-
teries in household waste is prohibited.

10
https://support.pettec.de/hc/de
Declaration of conformity (see chapter „Declaration of
conformity“): Products designated with this symbol ful-
fill all applicable community provisions of the European
Economic Area.
Stage10 GmbH declares that, on the date the equip-
ment accompanied by this declaration is placed on the
market, the equipment conforms with all technical
and regulatory requirements of the relevant directives,
regulations and standards.
CUSTOMER SERVICE
Declaration of conformity
Stage10 GmbH confirms that the product described in these instructions (Pet
Cam Feel) conforms to guideline 2014/53/EU. The complete text of the EU
declaration of conformity is available at the following URL:
MANUFACTURER INFORMATION AND SERVICE
If you have questions about the PetTec Pet Cam Feel or experience
problems using it, first contact us via email at the following address:
info@PetTec.de
PetTec® is a brand of Stage10 GmbH | Leipziger Platz 9 | 10117 Berlin | www.
PetTec.com

11
DISPOSAL
Disposing of packaging
Please sort the packaging before disposal:
• Cardboard and paperboard with paper recycling
• Plastic wrap with recyclables
Disposal of devices
Applicable in the European Union and other European count-
ries with systems for the separate collection of recyclables.
Do not dispose of used devices with household trash!
If your Pet Cam Free is no longer usable, each user is obligated
by law to dispose of used devices separately from household
trash, e.g. at a collection site in your municipality. This ensures
that used devices are recycled properly and that negative en-
vironmental effects are avoided. Therefore, electronic devices
are marked with the symbol shown here.
You can find further information about our products, troubleshooting,
and helpful tips at:
support.PetTec.de

12
PetTec© ist eine Marke
der Stage10 GmbH
Leipziger Platz 9
10117 Berlin
Deutschland
www.PetTec.com
PetTec Pet Cam Feel
Art-No. 16206
EAN 4 250541 926642
Table of contents
Other Pettec Digital Camera manuals
Popular Digital Camera manuals by other brands

Polaroid
Polaroid SX-70 Alpha Model 2 manual

Dalsa
Dalsa Piranha 4 Color P4-CC-04K07T-00-R user manual

FujiFilm
FujiFilm FF210001 owner's manual

Digital Blue
Digital Blue Disney Pix Micro manual

Sirius Satellite Radio
Sirius Satellite Radio AW-415 quick guide

Nikon
Nikon AI-S Micro-Nikkor 55mm f/2.8 instruction manual