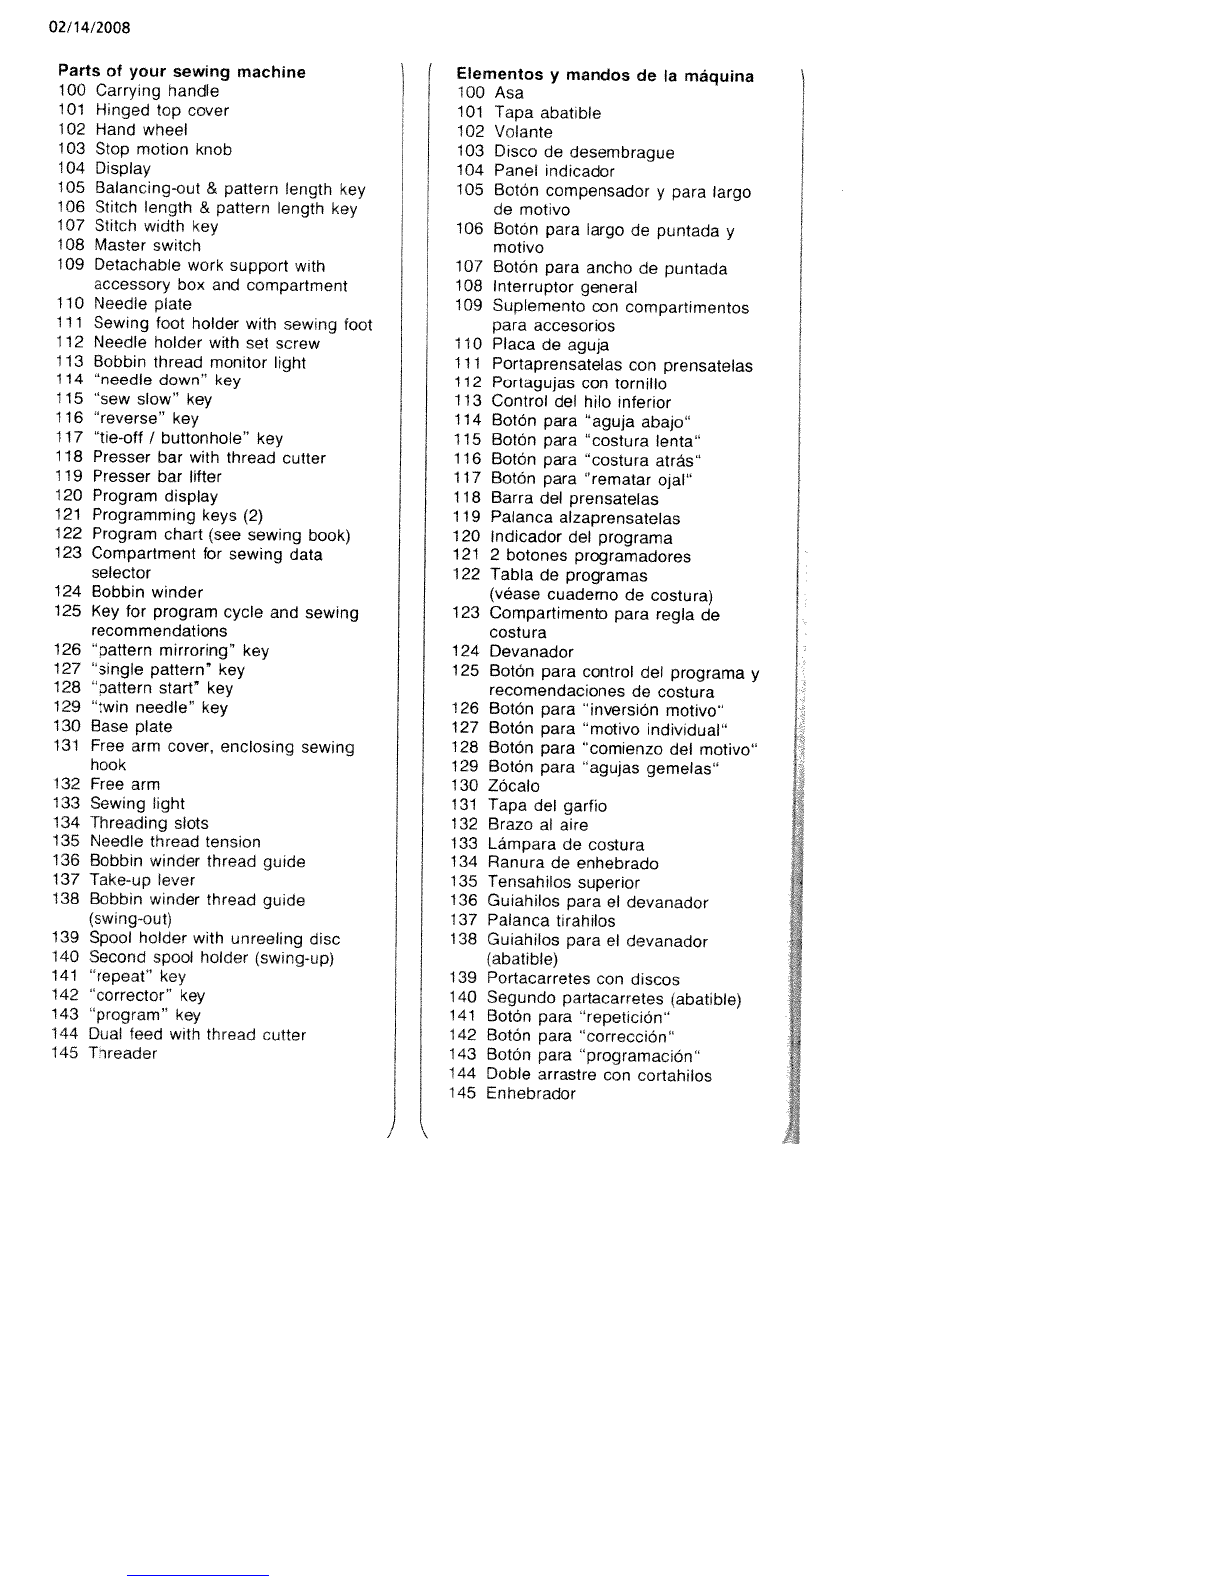
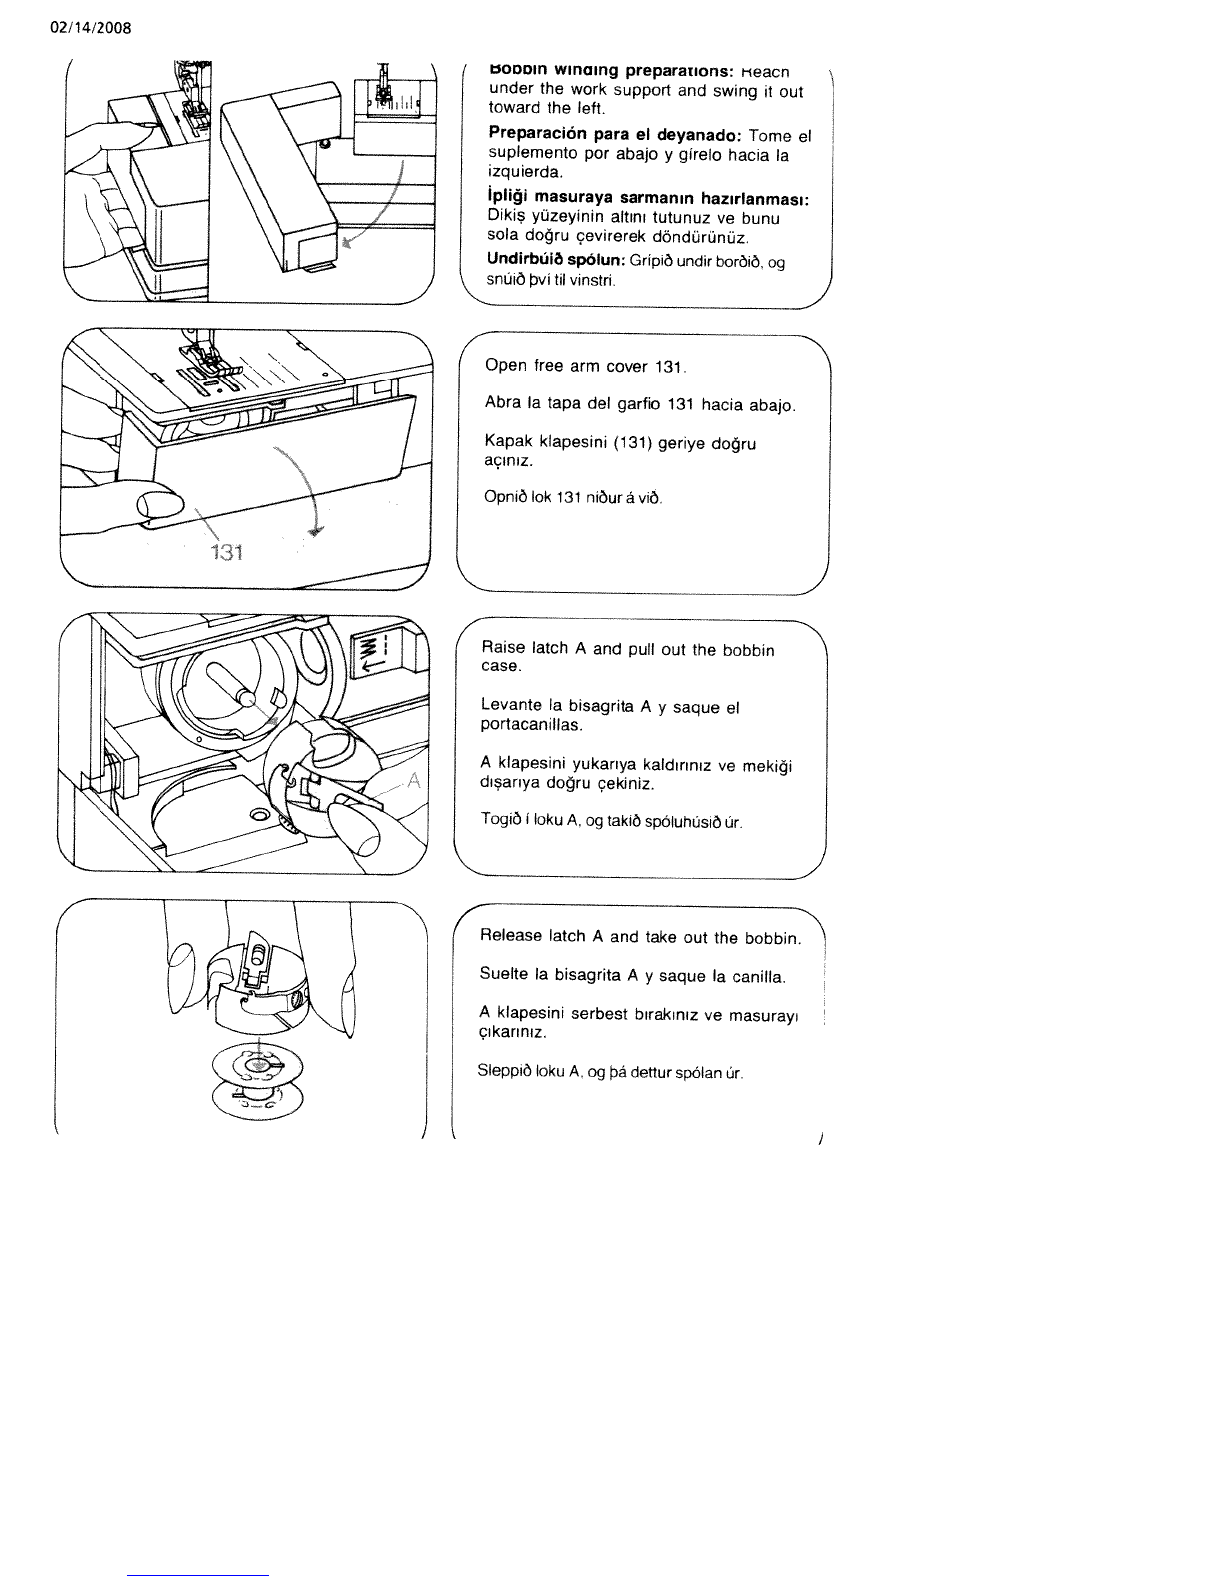
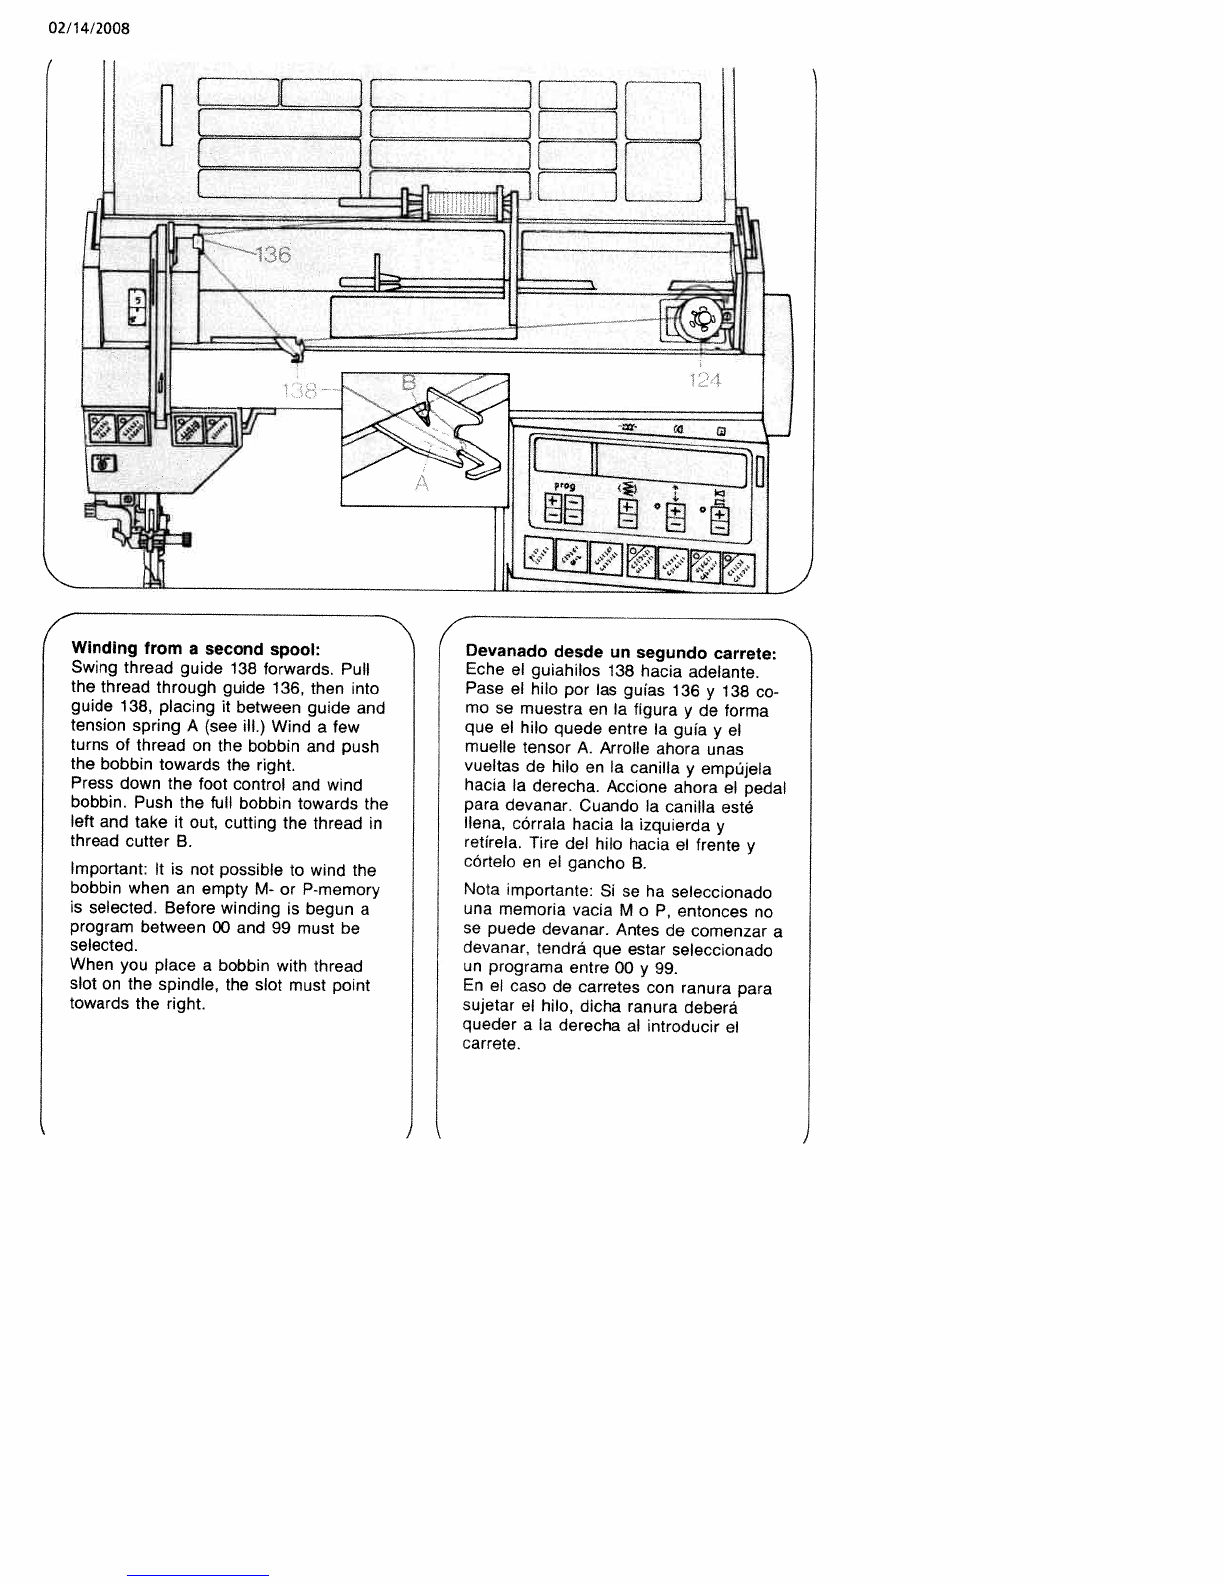
Pfaff Creative 1471 User manual

J!SJMEQ!01
!SeWeU1ELU!IE
EWUEHfl).j
QISUEW
op
seuo!DDnJ1UI
OO9
UOEJDflJISUI
8OO/tLftO

02/14/2008
•
I%
%%4L
LI
II
Extienda
esta
hoja
Bu
sayfayi
diariya
doru
katlayiniz
Flettiô
essari
sIôu
me
safety
rules
Take
care
to
avoid
injury
to
your
fingers
by
the
needle
during sewing.
Make
sure
you
unplug the
power
cord
whenever
you
have
to
leave the
machine
or
want
to
clean
it,
oil
it
or
change
mechanical
and
accessory
parts.
Be
sure
to
use
only
a
15watt
light
bulb
in
the
sewing
lamp.
r
safety
rules applicable
in
the
ited
Kingdom
please
see
page
47.
didas
de
seguridad
para
las
iquinas
de
coser
domésticas
segUn
‘1
57730,
parte 2C
Debido
al
peligro
de
accidentes
que
representa
01
movimiento
de
Ia
aguja,
el
usuarlo
deberã
poner
todo
el
cui
dado
posiblo
durante
01
trabajo
y
no
deberá
apartar
Ia
vista
do
a
zona
do
costura.
Antes
de
cambiar
a
aguja,
el
pie
prensatelas.
Ia
canilla
y
Ia
placa
de
aguja,
10
mismo
quo
a!
limpiar
o
ongrasar
Ia
maquina,
o
cuando
no
so
Ia
use,
deberá
desconectarse
eléctri
camente,
as
decir,
deberá
sacarse
el
enchufo
do
a
red.
La
potencia
max.
admisible
de
Ia
bombilla
es
de
15
vatios.
DIN
(Alman
End
üstri
Norm
u)
57730
Kisim
2c’ye
gore
evde
kullanalan
diki
makinalari
için gUvenlik
talimatlari
a)
Makinayi
kullanan kimsenin, yukariya
ye
asaiya
doru
hareket
eden
ine
dolayistyla, yeteri
kadar
dikkatli
davranmasi
ye
çalisma
esnas?nda
diki
yerini
devamli
olarak
gözlemesi
gerekir.
b)
Makinanin
terkodilmesi
esnasinda,
bakim
isbn
esnasinda
veya
makina
parçabannin
veya
iláve
parçalanin
deitiriImesi
sirasinda,
makinanin
fiini
pnizden
cikarmak
suretiyle,
ceryanin
kesilmesi
gerekir.
c)
Lâmbanin
müsaado
obunan
azami
gucü
15
Vattir.
Nokkrar
öryggisráôstafanir
a)
GstiO
hess
aO
fingur
verOi
ekki
fyrir
nálinni.
egar
saumaO
or.
b)
Geriô
aô
aO
venju
yOar
aO
taka
vélina
ür
sambandi.
iegar
skipta
part
urn
nál.
saumfót.
eôa
egar
ér
eruO
aO
hreinsa
og
smyrja
vélina.
c)
Aldrei
ma
vera
sterkari
pera
i
vélinni
en
15W.
ontents
on
page
67
dice
pag.
69
çindekiler
Sayfa
71
Efnisyfirlit
or
a
bls.
73

02/14/2008
)iki
makinasinrn
parçalari
00
Tasima
kolu
01
Acihr
kapanir
kapak
02
El
çarki
03 Ayirma
diski
04
Gosterge sahasi
05
Balans
(äne
ye
arkaya
doru
bati
uzunlukiari
arasinda
dengeleme)
ye
örnek
uzuniuu
tusu
06
Dikis
(batis)
uzunluu
ye
ärnek
uzuniuu
07
Dikis
(batis)
tusu
08
Ana
salter
09
Teferruat
(iiáve
parcaiar)
kutucuu
ye
teferruat
böyimesiyie
birlikte
deisebiien
(dikeiecek
eyin
üzerine
konduu.
kaldinlabilir) dikis
yüzeyi
10
Batis
levhasi
11
Batis
ayai
tutami,
diki
ayai
lie
biriikte
12
lne
tutamai,
tespit
vidasi
lie
birFkte
13
Alt
iplik-kontrol
gostergesi
14
Tus;
“iplik
asaida”
15
Tus;
“yava
ciikme”
16
Tus:
“geriye
doru
17
Tus:
“takviye
dikii/iIik”
18
Kumas
bastirma
cubuu
19
Kumas
bastirma
koiu
20
Program
gôstergesi
21
2
program
tuu
22
Program
cetveii
(diki
kitabina
bakiniz)
23
Surguiu
cetvei
cm
böime
24
Sarici
25
Programin
seyri
ye
diki
tavsiyeieri
cm
tu
26
Tus:
“ärnek
ters
görünumO”
27 Tus:
“tek
ärnek”
28
Tu:
“örnek
baiangici”
29
Tus:
“cift
ine”
30 Zemin
ievhasi
31
Kapak
kiapesi,
arkasinda
kiskaç
32
Serbest
koi
33
Diki
ii
34
ineye
p11k
geçirme
yarikiari
35
Ust
p11k
gerinhi
36
Sarici-iplik kilavuzu
37
Horoz
38
Sarici-iplik kilavuzu
(çevriiebiiir)
39
Däner
diskil
makara
tutucusu
40
kind
makara tutucusu
(yukanya
çevriiebiiir)
41
Tus:
“tekrariama”
42
Tus:
“düzeitme”
43
Tus:
program
sunumu”
44
Iplik
kesicisi
lie
biriikte
cift
kuma
tasimasi
45
ineye
p11k
geçiridi
Hiutir
vélarinnar
100
101
102
103
104
105
106
107
Takki
fyrir
sporbreidd
108
Aôalrofi
109 VinnuborO
rneô
hOlfi
fyrir
aukahiuti
110
Stingplata
111
Halda
fyrir
saurnftur
112
Nálahalda
113
LjOs
fyrir
undirtvinna
114
Takki
nálin
niôur
115 Takki
saurnaO
hgt
116
Takki.afturábak
117
Takki
hefting
—
hnappagOt
118
Fotstong
119
FOtiyftir
120
Nürner
saurnspors
121
122
123
124
SpOlari
125 Upprifjunartakki
og
ráôieggingar
126
Takkl
rnynzturspegiun
127
Takki
,eitt
rnynztur’
128
Takki
mynzturbyrjun
129
Takki
,tvr
náiar
130
Botnplata
131
Armiok
og
ar
fyrir
innan
gripari
132
Friarmur
133
LjOs
134
Raufar
tyrir
rôingu
135
Yfirtvinnaspenna
136
frôissfyring
fyrir
spOlun
137
ráOgjati
138 1DrOisfyring
fyrir
spólun
(sern
er
smelit
it)
139
Tvinnakefiishaida
meO
skiturn
140
Aukakeflispinni
(sern
er ‘tt
upp)
141
Takki
,endurtekning’
142
Takki
.IeiOretting
143 Mynzturminni
144
Efri
fiytjarinn
og
tvinnahnifur
145
I’rOarinn
Valtakkar
fyrir
saumspor
Tafla
yfir
saumspor
(sja
saumabOk)
Hóif
tyrir
bkling
urn
sporin
Handfang
Fellilok
HandhjOl
LausagangsskrUfa
S’niflOtur
Péttleiki og
rnyzturiengd
Takki
fyrir
sporlengd
og
mynzturlengd


02/14/2008
Parts
of
your sewing
machine
100
Carrying
handle
101
Hinged
top
cover
102
Hand
wheel
103
Stop
motion knob
104
Display
105
Balancing-out
&
pattern
length
key
106
Stitch
length
&
pattern
length
key
107
Stitch
width
key
108
Master
switch
109
Detachable
work
support
with
accessory
box
and
compartment
110
Needle
plate
111
Sewing
foot
holder
with
sewing
foot
112
Needle
holder
with
set
screw
113
Bobbin
thread
monitor
light
114
needle
down
key
115
sew
slow
key
116
“reverse”
key
117
tie-off
/
buttonhole”
key
118
Presser
bar
with
thread
cutter
119
Presser
bar
lifter
120
Program
display
121
Programming
keys
(2)
122
Program
chart
(see
sewing
book)
123
Compartment
for
sewing
data
selector
124
Bobbin
winder
125
Key
for
program
cycle and
sewing
recommendations
126
pattern
mirroring”
key
127
single
pattern’
key
128
“pattern
start”
key
129
‘twin
needle”
key
130
Base
plate
131
Free
arm
cover,
enclosing
sewing
hook
132
Free
arm
133
Sewing
light
134
Threading
slots
135
Needle
thread
tension
136
Bobbin
winder
thread
guide
137
Take-up
lever
138
Bobbin
winder
thread
guide
(swing-out)
139
Spool
holder
with
unreeling
disc
140
Second
spool
holder
(swing-up)
141
“repeat”
key
142
“corrector”
key
143
“program’
key
144
Dual
feed
with
thread cutter
145
Threader
Eementos
y
maridos
de
Ia
máquina
100
Asa
101
Tapa
abatible
102
Volante
103
Disco
de
desembrague
104
Panel
indicador
105
BotOn
compensador
y
para
argo
de
motivo
106
Botón
para
argo
de
puntada
y
motivo
107
BotOn
para
ancho
de
puntada
108
Interruptor
general
109
Suplemento
con
compartimentos
para accesorios
110
Placadeaguja
111
Portaprensatelas
con
prensatelas
112
Portagujas
con
tornillo
113
Control
del
hilo
inferior
114
BotOn
para
“aguja
abajo”
115
Botón
para
“costura
lenta”
116
Botón
para “costura
atrfts”
117
BotOn
para “rematar
ojal”
118
Barra
del
prensatelas
119
Palanca
aizaprensatelas
120
lndicador
del
programa
121 2
botones programadores
122
Tabla de
programas
(véase
cuademo
de
costura)
123
Compartimento
para
regla
de
costura
124
Devanador
125
Botôn
para
control del
programa
y
recomendaciones
de
costura
126
BotOn
para
“inversion
motivo”
127
BotOn
para
“motivo
individual”
128
BotOn
para
“comienzo
del
motivo”
129
Botón
para
“agujas
gemelas”
130 ZOcalo
131
Tapa
del
garfio
132
Brazo
al
aire
133
Lámpara de
costura
134
Ranura
de
enhebrado
135
Tensahilos
superior
136
Guiahilos
para
el
devanador
137
Palanca
tirahilos
138
Guiahilos
para
el
devanador
(abatible)
139
Portacarretes
con
discos
140
Segundo partacarretes
(abatible)
141
Botón
para
“repeticiOn’
142
BotOn
para
“correcciOn”
143
BotOn
para
programaciOn
144
Doble
arrastre
con
cortahilos
145
Enhebrador
I

02/14/2008
Machine
connection
Fold
down
the
carrying
handle.
Conexión
eléctrica
Eche
hacia
atrás
el
asa.
Elektrik
batantIs4
Taima
kolunu
arkaya
doru
deviriniz
Tenging vélarinnar
LeggiO
handfangiO
niOur.
4
Lift
off
the
cover
Saque
el
maletin,
canta
kapaini
kaldiriniz
Lyftiôlokinu.
4
Tilt
cover
101
backwards.
Levante
Ia
tapa
abatible
101.
Açilir
kapanir
kapai
(101)
açiniz
—-
—
‘
Opniö
teIIiIokiO
101.
.J
1
L
Plug
in
the machine.
Conecte
Ia
maquina
con
Ia
red.
Ceryan kablosunu
baIayiniz
Tengiâ
vélina
viO
rafmagn.

02/14/2008
._
Pull
the
power
cord
out
of
the
foot
control.
7\_
Saque
el
cable
del
pedal.
Kabloyu
martan
dariya doru
çekiniz
-—
Togiã
IeiOsluna
r
mótstOOunni.
-
—-—-
_______
__________________________
Plug
the
foot
control
lead
into
the
machine
socket
and
place
the
foot
.--
control
on
the
floor.
Coioque:ipedal
en
el
suelo
y
conéctelo
--
Mar
kablosunu
makinaya
balaytniz
ye
mari
yere
koyunuz
TengiO IeiOsluna
viO
vélina.
og
setjiô
rnOtstöOuna
a
gOlfiO.
108;
the sewing
Pulse
el
interruptor
general
108.
La
lam
para
de
costura
se
enciende.
Ana
altere
(108)
basiniz,
bu
arada
dikis
iI
yanar
Prstià
a
aOalrofann
108.
og
urn
IeiO
kviknar
a
Iósinu.
-
-
----

02/14/2008
,
\
b000(fl
winaing
preparalions:
Meacn
under
the
work
support
and
swing
it
out
_______
toward
the
left.
—
—
Preparación
para
&
deyanado:
Tome
el
—
suplemento
por
abajo
y
girelo
hacia
Ia
izquierda.
EpIii
masuraya
sarmanin
hazirlanmasi:
ii
.
Diki
yuzeyinin
altini
tutunuz
ye
bunu
sola
doru
çevirerek
dOndürünüz.
UndirbUiô
spolun:
GripiO
undir
borôiô,
snüiôvitilvinstri,
Abralatapadeig:fb
131
hacia
abaj
Kapak
klapesini
(131)
geriye
doru
Opniôlok
131
niôuráviO,
latch
A
and
pull
out
the
bobbin
Levante
Ia
bisagrita
A
y
saque
el
portacanillas.
A
klapesini
yukariya
kaldiriniz ye
mekii
disariya
doru
çekiniz.
Togiô
I
loku
A.
og
takiO
spóluhüsiô
/r.
I
Release
latch
A
and
take
out the bobbin.
)
Suelte
Ia
bisagrita
A
y
saque
a
H
-.
i
A
klapesini
serbest
birakiniz ye
masurayi
çikariniz.
SleppiO
loku
A.
og
á
dettur
spOlan
ür,

02/14/2008
j
I
Place the
bobbin
on
winder
124
and
turn
it
until
pin
A
engages
in
slot
B.
Coloque
a
canilla
en
el
devanador
124
y
girela
hasta
que
Ia
espiga
A
encaje
en a
ranura
B.
A
pimi
B
yarii
içerisine
oturuncaya
kadar
masurayl,
sarici
uzerine
takiniz.
SetjiO
spOluna
a
spOlarann
124.
Hak
A
verOur
aO
falla
I
rauf
B.
‘isengaging
the
sewing
mechanism:
Hold
the
hand
wheel
steady
and
turn
V
knob
103
towards
you.
Desconexión
del
mecanismo
de
costura:
Sujete
el
volante
y
gire
el
disco
103
hacia
el
frente.
Diki
mekanizmasini kapamak:
El
carki
ni
sikica
tutunuz
ye
disk
103’
ü
äne
doru
ceviriniz.
Setjiô
vélina
I
lausagang:
Haldô
urn
handhjáliô
og losiô
skrüfu
103.
wing
the
thread
spool
towards
the
back.
Eche
hacia
atrás
el
segundo
portacarretes.
kind
makara
tutucusunu
geriye
doru
cevirerek
döndürünüz!
tiO
auka
ketlispinnanurn
upp.
Push
a
spool
of
thread and
unwinding
collar
onto the
holder.
lntroduzca
el
carrete
y
el
disco
pequeno
C
en
el
portacarretes.
Makarayi
ye kucuk
döner
diski
(C)
tutamak üzerine sürünüz.
SetjiO
Mnnakefli
og
litla
skifu
C
a
pinnann.

Winding from
a
second
spool:
Swing
thread
guide
138
forwards.
Pull
the
thread
through
guide
136,
then
into
guide
138,
placing
it
between
guide
and
tension
spring
A
(see
ill.)
Wind
a
few
turns
of
thread
on
the
bobbin
and
push
the
bobbin
towards
the
right.
Press
down
the
foot
control
and
wind
bobbin.
Push
the
full
bobbin
towards
the
left
and take
it
out,
cutting
the
thread
in
thread
cutter
B.
Important:
It
is
not
possible
to
wind
the
bobbin
when
an
empty
M-
or
P-memory
is
selected.
Before
winding
is
begun
a
program
between
00
and
99
must
be
selected.
When
you
place
a
bobbin
with
thread
slot
on
the
spindle,
the
slot
must
point
towards
the
right.
Devanado
desde
un
segundo
carrete:
Eche
el
guiahilos
138
hacia adelante.
Pase
el
hilo
por
las
gulas
136
y
138
co
mo
se
muestra
en
Ia
figura
y
de
forma
que
el
hilo
quede
entre
Ia
guia
y
el
muelle
tensor
A.
Arrolle
ahora
unas
vueltas
de
hilo
en
Ia
canilla
y
empUjela
hacia
Ia
derecha.
Accione
ahora
el
pedal
para
devanar.
Cuando
Ia
canilla
esté
lena,
cOrrala
hacia
Ia
izquiorda
y
retirela.
Tire
del
hilo
hacia
el
frente
y
cOrtelo
en
el
gancho
B.
Nota
importante:
Si
se
ha
seleccionado
una
memoria
vacia
M
o
P,
entonces
no
se puede
devanar.
Antes
de
comenzar
a
devanar,
tendrá
que
estar
seleccionado
un
programa entre
00
y
99.
En
el
caso
do
carretes
con
ranura
para
sujetar
el
hilo,
dicha
ranura
deberá
queder
a
Ia
derecha
al
introducir
el
carrete,
02/14/2008
L
it
U
t.
——
r-
___1
II
II
11
1
I
4
)

02/14/2008
kinci
bir
makaradan
ipligi
masuraya
sarmak:
Sarici-iplik
kilavuzunu
(138)
one
doru
cevirerek
döndürünüz.
ipiii,
kiiavuz
136
içerisine
ye
ekilde
goruiduu
gibi,
kilavuz
138
içerisine
çekiniz;
bu
arada
ipliin
kiiavuz ye
geriiim
yayi
(A)
arasina
gelmesi
gerekir.
$imdi
iplii
birkac
defa
masuraya
sariniz.
Masurayi
saa
doru
bastiriniz.
Mari
çaIitiriniz
ye
ipHi
ma
suraya
sariniz.
Doimus
olan
masurayi
sola
doru
basit,rcniz,
cikanniz,
iplii
one
doru
çekiniz
ye
B
kesicisinde
kesiniz.
Onemii:
Bir
bo
M-
veya
P-Biriktiricisi
seçilmise,
iplik
masuraya
sarilamaz.
Sarmaya
baiamadan
änce,
00
ye
99
arasindaki
bir
programiri
seçilmis
olmasi
9erekir.
iplik
tutamak
yarIIni
(kertiini)
haiz
ma
karalarda, makaranin sürüimesi
(takil
masi)
esnasinda
yariin,
yani
kertiin
sada
bulunmasi
gerekir.
SpóIaô
at
tvinnakefli:
SmeiiiO
st’ringu
138
tram
a
via.
‘rôiO
tvinnann
I
st9ringu
136,
og
ems
og
myndin
snir
I
st9ringu
138,
en
gtiã
aô
vi
aO
hann
rOist
undir spennifjOôur
A.
Snüiô
sloan
tvinnanum
nokkrum
sinnum
knngum
spOiuna.
YtiO
nü
spOlaranum
Iii
hgri.
StigiO
nU
a
mótstOOuna
og
spohO
a
spoluna.
iegar
spOian
er
fuii
er
henni
‘tt
til
vinstil,
hun
tekin
at
og tvinninn
er
skorinn
meO
hnifnum
B
i
stnngu
138.
Ef
ér
hafi6
vaiiô
tOmt
M-
e6a
P-minni
er
ekki
hgt
a6
spOia
a
spOluna
a
meöan.
AOur
en
spOia6
er
verôur
vélin
a6
vera
stilit
a
einhvern
af
fOstu
saumunurn
a
mliii
00
og
99.
ArlOandi
er
aO
au
tvinnakefli,
sem
eru
meO
skárauf,
séu
sett
annig
a
pinnann
aO
raufin
vlsi
til
hgri.
Engaging
the
sewing
mechanism:
Hold
the
wheel
firmly,
turn
disk
103
towards
the
back,
then
turn
the
hand
wheel
forward
until
it
snaps
in.
Conexión
del
mecanismo
de
costura:
sujete
el
volante
y
gire
el
disco
103
hacia
atrás.
Seguidamente
gire
el
volante
hacia
adelante
hasta
quo
encaje.
DikiS
mekanizmasin,n
calitirilmasi:
El
çarkini
sikica
tutunuz
ye
diski
(103)
geriye
doru
ceviriniz.
Daha
sonra
el
çarkini,
yerine
oturuncaya kadar
One
doru
çeviriniz.
Gangverk
vélarinnar
tengiO
ér
nu
aftur
—
haldiO
urn handhjOiiO
og
festiO
skifu
103.
SnüiO
handhjOlinu
aOeins
tram
a
viO,
ar
til
per
heyriO
smá
smell.

02/14/2008
Winding
through
the
needle:
Raise
the
sewing
foot
with
the
needle
in
its
up
position.
Place
a
bobbin
on
spindle
124.
Disengage
the
sewing
mechanism.
Draw
the
needle
thread under the
sewing
foot,
up
and
through guide
138
(see
ill.).
Wind
a
few
turns
of
thread
on
the
bobbin
and
push
the bobbin
towards
the
right.
Press
down
the
foot
control
and
wind.
Push
the
full
bobbin
towards
the
left
and
take
it
out,
cutting
the thread
in
thread
cutter
“A”.
Important:
It
is
not
possible
to
wind
the
bobbin
when
an
empty
M-
or
P-memory
is
selected.
Before winding
is
begun
a
program
between
00
and
99
must
be
selected.
Devanado
a
través
de
Ia
aguja
Eleve
el
pie
prensatelas
y
Ia
aguja.
Coloque
Ia
canilla
en
el
devanador
124.
Desconecte
el
mecanismo
de
costura.
Pase
el
hilo
superior
por
debajo
del
prensatelas
hacia
a
derecha
y
por
Ia
guia
138
(v.
figura). Arrolle
unas
vueltas
de
hilo
en
Ia
canilla
y
cOrrala
hacia
Ia
derecha.
Accione
el
pedal
para
devanar.
Corra
Ia
canilla
Ilena
hacia
Ia
izquierda,
retirela
y
corte
el
hilo
en
el
gancho
‘A’.
Nota
importante:
Si
se
ha
seleccionado
una
memoria
vacia
M
0
P,
entonces
no
se
puede
devanar.
Antes
de
comenzar
a
devanar.
tendrá
que
estar
seleccionado
un
programa
entre
00
y
99.
______—
1L
4
N
4

02/14/2008
igne
vaitastyla
iphi
rnasuraya sarmak
Diki
ayaini
yukanya
kaldiriniz.
lnenin
durumu: yukarida.
Masurayi,
sanc
(124)
üzerine
takinz.
Diki
mekanizmasini
kapatiniz.
Diki
ayaI
altindaki
üst
iplii,
saa
doru
ye
kilavuz
138’den
geçirmek
suretiyle
cekiniz
(ekle
bakiniz).
lplii
birkaç
defa
masuraya
sariniz
ye
masurayi
saga
doru
bastirintz,
Mars
çalitiriniz
ye
iplii
masuraya
sariniz.
Dolmu
olan masurayi
sola
doru
bastiriniz,
çkarinz, iplii
one
doru
cekiniz
ye
“B”
kesicisinde
kesiniz.
Onemli:
Bir
bo
M-
veya
P-Biriktiricisi
seçilmisse,
p11k
masuraya
saritamaz.
Sarmaya
baØmadan
once,
00
ye
99
arasindaki
bir
programin
seciImi
olmasi
gerekir.
Spolaô gegn
urn
náhna
FOtlyftir
og
nál
I
efstu
stöôu,
SetjiO
spOlu
a
spOlarann
124,
takiô
gangverkiô
Or
sambandi.
DragiO
tvinnann
undir
saumfOtinn
hgra
megin,
og
slOan
i
st’ringu
138
ems
og
myndin
s’nir.
SnOlO
tvinnanum
nokkrum
sinnum
kringum
spOluna, og
itiO
henni
slOan
til
hgri.
StIglO
nO
a
mOtstOOuna
og
spóliO
a
spOluna.
legar
spOlan
er
fuller
henni
tt
til
vinstri,
hOn
tekin
af
og
tvinninn or
skorinn
meO
hnifnum
A.
Ef
pôr
hafiO
vali6 tOmt
M-
efa
P-minni
or
ekki
hsgt
a8
spOla
a
spOluna
a
me6an.
A6ur
en
spOla6
er
verôur
vélin
a6
vera
stilit
a
einhvern
af
föstu
saumunum
a
mull
00
og
99.
4
Engaging
the
sewing
mechanism:
Hold
the
wheel
firmly,
turn
disk
103
towards
the
back,
then
turn
the
hand
wheel
forward
until
it
snaps
in.
Conexión
del
mecanismo
de
costura:
sujete
el
volante
y
gire
el
disco
103
hacia
atrás. Seguidamente
gire
el
volan
te
hacia
adelante
hasta que
encaje.
Diki
mekanizmasinin
çaIitirilmasi:
El
carkini
sikica
tutunuz
ye
diski
(103)
geriye
doru
ceviriniz.
Daha
sonra
el
çarkini,
yerine
oturuncaya
kadar
one
doru
çeviriniz.
Gangverk
vélarinnar
tenglO
Ier
nO
aftur
—
haIdlO
urn
handhjOliO
og
festiO
skifu
103.
SnOiO
handhjOlinu
aOeins
tram
a
viO,
ar
til
pôr
heyriO
smá
smell.
/
I
-

02/14/2008
Inserting
the
bobbin:
insert bobbin so
that
thread
unwinds
towards
the
back
(A).
Draw
the
thread
into
slot
B
and
into
eye
C.
Colocación
de
Ia
canilla
en
Ia
cápsula:
lntroduzca
Ia
canilla
como
se
muestra
en
A
(hilo
hacia
atrás).
Pase
luego
el
hilo
por
Ia
ranura
B
y
por
debajo
del
mueHe
tensor
hasta
que
salga
por
el
on
Masurayl
yenIetimiek
A
(Iplik
arkaya
doru).
lplii
B
yanina
ye
C
deliine
kadar
çekiniz.
Spolan
sell
i.
Tvinninn a
aO
renna
aftur
af
spOlunni Tvinninn
lagOur
i
rauf
B
undirtaOrina
og
üt
urn
op
C.
Checking
the
bobbin
thread
tension:
With
a
brief,
sharp
upward
movement
of
your
hand
the
bobbin
must
gradually
slip
downwards.
(Turn
screw
0
to
the
right
for
stronger
tension
and
to
the
left
for
weaker tension.
Comprobación de
Ia
tension
del
hilo
inferior:
Suspendiendo
Ia
cápsula
del
hilo,
solo
deberâ
deslizarse
al
dar
tiron
citos
del
hilo.
(Girando
el
tornillo
D
a
Ia
izquierda,
a
tensiOn
disrninuye,
y
viceversa.)
Alt
iplik
gerginhiinin
kontrol
edilmesi:
Mekii,
hafifce,
aniden
yukariya
doru
hareket
ettiriniz.
Mekiin
kademeli
olarak
asaiya
inmesi
gerekir.
(Ayar
vidasi
D’yi
sola
çeviriniz
=
daha
gevsek,
saga
ceviriniz
=
daha
siki).
Rett
undirspenna:
Látiô spOluhusiO
hanga
niOur,
rykkiô
lauslega
i
tvinnann,
og
á
a
DaO
aO
renna
aOeins
niOur.
(Stilliskrüfa
D
=
vinstri
snüningur
losar,
hgri
snüningur
herOir.)

02/14/2008
Inserting
the
bobbin
case:
Raise
latch
A
and push
the
bobbin
case
onto
stud
B
as
far
as
it
will
go,
making
sure
cutout
C
points
upwards.
Colocación
de
Ia
cápsula
con
Ia
canhlla
en
el
garfio:
Levante
Ia
bisagrita
A
e
introduzca
Ia
capsula
hasta
el
tope
en
Ia
espiga
B.
La
muesca
C
tiene
que
mirar
hacia
arriba.
Mekii
takmak:
A
klapesini
kaldiriniz
ye
mekii
dayanaa
kadar
B
pimi
üzerine
sürünüz.
Bu
sirada
C
kesiminin
yukariya
doru
yOnelmi
olmasi
gerekir.
Spoluhusiô
sett
I:
Haldiô
urn
loku
A,
og
setjiO
aO
a
tiff
B,
annig
aO
ürtakiô
C
vlsi
upp
a
viO.
Placing
spool
of
thread
on
pin:
Place
the
small
or
medium-size
unwinding
collar
D
in
front
of
small
spools, and
the
large
collar
E
in
front
of
large
spools.
Colocaciôn
del
carrete:
Para
carretes
pequenos
coloque
el
disco
pequeno
o
mediano
D;
para
grandes
el
disco
grande
E.
Makaranin
takilmasi:
Kuçuk
makaralarin
änüne
kuçuk
veya
orta
buyuklukte
olan
dOner
rondelayi
(D),
bOyük
makaralarin
önUne
buyük rondelayi
(E)
sürünOz.
Tvlnnakeflin
sett
a:
Fyrir
liii
kefli
or
litla
skifan
D
soft
fyrir
framan
kefliô,
en
skifa
E
fyrir
strri
kefli.
I
4

02/14/2008
Upper
threading:
With
the
needle
in
its
top
position,
raise
the
sewing
foot.
Draw
the
thread
into
slot
A,
from
below
into
slot
B
and take-up
lever
137
(see
arrows),
then
back
into
slot
8and
into
the
right
thread
guide
on
the
needle
holder.
Enhebrado
del
hilo
superior:
Eleve
a
aguja
y
el
prensatelas.
Pase
el
hilo,
siguiendo
Ia
flecha,
por
a
ranura
A,
des
de
abajo
por
Ia
ranura
B,
por
Ia
palanca
tirahilos
137,
de
nuevo
por
Ia
ranura
B
y
por
Ia
gula
derecha
del
portagujas.
Ust
ipIiin
takilmasi:
inenin
durumu,
yukarida.
Diki
ayaini
yukariya
kaldiriniz.
Iplii,
ok
istikametinde
olmak
üzere,
A
yarlina,
alt
taraftan
B
yarIIna,
horoz
(137)
içerisine,
geriye
doru
B
yariina
ye
iplik
tutamainda
bulunan
sa
kilavuz
içerisine
çekiniz.
Pr8ing:
Nálin
I
efstu stöôu.
Fôtur
uppi.
PrOiO
ems
og
ärvarnar
sna
I
rauf
A,
aO
neOan
I
rauf
B.
i
ráOgjafa
137.
aftur
I
rauf
8.
og
siOan
I
hgri
stringu
a
nálahöldunni.
I
I
/
/III1Ic.’V
‘
.._—‘\J
/
,0
N
4
Place
the
needle
thread
behind
hook
D
and
hold
it
there.
Pull
threader
145
fully
downwards.
Coloque
el
hilo
superior
detrás
del
gancho
D
y
sujételo.
Empuje
el
enhebrador
145
hacia abajo
eI
todo.
Ust
ipIii
D
çengeli
arkasina
yerIetiriniz
ye
tutunuz.
Ineye
iplik
geçiriciyi
(145)
tamamen
asaIya
doru
çekiniz.
Leggi
yfirtvinnann
undir
hak
D
og
haldiô
I
tvinnann.
Togiô
siOan
rôarann
145
alveg
niOur.
/
JI
A
I’
€1
0

02/14/2008
Swing
threader
towards
front
against
needle.
Gire
el
enhebrador
hacia
Ia
aguja de
forma
que
su
gancho
penetre
por
el
ojo
de
Ia
aguja.
lneye
iplik
geçiriciyi,
nenin
on
tarafina
getiriniz.
SnóiO
nü
rôaranum
annig
aô
hann
fan
i
gegn
urn
nalaraugaO.
Place
thread
into
hook
E
from
below.
Enganche
el
hilo
desde
abajo
en
el
gancho
E.
Iplii,
asaidan
E
çengeline
asiniz.
Leggiô
tvinnann
nü
undir
krOkinn
E
a
rôar
anum.
Swing
threader
towards back,
release
thread
at
same
time
and
allow
threader
to
move
upwards, then
pull
the
thread
fully
through
the
needle
eye.
Gire
hacia
atras
el
enhebrador,
suelte
el
hilo
y
eleve
el
enhebrador.
Finalmente,
haga pasar
el
hilo
del
todo
por
el
ojo
de
Ia
aguja.
lneye
iplik
geciriciyi
arkaya
doru
getini
riiz,
bu
arada
iplii
serbest
birakiniz ye
ineye
iplik
geçiriciyi
yukariya
doru
kaydirtiniz.
Daha
sonra
iplii
tamamen
igne
deliinden
çekiniz.
Látiô
nü
L,rOarann
ganga
hgt
til
baka,
og
alla
leiô
upp.
Tvinninn
kemur
nili
sem
lykkja
i
gegnum
nálaraugaO
og
ler
getiô
nü dregiO
endann
I
gegn.
N

02/14/2008
0
ID
0
Hold
the
needle
thread
taut.
Turn
the
hand
wheel toward
you
until
the
needle
moves
down
and
up
again.
Pull
the
bobbin
thread
up
by
pulling on
the
needle
thread.
Sujete
el
hilo
superior,
gire
el
volante
hacia
el
frente,
haga
una
puntada
y
saque
el
hilo
inferior
tirando
del
hilo
superior.
Ust
iplii
sikica
tutunuz.
El
carkini
one
doru
ceviriniz,
Bir
batis
dikiniz,
Ust
iplikle,
alt
iplii
yukariya
doru
cekiniz.
HaidlO
I
yfirtvinnann,
SnuiO
handhjö{inu
tram
a
viO
ar
til
nãliri
hefur
tariô
niOur
og
kemur
upp
attur
TogiO
undirtvinnann
upp.
j
Place
both
threads
to
the
right
under
the
sewing
toot.
Eche
ambos
hilos
hacia
Ia
derecha
por
debajo
del
prensatelas.
Ust-
ye
alt
iplii
saOa
doru,
diki
ayai
altina
koyunuz.
Lãtiô
ytir-
og undirtvinnann
undir
tOtinn
hgra
megin.
Close
the
free
arm
cover.
Cierre
a
tapa
131.
Kapak
klapesini
(131)
yukarsya
doru
kapatiniz,
Lokiôlokinu
131.

02/14/2008
I!
L
-
-
Swing
work
support
109
back
against
the
free
arm.
Gire
hacia dentro
el
suplemento
109.
Diki
yüzeyini
(109)
makinaya
doru
çe
virerek
döndürünüz.
YtiO
vinnuborOi
109
aô
arminum.
—
.
Lower
presser
bar
lifter
119.
(A
indicates
the
darning
position).
Baje
Ia
palanca
alzaprensatelas
119.
(A”
es
a
posiciOn
para
zurcir).
Kuma
bastirma
kolunu
(119)
aaiya
in
diriniz,
(A,
örerek
tamir
etme
-
yama
yapma
-
durumudur).
SetjiO
fótlyftirinn
119
niOur.
(StaOa
A
er
fyrir
stoppvinnu).
f
Place
fabric
under
sewing
toot.
Coloque
Ia
tela
debajo
del
prensatelas.
Kumasi
diki
ayai
altina
koyunuz.
SetjiO
efniO
undir
fOtinn,
J
7-
To
insert
extra-thick fabric
plies
raise
le
ver
119
higher.
Al
colocar
piezas
de
tela
muy
gruesas,
levante más
Ia
palanca
119.
cok
kahn
olan
kumaIarin
yerletiriImesi
esnasinda,
kolu
(119)
daha
yukariya
kal
diriniz.
Ef
ér
eruô
meO
mjog
iykk
efni,
tIã
tiO
fOtlyftir
119
hrra.
J
/

02/14/2008
Operating
the
toot
control:
The
farther
you
press
the
pedal
down,
the faster
the
machine
runs.
Para
poner
en
marcha
Ia
máquina,
pise
el
pedal:
a
medida
que
aumente
a
presiOn
aumentarâ
Ia
velocidad.
Marsa
ayakla
basiniz.
Marsa
nekadar
fazia
bir
sekilde basilirsa, creative”
okadar
süratli
diker,
StigEô
a
mótstöôuna:
tvi
fastar sem
lér
stigiô.
vi
hraOar
saumar
vélin.
Needle
thread tension
135
A
=
Setting
mark.
Tensahilos
superior
135
A
=
Marca
para
Ia
regulaciOn.
Ust
iplik
gerilimi
135
A
=
Ayar
aretlemesi.
Ytirspenna
135
A
viOmiôun
tyrir
rétta
spennu.
4
N
Checking
the
needle
thread tension:
The normal
setting
is
in
the
white
range
between
3
and
5.
The higher
the
num
ber,
the tighter
the
tension.
To
check
the
tension,
set
the machine
for
zigzag
stitch
by
entering
program
10
(page
22).
Sew
a
short
seam.
The
threads
should
interlock
in
the
middle
of
the
material.
4
Comprobación
de
Ia
tension
del
hilo:
La
regulaciOn
normal
se
encuentra
en
a
zona
blanca
entre
3
y
5.
Cuanto
más
alto
sea
el
nümero
tanto
mayor
será
a
tensiOn.
La
comprobaciOn
se
hace
con
Ia
puntada
zigzag.
Ajuste:
pulse
el
programa
10
(pag.
22):
haga
una
costura
corta;
os
hilos
debe
ran
quedar
anudados
dentro
de
las
piezas
de
costura.
—7
-—‘-7
Table of contents
Other Pfaff Sewing Machine manuals

Pfaff
Pfaff 3822-1/32 User manual

Pfaff
Pfaff 1245 User manual

Pfaff
Pfaff 3819 series User manual

Pfaff
Pfaff CALANDA 132 User manual

Pfaff
Pfaff POWERline 2595 BASIC User manual

Pfaff
Pfaff 51 User manual

Pfaff
Pfaff 571 User manual

Pfaff
Pfaff smart 100s User manual

Pfaff
Pfaff 5463 User manual

Pfaff
Pfaff 259 User manual

Pfaff
Pfaff ambition essential 1.0 User manual

Pfaff
Pfaff 118 User manual

Pfaff
Pfaff Powerline 2545 User manual

Pfaff
Pfaff 3307-1 SERIES User manual

Pfaff
Pfaff 294 User manual

Pfaff
Pfaff GrandQuilter User manual

Pfaff
Pfaff admire air 5000 User manual

Pfaff
Pfaff 918 User manual

Pfaff
Pfaff Automatic 260 User manual

Pfaff
Pfaff 333-712/02 User manual