Pfisterer CONNEX User manual

PFISTERER Kontaktsysteme
GmbH & Co. KG
Rosenstraße 44
7365 Winterbach
Germany
Phone +49( )71 81-7 5-
www.pfisterer.de
Instructions for use
CONNEX cable connector
Size 3 and 3/S
Read the installation
instructions before working
with the product

© PFISTERER Kontaktsysteme GmbH & Co. KG
Rosenstraße 44
D-7365 Winterbach
Phone +49( )71 81-7 5-
Fax +49( )7181-7 5-422
E-Mail: dialog@pfisterer.de
www.pfisterer.de
☞NOTE!
These installation instructions can be accessed on the Internet at www.pfisterer.de.
2 PFISTERER CONNEX cable connector Size 3 and 3/S

Content Page
1. General . . . . . . . . . . . . . . . . . . . . . . . . . . . . . . . . . . . . . . . . . . . . . . . . . . . . . 4–6
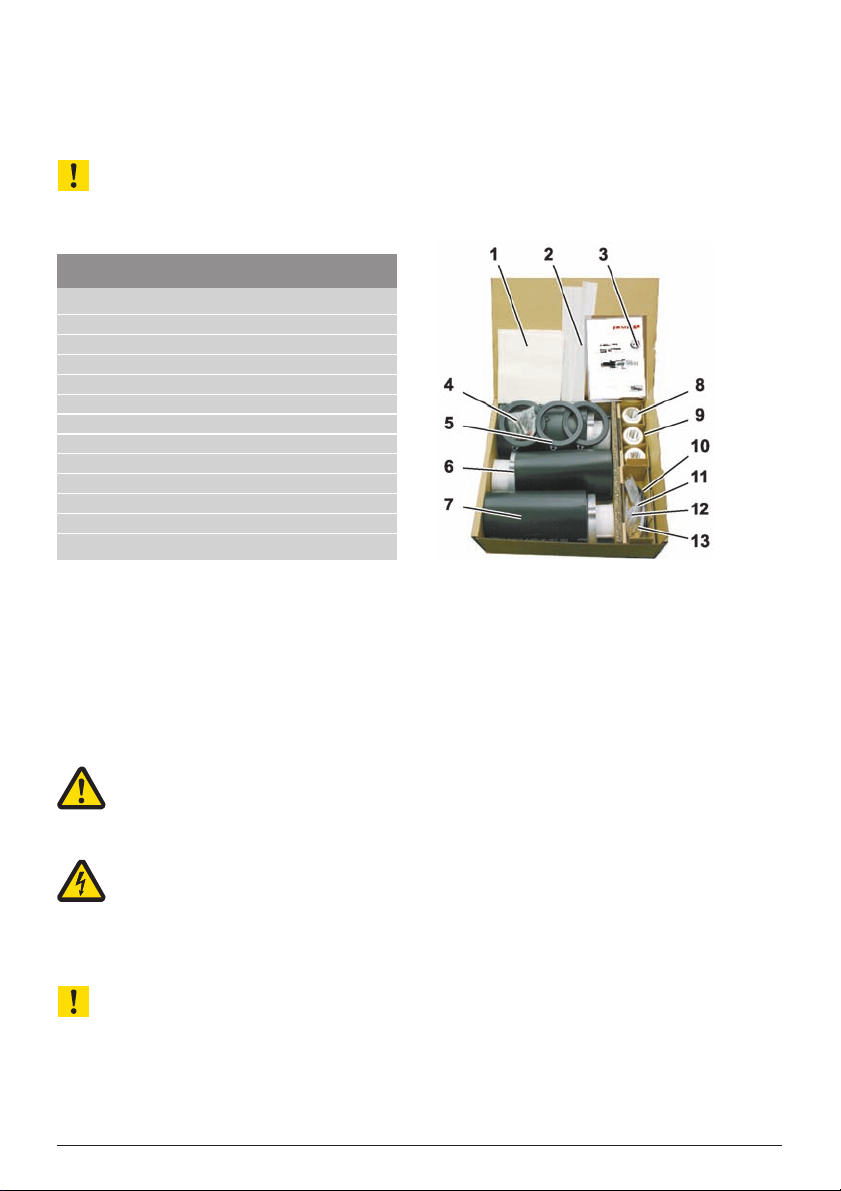
1.1 Scope of delivery . . . . . . . . . . . . . . . . . . . . . . . . . . . . . . . . . . . . . . . . . . . . 4
1.2 Explanation of symbols . . . . . . . . . . . . . . . . . . . . . . . . . . . . . . . . . . . . . . . 4
1.3 Information on the installation instructions . . . . . . . . . . . . . . . . . . . . . . . . . 5
1.4 Liability and warranty . . . . . . . . . . . . . . . . . . . . . . . . . . . . . . . . . . . . . . . . 5
1.5 Copyright protection . . . . . . . . . . . . . . . . . . . . . . . . . . . . . . . . . . . . . . . . . 5
1.6 Spare parts . . . . . . . . . . . . . . . . . . . . . . . . . . . . . . . . . . . . . . . . . . . . . . . . 6
1.7 Disposal . . . . . . . . . . . . . . . . . . . . . . . . . . . . . . . . . . . . . . . . . . . . . . . . . . 6
2. Safety . . . . . . . . . . . . . . . . . . . . . . . . . . . . . . . . . . . . . . . . . . . . . . . . . . . . . . . 7–10
2.1 Intended use . . . . . . . . . . . . . . . . . . . . . . . . . . . . . . . . . . . . . . . . . . . . . . . 7
2.2 Content of the installation instructions . . . . . . . . . . . . . . . . . . . . . . . . . . . . 7
2.3 Modifications and changes to the product . . . . . . . . . . . . . . . . . . . . . . . . . 7
2.4 Operator's responsibility . . . . . . . . . . . . . . . . . . . . . . . . . . . . . . . . . . . . . . 8
2.5 Requirements on the personnel . . . . . . . . . . . . . . . . . . . . . . . . . . . . . . . . . 8
2.6 Work safety . . . . . . . . . . . . . . . . . . . . . . . . . . . . . . . . . . . . . . . . . . . . . . . . 9
2.7 Personal protective gear . . . . . . . . . . . . . . . . . . . . . . . . . . . . . . . . . . . . . . 9
2.8 Possible product dangers . . . . . . . . . . . . . . . . . . . . . . . . . . . . . . . . . . . . . 1
3. Technical data . . . . . . . . . . . . . . . . . . . . . . . . . . . . . . . . . . . . . . . . . . . . . . . . 11
3.1 Dimensions and weight(s) . . . . . . . . . . . . . . . . . . . . . . . . . . . . . . . . . . . . . 11
3.2 Cable data . . . . . . . . . . . . . . . . . . . . . . . . . . . . . . . . . . . . . . . . . . . . . . . . 11
3.3 Ratings . . . . . . . . . . . . . . . . . . . . . . . . . . . . . . . . . . . . . . . . . . . . . . . . . . . 11
4. Design . . . . . . . . . . . . . . . . . . . . . . . . . . . . . . . . . . . . . . . . . . . . . . . . . . . . . . 12
5. Transport, packing and storage . . . . . . . . . . . . . . . . . . . . . . . . . . . . . . . . . . 13
5.1 Safety notes . . . . . . . . . . . . . . . . . . . . . . . . . . . . . . . . . . . . . . . . . . . . . . . 13
5.2 Transport inspection . . . . . . . . . . . . . . . . . . . . . . . . . . . . . . . . . . . . . . . . . 13
5.3 Packaging . . . . . . . . . . . . . . . . . . . . . . . . . . . . . . . . . . . . . . . . . . . . . . . . . 13
5.4 Storage . . . . . . . . . . . . . . . . . . . . . . . . . . . . . . . . . . . . . . . . . . . . . . . . . . . 13
6. Assembly accessories . . . . . . . . . . . . . . . . . . . . . . . . . . . . . . . . . . . . . . . . . 14–15
6.1 Required tools . . . . . . . . . . . . . . . . . . . . . . . . . . . . . . . . . . . . . . . . . . . . . . 14
6.2 Recommended tools and accessories . . . . . . . . . . . . . . . . . . . . . . . . . . . . 14–15
7. Assembly / Installation . . . . . . . . . . . . . . . . . . . . . . . . . . . . . . . . . . . . . . . . . 16–28
8. Dismantling / Removal . . . . . . . . . . . . . . . . . . . . . . . . . . . . . . . . . . . . . . . . . 29–32
9. Testing of CONNEX connectors . . . . . . . . . . . . . . . . . . . . . . . . . . . . . . . . . . 33
9.1 Required accessories . . . . . . . . . . . . . . . . . . . . . . . . . . . . . . . . . . . . . . . . 33
9.2 Installation of blind cap . . . . . . . . . . . . . . . . . . . . . . . . . . . . . . . . . . . . . . . 33
10. Spare parts . . . . . . . . . . . . . . . . . . . . . . . . . . . . . . . . . . . . . . . . . . . . . . . . . . 34
1 .1 Spare part procurement . . . . . . . . . . . . . . . . . . . . . . . . . . . . . . . . . . . . . . 34
11. Index . . . . . . . . . . . . . . . . . . . . . . . . . . . . . . . . . . . . . . . . . . . . . . . . . . . . . . . 35
PFISTERER CONNEX cable connector Size 3 and 3/S Content 3

1. General
1.1 Scope of delivery
Check the scope of delivery for completeness. Contact the manufacturer immediately if
parts are missing.
ATTENTION
Operate the product only with the parts listed in the scope of delivery.
Packing unit
Pos. Name Qty.
1 Cleaning cloth 3
2 Sealing tape*) 3
3 Installation instructions 1
4 Bolts M8x45 9
5 Sealing*) 3
6 Bell flange 3
7 Shrink tubing*) 3
8 Tension cone 3
9 Contact ring 3
1 Tape measure 1
11 Special PFISTERER grease 4
12 Emery cloth**) 1
13 Semi-conducting tape 3
4 General PFISTERER CONNEX cable connector Size 3 and 3/S
1.2 Explanation of symbols
Important safety relevant notes in these installation instructions are marked by symbols.
These notes specified for work safety must be absolutely observed and followed.
Exercise special care in these cases to avoid accidents, personal injury and property
damage.
WARNING Danger of injury or life
This symbol identifies notes whose non-observance can lead to impaired
health, injuries, permanent bodily harm or death.
WARNING Danger of electrical current
This symbol alerts to dangerous situations through electrical current.
Non-observance of the safety note presents danger of serious injuries or death.
The work activities to be performed may only be carried out by a trained
professional electrician.
ATTENTION Danger of property damage
This symbol identifies notes whose non-compliance may lead to damages,
malfunction and/or failure of the product.
☞NOTE!
This symbol points out tips and information to be observed for efficient and trouble-free
handling of the product.
*) If included in scope of delivery (design-specific).
**) ATTENTION Only for roughening the outer jacket!

1.3 Information on the installation instructions
These installation instructions describe the safe and proper handling of the product. The
safety notes and directions specified as well as the local accident prevention regulations
and general safety rules applicable to the area of operation must be observed.
The installation instructions, especially the chapter on safety and the respective safety
notes, must be studied completely before beginning any work on the product. The
material read must have been understood.
The installation instructions are part of the product. They must be stored in the immediate
vicinity of the product (e.g. control room, switchboard station) accessible at any time.
1.4 Liability and warranty
All specifications and notes in these installation instructions were compiled under
consideration of the applicable regulations, the best available technology as well as our
experience and insights of many years.
The installation instructions are to be kept in the immediate vicinity of the product
(e.g. control room, switchboard station), accessible to any person working on or with the
product.
These installation instructions must be carefully read before beginning any work on and
with the product. The manufacturer is not liable for damages and malfunctions resulting
from the non-compliance with the installation instructions.
The text and image representations do not necessarily correspond to the scope of delivery.
The illustrations are not to a scale of 1:1.
In case of special designs, additional ordering options or because of latest technical
changes, the actual scope of delivery can deviate from the specifications and notes as well
as illustrations shown here. Please contact the manufacturer in case of questions.
We reserve technical changes on the product in the framework of improving product
features and enhancements.
1.5 Copyright protection
The installation instructions are to be treated confidentially. They are exclusively intended
for persons working on and with the product.
The entire content, texts, drawings, illustrations and other presentations are protected by
copyright and subject to additional commercial property rights. Any misuse is punishable by
law.
Distribution to third parties as well as copying in any type and format – even in excerpts –
as well as the use and/or publication of the content are not permitted without written
approval by the manufacturer. Infringements are liable to damage compensation.
Additional claims are reserved.
We reserve all rights of exercising industrial property rights.
PFISTERER CONNEX cable connector Size 3 and 3/S General 5

1.6 Spare parts
Use only original spare parts of the manufacturer.
ATTENTION
Wrong or faulty spare parts can lead to damages, malfunctions or total failure of the
product.
All warranty, service, damage compensation and liability claims against the manufac-
turer or his representatives, dealers and agents become void when using unauthorized
spare parts.
1.7 Disposal
Dispose properly of dismantled parts after disassembly unless a return or disposal
agreement has been entered into:
• Scrap metal material remnants
• Submit plastic elements to plastics recycling
• Dispose of any other components sorted according to material properties.
ATTENTION
Lubricants and other operating materials are subject to special waste treatment and
may only be disposed of by certified enterprises.
6 General PFISTERER CONNEX cable connector Size 3 and 3/S

PFISTERER CONNEX cable connector Size 3 and 3/S Safety 7
2. Safety
The product has been manufactured at the time of its development and production
according to accepted engineering standards and is deemed safe to operate.
However, this product may present dangers if not used properly or according to its
intended purpose by professionally trained personnel.
The chapter "Safety" provides an overview of all key safety aspects for optimal personal
protection as well as for the safe and trouble-free operation of the product.
Furthermore, the other chapters of these installation instructions contain specific safety
notes, marked by symbols, to avert danger.
2.1 Intended use
The CONNEX cable connector (inner cone system according to DIN EN 5 18 /5 181) Size 3
and Size 3/S is primarily intended for cable connections according to DIN VDE 276-62 .
Operational safety is only ensured when the product is used as intended.
ATTENTION
Any use of the product exceeding the intended use and/or any different use is
prohibited and deemed as not in accordance with the intended use.
Any claims against the manufacturer and/or his authorized agents because of
damages resulting from unintended use of the product are excluded.
The operator is solely liable for all damages resulting from unintended use.
The intended use also includes proper compliance with the operating conditions as well as
specifications and directions of these installation instructions.
The product may only be operated together with the parts listed in the scope of delivery.
2.2 Content of the installation instructions
Any person ordered to work on or with the product must have read and understood the
installation instructions prior to begin working with the product. This also applies if the
respective person has already worked with such or a similar product or has been trained
by the manufacturer.
Knowledge of the content of the installation instructions constitutes one of the prerequisites
to protecting persons against dangers and to avoid errors thereby operating the
product in a safe and trouble-free manner.
It is recommended for the operator to request tangible proof by the personnel of having
taken notice of the installation instruction's content.
2.3 Modifications and changes to the product
To avoid dangers and to ensure optimal performance, neither changes nor modifications
and attachments may be made to the product that have not been expressly approved by
the manufacturer.

8 Safety PFISTERER CONNEX cable connector Size 3 and 3/S
2.4 Operator's responsibility
These installation instructions must be stored in the immediate vicinity of the product and
accessible to persons working with the product at any time.
The product may only be operated in a technically flawless and operationally safe con-
dition.
The directions of the installation instructions must be followed completely and without
restrictions.
Apart from the safety notes and directions specified in these installation instructions,
the applicable local accident prevention regulations and general safety rules as well as the
applicable environmental protection regulations must be observed and complied with.
The operator and his authorized personnel are responsible for the trouble-free operation
of the product as well as for clear determinations regarding the responsibility for instal-
lation and repair of the product.
2.5 Requirements on the personnel
Only professional personnel authorized and trained by the manufacturer may work on and
with the product. The manufacturer will issue a training certificate to the personnel. The
certificate is valid for 3 years.
The personnel must have received instructions on occurring dangers.
Professional personnel is anyone able to judge the work assigned to him and recognize
possible dangers because of this professional training, know-how, experience and know-
ledge of the relevant regulations.
The responsibilities for work on and with the product (installation, repair) must be clearly
defined and observed to prevent ambiguous assignment of competencies for the sake of
safety.
Only those persons may work on and with the product that can be expected that they
will perform their activities in a reliable manner. Any manner of work compromising the
safety of persons, the environment or product must be refrained from.
Persons under the influence of drugs, alcohol or medication affecting reaction time must
never work on or with the product.
The regulations regarding age and occupation applicable at the product location must be
observed when selecting the personnel.
The personnel is obligated to immediately report product changes affecting safety to the
operator.

PFISTERER CONNEX cable connector Size 3 and 3/S Safety 9
2.6 Work safety
Personal injuries and property damages when working with and on the product can be
prevented by following the safety notes and directions specified in these installation
instructions.
Neglecting these notes can lead to endangering persons and damaging or destroying the
product.
Any liability and damage compensation claims against the manufacturer or his represen-
tative are void in case of non-compliance with the safety notes and directions specified in
these installation instructions as well as with the accident prevention regulations and
general safety rules applicable to the operation area.
2.7 Personal protective gear
Always wear the following when working on and with the product:
–Protective work clothing
Closely fitting work clothes (low tear strength, no wide sleeves,
no rings and other jewelry, etc.)
–Safety shoes
to protect against heavy parts being dropped and slipping on slippery
surfaces
When working in especially dangerous areas (depending on local conditions):
–Protective helmet
to protect against parts being dropped and parts and materials
being scattered about
Wear the following when cleaning and greasing:
–Protective gloves
to protect the skin from contact with harmful substances
–Protective goggles
to protect the eyes against liquids

1 Safety PFISTERER CONNEX cable connector Size 3 and 3/S
2.8 Possible product dangers
The product has been subjected to a danger analysis. The resulting construction and
design of the product correspond to the state-of-the-art.
The product is safe to operate when used as intended.
Nonetheless, a residual risk remains!
The product operates with high electrical voltage.
WARNING Danger of electric current
The electric energies may cause very serious injuries. Damages to the insulation or
individual components represent danger to life.
Please observe the following before working on electrical installations:
1. Disconnect
2. Secure against power restoration
3. Check for absence of voltage
4. Ground and short-circuit
5. Cover or block off adjacent live parts.

PFISTERER CONNEX cable connector Size 3 and 3/S Technical Data 11
Length, incl. shrink tubing [mm] ca. 46
Outside diameter, max. [mm] 147
Circle diameter [mm] 13
Weight / piece [kg] ca. 3,3
With voltage tap
Conductor diameter, min. / max. [mm] 7,2 / 34,6
Cross-section, min. / max. [mm2] 5 / 8
Diameter over insulation, min. / max. [mm] 15,5 / 46,
Without voltage tap
Conductor diameter, min. / max. [mm] 7,2 / 34,6
Cross-section, min. / max. [mm2] 5 / 8
Diameter over insulation, min. / max. [mm] 15,5 / 5 ,
Rated current IN[A]) 125
Max. operating voltage UM[kV] 42 (52)*)
Rated power frequency withstand voltage 5 Hz / 1 min [kV] 95, (117)*)
Rated lightning impulse withstand voltage 1,2/5 µs [kV] 2 (25 )*)
Partial discharge 2 x Uo[pC] ≤ 1
DC voltage test 15 min 6 x Uo[kV] 125 (156)*)
Rated short-time withstand current ,5 sec [kA] 63
1 sec [kA) 5
Rated impulse current [kA] 15
*) ( ) = Size 3/S
ca. 46
ca. 27
D = 13
D = 147
D = 54,8
3. Technical data
3.1 Dimensions and weight(s)
3.2 Cable data
´
3.3 Ratings

1
2
3
4
8
9
6
5
5
7
12 Design PFISTERER CONNEX cable connector Size 3 and 3/S
4. Design
Fig. : Overview
1 Contact ring
2 Tension cone
3 Thrust piece
4 Insulating part
5 Voltage tap*)
6 Screws M8x45 (enclosed as parts)
7 Sealing*)
8 Bell flange
9 Shrink tubing*)
*) If included in scope of delivery (design-specific)

PFISTERER CONNEX cable connector Size 3 and 3/S Transport, packing and storage
13
5. Transport, packing and storage
5.1 Safety notes
WARNING Danger of injury
Danger of injury by dropping parts is present during transport or loading and
unloading. The product may be damaged or destroyed by improper transport.
Always observe the following safety notes for this reason:
– Never lift loads across persons.
– Always move the product with care and caution.
5.2 Transport inspection
Check delivery immediately on receipt for completeness and transport damage.
Do not accept delivery or only accept under proviso if there is externally recognizable
transport damage. Note the scope of damage on the transport documents/delivery note
of the carrier. Start complaints procedure.
Complain about hidden deficiencies as soon as they are discovered as compensation
claims can only be asserted within the applicable complaints period.
5.3 Packaging
☞NOTE! Good for environmental protection!
Packaging materials are valuable raw materials and can continue to be used in many cases
or sensibly reconditioned and re-cycled.
If there is no returns agreement for the packaging, separate materials according to type
and size and direct to further use or re-cycling.
ATTENTION
Always dispose of packaging materials in an environmentally friendly manner and in
accordance with the applicable, local disposal guidelines. If necessary, commission
a re-cycling company.
5.4 Storage
Store packages closed until assembly and observe the setup and storage marks attached
to the outside.
Store packages only under the following conditions:
– Do not store outside.
– Store in a dry place.
– Do not expose to aggressive media.
– Relative humidity: max. 6 %

14 Assembly accessories PFISTERER CONNEX cable connector Size 3 and 3/S
6. Assembly accessories
Special tools are required for assembly or disassembly.
6.1 Required tools
6.2 Recommended tools and accessories
Name Article No. Description
Hydraulic manual 827 17 2 For the axial pressing
compression tool on or pulling off
of the contact ring.
Compression 3 5 675 3
head size 3
Impact head 559 214 3 For the preassembly of the
size 3 contact ring.
Torx screwdriver 546 4 9 To tighten or loosen the
SW 6 screws of the CONNEX
cable connector.
Name Article No. Description
Measuring 559 223 1
For the efficient jacket removal.
template size 3
Stripping pliers 3 5 51 51 For axial and radial cutting of
the insulation to expose the
conductor.
Replacement blade 3 5 63 63
for stripping pliers
Peeling tool and 827 951 1 To remove the outer
outer jacket cutter jacket.
set To peel off the easy strip semi-
conducting layer.
To bevel the conductor
insulation.
Chain 827 165 1 To hook assembly lever into
punched strip. Requirement:
M12 thread connection on
system.

PFISTERER CONNEX cable connector Size 3 and 3/S Assembly accessories 15
6.2 Recommended tools and accessories
Name Article No. Description
Punched strip 827 166 1 To hook in assembly lever.
Assembly lever 827 167 1 To press in or pull off the
size 3 CONNEX cable connector.
Assembly bushing 827 174 4 To preassemble CONNEX
cable connectors (e.g. in the
shop).
Protective cap 827 134 3 To protect the pulled off
CONNEX cable connector
against damage and
contamination (not voltage-
proof).
Blind cap 827 133 1 Protection against touching
live CONNEX cable connector.
Transport case 3 5 798 1 To accommodate the tools.
In addition for flexible cables:
See PFISTERER catalog “4 Cable fittings for medium and high-
voltage networks“ for recommended tools and accessories for the
round-pressing of Al-sleeves.

16 Assembly / Installation PFISTERER CONNEX cable connector Size 3 and 3/S
7. Assembly / Installation
WARNING Danger of injury
Installation and assembly work may only be carried out by trained technical staff
while observing the safety instructions.
Inspect parts for completeness and flawless condition before beginning with the
assembly.
ATTENTION
Damaged components may not be assembled
Use only perfect parts
1. Mark where the jacket will be cut (1)
on the cable approx. 3 mm below the
outer flange of the device connector.
For cables with wire ground screen:
L = depending on distance to ground
connection.
☞NOTE!
See following page for cables with outside
diameter > 60 mm.

PFISTERER CONNEX cable connector Size 3 and 3/S Assembly / Installation 17
2. Remove outer jacket up to the “cut mark“ using
a suitable tool. [➔Seite 14]
ATTENTION
Do not damage the underlying screen wires.
3. Unwrap outer jacket starting at the cut mark.
Cables with outside diameter > 58 mm:
a) 6 mm Make another mark 6 mm from the
“cut mark“ (1).
b) Remove outer jacket up to 6 mm above the
“cut mark“ using a suitable tool. [➔Seite 14]
ATTENTION
Do not damage the underlying screen wires.
c) Unwrap outer jacket starting at the cut mark
+ 6 mm.
d) Apply two layers of insulation tape 6 mm wide (1).
The insulation tape wrapping ends at the
“cut mark“ (2).
e) Continue with step No. 4.

4. Mark the reference length (1):
– 177 mm from the cut mark on the jacket
– or using the measuring template, size 3.
5. Mark the shrink area:
– Make another mark approx. 11 mm from the
reference length (1).
6. Sand the outer jacket in the shrink area using
emery cloth.
7. Clean roughened area.
8. Heat the shrink area with a “soft“ flame until the
surface takes on a slight gloss.
9. Apply one layer of sealing tape *) in the shrink area
1 mm from the reference length.
If included in scope of delivery (design-specific).
1 . Apply one layer of adhesive tape at each of three
points (I, II, III.) to fix the screen wires.
Attach the first adhesive tape (I) at the reference
length (1). Allow adhesive tapes to hang loosely;
do not tear.
11. Cut cross conductor band at jacket cut (1).
18 Assembly / Installation PFISTERER CONNEX cable connector Size 3 and 3/S

PFISTERER CONNEX cable connector Size 3 and 3/S Assembly / Installation 19
12. Fold over groups of screen wires.
ATTENTION
Route screen wires in parallel, without crossing each
other
13. Fix screen wires with adhesive tape (I) at the
reference length (1) and …
... at the other two spots (II and III).
14. Tear off the remaining adhesive tape no longer
needed after all screen wires have been folded over
and fixed.
15. Beat screen wires tight at jacket cut.
16. Remove wrapping up to the cut mark on jacket.
17. Mark the end of the cable (1):
– 218 mm from the cut mark on the jacket
– or using the measuring template, size 3.
18. Cut off the cable at the mark using a metal cutting
saw.
ATTENTION
To obtain a straight cut, the cable must be cut with a
metal cutting saw.

19. Insert sealing*) and three bolts M8x45 into the bell
flange.
*)If included in scope of delivery (design-specific).
2 . Push shrink tubing*) over cable.
*) If included in scope of delivery (design-specific).
21. Push bell flange over cable.
In case of extruded fully bonded semi-conducting layer:
22. Push stop ring against jacket cut.
23. Set spacer of circular peeling device to 3 mm .
24. Set circular peeling device so that as little as
possible material is peeled off the insulation
(white).
25. Peel extruded fully bonded semi-conducting layer up
to 3 mm from the jacket cut.
26. Remove peeled-off semi-conducting layer.
27. Remove stop ring.
28. Determine diameter using the enclosed tape
measure (1):
DL Diameter of conducting layer
Di Diameter of insulation
ATTENTION
The diameter of the insulation (Di) must lie within
the diameter range of the insulating part (see specifi-
cation in the insulating part neck)
29. Determine difference between DL and Di:
– DL – Di < 3,5mm
continue with step no. 3 .
– DL – Di > 3,5mm
continue with subsequent steps a) to g).
2 Assembly / Installation PFISTERER CONNEX cable connector Size 3 and 3/S
Table of contents