manuals.online logo
Brands
  1. Home
  2. •
  3. Brands
  4. •
  5. Philips
  6. •
  7. Electric Shaver
  8. •
  9. Philips Bodygroom 3500 Instruction Manual

Philips Bodygroom 3500 Instruction Manual

Philips Norelco Bodygroom 3500 Showerproof body groomer BG5025/49
Frequently Asked Questions
Click on a question to go directly to the answer:
1. Can I rinse my Philips Groomer with water?
2. Where is the model and serial number of my Philips Male Groomer?
3. What do the symbols on my Philips Groomer mean?
4. Can I use my Philips Groomer while connected to the power outlet?
5. On which areas can I use my Philips Body Groomer?
6. How do I charge my Philips Groomer?
7. How do I change the length settings of my Philips Groomer?
1. Can I rinse my Philips Groomer with water?
You can rinse your Philips Groomer or Trimmer only if it is waterproof. You can check that by looking
at the signs and symbols printed on your groomer's box or body.
Crossed out tap symbol
If you see a crossed out tap symbol on the box or body of your groomer, it means that the groomer is
not washable and should be cleaned without water.
Tap symbol
A tap symbol printed on your grooming device indicates that it is washable and its parts (cutters and
combs) can be cleaned with water. However, this does not mean that you can use it to clip or trim
your hair in the shower or bath.
Bath or shower symbol
If you see a shower or bath symbol printed on your groomer, it means that your device is waterproof.
It can be safely cleaned with water and used while taking a shower or a bath. For safety reasons,
these waterproof groomers can only be used cordless and will not turn on if they are connected to
the power supply.
Note: Please keep in mind that the symbols on your Philips Groomer vary per model type. If you are
still unsure whether it is safe to clean your Philips Groomer with water then please contact us for
further support.
2. Where is the model and serial number of my Philips Male Groomer?
If you own a Philips Trimmer or Hair Clipper and want to know where its model and serial number is
located, please check the information below.
The model number is often needed when registering your product or when looking for information
about your specific model. The serial number can be used to identify the production date of your
product.
Back of the device
For some grooming devices like the OneBlade, the model and serial numbers are located on the back
of the handle. The model number usually starts with 2 alphabets followed by 4 digits, e.g. QP2540.
The serial number has the format of YYWW (Year and week).
Top of the device
Some hair clippers and beard trimmers have the model number located on the top of the device, just
below the cutting teeth. The serial number is usually located under the cutting unit. Try pulling off
the upper part of your groomer and see if you can find 4 digits in the format of YYWW in there, e.g.
1823.
Inside the handle
For nose trimmers the model and serial number is located inside the battery compartment. Remove
the lower part of the handle of your trimmer to see the battery compartment. The model and serial
number will be printed over there.
3. What do the symbols on my Philips Groomer mean?
If you are wondering, what do the lights and symbols on your Philips Male Grooming device mean,
then please read our answer below.
Charging indications
Most Philips Hair Clippers and Trimmers have charging indications and lights on them to indicate
when your device needs to be charged and is fully charged. Depending on the device you own the
charging indications may be displayed in many different ways, as shown in the image below.
Some grooming devices do not have any charging indication on them. In that case, check the
product's charger to see if has a light on it. This light lights up when the charger is connected to the
power supply. For these products, follow the advised charging time as instructed in the user manual.
Travel lock
Some grooming devices come with a travel lock functionality to prevent your groomer from turning
on by accident while travelling.
To activate the travel lock press and hold the on/off button for 3 seconds. The lock symbol will flash
briefly to indicate that the device is locked now. If you try to switch it on it will not work, rather the
travel lock symbol will flash to remind you to deactivate it.
To deactivate the travel lock you can again press and hold the power button for 3 seconds. The
symbol will again flash briefly and then the groomer will turn on.
Turbo mode
Some Philips Hair Clippers and Multigroomers are equipped with a Turbo Mode. This is usually
indicated with a T shaped symbol on the clipper. Press this button when you need extra power from
your clipper. This can be useful when you are trimming very thick hair.
Quiet mode
Some Philips Hair Clippers have the symbol of a baby printed on them. This is the quiet mode, which
you can use while trimming your child’s hair. This reduces the noise coming from the machine and
helps keep children calm while clipping their hair.
Oil reminder
If you see the image of an oil drop flashing on your grooming device, this is a reminder for you to oil
your groomer. You should regularly clean and oil your groomers with the oil provided in the package
or sewing machine oil.
Depending on the grooming device you own, you may find other symbols printed or flashing on it.
For more information regarding your exact model please refer to the user manual or contact us.
4. Can I use my Philips Groomer while connected to the power outlet?
If you are wondering whether you can use your Philips Male Grooming device corded, read our
advice below.
Showerproof and washable devices
Waterproof trimmers and clippers can be safely used and cleaned with water. However, these
devices will not work when they are plugged into an electric socket. They are designed this way to
prevent any kind of accidents.
To find out if your groomer is showerproof look for the following symbol, printed on the body of your
device.
Non-washable devices
Some Philips Groomers are only meant for dry use. This means you cannot use them or clean them
with water. These types of devices can be used while they are plugged in to an electric socket.
To check if your device is non-washable look for the following symbol printed on it.
Washable devices
Some Philips Groomers suitable for dry use can still be cleaned with water. These can be used while
they are connected to the power outlet. However, while cleaning them with water make sure you
unplug them first.
These type of washable devices have the following symbol printed on them.
If you are still unsure about the usage of your grooming device, then please consult your user manual
for further details or contact us.
5. On which areas can I use my Philips Body Groomer?
You can use your Philips Bodygroomer to trim and shave your body hair below the neckline for
example armpits, chest and pubic area.
We do not recommend using it on other body parts such as your face or head. This is because you
will not get desired results, and it may also cause skin damage.
For sensitive areas like your pubic region always check if there are special attachments provided to
use on these areas, or if it is ok to use the groomer directly. You can find more information about this
in your user manual or can contact us.
6. How do I charge my Philips Groomer?
Follow our instructions below on how to charge your Philips Groomers, Beard Trimmers and Hair
Clippers.
Charging instructions for Philips Groomers
You should charge your Philips Male Grooming devices when the charging indicator on the body of
your groomer signals low battery. If your device does not have a battery indicator on it, then charge
it whenever the groomer is working slower than usual.
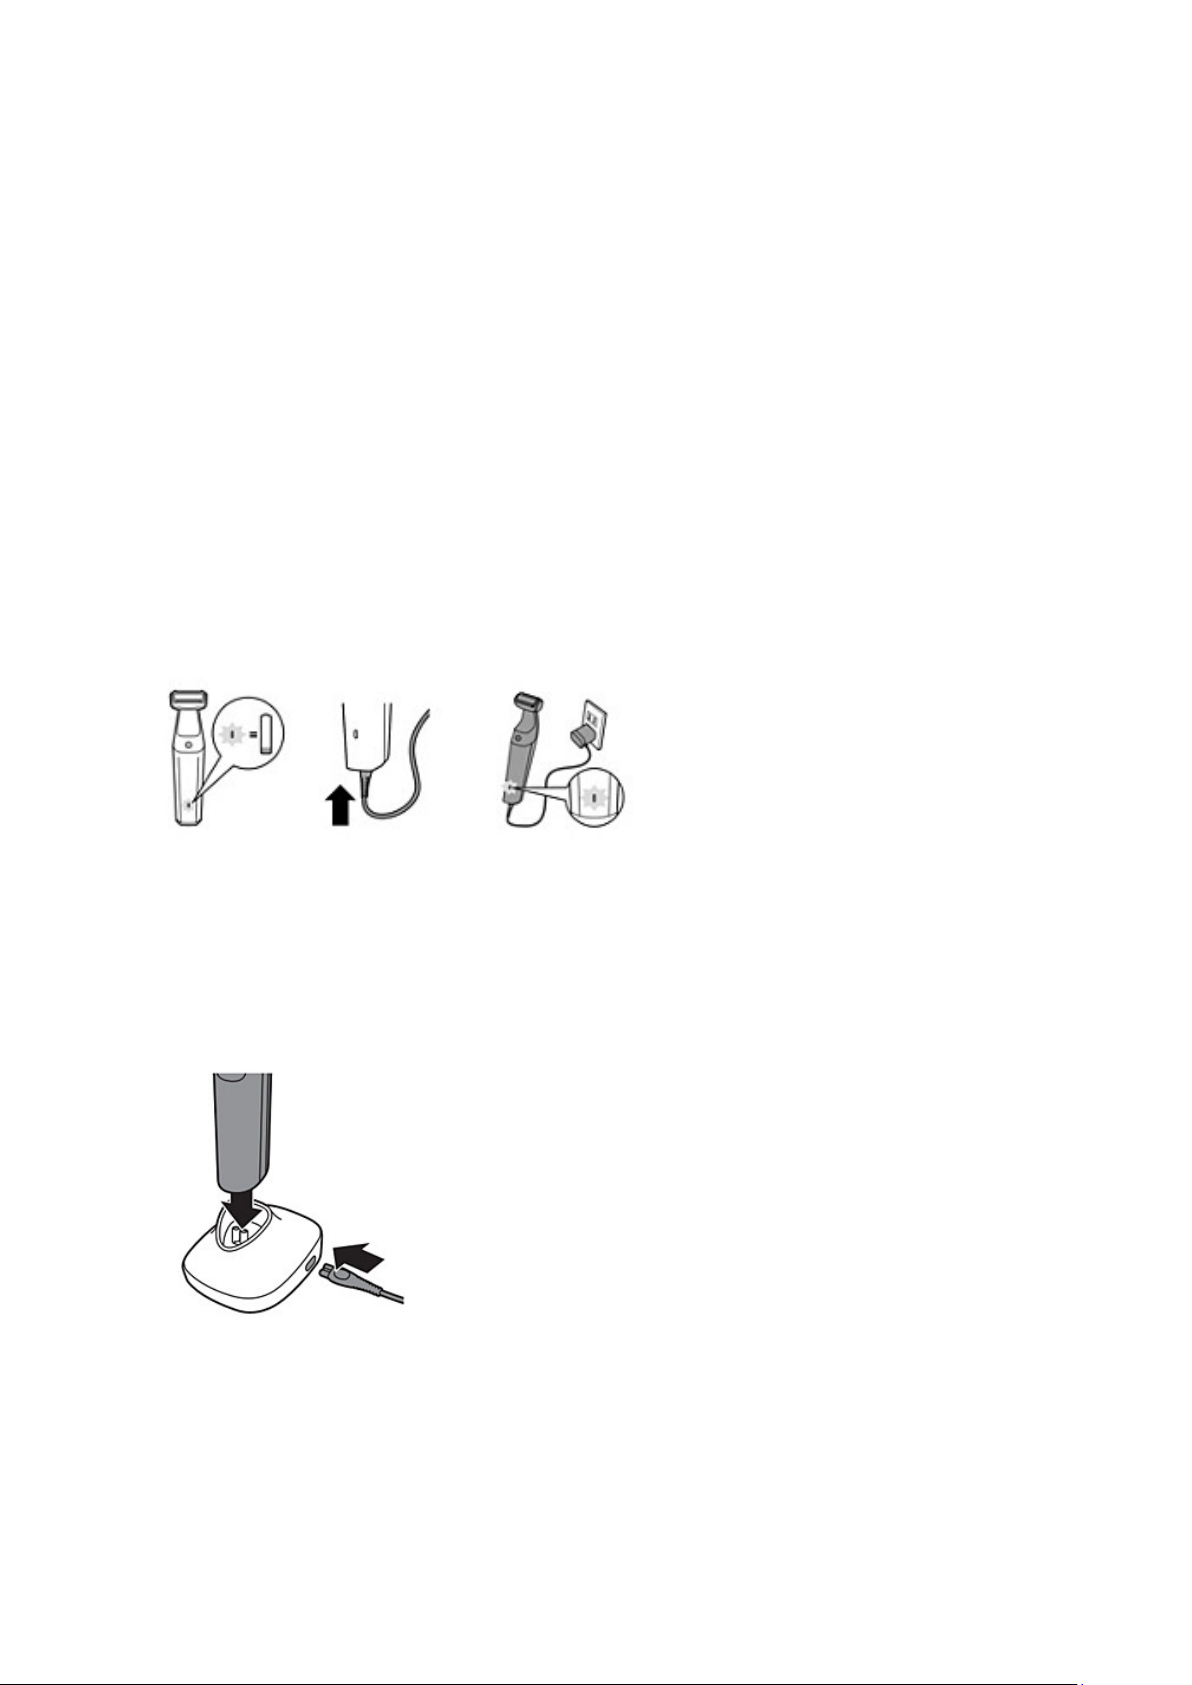
1. Insert the charging plug in to you grooming device's charging socket. Make sure the plug's shape
matches the socket and is completely inserted. Do not force it in.
2. The charging indicator on your device will start flashing to indicate that the groomer is charging.
Once the groomer is fully charged, the charging indicator lights up continuously for approximately
30 minutes and then automatically turns off to save energy.
3. After charging, unplug the charger from the power outlet and the groomer. Your groomer is now
ready to use.
4. For most groomers, normal charging time is between 1 to 8 hours. If you are charging your device
for the first time, we recommend letting it charge for at least 3 hours. Check your user manual for
specific charging instructions of your model.
Charging your Philips Groomer with a charging stand
If your Philips Groomer comes with a charging station, follow the instructions below on how to
charge it.
1. Connect the charging station to a working power outlet.
2. Place your groomer in the charging stand. You may see a light on your groomer or charging stand
to indicate that the charging process has begun.
3. Once the groomer is fully charged, unplug the charging stand and continue using your groomer.
Battery operated devices
Some Philips grooming devices run on disposable AA batteries. To charge these devices you need to
ensure that the disposable batteries have not run out. In case your trimmer does not switch on or
runs slower than before, it’s time to replace the batteries.
Only use the disposable batteries as specified in your user manual. Do not mix different types of or
old and new batteries. When putting in new batteries make sure the + and - poles of the battery
point in the right direction.
7. How do I change the length settings of my Philips Groomer?
Your Philips Groomer may come with different trimming combs and attachments. These products
can also be used without any attachment to clip the hair very close to your skin. Find out here how to
adjust the length settings when using these attachments.
Click-on combs
If your groomer comes with multiple click-on combs, you can use these to get the desired hair length.
The numbers on the combs indicate the length of the remaining hair after trimming. Simply click-on
the appropriate comb onto the appliance and start grooming.
Adjustable comb
Some combs are adjustable. These have a slide beneath them with different numbers or settings that
correspond to the remaining hair length you will have after trimming your hair or beard. You can
slide the button from left to right, to select the desired hair length you want to keep.
Zoom wheel
Some Philips Groomers come with a rotating button on their body, also called the zoom wheel. You
can slide the wheel to match the length setting indicated on the handle.
Some models have a two rows of length settings. In these models, the different rows refers to short
length settings and the other for longer lengths. Always make sure you have attached the compatible
comb or cutter for your desired length settings.
Push & Slide
Your Philips Groomer may have a different kind of sliding button to adjust length settings. For these
models, you may find the button on the handle of the device or on the comb itself. To change the
settings just push the button and then slide it up or down.
You may refer to your user manual for detailed instructions or contact us.

This manual suits for next models

1

Other Philips Electric Shaver manuals

Philips PT937 User manual

Philips

Philips PT937 User manual

Philips HQT764 User manual

Philips

Philips HQT764 User manual

Philips MG7770/18 User manual

Philips

Philips MG7770/18 User manual

Philips Bikini Perfect HP6376/00 User manual

Philips

Philips Bikini Perfect HP6376/00 User manual

Philips AT940 User manual

Philips

Philips AT940 User manual

Philips OneBlade Pro QP6520 User manual

Philips

Philips OneBlade Pro QP6520 User manual

Philips PT866 User manual

Philips

Philips PT866 User manual

Philips HQ 7850 User manual

Philips

Philips HQ 7850 User manual

Philips HQ7100 User manual

Philips

Philips HQ7100 User manual

Philips OneBlade QP6541 User manual

Philips

Philips OneBlade QP6541 User manual

Philips Norelco Multigroom 7000 Instruction Manual

Philips

Philips Norelco Multigroom 7000 Instruction Manual

Philips HQ906 User manual

Philips

Philips HQ906 User manual

Philips NORELCO AT620 User manual

Philips

Philips NORELCO AT620 User manual

Philips HQ8894/03 User manual

Philips

Philips HQ8894/03 User manual

Philips YS534 User manual

Philips

Philips YS534 User manual

Philips Cool Skin HQ6707 User manual

Philips

Philips Cool Skin HQ6707 User manual

Philips NT8110/60 User manual

Philips

Philips NT8110/60 User manual

Philips HQ8100/16 User manual

Philips

Philips HQ8100/16 User manual

Philips HQ7180 User manual

Philips

Philips HQ7180 User manual

Philips PQ217 User manual

Philips

Philips PQ217 User manual

Philips Multigroom MG7790 User manual

Philips

Philips Multigroom MG7790 User manual

Philips HQ6695 User manual

Philips

Philips HQ6695 User manual

Philips 662 User manual

Philips

Philips 662 User manual

Philips SW6710/15 User manual

Philips

Philips SW6710/15 User manual

Popular Electric Shaver manuals by other brands

Sencor SMS 3013RD user manual

Sencor

Sencor SMS 3013RD user manual

Braun BT 5090 manual

Braun

Braun BT 5090 manual

DS Produkte MN-2008 instructions

DS Produkte

DS Produkte MN-2008 instructions

Braun S9 manual

Braun

Braun S9 manual

Remington HC2000 Series Use & care manual

Remington

Remington HC2000 Series Use & care manual

Panasonic ES2235 operating instructions

Panasonic

Panasonic ES2235 operating instructions

VS Sassoon VSM725A instructions

VS Sassoon

VS Sassoon VSM725A instructions

Panasonic es-st29 operating instructions

Panasonic

Panasonic es-st29 operating instructions

Braun Series 3 manual

Braun

Braun Series 3 manual

Jata JBCP3315 Instructions of use

Jata

Jata JBCP3315 Instructions of use

AEG HR 5626 instruction manual

AEG

AEG HR 5626 instruction manual

Panasonic ER-GB80 operating instructions

Panasonic

Panasonic ER-GB80 operating instructions

Mueller 9 Series instruction manual

Mueller

Mueller 9 Series instruction manual

Remington X5 Limitless manual

Remington

Remington X5 Limitless manual

Braun 720s-7 manual

Braun

Braun 720s-7 manual

Remington TA-3070 Use & care guide

Remington

Remington TA-3070 Use & care guide

Braun Gillette Venus manual

Braun

Braun Gillette Venus manual

Braun PocketGo 370 owner's manual

Braun

Braun PocketGo 370 owner's manual

manuals.online logo
manuals.online logoBrands
  • About & Mission
  • Contact us
  • Privacy Policy
  • Terms and Conditions

Copyright 2025 Manuals.Online. All Rights Reserved.