manuals.online logo
Brands
  1. Home
  2. •
  3. Brands
  4. •
  5. Philips
  6. •
  7. Home Cinema Speakers
  8. •
  9. Philips HTS6100/93 User manual

Philips HTS6100/93 User manual

3Enjoy
Need help?
User Manual
See the user manual that came with your Philips DVD Home Theatre System.
Register your product and get support at
www.philips.com/welcome
Quick Start Guide
HTS6100
What’s in the box?
Connect
Set up
Enjoy
1
2
3
2008 CKoninklijke Philips N.V.
All rights reserved.
sgpjp_818/98-eng1
EasyLink control
This feature is only applicable if this DVD Home Theatre
unit is connected to HDMI CEC compliant TV/device
using HDMI cable. It enables all the linked devices
response or react to certain commands simultaneously
with one touch control.
AUDIO
AUDIO
HDMI
HDMI CEC
TV
HDMI
ATurn on the HDMI CEC operations on your TV and
other connected devices. See TVs/devices manual for
details.
BYou can now enjoy the EasyLink controls.
One touch play [ Auto Wake-up TV ]
APress PLAY.
It turns on this unit and start disc play (if a video disc
is detected), and your TV automatically turns on and
switches to the correct viewing channel.
Note This is only possible if this unit is in standby
mode. If this unit is in active mode, you have to press
DISC followed by PLAY to start disc play.
One touch power off [ System Standby ]
APress and hold 2.
It turns off all linked devices.
Note This unit responses to standby command from
other HDMI CEC compliant TV/devices.
One touch audio input switching
This unit is able to render the audio signals from the
active source and switch automatically to the
corresponding audio input.
Before you can enjoy this feature, connect audio cables
from this unit to your TV/devices and follow the
instructions below to map the audio inputs to the
connected devices.
APress DISC.
BPress OPTIONS.
CPress B.
DSelect
[ EasyLink ], then press B.
Screen Saver
DivX(R) VOD Code
Sleep Timer
Display Dim
Disc Lock
OSD Language
EasyLink
Standby Mode
General Setup
Auto Wake-up TV
System Standby
System Audio Control
Audio Input Mapping
ESelect [ System Audio Control ] > [ On ], then
press OK.
FSelect [ Audio Input Mapping ], then press OK.
GSelect [ OK ] in the menu, then press OK to start
scanning of devices.
HWhen scanning complete, select the audio input of
this unit that is used to connect to your TV/device
(e.g. AUX1 Input), then press B.
ISelect the TV/device (appeared in its brand name)
in the right panel, then press OK.
JRepeat steps 8~9 to map other connected devices.
KTo exit the menu, press OPTIONS.
Note Philips does not guarantee 100%
interoperability with all HDMI CEC compliant devices.
DVD HomeTheatre (SoundBar) Remote Control
and 2 batteries
Wall mount bracket
and 2 knobs
Micro bre
cleaning cloth
Subwoofer
User
Manual
Power cable Composite
Video cable
HDMI cable
AM/MW loop
antenna
subwoofer
Satellite Receiver /
Cable Box
HDD / DVD Recorder
1Connect 2Set up
A
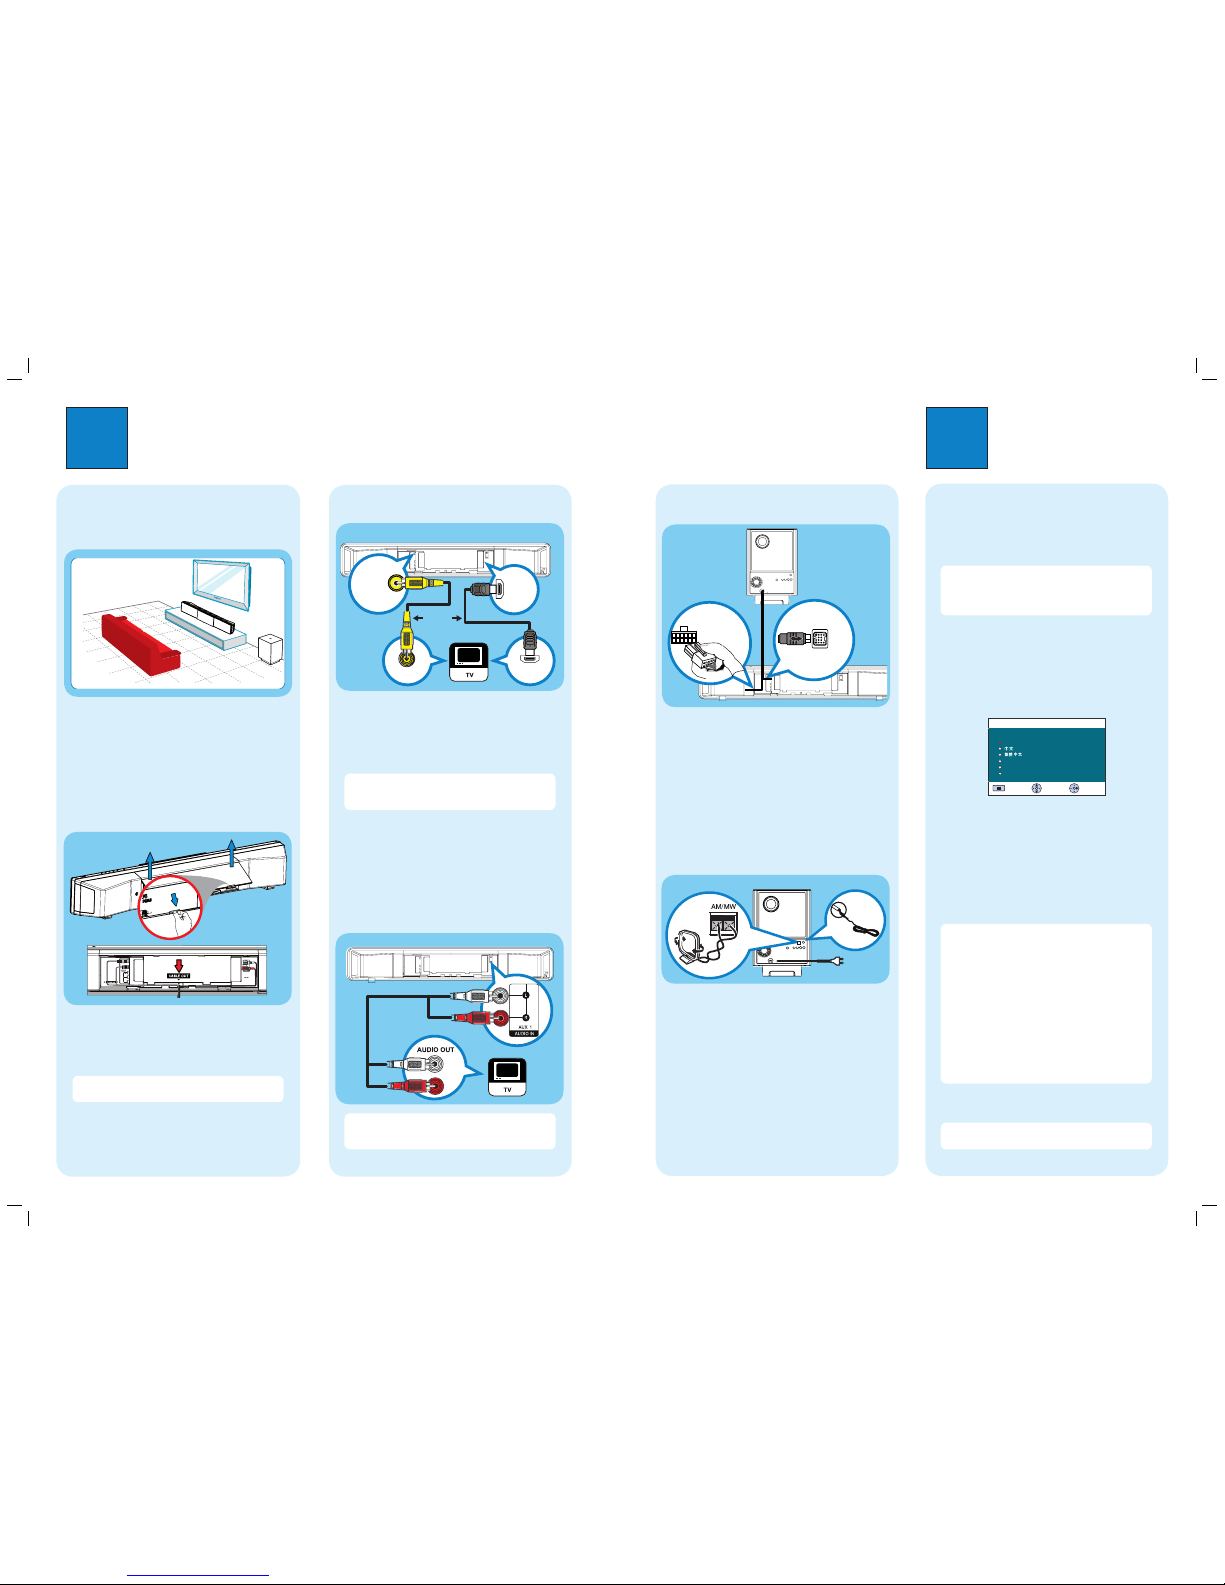
Find the viewing channel
APress 2to turn on this DVD Home Theatre unit.
BTurn on the TV. Use the TVs remote control to
select the correct viewing channel.
Note To search for the correct viewing channel,
press the Channel Down button on the TVs remote
control repeatedly (or AV, SELECT, °button) until
you see the Video In channel.
B
Start Ambisound setup
When you turn on this DVD Home Theatre unit
(SoundBar) for the rst time, follow the instructions on
the TV to complete the setup.
Please choose your language:
OSD Language
Select
Change
Stop: Exit
English
Melayu
Русский
ไทย
ASelect a language for on-screen display, then press
B.
B[ Welcome ] message is displayed, press B to
continue.
C[ Orientation ] message is displayed, press Bto
continue.
DSelect a most suitable predefined setting according
to your room environment and setup, press Bto
confirm and go to the next setup screen.
[ Room Acoustics ]
Select the type of walls that surround your room.
The default setting is [ Hard (concrete, wood) ].
[ Room Placement ]
Select the SoundBar placement position in your
room. The default setting is [ Middle of room ].
[ Height ]
Select the height at which the SoundBar is placed.
The default setting is between 0.8~1.2 m.
[ Listening Position ]
Select the distance between the listening position and
the SoundBar. The default setting is between 2~3m.
EWhen [ Complete ] screen is displayed, press Bto
exit.
Note Refer to the accompanying user manual
for other setup options.
A
Placement
Proper speakers system placement is important to
ensure optimum sound performance.
APlace the DVD Home Theatre unit (SoundBar) at the
normal listening ear-level, or at least above the knee-
level. Face it straight ahead towards the listening
area.
BPlace the subwoofer on the floor, at least one metre
away from the TV.
B
Prepare for rear connections
APush up the catches to lift up the rear cover.
BConnect the required cables (see the following
sections for details) and direct all the cables to the
CABLE OUT point.
Note All the cables must be placed properly inside
the rear panel in order for the rear cover to close.
C
Connect to TV
HDMI IN
HDMI OUT
VIDEO OUT
VIDEO IN
zIf your TV supports HDMI, connect the HDMI cable
from the HDMI OUT socket to the HDMI IN socket
on your TV. Or;
zConnect the composite video cable from the VIDEO
OUT socket to the VIDEO IN socket on your TV.
Note HDMI connection does not support audio
output from your TV to this unit, a separate audio
connection is required.
D
Connect audio output from TV (for
EasyLink control)
To hear the TV audio through this DVD Home Theatre
unit, connect an audio cable (not supplied) from the
AUDIO IN-AUX1 sockets to the AUDIO OUT sockets
on your TV.
Note To listen to the audio output from this
connection, press AUX/DI /MP3 LINK repeatedly
until ‘AUX1 INPUT’ is displayed on the display panel.
DVD Home Theatre unit (rear)
E
Connect subwoofer
TO SUBWOOFER
LOUDSPEAKERS
zUnwind the cables from TO MAIN UNIT on the
subwoofer, then connect the grey end cable to TO
SUBWOOFER socket and white end cable to
LOUDSPEAKERS socket on this DVD Home
Theatre unit.
F
Connect radio antenna and power
cable
Keep the antennas away from the electronic devices to
prevent unwanted interference.
C
B
A
AConnect the AM/MW loop antenna to the AM/MW
socket. Place it on a shelf, or attach it to a stand or
wall.
BConnect the FM antenna to the inner pin of the FM
75 socket (for some models, it has been
connected in the factory). Extend the wire for
optimum reception.
CConnect the power cable from subwoofer to the AC
power outlet.
Subwoofer (rear)
Or
Subwoofer (rear)

Other manuals for HTS6100/93

1

This manual suits for next models

2

Other Philips Home Cinema Speakers manuals

Philips DCD3020 User manual

Philips

Philips DCD3020 User manual

Philips CSS5530G/96 User manual

Philips

Philips CSS5530G/96 User manual

Philips HTL1180B User manual

Philips

Philips HTL1180B User manual

Philips HTL1170B User manual

Philips

Philips HTL1170B User manual

Philips HTS9221/12 User manual

Philips

Philips HTS9221/12 User manual

Philips HTB5141K/51 User manual

Philips

Philips HTB5141K/51 User manual

Philips CSS5530B User manual

Philips

Philips CSS5530B User manual

Philips HSB2351/F7 User manual

Philips

Philips HSB2351/F7 User manual

Philips DCD3020 User manual

Philips

Philips DCD3020 User manual

Philips Fidelio HTL9100 User manual

Philips

Philips Fidelio HTL9100 User manual

Philips HTD3500 User manual

Philips

Philips HTD3500 User manual

Philips HTD5550 User manual

Philips

Philips HTD5550 User manual

Philips htl1193b User manual

Philips

Philips htl1193b User manual

Philips Fidelio B5 User manual

Philips

Philips Fidelio B5 User manual

Philips HTS5110 User manual

Philips

Philips HTS5110 User manual

Philips HSB2351/51 User manual

Philips

Philips HSB2351/51 User manual

Philips HTB3520 User manual

Philips

Philips HTB3520 User manual

Philips MX-3600D User manual

Philips

Philips MX-3600D User manual

Philips HTD3500 User manual

Philips

Philips HTD3500 User manual

Philips HTS5561/12 User manual

Philips

Philips HTS5561/12 User manual

Philips HTS5520 User manual

Philips

Philips HTS5520 User manual

Philips htb5151k User manual

Philips

Philips htb5151k User manual

Philips HTL5110 User manual

Philips

Philips HTL5110 User manual

Philips HTL2160/F7 User manual

Philips

Philips HTL2160/F7 User manual

Popular Home Cinema Speakers manuals by other brands

Yamaha NX-SW60 Service manual

Yamaha

Yamaha NX-SW60 Service manual

Dcm Cinema1 manual 

Dcm

Dcm Cinema1 manual 

Onkyo HTP-038 instruction manual

Onkyo

Onkyo HTP-038 instruction manual

JBL Cinema 500 quick start guide

JBL

JBL Cinema 500 quick start guide

Panasonic SC-BTT105 owner's manual

Panasonic

Panasonic SC-BTT105 owner's manual

Daewoo DV-135 Service manual

Daewoo

Daewoo DV-135 Service manual

Panasonic SC-HTB100EGK operating instructions

Panasonic

Panasonic SC-HTB100EGK operating instructions

Onkyo HTP-990 Service manual

Onkyo

Onkyo HTP-990 Service manual

Kruger&Matz KM8007 owner's manual

Kruger&Matz

Kruger&Matz KM8007 owner's manual

Yamaha NS-AP8600 owner's manual

Yamaha

Yamaha NS-AP8600 owner's manual

RCA RTD 152 Service manual

RCA

RCA RTD 152 Service manual

AudioSource SW Two owner's manual

AudioSource

AudioSource SW Two owner's manual

Sony SAVA-27 Service manual

Sony

Sony SAVA-27 Service manual

Atlantic Technology System 4200 Brochure & specs

Atlantic Technology

Atlantic Technology System 4200 Brochure & specs

Bose VCS-300 owner's guide

Bose

Bose VCS-300 owner's guide

JBL TRIO138S owner's guide

JBL

JBL TRIO138S owner's guide

TCL TS5000 user manual

TCL

TCL TS5000 user manual

Sven HT-210 Operation manual

Sven

Sven HT-210 Operation manual

manuals.online logo
manuals.online logoBrands
  • About & Mission
  • Contact us
  • Privacy Policy
  • Terms and Conditions

Copyright 2025 Manuals.Online. All Rights Reserved.