Philips VR20D/07 User manual

38 EN
TAPE MANAGER
Tape Manager
Functions LOAD A RECORDED
CASSETTE
1
Insert a recorded cassette.
●While "– – – –" is blinking on the front display panel,
the tape will run for a few seconds to search for the
tape number.
ACCESS TITLE SCREEN
2
Press TAPE MANAGER.
●After pressing TAPE MANAGER, it may take a few
seconds to access the title screen while the recorder
searches for the programme information.
CHOOSE A PROGRAMME
3
Press %fi(or 5∞) to
move the highlight bar
(pointer) to the
programme you want to
watch.
START PLAYBACK
4
Press OK. Playback begins automatically after the
selected programme is located.
●If you press
#
instead of OK, the editing screen will
appear. You can edit the programme title and
category (Zpg. 41).
Turn on the TV and select the AV mode.
This function is useful when you wish to quickly find out what
programmes you have recorded on a tape with this recorder.
This function allows you to select a programme to watch, and
then automatically searches for the start of the programme.
To start recording on the
blank portion of a tape
If you do not record programs consecutively, two tape
numbers will be recorded on one tape and the recorder
will not be able to search for the correct programme. To
continue recording on the blank portion of a tape, follow
the procedure described below:
1Press %fi, and select a "BLANK" item on the program
title screen.
2Press OK. The recorder automatically searches for a
blank portion on the tape.
3After confirming that this is the tape on which you
really wish to record, begin recording.
1
4
2
3
5
8
0
9
6
7
-
+
-
+
+
+
--
PROG. +
PROG. –
OK
MENU
TAPE MANAGER
TAPE MANAGER
TV PROG
OKOKOK
]0013 FOOTBALL '98 1/ 3
BLANK 1:25 (LS3)
22 : 00 26.02.99 BBC1
20 : 00 27.02.99 BBC2
BLANK 0 : 30 (LS3)
21 : 00 28.02.99 I-1
22 : 15 28.02.99 PR.07
21 : 00=22 : 30 1 : 30 (STD)
WORLD CUP '98 /SPORTS
[5∞] =
[
3
]
:
EDIT
[TAPE MANAGER]
:
EXIT

EN 39
ACCESS MAIN MENU
SCREEN
1
Press MENU.
ACCESS TAPE MANAGER
SCREEN
2
Press %fito move the
highlight bar (pointer) to
"TAPE MANAGER", then
press OK or
#
.
CHECK MEMORY
3
Press %fito move the
highlight bar (pointer) to
"CHECKING MEMORY",
then press OK or
#
.
●The CHECKING
MEMORY screen will
appear.
RETURN TO NORMAL
SCREEN
4
Press MENU.
Checking Memory
You can check the amount of recorded information in the
memory.
MAIN MENU
MODE SET
AUTO CH SET
MANUAL CH SET
INITIAL SET
TAPE MANAGER
[5∞] =
[MENU] : EXIT
CHECKING MEMORY
0 100
[MENU] : EXIT
TAPE MANAGER
EDITING
SORTING
CHECKING MEMORY
TAPE MANAGER : ON
[5∞] =
[MENU] : EXIT
NOTES:
●
Tape Manager is possible with the cassettes recorded with this
recorder only.
●
To record the date and time as the programme title in this
recorder's memory, make sure the recorder's clock is set
correctly before recording.
●
To record the programme information in this recorder's
memory, you must record each programme for over the
minimum recording time; 10 min. for the D-VHS (STD) mode,
30 min. for the D-VHS (LS3) mode, 8 min. for the S-VHS/VHS
(SP) mode or 15 min. for the S-VHS/VHS (LP) mode.
●
Tape Manager may not work properly depending on the
cassette being used.
●
If the recorder finds two tape numbers in one tape while
playing back or searching for the beginning of a programme,
then when you remove the tape, the tape will be assigned just
one number (smaller number).
●
The programme information is stored in this recorder’s
memory. If the memory in this recorder should ever be
damaged and the programme information lost, it is impossible
to restore that information.
●
After recording a tape with this recorder, write the tape
number on a label and affix the label to the cassette in order
to allow you to find the tape by its number.
TURN OFF TAPE MANAGER
1
Press %fito move the
highlight bar (pointer) to
"TAPE MANAGER", then
press OK or
#
to set to
"OFF".
RETURN TO NORMAL
SCREEN
2
Press MENU.
Turn Off Tape Manager
If you don't want to record information on the programmes, set
"TAPE MANAGER" to "OFF".
TAPE MANAGER
EDITING
SORTING
CHECKING MEMORY
TAPE MANAGER : OFF
[5∞] =
[MENU] : EXIT
Perform steps 1to 2of "Checking Memory" in the left
column before continuing.

40 EN
Title Editing
Turn on the TV and select the AV mode.
When you record a TV programme with this recorder, the
recorder automatically records the recording start time, date,
and channel in each programme title. If the tape is recorded for
the first time, the tape number and the date and time are
recorded in the tape title. You can then edit the tape title and
the programme titles as you like. You can also edit the category
in the programme title.
In short, you can use the Tape Manager function to create your
own video tape library.
ACCESS MAIN MENU
SCREEN
1
Press MENU.
ACCESS TAPE MANAGER
SCREEN
2
Press %fito move the
highlight bar (pointer) to
"TAPE MANAGER", then
press OK or
#
.
ACCESS EDITING SCREEN
3
Press %fito move the
highlight bar (pointer) to
"EDITING", then press OK
or
#
.
SELECT TAPE NO.
4
Press %fito move the
highlight bar (pointer) to
the number of the tape
whose title you want to
edit, then press OK or
#
.
●The "*" mark indicates the tape number of the
cassette that is currently in the recorder.
SELECT TAPE TITLE
5
Press %fito move the
highlight bar (pointer) to
the tape number, then
press OK or
#
.
●The "*" mark indicates the current position on the
tape.
Edit Tape Title
TAPE MANAGER (cont.)
1
4
2
3
5
8
0
9
6
7
-
+
-
+
+
+
--
PROG. +
PROG. –
OK
MENU
NUMBER
CLEAR
MAIN MENU
MODE SET
AUTO CH SET
MANUAL CH SET
INITIAL SET
TAPE MANAGER
[5∞] =
[MENU] : EXIT
TAPE MANAGER
EDITING
SORTING
CHECKING MEMORY
TAPE MANAGER : ON
[5∞] =
[MENU] : EXIT
]1/ 12
0115 MOVIE1
*0114 18.03.99 -
0113 25.02.99 -
0112 23.02.99 -
0111 MOVIE2
0110 BASEBALL
0108 05.09.98 -
0107 29.08.98 -
0106 BEST HIT
[5∞] =
[MENU]
:
EXIT
]0114 18.03.99 - 1/ 3
20:00 27.02.99 BBC2
22:00 26.02.99 BBC1
21:00 28.02.99 I-1
*22:15 28.02.99 PR.07
8:15 15.01.00 PR.99
[5∞]
= : EDIT
= [CLEAR] : DELETE ]
[MENU]
:
EXIT

EN 41
Edit Programme Title And
Category
SELECT PROGRAMME
1
Press %fito move the
highlight bar (pointer) to
the programme you want
to edit, then press OK or
#
.
ENTER CHARACTER
2
Press NUMBER keys to enter characters, then press OK.
For details, refer to "Entering Character" in the left
column.
SELECT CATEGORY
3
Press %fito move the
highlight bar (pointer) to
select the category you
want, then press OK or
#
.
RETURN TO NORMAL
SCREEN
4
Press MENU.
Perform steps 1to 4of "Edit Tape Title" on page 40 before
continuing.
ENTER CHARACTER
6
Press NUMBER keys to enter characters, then press OK.
For details, refer to "Entering Character" below.
RETURN TO NORMAL
SCREEN
7
Press MENU.]0114 18.03.99 - 1/ 3
20:00 27.02.99 BBC2
22:00 26.02.99 BBC1
21:00 28.02.99 I-1
*22:15 28.02.99 PR.07
8:15 15.01.00 PR.99
20:00=21:30 1:30 (STD)
TITLE /CATEGORY
[5∞]
= : EDIT
= [CLEAR] : DELETE
[MENU]
:
EXIT
]0114 18.03.99 - 1/ 3
20:00 27.02.99 BBC2
22:00 26.02.99 BBC1
21:00 28.02.99 I-1
*22:15 28.02.99 PR.07
8:15 15.01.00 PR.99
20:00=21:30 1:30 (STD)
WORLD CUP '98 /SPORTS
[5∞]: SELECT
: OK
[MENU]
:
EXIT
Entering Character
Press NUMBER key, then press
#
to enter each character.
Refer to the example below.
(Ex.) Enter "NEWS"
1Press 6 (MNO) twice to enter "N", then press
#
.
2Press 3 (DEF) twice to enter "E", then press
#
.
3Press 9 (WXYZ) once to enter "W", then press
#
.
4Press 7 (PQRS) four times to enter "S", then press
#
.
NOTES:
●
If you make a mistake, press
@ #
to select the character, then
enter the correct character.
●
If you want to delete a character, press
@ #
to select the
character, then press CLEAR.
Choice Of Category
CATEGORY %
% fi
MOVIE
% fi
SPORTS
% fi
SPECIAL
% fi
SERIES
% fi
SHOW
% fi
MUSIC
% fi
CHILDREN
% fi
NEWS
% fi
OTHERS fi
NUMBER KEY CHARACTER
1. , / – + *( ) 1
2A B C 2 Ä À Á Â Ã Å Æ
3D E F 3 È É Ë Ê
4G H I 4 Î Ï Ì Í
5J K L 5
6M N O 6 Ö Ô Ò Ó Õ Ø Ñ
7P Q R S 7
8T U V 8 Ü Ù Û Ú
9W X Y Z 9
00 _

42 EN
TAPE MANAGER (cont.)
Delete Tape Data
SELECT TAPE TITLE
1
Press %fito move the
highlight bar (pointer) to
the tape number you want
to delete, then press
CLEAR.
DELETE TAPE DATA
2
Press %fito move the
highlight bar (pointer) to
"YES", then press OK or
#
.
RETURN TO NORMAL
SCREEN
3
Press MENU.
Perform steps 1to 4of "Edit Tape Title" on page 40 before
continuing.
]0114 18.03.99 - 1/ 3
20:00 27.02.99 BBC2
22:00 26.02.99 BBC1
21:00 28.02.99 I-1
*22:15 28.02.99 PR.07
8:15 15.01.00 PR.99
[5∞]
= : EDIT
= [CLEAR] : DELETE ]
[MENU]
:
EXIT
]0114 18.03.99 -
DELETE
YES
NO
[5∞] =
[MENU]
:
EXIT
1
4
2
3
5
8
0
9
6
7
-
+
-
+
+
+
--
PROG. +
PROG. –
OK
MENU
CLEAR

EN 43
Delete Programme Data
SELECT PROGRAMME
1
Press %fito move the
highlight bar (pointer) to
the programme you want
to delete, then press
CLEAR.
DELETE PROGRAMME
DATA
2
Press %fito move the
highlight bar (pointer) to
"YES", then press OK or
#
.
RETURN TO NORMAL
SCREEN
3
Press MENU.
Perform steps 1to 4of "Edit Tape Title" on page 40 before
continuing.
NOTES:
●
When you delete data, only the tape and/or programme
information is deleted. The actual recording on the tape is not
erased.
●
If the recorder’s memory becomes full, the recorder registers
the tape in the library under the smallest tape number that is
still available.
]0114 18.03.99 - 1/ 3
20:00 27.02.99 BBC2
22:00 26.02.99 BBC1
21:00 28.02.99 I-1
*22:15 28.02.99 PR.07
8:15 15.01.00 PR.99
20:00=21:30 1:30 (STD)
TITLE /CATEGORY
[5∞]
= : EDIT
= [CLEAR] : DELETE
[MENU]
:
EXIT
20:00 27.02.99 BBC2
DELETE
YES
NO
[5∞] =
[MENU]
:
EXIT
1
4
2
3
5
8
0
9
6
7
-
+
-
+
+
+
--
PROG. +
PROG. –
OK
MENU
CLEAR

44 EN
TAPE MANAGER (cont.)
Sorting By Tape Number
If you have recorded a lot of tapes with this recorder, this
function is useful for finding out what is recorded on each tape.
1
4
2
3
5
8
0
9
6
7
-
+
-
+
+
+
--
PROG. +
PROG. –
OK
MENU
MAIN MENU
MODE SET
AUTO CH SET
MANUAL CH SET
INITIAL SET
TAPE MANAGER
[5∞] =
[MENU] : EXIT
TAPE MANAGER
EDITING
SORTING
CHECKING MEMORY
TAPE MANAGER : ON
[5∞] =
[MENU] : EXIT
SORTING
BY TAPE NO.
BY DATE
BY CATEGORY
[5∞] =
[MENU] : EXIT
]1/100
0999 BBC2 1900 28.12.99
0999 F1 BRAZIL 28.12.99
0999 007 GOLDE 25.12.99
0999 BBC1 2100 30.11.99
0998 ZDF 2100 28.11.99
0998 PR99 1000 01.01.00
0997 ARSENAL V 25.11.99
0996 BBC2 2300 24.11.99
0996 RA11 915 26.12.99
[
23
]
:
PAGE [MEMU] : EXIT
[5∞] = : EDIT
ACCESS SORTING SCREEN
3
Press %fito move the
highlight bar (pointer) to
"SORTING", then press OK
or
#
.
ACCESS TAPE NO. SCREEN
4
Press %fito move the
highlight bar (pointer) to
"BY TAPE NO.", then press
OK or
#
.
SELECT TAPE NO.
5
Press %fito move the
highlight bar (pointer) to
the tape number you want
to select, then press OK.
●The editing screen will appear. You can edit the tape
title, or the programme title and category (Zpg. 40,
41).
RETURN TO NORMAL
SCREEN
6
Press MENU.
NOTE:
If you wish to play back the programme on the tape you have
found, insert the cassette and see the "Tape Manager Functions"
(
Z
pg. 38) for the operation.
ACCESS MAIN MENU
SCREEN
1
Press MENU.
ACCESS TAPE MANAGER
SCREEN
2
Press %fito move the
highlight bar (pointer) to
"TAPE MANAGER", then
press OK or
#
.

EN 45
ACCESS CATEGORY
SCREEN
1
Press %fito move the
highlight bar (pointer) to
"BY CATEGORY", then
press OK or
#
.
SELECT CATEGORY
2
Press %fito move the
highlight bar (pointer) to
the category you want to
watch, then press OK or
#
.
SELECT TAPE NO.
3
Press %fito move the
highlight bar (pointer) to
the tape number you want
to select, then press OK.
●The editing screen will appear. You can edit the tape
title, or the programme title and category (Zpg. 40,
41).
RETURN TO NORMAL
SCREEN
4
Press MENU.
Sorting By Category
If you have recorded a lot of tapes with this recorder, this
function is useful for finding out what category of programme is
recorded on the tape.
Perform steps 1to 3of "Sorting By Tape Number" on page
44 before continuing.
SORTING
BY TAPE NO.
BY DATE
BY CATEGORY
[5∞] =
[MENU] : EXIT
MOVIE
SPORTS
SPECIAL
SERIES
SHOW
MUSIC
CHILDREN
NEWS
OTHERS
– – – – – – – –
[5∞] =
[MENU] : EXIT
]MOVIE 1/ 2
0999 007 GOLDE25.12.99
0980 GUNDAM3 23.12.98
0979 GUNDAM2 21.12.98
0975 GUNDAM1 30.10.99
0960 ZDF 2100 28.11.97
0960 PR99 1000 01.01.00
0951 GODILLA 25.11.97
0926 CNN 115 06.06.98
0910 RA11 930 05.02.99
[
23
]
:
PAGE [MEMU] : EXIT
[5∞] = : EDIT
ACCESS DATE SCREEN
1
Press %fito move the
highlight bar (pointer) to
"BY DATE", then press OK
or
#
.
SELECT TAPE NO.
2
Press %fito move the
highlight bar (pointer) to
the tape number you want
to select, then press OK.
●The editing screen will appear. You can edit the tape
title, or the programme title and category (Zpg. 40,
41).
RETURN TO NORMAL
SCREEN
3
Press MENU.
Sorting By Date
If you have recorded a lot of tapes with this recorder, this
function is useful for searching for tape numbers sorted by date.
Perform steps 1to 3of "Sorting By Tape Number" on page
44 before continuing.
SORTING
BY TAPE NO.
BY DATE
BY CATEGORY
[5∞] =
[MENU] : EXIT
]1/100
0997 JAPAN VS 14.02.00
0993 LOST WORL 02.01.00
0998 PR99 1000 01.01.00
0999 FOOTBALL 28.12.99
0999 F1 BRAZIL 28.12.99
0996 RA11 2000 26.12.99
0999 007 GOLDE 25.12.99
0993 CNN 115 25.12.99
0999 BBC1 2000 30.11.99
[
23
]
:
PAGE [MEMU] : EXIT
[5∞] = : EDIT

46 EN
EDITING
Edit From
A Camcorder
NOTES:
●
All necessary cables can be obtained from your dealer.
●
You can also use another video recorder as the player instead
of a camcorder.
●
When you are editing through the DV IN connector, the
recorder will stop if the player begins playing a blank portion
of tape or the signal is interrupted.
1
4
2
3
5
8
0
9
6
7
-
+
-
+
+
+
--
PROG. +
PROG. –
PROG.+/–
NUMBER "0"
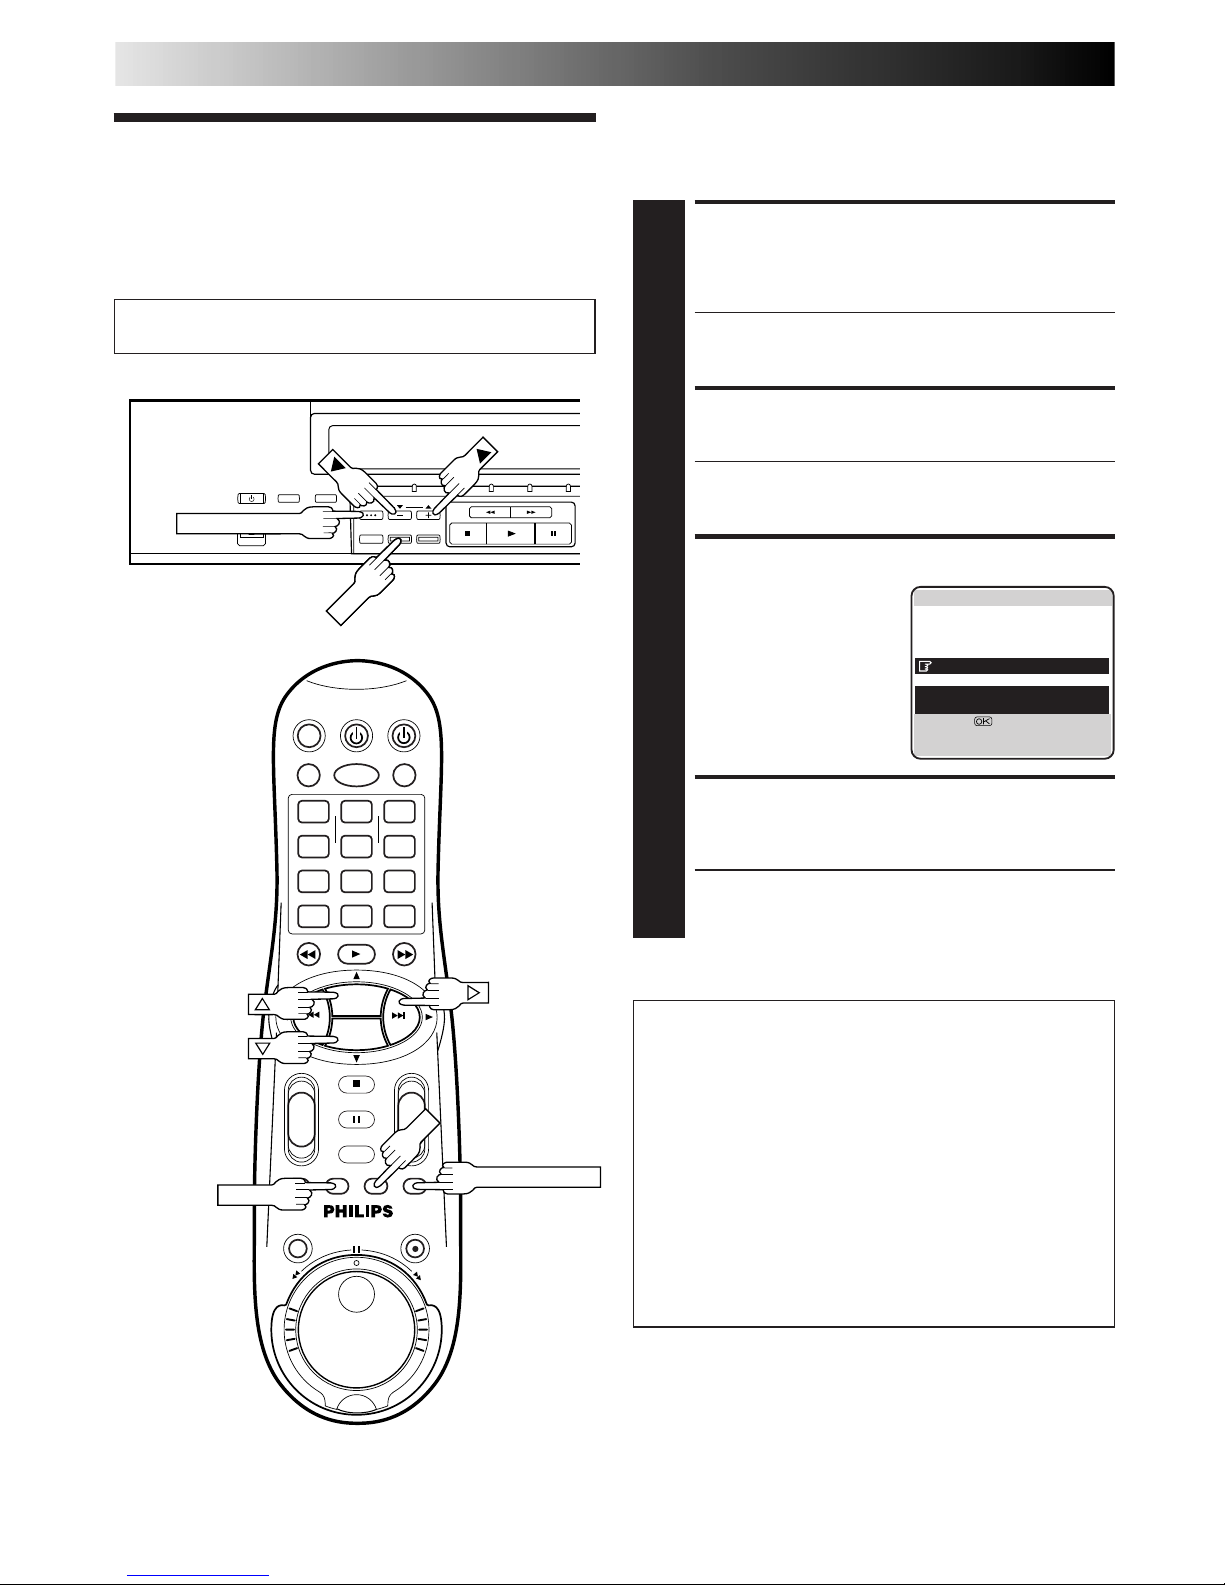
You can use a camcorder as the source player and your video
recorder as the recorder.
You can perform digital editing if the camcorder has a DV
output connector.
MAKE CONNECTIONS
1
A
If the camcorder has no S-VIDEO output connector...
... connect the camcorder’s AUDIO/VIDEO OUT
connectors to the recorder’s front panel AUDIO/
VIDEO input connectors.
B
If the camcorder has an S-VIDEO output connector...
... connect the camcorder’s S-VIDEO OUT and
AUDIO OUT connectors to the recorder’s front
panel S-VIDEO and AUDIO input connectors.
AC
If the camcorder has a DV OUT connector...
... connect the camcorder’s DV OUT connector to
the recorder’s DV IN connector.
See "DV Sound Setting" (Zpg. 47) for the DV
sound selection.
●When using a mono camcorder, connect its AUDIO
OUT connector to the AUDIO L input connector on
your recorder.
●When a certain camcorder with Master Edit Control is
used, the camcorder is capable of controlling the
recorder. Refer to the camcorder’s instruction manual
for operating procedure.
SET RECORDING MODE
2
Set the appropriate recording mode (D-VHS, S-VHS or
VHS) (Zpg. 22, 23).
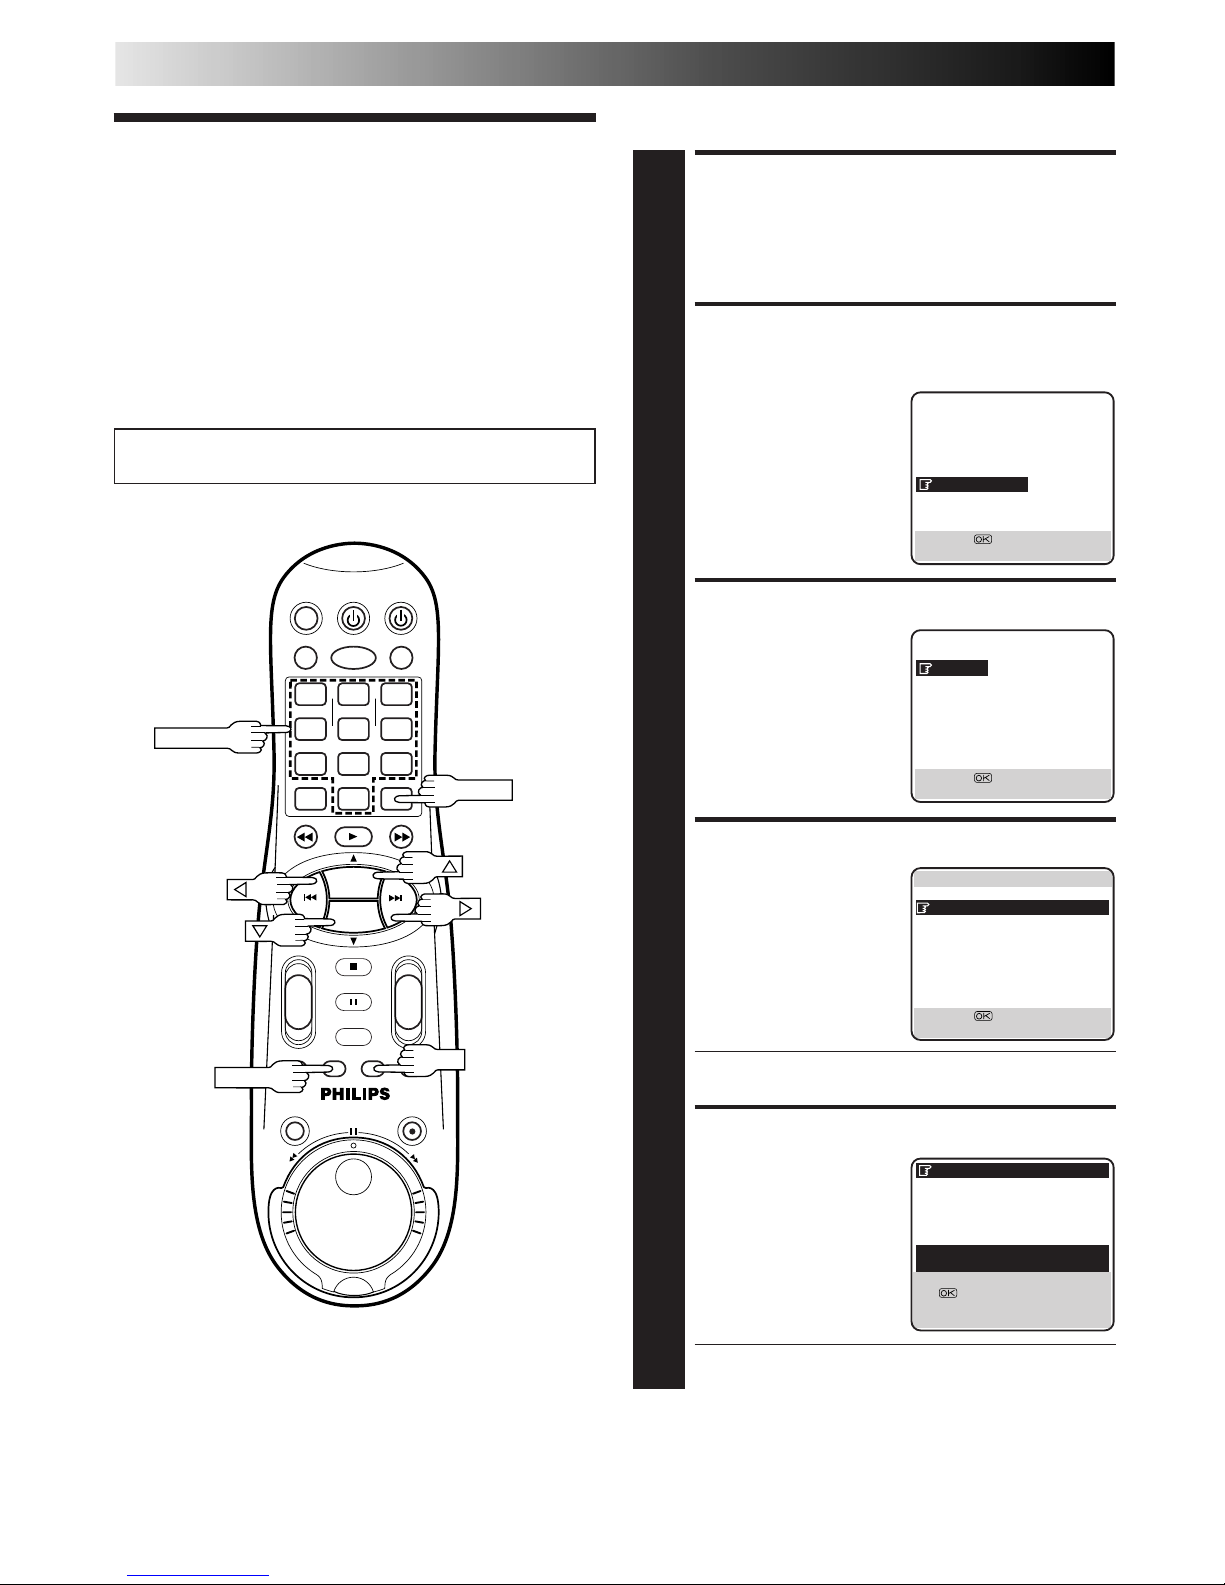
SET RECORDER’S INPUT
MODE
3
Press NUMBER key "0" and/or PROG. +/– to select
"F-1" for the AUDIO/VIDEO input connectors, "S-2" for
the AUDIO/S-VIDEO input connectors, or "I-1" for the
DV input connectors, depending on the connectors
being used.
START CAMCORDER
4
Engage its Play mode.
START RECORDER
5
Engage its Record mode.

EN 47
VIDEO OUT
Camcorder
VIDEO
input
Recorder
AUDIO OUT
Video Cable (not provided)
Player
AUDIO input
A If the camcorder has no S-VIDEO output connector...
S-VIDEO OUT
Camcorder
S-VIDEO
input
Recorder
AUDIO OUT
Audio Cable (not provided)
Player
B If the camcorder has an S-VIDEO output connector...
AUDIO input
S-Video Cable (provided)
Audio Cable (not provided)
DV Camcorder
Recorder
DV OUT
DV Cable
(not provided)
Player
C If the camcorder has a DV OUT connector...
DV IN
DV Sound Setting
Up to four audio signal channels can be input from a DV
camcorder through the DV IN connector (i.Link). This
recorder allows you to select and record two of these
channels. This setting is used to specify which two
channels to record.
1Press MENU to access the Main Menu screen.
2Move the highlight bar (pointer) to "MODE SET" by
pressing %fi, then press OK or
#
.
3Move the highlight bar (pointer) to "DV SOUND" by
pressing %fi, then press OK or
#
to select "SOUND1",
"SOUND2" or "FULL".
When there are four DV audio channels (32kHz):
SOUND 1: Records the two channels (L/R) of DV
SOUND 1.
SOUND 2: Records the two channels (L/R) of DV
SOUND 2.
FULL: Mixes and records both DV SOUND 1 and
2.
When there are two DV audio channels (48kHz):
Because there are only two channels, those two
channels are recorded regardless of the DV sound
setting.
4Press MENU to return to the normal screen.
PREVIOUS PAGE
AV1 SELECT VIDEO
AV2 SELECT AV2
DV SOUND SOUND1
AUDIO REC NICAM
[5∞] =
[MENU] : EXIT
MODE SET
DSPC ON
O. S. D. ON
DIRECT RECORD ON
AUTO SP=LP TIMER OFF
DIGITAL 3R ON
POWER SAVE OFF
S-VHS AUTO
NEXT PAGE
[5∞] =
[MENU] : EXIT

48 EN
Edit To Or
From Another
Video
Recorder
You can use your video recorder as the source player or as the
recording deck.
MAKE CONNECTIONS
1
Connect the player’s 21-pin SCART connector to the
recorder’s 21-pin SCART connector as illustrated on
page 49.
A
When Using Your Video Recorder As The Source
Player ...
... connect its AV1 IN/OUT connector to the
recording deck.
B
When Using Your Video Recorder As The Recording
Deck ...
... connect its AV2 IN/DECODER or AV1 IN/OUT
connector to the source player.
C
If Another Recorder Is Compatible With The Y/C
Signal ...
... connect your recorder
's
AV1 IN/OUT connector to
another recorder.
With Cconnection ...
●When using your recorder as the recording deck, set
"AV1 SELECT" to "S-VIDEO" and "AV2 SELECT" to
"AV2" (Zpg. 50).
●When using your recorder as the source player, set
the AV1 OUT switch on the rear panel to Y/C
(Zpg. 6).
SET RECORDING MODE
2
Set the appropriate recording mode (D-VHS, S-VHS or
VHS) (Zpg. 22, 23).
SET RECORDING DECK’S
INPUT MODE
3
Set to AUX. With this video recorder, press NUMBER
key "0" and/or PROG. +/– to select "L-1" for the AV1 IN/
OUT connector, or "L-2" for the AV2 IN/DECODER
connector, depending on the connector being used.
●When using the AV2 IN/DECODER connector, make
sure "AV2 SELECT" is set to "AV2" (Zpg. 50).
START SOURCE PLAYER
4
Engage its Play mode.
START RECORDING DECK
5
Engage its Record mode.
EDITING (cont.)
1
4
2
3
5
8
0
9
6
7
-
+
-
+
+
+
--
PROG. +
PROG. –
OK
MENU
NUMBER "0"
PROG.+/–

EN 49
NOTES:
●
All necessary cables can be obtained from your dealer.
●
For Y/C signal input/output, be sure to use a 21-pin SCART cable that is compatible with the Y/C signal.
●
When you use this recorder as the player for editing, be sure to set "O.S.D." to "OFF" before starting (
Z
pg. 12).
●
If you are using another recorder with S-Video and Audio input/output connectors, you can connect those connectors to this
recorder's S-VIDEO and AUDIO input/output connectors.
When Using Your Video Recorder As The Source Player ...
... connect its rear panel S-VIDEO and AUDIO output connectors to the recording deck's S-Video and Audio input connectors.
When Using Your Video Recorder As The Recording Deck ...
... connect its rear panel S-VIDEO and AUDIO input connectors to the source player's S-Video and Audio output connectors.
Then, set the recorder's input mode to "S-1".
Another recorder
Another recorder
Recorder
21-pin SCART
Cable (provided)
Player Your recorder Recorder Your recorder
TV Receiver
(AV mode)
TV Receiver
(AV mode)
21-pin SCART
Cable (provided)
Player
AB
Another recorder
Recorder
Player
Your recorder
CTV Receiver
(AV mode)
21-pin SCART
Cable (provided)
S-Video Cable
(provided)
21-pin SCART Cable
(not provided)
21-pin SCART Cable
(not provided)
Audio Cable
(not provided)

50 EN
MODE SET
DSPC ON
O. S. D. ON
DIRECT RECORD ON
AUTO SP=LP TIMER OFF
DIGITAL 3R ON
POWER SAVE OFF
S-VHS AUTO
NEXT PAGE
[5∞] =
[MENU] : EXIT
AV2 SELECT Setting
Set "AV2 SELECT" to the appropriate mode depending on the type of unit connected to the rear panel AV2 IN/DECODER
connector of this recorder.
1Press MENU to access the Main Menu screen.
2Press %fi to move the highlight bar (pointer) to "MODE SET", then press OK or
#
.
3Press %fi to move the highlight bar (pointer) to "AV2 SELECT".
4Press OK or
#
to select "AV2", "DECODER" or "SAT".
a–AV2 : To use this recorder as the recording deck with the player connected to the
AV2 IN/DECODER connector, or to use the satellite tuner connected to the
AV2 IN/DECODER connector.
b–DECODER : To use a decoder connected to the AV2 IN/DECODER connector.
If "AV1 SELECT" is set to "S-VIDEO" and "AV2 SELECT" is changed to
"DECODER", "AV1 SELECT" will be changed to "VIDEO" automatically.
c–SAT : To view a satellite programme with the TV set while the recorder is in
Timer mode, in Stop mode, recording or turned off. (Zpg. 53)
5Press MENU to return to normal screen.
●If you have a satellite tuner or a decoder connected to the AV2 IN/DECODER connector, be
sure to set "AV2 SELECT" back to appropriate mode after editing.
●If you're not connecting a decoder to the AV2 IN/DECODER connector, leave "AV2 SELECT"
set to "AV2".
●The default setting is "AV2"; if the recorder's memory backup has expired due to a power cut
or because the AC was removed from the recorder, "AV2" will be automatically selected when
the power is restored to the recorder. If you are using a satellite tuner or a decoder, be sure to
set "AV2 SELECT" back to appropriate mode.
●If the AV1 OUT switch on the rear panel is set to Y/C, it is impossible to set "AV2 SELECT"
to "DECODER".
EDITING (cont.)
PREVIOUS PAGE
AV1 SELECT VIDEO
AV2 SELECT AV2
DV SOUND SOUND1
AUDIO REC NICAM
[5∞] =
[MENU] : EXIT
MODE SET
DSPC ON
O. S. D. ON
DIRECT RECORD ON
AUTO SP=LP TIMER OFF
DIGITAL 3R ON
POWER SAVE OFF
S-VHS AUTO
NEXT PAGE
[5∞] =
[MENU] : EXIT
AV1 SELECT Setting
Set "AV1 SELECT" to the appropriate mode depending on the type of unit connected to the rear panel AV1 IN/OUT connector of
this recorder.
1Press MENU to access the Main Menu screen.
2Press %fi to move the highlight bar (pointer) to "MODE SET", then press OK or
#
.
3Press %fi to move the highlight bar (pointer) to "AV1 SELECT".
4Press OK or
#
to select "VIDEO" or "S-VIDEO".
a–VIDEO : If a connected device's output is compatible only with regular video signals,
set "AV1 SELECT" to "VIDEO".
b–S-VIDEO : If a connected device's output is compatible with Y/C signals, set "AV1
SELECT" to "S-VIDEO". This setting will let you take advantage of higher-
quality S-VHS pictures.
5Press MENU to return to normal screen.
●If "AV2 SELECT" is set to "DECODER", it is impossible to set "AV1 SELECT" to "S-VIDEO".
PREVIOUS PAGE
AV1 SELECT VIDEO
AV2 SELECT AV2
DV SOUND SOUND1
AUDIO REC NICAM
[5∞] =
[MENU] : EXIT

EN 51
The Synchro Editing function synchronizes the start of the
playback and recording operations when starting an edit
operation using a camcorder with LANC connector and your
video recorder.
Synchro Editing
(S-VHS/VHS Mode
Only)
MAKE CONNECTIONS
1
Connect your recorder to camcorder (Zpg. 46), and
connect your recorder's SYNCHRO EDIT connector to
the camcorder's LANC connector.
SET RECORDING MODE
2
Set the appropriate recording mode (S-VHS or VHS)
(Zpg. 23).
SET RECORDER'S INPUT
MODE
3
Set the appropriate input mode, depending on the
connectors being used in step 1.
LOCATE START POINT
4
Start playback of the tape in the camcorder, and pause
playback when you find the point where you want to
start editing. Press and hold PAUSE and press RECORD
on your recorder so that the recorder enters the Record-
Pause Mode.
START SYNCHRO EDITING
5
Press SYNCHRO EDIT.
PAUSE SYNCHRO EDITING
6
Press SYNCHRO EDIT again.
●Repeat steps 4– 6as necessary.
NOTES:
●
The Synchro Editing function is impossible with the connec-
tion using DV connector.
●
The Synchro Editing function may not work with the initial
part of a camcorder tape.
●
The Synchro Editing function cannot be used when using the
JLIP function. (Pressing SYNCHRO EDIT cancels the JLIP
function.)
●
The Synchro Editing function may not work properly with
some type of camcorder.
LANC Cable
(not provided)
Camcorder
Recorder
SYNCHRO EDIT
connector
Player
To LANC connector
PAUSE
RECORD
SYNCHRO EDIT

52 EN
INFORMATION ON J TERMINAL
J Terminal (JLIP (Joint Level
Interface Protocol) Connector)
The J Terminal is used for service purposes.

EN 53
SYSTEM CONNECTIONS
AV1 IN/OUT
(L-1)
AV2 IN/DECODER
(L-2)
DV IN
AV1 OUT
COMP. Y/C
S IN
(S-1)
S OUT
R.PAUSE
ANT. IN
ANT. OUT
R
L
AUDIO
OUT IN
(S-1)
SYNCHRO EDIT
JLIP
DECODER VCR TV
Connection To
A Satellite
Tuner
Simple Connections
This is an example of simple connection if your TV has
only one 21-pin SCART connector. . .
Connect the satellite tuner to the video recorder's AV2 IN/
DECODER connector, then connect the recorder's AV1 IN/OUT
connector to the TV's 21-pin SCART connector.
Mains outlet
TV Aerial
cable
Aerial connector
Satellite Tuner Unit
Satellite Cable
Outdoor Unit Aerial
Back of TV
21-pin AV input
connector (SCART)
RF OUT
ANT. IN
Back of Recorder
IMPORTANT
When you set "AV2 SELECT" to "SAT" (Zpg. 50), it is possible to view a satellite broadcast with the TV set to its AV mode even
if the recorder is in Timer mode, in Stop mode, recording or turned off. When the recorder is in Stop mode or recording, press
VCR/TV on the remote control to turn off the VCR indicator on the display panel.
●
In this case, be sure to set the AV1 OUT switch on the rear panel to COMP.
AV1 OUT switch
NOTES:
●
Set "AV2 SELECT" to "AV2" or "SAT". (
Z
pg. 50)
●
You can use Automatic Satellite Program Recording function
(
Z
pg. 37) with this connection.
●
To record a programme via the satellite tuner, select L-2 mode
by pressing NUMBER keys and/or PROG. +/– so that "L-2"
appears on the display panel.
●
If both the satellite tuner and the TV have S-VIDEO connec-
tors, you can enjoy high-quality S-VHS pictures. Connect
your recorder and the TV via S-VIDEO connection (
Z
pg. 7),
then connect the satellite tuner's S-VIDEO and AUDIO output
connectors to the recorder's S IN and AUDIO IN connectors
on the rear panel. Select S-1 mode by pressing NUMBER keys
and/or PROG.+/–, so that "S-1" appears on the display panel.
●
For details, refer to the instruction manual for the satellite
tuner.

54 EN
AV1 IN/OUT
(L-1)
AV2 IN/DECODER
(L-2)
DV IN
AV1 OUT
COMP. Y/C
S IN
(S-1)
S OUT
R.PAUSE
ANT. IN
ANT. OUT
R
L
AUDIO
OUT IN
(S-1)
SYNCHRO EDIT
JLIP
DECODER VCR TV
EXT.2 EXT.1
Perfect Connections
This is an example of recommended connection if your
TV has more than two 21-pin SCART connectors. . .
Connect the satellite tuner's VCR connector to AV2 IN/DECODER
connector, and AV1 IN/OUT connector to TV's connector. Then
connect the satellite tuner and TV.
Mains outlet
TV Aerial
cable
Aerial
connector
Satellite Tuner Unit
Satellite Cable
Outdoor Unit Aerial
Back of TV
21-pin AV input
connectors (SCART)
RF OUT
ANT. IN
Back of Recorder
NOTES:
●
Set "AV2 SELECT" to "AV2". (
Z
pg. 50)
●
You can use Automatic Satellite Program Recording function
(
Z
pg. 37) with this connection.
●
To record a programme via the satellite tuner, select L-2 mode
by pressing NUMBER keys and/or PROG. +/– so that "L-2"
appears on the display panel.
●
For details, refer to the instruction manual for the satellite
tuner and decoder.
SYSTEM CONNECTIONS (cont.)

EN 55
VIDEO Plus+®Setup
IMPORTANT
Normally, Auto Set Up (Zpg. 8), Preset Download (Zpg. 10) or Auto Channel Set (Z pg. 56) sets the Guide Program Numbers
automatically. You need to set the Guide Program Numbers manually only in the following cases.
●
When timer-programming with the VIDEO Plus+ system, the channel position, where the station you wish to record is
received on your recorder, is not selected or when you add a channel after Auto Set Up or Auto Channel Set has taken place.
— Set the Guide Program Number for that station manually.
●
When you delete a channel or change channel positions manually after Auto Set Up or Auto Channel Set has taken place.
— Set the Guide Program Numbers for all the receivable stations manually.
●
When you wish to timer-record a satellite programme with the VIDEO Plus+ system.
— Set the Guide Program Numbers for all satellite broadcasts received on your satellite tuner.
Guide Program Number Set
ACCESS MAIN MENU
SCREEN
1
Press MENU.
ACCESS INITIAL SET
SCREEN
2
Press %fito move the highlight bar (pointer) to
"INITIAL SET", then press OK or
#
.
ACCESS GUIDE PROG SET
SCREEN
3
Press %fito move the highlight bar (pointer) to "GUIDE
PROG SET", then press OK or
#
.
ENTER GUIDE PROG
NUMBER
4
Press %fior NUMBER keys
to enter the Guide Program
number for the desired
station as shown in the TV
listings. Then press OK or
#
.
(Ex.) When inputting the
Guide Program
number 4 for CH4.
ENTER RECEIVING
CHANNEL POSITION
NUMBER
5
Press %fior NUMBER
keys to input the number
of the recorder's channel
position on which the
Guide Program number's
broadcast is received.
Then press OK or
#
.
●If the satellite broadcast
is received on your
recorder's auxiliary
channel "L-1" or "L-2",
select "L-1" or "L-2" for the channel position,
depending on the connection to the satellite tuner
(Zpg. 53, 54).
●Repeat steps 4and 5as necessary.
RETURN TO NORMAL
SCREEN
6
Press MENU.
(Ex.) If CH4 is received on
channel position 4.
Guide Program Number
"Guide Program (GUIDE PROG) number" refers to the
assigned TV station numbers, according to broadcast area,
for the VIDEO Plus+ timer recording. The Guide Program
numbers can be found in most TV listings.
GUIDE PROG SET
GUIDE PROG TV PROG
45
[
5
∞
] =
[MENU] : EXIT
GUIDE PROG SET
GUIDE PROG TV PROG
44
CH4
[5∞] =
[MENU] : EXIT
Turn on the TV and select the AV mode.
SUBSIDIARY SETTINGS

56 EN
SUBSIDIARY SETTINGS (cont.)
Tuner Set IMPORTANT
Perform the following steps only if —
— Auto Channel Set has not been set correctly by Auto Set
Up function or by Preset Download (Zpg. 8, 10).
— you have moved to a different area or if a new station
starts broadcasting in your area.
Your recorder needs to memorize all necessary stations in
channel positions in order to record TV programmes. Auto
Channel Set automatically assigns all receivable stations in your
area to call them up by using the PROG. +/– buttons without
going through any vacant channel.
TURN ON THE RECORDER
1
Press VCR POWER.
ACCESS MAIN MENU
SCREEN
2
Press MENU.
ACCESS AUTO CH SET
SCREEN
3
Press %fito move the
highlight bar (pointer) to
"AUTO CH SET", then
press OK or
#
twice.
●The Auto Set screen
appears, and remains on
screen while the
recorder searches
for receivable
stations.
As Auto Channel Set
progresses, the " "
mark on the
screen moves from
left to right.
Wait until the
screen as shown in
step 4appears.
Auto Channel Set
MAIN MENU
MODE SET
AUTO CH SET
MANUAL CH SET
INITIAL SET
TAPE MANAGER
[5∞] =
[MENU] : EXIT
1
4
2
3
5
8
0
9
6
7
-
+
-
+
+
+
--
PROG. +
PROG. –
OK
PROG.+/–
MENU
VCR POWER
Turn on the TV and select the AV mode.
0
+++
End
Beginning
AUTO SET
PLEASE WAIT
[MENU] : EXIT

EN 57
VIEW CONFIRMATION
SCREEN
4
After "SCAN COMPLETED"
is displayed on the screen
for about 5 seconds, the
Confirmation screen
looking like the one to the
right appears. The stations
your recorder located
appear on a Confirmation
screen — channel
positions (PR), channels
(CH) and station names
(ID – Zpg. 62). The blueback screen and the
programme currently being broadcast by the blinking
station appear alternately for 8 seconds each.
To view the next page, use the %fi
@ #
button on the
remote control.
●The Guide Program numbers will also be set
automatically during Auto Channel Set.
RETURN TO NORMAL
SCREEN
5
Press MENU.
●Using the Confirmation screen, you can skip or add
channel positions, enter station names and perform
other operations. Refer to pages 58 – 61 for the
procedures.
●Depending on reception conditions, the stations may
not be stored in order, and the station names may not
be stored correctly.
●For information on scrambled broadcasts, refer to
page 59.
IMPORTANT
●In certain reception conditions, station names may not be
stored correctly, and auto Guide Program Number Set may
not work properly. If the Guide Program numbers are not set
properly, when you timer-record a TV programme using the
VIDEO Plus+ system, the recorder will record a TV
programme of a different station. When programming the
timer using the VIDEO Plus+ system, be sure to check
whether the channel position on which your recorder
receives the broadcasting station you wish to record is
selected (Zpg. 30, "VIDEO Plus+®Timer Programming").
●Your video recorder memorizes all detected stations even if
reception of some of them is poor. In these cases picture
quality may be poor. To delete those stations with an
unacceptable picture Z"Delete A Channel" on page 59.
NOTES:
●
Fine tuning is performed automatically during Auto Channel
Set. If you want to perform it manually, refer to page 60.
●
If you perform Auto Channel Set when the aerial cable is not
connected properly, "SCAN COMPLETED -NO SIGNAL-"
appears on the screen in step 7. When this happens, make
sure of the aerial connection and press OK; Auto Channel Set
will take place again.
1
4
2
3
5
8
0
9
6
7
-
+
-
+
+
+
--
PROG. +
PROG. –
OK
MENU
PR CH ID PR CH ID
01 26 BBC1 08 ––––
02 33 BBC2 09 ––––
03 23 ITV 10 ––––
04 30 CH4 11 ––––
05 37 CH5 12 ––––
06 –––– 13 ––––
07 –––– 14 ––––
[5
∞ ]
= : EDIT
= [X] : DELETE
[MENU] : EXIT
5
5
5
Table of contents
Other Philips VCR System manuals

Philips
Philips 20DV1 User manual

Philips
Philips VR 710/07 User manual

Philips
Philips VCA431AT User manual

Philips
Philips VR110/07 User manual

Philips
Philips VR768/59 User manual

Philips
Philips VRA471AT User manual

Philips
Philips VR608 User manual

Philips
Philips VR610 User manual

Philips
Philips VR788/50 User manual

Philips
Philips VR 632 User manual

Philips
Philips VR 766/07 User manual

Philips
Philips VR150/07 User manual

Philips
Philips 6SB57 User manual

Philips
Philips VR676/39 User manual

Philips
Philips turbo drive VR550 User manual

Philips
Philips VRZ220AT User manual

Philips
Philips VRX364AT User manual

Philips
Philips VR 948 User manual

Philips
Philips VRZ220AT User manual

Philips
Philips VR 768 User manual