Phonar Match-Air User manual

1
User Manual
Match-Air + Platin HUB
Congratulations on your purchase of your new audio speaker system. Match-Air products combine all
the advantages of high-quality smart audio systems.
With the Match-Air we want to convince discerning and at the same time modern music lovers with a
high sound quality and unlimited fle ibility. The built-in innovative power-dac and filter technology
sets new standards for authentic music reproduction.
Component: The Match-Air system includes a set of active stereo loudspeakers with integrated signal
receiver as well as a HUB control and radio unit.
Mode of operation: The HUB has a multi connectivity for various sources. CD player, computer, TV
set can be connected via digital or analogue inputs. It can also be connected to the Internet via Wi-Fi
to provide access to streaming services such as Spotify, Tidal, Qbozz or Internet radio stations
controlled by a native App.
The switching of the inputs and the volume control can be done by a wireless remote control. The
loudspeakers receive a high-resolution signal from the HUB wirelessly over a radio link in high-
resolution quality

2
Content:
Safety instruction……………..………………………………………………………… 2
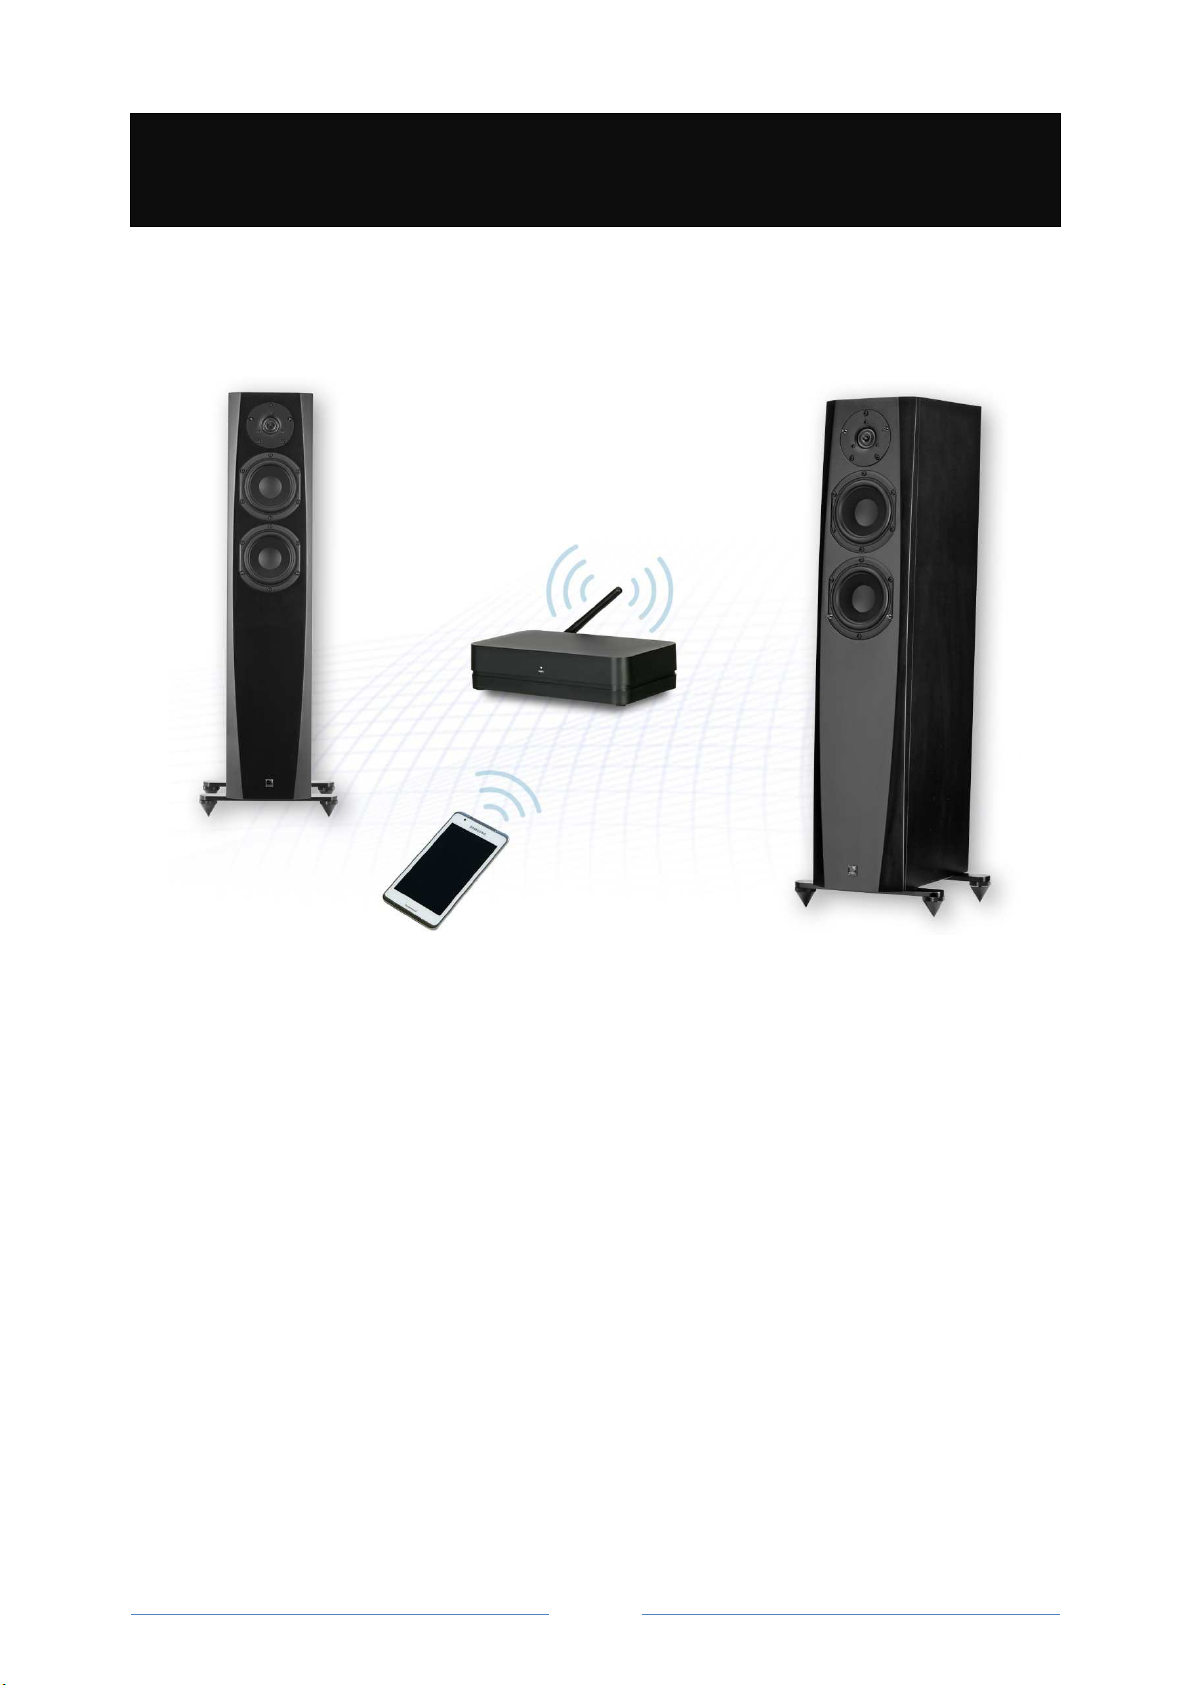
The Platin HUB 3
Inputs…..……………………………………………………………………………………. 3
Initial setup 3
How to connect the remote control……………………………………..…... 3
How to connect the Match-Air speaker…………..………………………… 4
Connect to the Wi-Fi Network ………….………………………………….….. 4
Streaming audio playback….……………………………………………………… 5
How to use the inputs………………………………………………………………. 6
The Match-Air 7
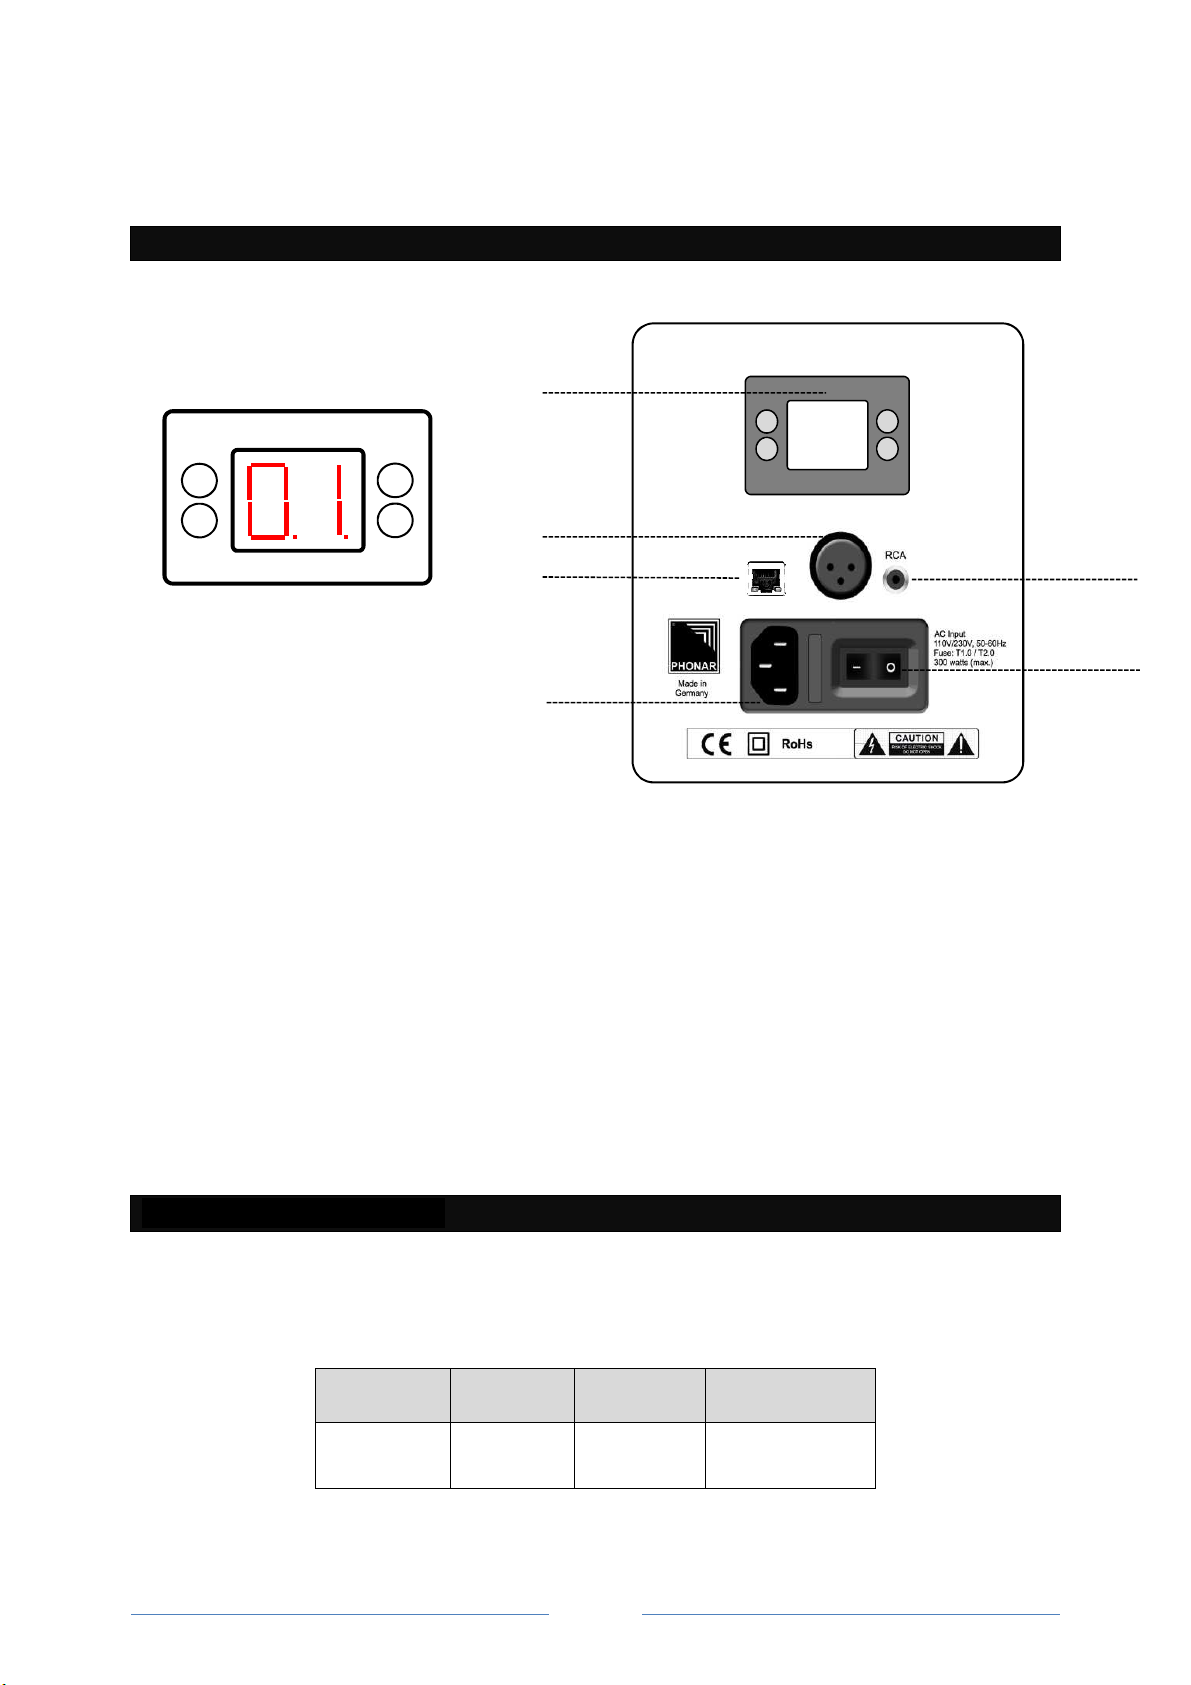
Electronic pannel………………………………………………………………………… 7
Definition of the speaker channels.……………………………………………. 7
Analogue Inputs at the speaker pannel………………………………………. 8
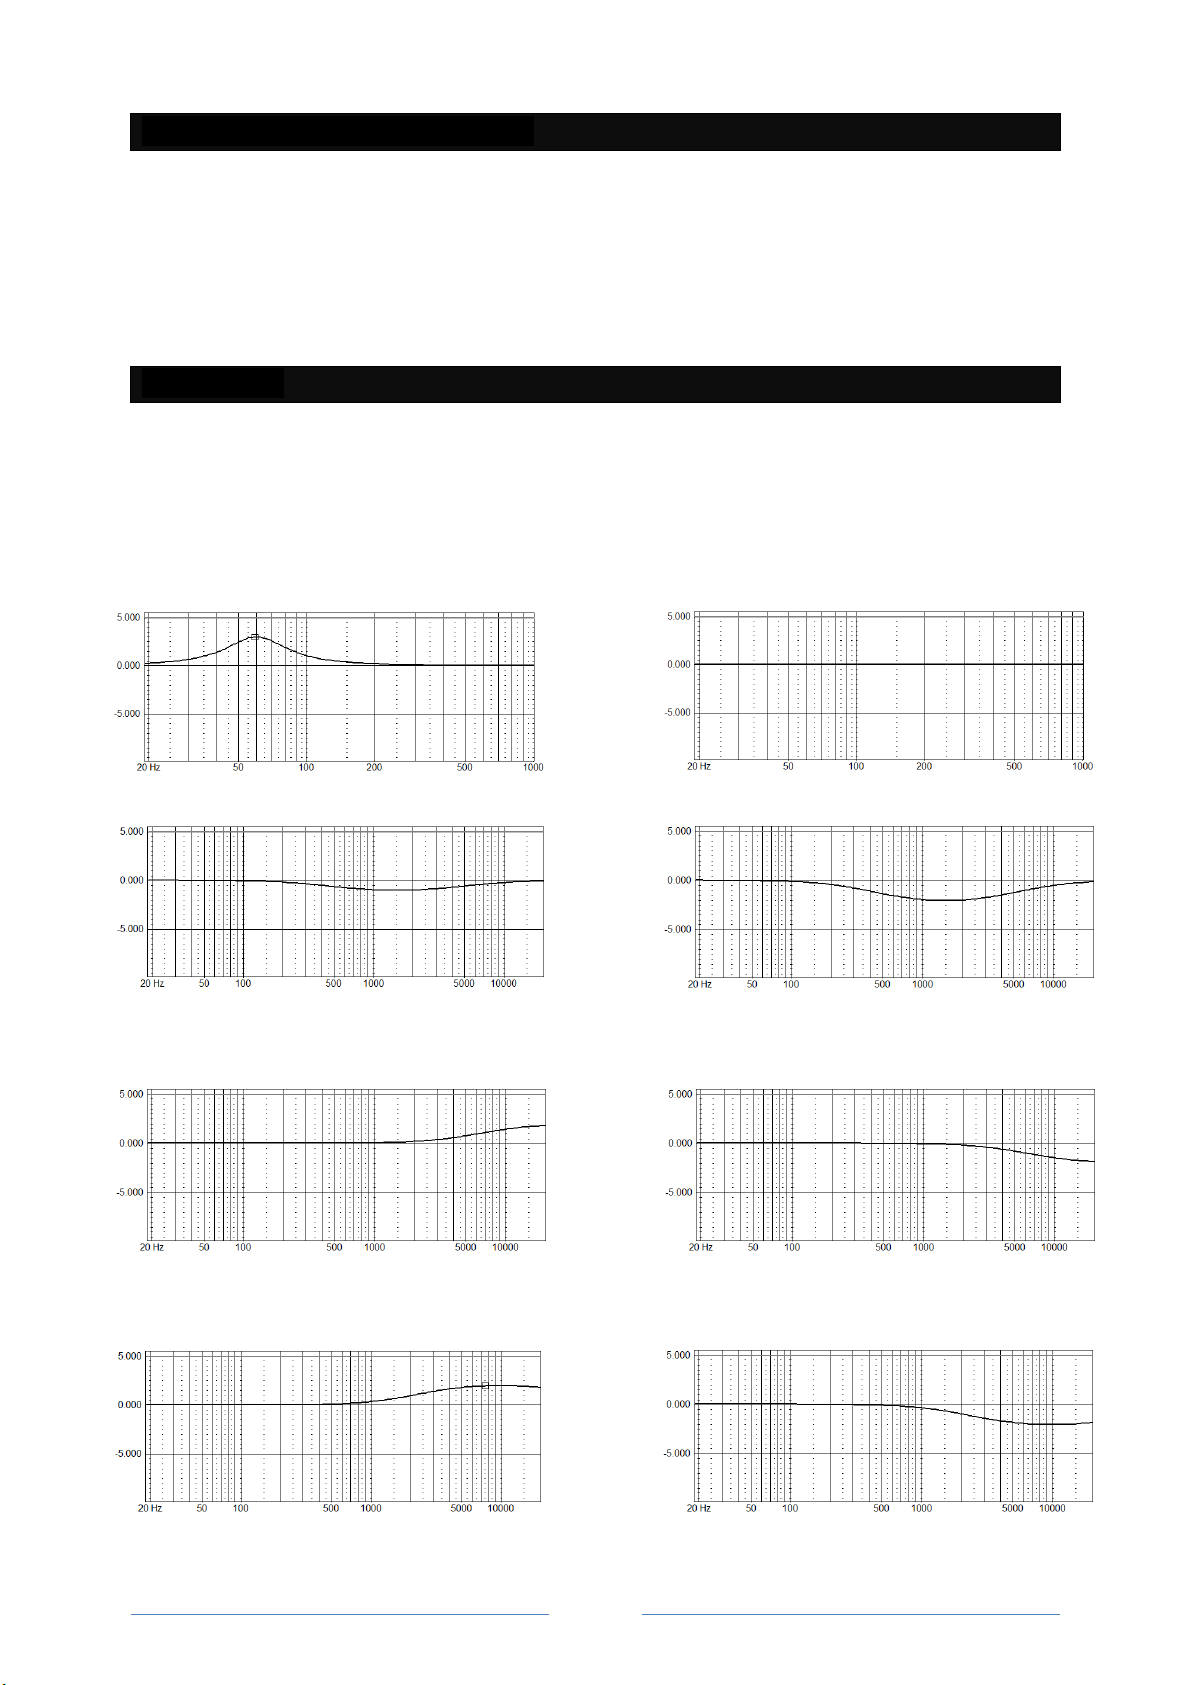
Sound Setups……….…………………………………………………………………….. 8-9
Automatic Standby…………………………………………………………………….. 9
Input Selection…………………………………………………………………………… 9
Volume regulation.……………………………………………………………………. 9
Warnings……………………………………………………………………………………. 9
Care and Maintenance………………………………………………………………. 9
Disposal…..…………………………………………………………………………………. 10
Warranty and Service………………………………………………….…………….. 10
Safety instruction:
1. Read this manual carefully.
2. Keep these instructions carefully.
3. Pay attention to all warnings.
4. Follow all instructions
5. Do not use this unit near water.
6. Clean only with a dry cloth.
7. Follow the manufacturer's installation instructions.
8. Do not place the unit near sources of heat, heat registers, stoves, or other equipment
(including amplifiers) that produce heat.
9. Use the enclosed power cord. Choose the correct plug for your power supply.
10. Protect the power cord from crushing and buckling. Do not place objects on the cable.
11. Use only manufacturer-specified accessories / accessories.
12. Unplug the unit during thunderstorms or if it is not used for a long time.
13. Leave all maintenance to qualified service personnel. Maintenance is required if the device
has been damaged, such as: B. Power supply without function, plug is damaged, the device
was not put in order.

3
The Platin HUB
Inputs:
This stereo HUB is equipped with all the important connectivity options:
•1 RCA
•3 Optical Digital
•1 HDMI Digital
•1 AUX
•1 COAX Digital
•1 USB
•1 Bluetooth
•1 Wi-Fi
•The HDMI input only supports signals from ARC (Audio Reverse Channel) -enabled TVs. It may
be necessary to enable the digital PCM sound on your TV to use this input. Please read the
instructions of your ARC-compatible TV.
•The HUB is connected to a PC / MAC via the USB input for the transmission of audio signals. It
supports a sampling rate of 24 bits / 192 kHz.
•The OPT1, OPT2, OPT3 and COAX inputs support SPDIF signals in 24-bit / 192 kHz
•The RCA input is used for analog signals.
•The AUX input is a combination connector that can be used for either a 3.5mm analog source
or a 3.5mm optical input
ther equipment:
•DC in the Power Back 5V / 2A
•WiSA LED indicates the status of the wireless speaker connection
•WLAN LED front home network connection
•antenna socket
•
Reset button
Initial setup:
How to connect the remote control:
Before using the Stereo HUB, you need to connect your remote to the HUB. Proceed as follows:
1. Connect the HUB to the mains.
2. Insert the batteries into the remote control. By pressing the volume after
above or below the LED on the remote control lights up and confirms the
perfect function.
3. Press and hold the pairing button on the back of the stereo HUB for 6 seconds.
4. Press any button on the remote control to use the stereo HUB communicate.
Now the remote control is integrated and can control the HUB

4
How to connect the Match-Air speakers:
Note: The stereo HUB works with a pair of WiSA speakers. Please read Part 2 of this guide for more
detailed information.
Attention! If the display is in standby mode (no display), activate it by pressing any key. Now you can
see the current setting of the module in the display.
1. Start by connecting the power supply to the speaker and HUB.
2. Define the channel (Left / Right / Analogue) of the single speaker as described on page 7.
3. After switching on, activate the "pairing mode" for all speakers that you want to connect to
the stereo HUB. Press and hold the "Pair / ESC" button on the rear electronic module of the
Match-Air for 3 seconds (see page 7). Two dots should flash in the display.
4. Press the pairing button on the stereo HUB, ma . 2 seconds.
After a few seconds, all speakers should be connected and the display should now light a dot.
If a speaker can not connect, repeat steps 2 and 3 for unpaired speakers only.
5. Test the connection by applying an audio signal to an input of the Stereo HUB:
•select the appropriate input using the remote control,
•set to low volume
•confirm the audio playback.
Now a music signal should be played.
Connect tot he Wi-Fi Network:
Using the Google Home app
Wi-Fi setup for I S:
1. Scan the "Google Home" app from the App Store by scanning the following QR code:
2.
Screw the antenna into the provided socket on the back of the HUB.
3.
Turn on the stereo HUB. Wait until the white front LED flashes.
4.
Open the Google Home app and follow the setup instructions.
5.
Now the stereo HUB should be connected to your network. The LED on the front lights up.

5
Wi-Fi setup for Android:
1. By scanning the following QR code, download the "Google Home" app from the Google Play
Store
2.
Screw the antenna into the provided socket on the back of the HUB.
3.
Turn on the stereo HUB. Wait until the white front LED flashes.
4.
Open the Google Home app and follow the setup instructions.
5.
Now the stereo HUB should be connected to your network. The LED on the front lights up.
If no Smart Setup is available, follow these steps:
1. Turn on the stereo HUB. Wait until the white front LED flashes.
2. Use the computer to connect to the Wi-Fi network called Stereo HUB_XXXXXX.
3. Open the web browser from the same computer and enter the IP address 192.168.43.1
4. Follow the instructions for network setup in the web browser.
Streaming audio playback:
Chromecast Play:
•Make sure your playback device (smartphone / tablet / PC) is in the same network as your
stereo HUB
•
In every app supported by Chromecast, you'll find the Chromecast icon. Press the logo below
and select "Stereo HUB" (or the name you gave it) as the playback device
•
Stereo HUB automatically changes the input to "STREAM" when streaming starts.
Spotify Connect Playback:
•
Open the Spotify app and make sure the device is in the same network as the
stereo HUB.
•
In the Spotify app, you can select the HUB (or name you chose) as the playback
device.
•
The stereo HUB automatically changes the input when a stream
starts.
Bluetooth playback
•The stereo HUB connects to a Bluetooth compatible device. In the Bluetooth settings the
HUB appears under the name "Stereo HUB_XXXXXX".
•Establish a connection. After that, you can start playing immediately from any APP that
supports Bluetooth playback.
•The stereo HUB automatically changes the input to "STREAM" when streaming starts.

6
•The volume is adjusted via the Playback APP or the
remote control.
•If another user wants to play from Bluetooth, simply
disconnect the current user and select a new one.
How to use the Inputs:
HDMI / ARC audio input
1. Make sure that your TV has HDMI ARC (Audio Return Channel), and connect the Stereo HUB
HDMI terminal with a HDMI 1.4 cable or higher.
2. Turn on your TV and enable the HDMI / ARC audio input in your TV settings. In the TV
settings, also set the audio output to PCM.
3. Select the HDMI input of the stereo HUB using the remote control.
4. To support the TV-CEC control, you can adjust the volume of both the TV remote control and
the system remote control.
PC / Mac input from the computer
•Connect the USB cable between the computer and the stereo HUB.
•Some computers require special drivers that need to be installed. These can be downloaded
from the manufacturer's website.
•Select the USB input and adjust the volume via the remote control.
•Select "Stereo HUB" as the output device on the computer and start playback from the
computer.
Digital inputs PT1, PT2, PT3, C AX, AUX (optical interface)
1. Any audio source or TV with SPDIF output can be connected to the stereo HUB using a
suitable connecting cable.
2. After connecting the cable between the devices, switch on the speakers, select the
corresponding input via the remote control. Adjust the volume to the desired level.
3. Turn on the audio source and start playback. The sound should now be transmitted from the
speakers.
Analog inputs RCA, AUX (3,5mm)
1. Any audio source or analog output TV can be connected to the stereo HUB using a suitable
connection cable.
2. After connecting the cable between the devices, switch on the speakers, select the
corresponding input via the remote control. Adjust the volume to the desired level.
3. Turn on the audio source and start playback. The sound should now be transmitted from the
speakers.

7
The Match-Air
Electronic pannel:
1. Control panel and Displayay
2. XLR - Analoge Input
3. RCA - Analoge Input
4. USB Service Input only
5. Power-Switch On / Off
6. IEC socket standard C13 socket for receiving a power cable.
110/230 Volt with glass fuse 5 20mm / 1AT / 2AT
Definition of speaker channels
Assign the correct channel (Left / Right to each speaker according to its placement in the room. To
define, press the "OK" button on the control panel until the channel is correctly selected for each
speaker:
Channel Right Left
Analog
ue
RCA / XLR
Display 0 I A
Pay attention to the left digit in the display field. A pair of stereo speakers should now be defined as
"0" as the right channel and "I" as the left channel.
Left Display:
0 = right speaker channel
I = left speaker channel
A = analoge Input
Right Display:
Filter Setups 1-7 Sound Filters
1
3
5
6
USB
XLR
analogue input
K
Pair / Esc
+
-
Match Air
4
2
OK
Pair / Esc
+
-

8
Analogue Inputs at the speaker pannel:
The Match-Air also has two analog inputs, which are suitable for connection to a preamplifier. The
wired control of the Match-Air is optional. The use of a HUB is not necessary. To activate and thus
permanently use the analog inputs, you connect the speakers to your preamplifier. Now press the
"OK" button on the control panel of the match until "A" appears in the left half of the display (see
page 7). Now you can operate the Match-Air as a pure active speaker via a preamplifier.
Sound Setups:
You have the possibility to make 10 sound adjustments to the match-air. Use the right half of the
display. Use the + and - keys to go to the respective setups.
The effects on the sound are described as following:
Setup 0
Bass emphasis + 3dB at 60 Hz
Setup 1
linear
Setup 2 S
light midds reduction between 300Hz and 10kH
Setup 3
Midds reduction between 300Hz and 10kHz
Setup 4
Slightly rising treble range from 2kHz
Setup 5
Slightly falling treble range from 2kHz
Setup 6
Increasing frequency range from 1kHz
Setup 7
Falling frequency range from 1kHz

9
Presets 8 and 9 shall be only used, if you have acoustic room problems which causes a typical
sublimate bass sound at 50 or 100 Hz: One of the following Presets shall help to avoid an overloaded
bass sound caused by room resonances and reflections. Try and listen.
Setup 8 Equalization of bass at 100Hz
Setup 9 Equalization of bass at 50Hz
Automatic Standby:
If the HUB and speakers do not receive a signal for 20 minutes, they will go into standby mode. When
the audio signal returns, both are automatically activated.
Input Selection:
The input selection of the stereo HUB is operated by the remote control. The LED indicates which
input has been selected.
Volume control:
The volume is controlled by the remote control. The LEDs indicate the currently set level. A mute
button on the remote will mute the audio, but playback will continue. Press this button again or
increase the volume by pressing the Volume button to hear the signal again.
Warnings:
To reduce the risk of fire or electric shock, do not e pose this unit to rain or moisture. The device
must not be e posed to dripping or splashing, and no objects filled with liquids, such as vases or
glasses, may be placed on the device.
Care and Maintenance:
Please note the following hints so that you can permanently enjoy the look and sound:
Care: The pores of the wooden parts have a closed surface. Nevertheless, you should not use liquid
cleaning agents to clean the wooden parts. Use a dry, slightly damp dust-free cloth to clean the
wooden parts. You should definitely refrain from the use of chemical agents.
Maintenance: The matches are largely maintenance-free. Just tighten the screws of the speaker
chassis on the front slightly after 3-5 weeks.

10
Disposal:
Phonar products are made from environmentally sound materials that comply with
international regulations for the disposal of old equipment. For eventual disposal
after years of use, contact your local disposal site.
Garantie und Service
Phonar has a warranty period of 24 months. The warranty period starts from the date of purchase. In
case of defects or malfunctions, please contact your Phonar dealer. For a smooth completion of the
repair, please lift the proof of purchase. Without this proof, repairs are always carried out with costs.
The guarantee consists in the free disposal of material or manufacturing defects by repair or
replacement of defective parts.
E cluded from the repair are defects due to improper use (such as operating errors or mechanical
damage), wear or force majeure. The warranty does not apply to intervention by unauthorized
persons. For damages incurred on the transport to the service workshop liability of the distributor or
manufacturer is e cluded.
When claiming a guarantee
The Match products should preferably be brought or delivered in the original carton to the dealer
from whom you purchased the device.
http://www.phonar.de Phonar Akustik, 24963 Tarp
This manual suits for next models
1
Table of contents