Sony DHC-EX880MD User manual

Mini Hi-Fi
Component
System
©1998 by Sony Corporation
Operating Instructions
3-864-000-11 (1)
DHC-EX880MD
DHC-MD717
T

2
Table of Contents
WARNING
To prevent fire or shock hazard, do not
expose the unit to rain or moisture.
To avoid electrical shock, do not open the cabinet.
Refer servicing to qualified personnel only.
Do not install the appliance in a confined space,
such as a bookcase or built-in cabinet.
Laser component in this product is capable of
emitting radiation exceeding the limit for Class 1.
This caution label is located inside the unit.
This appliance is classified as
a CLASS 1 LASER product.
The CLASS 1 LASER
PRODUCT MARKING is
located on the rear exterior.
IMPORTANT
Never connect two mains leads into a single mains
plug.
For TA-EX880/TA-MS717
The mains lead plug of TA-EX880/TA-MS717 is a
2-pin type designed to be connected only to
ST-EX880/ST-MS717.
Do not connect this plug to any other system or
mains supply.
US and foreign patents licensed from Dolby
Laboratories Licensing Corporation.
Getting Started
Step 1: Hooking up the system............ 4
Step 2: Setting the time ....................... 12
Step 3: Presetting radio stations ........ 13
Basic Operations
Playing a CD ......................................... 15
Recording a CD on an MD .................. 17
Playing an MD ...................................... 19
Listening to the radio ........................... 21
Recording from the radio .................... 23
The CD player
Playing the CD tracks repeatedly ...... 26
Playing the CD tracks in random
order ................................................ 26
Programming the CD tracks ............... 27
Using the CD display........................... 29
Labeling a CD ....................................... 30
Checking CD text information ........... 33
The MD deck — Playback
Playing the MD tracks repeatedly ..... 34
Playing the MD tracks in random
order ................................................ 34
Programming the MD tracks .............. 35
Using the MD display.......................... 37

3
The MD deck — Recording
Before you start recording .................. 38
Types of recording ............................... 39
Recording 3 CDs on 3 separate
MDs ................................................. 41
Recording 3 CDs in succession
on an MD ........................................ 42
Recording your favorite CD tracks
on an MD ........................................ 43
Recording only the first track
on each CD...................................... 46
Recording the current CD track ......... 47
Recording on an MD manually .......... 48
Starting recording with 6 seconds of
prestored audio data ..................... 50
Adjusting the recording level ............. 51
Marking track numbers ....................... 52
Making the space between tracks
3 seconds long ................................ 54
Monaural recording ............................. 55
The MD deck — Editing
Before you start editing ....................... 56
Labeling an MD .................................... 57
Erasing recordings ............................... 60
Moving recorded tracks ...................... 62
Dividing recorded tracks .................... 63
Combining recorded tracks ................ 65
Undoing the last edit ........................... 66
Other Features
Adjusting the sound ............................ 68
Labeling the preset stations ................ 69
Using the Radio Data System
(RDS)* .............................................. 70
Falling asleep to music ........................ 73
Waking up to music ............................. 74
Timer-recording radio programs ....... 76
Using Optional Equipment
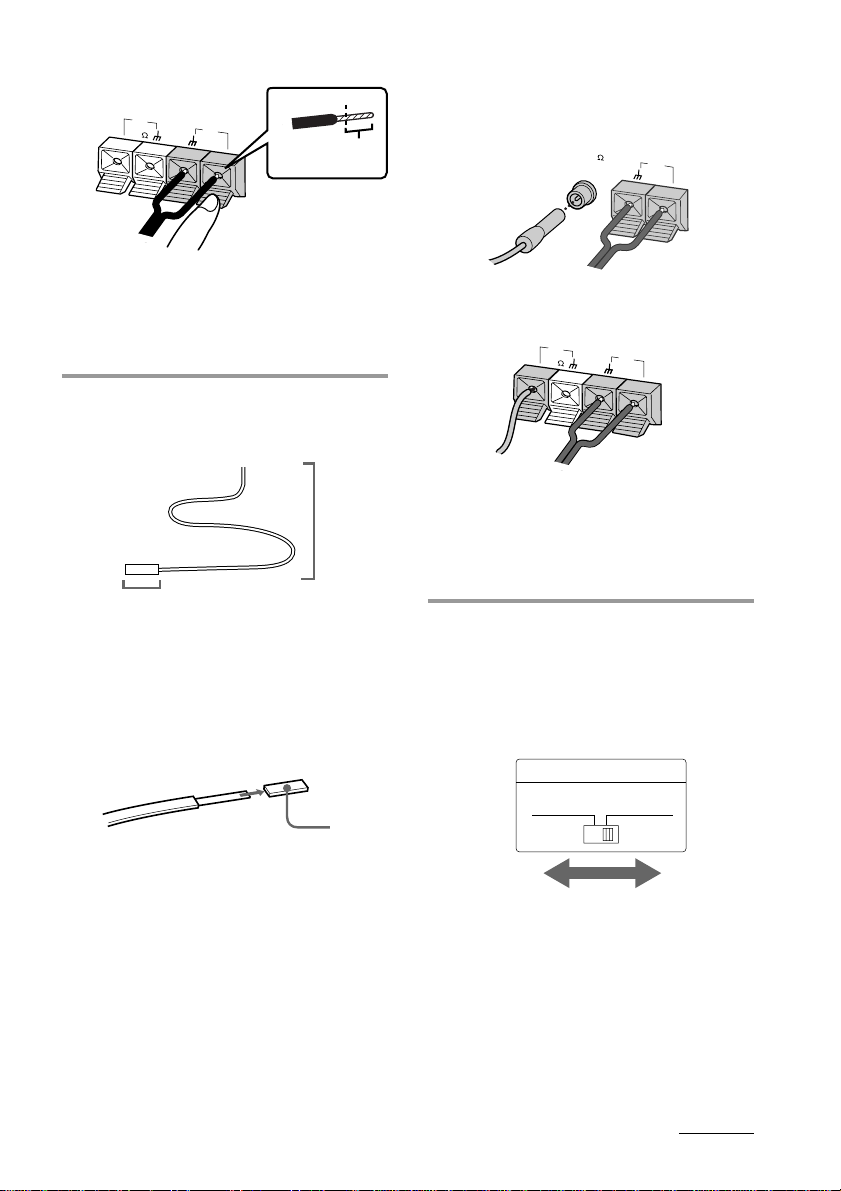
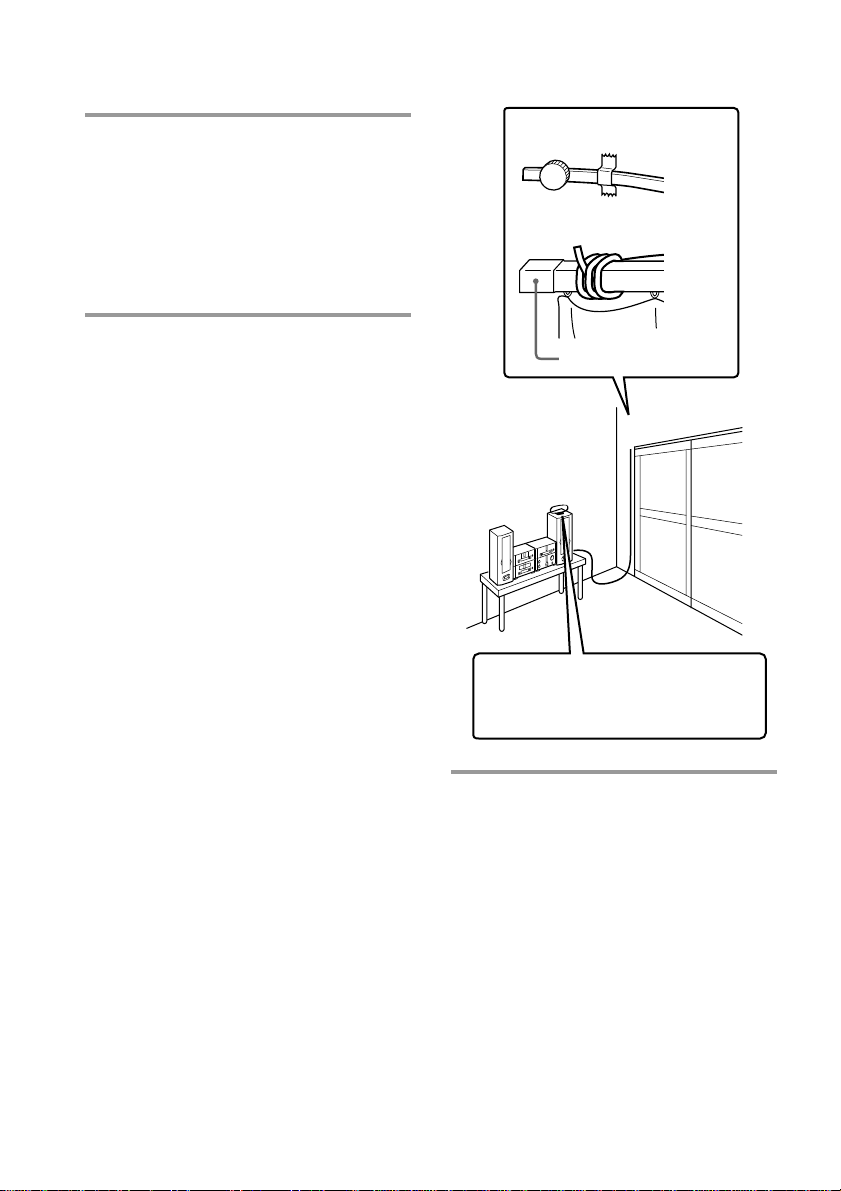
Connecting optional antennas............ 79
Connecting optional AV
components .................................... 80
Listening to the sound of digital
components .................................... 82
Recording the sound of digital
components .................................... 83
Connecting the optional
TC-TX770 tape deck* ..................... 84
Recording a CD on a tape with the
optional TC-TX770 tape deck* ..... 85
Additional Information
Precautions ............................................ 87
System limitations of MDs.................. 88
Self-diagnosis display function .......... 90
Display messages ................................. 91
Troubleshooting ................................... 94
Specifications ...................................... 100
Index..................................................... 102
* DHC-EX880MD only

4
*
Perform the following procedure 1to 0to hook up your system using the supplied cords and
accessories.
This system is designed for easy connection when the components are stacked vertically as
shown below. Be sure to stack the components in the same order shown in the illustration to
prevent misconnection.
The supplied antennas are for indoor use. We recommend connecting an outdoor antenna
(optional) to ensure stable reception. See page 79 for connecting outdoor antennas and other
optional equipment.
Preparations
1Take the transport cartridge out of the MD deck.
2Remove the transit key on the bottom of the CD player.
3Stack the components vertically in the order shown in the illustration below.
* Used to connect the optional TC-TX770 tape deck (for DHC-EX880MD only, see page 84).
Getting Started
FM lead antenna AM loop antenna
Tuner
Amplifier
MD deck
Speaker
(right) Speaker
(left)
CD player
Rear panel
Step 1: Hooking up the system

5
Preparations
1Take the transport cartridge out of the MD
deck. (Pull the cartridge straight toward
you, then diagonally upward.)
Tip
Keep the transport cartridge for future use. When
you move the system, insert the cartridge into the
lowermost slot of the MD deck in the same manner
as when you purchased the system to prevent deck
trouble (see page 87).
Note
If you turn on the system without taking out the
cartridge, “MD MECHA ERROR” appears. Turn off
the system, wait until the clock appears in the
display, then take out the cartridge.
2Remove the transit key on the bottom of
the CD player.
Tips
•Keep the transit key for future use. When you
move the system, insert the transit key into the
hole on the bottom of the CD player and turn it
90° in the same manner as when you purchased
the system to prevent CD player trouble
(see page 87).
•If you do not remove the transit key, the CD
player will not operate correctly.
•If you do not remove the transit key, the CD
player will rock when placed on a flat surface.
3Stack the components vertically in the
order shown in the illustration below (in
the order of the CD player, MD deck,
amplifier and tuner).
Transport
cartridge
Tuner
Amplifier
MD deck
CD player
+=
•
•
•
•
•
•
•
•
•
010
)
n
0
N
·∏
p
Bottom panel
of CD player
Turn 90° to the right or
left and pull out the key.
•
•
•
•
•
•
•
•
•
010
continued

6
Step 1: Hooking up the system
(continued) 2Connect the connectors of the
MD deck and CD player, using the
optical cable.
1Take the caps off the connectors
of the MD deck and CD player.
2Insert the cable plugs.
1Connect the audio cords to the jacks
with the same Roman numerals
(, , , ).
Connect the amplifier to the tuner, CD
player and MD deck, using the audio
cords (you have four). Match the color of
the plugs and the jacks, and insert the
plugs firmly, pushing them in all the
way.
Tip
The audio cords are used to send analog signals
between the components.
The signals are sent as follows:
jacks: Radio sound received by the tuner is sent
to the amplifier.
jacks: CD sound is sent to the amplifier.
jacks: Amplifier sound is sent to the MD deck.
jacks: MD sound is sent to the amplifier.
Not pushed in all the way
Insert completely
Pull firmly if tight.
MD deck
CD player
SONY
SONY
CD player
MD deck
Insert the
plugs firmly
with the SONY
logo facing
upward until
they click.
OK
N.G.

7
Tip
The flat cord is used to send signals and electricity
between the components for interlinked operation
such as CD Synchro Recording.
Note
Keep the flat cord away from the antennas to
prevent noise during radio reception.
4Connect the speakers.
The supplied speakers can be used as
either the left or right speakers.
1Connect the speaker cords to the
SPEAKER terminals of the same
color.
* The color of your speaker cords might be
different. See the manual provided with
your speaker system for details (except for
tourist model).
2Pull gently on the speaker cord to
make sure it is connected correctly.
If the speaker cord pulls out, connect
it again.
3Connect the flat cord to the SYSTEM
CONTROL connectors on each
component with the same color.
Red
Tuner
Amplifier
MD deck
CD player
Connect the
flat cord from
the top in
order of the
blue, white,
black and red
connectors.
Blue
White
Black
Push straight in until
the connector clicks.
To disconnect
To connect
continued
L
R
L
R
Gray* (‘)
Black* (’)
Insert this portion.
L
R
L
R
Push in the
tabs on both
sides of the
connector and
pull straight
out.

8
For DHC-EX880MD
Step 1: Hooking up the system
(continued) 6Connect the AM antenna.
The supplied AM antenna has the
following structure:
1Remove only the twisted portion
() of the antenna from the
plastic stand.
2Set up the stand.
3Insert the antenna cord into the AM
antenna terminals.
Notes
•Keep the speaker cords away from the antennas to
prevent noise during radio reception.
•The supplied speakers can be used as either the
right or left speakers. Place the speaker connected
to the SPEAKER R terminals on the right side, and
the speaker connected to the SPEAKER L
terminals on the left side of the system.
DHC-MD717 is used for the illustration purpose.
5Connect the amplifier power cord to
the tuner.
Connect the power cord extending from
the rear panel of the amplifier to the
power outlet on the rear panel of the
tuner.
This supplies power to the amplifier.
Tourist model
Other models
Left
Plastic stand
•
•
•
•
•
•
•
•
•
010
Right
Antenna
The antenna is the proper shape
and length for receiving AM radio
waves, so do not remove or roll up
the antenna.
AM
FM75
Insert this
portion.

9
AM
FM75
2Insert the antenna cord into the FM
antenna terminal.
3Pull gently on the antenna cord to
make sure it is connected correctly.
If the antenna cord pulls out, connect
it again.
8Adjust the operating voltage (for
DHC-MD717 only).
Before connecting the power cord, set
VOLTAGE SELECTOR on the tuner and
amplifier to the position of the local
power line voltage.
Cover
For DHC-MD717
AM
FM
75
Insert this
portion.
A
B
continued
4Pull gently on the antenna cord to
make sure it is connected correctly.
If the antenna cord pulls out, connect
it again.
7Connect the FM antenna.
The supplied FM lead antenna has the
following structure:
A: The antenna cord receives signals
along its entire length, so do not roll
up the cord.
B: Insert this portion into the antenna
terminal.
1Remove the cover from portion B
(for DHC-MD717 only).
For DHC-EX880MD
For DHC-MD717
AM
FM
75
110-120V220-240V
VOLTAGE SELECTOR

10
2Fasten the antenna cord with a tack
or tape.
Find the AM antenna position and
orientation that provides the best
reception, such as near a window.
Step 1: Hooking up the system
(continued)
9Connect the tuner power cord to a
wall outlet.
Plug Adapter (for DHC-MD717
only)
If the plug of this unit does not fit your
wall outlet, attach the supplied adapter
on to the plug.
!º Extend the FM antenna.
After selecting and tuning in the FM
stations in step 4 of “Step 3: Presetting
radio stations” on page 13, fasten the
antenna to a wall or the ceiling as
follows:
1Hold the tip of the antenna to find
an orientation that provides good
reception.
When fastening the antenna to a
wall, select the wall that provides the
best reception.
Fasten with a tack or tape.
Do not tie the cord.
Curtain rail
OK
N.G.

11
Arranging the
components side by side
Once you have finished the connections, you
can rearrange the components as desired.
Inserting two R6 (size AA)
batteries into the remote
Always insert the batteries from the ’end as
shown in the illustration.
Tip
With normal use, the batteries should last for about
six months. When the remote no longer operates the
system, replace both batteries with new ones.
Note
If you do not use the remote for a long period of
time, remove the batteries to avoid possible damage
from battery leakage.
R6 (size AA) batteries
•
•
•
•
•
•
•
•
•
010
]
]
}}

12
Step 2: Setting the
time 3Turn MULTI CONTROLLER and
set the hour, then press
ENTER/YES.
The minute indication flashes.
4Turn MULTI CONTROLLER and
set the minute, then press
ENTER/YES.
The clock starts working.
If you made a mistake
Press Nor nuntil the indication you wish
to change (day, hour, minute) flashes, then
change the setting.
To change the preset time
You can also set and change the time while
the system is on.
1Press CLOCK/TIMER SET.
2Turn MULTI CONTROLLER until
“CLOCK” appears.
3Press ENTER/YES.
4Perform steps 2 to 4 of “Setting the time”.
If the system is off, start over from step 1 of
“Setting the time”.
To show the time
The built-in clock constantly shows the time
in the tuner display while the system is off.
To show the time while the system is on,
press DISPLAY. Each time you press the
button, the display changes as follows:
Normal display ˜Clock display*
* The clock display returns to the normal display
after about eight seconds. The time cannot be
displayed constantly while the system is on.
Tip
The upper dot flashes for the first half of a minute (0
to 29 seconds), and the lower dot flashes for the last
half of a minute (30 to 59 seconds).
You can set the time while the system is off.
You must set the time beforehand to use the
timer-recording and other timer functions.
The clock is on a 24-hour system for the
DHC-EX880MD, and a 12-hour system for
DHC-MD717.
The DHC-EX880MD is used for illustration
purpose.
1Press CLOCK/TIMER SET.
The day indication (“SUN”) flashes.
2Turn MULTI CONTROLLER and
set the day, then press ENTER/YES.
The hour indication flashes.
n
N
2,3,4
2,3,4 1
DISPLAY
N/n

13
Step 3: Presetting
radio stations 2Press BAND repeatedly until the
band you want appears in the
display.
Each time you press the button, the band
changes as follows:
DHC-EX880MD:
FM nMW nLW
DHC-MD717:
FM nAM
3For DHC-EX880MD:
Press TUNING MODE repeatedly
until “AUTO TUNING” appears.
For DHC-MD717:
Press AUTO.
4Turn MULTI CONTROLLER.
Turn MULTI CONTROLLER slightly,
then release it. The frequency indication
changes and scanning stops when the
system tunes in a station. “TUNED” and
“STEREO” (for a stereo program)
appear.
To stop scanning, press TUNING MODE
(for DHC-EX880MD) or AUTO (for
DHC-MD717).
continued
n
N
6,8
5
2
3
14,5,7
n
N
6,8
5
23
14,5,7
MANUAL
The bands you can receive vary depending
on the model you purchased.
The DHC-EX880MD lets you preset up to 40
stations, 20 for FM, 10 for MW and 10 for LW.
The DHC-MD717 lets you preset up to 30
stations, 20 for FM and 10 for AM.
For DHC-EX880MD
For DHC-MD717
Tuning in a radio station
you wish to preset
1Press 1/u (power) to turn on the
system.

14
Step 3: Presetting radio stations
(continued) To tune in a radio station with a
weak signal
For DHC-EX880MD:
Press TUNING MODE repeatedly until
“TUNING” appears in step 3, then turn
MULTI CONTROLLER to tune in the desired
station.
For DHC-MD717:
Press MANUAL in step 3, then turn MULTI
CONTROLLER to tune in the desired station.
When you have tuned in the station, continue
from step 5.
To change the preset number
Start over from step 2.
To change the AM tuning interval
(DHC-MD717 only)
The AM tuning interval is factory-preset to
9 kHz. To change the AM tuning interval,
tune in any AM station first, then turn off the
system. While holding down the ENTER/
YES button, turn the system back on. When
you change the interval, all the preset stations
will be erased. To reset the interval, repeat the
same procedure.
Tips
•The preset stations are retained for a day even if
you pull out the power cord or if a power
interruption occurs.
•You can label the preset stations (see page 69).
Storing the radio station
5Press MENU/NO, then turn
MULTI CONTROLLER until
“Memory ?” appears.
6Press ENTER/YES.
7Turn MULTI CONTROLLER and
select the desired preset number.
For DHC-EX880MD:
Select from 1 to 20 for FM, 1 to 10 for
MW, or 1 to 10 for LW.
For DHC-MD717:
Select from 1 to 20 for FM, or 1 to 10 for
AM.
8Press ENTER/YES.
“Complete” appears and the station is
stored.
9Repeat steps 2 to 8 to store other
stations.

Basic Operations
15
Playing a CD
YoucanplayuptothreeCDsinarow.
Ifthepowerisoff,firstpress 1/u(power)to
turnonthesystem.
CD indicators
Basic Operations 1Press any §on the CD player and
placeaCDonthedisctray.
Thedisctrayopens.
Pressthesame §againtoclosethetray.
ToloadotherCDs,pressadifferent §
andplacetheCDinthedisctray.
2Press FUNCTION>/.on the
amplifierrepeatedlytoswitchthe
functiontoCD.
3Press CONTINUE on the CD player
repeatedly until “ALL DISCS”
appears.
To play only one CD, press CONTINUE
until“1DISC”appears.
4Press ·∏on the CD player (or
CD·on the remote).
TheselectedCD1–3buttonlightsgreen
andplaystarts.
TostartplayfromadifferentCDorto
playonlyoneCD,presstheCD1–3
buttonforthetraycontainingthedesired
disc.PlaystartsfromtheCDwhose
numberwaspressed.
Playing time
Track number
Disc tray number
With the label
side up. When
you play a
single CD,
place it on the
inner circle of
the tray.
)
n
0
N
·∏
p
+=
+=
)
n
0
N
·∏
p
§
§
§
1/u
(power) CD 1 – 3
buttons
1/u
(power)
•
•
•
•
•
•
•
•
•
010
n
N
)
n
0
N
·∏
p
+=
+=
)
n
0
N
·∏
p
§
§
§
21
4
3p
0/)SELECTOR
DISC SKIP
VOLUME
P
p
=/+
·P
+=
p
·P
+=
p
ª·
)0
p
–+
+
–
3
4
2
D.SKIP
VOL (+/–)
continued

16
Playing a CD (continued)
To Do this
Stop play Press p.
Pause Press ·∏ (or CD Pon the
remote). Press again to resume
play.
Select a track Turn SELECTOR clockwise (to
go forward) or counter-
clockwise (to go back) and
release it when you locate the
desired track (or press CD +
or =on the remote).
While “ALL DISCS” is selected,
turn and hold SELECTOR to
locate other discs and select
tracks.
Find a point in Press 0or )during play
a track and release it at the desired
point.
“—OVER—” appears at the end
of the CD.
Select a CD • Press CD 1 – 3. Play starts
when the button is pressed.
• Press DISC SKIP (or
CD D.SKIP on the remote)
repeatedly so that the
CD1–3button is lit green.
Press ·∏ (or CD ·on the
remote) to play the selected
CD.
If you press DISC SKIP (or CD
D.SKIP on the remote) during
play, the selected CD changes
and the new CD is played.
Remove a CD Press §of the desired CD1–3.
Adjust the Turn VOLUME (or press VOL
volume or on the remote).
Tips
•You can switch from another source to the CD
player and start playing a CD just by pressing
·∏ (or CD ·on the remote) or the CD1–3
buttons if a CD is loaded on the tray (Automatic
Source Selection).
•You can also select and start playing a track in
step 4.
1Press DISC SKIP (or CD D.SKIP on the remote)
and select the desired CD.
2Turn SELECTOR (or press CD =or +on
the remote) until the desired track number
appears.
3Press ·∏ (or CD ·on the remote).
•The CD 1 – 3 button indicators have the following
meanings when lit:
Green: The disc tray is selected or the CD loaded
on the tray is playing.
Orange: A CD is loaded on the tray.
•When a CD is loaded on the tray, the CD 1 – 3
indicator for the tray is lit orange.
•If a CD is not loaded to any of CD 1 – 3, “NO
DISC” appears.
Note
Do not forcibly press the disc tray closed with your
finger, as this may cause CD player trouble. Always
close the tray by pressing the §button for the tray.

Basic Operations
17
Recording a CD on an
MD
— CD Synchro Recording
Step 1: Preparing the CD
player
1Press any §on the CD player and
placeaCDonthedisctray.
Thedisctrayopens.
Pressthesame §againtoclosethetray.
2Press FUNCTION>/.on the
amplifierrepeatedlytoswitchthe
functiontoCD.
3Press DISC SKIP on the CD player
(orCDD.SKIPontheremote)
repeatedlyuntiltheCD 1–3button
youwantlightsgreen.
4Press CONTINUE on the CD player
repeatedlyuntil“1DISC”appears.
With the label
side up. When
you play a
single CD,
place it on the
inner circle of
the tray.
continued
YoucanmakeadigitalrecordingofaCDon
anMD,markingtracknumbersinthesame
sequenceastheoriginalCD.
IftheMDispartiallyrecorded,recording
startsafterthelastrecordedtrack.Toerase
therecordedcontents,see“Erasing
recordings”onpage60.
Inaddition,youcanalsoselecttherecording
methodtosuityourpurpose.(See“Typesof
recording”onpage39.)
Ifthepowerisoff,firstpress 1/u(power)to
turnonthesystem.
)
n
0
N
·∏
p
+=
+=
)
n
0
N
·∏
p
§
§
§
1/u
(power)
CD 1 – 3
buttons
1/u
(power)
•
•
•
•
•
•
•
•
•
010
n
N
)
n
0
N
·∏
p
+=
+=
)
n
0
N
·∏
p
§
§
§
25 87
436 1
9
10
p
§
p
·
P
+=
p
·
P
+=
p
ª·
)0
p
–+
+
–
2
4
3
10

18
Recording a CD on an MD
(continued)
Step 2: Recording
5Press PUSH OPEN on the MD deck
andopenthedoor.
6InsertarecordableMDtoMD 1of
theMDdeckandclosethedoor.
Note
When using CD Synchro Recording, you can
only record the MD loaded to MD 1.
7Press CD SYNC on the MD deck.
8Turn SELECTOR on the MD deck
until “NORMAL ?” appears.
9Press ENTER/YES on the MD deck.
TheMDdeckstandsbyforrecording
andtheCDisinpauseforplayback.
10 Press ·∏on the MD deck (or
MD Pontheremote).
Recordingstarts.
TheCDplayerandMDdeckbothstop
whentherecordingiscompleted.
To cancel recording
Press pontheMDdeckduringsteps7to10.
To stop recording
Press pon the MD deck.
Ejecting an MD
If an MD is already loaded to MD 1, eject it as
follows:
1Press §.
The MD appears at the slot.
2Press PUSH OPEN and open the door of the MD
deck, then remove the MD from the slot.
When recording is completed
Press §and eject the MD. “TOC Writing” flashes
and the MD Table of Contents (TOC) is updated.
While “TOC Writing” is flashing
Do not move the deck or pull out the power cord to
ensure the complete recording. The deck is currently
updating the Table of Contents (TOC).
If the MD runs out of recording time
The CD player and MD deck both stop.
Tip
If you record on an unrecorded or completely
erased (see page 61) MD, the disc title assigned to
the CD (see page 30) is copied as it is to the MD
(Disc Memo Copy).
However, CD text information is not copied in some
cases.
Note
If the MD is record-protected, “Protected” appears
and the MD cannot be recorded.
Press §and eject the MD, then slide close the tab at
the side of the MD to cover the hole (see page 39).
With the
label side up
With the
arrow
pointing
toward the
deck
p
+=
•
•
•
•
•
•
•
•
•
010
)
n
0
N

Basic Operations
19
Playing an MD
YoucanplayuptothreeMDsinarow.
Ifthepowerisoff,firstpress 1/u(power)to
turnonthesystem.
1Press PUSH OPEN and open the
dooroftheMDdeck.
2InsertanMDandclosethedoor.
InserttheMDuntiltheMD 1–3button
totherightoftheslotislitorange.
3Press FUNCTION>/.on the
amplifierrepeatedlytoswitchthe
functiontoMD.
4Press CONTINUE on the MD deck
repeatedly until “ALL DISCS”
appears.
To play only one MD, press CONTINUE
until“1DISC”appears.
5Press ·∏on the MD deck (or
MD ·on the remote).
TheselectedMD 1–3buttonlights
greenandplaystarts.
TostartplayfromadifferentMDorto
playonlyoneMD,presstheMD 1–3
buttonfortheslotcontainingthedesired
disc.PlaystartsfromtheMDwhose
numberwaspressed.
continued
With the
label side up
With the arrow
pointing
toward the
deck
Playing time
Track number
Disc number
MD indicators
p
+=
•
•
•
•
•
•
•
•
•
010
)
n
0
N
1/u
(power)
MD 1 – 3
buttons
1/u
(power)
•
•
•
•
•
•
•
•
•
010
n
N
)
n
0
N
·∏
p
+=
+=
)
n
0
N
·∏
p
§
§
§
31
524 p
0/)§VOLUME
SELECTOR
DISC SKIP
P
p
=/+
·
P
+=
p
·
P
+=
p
ª·
)0
p
–+
+
–
3
5
4
D.SKIP
VOL (+/–)

20
Playing an MD (continued) Tips
•You can switch from another source to the MD
deck and start playing a MD just by pressing ·∏
(or MD ·on the remote) or the MD 1 – 3 buttons
if an MD is loaded in the slot (Automatic Source
Selection).
•You can also select and start playing a track in
step 5.
1Press DISC SKIP (or MD D.SKIP on the remote)
and select the desired MD.
2Turn SELECTOR (or press MD =or +on
the remote) until the desired track number
appears.
3Press ·∏ (or MD ·on the remote).
•The MD 1 – 3 button indicators have the following
meanings when lit.
Green: The slot is selected or the MD loaded in
the slot is playing.
Orange: An MD is loaded in the slot.
•When an MD is loaded in the slot, the MD 1 – 3
indicator for the slot is lit orange.
•If an MD is not loaded to any of MD 1 – 3, “NO
DISC” appears.
To Do this
Stop play Press p.
Pause Press ·∏ (or MD Pon the
remote). Press again to resume
play.
Select a track Turn SELECTOR clockwise (to
go forward) or counter-
clockwise (to go back) and
release it when you locate the
desired track (or press MD +
or =on the remote).
Find a point in Press 0or )during play
a track and release it at the desired
point.
Select an MD • Press MD 1 – 3. Play starts
when the button is pressed.
• Press DISC SKIP (or MD
D.SKIP on the remote) so
that the MD 1 – 3 button is lit
green. Press ·∏ (or
MD ·on the remote) to
play the selected MD.
If you press DISC SKIP (or MD
D.SKIP on the remote) during
play, the selected MD changes
and the new MD is played.
Remove an MD 1Press PUSH OPEN and open
the door of the MD deck.
2Press §and remove the MD
from the slot.
Adjust the Turn VOLUME (or press VOL
volume or on the remote).
This manual suits for next models
1
Table of contents
Other Sony Stereo System manuals

Sony
Sony MHC-GT3D User manual

Sony
Sony MEX-M70BT User manual

Sony
Sony TC-W285 Primary User manual

Sony
Sony GX255 User manual

Sony
Sony CMT-V50iP User manual

Sony
Sony HCD-VP100 User manual

Sony
Sony MHC-G202/C20 User manual

Sony
Sony CMT-C7NT User manual

Sony
Sony SRS-X77 User guide

Sony
Sony HCD-H991AV User manual

Sony
Sony MHC-G101 Primary User manual

Sony
Sony MHC-ZX10 - Mini Hifi Component System User manual

Sony
Sony CMT-SBT100 User manual

Sony
Sony HTC-NX1 User manual

Sony
Sony LBT-G3000 User manual

Sony
Sony CX-JDS20 User manual

Sony
Sony HCD-GPX6 User manual

Sony
Sony SRS-ZR7 User manual

Sony
Sony CMT-NEZ3 - Micro Hi Fi Component System User manual

Sony
Sony MEX-BT4050U User manual